
The Speaker Company NTIW26 and NTIW25 In-wall Speakers
tSc NTIW26 and NTIW25 In-wall Speakers
- Product Name: NTIW26 and NTIW25 In-wall Speakers
- Manufacturer: The Speaker Company (tSc)
- Performance Rating:


- Value Rating:
- Review Date: January 19, 2009 05:30
- MSRP: $ 149.97, $119.97/each
|
NTIW26 |
|
|
Type |
In-Wall |
|
Mid-Woofer(s) |
6.5" (x2) titanium wet powder coated poly cone woofers w/butyl rubber surround |
|
Tweeter type |
16mm swiveling titanium dome tweeter |
|
Magnetic Shielding |
Yes |
|
Performance |
|
|
Frequency Response |
55 Hz - 20 kHz |
|
Impedance in Ohms |
8 |
|
Power handling (watts) |
100 watts RMS |
|
Sensitivity |
88 dB |
|
Equalization |
Dual mid & high equalization settings +/- 3dB |
|
Dimensions |
|
|
Outer Dimensions H/W/D |
15 3/8" X 9 3/4" X 3 1/2" |
|
Inner Dimensions H/W* |
14" X 7 3/4 " |
|
Finish |
White |
|
NTIW25 |
|
|
Mid-Woofer(s) |
5.25" (x2) titanium wet powder coated poly cone woofers w/butyl rubber surround |
|
Tweeter type |
13mm swiveling titanium dome tweeter |
|
Magnetic Shielding |
Yes |
|
Performance |
|
|
Frequency Response |
55 Hz - 20 kHz |
|
Impedance in Ohms |
8 |
|
Power handling (watts) |
80 watts RMS |
|
Sensitivity |
88 dB |
|
Equalization |
Dual mid & high equalization settings +/- 3dB |
|
Dimensions |
|
|
Outer Dimensions H/W/D |
8 1/4" X 15 3/8" X 3 1/2" |
|
Inner Dimensions H/W* |
14" X 7 1/8" |
|
Finish |
White |
Pros
- Exceptional value
- Great looks
- High quality components
- Easy installation
Cons
- Packaging/QC may not be highest quality
tSc NTIW26 & NTIW25 Build Quality
We don't talk much about in-wall speakers here at Audioholics because it is so hard to do a review. It's a rare occasion when you can find someone that will let you tear up their room just to install dedicated speakers. Heck, we have a hard enough time convincing people to buy speakers at all. When the rare occasion arises, we jump. The Speaker Company jumped with us and agreed to provide their brand new NT line of speakers. We chose a pair of the 6.5" NTIW26 for the fronts and a duo of 5.25" NTIW25's for the rears. Because of the shape of the room, a center channel was not feasible. In the world of home theater, you've got to expect a few issues. In the grand scheme of things, running a phantom center isn't so bad.
First Impressions and Build Quality
 The speakers arrived double
boxed (of sorts). Basically, every one of the speakers was wrapped in
bubble-wrap and stuck in a box surrounded by foam packing peanuts. All four of
the boxes were then boxed together in a single larger box. The problem with
this packing method was that the bevels on the speakers, while rounded, are quite
thin and sharp. On three of the boxes one corner of the bevel pierced the side
of the box despite the bubble-wrap and peanuts. Since there were also some
packing peanuts in the larger box, only one of these edges pierced all the way
through. While there was no damage to the bevels of any of the speakers, it was
a little disconcerting. As you can tell from many of the pictures, the speakers
had no branding on the front and one was actually missing any sort of branding.
These were pre-production speakers and probably the first batch of speakers they received. It's a
testament to how rare in-wall speaker reviews are that they would offer up
their earliest speakers.The Speaker Company (tSc) has assured me that they will pack these speakers in 5-ply brown cardboard boxes with custom molded styro inserts, a manual and mounting templates. The packaging is designed to survive a “two way” trip should someone decide to return them.
The speakers arrived double
boxed (of sorts). Basically, every one of the speakers was wrapped in
bubble-wrap and stuck in a box surrounded by foam packing peanuts. All four of
the boxes were then boxed together in a single larger box. The problem with
this packing method was that the bevels on the speakers, while rounded, are quite
thin and sharp. On three of the boxes one corner of the bevel pierced the side
of the box despite the bubble-wrap and peanuts. Since there were also some
packing peanuts in the larger box, only one of these edges pierced all the way
through. While there was no damage to the bevels of any of the speakers, it was
a little disconcerting. As you can tell from many of the pictures, the speakers
had no branding on the front and one was actually missing any sort of branding.
These were pre-production speakers and probably the first batch of speakers they received. It's a
testament to how rare in-wall speaker reviews are that they would offer up
their earliest speakers.The Speaker Company (tSc) has assured me that they will pack these speakers in 5-ply brown cardboard boxes with custom molded styro inserts, a manual and mounting templates. The packaging is designed to survive a “two way” trip should someone decide to return them.
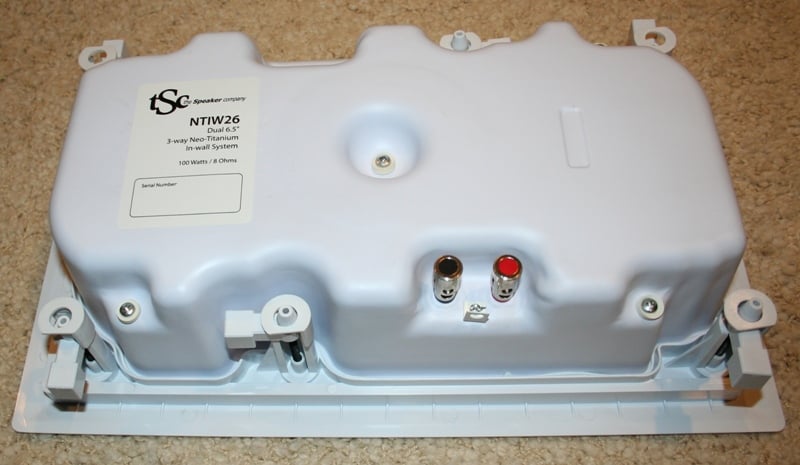
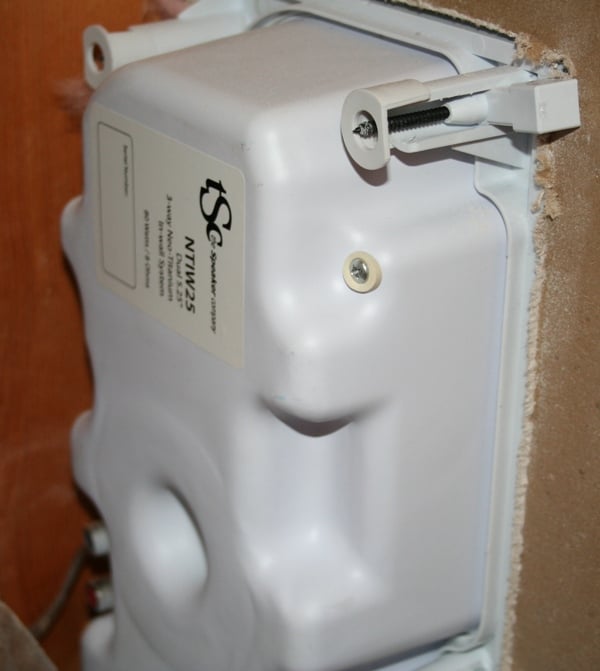
While there is nothing inherently wrong with an in-wall or in-ceiling speaker without a backbox, I pretty much universally prefer one. To me, it makes placement much easier as sonically the size of the air gap behind the speaker becomes moot. Open back speakers must make some assumptions about the size/shape of the wall in which they are installed - and how do they know whether I have 8 or 10 foot high walls? Additionally, if they assume a well insulated wall, then that provides one sort of "box" for the speaker. If they assume an interior wall without insulation, that provides a different box. I'm not big on assumptions and having a backbox makes them moot. The NT series of in-wall speakers all come with dedicated backboxes.
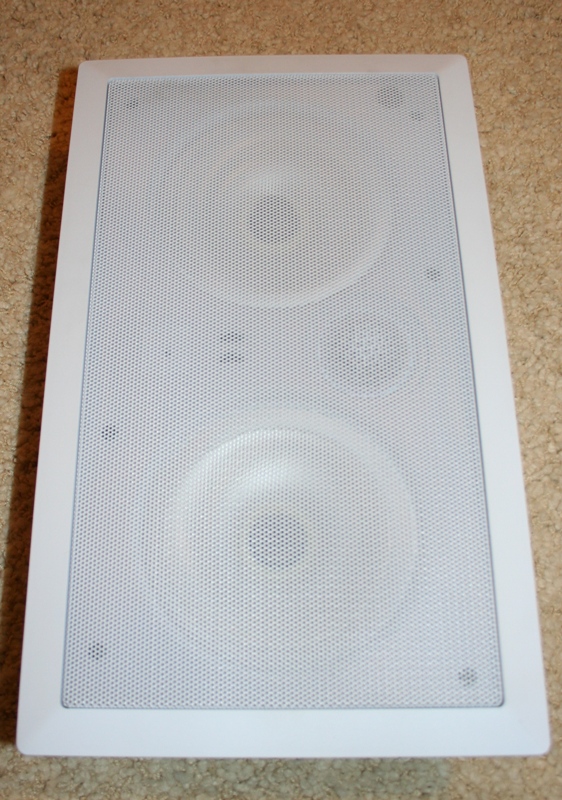
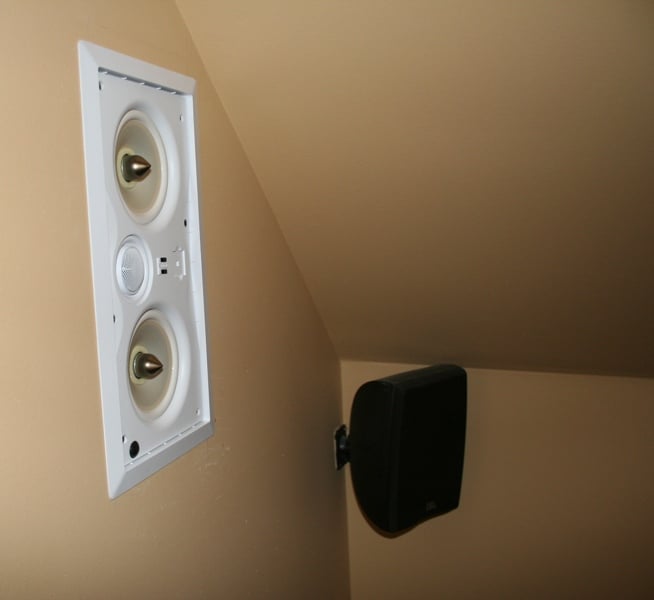
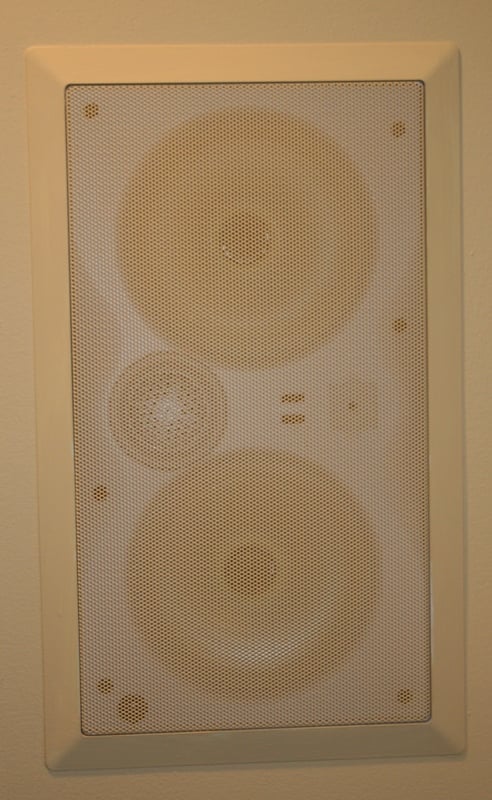
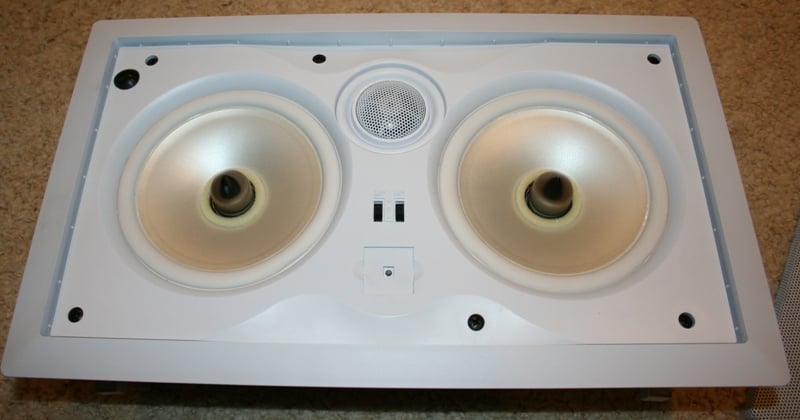 Each of the speakers are an
MTM (Midrange-Tweeter-Midrange) design with the tweeter slightly offset to help
reduce lobing effects. The speakers are all white except for a gold aluminum
phase plug and a few black screws. Personally, I'd preferred if the NT speakers
had all white hardware (namely the black screws and the two black adjustment
switches) as they are gorgeous to look at without the grills on. Of course,
being an Audioholic, I'm one of the few that would actually do that so I'm not
going to hold that against them. In-wall speakers are made to disappear in the
room. Also included was an acoustically transparent foam layer that is meant to
be placed between the grill and the drivers. This helps the speaker blend into
the room as the white baffle can be seen behind the grill under direct light.
In the room in which they were installed, this wasn't an issue so we decided to
leave it off. For those of you keeping score, these speakers look remarkably similar to the MB Quart Alexxa series sold in the Audioholics E-store for more than 2x the price.
Each of the speakers are an
MTM (Midrange-Tweeter-Midrange) design with the tweeter slightly offset to help
reduce lobing effects. The speakers are all white except for a gold aluminum
phase plug and a few black screws. Personally, I'd preferred if the NT speakers
had all white hardware (namely the black screws and the two black adjustment
switches) as they are gorgeous to look at without the grills on. Of course,
being an Audioholic, I'm one of the few that would actually do that so I'm not
going to hold that against them. In-wall speakers are made to disappear in the
room. Also included was an acoustically transparent foam layer that is meant to
be placed between the grill and the drivers. This helps the speaker blend into
the room as the white baffle can be seen behind the grill under direct light.
In the room in which they were installed, this wasn't an issue so we decided to
leave it off. For those of you keeping score, these speakers look remarkably similar to the MB Quart Alexxa series sold in the Audioholics E-store for more than 2x the price.
 The tweeters are titanium domes with the woofers being titanium wet powder coated poly
cone. The tweeters swivel slightly with a firm push for fine tuning. With
swiveling tweeters I rarely see any sort of mechanism to let you know when they
have been reoriented straight forward. The NTs are no different. This is a
feature that I believe should be standard on such speakers as it is easy to
move them and not be sure that they are orientated the same direction. In
addition, there are two "tuning" switches that will either boost or
cut your highs or mids by 3dB. This is the sort of feature that is absolutely
essential to in-wall speakers as placement options are often extremely limited
and sonic distortion may very well occur based on that placement. The drivers
also feature butyl
rubber driver surrounds which are moisture resistant and suitable for use in
bathrooms, kitchens, saunas, and even under outdoor eves. All of the speakers
are magnetically shielded.
The tweeters are titanium domes with the woofers being titanium wet powder coated poly
cone. The tweeters swivel slightly with a firm push for fine tuning. With
swiveling tweeters I rarely see any sort of mechanism to let you know when they
have been reoriented straight forward. The NTs are no different. This is a
feature that I believe should be standard on such speakers as it is easy to
move them and not be sure that they are orientated the same direction. In
addition, there are two "tuning" switches that will either boost or
cut your highs or mids by 3dB. This is the sort of feature that is absolutely
essential to in-wall speakers as placement options are often extremely limited
and sonic distortion may very well occur based on that placement. The drivers
also feature butyl
rubber driver surrounds which are moisture resistant and suitable for use in
bathrooms, kitchens, saunas, and even under outdoor eves. All of the speakers
are magnetically shielded.
The
backs of the speakers sport dual spring-clip binding posts that pretty much
only accept bare wire. I suppose you could use pins but that would be a waste.
I generally don't like this sort of connection as they tend to be weak but these
were higher quality than others I'd seen. It took a good deal of force to
depress the spring and I was very confident that the wires were being held
securely. I wouldn't be surprised if on the unimaginable chance that the
speakers actually fell out of the wall, you'd find them dangling on the end of
the speaker wires! They were that secure.
The installation method is very straightforward. There is a beveled lip (the ones that pierced the boxes) that sits on top of the drywall. Behind that there are six clips that turn and compress as you tighten a screw from the front. These are meant to grip the drywall and are similar to "old work" electrical boxes you may have installed at one time or another. You'll want to try and give yourself about an inch of clearance on either side of the speaker opening in order to give the clips enough drywall to grip. The mounting hardware does not give you enough room to grab on to a 2x4 if one is available (at least on the 4" side) so you don't want to cut either of your edges right up against a stud. In this case, a studfinder is definitely your friend. The clips run down little tracks and are held in place by a sort of ring at the top. On one of the speakers, the ring was broken and missing and the clip kept popping out of the channel. Luckily, this was a wall that I had direct access to from behind (see below) and I literally held it in place while it was installed. Honestly, six connection points is probably two to many so I don't think missing one would have been a problem. Also, it was traveling down toward the drywall, it was just really, really hard to screw. With enough elbow grease, I might have gotten in down anyhow.
tSc Setup and Installation Pt. 1
While many of you don't need a primer on how to install in-wall speakers, I'm going to run through the basics anyhow. For those of you that don't need this, feel free to skim forward until you get to something interesting. For the rest, let's start with the basics.
You're going to need a template.
 I mentioned that I had one of the pre-production sets
of speakers received by tSc. This meant limited branding but more importantly
it meant zero additional material. Essentially, I got speakers in a box. No
manuals, no directions, no templates… nothing. This isn't a problem really
since installing in-wall speakers isn't exactly rocket science so we made do. At
the time of the review, even some of the online information was wrong so we
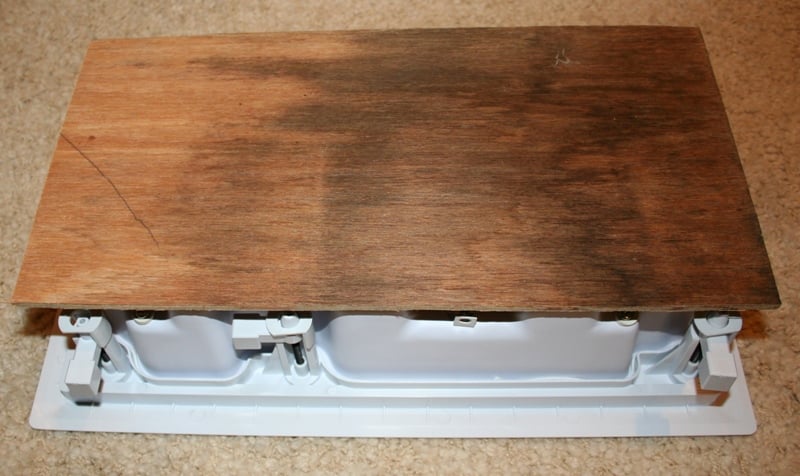
really had to double check everything. The first thing we did was to make a
template. The NT speakers by tSc make this an easy task with the small lip
about an inch inside the beveled edge. Each of the speakers needed a hole that
was 14" tall (or wide depending on how you orientated them) with the 25's
needing a 7-1/8" and the 26s needing a 7-3/4" wide hole. While I was
all prepared to cut something out of cardboard (the easiest way), my father
(whose home was getting the speakers) wanted to use plywood. A few rips with
the circular saw later, and we had our template. The overlap with the mounting
clips makes it so your hole didn’t have to be exact as long as it wasn't too
small.
I mentioned that I had one of the pre-production sets
of speakers received by tSc. This meant limited branding but more importantly
it meant zero additional material. Essentially, I got speakers in a box. No
manuals, no directions, no templates… nothing. This isn't a problem really
since installing in-wall speakers isn't exactly rocket science so we made do. At
the time of the review, even some of the online information was wrong so we
really had to double check everything. The first thing we did was to make a
template. The NT speakers by tSc make this an easy task with the small lip
about an inch inside the beveled edge. Each of the speakers needed a hole that
was 14" tall (or wide depending on how you orientated them) with the 25's
needing a 7-1/8" and the 26s needing a 7-3/4" wide hole. While I was
all prepared to cut something out of cardboard (the easiest way), my father
(whose home was getting the speakers) wanted to use plywood. A few rips with
the circular saw later, and we had our template. The overlap with the mounting
clips makes it so your hole didn’t have to be exact as long as it wasn't too
small.
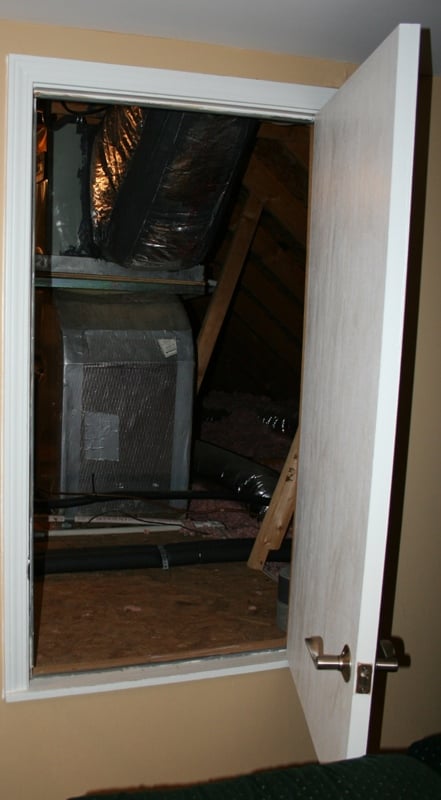 The next step was placement. The room the speakers were going into was a
bonus room built up in the attic. As such, we had unparalleled access behind
the walls. Recently, my parents had installed a bathroom up there which limited
some of the access but we could still exit the room directly behind the right
wall and walk around to behind the front wall. Getting to the left and back
wall was more of an issue but it was doable by climbing over the top of the
room and (theoretically) dropping down the wall from above. The wall of the
back of the room was angled because it was flush with the roof (basically a hip
roof) though it wasn't much of a problem since we could push a wire down from
above if we needed. Fortunately, we already had the wires run to the back of
the room (just not to the right places) so half of our work was done for us.
The next step was placement. The room the speakers were going into was a
bonus room built up in the attic. As such, we had unparalleled access behind
the walls. Recently, my parents had installed a bathroom up there which limited
some of the access but we could still exit the room directly behind the right
wall and walk around to behind the front wall. Getting to the left and back
wall was more of an issue but it was doable by climbing over the top of the
room and (theoretically) dropping down the wall from above. The wall of the
back of the room was angled because it was flush with the roof (basically a hip
roof) though it wasn't much of a problem since we could push a wire down from
above if we needed. Fortunately, we already had the wires run to the back of
the room (just not to the right places) so half of our work was done for us.
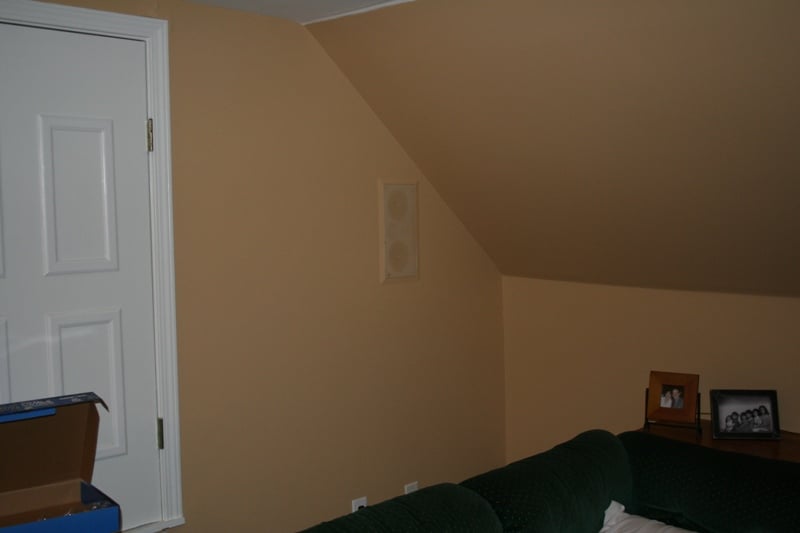
The way the room was laid out, the couch was on the right side of the room with an open area to the left that eventually led to a bathroom. This made for placement issues with the left surround speaker as it ended up being nearly 10 feet further away from the listening position as the right surround. The original speakers (JBL Home Theater in a Box) were placed in the corners which I wouldn't have condoned even if it would have worked for in-walls. While surrounds generally should be placed to the left and the right of the seated position, I opted to place them behind the couch as it would create a more symmetrical placement and would still sound pretty good (especially to my decidedly non-audiophile parents).
The best laid plans and all of that…
It didn't take long with a studfinder to realize that my initial idea wasn't going to work. Where I wanted to place the left surround was jammed up with studs and by the time we found a large enough opening to accommodate the speaker, it was placed almost a third of the way into the couch. Well, that wasn't going to do so we quickly reconsidered. With a little bit of planning, we decided we would place them on the side walls even though this would again have the left speaker 10 feet farther away from the listening position. "Hey," I told my father, "you can only do what you can do." This is one of the limitations of in-wall speakers and too often people have grand plans for placement (like me) without ever exploring if their plans are even viable. Since my parents live 6+ hours away, I at least have an excuse for not testing it out with a studfinder first. Above the distance issue, the two side walls did not have symmetrical stud placement. This meant that one speaker was a bit (a few inches) higher and farther forward than the other. It couldn't be helped. Again, when working with in-walls, these are the problems you come across.
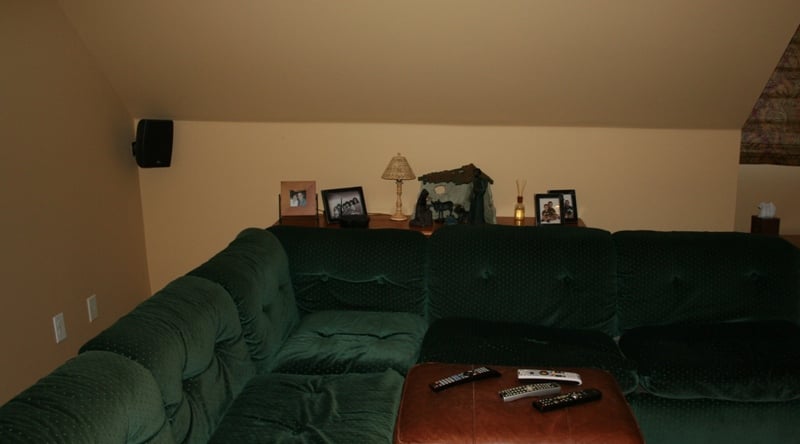
Back of Room (notice, no left rear speaker, it's way off to the side)
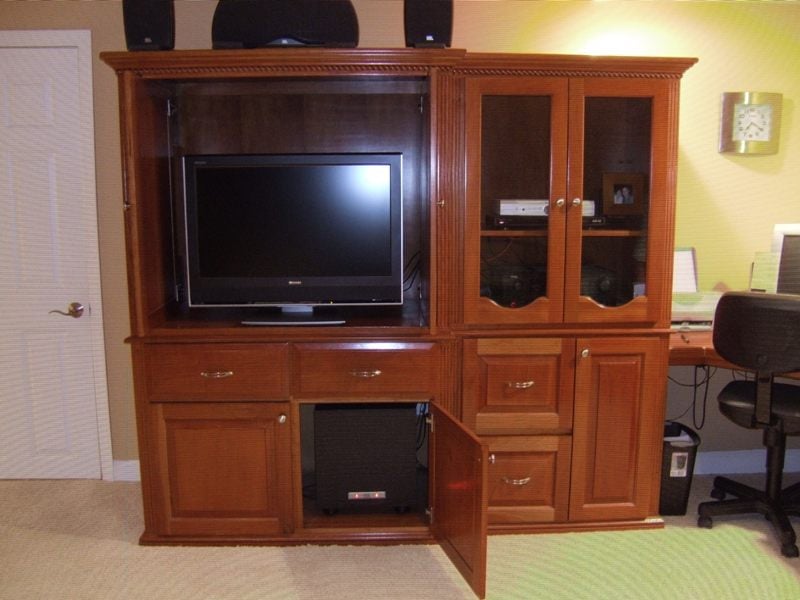
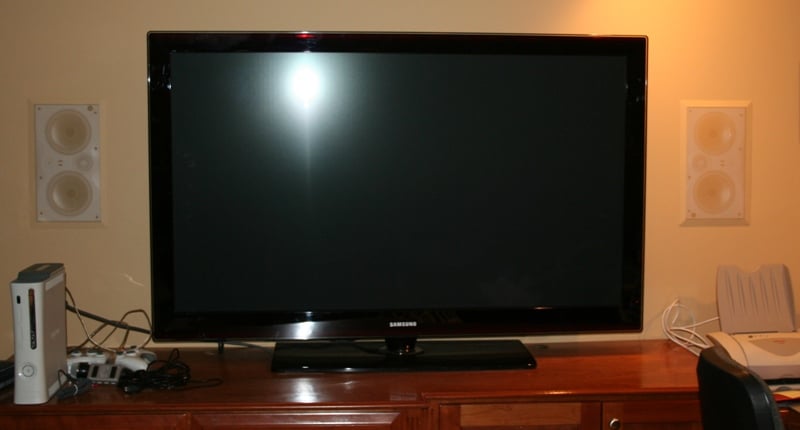
When my parents bought their initial system, it consisted of the JBL speakers, a 32" JVC CRT display, and an Onkyo receiver. Good gear for the most part especially for the time and the amount of money spent. They did make the classic mistake of thinking that they'd have this same gear forever. When they bought the TV, flat panel prices were in the 10's of thousands and seemed completely out of reach. A few years later and they're ready to upgrade but can't. Why? They have a huge entertainment center that was custom built for their TV. Not only that, but when it was constructed, they didn't consider speaker placement and ended up having to put the fronts way up on top of the entertainment center which made the TV (my mother's words) "look like it had horns." Needless to say, she'd push the speakers back to reduce the offending imagery. Sonically, this wasn't helping the JBLs any.
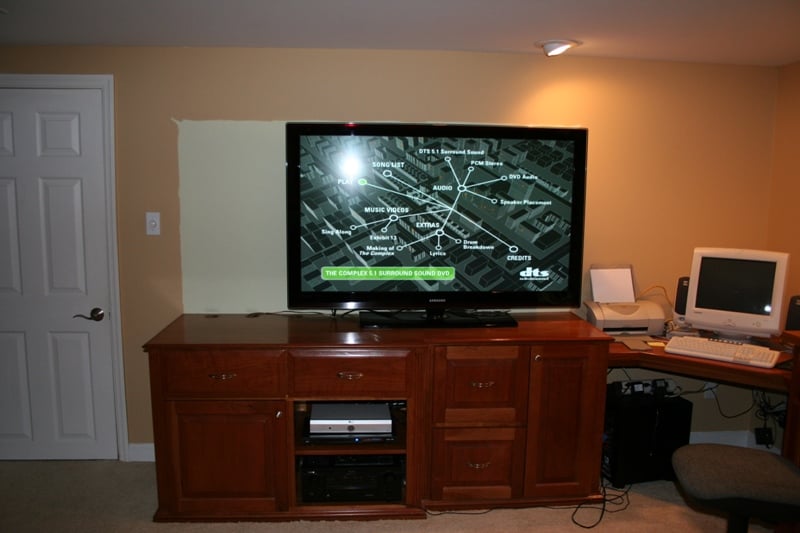 Fast forward a few years and they want to
upgrade to a flat panel but can't because of the size of the cabinet. After a
few days of, ahem, discussion, they had
the top of the thing lopped off and purchased a 58" Samsung plasma!
Hurrah! Now we're talking! But this introduced a new problem - there was no
room for a center channel. Sure, we could install one near the ceiling but that
would look sort of silly. We could wall mount the TV and install one underneath
but again, the display would be near the ceiling and look off. The options quickly
settled down to either installing a box speaker in a cabinet or forgoing the
center altogether and going for a 4.1 system and a phantom center.
Fast forward a few years and they want to
upgrade to a flat panel but can't because of the size of the cabinet. After a
few days of, ahem, discussion, they had
the top of the thing lopped off and purchased a 58" Samsung plasma!
Hurrah! Now we're talking! But this introduced a new problem - there was no
room for a center channel. Sure, we could install one near the ceiling but that
would look sort of silly. We could wall mount the TV and install one underneath
but again, the display would be near the ceiling and look off. The options quickly
settled down to either installing a box speaker in a cabinet or forgoing the
center altogether and going for a 4.1 system and a phantom center.
They opted for the latter.
Given the amount of sonic and visual improvement they were about to make to their setup, I considered this a win on all counts. In-wall speakers had the benefit of appeasing my mother who really didn't want to see the speakers anyhow, and they appeased me in that I wouldn't have to pull my hair out every time I came over and saw where my mother had relocated the speakers. From my father's point of view, he got what he wanted most (a bigger TV) and got better sound as well (or so I promised him). As it is for many people, the TV was the easy sell; it was the speakers that tended to get the most frowns.
I wanted to see if I could change that.
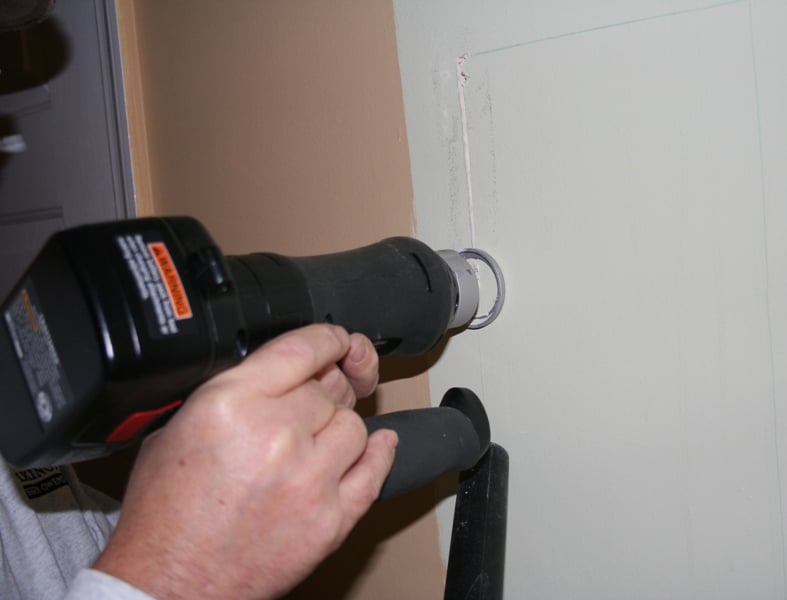 The last part of the preparation was the
tools. My father just got a hand held, battery powered rotary saw. We decided
to use that to cut the holes in the walls. Was it easier than a manual drywall
saw? No. It also wasn't faster nor did it provide a straighter cut. But it was
cooler to use. We also had on-hand a cordless drill, a cordless screwdriver, a
drywall saw, a snake (stiff piece of wire for re-routing the speaker cables), a
pencil, a level, a tape measure, and a vacuum cleaner. After placing the
template on the wall, we leveled it, checked our measurements, and drew it in
with a pencil. Cutting the holes was pretty much a snap with the router. One of
us would cut the hole while the other held the hose of the vacuum near the cut
to catch the majority of the dust. It's wasn't 100% but it did cut down on the
cleaning afterwards.
The last part of the preparation was the
tools. My father just got a hand held, battery powered rotary saw. We decided
to use that to cut the holes in the walls. Was it easier than a manual drywall
saw? No. It also wasn't faster nor did it provide a straighter cut. But it was
cooler to use. We also had on-hand a cordless drill, a cordless screwdriver, a
drywall saw, a snake (stiff piece of wire for re-routing the speaker cables), a
pencil, a level, a tape measure, and a vacuum cleaner. After placing the
template on the wall, we leveled it, checked our measurements, and drew it in
with a pencil. Cutting the holes was pretty much a snap with the router. One of
us would cut the hole while the other held the hose of the vacuum near the cut
to catch the majority of the dust. It's wasn't 100% but it did cut down on the
cleaning afterwards.
tSc Setup and Installation Pt. 2
 Once we got all the holes cut, it was a simple matter of running (or
re-routing) the wires. In the front, we just ran them along the wall behind the
entertainment unit and punched a hole underneath the speaker location. For the
most part, we were close enough for the other person to reach down into the
wall from the speaker cutout and grab the wire. For the side speakers, we had a
bit of a problem with the left speaker. Because of the added bathroom, we
didn't have access to the left wall. The original wire was run to the corner.
Our new location was a few feet in from the corner on the wall. I climbed on
top of the ceiling with the intention of dropping down on the other side and
just plucking the wire out and moving it manually. Unfortunately, there was
about a ten foot drop on the other side through a 3 foot by 1.5 foot opening. I
could probably make it down but I wasn't sure I could make it back. My father
pushed the snake up through the speaker cutout until I could see it, I attached
the wire, and he pulled it back.
Once we got all the holes cut, it was a simple matter of running (or
re-routing) the wires. In the front, we just ran them along the wall behind the
entertainment unit and punched a hole underneath the speaker location. For the
most part, we were close enough for the other person to reach down into the
wall from the speaker cutout and grab the wire. For the side speakers, we had a
bit of a problem with the left speaker. Because of the added bathroom, we
didn't have access to the left wall. The original wire was run to the corner.
Our new location was a few feet in from the corner on the wall. I climbed on
top of the ceiling with the intention of dropping down on the other side and
just plucking the wire out and moving it manually. Unfortunately, there was
about a ten foot drop on the other side through a 3 foot by 1.5 foot opening. I
could probably make it down but I wasn't sure I could make it back. My father
pushed the snake up through the speaker cutout until I could see it, I attached
the wire, and he pulled it back.
Author's Note: There are as many ways to run wires around a room as there are rooms. Check out Editor-in-Chief Clint DeBoer's excellent series of install articles for some ideas. The key is that there is always a way. Article 1, 2, 3, 4, 5.
 Now that we had the wires run, it was simply
a matter of installing the speakers and locking them down. Since we had leveled
our template before we cut the holes, the speakers went in with a snap and were
true. The cordless screwdriver made things a lot easier and comes highly
recommended. Just be sure to use the clutch function, or stop when it starts to
strain or when you see the drywall start to bend. You don't want to over
tighten them. As I mentioned, the only problem I had was with a ring on he
mounting clip that had fallen off and was causing the screw to pop out of the
channel. You could probably power through this but I had the ability (since it
was the right wall with attic access) to just walk into the attic and hold it
in place.
Now that we had the wires run, it was simply
a matter of installing the speakers and locking them down. Since we had leveled
our template before we cut the holes, the speakers went in with a snap and were
true. The cordless screwdriver made things a lot easier and comes highly
recommended. Just be sure to use the clutch function, or stop when it starts to
strain or when you see the drywall start to bend. You don't want to over
tighten them. As I mentioned, the only problem I had was with a ring on he
mounting clip that had fallen off and was causing the screw to pop out of the
channel. You could probably power through this but I had the ability (since it
was the right wall with attic access) to just walk into the attic and hold it
in place.
Once the speakers are in place, wired, and installed, it was time to do what we should have already done - test them. Since I knew that the wires were good and had worked in the past, I waited until after I installed them for tests. I advise against this. Believe me; I was sweating as my father's Denon AVR-1708 went through the test tones. Luckily all was well and everything worked perfectly.
 The last thing to do was paint. My parents
used a special blend of paint for that room mixed by a local shop (it even
bears my mother's name) so getting an off-the-shelf spray can for the grills
was not an option. For the bevels, I could have painted them before
installation but didn’t. I'm a pretty good free-hand painter so I just did it
on the wall. This pretty much insured that you'd rip the paint off the wall if these
were ever taken out to which I say, "Good!" They shouldn't be taken out
anyhow. I tried not to get any paint on the inside edge where the grill would
sit but that is pretty much an impossibility. Even if you could, I don't think
that you should as you'll certainly risk seeing white from some seated
positions.
The last thing to do was paint. My parents
used a special blend of paint for that room mixed by a local shop (it even
bears my mother's name) so getting an off-the-shelf spray can for the grills
was not an option. For the bevels, I could have painted them before
installation but didn’t. I'm a pretty good free-hand painter so I just did it
on the wall. This pretty much insured that you'd rip the paint off the wall if these
were ever taken out to which I say, "Good!" They shouldn't be taken out
anyhow. I tried not to get any paint on the inside edge where the grill would
sit but that is pretty much an impossibility. Even if you could, I don't think
that you should as you'll certainly risk seeing white from some seated
positions.
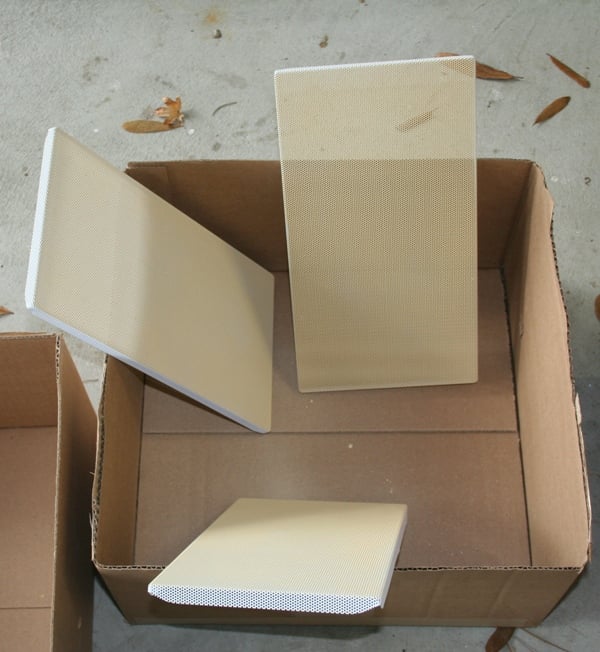
For the grills, we ended up grabbing a spray can solution that consisted of a small reservoir for the paint, a can of compressed air, and a plastic unit to make them work in concert. If I may make a small digression, this solution was barely adequate and was almost more trouble than it was worth. The real problem I was trying to avoid was filling in all the little holes on the metal grill with paint and then having to go back and poke them all clear with a toothpick. I was pretty sure that would happen if we used a brush. The problem was that the spray can was out of commission as much as in commission as it would get too cold and lock up, the paint would clog and it would lock up, or it would just lock up and need to be cursed at occasionally.
 If you do use a spray method for the grill
(and I do recommend it even with the aggravation we had), don't put more than 2
coats if you can help it. And that is two light
coats. The point is not to fill the holes in the grill. The more you layer
on; the most you fill those holes. Also, I'd recommend three full days of
drying before installing the grills. While paint may feel dry to the touch, it
isn't. If you install those grills too early, you're pretty much guaranteeing
you'll never get them off (or at least you won't without damaging the paint).
Since the speakers have the midrange and high boost and cut switches as well as
a swiveling tweeter, you're probably going to want to adjust them from time to
time.
If you do use a spray method for the grill
(and I do recommend it even with the aggravation we had), don't put more than 2
coats if you can help it. And that is two light
coats. The point is not to fill the holes in the grill. The more you layer
on; the most you fill those holes. Also, I'd recommend three full days of
drying before installing the grills. While paint may feel dry to the touch, it
isn't. If you install those grills too early, you're pretty much guaranteeing
you'll never get them off (or at least you won't without damaging the paint).
Since the speakers have the midrange and high boost and cut switches as well as
a swiveling tweeter, you're probably going to want to adjust them from time to
time.
What we ended up doing was setting up a sort of mock "paint booth" using the boxes the speakers came in. We propped one up on top of the other and leaned the grill back into it. This made cleanup a cinch since we were planning on throwing away the boxes anyhow. We used a third box for drying. The system worked pretty well and between the time it took to switch out the grills, realign the boxes, and keep the sprayer in working order we could pretty much keep working continuously. Within an hour, we were done.
Author's Note: Having a hard time getting the grills off before installation? Push in the mounting brackets and let the heads of the screws do the work for you. After installation, I use a grill pick (looks like an ice pick with the tip bent at a 90 degree angle). You'll have to get creative.
I was looking for an in-wall sub for this review but the one that was promised (not from tSc, another company) did not arrive in time for the review. I relocated my father's JBL sub into a different location (he had it under the computer desk in the corner) for the below listening tests. After a short time, it pretty much just died. I knew it was coming since he'd been having problems with it. Most of the below listening tests were done with the sub.
|
Before
|
After |
 |
|
|
|
|
NTIW26 NTIW25 Listening and Conclusion
My father's initial reaction to the speakers was one of disappointment. That's right, disappointment. "They seem sort of shrill, don't they?" he said to me. I just waited. After less than a minute, he turned back and changed his tune, "You know, I think I'm just hearing highs I've never heard before."
You know Dad, I think you're right.
Right out of the box I was impressed with the NTIW26's. Sure, the comparison to the JBLs wasn't fair as just the pair of NTIW26s cost almost as much as the entire JBL 5.1 system, but I was trying to compare to my vast (after doing this job as long as I have, I think I can say "vast" without stretching the truth too much) experience with speakers. They had an open and airy sound and were deep and rich. I initially played with the cut and boost switch but ended up leaving them at zero since a) my father couldn't tell the difference and b) he was going to run Audyssey and I figured I'd let that do the boosting and cutting. I also played with the tweeter alignment a bit but not as much as I will on future visits. I basically did very little physical calibration other than setting levels and orienting the tweeters.
DTS-CD: Diana
Krall - Love Scenes This is the first CD I thought to play,
mostly because of the phantom center. Diana Krall's voice on this album is
clearly anchored in the center though you don't need a center channel to
experience it. I've often used this album in two channel reviews without
feeling like I was unduly hamstringing the speakers. The NTs kept up very well
with the content of the album especially with the midrange and upper bass. The
JBL sub (before it died) was woefully inadequate and I was glad to bump the
crossover down to 60Hz on the Denon minimizing its load. At no time did I think
that the NTs were in anyway dropping the ball in the bass department. I'd
suggest that the 55Hz lower end spec might even be a little conservative.
Again, remember, in-wall speaker performance can vary highly based on room
size, shape, and speaker placement. Your results may be different than mine.
This is the first CD I thought to play,
mostly because of the phantom center. Diana Krall's voice on this album is
clearly anchored in the center though you don't need a center channel to
experience it. I've often used this album in two channel reviews without
feeling like I was unduly hamstringing the speakers. The NTs kept up very well
with the content of the album especially with the midrange and upper bass. The
JBL sub (before it died) was woefully inadequate and I was glad to bump the
crossover down to 60Hz on the Denon minimizing its load. At no time did I think
that the NTs were in anyway dropping the ball in the bass department. I'd
suggest that the 55Hz lower end spec might even be a little conservative.
Again, remember, in-wall speaker performance can vary highly based on room
size, shape, and speaker placement. Your results may be different than mine.
I'd have liked to have heard a more unified center experience with the NTs, however. It wasn't as if the imaging was bad - far from it. But I've heard more solid imaging in the past. With some additional tweaking of the tweeter alignment, this may tighten up a bit. The placement of the display (which I pushed as far back as I could) might have been deflecting a little of the sound, messing up the imaging slightly. I hope to eventually convince my parents to wall mount the display as well. Of course, after having to spend hours/days/months convincing my Mom that they "needed" a 58" plasma, her first comment was, "Huh, I thought it'd be bigger." If it was a lighter, instead of pushing back speakers like she used to, she very well may have been pulling out the TV. Wall mounting may or may not be an option here.
DTS-DVD: The
Blue Man Group - The Complex One thing I always loathed about the JBL
speakers was how horribly noticeable the rear speakers were. You always knew
they were there and always knew when they were playing. It was annoying. Not
once with those speakers did the surrounds blend into the background. This was
especially irksome with movie soundtracks where, instead of being enveloped by
the music, you were instead sort of blasted from three sides (front, left-rear,
and right-rear). I can honestly say that the NTIW25s are probably too much
speaker for surrounds. They are obviously every bit the speaker that the 26s
are and meshed very well with their slightly larger brethren. The rear imaging
was finally diffuse and unified creating the full surround effect that I've
never before experienced in that room.
One thing I always loathed about the JBL
speakers was how horribly noticeable the rear speakers were. You always knew
they were there and always knew when they were playing. It was annoying. Not
once with those speakers did the surrounds blend into the background. This was
especially irksome with movie soundtracks where, instead of being enveloped by
the music, you were instead sort of blasted from three sides (front, left-rear,
and right-rear). I can honestly say that the NTIW25s are probably too much
speaker for surrounds. They are obviously every bit the speaker that the 26s
are and meshed very well with their slightly larger brethren. The rear imaging
was finally diffuse and unified creating the full surround effect that I've
never before experienced in that room.
The Blue Man Group is known for its low bass, interesting and unusual sounds, and immersive nature. NTIW26s and 25s worked in concert to really draw you into the music, letting you lose yourself in the high quality mix. It's a very good possibility that my using this album for the review is what killed the sub and if that's the case, what a way for a sub to go. If I was a sub, I'd want to die playing Piano Smasher too.
Xbox 360: Rock
Band 2 I brought my Xbox 360 and my copy (and instruments) of Rock Band 2 thinking I was doing it for
the kids. It turned out that my parents liked playing it just as much as the
kids. The NTs presented the music and fan noise as if you really were in a rock
band. Of course, with the kids we had it set in "No Fail" mode but
when only the adults were playing, you could really get into the music and
mood. By this time the sub was dead so I set the speakers to Large and kept the volume reasonable.
Even without a sub, I never once thought I was missing out. There were plenty
of times when I had completely forgotten that the sub was dead until I started
watching a movie and wondered where the bass was. The fact that these speakers
are weather resistant is almost a shame. While they may be cost effective
enough for installation in a bathroom or outdoors, I'd be a crime to do so. As
quality speakers go, I can't believe how good these are for the price.
I brought my Xbox 360 and my copy (and instruments) of Rock Band 2 thinking I was doing it for
the kids. It turned out that my parents liked playing it just as much as the
kids. The NTs presented the music and fan noise as if you really were in a rock
band. Of course, with the kids we had it set in "No Fail" mode but
when only the adults were playing, you could really get into the music and
mood. By this time the sub was dead so I set the speakers to Large and kept the volume reasonable.
Even without a sub, I never once thought I was missing out. There were plenty
of times when I had completely forgotten that the sub was dead until I started
watching a movie and wondered where the bass was. The fact that these speakers
are weather resistant is almost a shame. While they may be cost effective
enough for installation in a bathroom or outdoors, I'd be a crime to do so. As
quality speakers go, I can't believe how good these are for the price.
Conclusion
 As reviews go, this isn't my most
rigorous. The fact is that once you leave your own room where you are familiar
with the acoustics and limitations, you're really unsure of what is the speaker
and what is the room. Plus, I couldn't exactly measure them as I would with
most speakers since I didn't have my heavily treated AV Rant podcast room to do
it in. At $300 a pair for the NTIW26s and $230 a pair for the NTIW25s, these
speakers are a remarkable value. Quality components, easy to mount, lots of
tuning options… the list of benefits goes on. Sonically, they at least met and
in many ways exceeded my expectations. Bass was admirable for a bookshelf much
less an in-wall. The highs and mids were well realized and very lifelike. The
NT speakers definitely live up to the tSc motto - Quality Loudspeakers at Half the Price.
As reviews go, this isn't my most
rigorous. The fact is that once you leave your own room where you are familiar
with the acoustics and limitations, you're really unsure of what is the speaker
and what is the room. Plus, I couldn't exactly measure them as I would with
most speakers since I didn't have my heavily treated AV Rant podcast room to do
it in. At $300 a pair for the NTIW26s and $230 a pair for the NTIW25s, these
speakers are a remarkable value. Quality components, easy to mount, lots of
tuning options… the list of benefits goes on. Sonically, they at least met and
in many ways exceeded my expectations. Bass was admirable for a bookshelf much
less an in-wall. The highs and mids were well realized and very lifelike. The
NT speakers definitely live up to the tSc motto - Quality Loudspeakers at Half the Price.
The real test, however, was how my parents feel about them. Before we even had them all the way installed, my mother was enamored. She loved the clean look and the space-saving attributes of the in-walls. My father appreciated that he was getting much better sound than he had ever experienced before. After I left, I sent them a list of movies to watch that would show off their new speakers. Later that night I got a call from them saying they had just finished watching Spiderman 2 (the "Horror Hospital" scene is a reference for surround sound). Their reaction? "Wow." Wow, indeed.
tSc NTIW26 In-wall Speakers
$149.97/each
tSc NTIW25 In-wall Speakers
$114.97/each
The Speaker Company
100 Corporate Drive
Mahwah, NJ
07430
About tSc
We offer quality speakers and speaker systems at discount prices. From
towers, satellite speakers, in-walls, bookshelves and surround systems as well
as headphones and iPod Docking stations The Speaker Company offers a full line
of speakers & accessories.
The Score Card
The scoring below is based on each piece of equipment doing the duty it is designed for. The numbers are weighed heavily with respect to the individual cost of each unit, thus giving a rating roughly equal to:
Performance × Price Factor/Value = Rating
Audioholics.com note: The ratings indicated below are based on subjective listening and objective testing of the product in question. The rating scale is based on performance/value ratio. If you notice better performing products in future reviews that have lower numbers in certain areas, be aware that the value factor is most likely the culprit. Other Audioholics reviewers may rate products solely based on performance, and each reviewer has his/her own system for ratings.
Audioholics Rating Scale
 — Excellent
- — Very Good
- — Good
- — Fair
- — Poor
| Metric | Rating |
|---|---|
| Build Quality | |
| Appearance | |
| Treble Extension | |
| Treble Smoothness | |
| Midrange Accuracy | |
| Bass Extension | |
| Bass Accuracy | |
| Imaging | |
| Soundstage | |
| Dynamic Range | |
| Fit and Finish | |
| Performance | |
| Value |
As Associate Editor at Audioholics, Tom promises to the best of his ability to give each review the same amount of attention, consideration, and thoughtfulness as possible and keep his writings free from undue bias and preconceptions. Any indication, either internally or from another, that bias has entered into his review will be immediately investigated. Substantiation of mistakes or bias will be immediately corrected regardless of personal stake, feelings, or ego.
View full profile