
A Tale of 5 Installs Part 3 - Best. Attic. Ever.
Axiom Epic Midi 400 System
What happens when a musician who is very much into music and live performance decides to finally step up his home to the world of 5.1 surround sound? "Adam" lives in a beautiful historic home and has to decide what kind of system to install - and more importantly - where to put it. His priorities are movies and the ability for him and his wife to be able to crank up the movies and enjoy feature films when the kids go to bed.
Vital Statistics:
- Married with a three beautiful young children
- Wife enthusiastic about watching movies in surround
- Older home with huge attic and minimal crawl space
- Small, wide room with short depth
- A/V Knowledge Level: "I read the manual. Stand back - I got this."
Day 1 - The Waiting is the Hardest Part
If you want to do it right - you need to have a plan. You also have to make a decision for the home which understands the intent and purpose of the room as well as any limitations. In the case of Install #3, Adam - the "victim" and a real music and movie buff - had a real-world dilemma: Do I install the system in the most install-friendly room, or place them in a more usable location? The "best" room (acoustically-speaking) consisted of a large, open living area which could actually support 7.1 audio. The downside was that it was adjacent to the children's rooms, meaning that the late-night subwoofer action was certain to be minimal or nonexistent. An alternative was to utilize a shallower room, but one which was located in a remote office/bedroom. With the door shut, this room could get cranked to full volume.
 Once we
settled on the back room (we wanted to be able to crank up the movies), we then
discussed how we would lay out and mount the speakers. Because of the 8 foot
ceilings and the position of the room's door and windows, we decided on
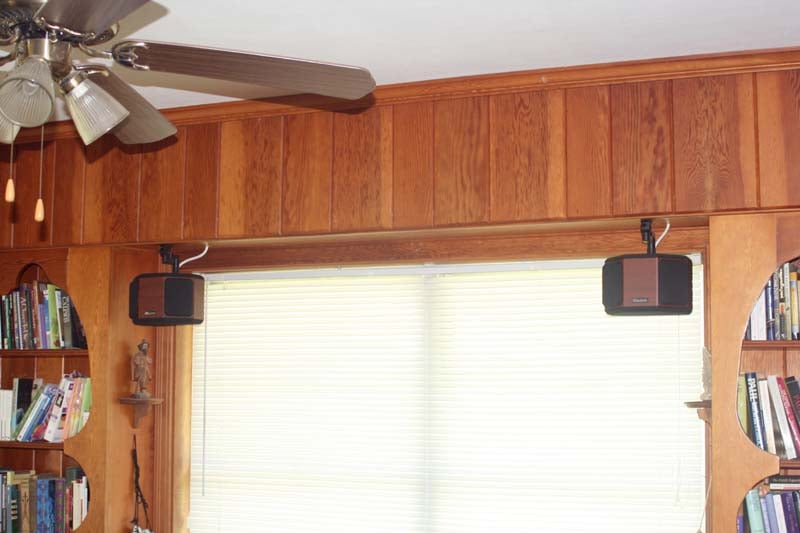
ceiling-mounting the front speakers - a pair of Axiom Audio M2s. The center
channel, a VP100, would get set on a shelf to be placed just under the 32-inch
Toshiba LCD TV, and a pair of QS4 speakers would have the pleasure of being
mounted behind the listening positions. The Epic
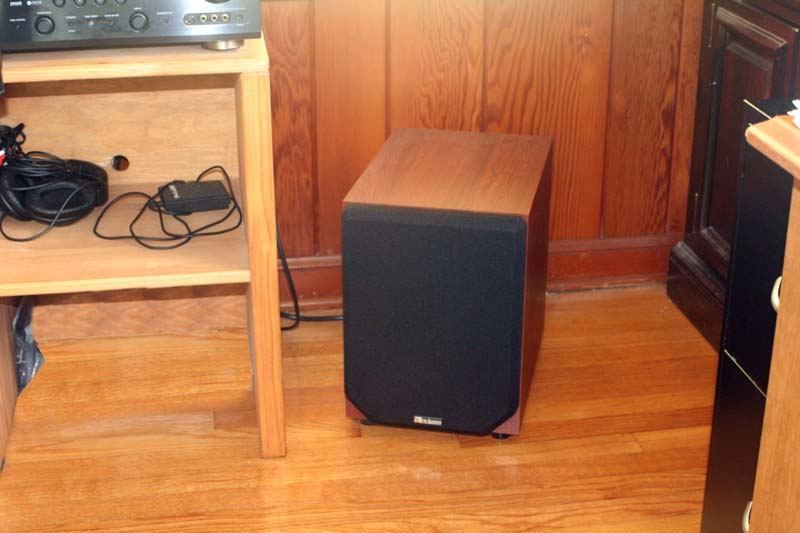
Midi 400 System came with an 8-inch, 500 watt EP400 subwoofer which we
intended to set to the right of the equipment rack.
Once we
settled on the back room (we wanted to be able to crank up the movies), we then
discussed how we would lay out and mount the speakers. Because of the 8 foot
ceilings and the position of the room's door and windows, we decided on
ceiling-mounting the front speakers - a pair of Axiom Audio M2s. The center
channel, a VP100, would get set on a shelf to be placed just under the 32-inch
Toshiba LCD TV, and a pair of QS4 speakers would have the pleasure of being
mounted behind the listening positions. The Epic
Midi 400 System came with an 8-inch, 500 watt EP400 subwoofer which we
intended to set to the right of the equipment rack.
For the fronts and surrounds we simply planned to drill a hole in the ceiling and then route the cables to the tie-line drop point. The surrounds would be slightly more difficult than the fronts since they would come through an alcove which framed out the window at the rear of the room. The job was clear - now we just had to get the cables where we needed them.
Down Below
 From
below Adam and I drilled upward and created our holes for the front speakers.
We also cut our box into the wall which would provide access to our tie-lines
to the front and rear speakers. We couldn't drill into the ceiling for our
surrounds because they were going to be mounted from a soffit. For that we
planned to drill down from above and hoped
to easily balance the holes for the left and right surround speakers. All that was
left was to go into the attic and get to work on all that drilling.
From
below Adam and I drilled upward and created our holes for the front speakers.
We also cut our box into the wall which would provide access to our tie-lines
to the front and rear speakers. We couldn't drill into the ceiling for our
surrounds because they were going to be mounted from a soffit. For that we
planned to drill down from above and hoped
to easily balance the holes for the left and right surround speakers. All that was
left was to go into the attic and get to work on all that drilling.
Into the Great Wide Open
We pulled an 8-foot ladder (no, even after my last experience, I didn't buy a new ladder) and embarked into the attic, which was one of the largest, most spacious of any I've ever been in. With our point of entry, we needed to make our way to the complete opposite side in order to drop our lines. As you can gather from my description, there was nearly enough headroom to stand up in the middle of the space and getting from one place to another wasn't very difficult at all. Finding our bearings was a matter of locating the power drop which was adjacent to where we wanted to put our tie lines.
This didn’t take too long, though we initially got sidetracked by a "close-but-no-cigar" hole which wasn't exactly where we wanted it (it turned out we were drilling above the door). Re-adjusting, we were able to hit the area we wanted and we made sure that our front speaker positions were clear of any studs - noting their relative positions for mounting the brackets.
It's Not My Fault!
 The first problem we ran into was not
seeing light when we drilled into our header. To make absolutely certain, I had
Adam shine a light directly into our tie-line hole from down below. Not seeing
it meant there was a random piece of wood somewhere in the wall below. Yeah, it
sounded familiar to me, as well. This was extremely unfortunate and I found
that it was (of course) too low to hit with the drill bit, even if I used the
extension attachment I kept around for exactly this type of situation (well,
not exactly this type of situation,
but one where it would actually work).
I was dreading the thought of having to create another hole in the wall -
especially since I didn't know if there might just be another piece of wood in
our way. Fortunately, we didn't have to.
The first problem we ran into was not
seeing light when we drilled into our header. To make absolutely certain, I had
Adam shine a light directly into our tie-line hole from down below. Not seeing
it meant there was a random piece of wood somewhere in the wall below. Yeah, it
sounded familiar to me, as well. This was extremely unfortunate and I found
that it was (of course) too low to hit with the drill bit, even if I used the
extension attachment I kept around for exactly this type of situation (well,
not exactly this type of situation,
but one where it would actually work).
I was dreading the thought of having to create another hole in the wall -
especially since I didn't know if there might just be another piece of wood in
our way. Fortunately, we didn't have to.
 Adam helpfully pointed out that a coat
closet resided just behind the place we selected for our tie line location.
What this meant was that we could drop our cables down into the closet, run
them down along the corner, and then poke through into our listening room.
Since the cables would be just inside the closet door, they would be impossible
to see unless you actually climbed into the closet and turned your head to the
right (an unlikely occurrence).
Adam helpfully pointed out that a coat
closet resided just behind the place we selected for our tie line location.
What this meant was that we could drop our cables down into the closet, run
them down along the corner, and then poke through into our listening room.
Since the cables would be just inside the closet door, they would be impossible
to see unless you actually climbed into the closet and turned your head to the
right (an unlikely occurrence).
Almost There
 Back
into the attic we dropped the cables down and drilled our rear surround speaker
drops. The closet drop was easy, but getting the holes right for the surrounds
proved to be more difficult. We used the 24-inch drill bit extension to make
the job a bit more manageable (this was on an outside wall of the house and we
found that the attic actually dropped down in back providing very difficult
access to this area). With his arm sticking way down, Adam managed to secure
two holes that worked... though we drilled a total of four holes (easily
patched) to get it perfect. This time, keeping the entire roll of Impact Acoustics
CL2-rated 12 gauge Speaker Cable in the attic proved to make the most sense
as it allowed us to pull exactly how much we needed without having to measure
or worry about over- or under-allocating.
Back
into the attic we dropped the cables down and drilled our rear surround speaker
drops. The closet drop was easy, but getting the holes right for the surrounds
proved to be more difficult. We used the 24-inch drill bit extension to make
the job a bit more manageable (this was on an outside wall of the house and we
found that the attic actually dropped down in back providing very difficult
access to this area). With his arm sticking way down, Adam managed to secure
two holes that worked... though we drilled a total of four holes (easily
patched) to get it perfect. This time, keeping the entire roll of Impact Acoustics
CL2-rated 12 gauge Speaker Cable in the attic proved to make the most sense
as it allowed us to pull exactly how much we needed without having to measure
or worry about over- or under-allocating.
Tying Up Loose Ends
Back downstairs we attached all of the cables to the 4-pair speaker wire binding posts and labeled them accordingly (very important). We tie-wrapped the cables in the closet to dress them up and made sure that everything was ready for mounting the speakers the following day.
Day Two - Up and Running
I'm Too Late
 I love
motivated homeowners. By the time I showed up for Day 2 I found that Adam and
his dad had already mounted the speakers to the ceiling. That just left wire
stripping and connecting the subwoofer and center channel. Life was good. After
several minutes (actually, it took me almost thirty) I had all 4 cable ends
ready and I'd stripped and cut the
center channel wire plus jumper cables which we'd use to get from the Yamaha RX-V663
receiver
to the 4-pairs of wall-mounted speaker binding posts. Connecting everything up was
painless and it wasn't long before I was configuring the system for use with
their new Toshiba 32-inch display and Axiom
Audio 5.1 Epic Midi system. The key elements in the setup were getting the
speaker distances correct as well as the bass management settings. We used an
80Hz crossover point since the Axiom Audio M2s had an extension of 70Hz
(+/-3dB). Levels should, as always, be set with an SPL meter, however the
Yamaha actually does a good job, provided you override the bass management
settings. It thinks anything that can reproduce 60-70Hz is a 'Large' speaker.
I love
motivated homeowners. By the time I showed up for Day 2 I found that Adam and
his dad had already mounted the speakers to the ceiling. That just left wire
stripping and connecting the subwoofer and center channel. Life was good. After
several minutes (actually, it took me almost thirty) I had all 4 cable ends
ready and I'd stripped and cut the
center channel wire plus jumper cables which we'd use to get from the Yamaha RX-V663
receiver
to the 4-pairs of wall-mounted speaker binding posts. Connecting everything up was
painless and it wasn't long before I was configuring the system for use with
their new Toshiba 32-inch display and Axiom
Audio 5.1 Epic Midi system. The key elements in the setup were getting the
speaker distances correct as well as the bass management settings. We used an
80Hz crossover point since the Axiom Audio M2s had an extension of 70Hz
(+/-3dB). Levels should, as always, be set with an SPL meter, however the
Yamaha actually does a good job, provided you override the bass management
settings. It thinks anything that can reproduce 60-70Hz is a 'Large' speaker.
Movie Time!
This is my favorite part. After putting in some movies and doing a thorough listening session I brought in the whole family to watch a scene from The Incredibles - in particular, the one where Dash escapes from the bad guys on the island. It's full of pans and surround material and will give any sub a run for its money. I found that we liked the bass cranked pretty high for movies - mostly because it sounded so good. The family seemed to enjoy it and it wasn't long before Adam had even programmed the other devices into his Yamaha receiver's remote control.
This was a job that had a few snags, but turned out extremely well. In fact, the system sounded better than I had hoped and Adam and crew really turned a simply office into a place where they can retreat after hours and crank up the movies for an in-house "date night." I learned that whether your room is large and open or small and confined doesn’t really matter - there's always a way to integrate 5.1 audio so that the sound and system meets your practical and aesthetic needs. Plan your system well and you'll eliminate as many hassles and mistakes up front and end up with impressive results - just ask Adam.
Clint Deboer was terminated from Audioholics for misconduct on April 4th, 2014. He no longer represents Audioholics in any fashion.
View full profile