
Professional Pre-wiring tips for Speakers, TVs, and Networking
Professional Pre-wiring tips for Speakers, TVs, and Networking
In my years as a custom AV integrator, I’ve seen many homeowners placed in difficult situations because of poor pre-wiring by either themselves or a contractor. The possible pitfalls are many, but so are the tips to help ensure you run the right wires, to the right locations, properly. Hopefully these tips will save you time and money, and allow you to have a better finished product. Each of them come from personal experience, but I'm sure I've missed a number of great options. Please share additions tips in the comments section at the bottom of the page.
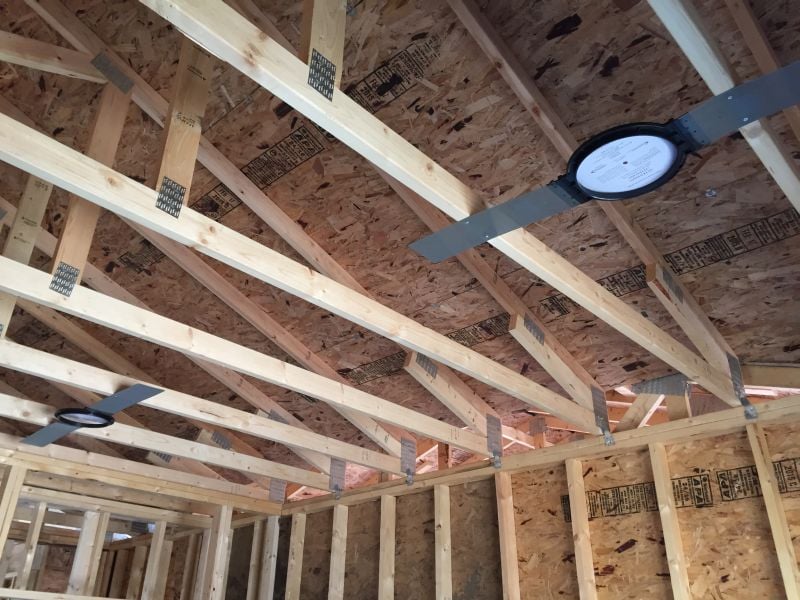
Cover exposed wiring
While you may take care handling your 50’ $200 HDMI cable, don’t think that the rest of the people working on your home will equally appreciate its delicacy. After you’ve wired your entire home, cover all exposed wiring with plastic bags. Wrap electrical tape around the bags to ensure they don't fall off. If you don't protect exposed cables you will likely come back to a freshly textured and painted home, only to discover that you also have freshly textured and painted cables. While you’re at it, ensure the cables are bundled up in such a way that the drywall installers can actually get the wires through the holes they will have to pre-cut in the drywall.
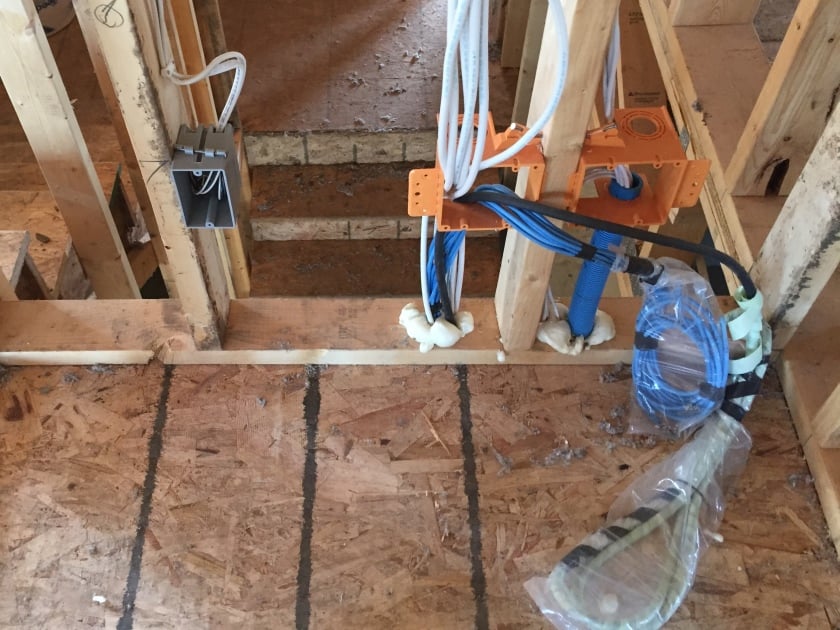
Covering exposed wiring helps protect it from being damaged as the home is constructed
Use 4-conductor speaker wire
If you're wiring for a whole-home speaker system, save yourself time and money by running 4-conductor speaker wire. Most speaker wire is classified as 2-conductor, meaning that there are two separate wires, enough for a single speaker. 4-conductor wire has four separate wires, enough to hook up two speakers. By using 4-conductor, you only have to pull a single speaker cable to each room that has a pair of speakers.
When shopping for 4-conductor wire, you will find it listed as “gauge/conductor count.” For example, a 16 gauge, 4-conductor wire would be labeled as 16/4 and typically called “sixteen four.” A 14 gauge, 2-conductor wire would be labeled as 14/2.
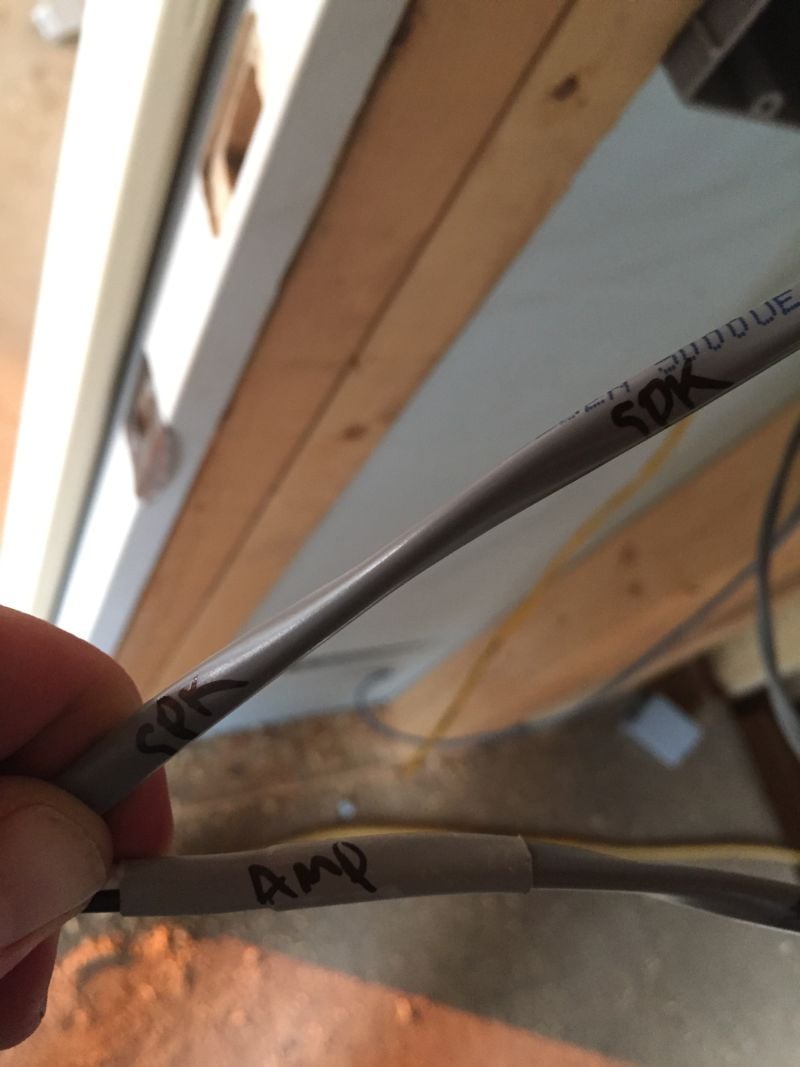
Always label wires. It's best to label them far enough up the jacket so as to avoid cutting off the label when you strip the wire
When running wire for whole-home speaker systems, I also recommend wiring as if you are planning to use volume controls. All this entails is looping the wire a bit, inside the wall, where a volume control would be. You can drywall right over the wire, and may never use a volume control, but at least if you ever want to install a volume control you could cut into the drywall and the wire would be right there for you.
Plan for PoE wireless access points
As the number and capabilities of Internet connected devices continue to increase, so do the demands placed on residential wireless networks. For many families, a single router is no longer powerful enough to handle the strain modern devices place on a network. Therefore, I recommend planning for a managed wireless network or at least multiple wireless access points.
Most commercial wireless access points (WAPs) can be powered with only Ethernet. This is referred to as PoE, or power over Ethernet. By running a few Ethernet cables to various locations in your home, you’ve already set up yourself to expand your wireless range with PoE WAPs. All new homes should be wired with Ethernet, but those wires are usually ran to the same location as cable jacks or AV equipment. That’s not where you would typically want a WAP.
In my home, I hid CAT6 cables behind blank wall plates in the master bedroom, kitchen pantry, and hallway closet ceilings. This will allow me to easily add additional WAPs in centralized locations, out of sight, and away from the interference of other electronics. If you didn't do this, there are still multiple ways you can increase the range of your wireless network.
Use low voltage boxes
High voltage electrical boxes work great for light switches and outlets, but not so great when running HDMI cables or installing volume controls. Whenever possible, you should use low voltage boxes. They are the same size as high voltage boxes, but are not enclosed. These boxes are far more convenient to work with, and in some cases AV wall plates simply won’t work with high voltages boxes.
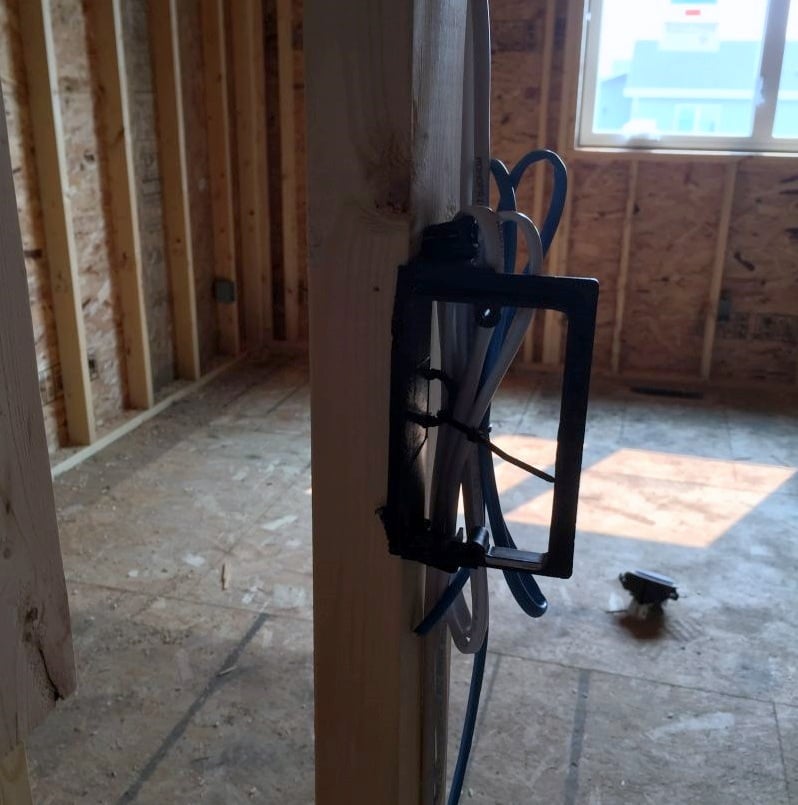
Low voltage boxes often times have loops you can zip tie wires to
Don’t rely on HDMI
HDMI is the standard connection when it comes to hooking up modern home theater equipment, so what happens when a pre-wired HDMI cable doesn’t work? Maybe a drywall screw went straight through it? Or what happens when the HDMI specification changes and the cable buried in your wall no longer works properly? It’s for these reasons, and others, that you should always run two CAT6 cables along with any HDMI cable. The CAT6 cables act as a backup. Through the use of an HDMI balun, either one or two of the CAT6 cables can be used in place of an HDMI cable.
Record your final product
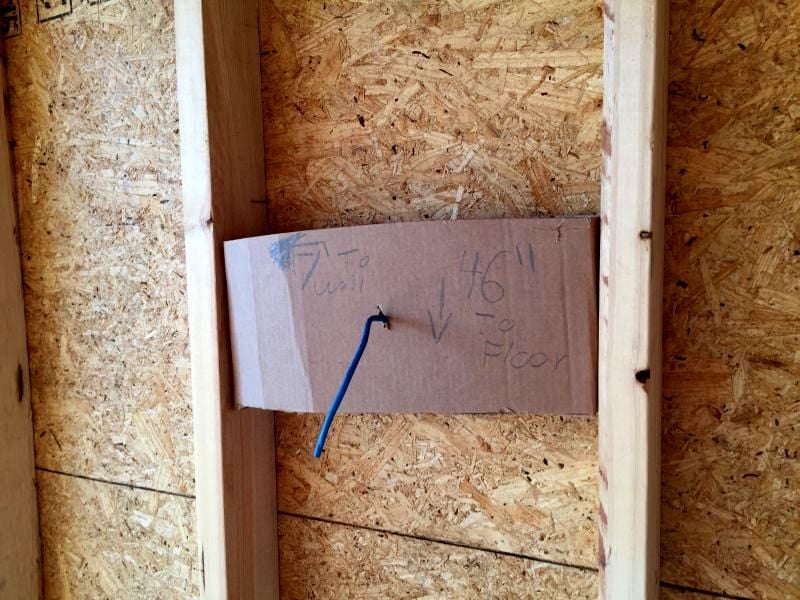
Especially in the case of large projects, don’t trust the wiring diagram to memory alone. While you probably don't need an official wiring diagram home a residential home, always take notes about what is ran where.
I also always take photos of wires that will be hidden in the wall. Better yet, I use my phone to take a video of every pre-wire I complete. In the video, I explain the purpose and thought process behind each wire. If, for some reason, you can only take photos, then write notes on the wall and capture those notes in your picture. In the image below I needed to know the exact location of two studs in the wall and where wires were ran. Taking a photo with the tape measure in it allowed me to easily locate the wire and studs after the home was finished.
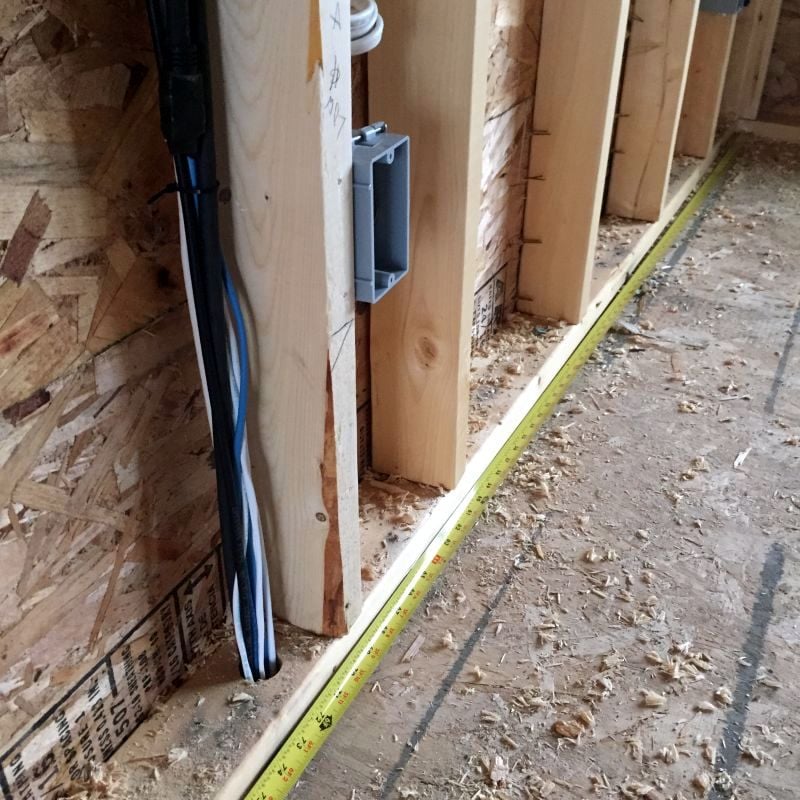
A picture + a tape measure = great record
Install rough-in brackets
There are three basic methods to follow when wiring a home for in-wall or in-ceiling speakers. You can simply loop wire in the wall/ceiling and pull it out when you cut holes for speakers. This method works well when you’re not sure precisely where you want speakers. It also makes sense when you’re not sure when you will actually install speakers because the wire will be hidden out of site.
The second method is to purchase and install rough-in brackets, also called new construction brackets. These brackets are installed before drywall. When the drywall is hung, the installers will cut out around the brackets. This method has several advantages. For example, you can precisely place your speakers during construction, install speaker back boxes to dampen sound transfer to other rooms and increase sound quality, and there’s no drywall to cut when installing the speakers. One downside to this method is that you have to know exactly where you want speakers before the home is finished. A second drawback is that you will have to pay for the brackets, which can be anywhere between $20 and $40 a pair.
Left: The RBH Sound rough-in brackets seen here don't yet have back boxes installed over them
Right: This image shows the rough-in brackets before they are assembled and installed. It also shows an RBH Sound foam back box that can be install before or after drywall goes up. It's one one of the few back boxes on the market that can be installed after a home is finished
The third method is a bit of a hack between the first two. Instead of buying actual rough-in brackets, you staple cardboard between studs and poke the speaker wire through the cardboard. If you’re lucky, the drywall installers will cut out around the wire. If you decide to move your speaker slightly, the hole can be easily patched with spackle. If you’re unlucky, the drywall installers won’t cut a hole and your wire will be completely hidden inside the wall.
The DIY cardboard rough-in bracket alternative might not look pretty, but it is functional
Run conduit up exterior walls
After your home is finished, you will likely still be able to run new wires by stringing them through the attic. And as long as you are running the wire to a location on an interior wall, the process should be pretty painless. However, running wire down an exterior wall can be difficult. Exterior walls are insulated, so you will need wire fishing tools, like a fiberglass rod. Additionally, and more importantly, you will need to contend with limited space between the top of the wall and the roof. This may require you to belly-crawl to the exterior wall, and use a combination of an angle drill and multiple lengths of drill bits.
Therefore, if you aren’t going to run conduit all over the home, at least pre-drill holes in the top plate of a few exterior walls and run about 5’ of conduit down the wall and leave 5’ in the attic. This will allow you to easily add wires in the future. I don’t use this technique often, but it’s a cheap, quick, and easy way to at least partially run conduit in your home.
Wire for multiple subwoofer locations
If you’ve followed Audioholics for long, you will know that we believe the subwoofer is the most important speaker in a surround sound system. It’s also the most difficult speaker to properly place in a room. Subwoofer location has a profound effect on sound quality, which is why you should wire for multiple subwoofer locations. This will allow you to test the subwoofer’s performance in multiples spots around the room and select the optimal location(s) for the best bass for your listening area.
Better yet, wiring for multiple locations will allow you to use multiple subwoofers. Seldom can one subwoofer provide great sound across several seats, but adding as second subwoofer can go a long way in ensuring all listeners hear smooth, even bass.
Use large conduit and run a pull string
Running conduit is a great idea. It gets you as close to future-proof as you can get, as long as you use the proper conduit.
About six years ago, I performed a consultation for a client who wanted to mount a TV above a patio door – yes, directly above the door. He was building a beautiful four season porch with glass walls and ceiling. I advised him to run HDMI, plus have his electrician run a conduit from the equipment location up to the TV. A few months later I was back at the home to install the AV gear,= and noticed that no HDMI had been run. The electrician only ran the conduit and the homeowner expected me to run the HDMI through the conduit. This normally wouldn’t be an issue, except that this conduit was only about ¾” in diameter. I couldn’t even fit a coax cable through it. I was able to fish a single CAT6 cable through and the homeowner had to shell out $700 for an HDMI balun – baluns are much cheaper now.

This Carlon conduit clipped right into the low voltage box
To avoid the above situation, ensure any conduit from equipment to a display measures 1.5” in diameter, or 2” if you want maximum flexibility. I personally recommend Carlon flexible raceway. It’s available in multiple diameters, is flexible enough to be easily installed and round corners, and supports a host of accessories. Carlon makes couplers to connect together two lengths of conduit, clamps to hold conduit in place, and couplers to secure the conduit to a low voltage work box.
You don't need to run a pull string, or pull line, through the conduit at the time of install, but it's a good idea. You can purchase a 500' spool for about $10. Tie a small plastic bag to the end of the string and use a vacuum to pull it through the conduit. This works much better than messing with steel or fiberglass fish tape.
Conclusion
The tips listed in this article are among my favorite when pre-wiring a home for a client, or even my own home. I hope that the serve you well. For more information on how to pre-wire a home, check out the links below. Getting your home theater properly wired is critical not only in ensuring best performance but best function as well. If you have questions on the tips listed here, or would like to offer up your own tips, leave a comment in our dedicated forum thread for this article.
Cliff, like many of us, has always loved home theater equipment. In high school he landed a job at Best Buy that started his path towards actual high quality audio. His first surround sound was a Klipsch 5.1 system. After that he was hooked, moving from Klipsch to Polk to Definitive Technology, and so on. Eventually, Cliff ended up doing custom installation work for Best Buy and then for a "Ma & Pa" shop in Mankato, MN.
View full profile