
How to Extend Wireless Internet for Full Coverage in Large Homes
How to Extend a Wireless Network: Repeaters, Powerlines, and Cascading Routers
We like Old homes. They are steeped in history, every blemish tells a story and every extra detail adds a bit of charm. We also like big homes. In a big house everyone can have their own space for respite or fun. Unfortunately, both types of homes are enemies of wireless internet. Dare to combine the two into one monster, and you’re likely to make Padawan installer retreat in terror.
We wrote this article to give you the Jedi Master IT skills needed to defeat the wireless woes of any home. You’re still on your own with Dark Sith lords.
We already wrote about how to set up a router and how to optimize wireless performance, but in some cases no matter where you place a router or what settings you tweak, there’s just no way a single router can provide fast and reliable wireless throughout the entire home. If that’s the situation you’re in, then this is the article for you. You should follow the steps outlined in our article about optimizing wireless performance before reading this guide. Not only is some of the knowledge in that article crucial to understanding this guide, you might find those tips improve your signal to the point where no longer have any issues.
Unlike our other “How To” guides for wireless networking, the solutions outlined here can cost a few hundred dollars. Additionally, for the sake of keeping this article a reasonable length, we assume you already have some basic networking skills. If this article creeps above your experience level, have a quick read through the articles linked to at the bottom of the page. Those will help bring you up to speed on everything you need to know.
Below we outline three common methods of extending a wireless network, and not all of them are equally reliable or cost effective.
1) Wireless to wireless range extender
The easiest and least expensive option is to place wireless extenders in your home. These nifty devices grab an existing wireless signal and boost it, or repeat it. Since they wirelessly connect to your existing network, they need to be placed in an area that already has a solid wireless signal. The downside to this option is twofold. First, since wireless extenders have to be close enough to the existing router that they have a good wireless signal, they can’t extend the network as far as other solutions. Second, because everything is wireless, they are more prone to slow speeds or dropped connection than other solutions
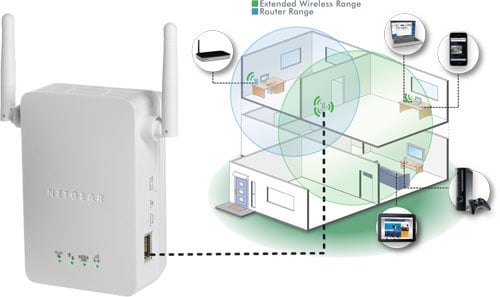
Netgear N300 Wi-Fi Range Extender Diagram
Some wireless extenders will extend the network under a different SSID (though the main router still handles DHCP, so all devices are still on the local network). For example, the SSID from the router might be “Audioholics,” but the SSID from the extender is “Audioholics_extended”. Other extenders operate under the same SSID as the router, so users never have to worry about switching between wireless networks as it’s done seamlessly. We tend to prefer using the same SSID to create a more seamless experience. It’s also best to match the wireless capabilities of the extender and the router. For example, if you have a dual band router, get a dual band extender.
Before installing a range extender, you will want to set your router to a fixed channel instead of auto. When the main router is set to auto channel scan and switches to a new channel, the extender can lose the signal momentarily. We actually recommend using a fixed channel in all of the options outlined in this guide.
Wireless extenders work well in situations where you only to reach one additional floor or only a few more rooms. We generally do not recommend them as a solution for older homes with lath and plaster walls. Lath and plaster walls so severely limit wireless range, you would likely end up with a host of extenders and an unreliable network.
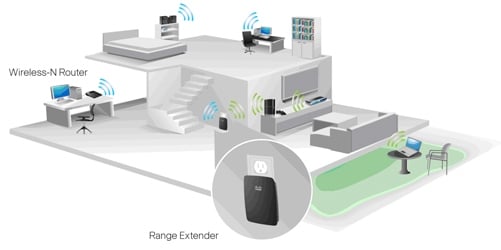
Linksys RE100 Range Extender Diagram
We have had good luck with the Linksys RE1000 and RE2000. They are small, can be plugged directly into an outlet (wall-wart) or used with an included power cable for more ideal placement. They also have an Ethernet port built-in so they can be used as a wireless bridge for non-wireless devices.
If you decide to go the wireless extender route, the setup is very similar to what’s covered our wireless bridge article. The setup can vary from one manufacturer to another, but is usually very simple. If you are feeling particularly adventurous, you could try to install the dd-wrt firmware on a spare router and convert it to a range extender, but that's beyond the scope of this article.
2) Ethernet over powerline to wireless range extender
A better solution than a simple wireless range extender is to use an Ethernet over Powerline kit in conjunction with a range extender. Ethernet over powerline kits allow you to have the next best thing to an actual hard wired connection (If you’re not familiar with Ethernet over powerline kits, our wireless bridge article explains them as well). This solution offers a number of advantages over using a simple wireless extender. For starters, the second WAP doesn’t have to be within range of the existing wireless network. This allows you to extend the coverage area much farther than the wireless only extender because it cuts down on overlap. This system can also be faster and more reliable because it’s not piggy backing onto another wireless signal. Finally, this method is expandable to multiple powerline kits and WAPs, meaning you can create a huge wireless network. Like the first option outlined, these may use the same or different SSID than your existing network.
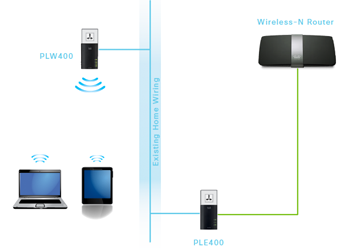
Linksys PLWK400 Diagram. Green = Ethernet. Blue = Existing electrical wiring
Sometimes these systems come as a complete kit (WiFi extender built into the Ethernet over powerline receiver), like the Linksys PLWK400 pictured above. In this scenario, the setup is nearly identical to that of a basic wireless range extender we have previously covered. There’s just one extra step. You need to connect the sending unit to the main router via an Ethernet cable and power on both the router and sending unit before setting up the wireless extender. For best results, plug both units directly into a wall outlet, instead of a surge protector. Note that the electrical wiring used by the sender and receiver needs to be connected to the same breaker box.
Alternatively, you can buy a standalone Ethernet over powerline kit and pair it with a separate wireless access point. In this scenario, hook up the power line kit as outlined here, and follow the steps outlined below to set up a generic WAP.
3) Ethernet to Wireless Access Point (WAP)
This is by far the best option available to increase wireless speed and range in a home. Instead of relying on powerlines to carry the signal to the wireless repeater or WAP, it uses actual Ethernet cable. Most new homes are already wired with Ethernet, but if you own an older home, chances are that you will need to run some cable. If you do need to purchase and run Ethernet, we recommend buying from Blue Jeans Cable (BJC) because they individually test every cable sold. We don’t know of any other cable company with quality control practices as high as BJC. If you are looking for a potentially even less expensive cable, though not as high of quality, check your local home improvement store for bulk cable.
This solution doesn’t mean that you need to string Ethernet all over your home. It might just mean that you need a single run of wire from the router to the location you want to place the WAP. Before actually drilling holes and stringing wire, place the WAP in the intended location to see if you get the extra coverage you need. It doesn’t need to be connected to the internet just to test signal strength. You may find that a short 20 or 25 foot run is enough to get the WAP where it needs to be.
Once you have determined the best location for the WAP, you need to decide what type you want to use. There are three general options that work well in residential environments, A) Apple Airport in bridge mode, B) generic WAP, C) router converted to WAP.
A) Apple Airport in bridge mode
If you have are using all Apple routers, this is potentially the most expensive, most reliable, and easiest of option. Apple makes two different routers, the Apple Airport Express and Airport Extreme (The Time Capsule also doubles as a router and can be used). The Extreme is Apple’s flagship router and retails for a hefty $199. The Express is the little brother of the family. It’s an extremely compact, full-fledged wireless router for only $99. The Extreme is normally used as the main router thanks to its four Gigabit Ethernet ports compared to only two 10/100BASE-T ports on the Express. The compact size of the Express, ability work as a bridge and generic WAP, and 3.5mm audio output for Airplay make it perfect to use as a WAP.
Apple Airport Network. Credit: Apple
Setting up this system is extremely easy because all of the routers can be set up and managed using Apple’s Airport Utility software. We would normally launch into a step by step guide of what to do, but Apple already has an official guide to help you set up this system. The only piece of guidance omitted is to set each router to a difference wireless channel.
B) Generic WAP
In this setup, you use a generic WAP, like the Linksys WAP300N, to extend the network. You can either use the same SSID as the main router or a different one. This guide assumes you want to use the same SSID. Overall, set up is pretty simple. The WAP might come with a setup wizard to make your life uber easy, but the instructions below show you how to manually set up the network.
First, login to your existing wireless router and write down the: SSID, encryption type, password, wireless channel, and DHCP range. The table below shows you what that list of information looks like.
| Setting | Main Router | WAP |
| Operation Mode | N 2.4GHz | N 2.4GHz |
| SSID | Audioholics | Audioholics |
| Encryption | WPA2-AES | WPA2-AES |
| Password | Pasword123 | Pasword123 |
| Wireless Channel | 6 | 11 |
| IP Address | 192.168.0.1 | 192.168.0.2 |
| DHCP Range | 192.168.0.100 - 198.168.0.254 | NA - Off |
Example Main Router and WAP Settings
Next, disconnect your computer from the router by unplugging the Ethernet cable connecting the two or disabling your wireless adapter. Unbox the WAP, power it on and connect it to your computer via Ethernet. Log in to the WAP. You will need to look at the included instruction manual to see how to login to the WAP. Once you are in, set the operation mode to Access Point (option may not be available if it can’t do anything else, like be a wireless bridge)/ Next, set the wireless SSID, encryption, and password to match the settings on the router. Set the wireless channel to something different than the main router. Assign the WAP an IP address outside the DHCP range of the router, but within the subnet (2nd to last number in the IP address). Using the example above, we could set the IP address of the WAP to anything between 192.168.0.2 and 192.168.0.99. Save the settings.
Next, unplug your computer from the WAP. Connect the WAP to an open LAN jack on the back of the router. You can now re-enable your wireless adapter on your computer and re-connect to your wireless network. You should now only see one network. You may need to reboot the router and WAP for everything to sync up, but it is unlikely.
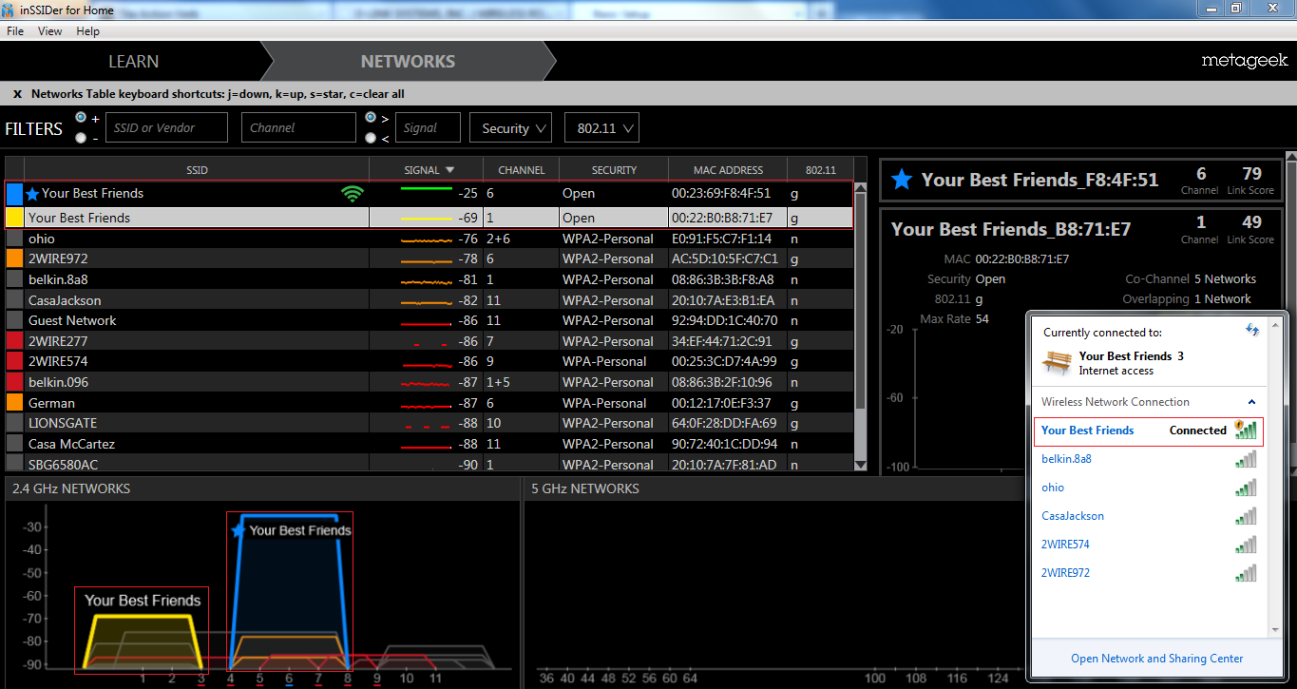
inSSIDer shows both networks, while Windows only sees one. Click to enlarge
At this point, everything should be working properly. If you need even more coverage, you can add additional WAPs around the home by repeating the process again. To test the setup, walk into an area of the home where the main router does not reach and test your internet connection. We also recommend using the program inSSIDer to view the signal strength of both networks and to ensure that your computer is connecting to the WAP, not the main router.
C) Router converted to WAP (a.k.a. Cascading routers)
Many people like to use a second wireless router to extend their network because they have one readily available. It’s a great idea because you can save some cash, but requires an extra step beyond setting up a generic WAP. We essentially need to dumb down the router and make it a simple WAP.
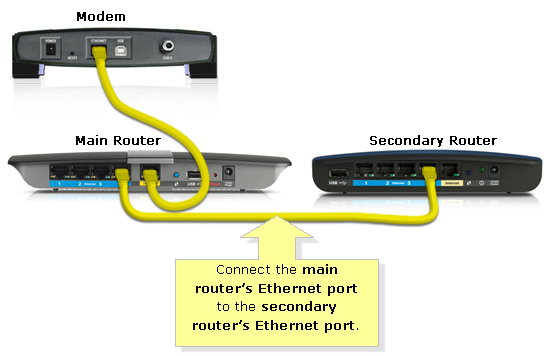
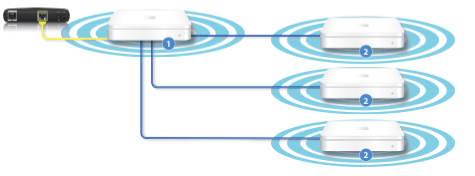
Ethernet connection diagram. Credit: Linksys
Disconnect your computer from the main network and connect it to one of the LAN jacks on the 2nd router (soon to be WAP). Power on and login to the 2nd router. Set the wireless SSID, encryption, and password so they are identical to the main network. Set the wireless channel so it is different than the main router. Next, assign the 2nd router an IP address outside the DHCP range of the main router, but within the subnet. If these were a simple WAP, you would be finished. But there is one last step.
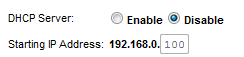
DHCP Disabled
The last step is to turn off DHCP on the 2nd router, making it WAP with built-in switch. Disable DHCP and save the settings. Now you need to connect an Ethernet cable from an open LAN port on the back of the main router to an open LAN port on the back of the 2nd router. Make sure you are using a LAN port on the second router, not the WAN port you would normally use if it were the DHCP server for the network.
Now it’s time to test everything out. You should be able to access either router by using its IP address. Again, we recommend using inSSIDER to verify everything is working properly. If the above instructions were confusing, check out this guide, by Linksys, about cascading routers.
Conclusion
In this article, we’ve covered three general ways to increase your wireless range. A basic wireless range extender is the least expensive and easiest option, but it lacks the speed, reliability, and range capabilities of the other options. Using an Ethernet over powerline kit offers even better speed, reliability and range, but is more expensive and isn’t always an option depending on the existing electrical wiring in the home. The final, and best option, is to connect and Ethernet cable from the main router to another router or WAP. We covered three different methods to accomplish this setup.
Hopefully one of the options covered in this guide suits your needs. Good luck!
Cliff, like many of us, has always loved home theater equipment. In high school he landed a job at Best Buy that started his path towards actual high quality audio. His first surround sound was a Klipsch 5.1 system. After that he was hooked, moving from Klipsch to Polk to Definitive Technology, and so on. Eventually, Cliff ended up doing custom installation work for Best Buy and then for a "Ma & Pa" shop in Mankato, MN.
View full profile