
How to Set Up a Wireless Network From Start to Finish
How to Set Up a Wireless Network From Start to Finish
Follow this Set Up Guide to Get the Best and Fastest WiFi network in your home
Wireless Internet is great. Radio waves burning holes in your brain as packets of data containing a Netflix movie fly through the air over to your TV; what could be better?
Surely, not much.
But WiFi can suck if it’s not setup properly.
Neighbors using up your bandwidth watching cat videos on YouTube. Signal dropping every time you take your iPad into the bathroom and try to download a new app (you know you do it). Agonizingly slow speeds every time your other family members jump on the network.
Setting up a wireless network properly can alleviate all of these problems. Resolving these issues is actually pretty easy. This guide takes you through the basic set up and configuration of a wireless router, and points you to a few extra resources to help optimize the system.
For starters, you’ll need to understand the 3 basic components involved in any home network. You could skip this part of the tutorial if you want, but it provides a fundamental understanding of how a wireless network works that will help frame the rest of the guide and allow you to troubleshoots problems more easily.
Setting Up a Wireless Network for Home Theater & Automation
Modem – The modem is the first link in this chain. It allows your home to connect to the Internet. It’s a small box with three connections on it: power, Ethernet, and coax or phone (you may find a USB port as well, just pretend it doesn’t exist, like the Matrix). Power is for, well, power. If you have cable Internet then the modem will have a coax cable jack on the back. It’s the only connection with threads for screwing in the cable. If you have DSL, you will see a phone jack instead of a cable connection. The last jack is Ethernet, which looks like a wide phone jack. This connects to the port on the back of your router labeled “WAN” and provides an Internet signal to the wireless router. If you find that your modem has multiple Ethernet jacks, then is it what is referred to as a gateway, and likely also has built-in wireless. Think of a gateway as a wireless router and modem combined into one box. You can still follow this tutorial for setting up a gateway. Simply ignore steps 2 and 4 about physically hooking up a router, all of the wireless configuration is the same.

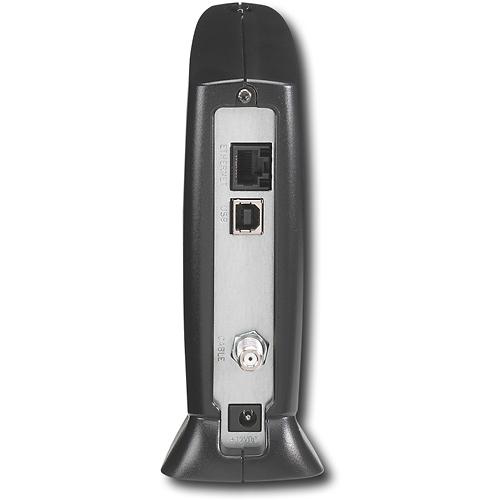
Motorola Surfboard Cable Modem
Wireless Router – The wireless router performs two main tasks. First, it takes the Internet signal from the modem and transmits it wirelessly in your home. Somewhere on the box of your router, it will tell you what types of wireless protocols it broadcasts. You’ve likely heard of wireless g or wireless n, or seen the specification 802.11g or 802.11n at some point during the purchasing of your router. As wireless technology has developed, new wireless protocols have emerged. Over the past 6 years or so, wireless g has slowly been phased out by a newer protocol, wireless n. Over the past 2 years, the newest wireless protocol, wireless ac has started to come into prominence. Luckily, all wireless routers are backwards compatible, so a brand new wireless ac router will work with older wireless g devices. There are two older protocols called wireless a and wireless b, but those where largely phased out years ago. As you run across these terms, know that the term “wireless g” and “802.11g” can be used interchangeably. The same goes for any wireless protocol, like 802.11n and 802.11ac. The second task a router performs is something called “DHCP”. We’ll skip over all of the details, but know that it allows multiple devices to connect to the modem. You’ll notice that the modem only has one Ethernet jack on it, meaning that only one device can connect to the Internet at a time. A router will typically have 4 or more “LAN” jacks for other devices on your network to connect to the Internet, plus all of the wireless devices in your home.
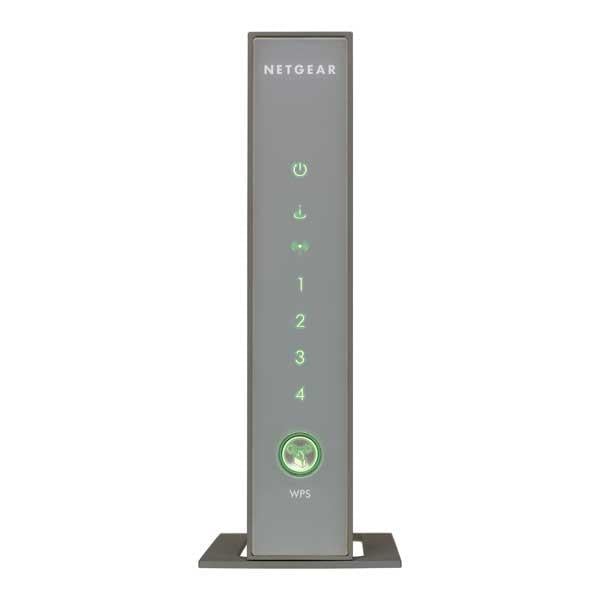
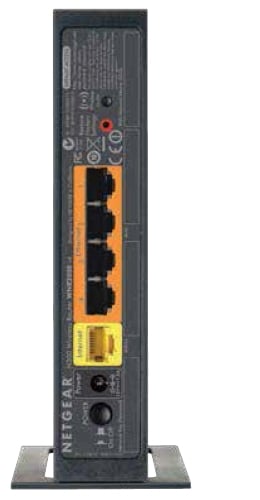
Netgear WNR2000 Wireless Router
Computer – Instead of computer, I could have put “wireless device”, because many different types of devices can connect to a wireless network. Nearly all modern computers, tablets, phones, and game consoles have built-in wireless. The reason I specified a computer is because in this tutorial the best device to use to configure the wireless network is a computer. In fact, it’s best to hardwire the computer to the router with an Ethernet cable. Every time you change a wireless setting, all of the devices on the wireless network will disconnect and with some changes they won’t just automatically reconnect. All of the setup procedures can be completed using a wireless computer, but it will make the process a pain. Seriously, use a hardwired computer for this tutorial; it will make your life much easier.
Okay, now that we’ve covered the three pieces of gear involved, we’ll go through the steps involved in actually plugging in and configuring everything.
1 & 2) Connect the modem and router
The key to successfully setting up a network is to hook up and power on devices in the proper order. First, connect the coax cable (or phone cable for DSL modems) from the wall to the modem. Second, connect an Ethernet cable from the modem to the “WAN” jack on the router. This jack might also be labeled “Internet” and/or be colored differently than the other Ethernet plugins on the router.
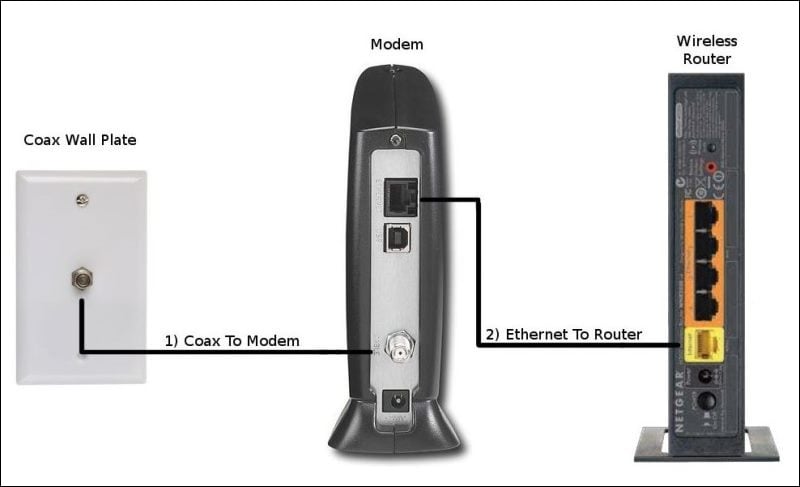
Steps 1 & 2
Editorial Note: Remember that if you have a wireless gateway (i.e. a modem with built-in wireless) then you do not need a separate router. In fact, you should not try to use a separate router combined with a gateway without advanced knowledge of home networks, particularly the functions of DHCP. If you have a gateway, simply connect the coax or phone line to it and power it on, wait a few minutes, and skip to step 5.
3 & 4) Power on modem then router
Connect the power cable from the wall to the modem. The modem will take a few minutes to fully start up. On the front of the modem should be a light labeled “online”, ensure that it is solid before proceeding. If you can’t find that light, just wait a few minutes for the modem to start and connect to the Internet. Next, connect the power cable for the router. Again, wait a minute or two for it to start up completely. Some routers have an “Internet” light that will turn solid once it’s started. As always, you can consult the product manuals to find out what the various lights mean.
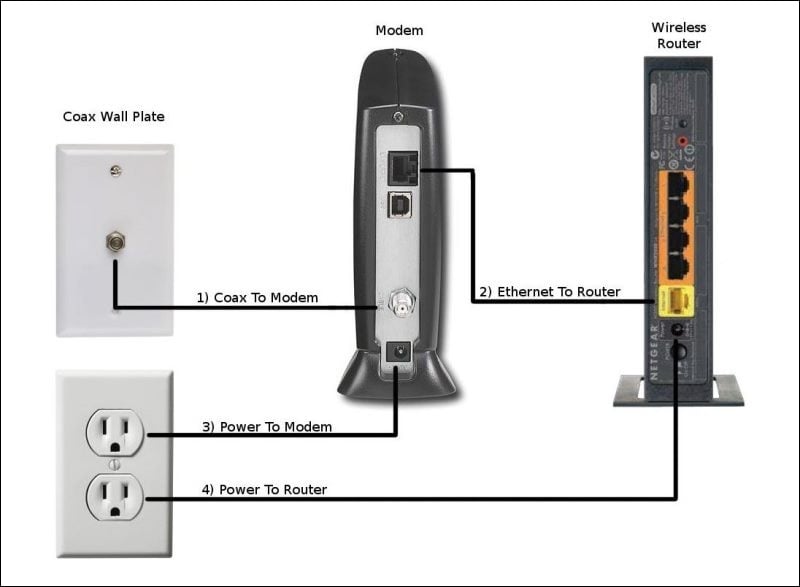
Steps 3 & 4
5) Connect computer and login to router
Now you can connect your computer to the router using an Ethernet cable. Most computers only have a single Ethernet jack, so connect the cable form the input on the computer to one of the jacks labeled “LAN” on the router. Most routers have 4 LAN connections, any one of them will work fine. Give the computer a minute or two to connect to the Internet. At this point, we can test that everything is working. Simply click this link: www.google.com. Did an Internet browser pop up and take you to Google (figure 1 below). If the answer is “Yes”, then everything is perfect so far. If, instead, your browser was not able to load Google, there are two possibilities. First, it’s possible that everything is setup properly, but your router took you to a different page on purpose. Some routers will take you to a sort of intro page the first time you go online. You should be able to tell if that’s the case by reading the page you were given. Second, if you receive a page like figure 2 below, the modem/router may not be online. Disconnect power from both devices (For good measure, turn off your computer as well). Then repeat steps 3&4, then power on your computer. If at this point you are still not able to connect, I would call your Internet provider for help.
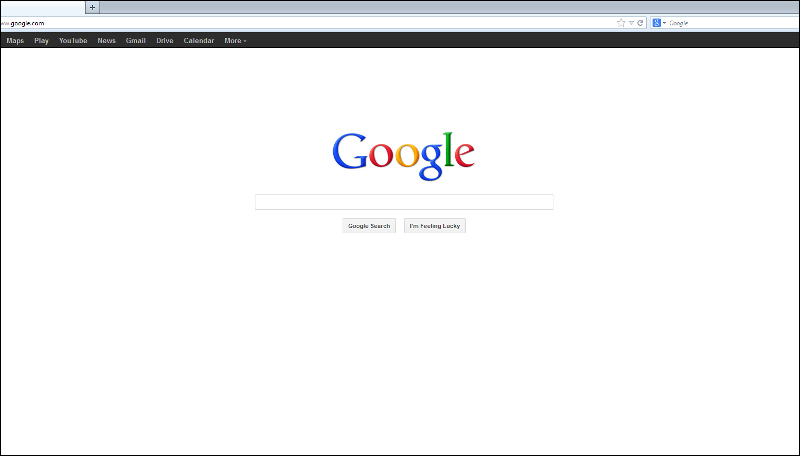
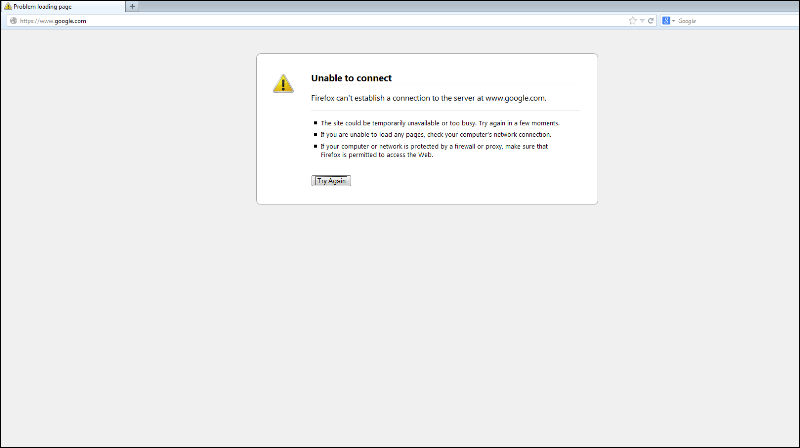
Figure 1- Good :) Figure 2 – Bad :(
As of right now, you are done making physical connections. Now we need to login to the router using the computer and start changing some internal settings. After that, we will update the firmware (Step 6), set the wireless name (Step 7) and security (step 8). It’s possible that your router came with a unique name and password already setup. If so, you could leave everything as is. However, I would highly recommend following the rest of this tutorial to customize the network so it works best for you. If your router can with a setup disk, you could use it at this time and jump to the last step in the tutorial. However, I’ve found that those discs are oftentimes more of a pain than they are worth. Feel free to try it, but proceed at your own risk. I would recommend setting it aside and following the rest of this tutorial.
Before we can adjust any settings in the router, we need to actually login to it. We have a separate tutorial to show you how to login to a router. Once you are logged into the router, you can continue to the next step.
6) Update firmware
Updating the firmware on a router can fix major and minor flaws, as well as add new features. It should always been done when setting up a router. Additionally, If you ever experience weird issues in the future, you should check to see if the firmware is the most current version. Good manufacturers continue to update the firmware for their routers for a long time after the router is no longer in production.
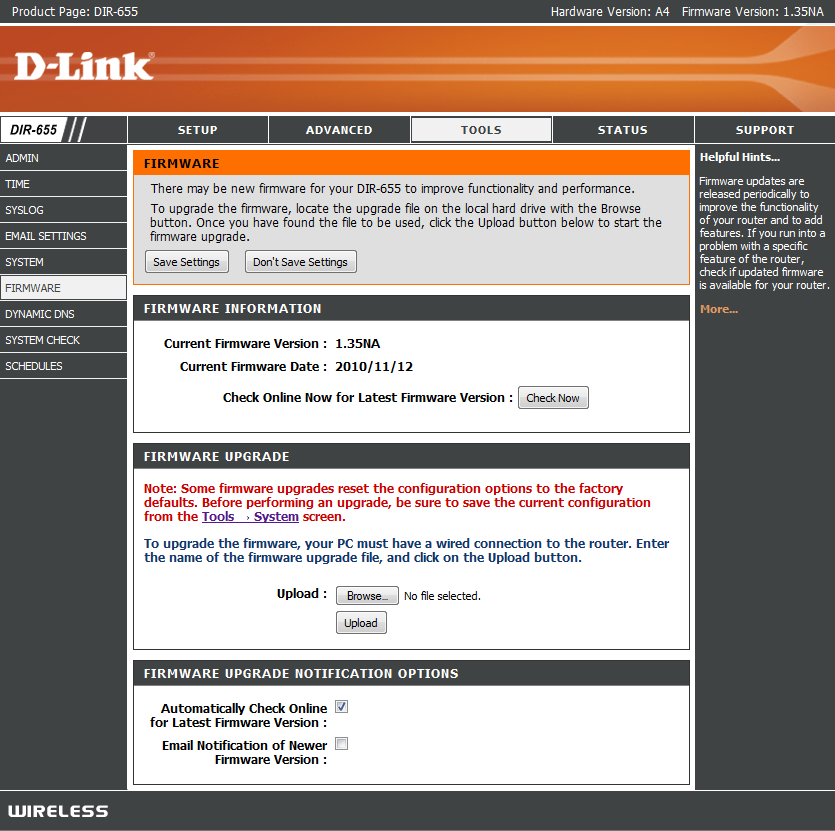
D-Link DIR-655 Firmware Upgrade Screen
The firmware setting is buried in a slightly different spot in the menu of each router, so you will just have to poke around a bit. It’s often under an “advanced”, “admin”, or “tools” tab. After locating the firmware section, you will need to determine if it already has the most recent version installed. Also, don’t assume that just because it’s a new router it has the newest firmware.
Some routers will have an “automatic” option that will check for, download, and install new firmware. For those not so lucky, you will need to download the newest firmware from the manufacturers’ support site and save the file somewhere on your computer (here are links to the support sites for some major manufacturers: Linksys, Netgear, Belkin, D-Link). I normally save files to the “Desktop” to make them easy to find. Once you have downloaded the proper firmware, use the “Browse” button in the router setup page to find and select the file. Once the firmware update process starts, do not do anything! Let it run its course. The router will likely take a few minutes to reboot. If you interrupt this process you can ruin the router. Once the firmware is updated, you may have to log back into the router.
If you are having trouble with the firmware upgrade process, don’t sweat it too much. You can just move on to the next step. However, if you ever start to experience unexplained issues in the future, it’s very possible that outdated firmware is the culprit.
7) Set wireless name/SSID
Every wireless network has a unique, customizable name, also called an SSID. When your computer shows you a list of all of the available networks, you’re seeing the SSID (name) of each network. In the image below, you can see a list of available networks as displayed on Windows 7. You need to decide on a network name that is different than any other networks in your area, but remember that this information is public. This is not a password. Avoid using a last name or any other information that could identify you, like your address. Try something generic, like a sports team or hobby. Avoid using any special characters, and stick to letters or numbers. Also avoid making it unnecessarily long. A good SSID would be something like “Vikings Fan” or “North Dakota Rocks” (got to represent my home state). In the image below, the name of my wireless network is “Your Best Friends”.
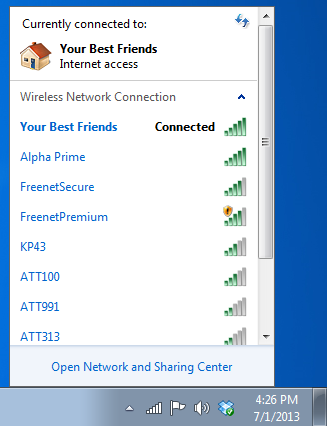
Network List
If you are setting up a dual band router, you will see an SSID option for each network. Do not use the exact same name. I typically keep the first part of the SSID the same and then add “5g” at the end of the SSID for the 5 GHz network, and “2g” or “2.4g” at the end of the 2.4 GHz network. For example, the two networks might be “Vikings 2g” and “Vikings 5g”. Once you have decided on a name, save the network settings. Your router might take a few moments to update.
8) Set wireless security
Next, we need to set up security on your network for two reasons. First, to keep unwanted guests from logging on and using up your bandwidth. Second, to keep people from eavesdropping on your network activity and stealing important data. Just like there are different wireless protocols (remember 802.11g, 802.11n, and 802.11ac?), there are different security options. WEP used to be used most often, but it is easily hacked and should be avoided. The next best option is WPA, which is far more secure than WEP. However, WPA2 is the newest and preferred security option. It might also be called “WPA2 – AES” in your router setup screen. Simply select it as the security type. While you're poking around the security settings we recommend disabling WPS. It allows you to connect equipment to the network without actually knowing the password, a cool feature designed for convenience. You click the WPS button on the router, then the WPS button on the device you want to connect, and presto, it's connected to the network. Super convenient, right? Yes, it is, but unfortunately it has well document security flaws as well.
Next, you need to choose a password. It can be between 8 and 63 characters. You can use a combination of uppercase and lowercase letters, numbers, and special characters. While a longer, more complex (or random) password is better for security than a short, simple password, it can also be more difficult to remember. It can also be a pain to enter in. I would recommend at least using one uppercase letter and one number in your password. Avoid using easily guessable phrases, and swapping out letters for numbers, for example, “3” in place of “E” is not very effective. No matter what you choose as a password, write it on a scrap of paper and tape it to the router. If the password is so easy you are positive you can remember it in 6 months, it’s likely a low quality password.
Editorial Note: Some old devices will not work with WPA or WPA2. If you have an old device that won’t connect after setting up your router with WPA2 security, try changing the security to WEP, or simply turn off all security and then try to connect the problem device again. If it connects, then we know the connection problem was related to WPA or WPA2 security. I would recommend upgrading the wireless card in that device or hard-wiring it to the network. I would NOT recommend compromising the security of the entire network just for one outdated device.
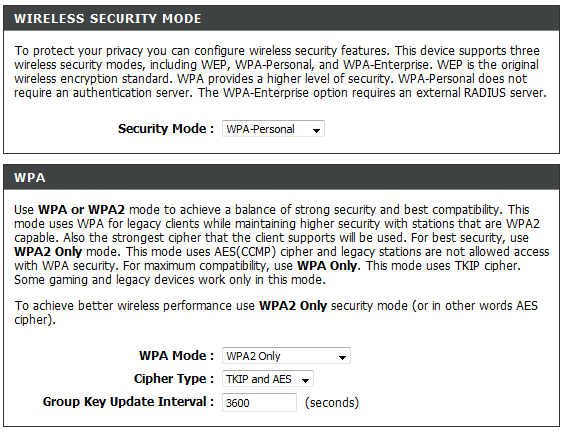
Wireless Security Selection
9) Optimize performance
Technically, step 9 is optional, but we highly recommend following it. As of right now, you have completed all of the basic setup steps and are ready to rock and roll. However, wireless is a finicky beast. Just because you have a good router and a fast Internet connection doesn’t mean you will have a strong wireless signal and fast wireless Internet everywhere in the home. There are a multitude of factors that can slow down or interfere with the signal, including old devices on the network and competing wireless networks from surrounding homes. There are a number of easy ways to optimize the performance of your router to overcome these, and more, problems. The easiest improvement you can make is moving the router to a centralized location in the home and away from other electronics. Beyond that, if you want (or need) to squeeze every last drop of performance from your router we have a guide to help you boost the speed, range, and reliability of your network.
Conclusion
Congratulations! You did it! You can now carry your wireless devices all over your home without the worry of neighbors using up your bandwidth. I'll leave you with one final tip about troubleshooting. If you ever call your Internet Service Provider because you can't get online they will always have you power-cycle your gear. This process solves 90% of the issues out there. Simply unhook power from your modem and router. Wait a minute. Power on the modem, wait a few more minutes, then power on the router and wait another couple of minutes. Try to connect again. Sound familiar? Power-cycling can solve a wide range of issues and is a good practice for all electronics, including TVs and phones. With that last bit of knowledge, you are basically ready to start up your own IT business. Really, you're like an expert or something. Don some thick glasses, load up your pocket protector, hike your pants up a few inches, grow a nice creepy mustache and embark on the IT career of your dreams.
Cliff, like many of us, has always loved home theater equipment. In high school he landed a job at Best Buy that started his path towards actual high quality audio. His first surround sound was a Klipsch 5.1 system. After that he was hooked, moving from Klipsch to Polk to Definitive Technology, and so on. Eventually, Cliff ended up doing custom installation work for Best Buy and then for a "Ma & Pa" shop in Mankato, MN.
View full profile