
Home Theater Multiple Subwoofer Set-Up & Calibration Guide
Rubix Cube Sub
Originally Published: May 4th, 2010
 Got a pimple, spray some Windex on it. Got a sore throat, swish some vinegar and honey. Got a cold? Eat some chicken soup. Home remedies, some are good, others are a mixed bag at best. I spent years conjuring up home remedies or tricks for properly calibrating multiple subwoofer theater rooms. In a perfectly rectangular room with the ability to place identical subs in the ideal locations around the room, this isn't such a daunting task. This is especially true since you can use room mode calculators to help determine the best subwoofer locations before actually placing them in a real room. But what about real world scenarios of people that don't have ideal rectangular rooms?
I suggest if at all possible to select a rectangular room for your theater room. This is a proven CEA/CEDIA recommendation for good reason. In rectangular rooms, bass reproduction is more predictable, making it virtually an exact science when choosing the ideal subwoofer locations and doing room analysis. This greatly minimizes trial and error, allowing for a more scientific and methodical approach. There are, of course, no free lunches - which means there are trade-offs for all listening spaces, even perfectly rectangular rooms.
Most of us don't have dedicated rectangular shaped rooms for home theater but instead have multi-purpose recreational rooms that double as a theater room. My hat's off to the fortunate ones, and you probably don't need to read this article since you never get pimples, you never get sick, and your theater room is perfectly calibrated just by plugging it in. For the rest of us, my advice and calibration tips in this article could prove invaluable to you and save you countless hours of frustration. Trust me, I've been down that road before and I didn't come to these conclusions in haste. I spent incalculable hours running sweep tones, testing, moving subs, listening and repeating to the limits of my wife's sanity of having to feel and hear the bass shaking the rafters of our home and rattling the fillings loose in her teeth. Like a dog chasing his tail, I was relentlessly spinning my wheels trying to get the perfect calibration until I came up with a methodical approach that not only saved time but saved my sanity as well. Many of the suggestions and placement tips in this article assume a perfectly rectangular room but also serve as a starting point for any room. Regardless of room shape, these methodologies will work, at least in practice, for most room types.
5 Steps to Better Bass in your Home Theater
In order to take advantage of the information in this article, you will need the following items:
- SPL meter
- RTA or FFT analyzer with at least 1/12th octave resolution
- Patience and perseverance
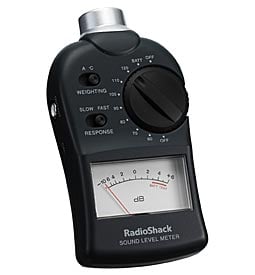
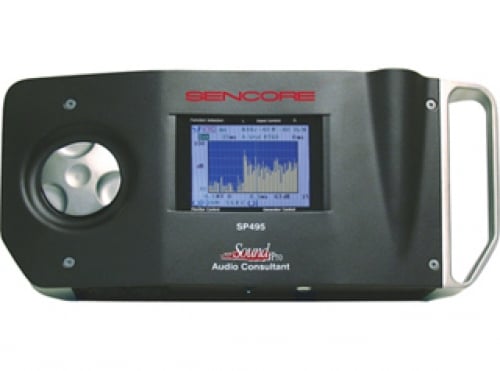
Radio Shack SPL Meter (left); Sencore SP495 FFT Analyzer (right)
The purpose of this article is to provide a method of achieving the smoothest bass response for all listening seats using proper placement, calibration and active equalization (when needed). The goal is met when measurably better performance is achieved by reducing excessive modal peaks and nodal dips across the entire bass spectrum (15 Hz to 200 Hz). +-10dB or better for this frequency spectrum should be attainable for the primary listening area. This is accomplished via proper placement and set-up of multiple subwoofers resulting in standing wave reduction through destructive interference. It is assumed the reader is knowledgeable on how to properly use an FFT or RTA analyzer to properly measure system response. Instructions about how to use such equipment can fill an entire article on its own, which is outside the scope of this article.
If the subs are properly setup, very few or no low frequency passive room treatments will be required as they tend to be cost prohibitive and space intensive. But, they can be a useful tool in helping to improve bass response, though they go beyond the scope of this article. You can read many articles on bass traps in our Acoustics section of the website.
The Benefits of Multiple Subwoofers for Home Theater
Step 1: Choose your Subs Wisely
 Ideally you should use identical subwoofers for the best overall performance, but it is possible to mix and match subwoofer brands and types if you're willing to do the extra work. If using mismatched subs, bear in mind that systems with different low frequency cutoffs may well be in phase and additive over most of their band, but at or below system resonance may well be out of phase. This can put us in the position of having the sub with a higher cut-off frequency reducing overall system output below its cutoff frequency. This is why we usually recommend using identical subs all around.
My primary theater room consists of two ported subs and two sealed servo subs. Had it not been for the fact that my servo subs of choice (Velodyne DD15's) have such an enormous array of configuration options such as adjustable EQ, adjustable high pass and low pass slopes, variable phase, etc, I would have not been able to pull off the integration of all four subs so well. This is a point to consider when using mismatched subs or purchasing a subwoofer.
Decide how many subwoofers you can afford and logically place in your room. It's usually a good idea to place either two or four subwoofers in your room. Odd multiples of subs don't work out so well in rectangular rooms (research conducted by Devantier, Welti of Harman Labs) but they can work just fine in odd shaped rooms without perfect symmetry. We usually don't recommend more than four subwoofers as it's not only overkill but can cause more problems than it solves, especially if the subs are placed in non optimal locations. For instances where more output is needed, you can exceed the four sub rule as long as you limit your placements to up to four locations. So in such cases you can stack subwoofers on top of each other in the locations that are best suited for optimal performance.
Step 2: Location Location Location
You hear this often from real estate agents that location is everything. Well as an audioholic, I can tell you the same applies for speaker and subwoofer placement. Location is critical and is your first line of defense for minimizing calibration heartache and ensuring the most consistent sound across all of your listening seats. Check the old school mentality of calibrating for a single money seat at the door. Our goal is a state of the art home theater experience for most if not all of the listeners in our room, sans the mother-in-law of course. You can put her in the corner seat closest to the bathroom, and just as long as you keep her happy with snacks and beverages she will love you for it.
We have covered subwoofer placement to death in various articles on this site with the two most recent and relevant being:
However based on recent research from Dr. Floyd Toole's book "Sound Reproduction" as well as the CEA/CEDIA-CEB22 Home Theater Recommendation, we felt it was time to update multi subwoofer placement options for rectangular shaped rooms. Experimentation in placement will be needed for odd shaped rooms however, and even in perfectly rectangular rooms, these diagrams should not be interpreted as a biblical source. You must measure and experiment to determine the ideal locations in your room.
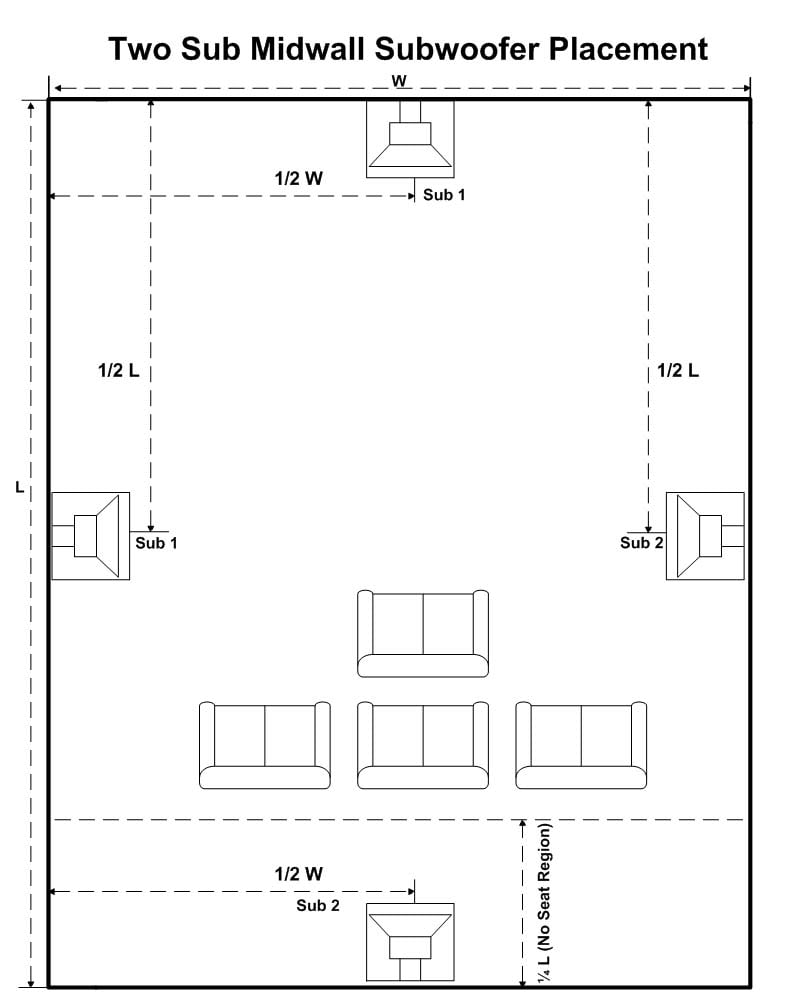
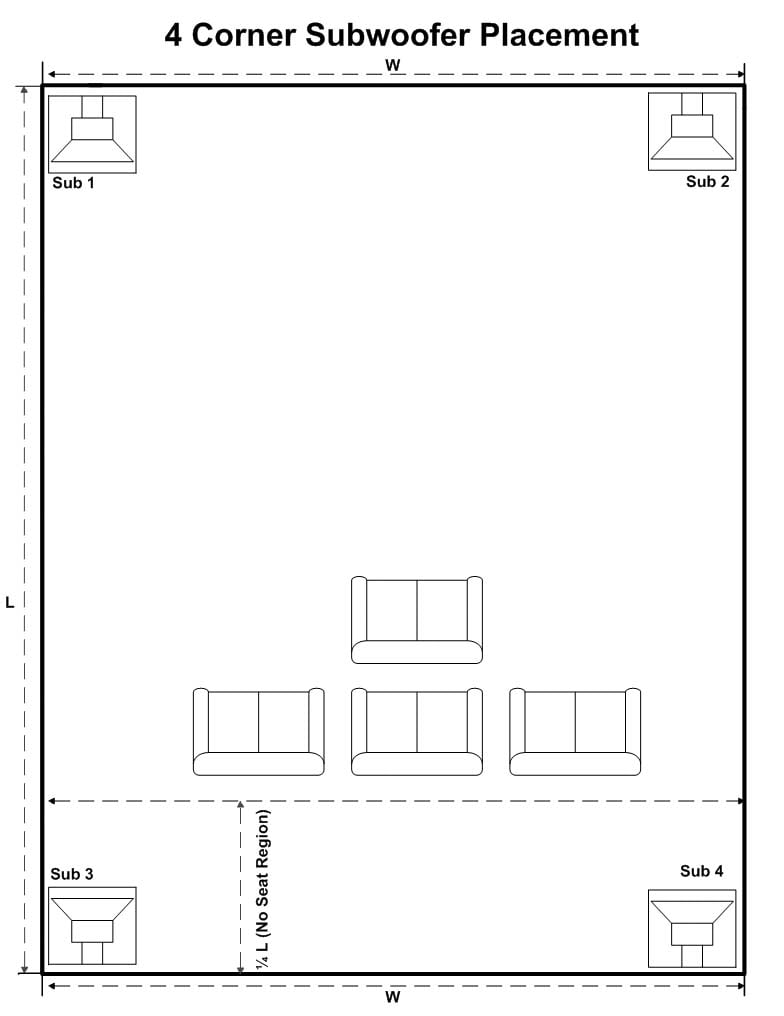
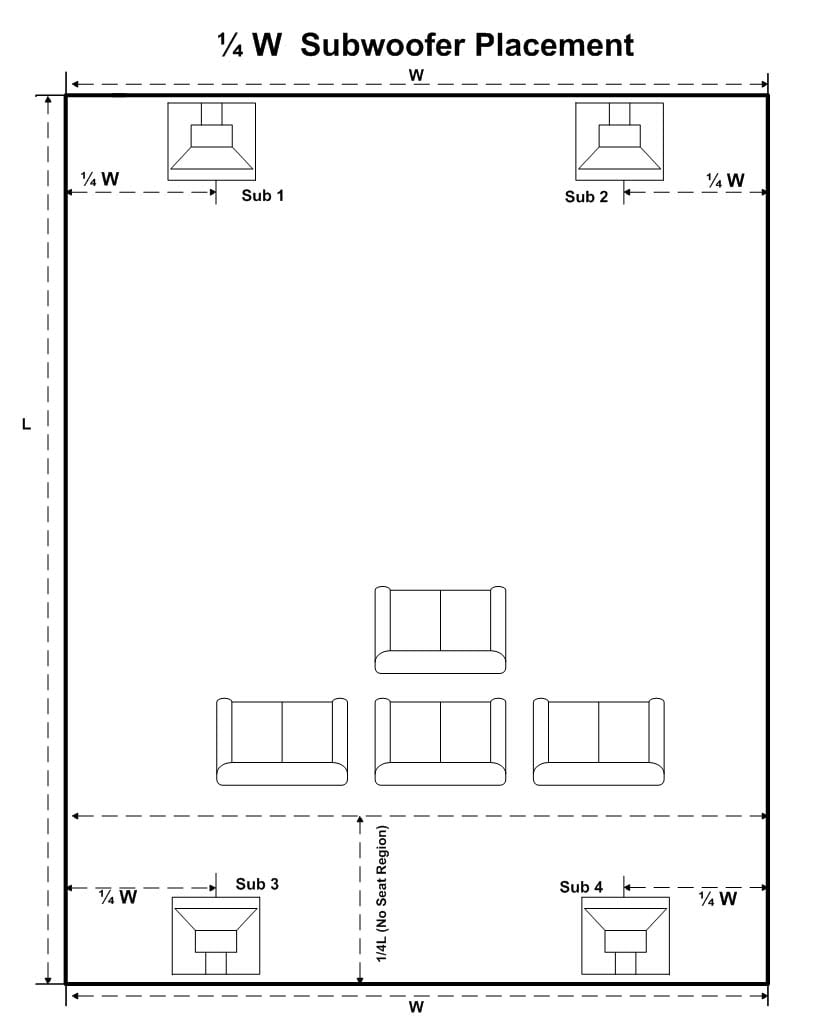
Figures: 1a. Two Sub Midwall; 1b. 4 Corner Placement; 1c. 1/4W Placement
Note: The distance from the walls to the subs should be measured at the acoustical center for each sub which is usually near the dustcap of the drivers.
Figure 1a. Two Sub Midwall Placement
If you are running two subs, the ideal locations for them in a rectangular room are on opposing vertical or horizontal midwalls. Two subs configured in such a method work nearly as good as four subs configured via our 4 Corner Placement recommendation. You will however need to stack two subs for each location to achieve the same output as the 4 Corner Placement unless you chose two subs with twice the output capability of the four subs you were planning on using.
Although it's been incorrectly touted as ideal to place four subs at each mid-wall location (since it offers consistent frequency response for each seat); this is usually NOT recommended because it is significantly acoustically less efficient than just employing a single subwoofer! Thus the maximum available output level of four identical subwoofers placed mid-wall will be at best equal to or at worst LESS than one subwoofer located in the front corner. In our opinion, this is a waste of power and money. We recommend avoiding this option for four subs unless you are stacking them for two locations or if your primary goal is the absolute best seat to seat consistency over maximum output.
Figure 1b. 4 Corner Placement
In you are running four subs, the ideal locations for them in a rectangular room are the corners of the room. Assuming all subs are identical, this will achieve up to 12dB of increased output when compared to a single corner loaded subwoofer. Placing the subs in all 4 corners will maximally reduce standing waves through destructive interference and provide the most linear and consistent frequency response for all seats. Used in conjunction with global equalization, this option provides nearly as good frequency response and seat to seat variation as the midwall placement with the huge advantage in efficiency. This can allow you to use smaller less powerful subs compared to the less efficient 4 midwall placement.
Figure 1c. 1/4 W Placement
Although this isn't spelled out in the CEA recommendation, Dr. Toole references it in his book as a good solution for two subwoofers but suggests additional subwoofers may be needed. In my experience I've had excellent results placing two subs against the front wall at locations of 1/4 the room width. I've had even better results placing two additional subs in a similar manner against the back wall. This configuration can achieve nearly as good frequency response performance as the 4 Corner placement with nearly as much bass gain as well.
Editorial Note about Subwoofer Placement & Combined SPL Output
Placing your subwoofers as symmetrically as possible with respect to the listening area can be useful especially if one favors a particular listening seat but we should attempt to make the bass good for all seats. If your placement options are limited, you will have to use trial and error to compensate by manipulating electrical delay of one or more of the subs (1 ms per foot) via the speaker distance settings (assuming your processor has multiple subwoofer outputs with independent delay settings and channel trims or can artificially add group delay by engaging one of the subwoofers internal crossover slightly (20Hz-30Hz) above or below your processor's crossover frequency.If you can't achieve proper integration, you will have to consider moving the sub(s) to a more optimal location. If your subs are properly summing together, you will potentially gain up to 6dB for every doubling of subwoofers (corner loaded) used minus the loss for mode cancellations. Realize however that anytime you vary time delay, phase or EQ for just a single sub you potentially reduce the effectiveness of standing wave reduction or modal reduction. Be careful not to cancel the modal reducing benefits of multi subs while also endlessly chasing your tail in search of the best settings! The goal is to time align the subs to the room which is NOT necessarily the distance to the listening position. In order for more than one sub to get "traction" against the same room mode they must be symmetrically placed to the mode.
If you can't move your subs to improve bass performance, try moving your seats a couple of feet forward or backwards. Make sure you keep the seats away from room nulls which are typically located at 1/4" the width and length of the room. We want to achieve the smoothest response possible minimizing modal peaks and nodal dips so it's a worthy effort to experiment with subwoofer and seat placement. This will minimize the amount of EQ required later which is always a less effective band aid solution to proper placement Remember even so called "perfectly" rectangular rooms aren't truly rectangular due to door openings, windows, differences in wall construction, etc. Exact ideal subwoofer placement can't always be calculated, sometimes it must be measured. A good deal of trial and error is often needed.
I recommend using room mode calculators as a starting point but keep in mind they are only useful for parallel walls in non rectangular rooms. There are more sophisticated software modeling tools from company's like Rhintek via their program called Cara that appear promising though we will have to do further testing to understand its potential. I also attached a very useful room mode calculator courtesy of HAA Acoustics.
Also recommended reading: Listening Room Acoustics: Room Modes & Standing Waves
THX Subwoofer Calibration Recommendations
When discussing this article with THX, they suggested the following guidelines to follow for proper subwoofer placement and setup in which apply most closely to rectangular shaped rooms. Odd shaped rooms will have to experiment a bit more to find the best positions.
There are a few variations for subwoofer placement, depending on how many subwoofers you have in your room. Small rooms generally mess up the bass with "room modes." The five things that you can do to control it are:
- Choose a room with dimensions so that the modal frequencies do not overlap
- Place the seats where you are not at a modal peak or dip
- Place the subs so they help control the amplitude of the modes
- Use low frequency absorbers to knock off the peaks of the bass
- Equalize (as a last step when everything else has been optimized)
In general for rectangular rooms; if you have four subs, THX recommends starting with one in each corner, if you have two, put them in opposite mid-wall positions, if you have one place it in one of the corners along the front wall. Next listen to the seat to seat variation and move the subs along the walls until you achieve the smoothest bass coverage. Being able to move a separate subwoofer around the room to find the best location many times outweighs the benefits of a "built-in" sub. Follow subwoofer positioning recommendations, perform the proper measurements and always trust your ears. When determining the best subwoofer placement, you should always move your subs around the room to determine how the room affects bass quality.
Multiple Subwoofer - Initial Setup & Measurements
Step 3: Make sure all of your subs are playing the same tune
Trust me on this one. It becomes quite problematic trying to integrate multiple subs if they aren't playing the identical signal. Stereo subs can work if your processor accommodates such a provision while also sending LFE signal to both, but at that point its really no longer stereo since the subs share mixed L/R info. Most processors don't - and even the ones that do usually don't accommodate simultaneous calibration of both subs, a critical measure we will get into in step 6 when using auto EQ systems.
Make sure you disable the internal Low Pass Filter (LPF) of each of your subwoofers or set them to the highest frequency setting to avoid deleterious interactions with the bass management of your receiver/processor. Also set the phase to each sub to zero degrees. In only rare instances do we suggest trying to gang the crossovers or vary phase, which is discussed later in this article (step 5).
Editorial Note on Multiple Subwoofer Connections and Setup
Set up your A/V processor/receiver so it's playing in "stereo" mode with the main channels and subwoofer channel both active. On some processors you must set the bass management to "Both" or "LFE + main" in order to ensure the subwoofers are active for two-channel sources, especially if you decide to set the main speakers to "Large". In most cases, we recommend setting all speakers to "Small" when using dedicated subwoofers to avoid overlapping of bass frequencies between the speakers and subwoofers below the crossover transition region. However there are instances where setting the main speakers to Large can provide a better blend with the subwoofers at and slightly below the crossover frequency. Assuming the speakers can handle a full range signal at reference levels, this option should not be ignored.
If your processor has only one subwoofer output, its time to get a y-splitter to feed that output to all of your subwoofers. If your processor has multi subwoofer outputs and can be configured to play the exact same signal for each output, use it. The bottom line is you want all of your subwoofers playing a mono signal that consists of all channels set to "Small" plus LFE info. Some processors/receivers like those from Denon allow for multiple subwoofer outputs where they assign two of the subs for stereo operation and a 3rd sub for LFE. The problem with this is when listening to two-channel sources, only the stereo subs will play and when listening to sources with LFE info, only the LFE sub will playback that info. The other problem with separate Sub and LFE assignments is that they can share bass signals and interact destructively. If you are relying on the modal averaging from all the subs, they must be playing the exact same signal all of the time for all sources. Use the "mono" feature to accomplish this.
As a side note, the new THX Big Room specification calls for four sub outputs from a single summed bass crossover with separate delays and level for each sub, but no individual EQ. This is a great step forward and we can't wait to review products that are designed to this specification. Users must be warned however that using different levels and time delays for each subwoofer requires a computer and sophisticated software such as the SFM system from JBL Synthesis to determine the best alignment in order to realize the standing wave reducing benefits multiple subwoofers properly positioned can offer.
Step 4: Level Match ALL of the subs
 It's important to level match all of the subs relative to each other as closely as possible. Failing to do so may result in poor integration and even cause the ones set higher than the others to be overdriven during loud passages. This can result in considerably higher distortion than your system is capable of for a given SPL. The proper way to level match your subs is to use the internal pink noise generator of your processor and an SPL meter set for slow response "C-weighted". Check the level of each sub independently by turning off all of the other subs not under test. Verify the level equidistant for each sub. Alternatively if you want an easy quick way to level match subs, measure each subwoofer's nearfield SPL by placing the microphone on the floor, about 4 inches from the surface of the cabinet that contains the subwoofer. If the system is a vented one, the mike should be approximately halfway between the center of the woofer cone, and the center of the port. For subwoofers with multiple drivers, this may not give you the most accurate results which is why we usually recommend measuring SPL at equidistant positions for each sub which may not be at the primary listening seats. Once you have all of the subs playing at the same output level with respect to each other, its time to calibrate the summed subwoofer level to the main channels or center channel.
Verify the SPL level at the primary and secondary listening positions for your main channels, center channel and combined subwoofers. Write this down and chart the SPL levels so you can make final adjustments more accurately. Ideally you want the subs each playing at the same level but you can boost their summed output a few dB above your main speakers once you flatten their summed response out which we will get to in step 6. It's a good idea to measure the SPL at least two locations and calibrate them to within 1-2dB of each other to ensure they are more closely level matched for your listening area. In fact THX suggests that you shouldn't rush your measurements. Take your time when performing SPL and RTA measurements. THX recommends each measurement take at least 20 seconds. Some professional calibrators recommend up to 1 minute. This ensures you get an accurate measurement at each subwoofer position. Why? Pink noise isn't always steady at low frequencies. Noise is by definition, random. The longer the analyzer spends averaging the signal from the pink noise, the less likely the SPL measurements are to contain errors due to the random nature of pink noise. Take your time to get a good average measurement. It's worth it in the long run.
Chart your results in a table as shown below.
| Subwoofer | Seat #1 | Seat #2 | Notes |
| Sub #1 | |||
| Sub #2 | |||
| Sub #3 | |||
| Sub #4 | |||
| Main L/R | |||
| Center |
Note: some calibrators match the sub levels to the main channels while others match to the main channels with the center channel running. We have found this to be a subjective preference that you must determine what sounds best to you.
Step 5: Measure the Initial Results
Before we start getting into auto setup or active equalization, let's get a level set for where we are. It's critical that we get the best possible blend between our main front speakers and the subwoofers. Some would argue the center channel to subwoofer splice is most critical. If you primarily listen to multi-channel music and movies, this may well be the case. However, we tend to be far more critical of two-channel audio listening than trying to determine if we are not getting a good bass blend between the center channel and the subs during instantaneous action scenes in movies. If you're listening habits favor two channel music sources, then it's best to calibrate the subs to the front main channels. If you favor more movie watching over music, then calibrate with respect to the center channel.
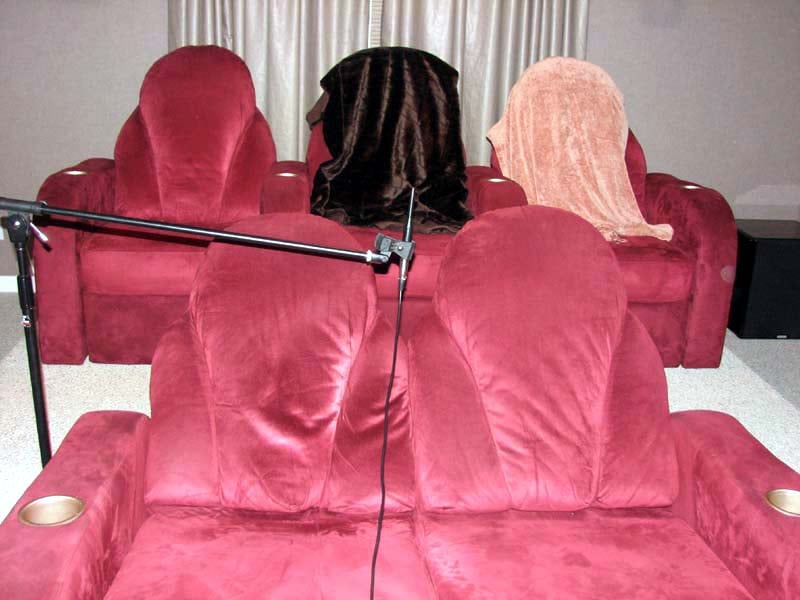
Plug in your RTA or FFT analyzer to an unused analog left and right input of your processor, position your mic at the primary listening position at ear height and let the fun begin. (If one is doing a high Q tuning, ear level is likely appropriate. If one had only a few filter sections of relatively low Q available for tuning, putting the mic on the floor at the listening location will probably give you a better measure of the overall power output of the system at low frequencies.)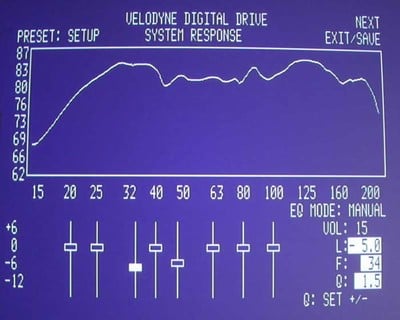 Set the frequency response scale of your RTA to plot between 10Hz to 200Hz with a 60dB range of the amplitude scale to get a clear picture of what is going on with your systems bass response. Make sure you have a resolution setting of at least 1/12th octave resolution or better. I see so many people using the display from the Velodyne SMS-1 as a method of measuring their system's bass response - not realizing the resolution of their display is a smoothed 1/3rd octave which is virtually useless at determining how to properly equalize and fix bass issues. Such low resolution measurement systems do a poor job of seeing the much higher Q problems which typically plague rooms, and need to be removed with a scalpel, not a saw. It's important to have enough resolution to accurately dial in the response.
Editorial Note about Resolution by. Dr. Floyd Toole
1/3-octave resolution is a crude approximation of "critical bandwidths" which represent the bandwidths over which loudness summation occurs. However, within a critical band multiple tones or overtones interact with each other to produce beats and something called "roughness", both of which are important contributors to timbre/sound quality. The engineering reality is that bass room modes behave as minimum phase systems and it is necessary to be able to match the shape of a parametric EQ to a peak so that the resonance is damped, not just turned down. This requires high resolution data.
After taking a baseline measurement of your primary listening position, try varying the following parameters to see if you can achieve measurable improvements (ie. Smoother and flatter bass response, less peaks and less nulls).
- Main speaker size: Large / Small (only consider the "Large" setting if its measurably beneficial and your speakers can handle full range signals at your highest preferred listening level without bottoming out)
- Main speaker crossover setting (for multi crossover receivers/processors)
- Subwoofer distance
- Subwoofer phase (typically most effectively manipulated to find the best blend between the subwoofer/satellite system at the crossover frequency). You can have success using this adjustment as a tool for better bass integration as well since most phase switches on subs are 0 to 180 degree switches, which affect ALL the frequencies. Further, the variable phase controls found on some subs affect at least an octave on either side of the crossover frequency. We usually recommend leaving this at the zero setting for all subs but you can experiment by varying the phase of one sub at a time to see if it makes a measurable improvement to the combined output.
I don't recommend varying the crossovers of your A/V processor more than 20Hz from the usually optimal and THX recommended 80Hz setting. We have found some processors have a tendency to truncate LFE info if you set the crossover below 80Hz. Setting the crossover too high causes the subwoofers to be localized especially if some of them are collocated near the listening area. It is entirely feasible however that 100Hz may work better with the small satellites. The stereo effect below 150Hz is very minor, and depending on the sensitivity, distortion and native cutoff frequency of the mid-high speaker, a crossover point at 100Hz may give you the best overall sound. Experimentation is the key here. If you're running really small satellite speakers that require a higher setting than you should consider replacing those speakers or placing your subs as far away from the listening area as possible to avoid localization.
Again it's usually recommended to keep all of your speakers set to "Small" to achieve the most optimal blend to your subwoofers and to ensure maximum dynamic range from your speakers by taking the heavy bass duties away from them. Removing the lowest frequencies from the mid-high speakers will lessen the distortion of those speakers and driving amplifiers!
Subwoofer distance is critical to ensure proper blending with the speakers and also each other. If you're running independent subwoofer outputs from your processor for each of your subs, properly set the distance to each respective subwoofer. If your subs are perfectly placed in a rectangular room than a single delay setting will work for all four subs and is in fact essential to maximize standing wave reduction.
However if your placement options are less than ideal, you may have to manipulate delay settings for each sub. In such cases, try averaging the distances between grouped subs (that share the same sub out of your processor) and your listening area. Basically if you have sub 1 located 10ft away from the listening area and sub2 located 8ft from the listening area, enter the average distance into your A/V receiver/processor (10+8)/2 = 9ft as a starting point. This can vary a bit depending on any added group delay caused by the subwoofers internal DSP processing (if any) as well as room interactions. In speaking with Gerry Lemay of HAA, he recommends measuring the combined (LCR plus Subs) output at the crossover frequency and adjust the time delay until you achieve the highest sound level.
Editorial Note on Subwoofer Distance:
If we are using an 80 Hz sub crossover frequency we can create a 180 degree phase change for the sub channel in the pre/pro by adding or subtracting a distance of half of the crossover's wavelength (for 80 Hz that corresponds to 7 foot). It makes little sense to add or subtract more that 7 feet in this instance because you've run through 180 degrees of phase change.
Once you've achieved the best measurable response at the primary listening position, repeat this procedure for the next best seat or secondary listening position. Try to find a combination of settings that yield the best response for both locations. You can expand this for more seats but in my experience if you've done a good job for the two main seats (ie. front center row and back center row) the other seats will usually benefit as well. Again the better you properly position your subs, the less guess work and tweaking you will have to do to attain consistent and optimal frequency response for all listening seats.
 Real In-Room Measurements
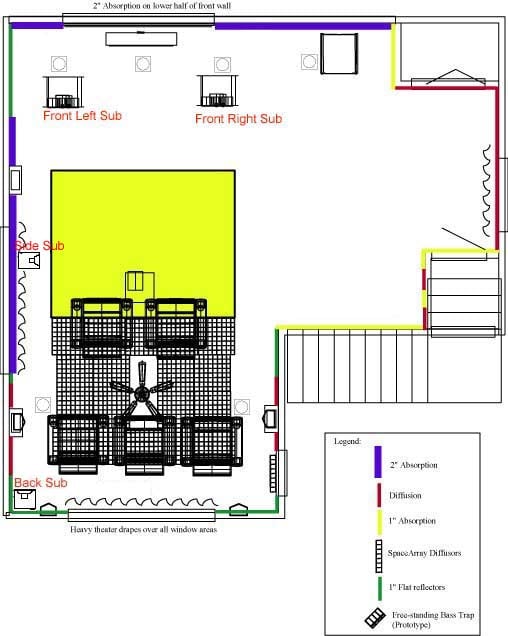
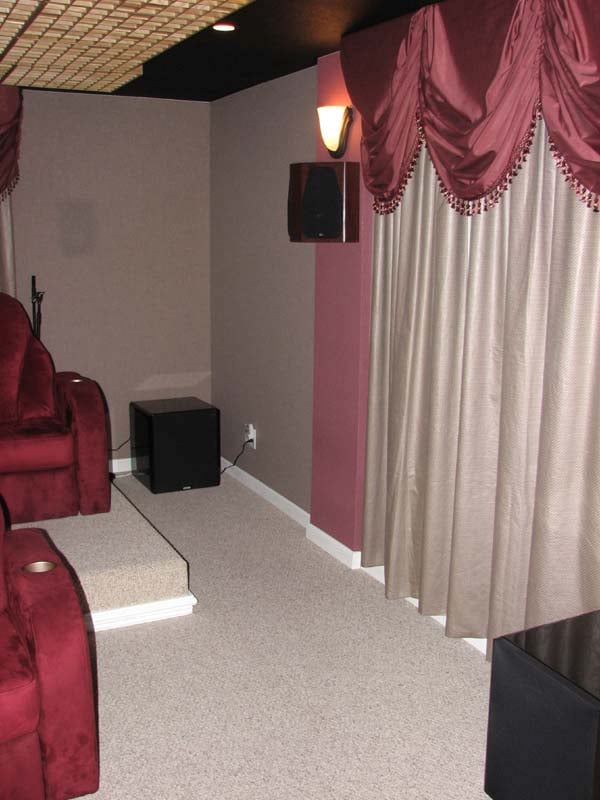
My theater room is very challenging due to the asymmetry of the front which makes it L shaped. Thus I was unable to take full advantage of modal averaging multi subs offer properly placed in a perfectly rectangular room. My room was a challenge not only for bass but for getting the main channels to image well. I was very fortunate to have Auralex Acoustics help me bring back some symmetry in my room with passive acoustical treatments. However there are almost no passive treatments effective below 100Hz so I had to get clever by tactically placing four subwoofers in my room and equalizing them with Audyssey MultEQ Pro. The big help was placing two subs in pressure zones of the room that are close to the listening area. As long as you cross them over low enough (80Hz or lower), they won't be localizable.
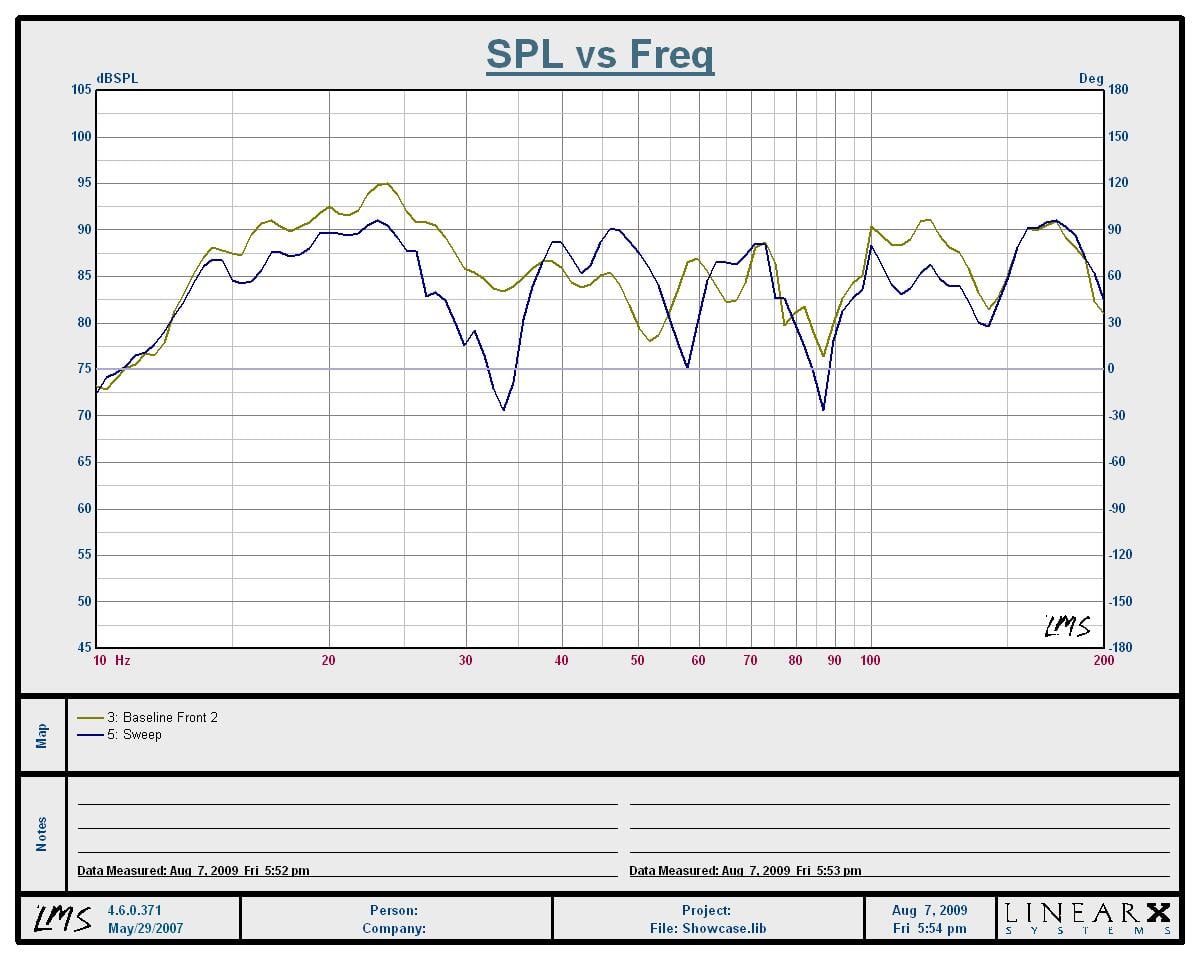
Using LMS, I measured the frequency response at the two most important seats in my theater room, the front row center, and back row center. I measured the response at these two locations when playing the front left sub, both front subs and all 4 subs with the main speakers set to "Small" and the crossover set to 80Hz.
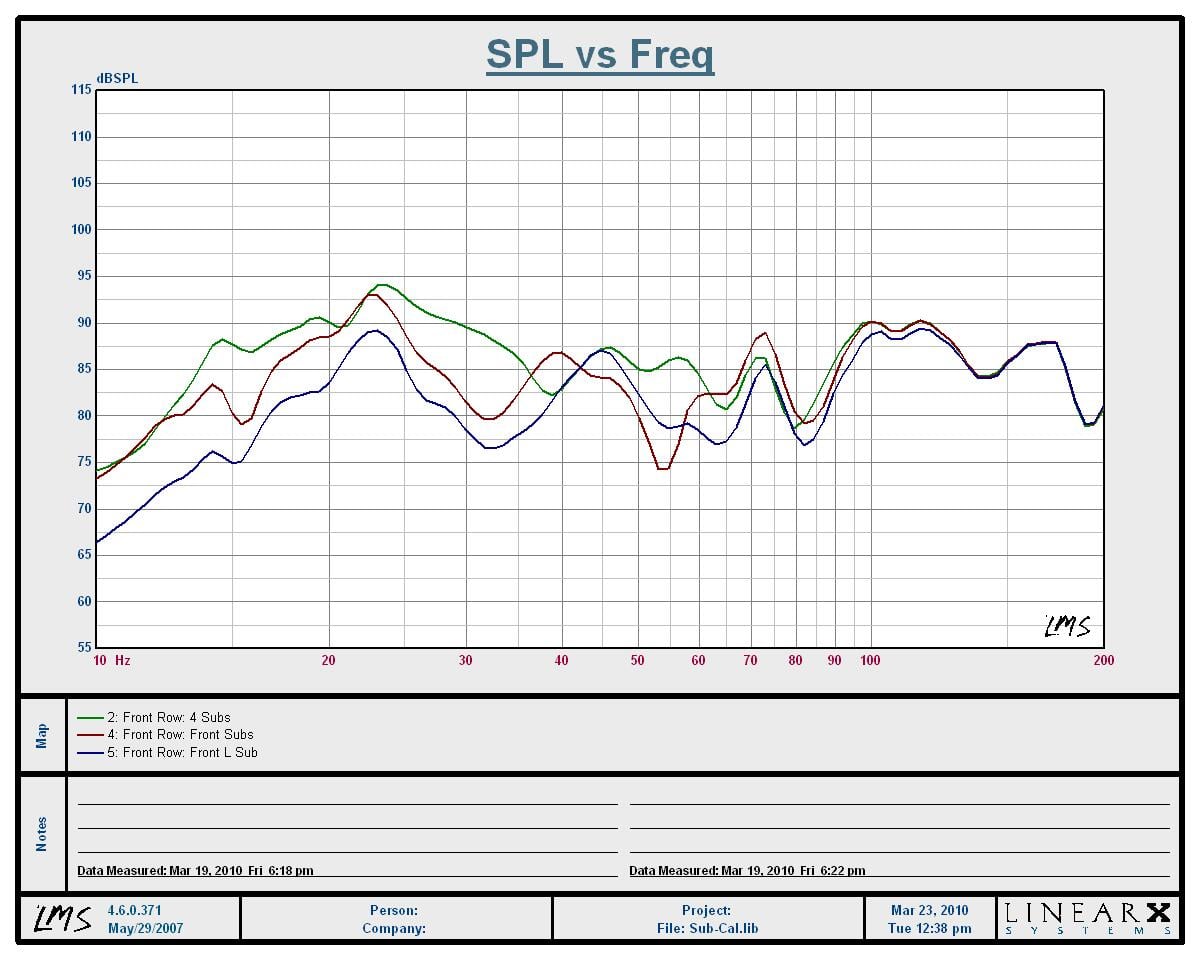
Frequency Response vs SPL - Front Row (1/12th Octave smoothed)
Green: all 4 subs; Red: front subs, Blue: Front Left sub
The bass response for just the Front Left RBH T-30LSE subwoofer (Blue trace) exhibits lots of peaks and nulls yielding a bass response of +-7.5dB from 17Hz to 150Hz which while not quite terrible is certainly not the best we can do. Introducing the Right Front RBH T-30LSE subwoofer (Red trace) into the mix adds significantly more output below 40Hz, but didn't help much to smooth out the bass response. Unfortunately since the RBH subs are part of the front speakers, I was limited in what I could do to optimize their position for the smoothest bass, so EQ is a must to better integrate them; but should not be used before we have all 4 subs playing nicely together. Having all 4 subs playing together (Green trace) helped to smooth out the bass response in the front row, although there was a lot of room gain below 40Hz. This is where EQ is a needed tool as can be seen in the next section where we employ Audyssey MultEQ room correction.
Let's move on to our second most important seat my theater room, the back center row. This is where I sit mostly when viewing movies or listening to multi channel music since this row offers more surround sound immersion and is also a bit more tactile response due to it being closer to the back wall and also being propped up on my riser platform.
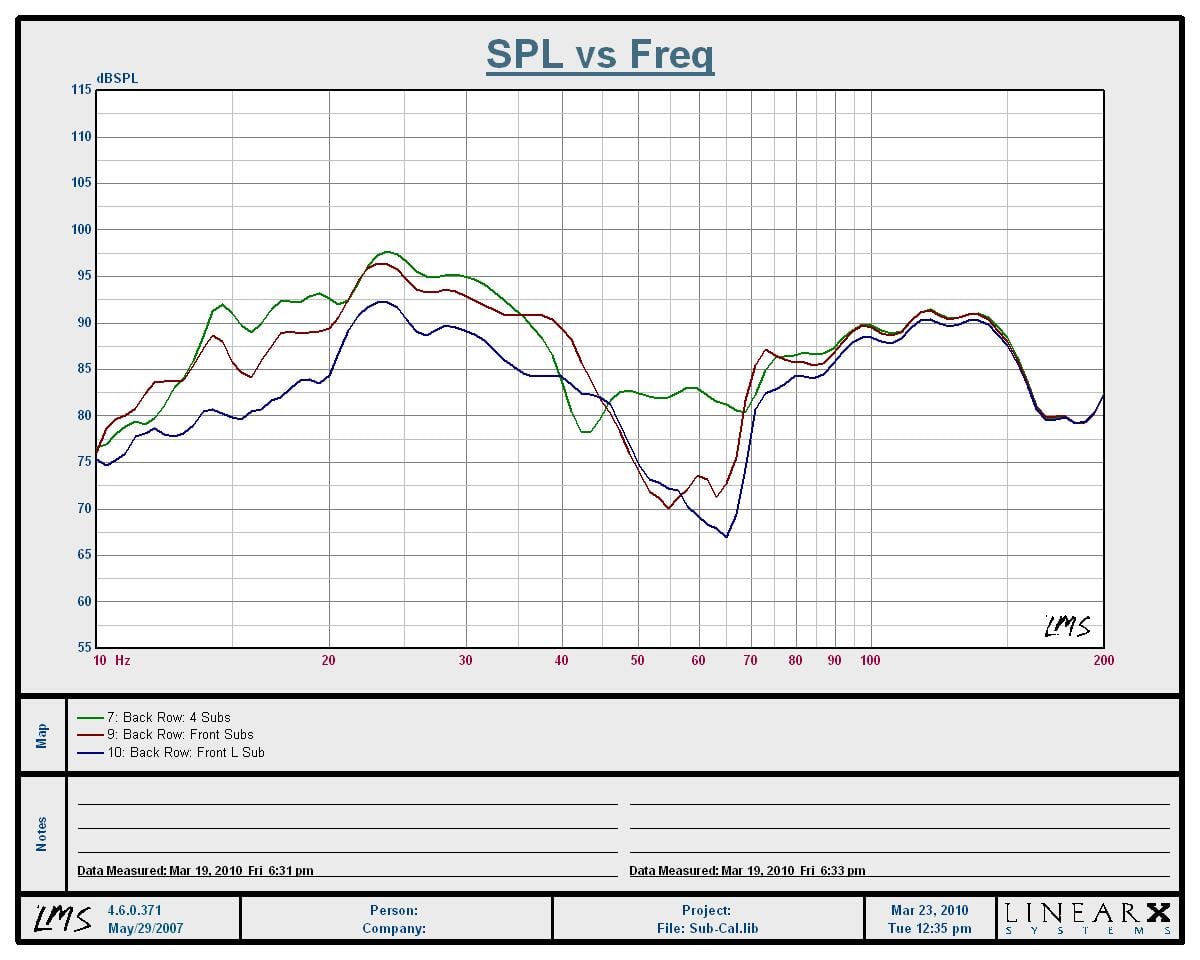
Frequency Response vs SPL - Back Row (1/12th Octave smoothed)
Green: all 4 subs; Red: front subs, Blue: Front Left sub
The response of just one front subwoofer is pretty bad. This is partly because the back row is so close to the back wall which excites the low frequency room modes. In this case we are looking at +-12dB from 20Hz to 150Hz. Adding the second front sub helped to boost gain below 45Hz for a more matched level at higher bass frequencies but there was still an unacceptably wide dip centered around 60Hz that needed to be dealt with. Adding the two Velodyne subs in the mix (Green trace) really helped this out but without EQ, we still had too much bass below 35Hz. Thus at this point we need to rely on our EQ to resolve the remaining bass issues as you will see in the next section of this article when we engage Audyssey MultEQ room correction.
Advanced Calibration Notes
For more advanced users utilizing subwoofers with built in equalization and or adjustable subsonic filters and crossover slopes, you may consider manipulating one sub at a ti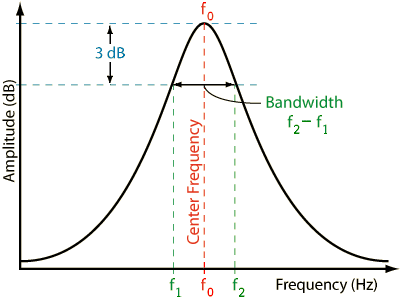 me to better tune in your response but there is a lot of guess work by doing so don't waste a lot of time tweaking if you aren't seeing measurably better results.
For example, if you have a measurable bass peak centered at 40Hz that is 10Hz wide, you can setup an EQ band of 40Hz with a Q of 4 to reduce this problem.
Where Q = fo / BW ; fo = center frequency and BW = bandwidth
To determine BW, mark -3dB high (f2) and -3dB low point (f1) of the problematic mode and subtract F1 from F2. Once you have that number, use that for the denominator and the center frequency (fo) of the peak or dip for the numerator and you will find the Q. (Note: This mathematical method works better for high Q and high amplitude resonances than it does for low Q low amplitude peaks and dips.)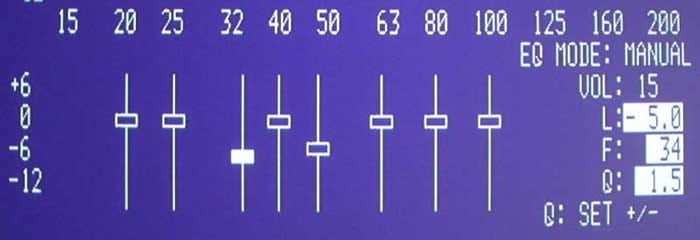 I recommend boost limits of +3dB (for low Q gains). As a general rule, try to flatten the overall response out with wide dips, than by adding narrow peaks in the response as that is a method less likely to overdrive the speaker or amplifier. However, if one has a good handle on the dynamic range of their system, and the Q of the band adjusted is high enough, a higher Q higher amplitude boost is going to be well tolerated. If you see no measurable improvements with boosting, don't do it. You have run into a room null that cannot be fixed with EQing and you will essentially be wasting amplifier power and headroom if you boost it. Keep your cuts limited to -10 to -15dB. If you need to cut more than that, then something else is going on. Try relocating the problematic sub or subs or even your listening seats to reduce the modal peaks. If you are finding poor integration at the system roll off points of your subs, try adjusting the subsonic filter 3dB point and slope, one at a time for each sub until you achieve a better blend. If your sub doesn't have this feature, you may have to keep experimenting with position or delay settings in your processor. Realize if you're using unequal subs you can expect to lose some bottom end as the phase shifts at or below resonance will cause subtraction from the output of subs having a lower F3 point). The optimum configuration would be to have all subs with the same system type and order as well as the same low frequency limit. (In short, if you have a vented or sealed box or bandpass box, they should all be the same. If one sub rolls off at 25 Hz, they all should.)
The bottom line is don't chase your tail. Only try to fix low to medium Q dips and peaks. I recommend revisiting step 2 one more time before proceeding. Once you've exhausted all of your manual options, proceed to step 6.
Multiple Subwoofer Post Setup - Listening and Adjusting
Step 6: Employ EQ or Auto Calibration System
Now that we have reasonable integration of all of our subs with the main speakers, its time to put the finishing touches to tighten up the response. In this case I used Audyssey MultEQ Pro with the external calibration mic and software. We have found that the guidelines we recommend below are relevant for other EQ systems such as the ones found in JL Audio subwoofers.
Audyssey Calibration Guidelines
- Position the microphone at seated ear level pointing straight up using a mic stand.
- Avoid placing the mic where direct sound from the loudspeakers is being blocked by an object. For theater chairs, tilt them back so the mic isn't up against the cushion.
- Calibration points around the vicinity of your primary listening area should be used.
- Avoid the extreme side seats. It's important to take measurements in a specific area between your most commonly used seats.
- Double the measurements in the two most important seats. This will allow Audyssey to apply more weighting on the most important seats.
- Adjust bass management, delays and trims as needed after calibration is completed
 We've found Audyssey to be one of the best auto room correction systems on the market. But like anything else, it's not perfect. After calibration, we typically have to adjust the bass management and crossover settings for better integration. Receivers with AutoEQ systems tend to set speakers large based on the measurements they take during setup which is especially problematic when a speaker is placed near a room boundary since the added boost gives the illusion of a small speaker being capable of delivering low frequencies at meaningful output levels. In speaking with Audyssey, they maintain that all speakers in a home theater system should be set to "small" when using powered subwoofers, regardless of the end result of the room calibration.
The speaker delay settings are usually pretty dead on and it does a great job of calculating subwoofer distance and even an average distance of multiple subwoofers. We tend to go back and tweak levels to accommodate multi row theater rooms as per our article "How to Calibrate a Multi Row Theater".
I tried to setup Audyssey using two subwoofer outputs of my AVP-A1HDCI where I grouped the front subs as "Sub1" and the side/back subs as "Sub2". This made the most sense since the subs that made up "Sub1" were equidistant from the listening area and the subs that represented "Sub2" were equidistant from the listening area. Theory was great but reality was terrible as can be seen in the graph below.
Frequency Response vs SPL - Front Row (1/12th Octave smoothed)
Yellow: all 4 subs; Blue: all 4 subs + Audyssey
As you can see Audyssey created a very ragged response, much worse than having no EQ employed at all. I even tried setting up my AVP-A1HDCI via 3 sub outs but had the same unfortunate results.
When I first setup the Audioholics Showcase Home Theater room, Audyssey's Chief Tech Officer Chris Kyriakakis paid me a visit. We spent countless hours calibrating measuring and calibrating my system. It was at that time we realized the best way to apply EQ would be to apply a simultaneous single correction curve to all of the subs. Chris agreed but unfortunately no Audyssey enabled A/V receivers or processors featuring multiple subwoofer outputs support this. Audyssey did however employ this in their new subwoofer calibration standalone processors: the Audyssey Sub Equalizer and the SVS AS-EQ1. Audyssey took it one step further by measuring each sub individually, adjusting phase, distance and level and then applying a single correction curve to both subwoofers. We pleaded with Denon to offer this for the AVP-A1HDCI Pre/Pro and they claim this upgrade is in the works. We keep our fingers crossed for that day but for now I pain through the process of using a single subwoofer output and making the best of a single delay setting for all four subwoofers not theoretically perfectly positioned in my odd shaped room.
Over time I became smarter and gave up the notion of independent subs. Thus until the above mentioned firmware update becomes available, we highly recommend you utilize a single subwoofer output for all of your subs when using Audyssey. This applies to most of the other room correction systems that I've tested. Below are the results of such a setup which you can see were quite favorable.
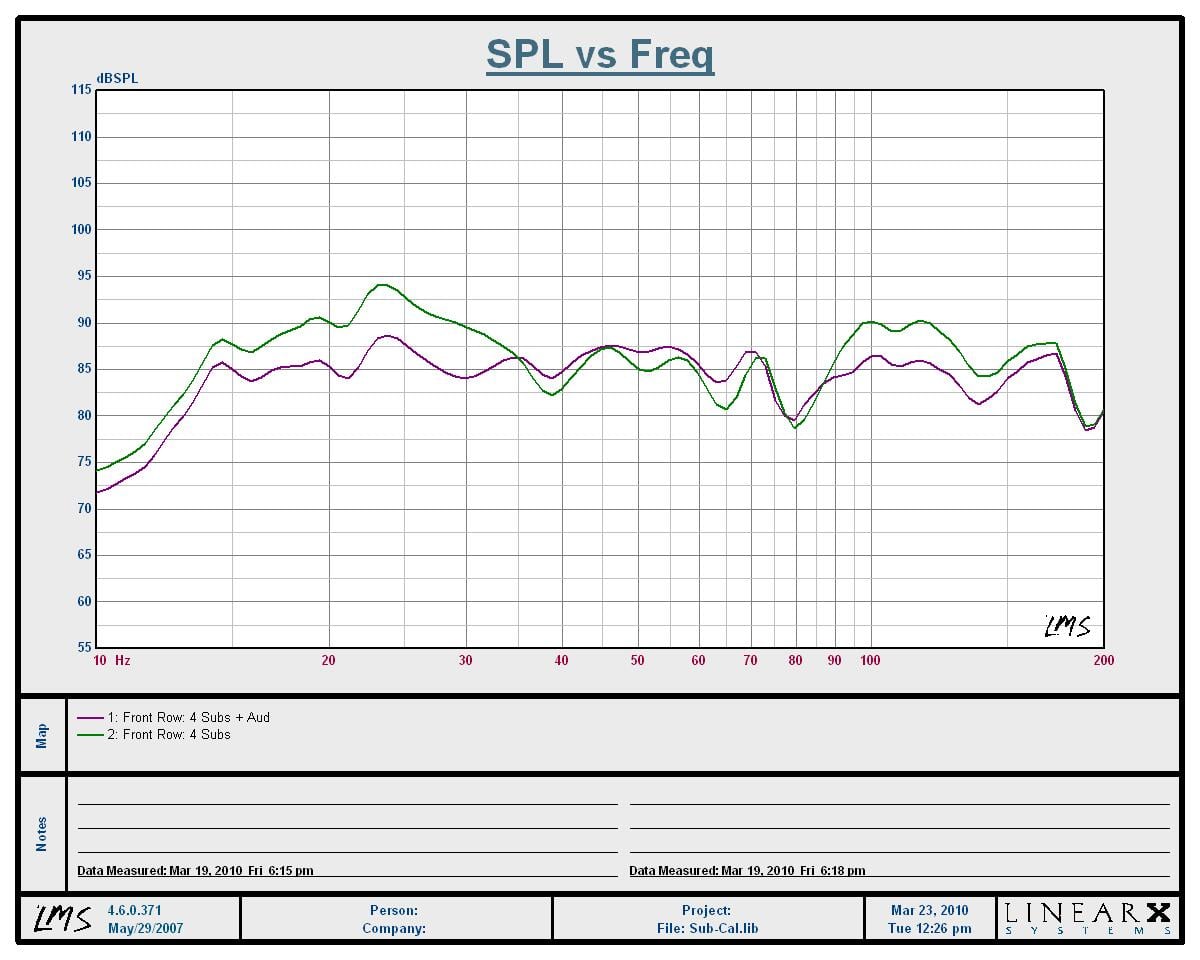
Frequency Response vs SPL - Front Row (1/12th Octave smoothed)
Green: all 4 subs; Purple: all 4 subs + Audyssey
Once we utilized Audyssey calibration, you can see how the bass was significantly flattened below 35Hz. We now realize a bass response of +- 3dB from 12Hz to 150Hz (ignoring the high Q dip at 80Hz) is quite incredible not only from a measurement standpoint but from an audible one.
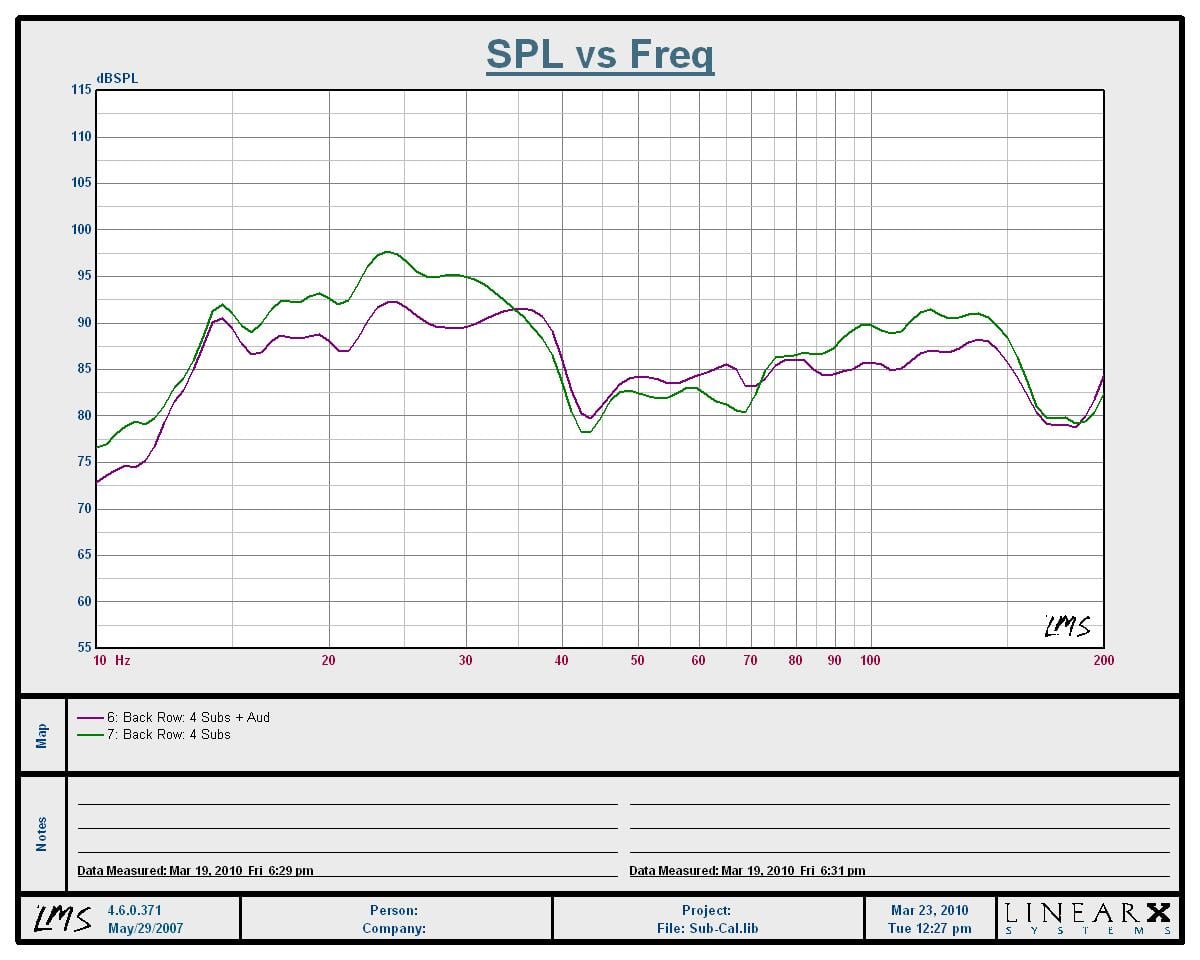
Frequency Response vs SPL - Back Row (1/12th Octave smoothed)
Green: all 4 subs; Purple: all 4 subs + Audyssey
As you can see by employing Audyssey, bass was significantly flattened below 40Hz and even between 80-150Hz for the satellite speakers. We have now achieved a bass response of +-6dB from 12Hz to 150Hz. The bass is about 2-3dB more elevated below 40Hz than I would have liked but it makes for excellent listening of multi channel music and movies. This is especially true since it tactically excites our riser platform giving you a bass shaker effect but much more natural than the electro/mechanical type of shakers available on the market as standalone products.
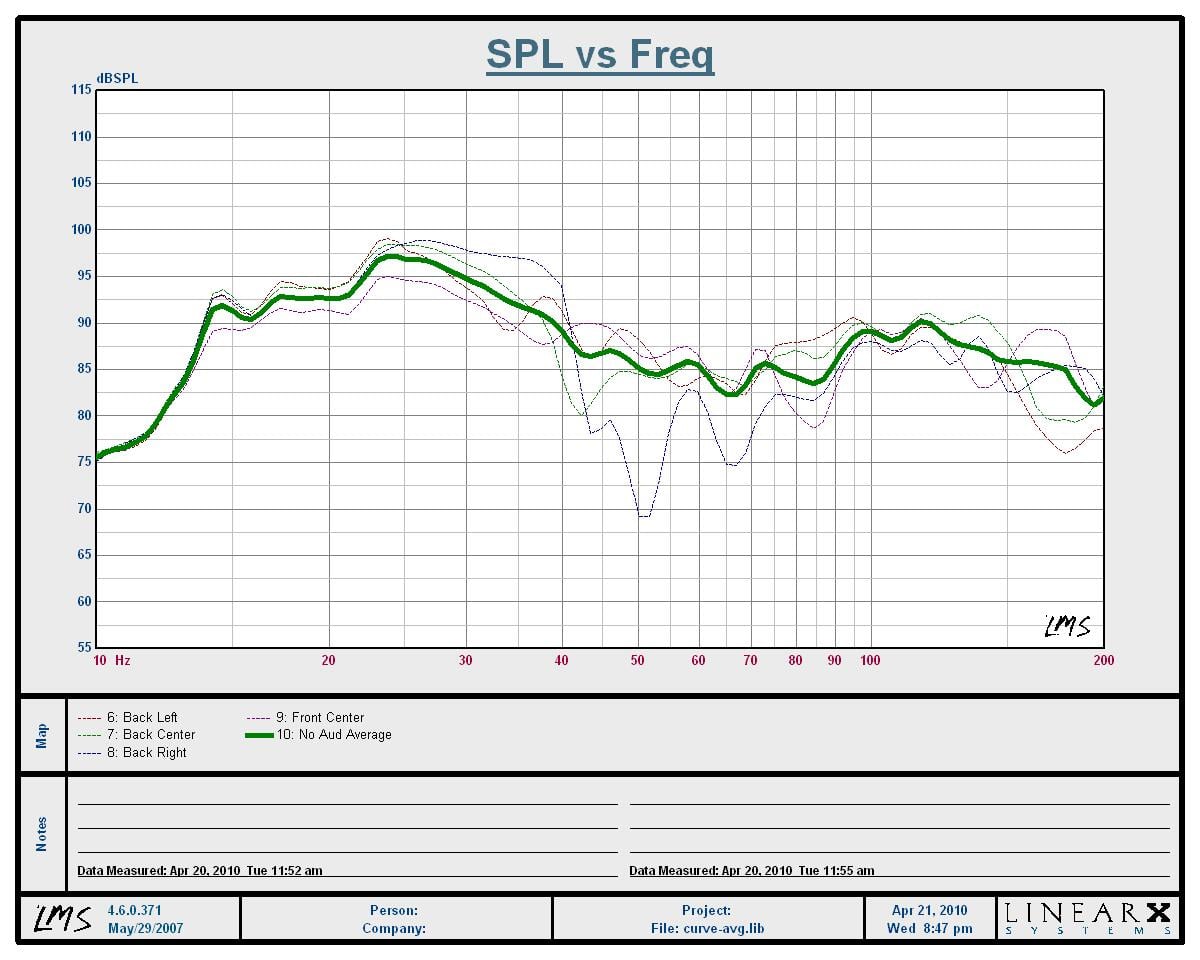
Frequency Response vs SPL across all seats with all 4 subs engaged
With averaged response: Green: No Audyssey; Purple: Audyssey
I wanted to really see how well the Audyssey EQ was benefiting my entire listening area so I pulled measurements at every seat and applied an averaging function to all of the measurements. The green trace represents the average with NO Audyssey EQ engaged for every seat while the purple trace represents the average WITH Audyssey EQ engaged for every seat. With no Audyssey engaged, the averaged response across all seats was around +-7dB from 12Hz to 150Hz. With Audyssey engaged, the averaged response across all seats was around +4 to -3dB from 12Hz to 150Hz. We went from a total variation of 14dB with no Audyssey to just 7dB with Audyssey engaged. That's a markedly incredible improvement in flattening bass response across the entire listening area. This was also a worst case scenario average since these responses were heavily based on the rear seat measurements. In reality my most important seat is in the front row for critical two-channel music listening. I recommend when looking to take an averaged room response, one should apply more weighting to the single or two most important listening seats. I went back and did this applying a weighting of 3 for the front center seat and a weighting of 2 for the back center seat and it only made the results more flattering for the Audyssey averaged curve.
Editorial Note about Global EQ
It's important to note that global EQ, even in systems such as Audyssey, cannot change seat-to-seat variations. Dr. Floyd Toole discusses this point in his book which we recommend reading. However, global EQ can bring the family of curves closer to a desirable flat response. The fact remains that only a single seat can be made to be "really" flat. It is for this reason that the first step in delivering good bass is to minimize the seat-to-seat variations so that global EQ has the maximum beneficial effect for all listeners.
Step 7: Listening and Adjusting
All of the great measurements in the world can't guarantee great sound. Now it's time to listen to the fruits of your labor to see if they paid off. Put on some bass-intense music you are very familiar with. Listen to it in two-channel with the subs across all of your seats to determine how it sounds. Next listen to multi channel audio both discrete and 2CH run through a ProLogic IIx decoder. In most cases bass should be a bit stronger when going from 2CH to matrixed 5.1/7.1. Make sure you are achieving satisfactory bass performance for all formats across your seating area. Feel free to adjust subwoofer level up or down a few dB to your liking. Experiment with the bass management (both speaker size and crossover settings) to make sure your best measured settings also sound the best.
When flattening out the bass response it isn't unusual to want to boost the subwoofer level up a few dB. It's much easier listening to elevated bass levels when you have a flat response than when you have modal peaks that tend to bloat bass and make it very unnatural sounding. Don't be afraid to calibrate your subs a few dB hotter than the rest of the surround channels once you've achieved flat bass response in your room. In some cases you may even need to tweak the level of an individual sub up/down. This is especially true for the subwoofer closest to the listening area.
If you're not happy with the sound of the Auto EQ engaged, turn it OFF or try rerunning the calibration to see/hear if you achieve better results. The bottom line is don't be fixated on the calibration results if they don't sound right to you. Tweaking is usually necessary for achieving the best sound but there is usually a high correlation between great sound and great measured results.
Summary of Main Points
For those that want the bottom line on multi-subwoofer setup and calibration, here it is.
- Choose your subs wisely - preferably all identical subs or subs with near equal f3 (3dB rolloff) points.
- Place your subs wisely - in home theater rooms, nothing is more important for achieving good bass than proper placement of your subwoofers and listening seats.
- Make sure all your subs are playing the identical signal - all of your subs should be playing a mono signal that consists of summed bass from all speakers set to "Small" plus LFE info.
- Setup bass management - in your A/V processor/receiver, set all speakers to small, use 80Hz crossover setting as a start, and defeat the internal LPF of all of your subwoofers.
- Level match all of your subs - make sure each sub is playing at the same output level. Then match their combined level to your main speakers or center channel at your listening positions.
- Vary parameters to optimize response – (ie. distance, phase, crossover setting, level, physical placement) to achieve the best measured response of your subs + main channels for your primary listening seats.
- Engage auto-EQ or use the manual EQ - to optimize your response at your primary listening seats. Remember, it's usually better to apply a single equalization correction curve for all subs simultaneously. This applies for all room correction systems, not just Audyssey. If auto EQ doesn't improve the sound of your system, disable it!
- Listen to the end results – listen at your primary listening seats and tweak level and crossover settings only if needed.
Conclusion
 The goal of a serious home theater playback system should be even (level) bass for all listening seats, plenty of dynamic range and smooth natural frequency response across all of the listening area for the most seamless blend. The best way of achieving good bass is by reducing the modal peaks and nodal dips by utilizing passive room treatments, multiple subs, proper speaker/subwoofer and seating placements and setup, and active equalization. Don't discount any of these tools in your bag of equalization (OR) correction tricks. The key is proper subwoofer placement and setup to reduce the guess work and minimize chasing your tail to find the best settings that yield the most optimal measurable performance.
Once you hear a properly calibrated home theater with smooth and even bass across the entire listening area, it's hard to ever go back. It's worth the time and effort to properly integrate multiple subwoofers into your theater room. With the proper tools, know how and patience, you can create a home theater experience that rivals even the very best Cineplex's (without the sound of someone chewing popcorn over your shoulder or talking on a cell phone). It's important to be methodical and persistent when properly calibrating your theater. An investment in measurement gear such as: LMS, TrueRTA, or even an FFT analyzer will save you time and frustration while also allowing you to achieve much more accurate results than just solely relying on your ears with test tones and an SPL meter. Leave the home remedies to Grandma (chances are she makes a better chicken soup than you) and embrace science to unleash the full potential of your theater system.
In future articles we will explore how to calculate room modes based on room dimensions. We will also delve into sound methods of making in-room measurements and interpreting their results in order to more accurately optimize system performance to enhance your listening experience.
Glossary of Terms
- Standing Wave - a stationary wave characterized by lack of vibration at certain points, between which areas of maximum vibration occur periodically usually when confronted with a boundary.
- Room Mode - an in-room peak in frequency response
- Room Node - an in-room dip in frequency response
- Crossover - a passive or electronic device used to limit the bandwidth of a speaker
- Bass Management - a passive or active system used to bandwidth limit speakers and sum bass to a dedicated subwoofer channel
- LFE - Low Frequency Effect channel is a dedicated channel for bass information in discrete 5.1/7.1 systems which can also contain bass from all speakers set to "small"
- Low Pass Filter (LPF) - a crossover used to limit the bandwidth of a speaker (usually a subwoofer) so only frequencies below a specified point will play
- High Pass Filter (HPF) - a crossover used to limit the bandwidth of a speaker (usually a satellite speaker) so that only frequencies above a specified point will play
- FFT - Fast Fourier Transform is a mathematical method of manipulating frequency and time domain information to make acoustical measurements
- RTA - Real Time Analyzer
- LMS - Analyzer to measure loudspeakers
- PEQ - Parametric Equalizer
- Q - a measure of dip/peak in a system based on center frequency divided by bandwidth
- Bandwidth - the range of frequencies a speaker/system can produce (ie. 20Hz to 20kHz)
- Octave - The interval of eight diatonic degrees between two tones of the same name, the higher of which has twice as many vibrations per second as the lower (ie 20Hz, 40Hz, 80Hz, etc)
- Resolution - the accuracy in which something is measured (IE/ 1/3, 1/12th, 1/24th octave)
- Audyssey - a multi point room correction system that uses spatial averaging and fuzzy math to develop the best correction curve for all seats.
- Room Correction - an electronic device that uses equalizers and in-room measurements to flatten system response and improve the sound quality at the listening seats.
- SPL - Sound Pressure Level
- SPL Meter - a device used to measure sound pressure
Acknowledgments
I'd like to thank the following people and sources for their feedback and contributions to this article to make it as accurate as possible.
- Dr. Floyd Toole of Harman
- John Dahl of THX
- Gerry Lemay of HAA
- CEA/CEDIA Application Notes
- Paul Apollonio of Procondev, Inc.
- Chris Kyriakakis of Audyssey Labs
Gene manages this organization, establishes relations with manufacturers and keeps Audioholics a well oiled machine. His goal is to educate about home theater and develop more standards in the industry to eliminate consumer confusion clouded by industry snake oil.
View full profile