
How to Properly Set Up your Center Channel Speaker to Maximize Performance
Status 8C Center
No matter how good of a loudspeaker system you have, it's inconsequential to how it will perform in your room if it isn't properly placed and set up. We've written many articles on loudspeaker placement in the past, but I felt it was prudent to focus on the center channel. The center channel is arguably the most important speaker in a multi-channel system. It produces most of the movie dialogue and also serves as an anchor for the soundtrack.
In the following articles, we address various center channel designs along with the pros and cons of each type:
Pros & Cons of Various Center Channel Designs
Horizontal vs Vertical Center Channels
Horizontal vs Vertical Center Channels - Alternative Perspective
But none of these articles give you practical information for setting up the center channel speaker in your own room. Hence, we wrote the following guide.
Getting the Center Channel Up off the Ground
No matter how good your center channel speaker is, if it's not firing directly into the listening area, or if its direct path is being obstructed by furniture or by peoples heads, the sound will be compromised.
Take for example the recent $65k+ Status Acoustics 8T & 8C Loudspeaker System we tested and installed into the Audioholics Showcase Home Theater Room.
I initially plopped down the Status 8C center channel on my 20" Plateau stands while I focused on testing and reviewing the 8T tower speakers (as shown in the picture below). It sounded quite good positioned like this, but more so in the front row than the back row. My theater room as two rows of seating with the second row placed on top of a riser platform.
Editorial Note on Stand(s):
Most center channel speakers aren't as large and heavy as the Status 8C, requiring only one stand. So, please forgive me for the plural (s) in stands during the course of reading this article.
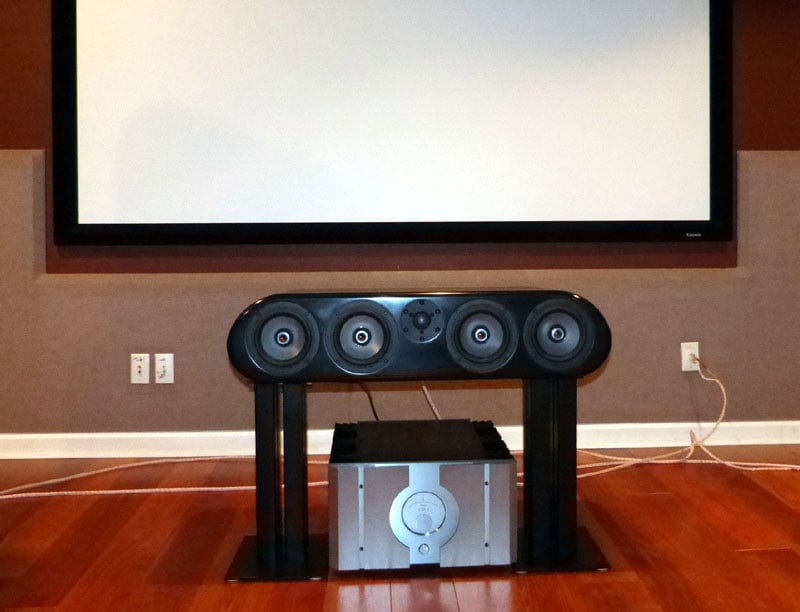
Status 8C Center on top of 20" Plateau Stands
From the second row of seating, the direct path of sound from the drivers was being partly blocked by the theater chairs from the front row. This made the dialogue less intelligible. I needed to raise the center channel up just a few inches but not so high that it would obstruct the image on the screen.
My quick and dirty solution was two-fold:
- Raise the stands by attaching 2" feet borrowed from the RBH Sound MS10.1 subwoofer.
- Tilt the center channel up 5-10 degrees by placing foam on the front of the stands, courtesy of Auralex.
You can achieve a tilt in your center channel speaker one of two ways, either tilt the stands up, or place something on the top the stands to tilt up the speaker while leaving the stands level.
Tilt the stands up method
If you can get custom feet built for your stands to prop them higher, its a good endeavor to pursue over just dumping a good speaker stand that may be only a few inches too short. It would also be a good idea to perhaps make the front feet of the stands a bit longer than the back feet so that the speaker will have a slight tilt upward. You can then affix rubber sticky pads to the back of the stands to secure the speaker and prevent it from sliding off the stands. If you have this option, than you can skip the option below with the foam inserts.

Plateau Stands with Auralex Foam strapped on top
Tilt under the speaker with foam inserts method
If you inserted equal length feet to raise the level of the stands but now need a tilt, you can achieve this by putting foam inserts on the top of the stands towards the front. I had some extra studiofoam left over from when I had my room treated by Auralex and cut a few pieces to place on top of the Plateau stands. You could just as easily use egg carton foam found at Home Depot or similar type of products. Using black electrical tape, I taped them down to the stands so that they would stay still when placing the 130lbs Status Acoustics 8C center channel on top of them. This also allows them to compress more evenly with the weight of the center channel. I also recommend placing adhesive felt pads towards the back of the speaker stands so that the back of the speaker is dampened from the direct contact with the hard metal surface. With the center channel carefully placed on top of the stands, it resulted in about a 7-10 degree tilt upward after the foam compressed.
If you want a less DIY solution then Auralex’s MoPAD Monitor Isolation Pads would be a great alternative. They can give your speakers a slight tilt and provide isolation at the same time. I've used them with excellent success to decouple speakers from an in-wall cabinet while also tilting them down towards the listening area as you can read in my review.
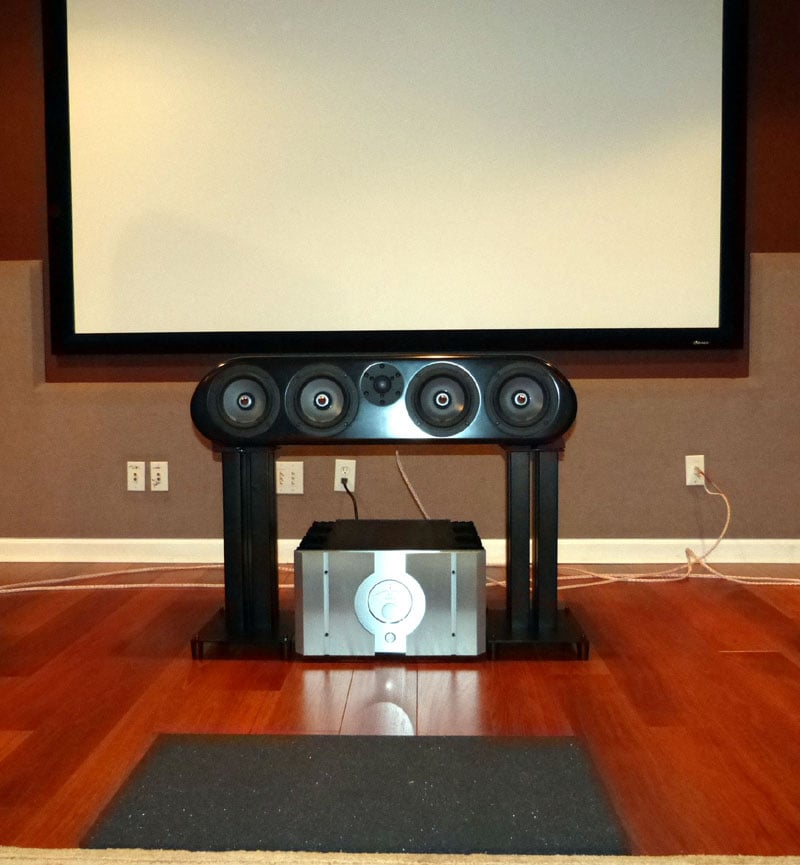
Status 8C Center on top of 20" Plateau Stands after the height fix
As you can see, I was able to raise the speaker up to just a couple of inches below the frame of the screen. It also has enough tilt now so that when sitting in the back row, the drivers aren't being blocked by the front row of seating. You can check this by placing a laser pointer on top of your center channel speaker while aiming it towards your theater chairs. With the alterations I made, the laser pointer fires straight towards the top of the center chair of my second row at the tweeter level. Success!
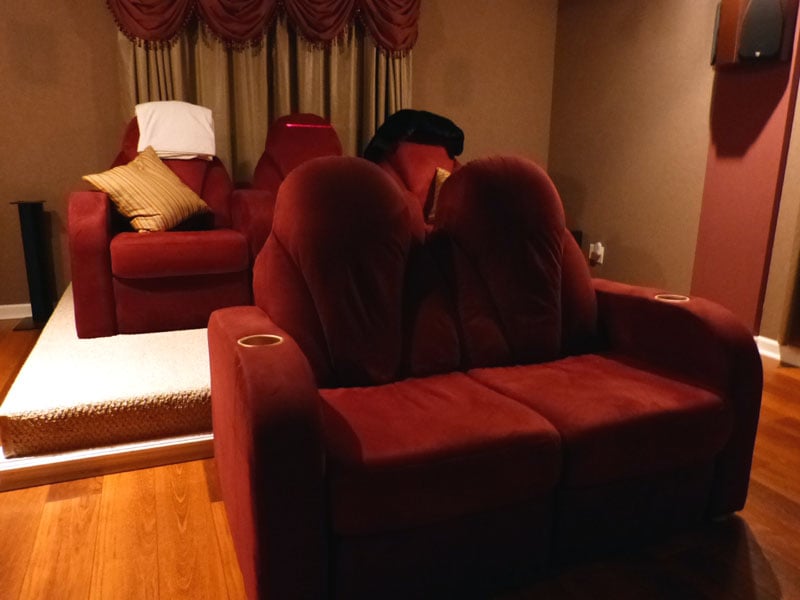
Audioholics Showcase Theater Chairs - (see the laser line on the center back seat)
Additional Tweak Suggestions
Here are some additional tweaks to further improve performance of your center channel.
Fill your Stands with Sand
Although the hefty Status 8C center channel cabinet is completely inert and free of cabinet resonance, the hollow Plateau stands are not. But luckily, I was able to completely fill the columns of the stands with sand to solidify them. You must use dry, very fine sand which you can readily find at a pet store. It took two 20lbs bags of sand to fill both stands. But, once filled, the resonance issue was completely eliminated. This is a well worth tweak for anyone using speaker stands for any of your speakers. Not only does it eliminate resonance but it also makes the stands far sturdier.
Absorb the floor reflections
Since the center channel is typically closer to the floor than the front speakers, it's perhaps even more critical to absorb floor reflections. If you flooring is carpeted then you likely don't need to take this measure. But in my case, we have hardwood flooring in our theater room. We do have a large throw rug that absorbs the first reflections for the main Status 8T towers, but the center channel definitely benefits from some additional floor absorption. I tested this by throwing down a piece of 1" acoustical foam as you can see in the picture above. The end result wasn't dramatic but every little bit helps and its certainly worth a try.
Along the same vein, if your center speaker is sitting on a TV stand or shelf, pull it to the front of the stand/shelf to eliminate the unwanted reflections caused by the close proximity of the surface it resides on. Again, you may not notice a huge difference (or you may), but each of these tweaks makes a little difference leading to a large difference cumulatively.

Side view of Status 8T & 8C System
Bass Management, Level Match & Time Alignment
Once everything is set in place, it's imperative to properly configure and calibrate all of your speakers. Most center channel speakers should be set to "small" and crossed over at 80Hz so that the dedicated subwoofer handles bass duties.
Using an analog SPL meter set for C-wt, slow response, use the internal test tones of your A/V receiver / processor to level match your speakers. I typically run my center channel about 1dB hot from the front row. That way, the back row isn't drown out by the surround speakers and you can still clearly hear the dialogue.
Last but not least, be sure you properly set the distance of all of your speakers in the speaker setup menu of your processor.
Wrap Up
It's a certainty that someone in our forums will likely make a comment on this little editorial article asking why I didn't just use a larger perforated screen and place three identical speakers vertically mounted behind the screen. (OK, I've heard this a lot before, can't you tell?) While that may be an ideal solution for some, it wasn't for this install for the following reasons:
- Perforated screens are ALWAYS a compromise for critical two-channel performance not just for the slight losses in high frequencies, but the diffraction they cause if NOT perfectly flush mounted near the speakers. The primary emphasis of the Audioholics Showcase system is audio before video.
- Placing three nearly 6 foot Status 8T towers in a room is both unaffordable and impractical.
- The screen would have to be massive to fully cover these speakers entirely and would cause severe vertigo for our patrons, especially when playing XBOX.
- When you have such beautiful speakers as these, you want to show them off, not hide them behind a screen.
The end result of this tweak was a marked improvement of an already excellent sounding installation (most notably from the back row) and an enhancement aesthetically by having the center channel propped up higher towards the screen. I highly recommend you take the time to properly place and set up all of your speakers, and give some extra attention to the center channel as it will repay you in dividends when trying to understand what Bane is saying while crushing Batman's back.
Gene manages this organization, establishes relations with manufacturers and keeps Audioholics a well oiled machine. His goal is to educate about home theater and develop more standards in the industry to eliminate consumer confusion clouded by industry snake oil.
View full profile