
Reference System 1: Gene DellaSala
Reference System 1
I had a vision for what the Audioholics Showcase home would be like for quite some time. It would be a home engulfed in the audio and visual in all of the right places where people visiting would gather and be entertained. At the same time, I wanted this home to have the ability to host only the coolest parties - ones worthy of Colombian respect since no one in my experience parties like them. Let us also not forget about the critical data center where multiple computers are networked together so our reviewers can work, test and measure gear while maintaining contact over the Internet.
The location is Land O Lakes, Florida - a remote wilderness area currently void of strip malls, Walmart's and McDonald's (at least for now), but chop full of cow pastures, deer, and summer locusts. Our builder of choice was Mercedes Homes. Though they aren’t quite a custom builder, we did manage to persuade them to customize our home quite a bit to fit our needs. Of course after hearing about our 1 million monthly readers, and that we would be throwing a shameless plug their way (Mercedes homes is #1), the blueprints and Sharpie quickly made their way into our hands.
After seeing the layout of the model, I knew exactly what I wanted to implement to make it worthy of the name Audioholics. Listed below were my requirements:
- Dedicated Home Theater Room - The main system (central plexus) which serves reference home theater both to its location and to a second zone - our Master Bedroom System.
- Interconnectivity between the Theater Room System, my test lab, The Master Bedroom System and the Family Room System.
- The Family Room System serves 7.1 at its location as well as simultaneous distributed audio to front yard, back yard, living room and guest room locations. Essentially the home run location for all distributed audio in and outside of the house.
- Ethernet at every TV location, and office connected back to the distribution center in the laundry room.
- Triple Coax to each TV location to receive HDTV via free air antenna located in the attic, Satellite or cable service all connected back to a distribution center in the laundry room.
Cables of Choice
Now for the fun part, figuring out what cables we needed, and at what lengths. Mercedes homes unfortunately wouldn’t let me run the cabling in my home due to liability reasons, but they did allow me to come up with a layout plan to have their contractor S&S Electric follow. S&S Electric offered me Monster Cabling as their solution. As soon as I heard the "M" word, I shivered at the thought of it (mostly due to price and a lack of options). When I actually saw the markup on the products I firmly said "no thanks". Their best upgrade was 16AWG Monster Cable at $100 per run. Yikes!
Through some pleading, I managed to convince them to let me use my own cabling for this job, especially since, from a performance standpoint, the available Monster Cable products simply didn’t live up to my criteria.
As any of our readers know, we are very critical on performance and value, especially involving cables. We avoid exotic cable companies that sell snake oil and only use and recommend legitimate cable manufacturers (typically ones that don’t buy football fields and rename them.) That being said, we called upon three of the best ones we have found: Blue Jeans Cable, Impact Acoustics, and DVI Gear.
After much consultation with our own resident expert Ray Adkins, I drew up a cabling plan for S&S Electric to follow.
Audio and Video Coax & Speaker Wire Connections Plan
This does not include alarm, intercom, or standard phone/fan, accessories, attic COAX, etc
Note: All speaker wires will use 10/2 Blue Jeans Cable, all audio, video and cable TV COAX will use Blue Jeans 3 color COAX 1694 cable.
Cabling Breakdown by Location
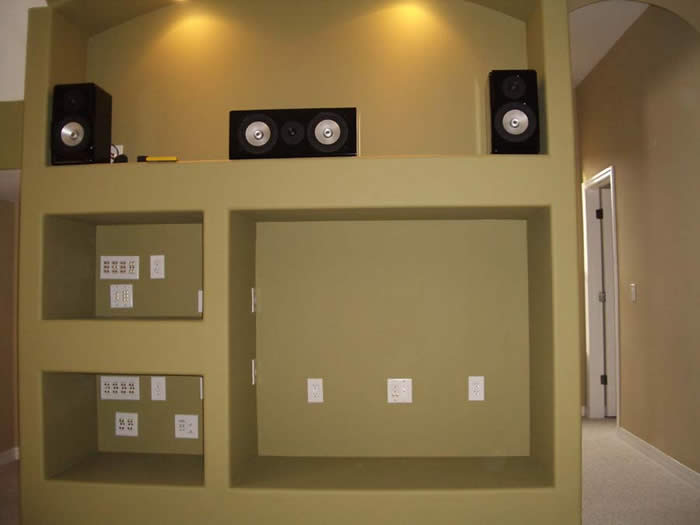
Dedicated Home Theater Room
Projector
- Conduit: 3 Video Coax, 2 Cat5e, 2 HDMI run to front wall connection box
- 1 dedicated 120V, 20A line
Middle Front Wall
- 6 COAX run to frontwall main A/V panel
- 3 x 10/2 speaker runs back to frontwall main A/V panel
- 2 x upper wall 10/2 speaker runs back to front wall connection box
Left Side Wall Display
- 2 Coax (video) run to frontwall main AV panel
Closet Office
- 6 Coax (3 audio, 3 video) back to frontwall main A/V panel
- 1 dedicated 120V, 20A line
- Data (Phone, Ethernet, CAT5e back to frontwall main A/V panel)
Main A/V Panel (front wall connection box to left of Air Conditioner)
- Data (Phone, Ethernet, COAX for Cable TV)
- All connections from Projector, Closet Office, Left Side Wall Display, and Main Bedroom A/V connections
- Master bedroom speaker cables ( 2 front, 1 center, 2 front subs, 2 rears)
- All speaker cables in Bonus Room (6 rears, 1 rear ceiling center, 2 Front inwalls, 3 Front floor center and left double runs)
- 8 Audio Coax from Family Room System #2
- 2 Audio Coax for Rear Subwoofers in Bonus Room
- 1 subwoofer connection from backyard
- 2 Dedicated 120V, 20A Lines
Guest Room
- 2 x 10/2 speaker cables back to Family Room (System #2)
- 1 Volume Control (Cat5e) back to System #2
Family Room
- 4 Coax (audio) front, rear, right side and outdoor subwoofers
- 8 Coax (audio) to Bonus Room
- ALL Volume Control Connections (10/4 and Cat5E bundle) which include 2 x living room, 4 x front yard (located indoor living room), 4 x outdoors backyard, 2 x guest room.
- Note: All downstairs and outdoor speaker connections (except Master Bedroom)
- 10/2 Speaker wire runs for 2 front, 1 center, 2 sides, 2 rears, 4 back yard, 4 front yard, 2 guest room and 2 living room
- Data (Phone, Ethernet, COAX for Cable TV)
- 1 Dedicated 120V, 20A Line in addition to standard supplied outlets
Master Bedroom
- 2 x 10/2 fronts channels, 1 x 10/2 center channel, 2 x 10/2 front left/right subs, 2 x 10/2 rear surrounds all back to Bonus Room (System #1)
- 6 Coax (3 video, 3 audio) back to System #1
- 2 Cat5e back to Bonus Room System #1
- Data (Phone, Ethernet, COAX for Cable TV)
Back Yard Lanai
- 2 x Coax (1 for Cable TV run back to distribution panel in laundry room, the other for DVD run back to System #2
- 2 pairs of speakers + subwoofer run back to System #2.
Front Yard
- 4 x 10/2 for 4 rock style speakers + 2 x CAT5e for VC’s back to System #2.
Whew! Did you get all of that? Good.
Practical Cabling Spaghetti
 We calculated total cable lengths needed for this job to be roughly 10,000 feet just for the COAX and speaker
cables. Since S&S supplied all of the CAT5e cabling for data and
Ethernet, I let them figure out what was needed. I could only imagine
the look on the face of Kurt Demke from Blue Jeans Cable when I called
in my order, especially when I told him I needed the cable in two
weeks. Talk about waiting until the last minute. About one week
later, 4 huge rolls of cable showed up at the door stop of S&S
Electric. Leave it to Blue Jeans Cable to not only meet a deadline,
but to beat it by half the allotted time. This wasn't too surprising
to me since this is a common experience I have had with Blue Jeans
Cable and for our forum readers who also use and rave about the quality
of their cables and customer service.
We calculated total cable lengths needed for this job to be roughly 10,000 feet just for the COAX and speaker
cables. Since S&S supplied all of the CAT5e cabling for data and
Ethernet, I let them figure out what was needed. I could only imagine
the look on the face of Kurt Demke from Blue Jeans Cable when I called
in my order, especially when I told him I needed the cable in two
weeks. Talk about waiting until the last minute. About one week
later, 4 huge rolls of cable showed up at the door stop of S&S
Electric. Leave it to Blue Jeans Cable to not only meet a deadline,
but to beat it by half the allotted time. This wasn't too surprising
to me since this is a common experience I have had with Blue Jeans
Cable and for our forum readers who also use and rave about the quality
of their cables and customer service.
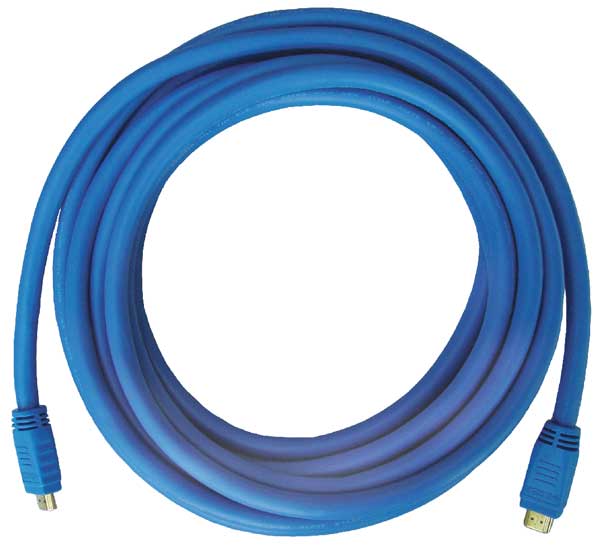
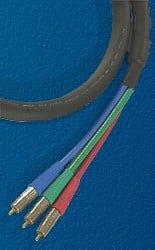
For HDMI cabling, I relied upon DVI Gear's SHR cables (pictured right) for my front projector system and Impact Acoustics for a secondary component run as well as interconnectivity between components. In my opinion, nobody has a better HDMI copper cable solution for long runs than DVI Gear. Impact Acoustics are also another great option for shorter runs, with their advantage being in flexibility since they are a bit thinner and more pliable than the DVI Gear SHR cables.
 I
used Impact Acoustics Sonic Wave products for all digital toslink
connections in all of the systems, and their Sonic Wave products for
all audio video connections to the components in System #2 & #3.
In my opinion, Impact Acoustics have some of the best solutions for
Toslink in any of their series. Their product offerings are of top
notch build quality and they make a snug connection unlike many
competitor toslink solutions that fall off at the slightest tug.
I
used Impact Acoustics Sonic Wave products for all digital toslink
connections in all of the systems, and their Sonic Wave products for
all audio video connections to the components in System #2 & #3.
In my opinion, Impact Acoustics have some of the best solutions for
Toslink in any of their series. Their product offerings are of top
notch build quality and they make a snug connection unlike many
competitor toslink solutions that fall off at the slightest tug.
System #1's cables are mostly comprised of Blue Jeans 1694 COAX and 10/2 Belden speaker cables. In fact every speaker run from in-wall to distribution panel to equipment uses Belden 10/2 speaker cables from Blue Jeans Cable.
Terminations for Coax are Canare and for speaker cables, compression WBTs.
Installation Job Time - Piece of Cake?
S&S Electric told both myself and my builder they could route all of this cabling in a few days. Three months later and after their third time rerouting cables to match my plans, they finished laying the cable down as I specified. Though they didn't work this job full time for three months, they did send a full fledged crew each time they came to my home site in efforts to complete this job which they quickly realized was grossly underestimated. As a funny side note, my next door neighbor kept a close eye on my home while it was under construction and heard a few of the workers spout out colorful metaphors in Spanish directed towards the home owner who decided on such extensive cabling. In their defense, it is doubtful in the history of their organization that they ever had to run such a complex home theater cabling installation. Only an Audioholic would place such demands on an electrical contractor. I was very fortunate they undertook this endeavor rather than closed the door and had me succumb to their prearranged 5.1 Monster Cable packages.
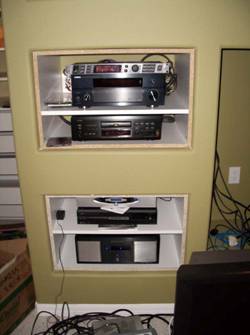
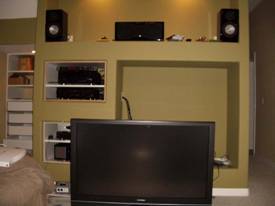
The Bonus Room (Main Theater & Control Center)
This is the central "plexus" for Audioholics where only the industry's finest gear resides. You won't find dinky cubed speakers in the room, or exotic battery powered cables (that is, unless we are ripping them apart to measure, analyze and do a little editorial on them.)
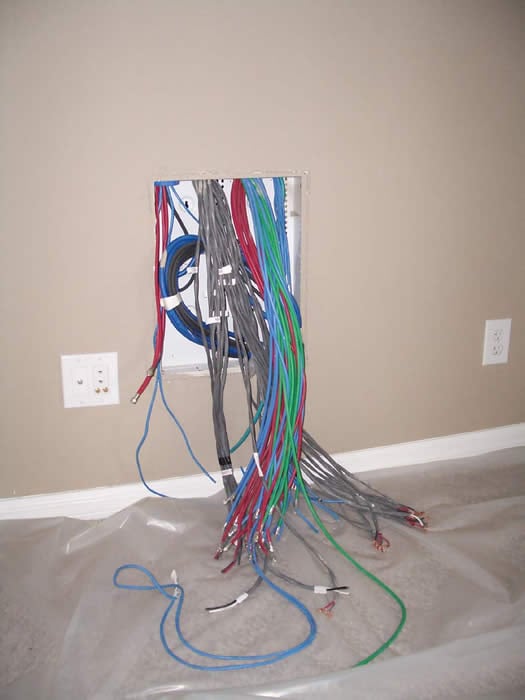
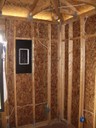
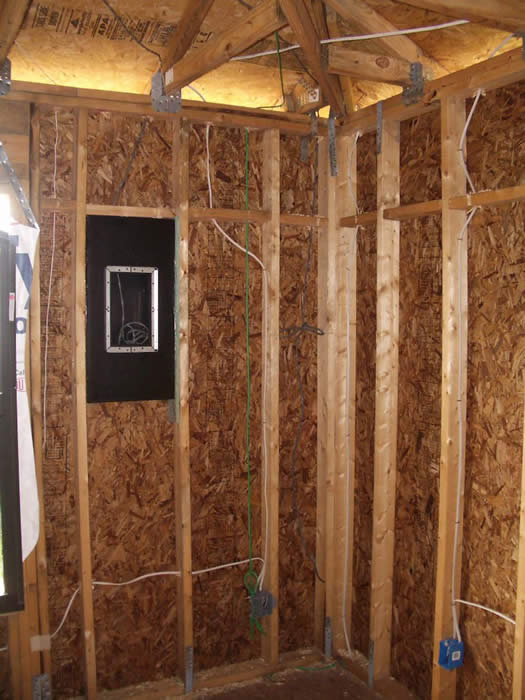
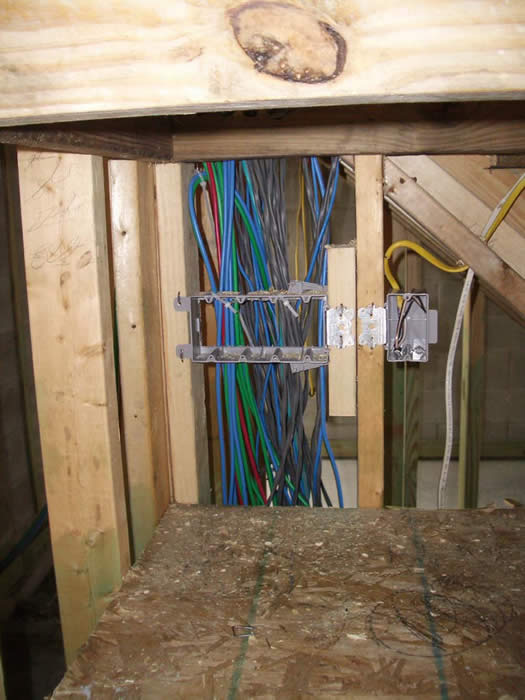
Here are some preconstruction pics that show how the cabling was routed.
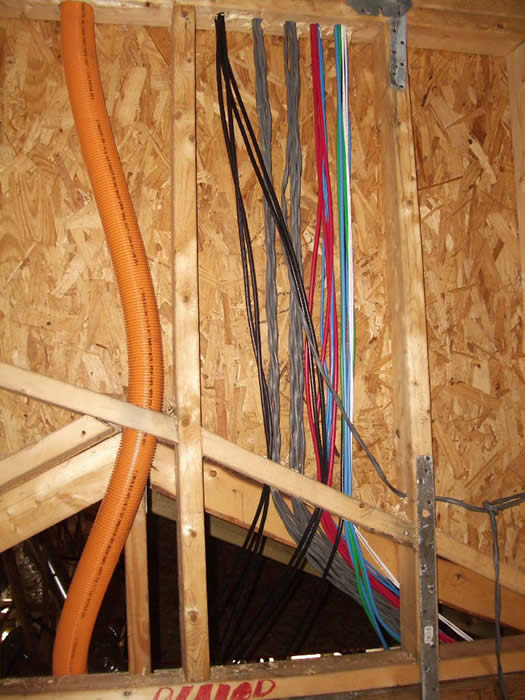
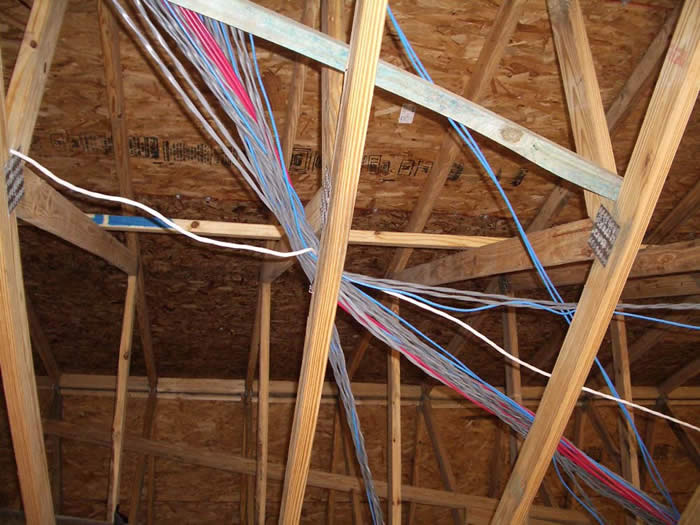
Note in several instances, I had to sneak into the home after work hours to move around audio / video cables that were overlapping power runs. There are some critical guidelines that installers should follow when running low level cables such as audio, and video in a home. Despite the fact I handed S&S Electric a routing guideline for my cables, they still made some routing boo boos.
The middle picture shows the conduit I had run for projector cables while the pics to the far left and right show the runs of speaker and coax throughout the room.
In speaking with Ray Adkins, I learned it's a common problem with many installers since most of the people running the cables have little experience with A/V.
Editorial Note On Running Cabling:
- Never run power cable parallel with audio or video cables
- If close proximity runs can't be avoided, try to cross cables orthogonally (perpendicular)
- Power cables should be at least 6 inches away from parallel runs of A/V cable.
- Keep cables clear of metal strapping and bracketing, otherwise any slight pull can result in tearing
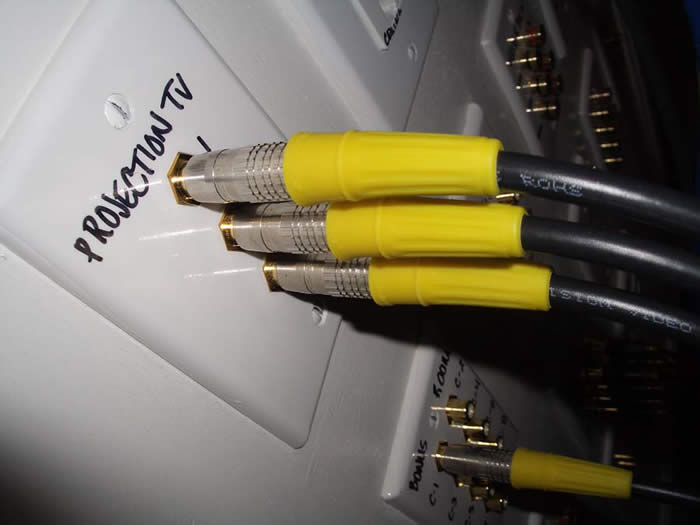
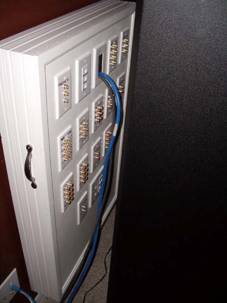
Main Control Panel System #1
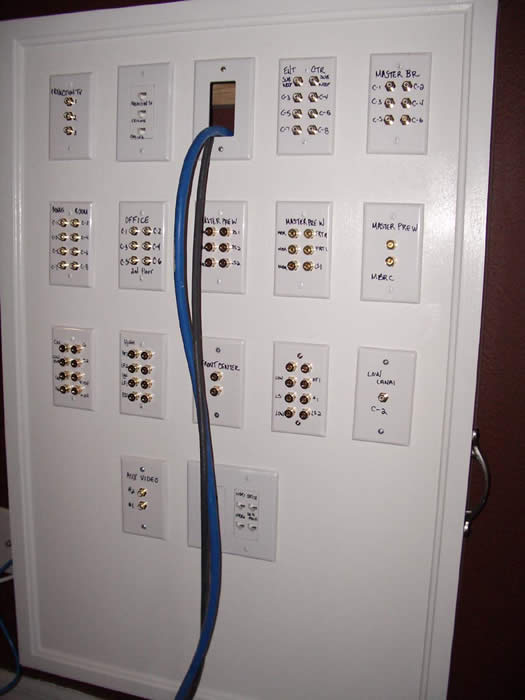
The pic to the above left shows all of the cables breaking out into what would soon be the main control panel (right). It took up until the last two weeks before closing to get my builder and S&S Electric to sort out a workable solution for termination. In the end, they went with my suggestion of building a wooden box and strapping the Décora wall plates onto the surface, followed by terminating all of the cables (except HDMI) into SpeakerCraft female banana's for speakers and coax for audio and video.
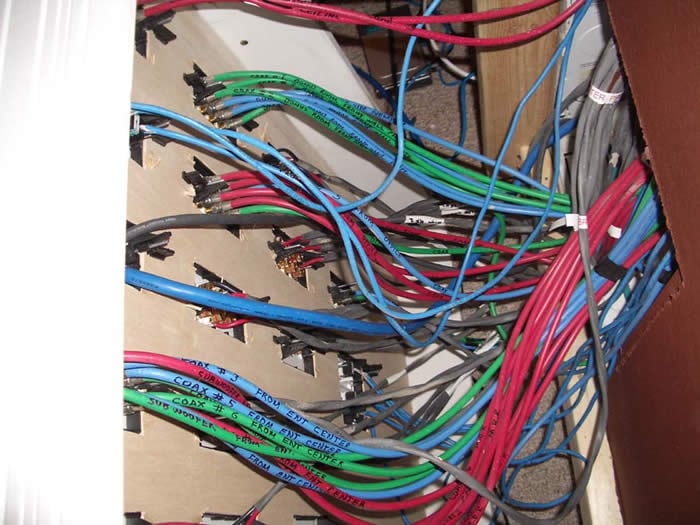
Terminations, Install, Data & Power
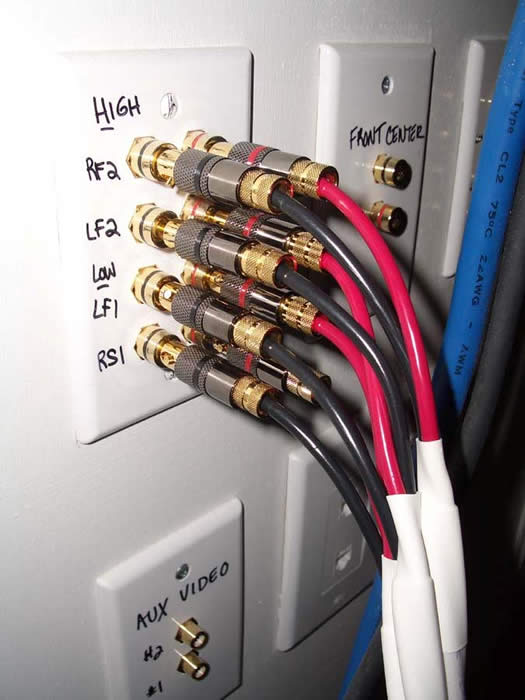
In practice, the main control panel SpeakerCraft terminations, coupled with compression WBT speaker terminations (left pic) and Canare Coax terminations (right pic) courtesy of Blue Jeans Cable worked flawlessly. My vision for hot swapping components and cables was quickly becoming a reality.
Editorial Note on Terminating Coax Cables
S&S Electric found it somewhat challenging to terminate the 1694A Coax since they are a bit thicker than standard RG6 Coax. I found the initial terminations they did didn't pass the tug test as the F connectors fell off at the slightest pull. A minor adjustment to their crimping tool and some added care resolved this problem.I verified continuity of these cables by using the 'Pin Test' method suggested by Ray Adkins.
What you do is take and insert a needle or sewing pin into the cable far enough to puncture the outer jacket and contact the outer braided shield, but not so far as to contact the dielectric of the center conductor. Then using a volt meter, touch one probe tip to the outer shell of the F connector and the other probe tip to the pin. You should observe continuity and a near zero ohm reading.
Editorial Note on Terminating Speaker Cables
When terminating the female Banana's onto the speaker wires, great care must be taken to ensure adjacent wires within the pair, or from other pairs groups, do NOT make physical contact with each other. When I popped off the back panel on the main control panel, I saw instances of strand contact between conductor pairs. Using a pair of needle nose pliers, I separated the conductors.
I then used a wrench to tighten down the terminations. The biggest source of discontinuity with cables is usually in the quality of the terminations. Making a tight compression fit is the best way to ensure uniformity in the connection while also minimizing resistance (the dominant metric of importance in speaker cables.)
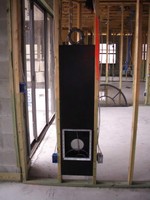
I also got S&S Electric to install some in-wall speaker cabinets (likely another first for them), as per my instructions. Thanks to the excellent consultation of Ray Adkins, we came up with an easy and effective method for them to follow.
 Procedure for Installing In Wall Speaker Cabinets
- Line the outer cabinet and 2x4 framing of the wall with wood glue.
- Secure the speaker box between the wall framing with wood screws which are inserted from inside of the cabinet.
Note: If the 2x4 framing is greater than 14 inches on center, use furring strips for a more snug fit before installing screws.
- Drill a small hole at the top of the speaker cabinet and insert speaker wire.
- Use glue or wood caulk to seal the whole after the wire has been run.
S&S Electric did a great job on my speaker cabinet installs and followed my instructions to the letter.
Family Room System
This is where the secondary 7.1 home theater system resides as well as where the majority of my guests will be entertained. It also serves the whole home for distributed audio, a particularly essential requirement when hosting parties. I had S&S home run all of the distributed speakers to this location with 10/4 and Cat5e. In all likelihood I will not have immediate use for the Cat5e run, but allow for future expansion for touch panel controls and automation.
Got enough wires? I hope so. With all of the 10/2 speaker runs for 7 main theater speakers, 12 pairs of distributed speakers, and Coax to connect all of the components including indoor and outdoor subwoofers, outdoor television and connectivity back to System #1, I believe I covered all of the bases.

All terminations were done with SpeakerCraft using F-connector to female RCA's for all A/V Coax and Female banana's for all speaker terminations. Cat5e for all of the volume controls and control data were terminated into RJ45 connectors for now.
 Master Bedroom System

The idea here was high WAF (how else could a husband sell off surround sound in his wife's bedroom without it being completely invisible)? In-wall speakers and no equipment (other than flat panel display and cable box) is the answer. With that in mind, realizing I was using the Denon AVR-5805 for System #1, it seemed only logical that it was time to take advantage of its second zone surround feature for this application. I decisively chose to prewire this room for 5 speakers and 2 subwoofers, 6 COAX runs, 2 CAT 5e and Ethernet.
To take it one step further, I decided to install inwall subwoofers. This allowed me to keep the theme of no visible equipment in the room while also allowing me to run dual subs.
Again I gave S&S electric specific installation instructions on mounting the RBH SI-10 in-wall subwoofer cabinets. We decided on MC products for the speakers since the Signature grills are not flush mounted to the walls like the MC ones are. More on this in the dedicated equipment article.
Data Distribution Panel
What use would the Audioholics Showcase home serve without having the ability to stream data and video throughout the house? We certainly wouldn't be able to get any work done and would likely spend most of the time just chilling listening to tunes and watching DVD's. Hmm on second thought….
We needed a centralized demarcation point for all phone, data, and cable. We selected the laundry room in which to install our data distribution panel. 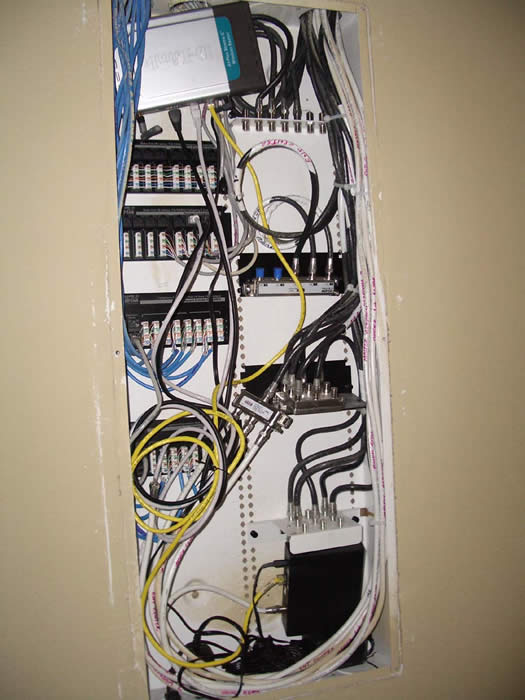
As you can see in this pic, we have punch down blocks for all phone and Ethernet service as well as for cable and satellite TV. In the distribution panel also resides our broadband modem and one of the wireless routers/hubs. We have prewire for Satellite TV, over-the-air antenna and cable TV (our current choice) to all of the theater rooms, two offices, and guest rooms and back yard. Our Ethernet connectivity is quite extensive, serving 3 desktop computers, an Xbox, Yamaha MusicCAST 2000 and the Denon AVR-5805. Our wireless network supports two laptop computers and a wireless print server.
 Power Distribution

You're probably wondering what kind of power we have to handle all of this. Fear not, as S&S Electric took good care of us. Rather than providing the standard 150amp service designated to this house design, they upgraded me to 300amp service via two distribution panels. Each dedicated line has 20amp service and independent grounds tied back to the panel. System #1 alone has 4 dedicated runs, followed by one each for Systems #2 and #3.
Peering at the above pic to the left, it is clearly obvious that routing power is S&S Electric's forte. This was a class A job of wire management, routing, and termination. Everything on the panel was clearly labeled just the way I like it to be.
 Every dedicated line for home theater equipment is fully protected and conditioned by the award winning APC S15 or H15.
When it comes to clean power, I don't mess around and elected what I
felt to be some of the best solutions in the industry (see our FAQ article on APC). More on this topic will appear in the dedicated Showcase equipment article.
Every dedicated line for home theater equipment is fully protected and conditioned by the award winning APC S15 or H15.
When it comes to clean power, I don't mess around and elected what I
felt to be some of the best solutions in the industry (see our FAQ article on APC). More on this topic will appear in the dedicated Showcase equipment article.
Cabling - That's a Wrap
As you can see, the wiring in the Audioholics Showcase home is quite complex, though highly functional. We spared no expense at using only the best solutions in the market which are all, of course, snake oil free. Stay tuned for the next article in this series which will deal with the selected Audioholics Showcase equipment.
First Steps - Designing an Auralex Treated Room
After all the years of my restriction to living space as my primary theater room, I was excited to be finally building a dedicated room in my new home for this single purpose. Unfortunately I was unable to make it the classic rectangle that home theater aficionados and acousticians hope for when designing the "ideal" home theater room.
Realizing my new theater room had some issues, mostly in symmetry and low end modal control, I elected to call on the pros from Auralex to see what kind of solution they could offer to my dilemma. It was refreshing for me to hear them not scold me on my room shape but instead offer a voice of encouragement on my project. A particular memorable thing that Jeff Hedback said to me was " it is basically predictable to acoustically treat a rectangular room. But it takes much more ingenuity, science and art, to balance and neutralize a non-rectangular room, the kind more commonly found in people's living spaces".
With that, I faxed them a crude sketch of my room layout as illustrated below (left). After weeks of deliberation and defining to Auralex what my goals were for the room, they proposed a treatment plan illustrated in the below right figure.
![[room00010011]](/images/room00010011.jpg)
![[topview]](../../../../images/topview.jpg)
Crude Room Sketch (Left Pic) Auralex Acoustic Solution (Right Pic)
Room Design Goals
Before we settled on the treatment plan illustrated above, I precisely defined my design goals for this room as listed below:
- Very open and natural sound conducive for high caliber music listening and movie watching
- Superb control of low end response without sacrificing amplifier power or dynamic range
- Uniform sound for all listening positions
- Aesthetically pleasing theater like look and feel
My biggest concern (which I was repeatedly vocal about) was that I didn't want to create a typical sonically "dead" room so many audiophiles love. I wanted this room to sound very natural and open, while at the same time be focused and uniform for a wide listening area. A lofty goal perhaps, but NOT one in which Aur alex felt they couldn't tackle.
The key to getting a theater room right is to understand the goals the end user has, including listening preferences, equipment dynamics, aesthetic and budgetary considerations. Being mindful of all of this, I conducted an interview with Aur alex to understand their thought process behind my room and to ensure I concisely conveyed my intentions and expectations for how this room should turn out.
Interview with Auralex
Interviews with: Brian Wheat , Jeff Hedback and Jeff D. Szymanski , PE
Audioholics: Please provide a background of Aur alex (history, target business, place in market, etc)
Headquartered in Indianapolis , Indiana , Auralex Acoustics was founded in 1977 with a mission to provide the best acoustical treatment products at the best value. Our products enjoy widespread use among many prominent artists, producers, engineers and corporations and can be found in recording and broadcast studios, home theaters, houses of worship and other commercial applications. For more information, about us, feel free to visit our website at www.auralexelite.com .
Audioholics: What type of room analysis did you do on the Audioholics room prior to designing an acoustical treatment solution?
The program used is called CARA ( www.rhintek.com ). Unlike many "calculator" type programs that can be found free on the 'net, CARA offers the ability to model complex rooms, like your "L" shaped room. In your case, we toyed with loudspeaker placement quite a bit and ultimately determined that, regardless of placement, there were some specific modal issues that were going to cause a problem. The space has a primary modal profile from the longest Length and Width dimensions and "subsets" of modal distributions from the "L" shaped nature. The various subsets will affect the "sonics" of the space differently: the Length, Width, and Height of the rear seating area is the most important modal subset.
Audioholics: Please explain the various products you selected in the Audioholics showcase room and detail their functions.
The key to designing and ultimately selecting the right products for the space relies on the following question; " how do I create a balanced response at multiple seating positions with great clarity and definition between spoken word, sound effects and musical content?" For your room, we incorporated the following products:
Auralex CFS- Custom Fabric System - An installed treatment system that places acoustically designed treatments (absorption and diffusion) behind aesthetically elegant acoustically transparent fabric. The thickness of the treatment follows the acoustic design needs of the space.
Aur alex Mineral Fiber Insulation - cavity resonance control and bass trapping benefits for your seating riser(s).
SpaceArray Diffusors - provides hemispherical acoustical diffusion based on a quasi-random series.
SpaceTrap - Prototype bass traps designed by Russ Berger.
DST-R Flat Reflector - 1" EPS diffusive panel to provide a diffusive soundfield in areas where space is limited such as side and back walls
Sonofiber Absorption - high density, (.75) NRC rated for 1", Class A flame retardant absorption treatment used to treat first reflection points and bring symmetry back into the room.

Sonofiber Absorption Mineral Fiber Insulation
SpaceArray Diffusor DST-R Reflector
The front wall is treated with 2" CFS absorption from floor to chair rail height providing good broadband absorption control of rear energy off your speakers. Portions of the left sidewall have 2"CFS absorption, other areas that were to be exposed drywall have CFS EPS flat board and other areas in the rear have DST-R diffusive panels. The rear wall has sections of DST-R diffusive panels and flatboard and best results are relying on the proposed theater curtain over the rear window.
The rear right sidewall has a SpaceArray on the door and DST-R diffusive panels on the actual wall surface surround. As the room works around the AirHockey table, the treatments are essentially a 50/50 blend of 1" CFS absorption and DST-R diffusive panels. The goal is to minimize coloration due to the asymmetrical profile without over treating the space, a fine balance that should prove to be right on target once the space is fully completed.
The ceiling has 18 SpaceArrays above the seating positions and a CFS 1" absorptive pod between the seats and main speakers. The SpaceArrays will offer a greatly enhanced response between the seating positions and are specifically intended to enhance your surrounds' function. They will also yield the more cinema "feel" of a higher ceiling. The 1"CFS pod is needed to minimize comb filtering of ceiling reflections with the direct sound from your LCR speakers. Again, this is a fine balancing act between control and the need to retain a natural response in the space. The detriments on untreated first reflections would be far worse than small potential gains of a more "normal" room feel. In simple words, this treatment combined with your carpet may yield the subjective feel of a very treated room…I await the final results, but this is needed.
Your Status Acoustics Titus speakers are going to excite the room beyond typical modal concerns, thus extreme bass trapping is needed regarding of how the modes overlap. To address this, we are placing three of the prototype Auralex PartScience bass traps in the space which are designed by Russ Berger. We will turn the riser for your theater seats into much needed additional trapping. We also have multiple broadband absorbing CFS columns that will clean up issues between 150- 400 Hz.
Audioholics: Please describe the basic functions of diffusion, absorption and bass trapping.
Diffusion - evenly disperses sound energy rather than remove the energy. Results can be an increased sense of room volume which can enhance the performance designs of bi/di polar surround speakers. Diffusion panels can be used in a design combination with absorption panels to control parallel surfaces and yield a more natural response.
Absorption - absorbs sound energy. The performance of an absorber is qualified by its NRC value…simply the higher the number, the more effective the product is. You would look at products with a .8 NRC rating for general control and products with 1.0 NRC or higher for more critical applications.
Bass Trapping - control below 100 Hz, can be attacked in many effective ways. Typically vertical corners and wall/ceiling junctures are treated. There are other pressure points that can be treated for low frequency control.
Audioholics: What are the most challenging aspects of the Audioholics showcase room?
Lack of acoustical symmetry combined with the performance specs of your speakers (see Status Acoustics Titus First Look).
Audioholics: Is there anything you would have done differently in the room if aesthetics weren't a factor?
From our perspective of reviewing the original design and now physically being in the space…we don't expect the need for changes. The original acoustical design placed Auralex SpaceCouplers over the 1" absorption pod on the ceiling. We are curious how the use of the SpaceCouplers might have projected energy toward the seating area. Visually, the SpaceCouplers would conflict with the projector so they were taken from the end result.
Building a Home Theater Riser
The next step before the theater chairs from Continental Seating arrived, was to build a Riser platform to raise the back row seating for better viewing, increase tactile response, and to help serve as a broadband absorber at low frequencies for better bass control. Auralex again came to my aid with the blueprints for this platform to serve all of my needs while also form fitting into my rooms dimensions and decor.
See: Building a Home Theater Riser Platform and Reducing HVAC Noise
What's Next?
In our next installment, we will look at 3-D modeling of this space to take a virtual tour of the Audioholics Showcase room followed by actual photo's of the completed job as comparison. Before and after measurements of the room will be included to illustrate the benefits of a properly treated room. We will also show step by step instructions on how to construct a theater chair riser which will serve as a bass trap and natural resonator to increase tactile response. Most importantly, we will do critical listening tests to determine if we have reached audio nirvana, or need to make additional tweaks to make the room worthy of the name Audioholics.
For more information about Auralex, visit: www.auralexelite.com
First Look - Post-Construction
After 13 grueling months, the Audioholics Showcase Home construction has been completed.
Now the fun begins.
With over 10,000 feet of cabling run behind drywall for distributing audio, video and data, at some point this all has to get hooked up to equipment. As of last week I started taking on this challenge solo but could always use a helping hand (*subliminal message* - email ineedyourhelp@audioholics.com and offer assistance immediately).
There are three immediate tasks at hand:
Main Home Theater Room System
This is the premier Audioholics Showcase system featuring 7.2 surround sound, front projection, theater seating, acoustically controlled room, 5.1 surround sound electronics for System 3: Bedroom System.
Family Room System
This system is the primary system used to entertain guests and houses 7.1 surround sound, DLP display, Xbox, and distributed audio for front/backyard, living room and guest rooms.
Master Bedroom System
This system features all inwall speakers, including the subs, with no equipment in the room other than the LCD display cable box, and RF repeater system.
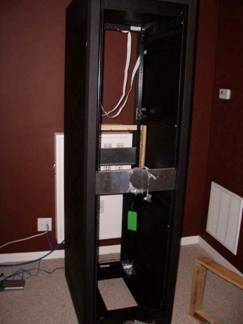
Middle Atlantic Rack (for Primary Theater Room)
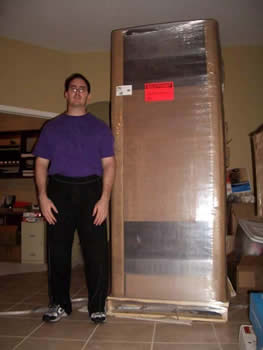 Here
I am today contemplating how to hoist this nearly 7', 300lbs Middle
Atlantic rack up a flight of steps by myself (yea our premier system is
on the second floor, nobody ever accused me of common sense being my
strong point). Just as I built up enough courage (read: insanity) to move
it, the local UPS guy shows up with yet another delivery. He seemed to
be a sturdy fellow so I tried out a tip I learned from my business partner and offered him a quick $20 to help me
carry this beast upstairs.
Here
I am today contemplating how to hoist this nearly 7', 300lbs Middle
Atlantic rack up a flight of steps by myself (yea our premier system is
on the second floor, nobody ever accused me of common sense being my
strong point). Just as I built up enough courage (read: insanity) to move
it, the local UPS guy shows up with yet another delivery. He seemed to
be a sturdy fellow so I tried out a tip I learned from my business partner and offered him a quick $20 to help me
carry this beast upstairs.
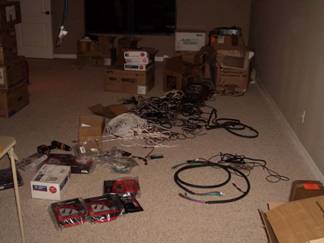
We did it! But now can someone tell me how to assemble this thing? Look at all the boxes, yikes!
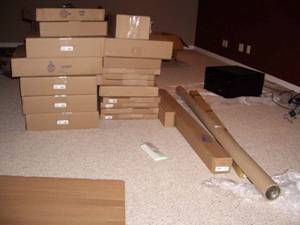
Ok
think back to childhood when you had to match up the shapes to the
empty peg boards. Does this look familiar? Good cause all of the
cables on the floor (and about three more box fulls) in the left pic
need to hook up to the main distribution box to the right. Are we
having fun yet?
 If not, try finishing off Family Room System that has about half the connections of this but in a much tighter space. Main System
will be at least a three month project between waiting on room
acoustics tuning, theater chairs, the main speakers, and getting it all
hooked up and operational. I simply could not wait that long to listen to my favorite tunes, so I managed to get most of Family Room System operational. Once the cabinet guy finishes our shelving, we can mount the TV and put in all the finishing touches.
If not, try finishing off Family Room System that has about half the connections of this but in a much tighter space. Main System
will be at least a three month project between waiting on room
acoustics tuning, theater chairs, the main speakers, and getting it all
hooked up and operational. I simply could not wait that long to listen to my favorite tunes, so I managed to get most of Family Room System operational. Once the cabinet guy finishes our shelving, we can mount the TV and put in all the finishing touches.
During this time you may have noticed I had been absent in the forums. It's not for being shy, as anyone here could tell you. I was up to my armpits in boxes, cables and gear. Living the Audioholics dream you say? Try living in my world for about six months. If you could endure that, than your heart and soul is Audioholics. Here is hoping for the best. Now it's back to the grind!
> Check out the Completed Audioholics Showcase Home < updated 7/25/08
Showcase Home Equipment List
Main Theater Room
|
Component |
Brand |
Model |
MSRP |
|
9.1 CH A/V Receiver |
Integra |
DRX-4.2 |
$1,500 |
| Preamp |
Anthem | STR | $3,999 |
| Power Amplifier |
Anthem |
STR |
$5,999 |
| 11 Channel Amplifier |
Yamaha |
MX-A5200 |
$2,899 |
| 11.2CH Atmos A/V Processor |
Yamaha |
CX-A5200 |
$2,699 |
|
Subwoofer Amplifier |
RBH Sound |
2 x SA-500 |
$599 |
|
Universal UBD Player |
Oppo |
UDP-205 |
$1,299 |
|
Music Server |
Yamaha |
MCX-2000 |
$2000 |
|
Turntable |
Marantz |
TT-15S1 |
$1,500 |
|
Gaming System |
Microsoft |
XBOX 360 |
$500 |
|
Gaming System |
Microsoft |
XBOX OneS |
$500 |
|
Power Conditioners |
APC |
S20 |
$1,999 x 2 |
|
LCD Front Projector |
Epson |
Pro Cinema 6040 |
$3,999 |
|
112” Screen |
Carada |
Criterion Series |
$1,499 |
|
Front Speakers |
Status Acoustics |
8T |
$50,000 |
|
Center Channel |
Status Acoustics |
8C |
$10,000 |
|
Side Channels |
RBH Sound |
SV-661WR |
$2,499 |
|
Back Channels |
RBH Sound |
SI-740 SE/R |
$1,299 |
|
Subwoofers |
Velodyne |
DD-15+ |
$3,999 x 2 |
|
Room Treatments & Consultation |
Auralex Elite |
NA |
$60,000 |
|
Riser / Bass Trap |
Auralex |
NA |
$3,000 |
|
HDMI Cables |
DVI Gear |
SHR Series |
$300 |
|
10AWG Speaker Cable |
Bluejeans |
10AWG |
$300 |
|
Exotic Speaker Cables |
Kimber |
8TC |
$22/ft |
|
Coax Cables |
Bluejeans |
1694A + Canare |
$400 |
|
Toslink & Coax, HDMI |
Blujeans |
Various |
$500 |
|
Component Rack |
Middle Atlantic |
WRK-44SA-32AXS-26 |
$3,000 |
|
Component Rack |
Audiav |
Crystal Series |
$4,100 |
| Universal Remote Control | Control4 |
SR260 |
$600 |
| 10" T3 Touchscreen Remote |
Control4 | CR-TT10-BL | $1,200 |
| 1GB 24 port Switch |
Pakedge | SX-24P8 | $1,240 |
| 802.11ac 3x3 Dual Band Indoor WAP | Pakedge | WK-2 | $1,350 |
| Phase Dimmers and Switches |
Control4 | various | $500 |
| Controller |
Control4 |
EA3 |
$1,000 |
| Universal Blu-ray |
Marantz | UD7007 | $1,299 |
|
Total |
$186,183 |
||
Family Room
| Component | Brand | Model | MSRP |
| 11.2 A/V Receiver | Marantz | SR8012 | $2,999 |
| 16CH Amplifier | Triad | TS-PAMP-100 | $1,700 |
| 8CH Audio Matrix |
Triad | TS-AMS8 | $1,200 |
| Controller |
Control4 | EA5 | $2,000 |
| Mains | Status Acoustics | Decimo | $3,500 |
| Center | RBH Sound | 661-SE/R | $1,199 |
| Side Channels | RBH Sound | 44-SE | $1,299 |
| Height Channels | RBH Sound | MC-615 x 2 |
$1000 |
| Subwoofer | JL Audio |
2 x e112 |
$4,200 |
| UHD Universal Blu-ray Player | Oppo | UDP-105 | $649 |
| Karaoke DVD Player | RSQ | Neo-E500 | $299 |
| Hifi VCR | JVC | HR-VP644U | $249 |
| 65" LCD UHD 4k Display | Samsung | Q9 | $3,000 |
| Power Conditioners |
Furman | Elite-15 DMi and Elite-20 PFi | $1,800 |
| HDMI Cables | Bluejeans Cable |
Various | $400 |
| Audio & Video Cables | Bluejeans Cable |
Various | $200 |
| Gaming System |
Nintendo |
Wii |
$250 |
| 10AWG Speaker Cable | Bluejeans | 10AWG with Canare | $150 |
| Acoustic Isolators | Auralex | MoPADs x2 |
$78 |
| HD PVR | Motorola | FIOS | NA |
| Universal Remote Control |
Control4 |
SR260 |
$600 |
| 802.11ac 3x3 Dual Band Indoor WAP | Pakedge | 2 x WK-2 | $2,700 |
| Phase Dimmers and Switches |
Control4 | various | $500 |
| 8-Port Switch |
Pakedge | SE-8 | $150 |
| 7-Port Router w Bakpak |
Pakedge | RK-1 | $750 |
| Total | $30,877 |
Master Bedroom
| Component | Brand | Model | MSRP |
| Mains | RBH Sound | MC-6 | $549 |
| Center | RBH Sound | MC-414 | $249 |
| Rears | RBH Sound | MC-615 | $499 |
| Subwoofers | RBH Sound | SI-10 | $499 x 2 |
| 42” Plasma Display | Panasonic | TC-P42G15 |
$1,299 |
| Controller |
Control4 | EA1 | $500 |
| Total: | $ 4,896 |
Distributed Audio
Throughout the Audioholics showcase home resides speakers in key rooms and outdoors, all feeding off the Family Room system. With the RX-V2700, Emotiva MPS-1 and MusicCAST MCX-2000 at the heart of this system, we are able to serve three independent zones of audio simultaneously while also serving multi channel surround sound in the family room. Best of all, control is handled via the RX-V2700 with no need for external switch boxes.
Here is a breakdown of rooms serving audio and their associated speaker systems:
| Dining Room | RBH Sound MC-615 in-ceiling speakers | $499/pair |
| Guest Room | Paradigm SA-25 In-wall speakers | $1,099/pair |
| Workout Room | NHT 02-ARC Outdoor Speakers | $499/pair |
| Front Yard | Boston Acoustics Voyager RK6T2 | $599/pair |
| Back Yard | Sonance Mariner 86 | $800/pair |
| Total | $3,497 |
Audioholics Showcase Equipment List Acknowledgments
Without the right gear, none of this would be possible. We painstakingly chose what we believe to be the best equipment for each application to get the job done. A full equipment list is forthcoming, but listed below are the key manufacturers who we have faith in based on our rigid product testing and review process and feature sets they endow. It is our intent to fill this home with bleeding edge technology for delivering the very best in home theater and video to satisfy even the most critical Audio- & Videoholic!
- APC AV
- Anthem AV
- Auralex Acoustics
- Audio Precision
- Audiav
- Blue Jeans Cable
- Boston Acoustics
- Continental Seating
- Control4
- Carada Screens
- Denon Electronics
- DVI Gear
- Furman Sound
- Middle Atlantic
- Marantz
- NHT
- Oppo Digital
- Paradigm
- RBH Sound
- Sonance
- Sencore
- Sanus Systems
- Status Acoustics
- Velodyne
- Wayne Kerr
- Yamaha Electronics
Gene manages this organization, establishes relations with manufacturers and keeps Audioholics a well oiled machine. His goal is to educate about home theater and develop more standards in the industry to eliminate consumer confusion clouded by industry snake oil.
View full profile