
DVDO Air3 Review: Wireless 3D HDMI for All!
DVDO Air3 Review: Wireless 3D HDMI for All!
- Product Name: Air3
- Manufacturer: DVDO
- Performance Rating:


- Value Rating:
- Review Date: December 04, 2013 08:00
- MSRP: $ 199
- Inputs: 1x HDMI (MHL and CEC Compatible)
- Outputs: 1x HDMI
- Maximum Video Resolution: 1080p60, 3D support
- Audio Formats: 7.1PCM/HD Audio (DTS-HD MA, Dolby TrueHD) - up to 192kHz, Dolby/DTS 5.1 up to 48kHz
- Wireless Standard: WiHD 1.1 (60 GHz)
- Range: 35 ft (10 m)
- Power Supply Transmitter: 5V/3A
- Receiver: 5V/1A
- Active Power Transmitter: 3W Typ. (Plus up to 10W for phone charging)
- Receiver: 3W Typ.
- Mounting Options: Two included brackets for back-of-TV/Wall/Ceiling mount with included adhesive and screws
- Unit Dimensions (L x W x D): 4” x 3.5” x 1”
- Package Dimensions: 10” x 5” x 5”
- Package Weight: 2.5 Ibs
Pros
- Great wireless range (for HDMI), over 30’
- Supports all current audio and video formats, except 4K resolution
- No noticeable quality difference compared to an actual cable
- Versatile placement options
- Huge cost savings over long wire runs
Cons
- May skip when walking in-between transmitter & receiver
- In-room only (i.e. cannot go through walls)
DVDO Air3 Introduction
Every time someone mentions “wireless HDMI”, I can’t help but groan and think about all of the failed wireless A/V products I have tested over the years. In my days as a custom installer, clients were constantly asking for wireless solutions, and I can’t blame them. Oftentimes a simple wireless transmitter, for audio, video, or control could have saved hundreds of dollars, if not more, in labor and parts. On more than one instance I said, “Sure, let’s try new wireless solution X, it looks promising.” However, nearly every “yes” set in motion a chain of events involving multiple service calls, hours of “Why the @#$% won’t you just work!,” a poor experience for the client and me, and ultimately a decision to hardwire everything. Fast forward a few years to the present and wireless products have improved but are still far from perfect, especially in the world on AV. However, DVDO’s Air3 Wireless HDMI kit, an updated version of the AIR system, appears to be a diamond in the rough. Following an impressive demo at CEDIA, I requested a review sample. They enthusiastically agreed and quickly shipped the unit. It arrived; I hooked it up, and held by breath as I waited to see if the Air3 was another waste of time, or the redeemer of all things wireless. (Hint: It’s mostly the latter)
Air3 Features and Overview
The Air3 does exactly what you would expect from a wireless HDMI kit. It sends an HDMI signal wirelessly from a transmitter (hooked up to the source, like a Blu-ray player) to a receiver (likely a TV or projector). The idea isn’t revolutionary, but actually pulling it off reliably or with any sort of range is. In order to pull of this feat, DVDO utilizes a relatively new wireless A/V standard, WirelessHD®, or WiHD (version 1.1).
There are two particularly important technological advancements that WiHD has over older wireless HDMI specifications. Frist, it uses the essentially barren 60 GHz RF band, avoiding interference with any other existing wireless products you are likely to find in a home. Second, it uses smart antenna and beam forming technology to bounce the signal off of walls and around obstacles. This allows the transmitter and receiver to work even without line of sight, as long as the signal can bounce off a surface to reach the receiver. Thanks to these two advancements, and some other fancy technologies you can read about here, WiHD products are able to keep up with almost anything thrown at them. For example, the specification has a theoretical maximum data rate of 28Gbps, which is 10Gbps over the new HDMI 2.0 spec, and nearly triple that of HDMI 1.4! More concretely, WiHD supports 1080p/60, 3D, 4K, HDCDP 2.0, CEC, and up to 13.1 channels of 24-bit 192 KHz compressed Dolby TrueHD or DTS-HD audio. Yeah, that’s a lot.

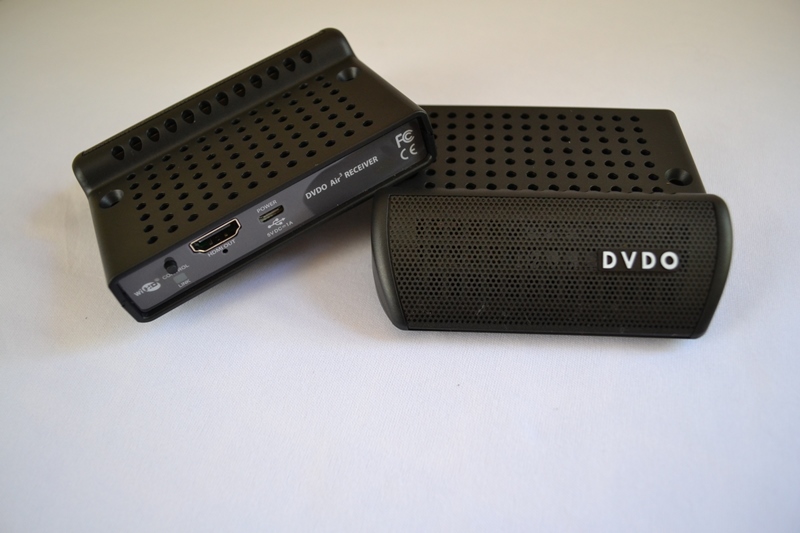
Air3 Transmitter Air3 Receiver
However, just because a standard can support an impressive amount of features, doesn’t necessarily mean that every licensed device will support them all. Luckily, the Air3 does support everything with the exception of 4K. On the plus side, unlike any other current WiHD products on the market, the Air3 incorporates built-in MHL connectivity. Anybody with an MHL compatible phone or tablet can use the Air3 to view their device on the big screen, a fact that DVDO is proud of. While this can already be achieved through devices like AppleTV and Google’s Chromecast, the Air3 is special because it’s a near zero latency system, not to mention that WirelessHD is 20 times faster than 802.11n. I don’t own an MHL compatible device so I was unable to test out this functionality, but I did use the Air3 for some quality Borderlands 2 time on my PS3. I certainly couldn’t tell a difference between the Air3 and the 45’ BJC HDMI cable that I normally use to run video from my receiver up to my Epson ProCinema 5020UB, so latency is a nonissue.
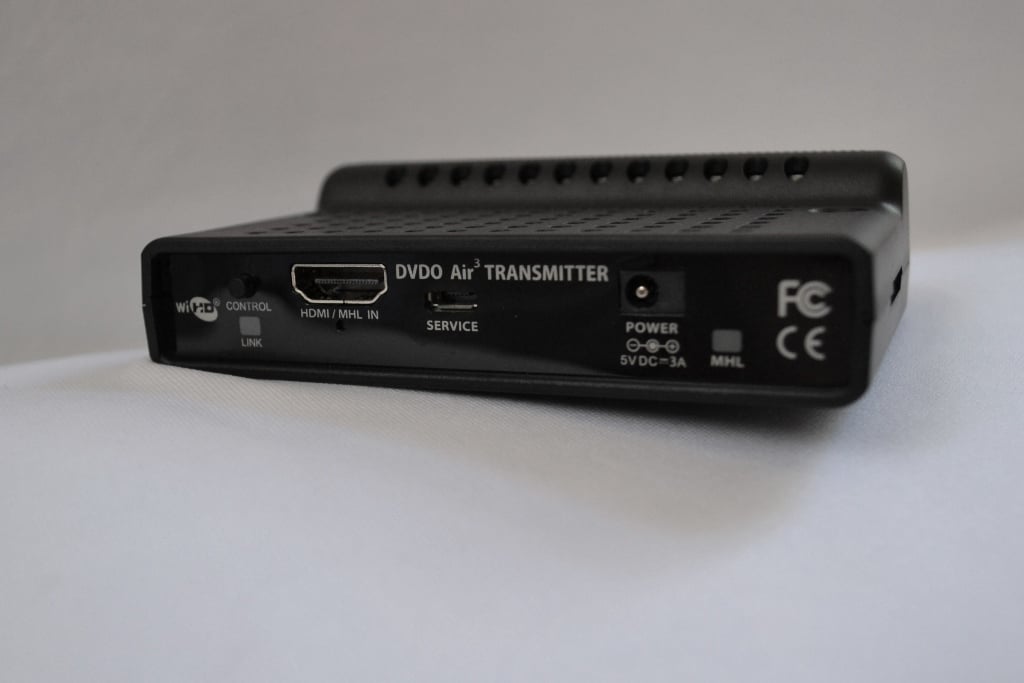
Beyond technical specifications, the Air3 transmitter and receiver units are physically very well designed. They come already paired at the factory, but both units have a “control” button to re-pair if needed. Alternatively, the control button can be used to connect multiple transmitters and receivers together to build a Wireless Video Area Network. A “link” button tells you if the units are connected or transmitting.
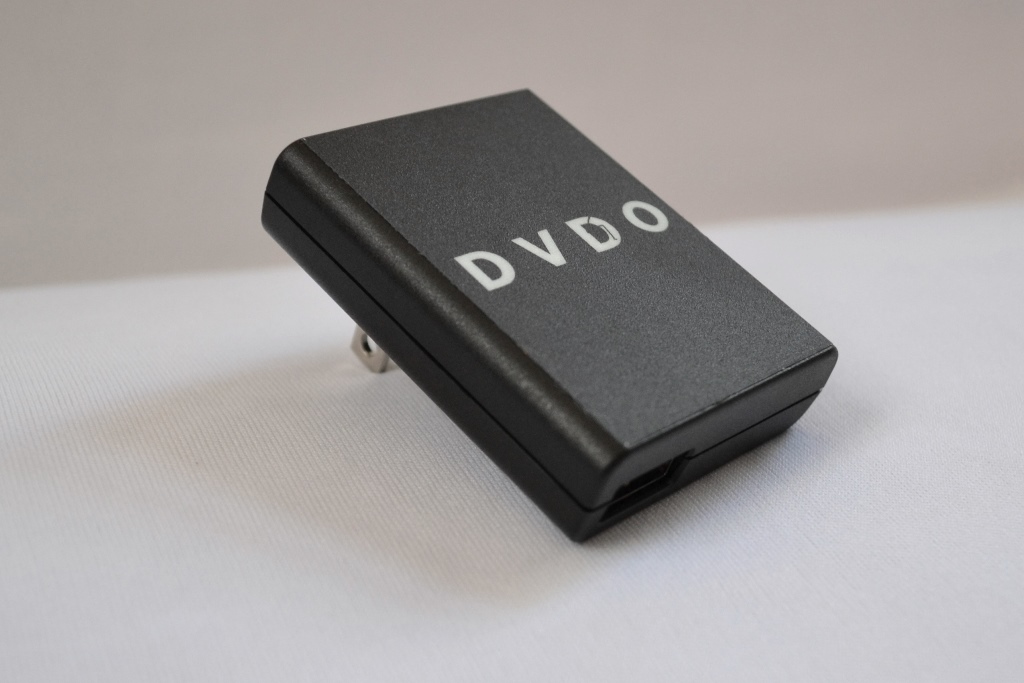
The transmitter has a single HDMI input and is powered via an included 5v AC/DC adapter. It also sports an “MHL” light to indicate when an MHL device is connected. The receiver has a single HDMI output and is powered via USB, small USB wall-wart style power adapter and USB cable included. Using USB to power the receiver is a great idea because it means that you can use any available USB port on your AV equipment for power. This is especially nice for people who place the receiver behind a wall-mounted TV where there may not be an available AC outlet.
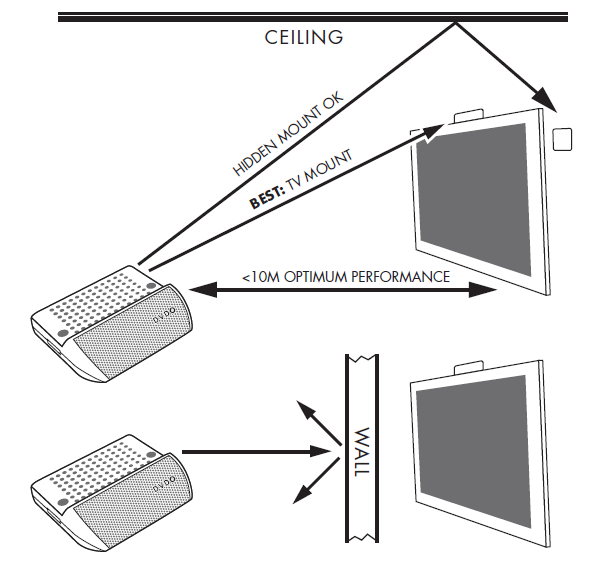
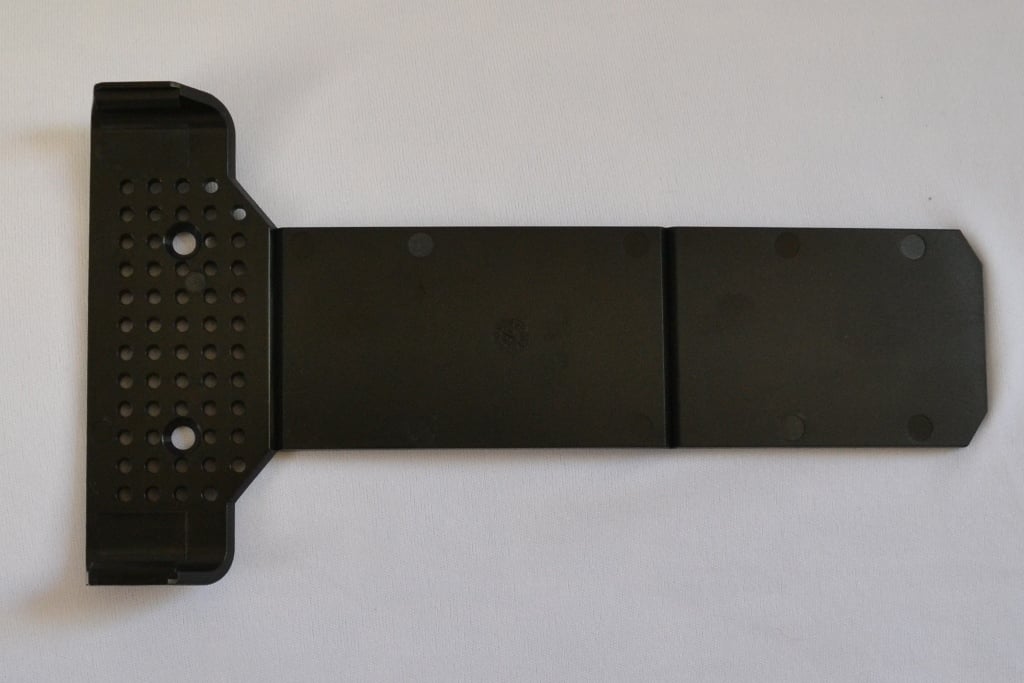
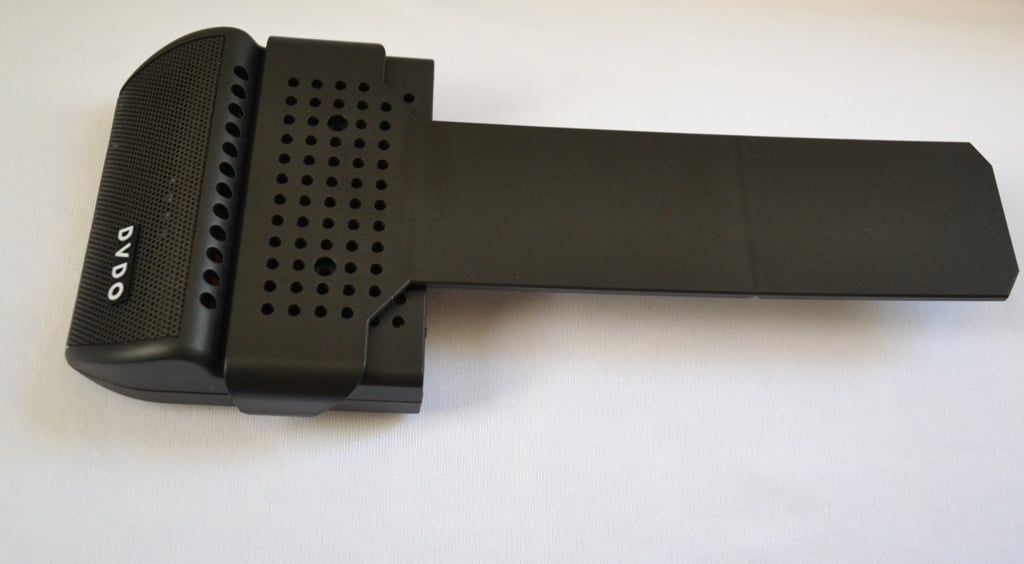
The transmitter and receiver use the same chassis, which is quite small at only 4” W x 3.5” H x 1” D. The small size means that the receiver can be tucked behind a wall mounted TV, or, as in my case, on top of a ceiling-mounted projector. DVDO recommends a direct line of sight between the transmitter and receiver, and to assist they include mounting brackets and adhesive pads. The mounting bracket clips onto the chassis, and has a long tongue that can be stuck to the back of a TV, allowing the unit peak out over the top of the TV. The brackets have two break points on them, allowing the tongue to be shortened or completely snapped off depending on where/how you choose to mount the unit. Alternatively, there are two holes that go all the way through the actual chassis, allowing the unit to be mounted directly to the wall without the use of the mounting bracket or adhesive.
Air3 Placement Guidelines
If the units are not line of sight, then they should be positioned so the wireless signal can bounce off of a nearby surface and reach the other receiver. The mesh part (i.e. where the DVDO logo is on the transmitter, shown in the cover photo of the article) of each unit is where the antenna is focused, so that’s the area that needs to be facing the right direction. If you want a better explanation of how the wireless signal gets from point A to point B, read the editorial note below.
Editorial Note: An analogy might help explain what was going on. Imagine all of the hard surfaces in your home are mirrors, and the Air3 transmitter is a laser pointer. The laser could be pointed directly at its target (the Air3 receiver), which would be line of sight. It could also be strategically pointed at a wall or ceiling to bounce the laser beam around an object and still make contact with the receiver. Think of the Air3 transmitter like a wide-spread laser that figures out automatically where the laser should be pointed to be bounce to the receiver. If it can’t figure out where to bounce the laser off of, the signal breaks. This means that if the Air3 is placed at a height where people will block the signal when they walk around, the Air3 will have to constantly readjust to find the best route to reach the receiver.
Ultimately, in my tests, achieving best performance simply came down to a small amount of trial and error. That isn’t to say I spent much time precisely positioning each unit. Actually, it was quite the opposite. I just tossed them around paying almost no attention to their orientation. It wasn’t until I tested the units at extreme distances or odd angles that I had to be careful of where to point them, but even at the maximum distance I tested (36’), it only took a few second to orient the units for a reliable signal.
Air3 Setup and Tests
From the moment the Air3 arrived and I saw the packaging, I knew it was a device accessible to the general consumer but designed with the custom installer in mind. That’s a good thing, as installers expect a lot from what they carry with them. The packaging is durable enough to hold up to the harsh environment that is an installer’s van and can the unboxed and repackaged with ease (great for a quick test at a client’s home).
Once I had the Air3 unboxed and all the pieces spread out, I went about testing the actual performance of the kit. In order to do this, I set up two separate scenarios. First, an initial, close range test to get a feel for how well the system worked when placed well within its specifications. Second, after establishing how it worked in a low stress situation, I tested its bandwidth and range limits.
Close Range (12’)
Some people may have started this initial test by reading the directions. I’m not one of those people. Wireless devices have always been too finicky about proper power on sequences. If the Air3 was to get my recommendation, it needed to foolproof enough that the directions were rarely needed. So, I unhooked the BJC HDMI from my Epson projector and hooked up the Air3 receiver in its place. Instead of careful placement, I literally left the Air3 hanging in the air supported by the HDMI cable.
Air3
Mounting Bracket Mount
Clipped Onto Transmitter
I hooked up the transmitter to the main HDMI output of my Denon AVR-X4000 receiver, powered everything on in no particular order, and waited for a picture to show up. And waited. And waited some more. Nothing. I read through the instructions, tried the proper power on sequence, and double checked everything I never checked in the first place. Check. Check. Check. As an all too familiar feeling of frustration with wireless HDMI solutions began to set in, the thought crossed my mind that perhaps the transmitter wasn’t hooked up to the proper spot on the back of the Denon. I hadn’t checked that, and the Denon has 3 different HDMI outputs so it was possible I made a mistake. Long story, well, still pretty long, I had hooked the transmitter into the Zone 2 HDMI output instead of Zone 1.
HDMI hooked up properly and dunce cap firmly affixed to my head, my Firehawk G4 screen light up with a brilliant picture and my MartinLogan Theos speakers with the glorious sound of success. I seized the opportunity to “test” the Air3 by playing Borderlands 2 on PS3 for an hour. It performed flawlessly, just as if the system was still hardwired. Picture, sound, and latency all seemed as good as hardwired. The only issue I noticed was that on occasion, if I blocked the line of sight between the transmitter and receiver, the sound would cut out for a fraction of a second as the two units realigned. Still, I was very pleased with the performance.
I wanted to see if the Air3 would work reliably in a scenario where people were walking in between the receiver and transmitter. So, I repositioned the receiver to sit on top of the projector, flipped over to Netflix and queued up a movie titled the same and based on one of my favorite books, Blue Like Jazz. Everything was working well, until about a half hour in the video dropped for a few seconds. About an hour in it dropped again. I repositioned the receiver, sticking it to the bottom of ceiling mounted projector, to provide a better line of site connection. After this repositioning, the Air3 worked perfectly for the rest of the movie. I tried walking, standing, waving my arms, jumping, and otherwise attempting to block the signal. No dice. The Air3 didn’t have any issues working around me.
Long Range (20’ – 25’)
After the Air3 had proven itself at close range, I wanted to see if it could handle the entire 40’ run on the main floor of the home. I don’t just mean handle Netflix, but a full 3D Blu-ray with 7.1 DTS-HD Master Audio. In order to test this, I unhooked my Oppo BDP-93 and hauled it into the living room, which is connected to the theater through French doors (the opening is 5’ W x 6.5’ H) and popped in Pacific Rim.
The Air3 receiver sat on a TV stand right below the FireHawk G4 in the theater, and 25’ away I held up the transmitter to establish line of sight. The results were the same as in the close range tests. Picture and sound were perfect with no noticeable degradation in quality. I kept edging the transmitter back till I was about at the back of my living room, nearly 40’ from the receiver. The signal was still strong. I propped the Air3 up on floor lamp to maintain line of sight and joined my wife in the theater to watch the movie. We watched the first half of the movie in 2D and the second half in 3D, without a single issue the entire time.
View From Transmitter to Receiver in Theater
At this point, the Air3 had proven that as long as it has line of sight, it will perform great. I pushed it a bit further and broke line of sight and still had great luck. However, “great luck” doesn’t mean perfect. When I broke line of sight between the units, the signal would drop out on occasion. The key was if the Air3 was able to bounce the signal around the obstacles in its way, namely me, and then through the opening left by the French doors. The answer to that question was dependent on where the obstacle was, the farther away from the transmitter, the better angle it had to bounce the signal around. The closer I stood to the transmitter, the less likely it was that it would make a reliable connection. If I clasped my hand around the transmitter, the signal would drop completely. Additionally, I noticed a pattern where the video would cut out when I stepped in front of the transmitter, only to reestablish a solid connection a moment later. This makes sense as the Air3 would need to find a new route to send the wireless signal over, which seemed to only take a few seconds.
Recommendations
The Air3 exceeded my expectation, which were admittedly pretty low. It’s not without its flaws. For example, it can’t go through walls or some glass, and it’s not uncommon for the signal to momentarily drop when you walk in between the receiver and transmitter. That said, the quality is equal, or pretty darn close, to a wired connection. Latency is also a nonissue, unlike other wireless HD technologies. The Air3 is also quite small and light, with a versatile mounting system. This means that it can be tucked behind just about anything. It also comes with a nice added bonus of two HDMI cables.
There are two general markets for most AV products, professionals (this includes local AV shops and installers) and the general public (bought and installed by the end-user). For professionals, products need to be bulletproof, and I think the Air3 is close when setup properly. If the Air3 units can be mounted with line of sight, or close to, and in an area where people won’t be interrupting the signal, I’d say go for it. Even up to 40’ away I had a consistent signal. Unfortunately, like with all wireless solutions, problems might not crop up right away because so many external variables can affect wireless signals, leading to long service calls. When installing it in a client’s home, let the system run for an hour two while you wrap up other parts of the job. If you didn’t notice any issues, you’re probably in the clear. As for the typical consumer, I heartily recommend the Air3. It’s much easier for you to perfect transmitter/receiver placement than for an installer making a return trip when they are already behind (I swear I was always running behind). It’s also likely much cheaper and easier to play a bit with positioning the Air3 than it is to buy and run a wire across a room.
If you need an HDMI solution that can go through walls or around obstacles easier, then try something like the IOgear GW3HDKIT we reviewed, which uses WHDi technology that operates on the 5GHz band. The two chief problems with WHDi products are that they are more prone to interference and use slight signal compression. Wireless solutions that use the 5GHz, or lower band, can have latency issues as well.
Conclusion
As with any product, you need to understand its limitations. If used properly, the DVDO AIR3 Wireless HDMI system is solid. No, it’s not perfect. It can’t go through walls and will occasionally drop the signal if not positioned properly. Sometimes, even when positioned properly, the signal will drop when someone walks in between the receiver and transmitter. Still, it doesn’t suffer from HDMI handshake issues like similar products. It automatically reestablishes lost connection without any fuss. It supports 3D and uncompressed HD audio. In the end, I have never used another wireless HDMI system that works as well as this one (granted, I have not reviewed a WHDi system personally). The DVDO Air3 is sure to be miracle solution for many clients, installers, and general consumers.
Cliff, like many of us, has always loved home theater equipment. In high school he landed a job at Best Buy that started his path towards actual high quality audio. His first surround sound was a Klipsch 5.1 system. After that he was hooked, moving from Klipsch to Polk to Definitive Technology, and so on. Eventually, Cliff ended up doing custom installation work for Best Buy and then for a "Ma & Pa" shop in Mankato, MN.
View full profile