
How to Install a Home Theater Projector and Screen from Start to Finish
Installing a Home Theater Projector and Screen
If you’ve never installed a projector or screen before, the process can be quite confusing. The general idea is simple, and you probably already have a good idea of where you want each piece to go, but the specifics are unclear. Which is mounted first, the screen or the projector? How far back should the projector be from the screen? How high should the screen be? How do you fine tune the projector’s position to fill the entire screen? This guide answers all of those questions, and hopefully any others you have about how to mount a projector and screen as well.
1. Screen Location
Your very first task is to determine the best location for the screen. There is usually only one wall in the room that the screen will work on, but try to place it on a wall that has no direct light. The more light that hits the screen, the more washed out the image will look. If the light in the room cannot be completely controlled, you might consider an ambient light rejecting screen like the StewartFilmscreen FireHawk G4 we reviewed.
After you have decided on the best wall, the next task it to decide on the height. We recommend that the bottom of the screen be between 24” and 36” inches off the floor. If you have multiple rows of seating, you may need to go a bit higher to keep clean sight-lines for people sitting behind the first row. Also take into account anything that will sit below the screen, like a center speaker or entertainment center.
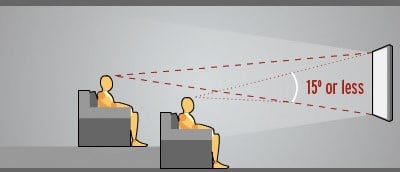
According to THX, viewers should not have to look up more than 15 degrees
At this point in the installation, you could pull out the instruction manual that came with the screen and mount the screen on the wall. However, we recommend swinging back and mounting the screen later, especially for individuals who are installing a front projections system for the first time. The height of the screen can be limited by the vertical offset and lens shift of your projector, which are discussed in step 2. Additionally, after watching a few movies you might find, much to your displeasure, that you prefer the screen higher or lower. It is for these reasons we recommend you mark out your ideal screen placement on the wall using painter’s tape and only mount it after the projector is installed. Make sure that you mark out the viewing area of the screen, not the outside edge of the frame.
Once you have taped off the ideal screen placement, it’s time to find out if the projector can accommodate that screen location.
2. Projector Location
Determining the best location for the projector is quite a bit trickier than the screen. You need to take into account the projector’s throw distance, vertical offset, and lens shift, in addition to restrictions caused by the placement of electrical outlets, lights, and joists. Each of these variables needs to be considered one at a time. We’ll start with throw distance. Let’s take a closer look at each of those foreign-sounding terms:
Throw Distance: How far away from the screen?
The throw distance rating of a projector tells you how close or far away from the screen the projector can be mounted. If you mount the projector too close to the wall, the projected image will be too small. If you mount it too far away, the image will be too big. Thankfully, nearly all modern projectors have a zoom adjustment, which allows you to adjust the size of the image without actually moving the projector closer or farther away from the screen. This can give you great flexibility when figuring out the proper distance from the wall for your projector.
The throw distance of your projector will be listed in the manual. If it only lists a single number, like “1.3”, then your projector does not have an optical zoom adjustment. This means that the only way to adjust the size of the image is to physically move the projector closer or farther away from the screen. In this case, you will need to be very careful to mount the projector in the exact right position. You can calculate this position by multiplying the throw distance number (in this example, 1.3) by the horizontal length of your screen (not diagonal).
Throw distance x width of screen in inches = distance from screen to projector lens
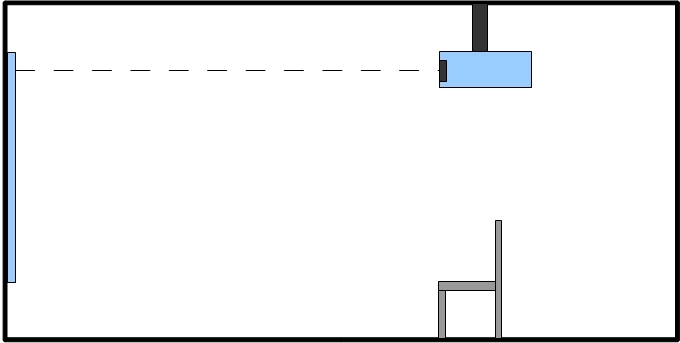
Throw distance is the distance from the screen to the projector
For example, if your screen is 87” wide and the throw distance of your projector is 1.3, the projector should be 113” (87x1.3=113”) from the screen. Remember to measure from the center of the projector’s lens straight to the screen, like the above image shows.
For most people, your projector will list a throw distance, or throw ratio in this case, of something like 1.5-2.25. The wider the throw ratio, the more wiggle room you have in placing your projector. For example, I use an Epson PowerLite Home Cinema 5020UB (replaced by the 5030UB), which has one of the widest throw ratios available at 1.34-2.87. I also use a StewartFilmscreen FireHawk G4 screen, which measures 100” diagonally, 49” high, and 87” wide. This means that I can place the projector between 116.6” (1.34 x 87”) and 249.7” (2.87 x 87”) inches away from the screen. Once you have determined the exact distance away from the screen that the lens should be, write it down and mark the ceiling with a piece of painter’s tape. I recommend labeling the painter’s tape so you don’t confuse it, later in the install, with tape used to mark joists.
Note that the closer the projector is to the screen the brighter the image will be. You can always turn the brightness up or down to suit your preferences. If the system is going in a room that will have ambient light, then the closer to the screen the better, as long as you stay within the rated throw range of your projector. Also note that some screens have a minimum distance requirement, meaning that the projector has to be a certain distance away from the screen in order to avoid hotspotting (when the center of the image is brighter than the edges). Check your manual to see if this is the case with your screen. With all of that said, you can usually get a little deeper black levels with the projector farther away. Also consider the noise of the projector when running. The fan in some projectors is loud enough to be heard during quite scenes of a movie, so mounting it a ways behind your seating position isn’t a bad idea. By the time you have taken into account the minimum distance requirements of the screen, throw distance of the projector, seating locations, and ceiling fixtures, you will probably have a very limited spot to mount the projector.
Vertical Offset: How far down from the ceiling?
Vertical offset tells you how high or low the projector needs to be mounted in order for the image to project at the proper height on the wall. Unfortunately, the math can be a little tricky to figure out. I will explain how to interpret and calculate vertical offset, but most people don’t need to get caught up in the math. Most projectors offer vertical lens shift, which means that the image can be adjusted up or down until it is at the proper height on the wall. If your projector has adjustable vertical lens shift, I recommend actually powering it on and holding it (use a ladder to save your arms) at the height and distance you want it mounted. Next, adjust the vertical offset until the image is in the right location. In some installs, you may need to physically lower the projector for everything to line up. In that scenario, you will need a projector mount that can accommodate an extension pipe. I recommend purchasing the pipe from a local hardware store and having them cut and thread it, you just need to spray paint it black.
For those who have a projector with a fixed vertical offset, are in a situation where you can’t just fire it up and see where the image is on the wall, or need to use an extension pipe, there’s some math to learn.
Offset can either be positive or negative. A positive offset means that the image will be higher than the lens when the projector is set on a table. A negative offset means that the image will be projected lower than the lens when the projector is set on a table. Since a projector is upside down when mounted on a ceiling, we are most concerned with positive offset. Offset is represented in percentages.
The percentage of offset is measured from the center of the lens to the vertical center of the screen. The image below shows a projector with 0% offset. This means that the center of the lens needs to be lined up with the vertical center of the screen. Obviously, this is not practical in most situations. Consumers want the projector to be out of the way, this is why manufacturers incorporate vertical offset.
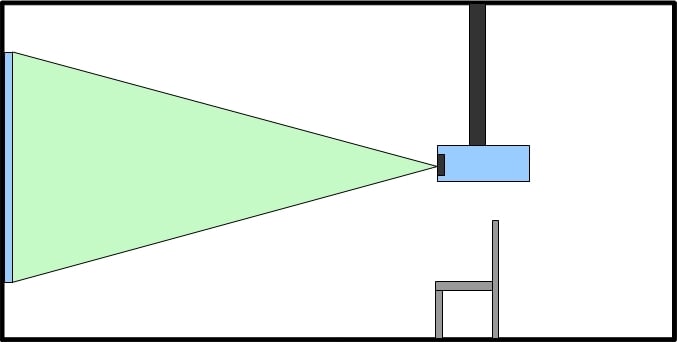
Projector with 0% Vertical Image Offset
Everyone agrees that the above image show a projector with 0% offset; however, you will find conflicting information about the image below. The image below shows a projector with a 50% offset. If you poke around the internet a bit, you will find people that refer to this as 100% offset, but that is incorrect. The total height of the screen is considered 100%. So, let’s say that you have a projector screen that is 49” high (continuing with the 100” diagonal screen mentioned earlier), a 100% vertical offset would mean that the projector needs to be mounted 49” above the center of the screen. In this instance, that would put the projector 24.5” above the top edge of the screen. If the projector had a 50% offset, the lens would be mounted at the same level as the top of the screen.
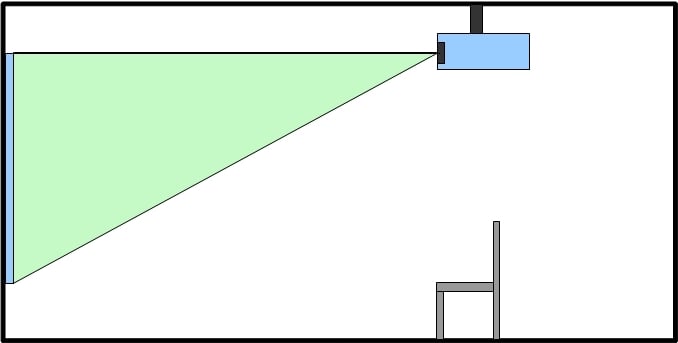
Projector with 50% Vertical Image Offset
You can use this formula to help determine how far above or below the center of the screen the lens should be.
Total height of screen x percentage of offset = distance of lens above/below center of screen
The Epson 5020UB I use has an adjustable offset of -96.3% to +96.3%. This means that the projector can be mounted anywhere from 47” (49”x.963) above the center of my screen to 47” below the center of the screen.
Horizontal lens Shift: How far off to the side?
Horizontal lens shift follows the exact same rules as vertical lens shift, but it allows you to mount the projector off-center horizontally instead of vertically. The formula is also essentially untouched.
Total width of screen x percentage of offset = distance of lens to the left/right of center of screen
There is seldom a reason that you cannot mount the projector so it is exactly lined up with the horizontal center of the screen, and there are two big reasons you should do everything within your power to mount the projector horizontally centered on the screen. First, lens shift can degrade picture quality by subtly distorting the image. The distortion might not be very noticeable, but is still a possibility. Second, vertical and horizontal lens shift interact with each other. The more of one you use, the less of the other you can use. JVC warns consumers about this in the image below.

JVC Vertical and Horizontal Image Offset Diagram
If any of the math was confusing—and it can be on your first read through—you can utilize Projector Central’s calculator, which handles all of the calculations for you. In either case, I always suggest powering on and testing out the projector to double check the calculations.
3. Mount Projector to Ceiling
At this point, you should know exactly where the projector lens needs to be. The next step is to mount the projector to the ceiling. In this article, I am using an OmniMount PJT40 projector mount. There are a wide variety of mounts on the market, and they all work similarly. The biggest difference I have noticed among mounts is how easy they are to install. This is especially true when it comes to dialing in the pitch, roll, and yaw of the projector, which is the final step in this article. Cheap mounts tend to be very difficult to make precision adjustments on. They also tend to be prone to drift, which is when the projector slowly moves out of alignment over time. Nice mounts are more likely to hold the projector in the exact location you leave it. I chose the PJT40 for use in this install because OmniMount’s new MicroDial system promises to make fine tuning easy and avoid drift. It also works with 3” NPT pipe, so I could drop the projector down if needed at some point in the future.
Note about the PJT40: As of publishing this review, I have been using the OmniMount PJT40 for about a month. It hangs down a little lower than my previous mount, the OmniMount 3N1-PJT, but is a big step up in every way. Fine adjustments were ridiculously easy thanks to the MicroDial system and the projector hasn’t drifted at all. All of the parts are above-average quality, which means you can feel confident the projector will stay mounted and not end up in your lap half way through a movie. The PJT40 is a little on the expensive side, but I think that the ease of install and high quality construction make it worth it.
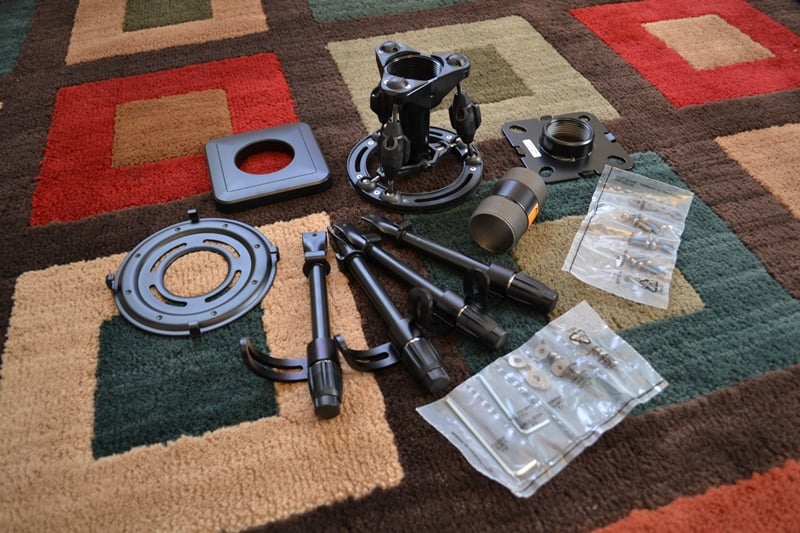

OmniMount PJT40 Parts Don’t forget tools
Projector mounts are split into two major sections, the part that attaches to the projector (projector plate) and the part that attaches to the ceiling (ceiling plate). You always start by attaching the projector plate to the top of the projector. Follow the instructions for your particular mount. Note that leveling the projector is easiest if you center the plate on the projector and ensure the plate is close to level.
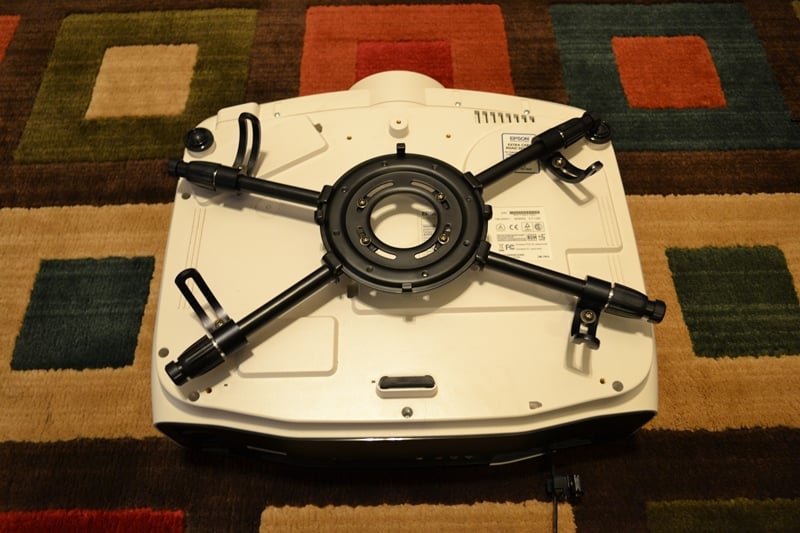
PJT40 Projector Plate
Next, you need to determine the exact location the ceiling plate should be mounted. Attach the ceiling plate to the projector plate. Your goal here is to completely assemble the mount while the projector is still sitting on the ground. Measure the distance from the lens to the ceiling plate. As you can see in the image below, that distance was about 6” for this install. Carry over that measurement to where you marked the ideal lens placement on the ceiling earlier in the install. Measure back and make another mark for the ceiling mount. In this install, that would mean that I simply measure back from the lens mark six inches, and that’s where the front of the ceiling plate should be. If the ceiling plate isn’t centered side-to-side with the projector lens, you will also need to take into account that distance. In the below image, the ceiling plate is centered side-to-side with the lens, so no additional measurements were needed.
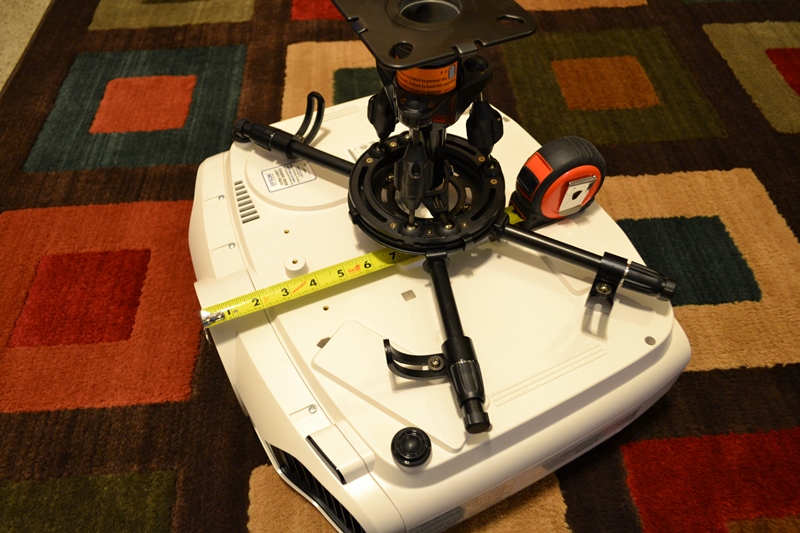
Measuring From Lens to Ceiling Plate
Detach the ceiling plate from the projector plate and proceed to mount the ceiling plate on the ceiling (are you tired of reading the words projector, ceiling, and plate yet?). The mount should come with 4 lag bolts, but most of the time only two are needed if they are properly centered on a ceiling joist. I never fully trust stud finders (especially on textured ceiling), so I recommend poking a small nail or precision screw driver into the ceiling to ensure you found a joist. In some instances there won’t be a joist where you want to mount the ceiling plate. In this case, you will either need to utilize lens shift or mount the plate to a block of wood that’s large enough to span the distance between two joists and secure that block to the ceiling joists (that block can go inside the ceiling if you have attic access). Once the ceiling plate is secured, install any sort of trim ring that came with the mount.
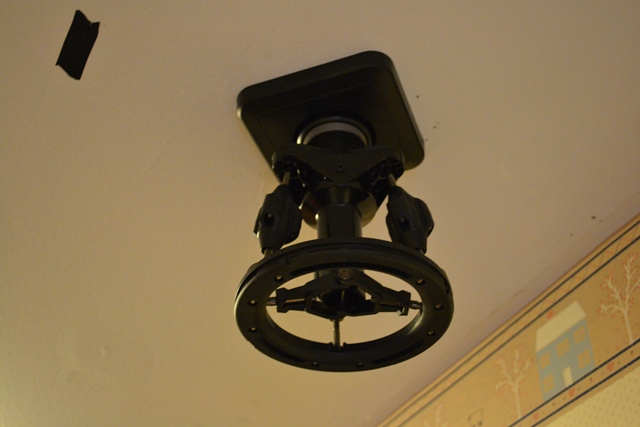
Ready for the projector! Try to ignore the ugly border
Enlisting the help of a significant other or friend is a good idea when attempting the next step. Verify everything is secure, then lift up the projector and attach it to the ceiling plate. Install any safety screws that came with the mount. Attach any power or video cables, and loosely zip tie the cables in place. To help avoid drift and lessen the risk of damaging the inputs on the projector, zip tie the cables to the mount, not the projector.You still need to leave enough slack for final adjustments.
4. Mount Screen on Wall
Every screen mounts a little differently, but steps are completed in the same order. This tutorial assumes you are using a fixed frame screen, as opposed to a retractable screen. First, assemble the frame. Second, temporarily mount the frame on the wall and check that it is horizontally level and vertically plumb. You may need to use shims between the frame and wall in order to achieve a plumb screen. Third, take down the frame and attach the actual screen to the frame. Fourth, re-mount the frame (now with screen attached) and double-check horizontal level and plumb. I recommend using a 2 or 3 foot level instead of a short 5 or 8 inch level (a.k.a. torpedo level).
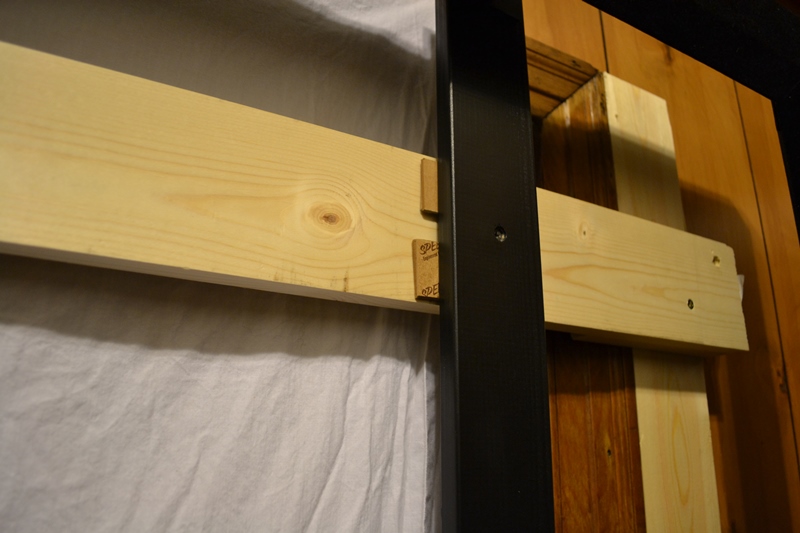
Sometimes you need to be creative
In my room, I actually had to build an entire wooden frame out of 1”x4”s to mount the screen’s frame to because it was going over a window. You can see in the above image that I also had to use shims when leveling.
5. Fine Tune Projector Orientation
You are almost done, but now comes what I think is the hardest part of the entire process. Fine-tuning can be time consuming, frustrating, and uncomfortable, unless that is, you enjoy holding your hands over your head for extended periods of time as you repeat the same steps over and over. You will need to adjust the focus, zoom, pitch (tilt up and down), yaw (angle to the left/right), and roll (horizontal level) of the projector/mount. This is where buying a nice projector mount, like the PJT40, really pays off. These adjustments are very minor, thus they require a mount that is stable and offers precision control. Many entry level mounts do not offer reliable and easy to use precision adjustments.
Most projectors come with a built-in grid pattern that will help when making these adjustments. Alternatively, you can use the patterns on dedicated calibration discs like Disney WOW, or on the THX Optimizer included on most THX certified discs (it’s usually buried in the DVD/Blu-ray menu). If you don’t have access to any test pattern, a normal 16x9 HD signal will also work.
You should start by taking a minute or two to get the image relatively close to accurate before doing any fine adjustments. As you go through this arduous process, know that you will have to revisit each adjustment multiple times. Every time you adjust one thing, it will affect something else. This is a back-and-forth process. It’s also nice to use two people, one to make the adjustments and the other to stand by the screen and give feedback. This is especially true if the projector is far away from the screen.
Zoom
Zoom is adjusted by turning a ring around the lens. I normally make the image a little larger than the screen to ensure that the entire screen is filled. Any part of the image that spills over will be absorbed by the screen frame. Sometimes I will purposefully make the image too small while performing other adjustments and only zoom out to the cover the full screen when everything else is dialed in. This is because it can be easier to tell if pitch, roll, or yaw are incorrectly set when you can see the border of the image on the actual screen, as opposed to the frame around the screen.
Focus
Adjusting focus on a projector is just like with a camera. Again, it’s controlled via a ring around the lens. You start by moving the image out of focus, and then slowly adjusting the ring until the image snaps into focus. If you are doing this alone, you can use a pair of binoculars or walk up to check focus. Many people simply adjust focus using their naked eye from the distance of the projector.
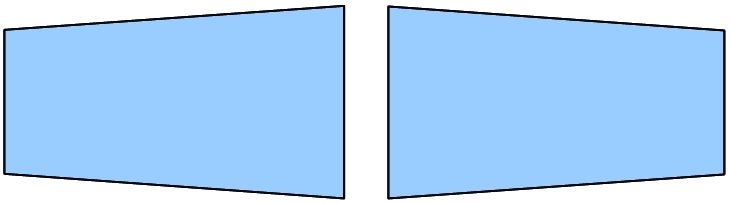
Roll
Roll is fairly easy to adjust. Assuming that the screen is level, all you need to do is set a small torpedo level on the projector, oriented so it is parallel to the screen, and adjust the mount until the projector is also level. If yaw is not correct, it’s possible that the image will look unlevel even if the projector and screen are both level. Remember, fine-tuning is a process of repeatedly making small adjustments to each setting. You don’t simply adjust any setting to be perfect and then move on to the next one.
When roll is not set correctly
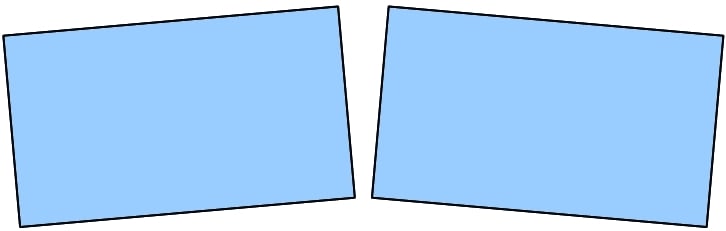
Pitch
If the projector is pointing up or down, you will have issues with pitch. The projector should be pointing straight forward, perpendicular to the screen. If pitch is set correctly, the left and right sides of the image will be parallel. The easiest way to dial in pitch is to set a small torpedo level on the projector, oriented so it is perpendicular to the screen, and adjust the mount until the projector is level.
When pitch is not set correctly
Once the pitch is set properly, chances are that the image will be too high or low on the screen. This is where vertical lens shift comes into play. Use lens shift to bring the image up or down. You may have to go back and forth between adjusting pitch and vertical lens shift a few times until the image is lined up properly. Do not, ever—no matter what—use keystone correction. Keystone correction is digital processing used to manipulate the size of the image and compensate for incorrect pitch. It is convenient, but will reduce image quality. If vertical lens shift doesn’t do the trick, you will need to physically lower or raise the mount or screen.
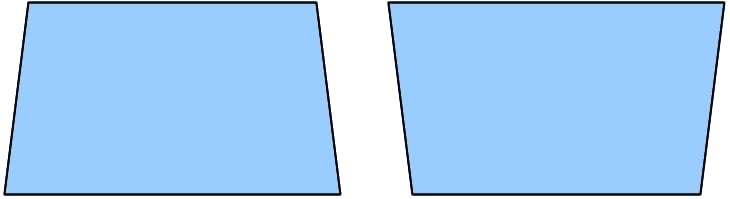
Yaw
I find that yaw is the most difficult adjustment to make. Unlike roll and pitch, you can’t use a level. To adjust yaw, you need to turn the projector from side-to-side until the top and bottom of the image are parallel. If the lens is exactly horizontally centered on the screen, the image will also be horizontally centered on the screen. If the lens is a little off, the image will be off. Just like adjusting pitch, lens shift is used to fix this problem. Adjust yaw a little bit, then lens shift, then yaw, and so on, until the image is horizontally centered.
When yaw is not set correctly
An invaluable tip when adjusting yaw is to use a piece of tape to mark the center of the screen (place the tape on the frame, not the screen). It’s far easier to line up the centerline on a test pattern to a piece of tape than it is to use the edges of the screen as a reference. You can also use this trick when adjusting pitch, just put the tape on the vertical center of the screen instead of horizontal center.
Conclusion
At this point, you are finished mounting and aligning your screen and projector. Congratulations are in order! But don’t get too settled in, you are likely far from finished with the entire system. Check out our home theater set up guide for help setting up the rest of your gear, and making picture adjustments on the projector. If you have any questions or comments, let us know in the comments below.
Cliff, like many of us, has always loved home theater equipment. In high school he landed a job at Best Buy that started his path towards actual high quality audio. His first surround sound was a Klipsch 5.1 system. After that he was hooked, moving from Klipsch to Polk to Definitive Technology, and so on. Eventually, Cliff ended up doing custom installation work for Best Buy and then for a "Ma & Pa" shop in Mankato, MN.
View full profile