
Optoma HD80 DLP Projector Review
Optoma HD80 DLP projector
- Product Name: HD80 DLP Projector
- Manufacturer: Optoma
- Performance Rating:

- Value Rating:
- Review Date: September 13, 2007 13:15
- MSRP: $ 2999
|
Brightness: 1300 ANSI lumens
(high power mode) |
Lamp: 300W UHP; 3000 hr life |
Pros
- One year lamp warranty
- Decent after-calibration performance
- Plethora of inputs
- Ergonomic backlit remote
Cons
- Outrageous 36% vertical offset
- High default color temp (even at Warm setting)
- Poor green color response
- Poor initial RGB levels (grayscale uniformity)
- Prominent fan noise (even in Normal mode)
- ImageAI-II Auto-Iris a tad noisy and slow
- No discrete on/off on remote
- No lens shift
- Weak 1.2x zoom
HD80 Setup and Installation
We reviewed the Optoma HD80's big brother, the HD81, back in March of 2007. It rated fairly well, but wasn't exactly a bargain product due to having a retail price tag that rivaled that of a compact car. Sure, it had outboard Gennum VXP processing and some creature features that made it cool, but 1080p became the defacto standard later that year and prices were dropping like the local mob rat sporting a pair of cement galoshes. As the HD80 hits the scene it has a lot of competition, but it joins a welcome crowd of under-$3000 projectors that output 1080p/24/60 and handle such features as 12-bit Deep Color and the related aspects of HDMI 1.3.
Basic Setup and Installation
Setup was interesting. We typically throw from about 11 to 11.5 feet away from a 100-inch Stewart Filmscreen Studiotek 130 Luxus Deluxe Screenwall. Guess what – not gonna happen. To hit a 100-inch screen, the Optoma HD80 requires at least 13.5 feet of throw. It only has a 1.2x zoom lens, so you're really going to need some decent room to make sure you can fill a larger screen. This isn't bad – it just needs to be noted as you plan your install. In our case, we ended up with an 84-inch diagonal screen and that worked well for our evaluation purposes. OK, here's where the other shoe drops: the Optoma HD80 has a 136% vertical screen offset. That means that if you have a 60-inch tall screen, you'll need to mount the projector 21.6-inches above it (or below it). If you're going for ceiling mounting, that means that you'll require over 9-foot ceilings just to have a 100-inch diagonal screen that sits 30-inches off the ground! In my opinion there is really no excuse for this and Optoma needs to start heeding its customers and providing lower offsets (or an expensive vertical lens shift). A 36% offset basically rules out anyone with 8-foot ceilings from practically using this projector, unless they intend to angle it downward or engage keystoning (which we definitely do not recommend unless you have no other option).
An anamorphic lens is available as an option for the HD80, but you're looking at $6000 for the motorized BX-AL133 that Optoma sells and recommends as an accessory. That's tough to swallow, but 2.35:1 screens are amazing and that (or a third party product) is about the only way you'll get it.
Note: You will not need to replace the filter on this projector as the light engine is sealed. This also results in a nice, tight enclosure that doesn't leak any light into the room.
Take a look at the throw chart:
Throw Chart for Distancing the Projector from a 16:9 Projection Screen
| Screen Size Diagonal (inches) |
Size (Inches) | Distance (Feet) | ||
| width | height | wide | tele | |
| 70 | 61.0 | 34.3 | 9.4 | 11.3 |
| 80 | 69.7 | 39.2 | 10.8 | 12.9 |
| 90 | 78.4 | 44.1 | 12.1 | 14.5 |
| 100 | 87.2 | 49.0 | 13.5 | 16.1 |
| 106 | 95.9 | 53.9 | 14.8 | 17.7 |
| 120 | 104.6 | 58.8 | 16.1 | 19.3 |
Connections
Taking a look at the rear of the HD80, you'll quickly find that all the inputs and features you're likely to need or want are there. Dual HDMI inputs as well as component and DVI-I mean that only the most ridiculous configurations are going to have trouble piping signals into this display. A 12V trigger output and RS-232C port means that custom installers have the tools they need to integrate this projector into more complex control systems. The only port missing from the HD80 is an HD15 (RGB) port for PC use and the DVI-I takes care of that since it supports analogue VGA-style signals through its input. This is one well-equipped projector.

HD80 Remote Control & Menu System
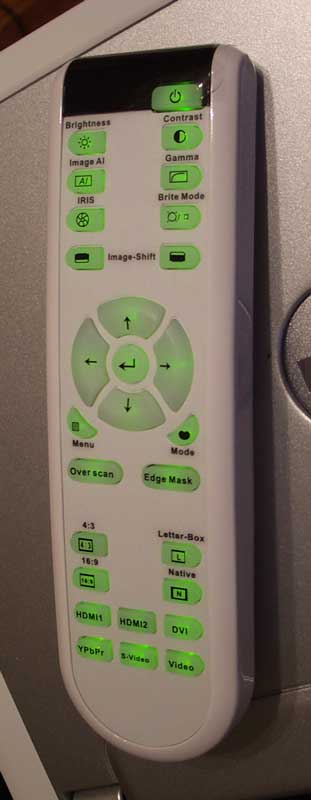 I
liked the remote that came with the Optoma HD80. It was very ergonomic and
failed only one of my main criteria – it lacks discrete on-off commands. All I
can say about that is “duh”. This should be very very obvious by now as
discrete on/off commands make it very easy to program universal remotes which
may not have access to the internal IR codes of the unit itself. Apart from
that, the backlighting was phenomenal. While others are going for pretty colors
and a more elegant look, Optoma chose bright green – the most visible backlight
color choice available bar-none. The controller feels good in the hand and your
fingers naturally find their way around the buttons. All inputs are found at
the bottom and main features like Iris, Brite Mode, Brightness & Contrast,
and ImageAI are directly accessible from the top of the remote. I would say, in
fact, that Optoma delivered almost all the primary (and even some secondary)
functions right on the remote so as to eliminate much of the required use of
the traditional menu system for on-the-fly picture adjustments.
I
liked the remote that came with the Optoma HD80. It was very ergonomic and
failed only one of my main criteria – it lacks discrete on-off commands. All I
can say about that is “duh”. This should be very very obvious by now as
discrete on/off commands make it very easy to program universal remotes which
may not have access to the internal IR codes of the unit itself. Apart from
that, the backlighting was phenomenal. While others are going for pretty colors
and a more elegant look, Optoma chose bright green – the most visible backlight
color choice available bar-none. The controller feels good in the hand and your
fingers naturally find their way around the buttons. All inputs are found at
the bottom and main features like Iris, Brite Mode, Brightness & Contrast,
and ImageAI are directly accessible from the top of the remote. I would say, in
fact, that Optoma delivered almost all the primary (and even some secondary)
functions right on the remote so as to eliminate much of the required use of
the traditional menu system for on-the-fly picture adjustments.
The Menu System
The menu system of the HD80 is a slightly tweaked version of what is seen on the HD81 projector. The menu is dressed up slightly and, as with the other Optoma menus, everything is easy to get in and out of. The best part of the menu is that it remembers where you've been, so you don't have to manually start over if you were 3 levels down into the navigation and making, for example, RGB adjustments. In my opinion, this is worth its weight in gold in terms of convenience points. For a more in-depth look at the menu options, please see our breakdown of the HD81 projector – it really is that similar.
Daytime Viewing Experiences
The system was clearly visible during the day when set to its brightest settings (Iris open, Brite Mode on and True Vivid raised up all the way). As you'll note in my calibration section below, the lumens put out at its brightest mode were over twice that of the optimized Cinema mode. This projector can certainly crank it out during the day and allow you to host a party, sporting event or other activity that requires some amount of ambient light compensation.
HD80 Calibration and Black Levels
 Calibrating
this projector was essential. We were not pleased with the initial measurements
– especially with the high color temperature and excessively blue picture. If
all HD80s behave as this one, you will want to get your projector calibrated by
an ISF professional to get the optimal picture quality from it. After I tweaked
this unit, I was pleased with the performance, but initially there is much to be
desired.
Calibrating
this projector was essential. We were not pleased with the initial measurements
– especially with the high color temperature and excessively blue picture. If
all HD80s behave as this one, you will want to get your projector calibrated by
an ISF professional to get the optimal picture quality from it. After I tweaked
this unit, I was pleased with the performance, but initially there is much to be
desired.
We utilized datacolor’s ColorFacts Professional 6.0 software to calibrate and measure the grayscale response of the HD80. Starting positions were more than slightly off and we wondered if the unit would be able to be brought under control through calibration. For the ‘before’ measurements, Auto Iris was engaged and the settings were configured for best film response in a light-controlled room.
|
Before Calibration |
After Calibration |
|
|
|
|
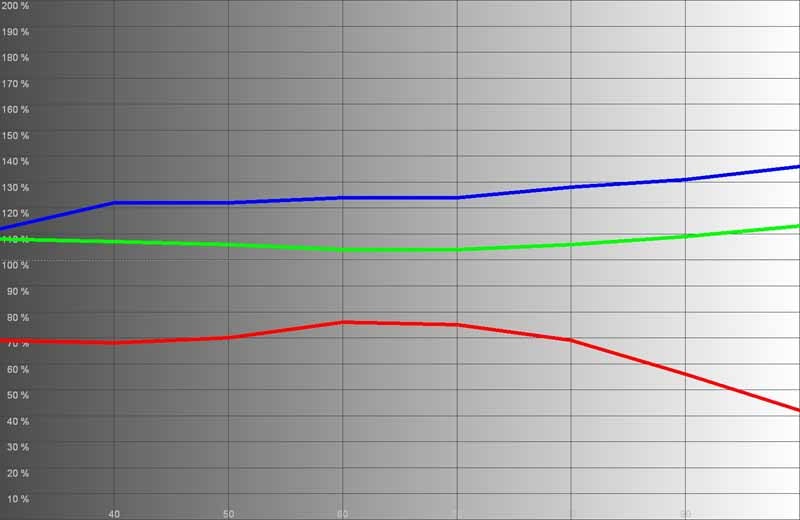
You can definitely see the initial color temperature throughout the entire IRE range. I was skeptical if I would be able to fix it completely. |
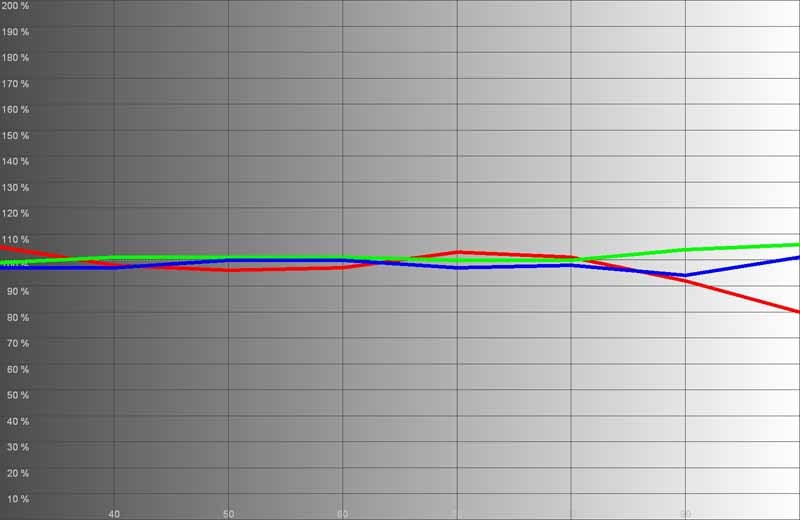
I guess I should have more confidence in myself as the values came together and we received very favorable results. We did note, that the red curve held its shape, dropping off significantly after 80IRE. This left a rather unnatural cast to any solid white areas on the screen. |
|
|
|
|
We have a somewhat S-shaped gamma curve that is not what we want in this projector. |
After measurements had the Auto Iris disengaged and we noticed a marked improvement. |
|
|
|
|
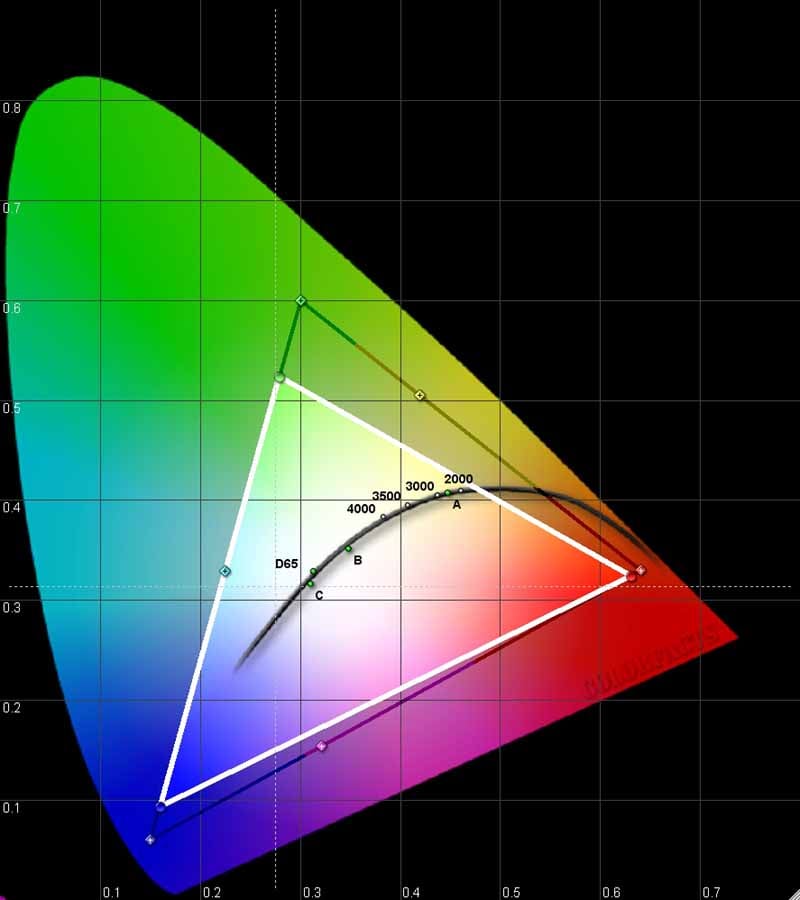
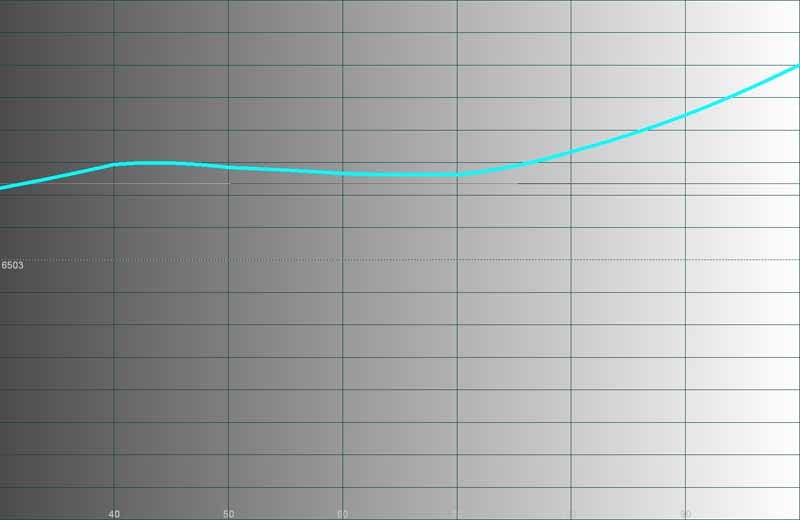
Yech – color temp averaged around 8300K – ridiculously high and nowhere near the desired D65. |
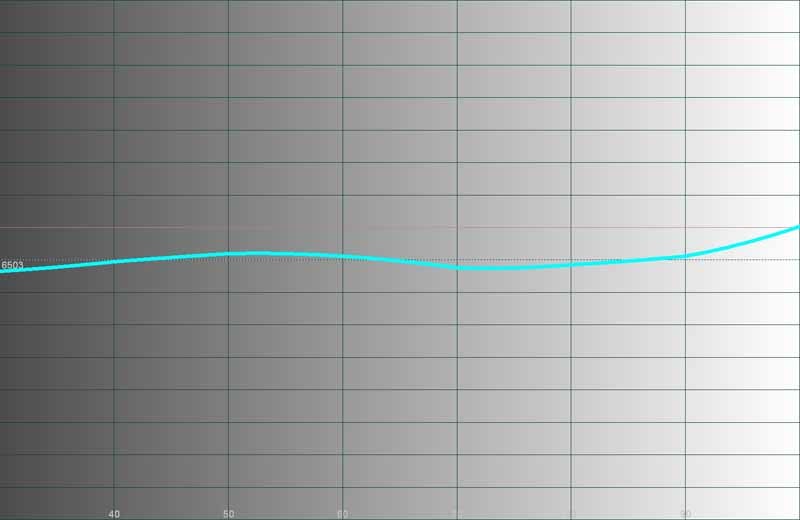
After calibration, we scored 6500K +/-100 IRE for most of the practical luminance range. |
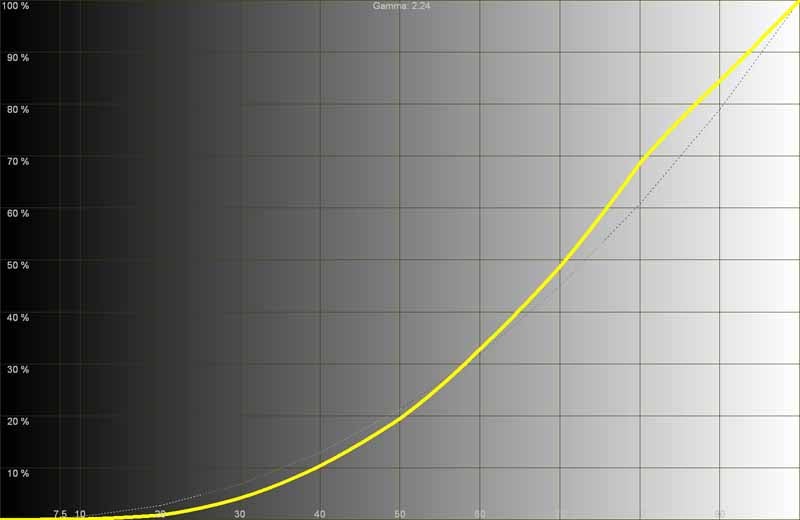
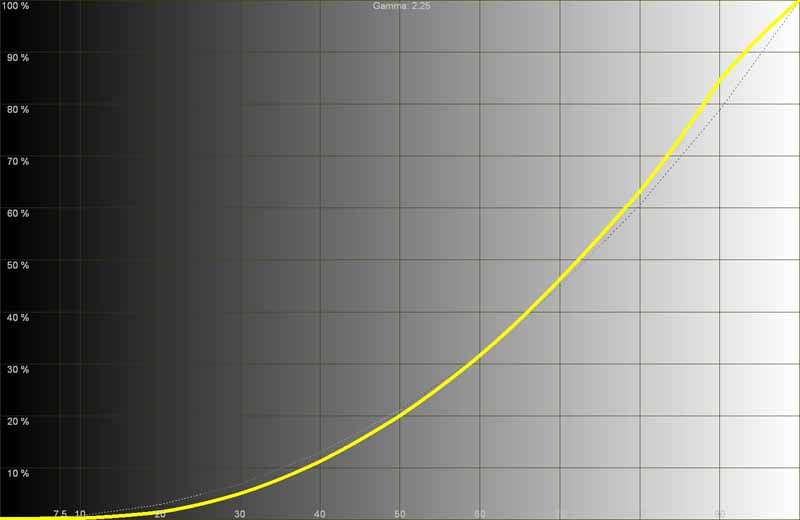
As you can see there are issues with the initial calibration of the HD80 and we had to really tweak it out (in the User menu) to get it into shape. If you're an installer, look forward to charging for an ISF calibration after you install this projector – it's all but required for best performance. Some interesting tidbits from my adventures:
My initial measurements were taken with the Color Temp set to 'Warm', the Irisz at Max (16), Cinema Mode, Film Degamma, ImageAI set to 'Off' and Brite and High Altitude modes set to 'Off'. With these settings here are the color temperature measurements:
- Warm = 8300K
- Mid = 9400K
- Cold = 11,400K
Wow, that's one cool projector – but not in the way that you want it to be cool. We proved that calibration can fix this, but Optoma should have better initial measurements on its projectors.
We measured around 21.5fL at 100IRE using our “best guess” Cinema settings. Here' is how the lumens looked through various modes:
- Cinema mode = 21.5fL
- Bright mode = 23fL
- TV mode = 27fL
- sRGB mode = 20fL
Now, Bright mode crept up to 31fL with the lamp's Brite Mode turned on. When I opened up the Iris (to 0) it fairly leaped to 51.5fL. That's bright!
Let's talk Contrast Ratio for a moment. I actually measured 1535:1 in Cinema mode, though this was based on a reported black level of 0.014fL. The Contrast Ratio went up to 1800:1 when I engaged the Auto Iris mode. In Bright mode with AI turned on we saw 2196:1 measured Contrast.
Note: Engaging Image AI (Auto Iris) negates the ability to disengage the Brite Mode lamp option. Image AI requires full lamp power in order to have the range of values it needs to alter the light output. As a necessary result, the fan noise increases. We recommend disabling Image AI and opting for the quieter low lamp mode and setting the Iris to 16 (closed) in light-controlled rooms.
HD80 Benchmark Testing and Results
Audioholics/HQV Bench Testing Summary of Test Results
Perfect
SD Score is 130
Perfect
HD Score is 100
Optoma
HD80 Benchmark SD Score: 80 (you are going to get an excellent
picture)
Optoma
HD80 Benchmark HD Score: 75 (you are going to get an excellent HD
picture)
| SD Test | Max Points |
Results | Pass/Fail |
| Color Bar | 10 | 10 | Pass |
| Jaggies #1 | 5 | 5 | Pass |
| Jaggies #2 | 5 | 5 | Pass |
| Flag | 10 | 10 | Pass |
| Detail | 10 | 10 | Pass |
| Noise | 10 | 5 | Pass |
| Motion adaptive Noise Reduction | 10 | 0 | Fail |
| Film Detail | 10 | 10 | Pass |
| Cadence 2:2 Video | 5 | 0 | Fail |
| Cadence 2:2:2:4 DV Cam | 5 | 0 | Fail |
| Cadence 2:3:3:2 DV Cam | 5 | 0 | Fail |
| Cadence 3:2:3:2:2 Vari-speed | 5 | 0 | Fail |
| Cadence 5:5 Animation | 5 | 0 | Fail |
| Cadence 6:4 Animation | 5 | 0 | Fail |
| Cadence 8:7 animation | 5 | 0 | Fail |
| Cadence 3:2 24fps film | 5 | 5 | Pass |
| Scrolling Horizontal | 10 | 10 | Pass |
| Scrolling Rolling | 10 | 10 | Pass |
| Total Points | 130 | 80 |
The HD80 was sent 480i via HDMI from a Denon DVD-3930CI.
| HD Test | Max Points |
Results | Pass/Fail |
| HD Noise Reduction A & B | 25 | 0 | Fail |
| HD Video Resolution Loss | 20 | 20 | Pass |
| Jaggies A & B | 20 | 20 | Pass |
| Film Resolution Loss | 25 | 25 | Pass |
| Film Resolution Loss Stadium | 10 | 10 | Pass |
| Total Points | 100 | 75 |
The HD80 was sent 1080i via HDMI from a Toshiba HD-XA2 HD DVD Player.
Comments on HQV Testing
We were quite pleased with the results of the onboard PixelWorks DNX processing. In fact, the HD80 scored higher on our HQV Benchmark DVD tests than the HD81 with the outboard Gennum processor. This may be surprising to some, but PixelWorks is no slouch when it comes to deinterlacing and scaling. The Film Detail test passed, but just barely as the lock on took right up until the very border of fully passing to engage. We've seen quicker processors, but the system had a good memory and it never missed its mark. Noise reduction was acceptable at lower settings, though it wasn't as effective. When turned up, the display exhibited what I call “floaters” - where the center of an item remains detached from the edges which are being processed to reduced noise. The effect is of objects orbiting inside themselves in a very unnatural way. In motion, trails could be seen at any setting above 4. If you want to engage the noise reduction, just be sure to keep it below this level.
HD80 Conclusion & Ratings
 Once calibrated, the Optoma
HD80 DLP projector put on a wonderful show. Blacks were rich and colors
vibrant. I did notice rainbows from time to time (and ALL the time on test
patterns) but it was rare to see them in everyday (or night) viewing material.
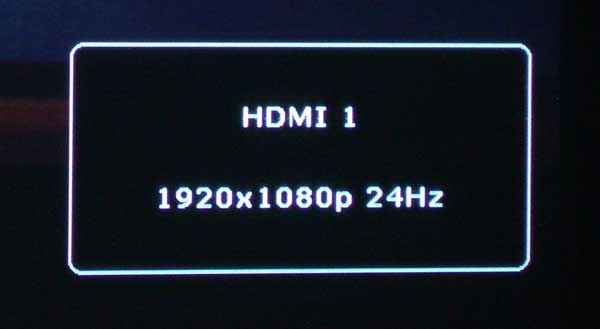
For the Blu-ray Discs, we had playback going at 1080p/24 – which was simply
amazing though at times it seemed to be jumpier than 1080p/30 or 1080i/60.
Once calibrated, the Optoma
HD80 DLP projector put on a wonderful show. Blacks were rich and colors
vibrant. I did notice rainbows from time to time (and ALL the time on test
patterns) but it was rare to see them in everyday (or night) viewing material.
For the Blu-ray Discs, we had playback going at 1080p/24 – which was simply
amazing though at times it seemed to be jumpier than 1080p/30 or 1080i/60.
advertisement
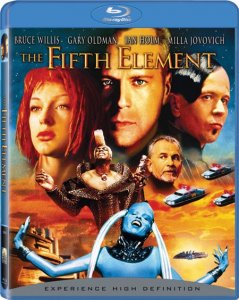 Blu-ray: The Fifth Element (Remastered)
This BD title
was done so poorly on its initial release (grainy, film defects, etc) that Sony
opted to take it back from users for free and replace it with a newly
remastered copy. I got mine replaced and when I popped it into my Playstation 3
to view it, I was pleased beyond words. Finally, I had a high-definition
version of this movie that exceeded, by far, the resolution and quality of the
Superbit DVD. Colors popped. Hair and skin detail flourished, and the many
lines, edges and motion elements in this disc never once created a problem for
the HD80 in either 1080p/24 mode or 1080p/30. There are even some nice extras
like a running text commentary which points out interesting facts – much like
pop-up videos on the MTV of days gone past. Here are some of my favorite screen
captures:
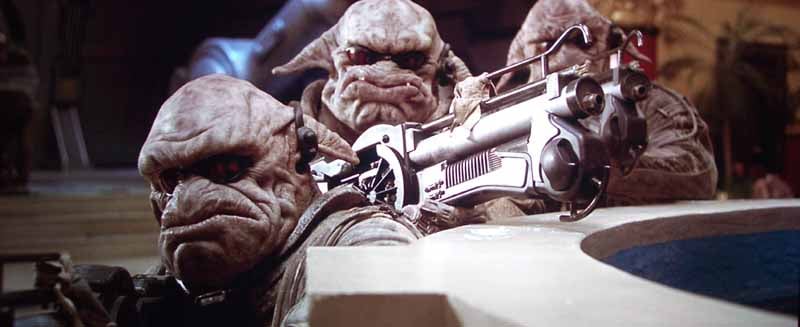
Just look at this gun and the
facial detail on the Mangalores.
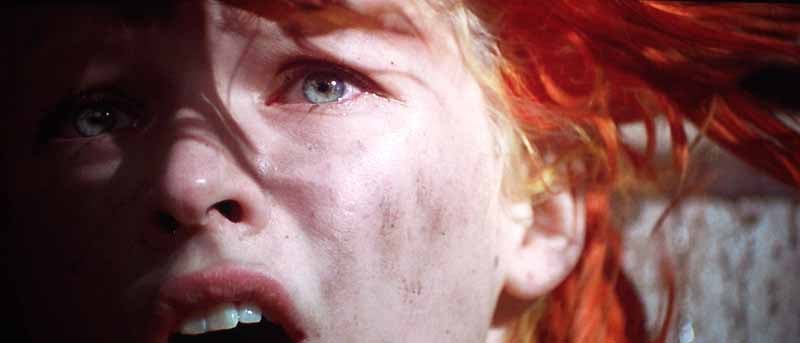
Milla Javovich has some excellent close-ups
in this movie.
Detail, detail, detail.. and color, color,
color... and motion... and sound...
The Fifth Element has it all.
 Blu-ray: House of Flying Daggers
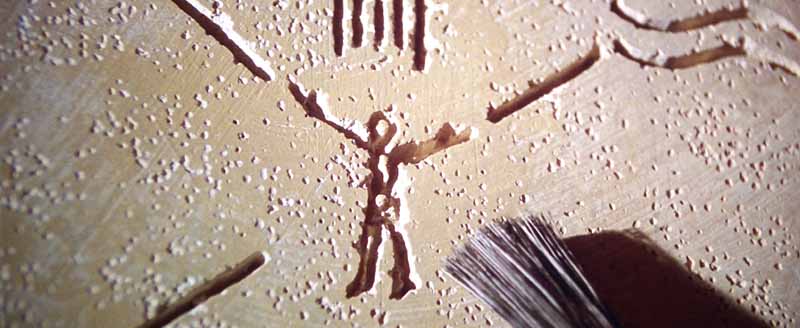
This disc was
not remastered, but it isn't all that bad to begin with. With this disc, which
I would not dub as 'Reference Quality' you have to more or less pick out
the moments of greatness. Color is certainly vivid – and that is what I focused
on for this part of the evaluation. I also caught some great moments of clarity
when bamboo shoots would slice through trees and blades of grass would appear
razor sharp. In one picture below the rope which binds our antagonist is just
bursting with detail, every strand was visible and clearly delineated. The
movie was absolutely filled with primary and tertiary colors. The opening scene
was dominated by pinks and blues while greens dominated the forest surrounding
the House of Flying Daggers. Blue held steady in our hero's outfit and each
location was clearly set apart by washes and tints of chromatic elements.

Here you get a good look at grass and clothing detail along with some deep colors.

Check out the rope and ground detail.

Colors popped and detail was present when
you got a shot that wasn't in high-speed motion.
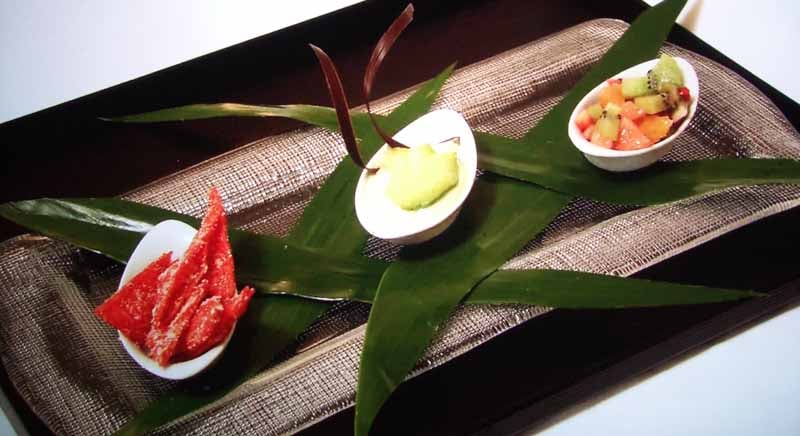
HDTV: DiscoveryHD – The Best Beaches
I caught this
show one day and snapped off some shots that really showed off how good 1080i/60
can look on this projector. I paid special attention to the flurry of textured
white walls and subtle color variation in the clouds and trees. These shots
were superb and the Optoma HD80 really made high-definition television
addictive:
I'd eat anything that looks this
good in high definition!

Rooftops and clear, clean white detail in
the buildings told me that the dynamic range was just fine on the HD80 after a
good calibration.

Splashes of color and a fuzzy rug made this
scene look fabulous in HD.
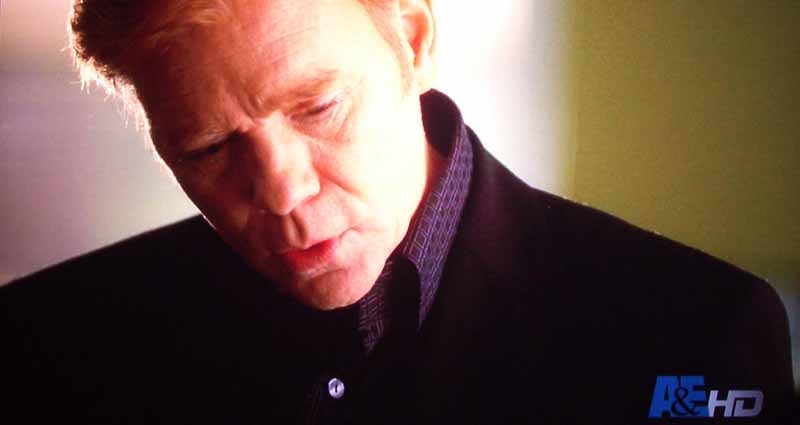
“I've got... to go... to the
bathroom...” Anything Caruso says sounds about the same... but at least he
looks good in HD saying it.

I liked the colors in this scene
and loved how well you could see the defendant's face as well as the differing
tones of white in his shirt.

This was just a great chance to see that the
1080i/60 to 1080p/30 conversion is going swimmingly well.
Conclusion
The HD80 is a difficult product to judge. On the one hand it is a 1080p DLP projector that comes in at a street price of around $2600. That makes it one of the cheapest 1080p projectors on the market – and the first 1080p DLP to break this price barrier that we know of. On the other hand there are some issues with respect to the fan noise, initial color and grayscale settings and installation issues. If you have 8-foot ceilings it may be very difficult to mount this projector on the ceiling and still have a center channel below the screen. On the other hand, if you have the time to calibrate the unit and you can handle the installation – then this might be a great system that lets you get your hands on a 1080p DLP at a price point never before possible. I will recommend this unit for die-hard DLP fans and those who have been sitting on the fence waiting for prices to dip below that $3000 mark. Remember, just three years ago 1080p was only possible at prices well over $10,000. In fact, anyone who personally purchased the HD81 and is reading this might be getting a little hot under the collar right about now. Optoma is joining a much-appreciated group of companies that are truly bringing incredible value to consumers.
The Score Card
The scoring below is based on each piece of equipment doing the duty it is designed for. The numbers are weighed heavily with respect to the individual cost of each unit, thus giving a rating roughly equal to:
Performance × Price Factor/Value = Rating
Audioholics.com note: The ratings indicated below are based on subjective listening and objective testing of the product in question. The rating scale is based on performance/value ratio. If you notice better performing products in future reviews that have lower numbers in certain areas, be aware that the value factor is most likely the culprit. Other Audioholics reviewers may rate products solely based on performance, and each reviewer has his/her own system for ratings.
Audioholics Rating Scale
 — Excellent
- — Very Good
- — Good
- — Fair
- — Poor
| Metric | Rating |
|---|---|
| Detail and Resolution | |
| Deinterlacing & Scaling | |
| Contrast and Black Levels | |
| Color Reproduction | |
| Noise Reduction | |
| Calibration Options | |
| Build Quality | |
| Ergonomics & Usability | |
| Ease of Setup | |
| Features | |
| Remote Control | |
| Fit and Finish | |
| Performance | |
| Value |
Clint Deboer was terminated from Audioholics for misconduct on April 4th, 2014. He no longer represents Audioholics in any fashion.
View full profile