
3D Immersive Surround Formats and Loudspeaker Layouts
Universal Speaker Layout for Immersive Surround
Immersive 3D Audio or Surround Sound made a breakthrough in 2014 by becoming available in two “native” formats. It was already available in AV receivers equipped with Yamaha’s “CinemaDSP” (5.1 with two additional presence speakers), Yamaha’s “CinemaHD3” (7.1 with four additional presence speakers and an additional subwoofer) and more recently those equipped with Dolby’s “Pro Logic IIz” (7.1 with two additional front height speakers) and Audyssey DSX (7.1 with two additional front height or wide speakers), but all of these were DSP-based upmixing formats. With last year’s introduction of “Atmos” from Dolby and “Auro-3D” from Auro Technologies of Belgium and the launch of the third “native” format, DTS:X this spring, native 3D Audio has arrived in Home Cinema products.
In a previous article about the first announced 3D Audio System Dolby Atmos and Home Cinema I have tried to “translate” a professional Dolby Atmos speaker layout into a possible Home Cinema speaker layout. The key line was “Ideally in-ceiling speakers, but perhaps more practically (or less impractically) the 11.2-setup introduced back in 2007 in Yamaha’s RX-Z11 does the job, as it would be able to pan the objects in the room on all three axes, and, with dual subwoofer setup for seamless bass across all listening seats, would be able to represent the main LFE and subwoofer channel.” A few months later Dolby introduced its “Dolby Atmos Speaker Setup Guide,” in which they proposed a configuration with in-ceiling speakers (the ideal situation), and the controversial solution of upward-firing “Dolby Enabled speakers.” The latter unleashed a lot of discussion both online and offline. The “classic 11.2” configuration mentioned in the article was NOT proposed, which surprises, because one can imagine this configuration to get closer to the “ideal” configuration with four in-ceiling speakers than upward-firing in-ceiling speakers that employ reflection of the height plane above the listening position.
Overcoming Problems with Bad Immersive Surround Mixes & Unified Speaker Layout YouTube Discussion
Speaker Layouts: Dolby Atmos
Let’s compare Dolby’s 7.1.4-configuration with a “classic 11.1.” Both configurations start with a basic 7.1 on the floor plane, with clockwise from Left Front (Figure 1):
- Front Left (FL)
- Front Center (FC)
- Front Right (FR)
- Surround Right (SR)
- Back Surround Right (BSR)
- Back Surround Left (BSL)
- Surround Left (SL)
- Subwoofer (SW)

Figure 1: Dolby's 7.1.4-configuration. Courtesy of Dolby.
Dolby’s 7.1.4-configuration specifies four in-ceiling speakers, clockwise from Left Top Front:
- Left Top Front (Ltf)
- Right Top Front (Rtf)
- Right Top Rear (Rtr)
- Left Top Rear (Ltr)
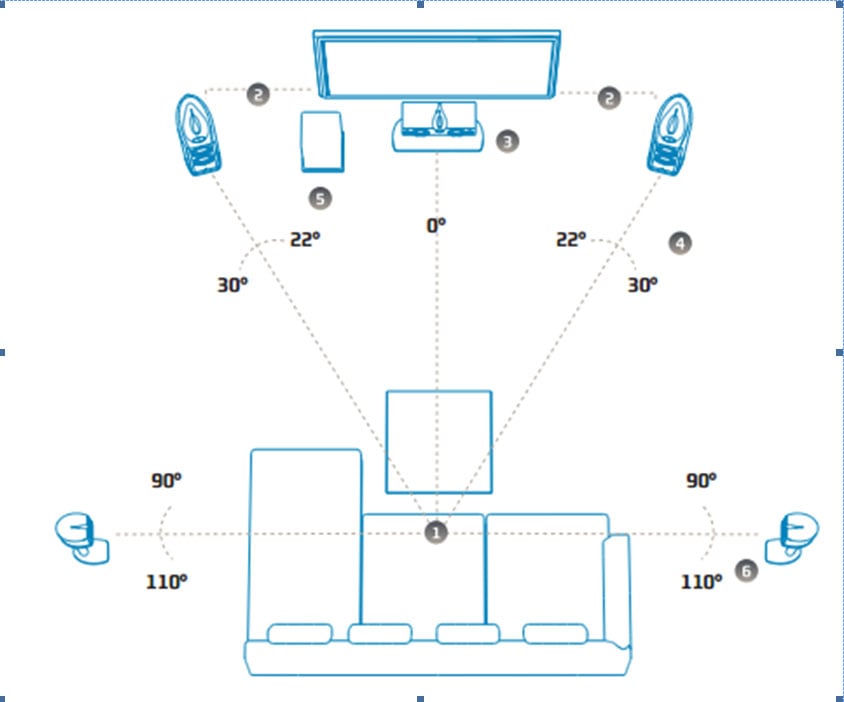
Figure 2: Horizontal angles of basic 5.1 speakers. Courtesy of Dolby.
For the ceiling speakers, Dolby has given also vertical angles min/ideal/max (Figure 3):
- Top Front: 30°/45°/55°
- Top Rear: 125°/135°/150°
Of course 30° Front corresponds to 150° Rear, 45° corresponds to 135° and 55° to 125°. Not following these exact angles doesn’t mean you don’t hear sound coming from above anymore. As the horizontal angles of the basic speakers, it’s an indication how to setup your Home Cinema. These vertical angles are important, as later in this article we’ll get back to these numbers if we wish to play Atmos sound using another speaker layout.
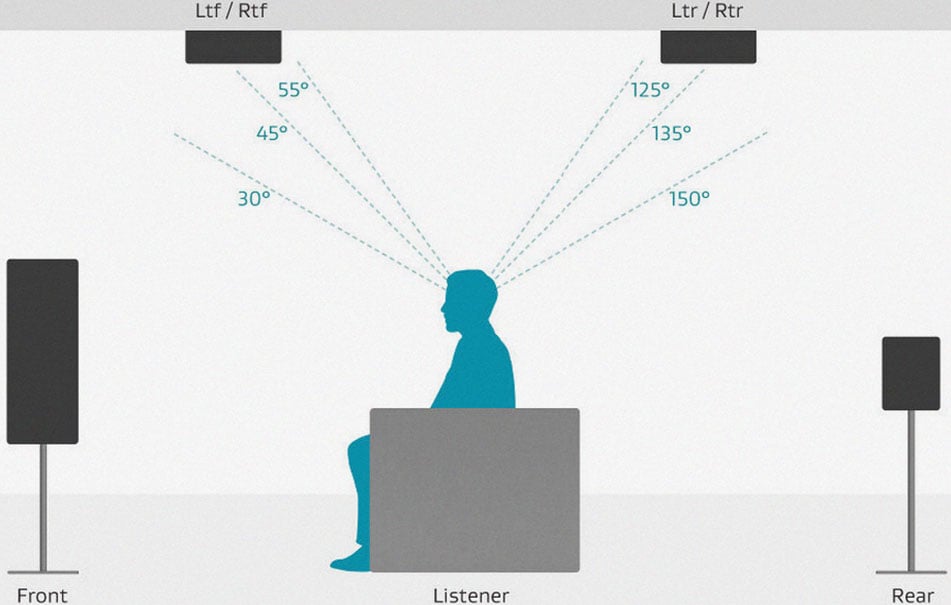
Figure 3: Vertical angles of in-ceiling speakers. Courtesy of Dolby.
Speaker Layouts: Auro-3D
Auro Technologies proposes two speaker configurations for Home Cinema: “Auro 9.1” and “Auro 10.1.” The “Auro 9.1” configuration starts with a basic 5.1, expanded with 4 “Height” speakers, to be positioned above the Front and Surround speakers. This is very similar to “classic 9.1,” that is the basic 5.1 with front and rear presence speakers (Figure 4). The Auro “10.1” adds a 10th speaker on top in the center of the basic circle, the so-called “Voice Of God” (VOG, Figure 5).
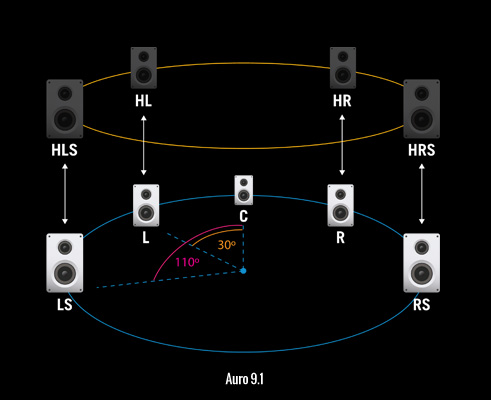
Figure 4: Auro 9.1 configuration. Courtesy of Auro.

Figure 5: Auro 10.1 configuration. Courtesy of Auro.
Speaker Layouts for DTS:X Immersive Surround Sound
Up until the moment of this writing, DTS has not shared speaker layouts for its new DTS:X codec. However, it is object-based codec technology (similar to the description of Dolby Atmos), and we pointed out in our DTS:X Overview article, the name is incredibly close to “DTS Headphone:X” that is clearly based on a “classic 11.1” setup, as DTS’s own demonstrations have showed. Other projects in which DTS is involved, for example the native 3D Audio recordings with Hans Zimmer, have been done in 11.1 as well.
Speaker layout: “Classic 11.2” used for Atmos
Yamaha’s “Classic 11.2”, expands the basic 7.1 with clockwise (Figure 6):
- Presence Left (Dolby and Audyssey call these “Front Height Left”)
- Presence Right (“Front Height Right” in Dolby and Audyssey)
- Rear Presence Right
- Rear Presence Left
- Subwoofer (Subwoofer L and Subwoofer R in the image, hence the .2)
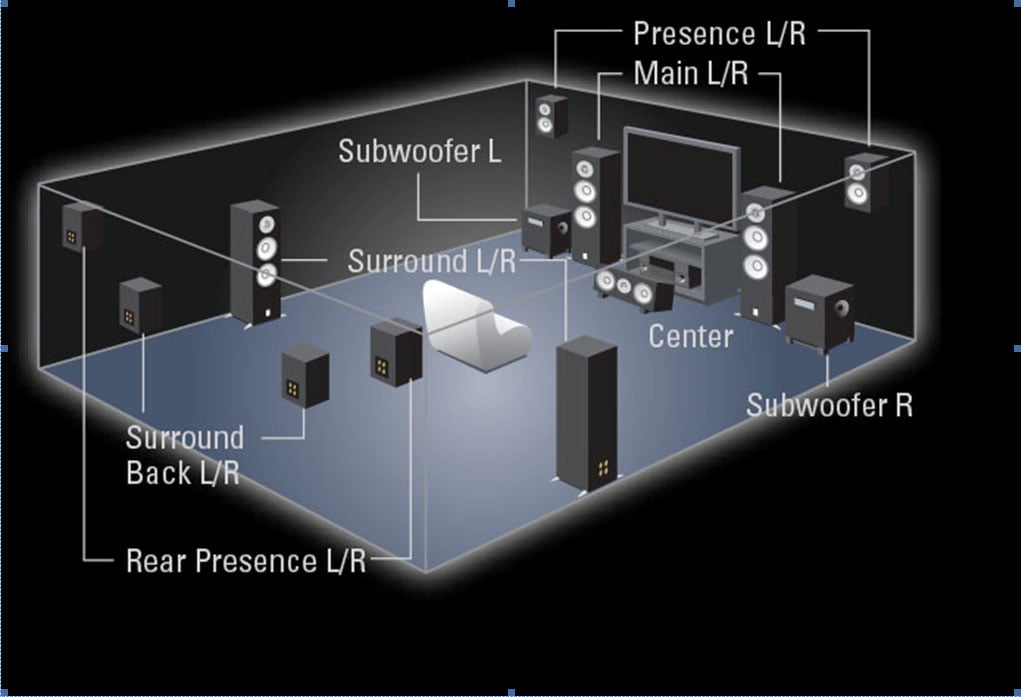
Figure 6: "Classic 11.2". Courtesy of Yamaha.
If we want to use the “Classic 11.2” speaker layout for Atmos playback, we should mount the presence speakers at a certain height. The vertical angles Dolby has specified for the in-ceiling speakers are useful for this. Only some basic mathematics is needed: the tangent of the vertical angle (like 30°, 45° or 55°) needs to be multiplied by the distance to the presence speaker on the floor plane (Figure 7):
h = l*tan(θ)
h = height of presence speaker
l = distance to presence speaker on floor plane
θ = (theta) vertical angle
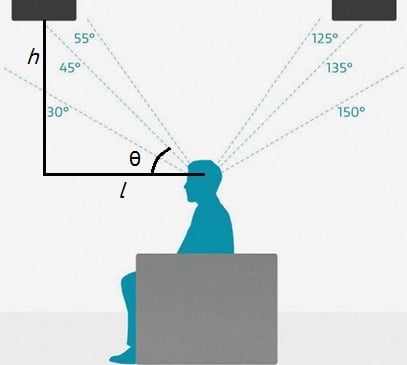
Figure 7: Height vs. Distance calculation.
Sitting in a typical listening position means the average height of the listener’s ear is 3 feet (≈ 1 meter). At a distance of 9 feet, one can mount a presence speaker at a height of h = 9 * tan (30°) + 3 = 8 feet minimum to meet Dolby’s advice. If we want to calculate the height of the rear presence speakers, the formula is the same, but with a negative distance. Is the back wall at a distance of 9 feet, we calculate h = -9 * tan (150°) + 3 = 8 feet. Graphics 1 and 2 display the height of the presence speaker at any given distance. All this works for smaller rooms only, as for very large rooms the minimum height exceeds the height of the ceiling. For example, an average American ceiling (assuming 8 feet high), at 30° the maximum distance from a presence speaker to the listening position would be d = (8-3) / tan (30°) = 9 feet. In the metric countries assuming a ceiling height of 3 meters d = 3 - 1 / tan (30°) = 3.5 meters. But even in larger rooms, presence speakers mounted at a slightly lower than 30° angle would still do the job, how many Home Cinemas do you know that respect the horizontal angles of 22° - 30° for the Fronts and 90° - 110° for the Surrounds (Figure 2) and still sound great?
The next figures show all presence speaker heights for the minimum, optimum and maximum vertical angles (30°, 45°, 55°), for any distance from the listening position to the presence speaker on the floor plane up to 15 feet (Figure 8), or up to 5 meters (Figure 9).
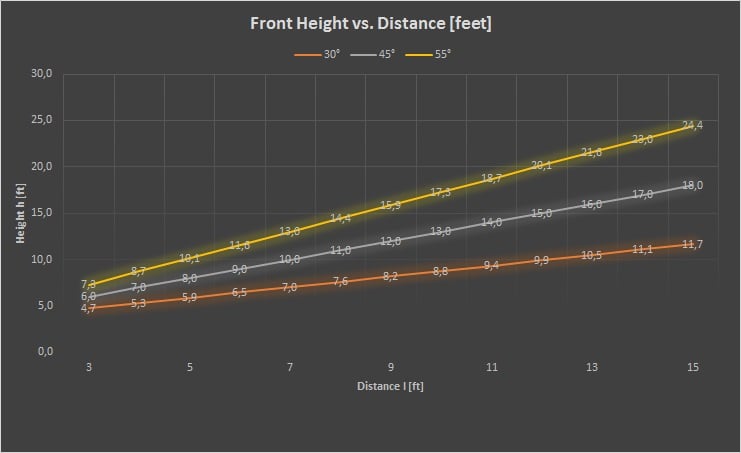
Figure 8: Front Height vs. Distance [feet].
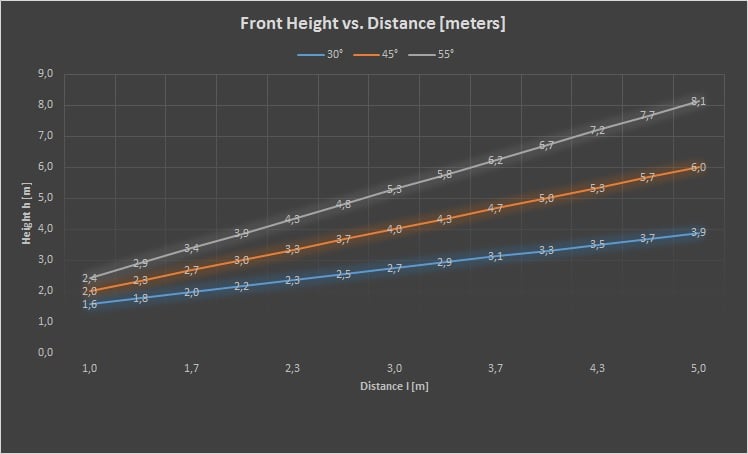
Figure 9: Front Height vs. Distance [meters].
We see the line of 30° for the front presence speakers (hence 150° for the rear presence speakers) crossing the ceiling height of 8 feet or 3 meters at a wall distance of 9 feet or 3.5 meters. Having front and rear wall at 9 feet or 3.5 meters, the room can be on and about 18 feet or 7 meters long to mount front and rear presence speaker close to the ceiling and still meet Dolby’s vertical angle. For small to medium sized rooms we can use this speaker layout.
Speaker layouts: Yamaha Atmos Enabled AV Receivers
With the latest firmware upgrade that enabled Dolby Atmos in Yamaha’s two top receivers came a document with additional information that proposes three speaker configurations for Dolby Atmos:
- “Front Height/Rear Height”: basic 7.2 with two front presence and two rear presence speakers (as introduced on the Z11, “classic 11.2,” upper left)
- “Overhead”: basic 7.2 with four in-ceiling speakers (as proposed by Dolby, lower right)
- “Dolby Enabled SP”: basic 7.2 with upward-firing speakers (as proposed by Dolby, lower left)
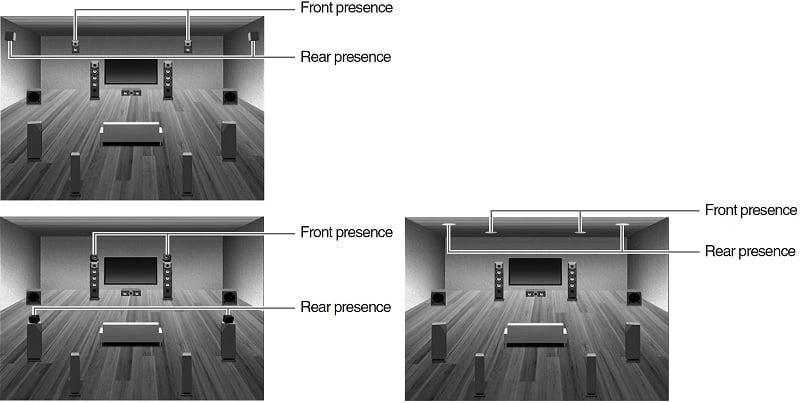
Figure 10: Speaker layouts. Courtesy of Yamaha.
Analysis
“Overhead” is arguably the Best Technical Means (BTMs) of speaker layout for Dolby Atmos, with in-ceiling speakers. This is the closest approach of the speaker layout in professional Atmos-certified cinemas. A system of 7+4 speakers of similar performance would do best. It is however hard to build a Home Cinema with in-ceiling speakers that sound tonally-similar to conventional wall-mounted surround speakers of the basic 7.1 layout. For presence speakers I have always advised to buy the smallest speaker of the same model range of the front speakers (IE: if fronts are Klipsch RF-82, for presence buy Klipsch RB-41). In-ceiling speakers however tend to be completely different in design. They are different not only in the drivers utilized, but think of the volume and the materials of the enclosure (if one is included). As of today it is very hard if to find an in-ceiling speaker that sounds even reasonably similar to a tower or bookshelf speaker of the same brand. In the basic 7.1 layout, it’s important to select similar sounding speakers to guarantee the homogeneity of the system. The same goes for the upper .4 speakers! Another solution could be mounting small matching bookshelf speakers in-ceiling or appending them from the ceiling. However this can compromise the safety of the listeners since consumer bookshelf speakers are not designed for this kind of mounting.
Dolby Enabled Reflection Speakers: A Last Resort for Immersive Surround?
 Dolby Enabled Speakers could do the job, since sound (mostly high frequencies) do reflect off normal-height flat ceilings in an average home. In those cases, there no need for mounting of additional speakers in-ceiling or on-wall, which makes speaker mounting easiest with this option. With proper DSP and the use of an auto calibration system and ideal geometrics on paper one could get an adequate result though within a somewhat narrow sweet spot. The problem is, as the frequency goes lower, the sound becomes less directional. I have not seen any polar plots of any Dolby Enabled Speakers, but I’ve seen their designs. Their polar plots should not differ too much from normal bookshelf speakers, with exception of the higher frequencies. As it seems the elevation of the Dolby Enabled Speakers is typically 20°, it would be interesting to study a polar plot of a typical full range speaker. In a polar plot we can see how much acoustical energy the speaker radiates to all sides on the vertical plane. In the next Figure 11, a two-way speaker is seen from the side with the woofer and tweeter pointed upwards. The energy radiating from the front side of the speaker is therefore also pointed upwards, in the “twelve o’clock” position. The backside of the speaker is in the “six o’clock” position, upside is “nine o’clock”, and downside is “three o’clock”. Every smaller circle represents an attenuation of 6 dB, which is half the sound pressure level.

Figure 11: Polar Plot of typical speaker. Courtesy of Sound Reinforcement Handbook.
Now we understand the position of the speaker in Figure 11, we know that a) is on-axis, b) is 15° below-axis, c) is 30° below-axis. The red line is 70° below-axis, equivalent to “20° elevated” as most Dolby Enabled Speakers are designed. If this typical speaker was used as a Dolby Enabled Speaker, the high frequencies (right polar plot) would have been attenuated significantly. Beware that the typical speaker in Figure 11 has a hornloaded tweeter, hence is more intentionally directional in high frequencies than speakers designed with normal dome tweeters. The lower frequencies, especially 500 Hz, 250 Hz and 125 Hz, (left polar plot) show attenuation of only 3-8 dB and that makes this speaker “audible” to “clearly audible” to listeners on the 70° below-axis. And “clearly audible” from 125 Hz and above means the listener is able to locate the sound source, so the acoustical separation between upward-firing speakers and the basic 5.1 or 7.1 seems not be as good as with in-ceiling speakers or presence speakers. Audioholics has reported this very phenomenon in their Atmos listening tests with Dolby Enabled speakers.

Dolby Atmos-Enabled Speaker Solution from Onkyo employs a single 3" paper driver
The same problem as in the “Overhead” layout occurs here: how do the Dolby Enabled Speakers of today match the already present Front and Surround speakers? The designs of today are focused on directivity, with absorption foam and other particular constructions, but few of them tonally match the existing Front or Surround speakers, since they are not made with matching driver elements. KEF is producing matching Dolby Enabled Speakers (model R50), but doesn’t provide any polar plots.
Front Height/Rear Height is a practically Classic 11.2. With this layout it is possible to match or get very close to Dolby’s ideal geometry of the additional loudspeakers that create the 3rd dimension of audio. It is easier to mount additional speakers on-wall especially if the Home Cinema is not build as new. It is possible to find additional speakers that match the already present Front and Surround speakers. It is for now the only solution more or less compatible with Auro-3D 9.1, as Auro Technologies does not propose or support upward-firing speakers. Also DTS:X is suspected to adopt this layout. And, what about all older media? Most Blu-ray’s and all DVD’s, TV-series, games, streams and video files don’t have a native 3D audio soundtrack, and the listener will have to go back to DSP-based upmixing formats, in this case the new Dolby Surround Upmixer (DSU) and/or Yamaha CinemaHD3. In the first case the “Overhead” would be first choice, but Classic 11.2 with right vertical angles would not perform less. In the latter case the Classic 11.2 layout is best backward-compatible. The downside of this layout is that in long rooms with low ceilings, it will be difficult or impossible to reach the requested vertical angles for a convincing 3rd audio dimension when playing Atmos.
What Speaker Layout to Choose?
In the old days choosing a speaker layout wasn’t so much an issue, finding a place for one or two speakers is not so difficult. With the rise of “5.1” in the DVD-era things got slightly more difficult: adding a central speaker under the CRT television was easy, placing the surround speakers a little less. But at least the new 5.1 speaker layout could be used for AC3 and DTS (and MPEG Multichannel in Europe). Also the 5.1 upmixing systems of the time, like Dolby Pro Logic II, Yamaha CinemaDSP and Harman Logic 7, used more or less the same 5.1 speaker layout. In the 2000’s Yamaha started to mount additional speakers high on the front wall, followed by Dolby Pro Logic IIz, DTS Neo:X and Audyssey DSX. Although different systems, they used virtually the same speakers, whether called “presence” or “front height” speakers.
Today we are at the dawn of 3D Immersive Surround formats and Dolby has shaken the world with two speaker layouts not seen before: one has to choose between adding in-ceiling speakers or adding upward-firing speakers. It is understandable why Dolby has chosen the solution with in-ceiling speakers, as physically it may be the closest to the professional cinema layout, and it works for any size of room, for Atmos that is. It would be best to have one basic speaker layout that the consumer can use for all formats the industry has to offer. The other 3D Immersive Surround formats, Auro-3D and probably the coming DTS:X format, have adopted a speaker layout close or identical to Classic 11.2. For small to medium sized rooms Classic 11.2 is a valuable option also for Dolby Atmos. In this article we have shown that Classic 11.2 is well adaptable to the Atmos geometry, the height calculations sustain this. This in combination with better choice of similar additional speakers and easier mounting (that leaves your existing precious front and surround speakers alone or you don’t have to install a false ceiling for your in-ceiling speakers) it is hard not to recommend. Even if in a larger room with low ceilings the presence speakers can’t be mounted high enough to meet Dolby’s requested vertical angles, Classic 11.2 is still the next best speaker layout.
The Last, and probably also least recommended speaker layout for immersive sound would involve the Dolby Enabled Speakers. This speaker layout is recommendable over the other speaker layouts ONLY if wall- and ceiling-mounting height speakers is impossible. However, the question remains if this kind of speakers add more intended effects to the movie you’re listening to than unintended side effects. The first impression may be “Hey, I hear sound from above, gotta have it!” Later on the poor channel separation in the mid and lower frequencies and the not improved aesthetics of the loudspeakers the impression could become mildly interesting and downright annoying overtime.
How Many Speakers Do You Need for Proper Dolby Atmos Playback YouTube
Conclusion
For Dolby Atmos, the Best Technical Means for speaker layout would be the 7.1.4 layout, with in-ceiling speakers. The other systems, Auro 3D and probably DTS:X, for best technical means would follow the 7.1.4 layout with presence speakers (“Classic 11.1”) as presented in the Yamaha Z11 back in 2007. As a result this layout could be proposed as “best practical means overall” in Home Cinema, being more or less “the most compatible solution” for ALL three 3D Immersive Surround codecs and easier to match and mount height speakers. This would make Dolby Enabled Speakers the least favorable option, even with the easiest mounting advantage. But after all, we are after a truly improved immersive surround experience anyways so why use a compromise when more viable options exist?
Right now Audioholics is testing a Yamaha RX-A2040 with Dolby Atmos using presence speakers in “Classic 11.1” layout. The results of this review are coming soon and could confirm if this speaker layout is a good alternative for in-ceiling speakers, or that Dolby Atmos sounds good only with the newly proposed layouts.
Many thanks to Tony Verkuijl of Yamaha Music Europe GmbH - Branch Italy for contributing this article.