
Dayton Audio T1503 Titanic Mk III Subwoofer Kit Review
- Product Name: Dayton Audio Titanic MK III Subwoofer Kit
- Manufacturer: Dayton Audio
- Performance Rating:

- Value Rating:

- Review Date: October 31, 2006 08:25
- MSRP: $ 749.85
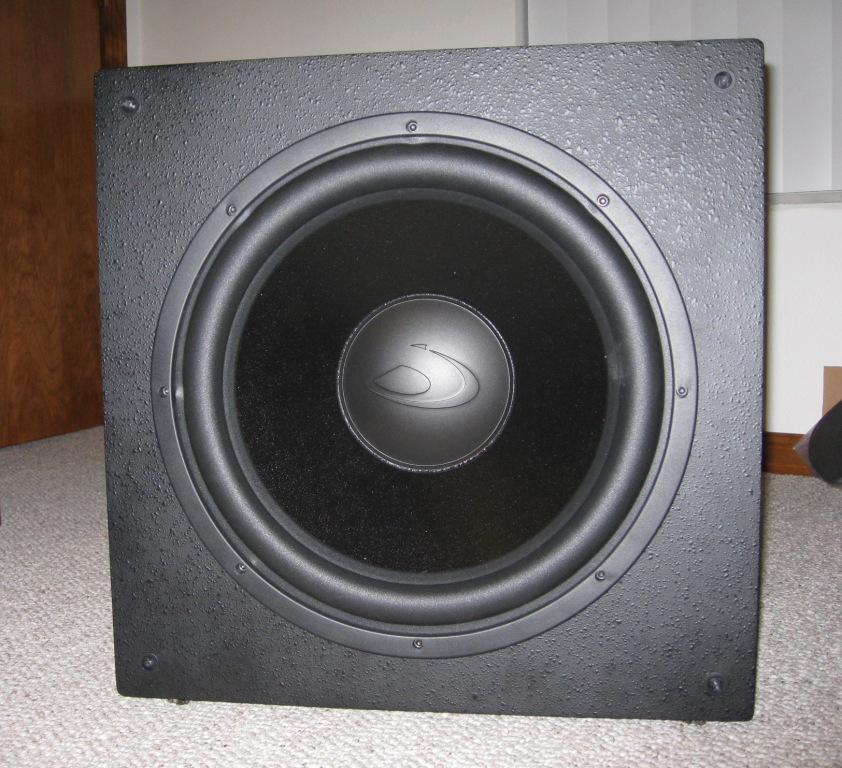
- 15" Titanic MKIII Subwoofer
- 1,000 watt amplifier
- SPL: 115dB
- 20mm of excursion
- Amplifier features stereo line-level as well as LFE input, variable low-pass crossover, full parametric EQ, and auto on/off.
- Dimensions: 19-1/8" W x 19-1/8" H x 19-3/8" D
Pros
- Convenient size
- Easy assembly
- 1000 W amp
- Good value as a kit
- Plays loud and clean
Cons
- Limited Low end frequency extension
- Parametric EQ only good for room peaks
Titanic T1503 MK III Design Comparison
 As a do-it-yourself speaker builder I was excited to get another kit in hand. With this being a subwoofer kit I decided to take a slightly different approach to the review. Instead of just putting it together and then listening and measuring, I wanted to take more of a design approach. First, I used the published driver parameters to design two different types of boxes using WinISD. I have BassBox Pro but WinISD has one significant advantage besides being freeware; it has a section where a parametric equalizer can be used which is precisely what is available with this kit. Next, I compared the published driver parameters with the parameters obtained using the Woofer Tester (WT). Then, I used the WT parameters with the given cabinet size and compared that design with the ideal design. Finally, I measured the completed T1503 kit from Dayton Audio for a final comparison to the two computer designs. What I didn’t do is actually build the ideal design given by WinISD but as you will see it was unnecessary.
Design Comparison
With the published specs from Dayton, two designs were run on WinISD. One is the closed system design of the provided cabinet (yellow) and the other is a vented system (cyan) for comparison. The -3dB cutoff frequency for the closed system is about 40 Hz. I tried applying the equalizer using different frequencies and different boosts and cuts to try and get a better low end cutoff but it really didn’t change the shape of the curve, it just shifted it up or down. That result signifies that the closed box really puts a lot of control on the driver. The default design that WinISD gives with a flat response is very close to the kit’s cabinet; with only 0.5 ft3 difference the curves are nearly identical. Keep in mind that the amplifier’s volume was subtracted out but not the brace. Also, with the foam provided in the kit a small amount of volume increase will be seen. On the other side of the coin is the vented system and the Titanic Mk III can go either way. The volume for the vented system though, is much larger. WinISD’s recommended volume for a cutoff of 22 Hz was 6.6 ft3 which I believe is just too big. With a volume of 5.2 ft3 the cutoff is 24 Hz which is a fair tradeoff even though the size is still fairly large. The graph below (cyan) shows this box response.
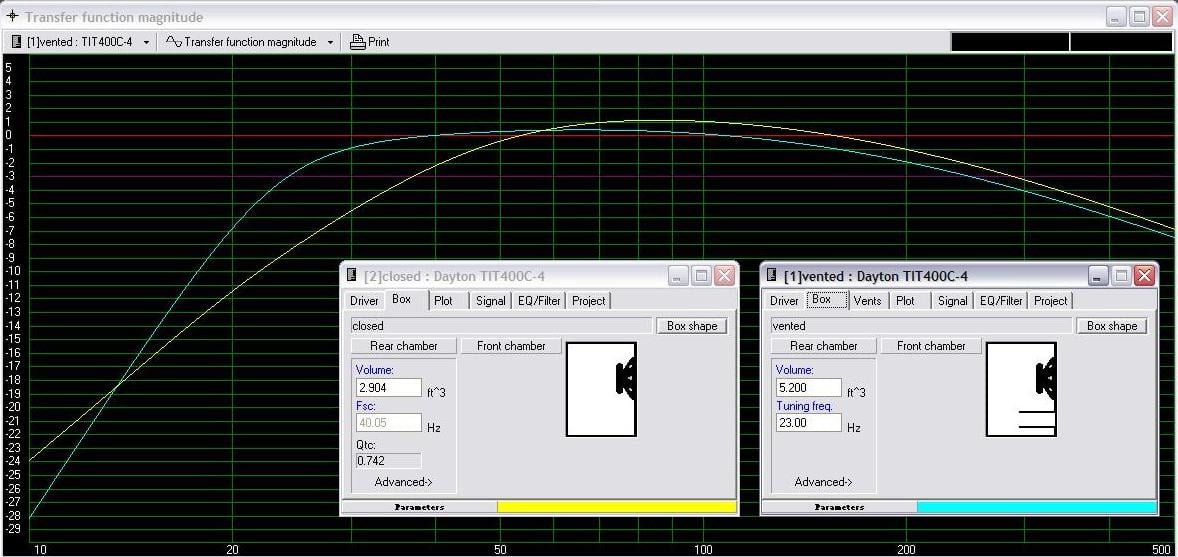
The frequency cutoff of the design may be of large importance but there are other factors to be considered that are just as important. Namely how the subwoofer will be placed in the room and its safety performance. Woofer placement can be seen further down in this review. By safety performance I am referring to how the closed system dampens the woofers movement and doesn’t allow it to bottom out. I have some personal experience with vented systems and over driving the woofer beyond its Xmax. I think it was very wise for Dayton to provide a closed box system especially given a 1000 Watt amp with an equalizer that can give a 6dB boost. I have the same amp in my own subwoofers and have bottomed those out with a 23mm Xmax woofer. Also, most people do not want large cabinet subwoofers.
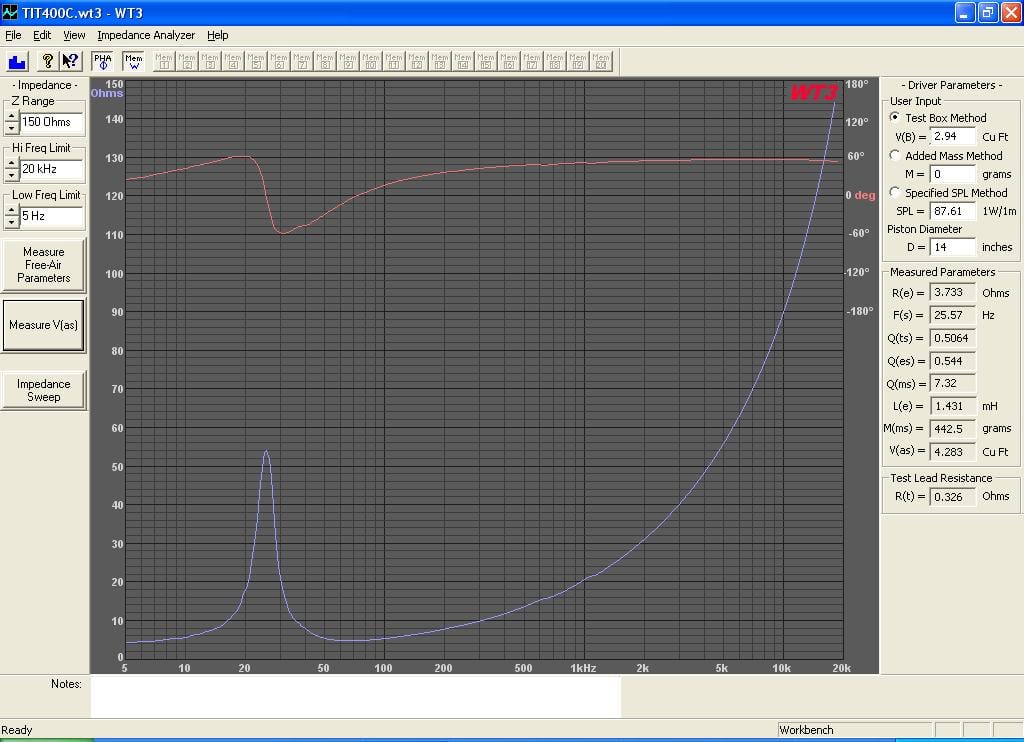
Next it was time to get Thiele and Small parameters from the driver. I had some trouble getting my Woofer Tester II working on my new computer so I acquired the Woofer Tester III. The WT3 is leaps and bounds better than the WT2. It is much faster and it plots a lot more data points. If you do a lot of speaker building I highly recommend it and if you already have the WT2 you should consider upgrading. As seen below, the published Thiele and Small parameters have some differences from the measured parameters but they are very close.
| Parameter | Published | Measured |
| f(s) Hz | 24.2 | 25.57 Hz |
| R(e) Ohms | 3.8 | 3.73 |
| Q(ms) | 6.75 | 7.32 |
| Q(es) | 0.52 | 0.544 |
| Q(ts) | 0.49 | 0.506 |
| V(as) ft3 | 5.456 | ? |
| L(e) mH | 2.57 | 1.43 |
| SPL 1W/1m | 88.7 | 87.61 |
| M(ms) grams | 253.9 | 442.50 |
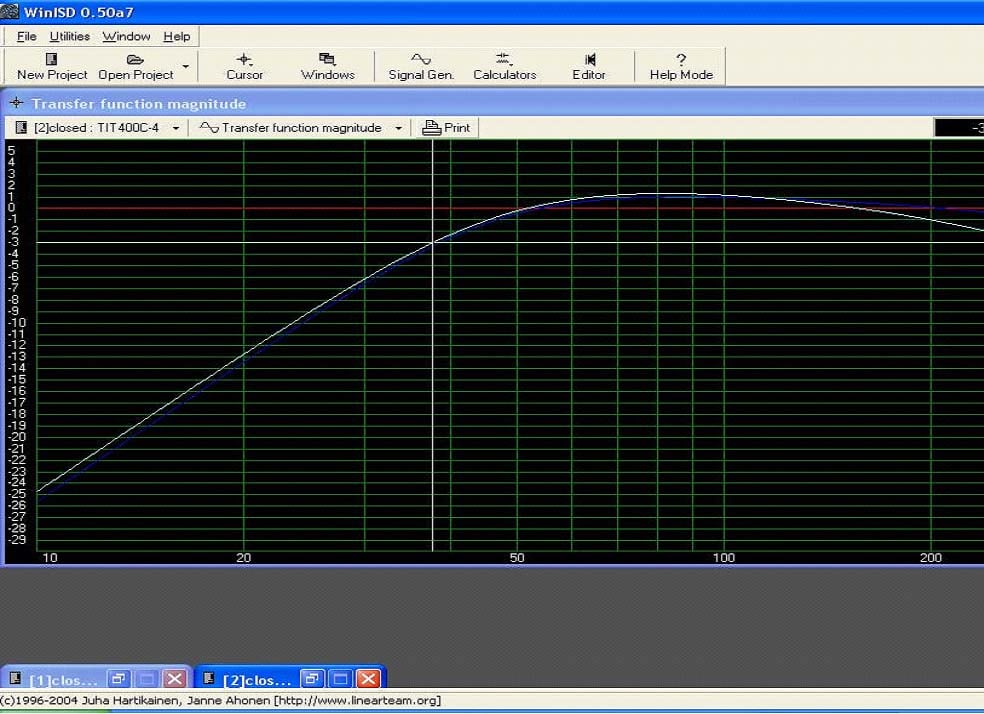
In comparing the published spec design with the measured spec design it can be seen that there is virtually no difference. You can also see that the design frequency cutoff is around 37 Hz which doesn’t seem great for a woofer of this size but wait to see how it performs in the room. The dark blue curve is the Woofer Tester specs and the cyan curve is the Dayton published specs. Even though the measured driver parameters are different from the published ones there is virtually no difference in the end result.
Here is a curve to show the cone excursion of the 3.2 ft3 box. The vertical scale is in millimeters and the red line at 20 is the Xmax of the driver.
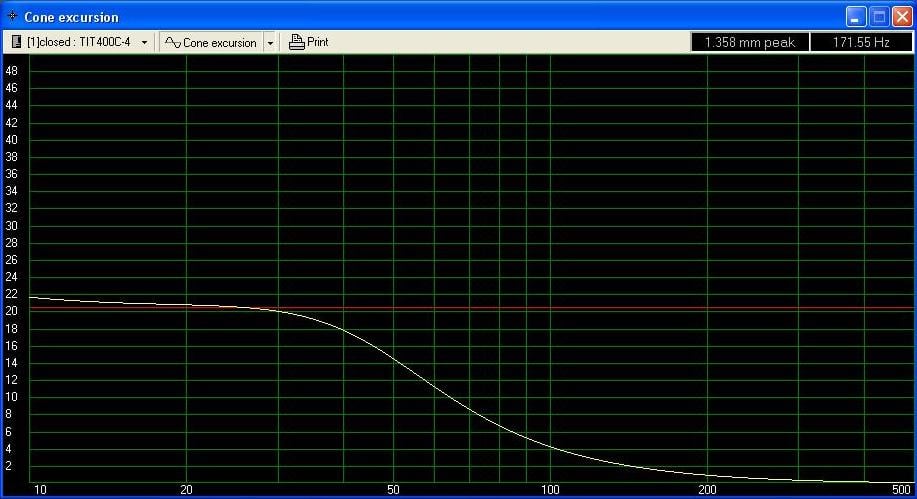
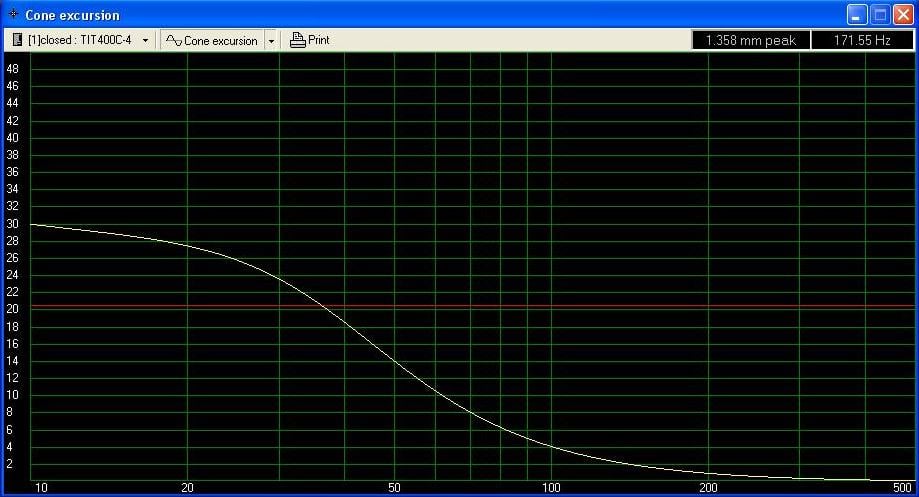
If the driver is put into a box of almost twice the size, 6.2 ft3, it can be seen how much the cone excursion increases and that the smaller box dampens the woofer.
Construction, Description and Inspection
 After doing my design comparisons and concluding that
the given cabinet in the kit was very close to the suggested design by WinISD
for a closed box system it was time to put the T1503 kit together. Before I started
just pulling out the tools and connecting things up I read the assembly
instructions in the User’s Manual which can be very important for a novice
speaker builder. Well for only having a 4 page document I was extremely impressed.
After a short introduction to the kit, it lets you skip to the Features section
if a pre-built kit was purchased. To build the kit only 4 tools are required,
screwdriver, hex driver, wire stripper and a utility knife; although they
forgot to include a mallet. It gives a specific order of what to install first
and why. It even suggests sealing the threads of the spikes which I have always
done on my own but when using these spikes I think it is required since they
can only be hand tightened. The kit was very easy to put together; the toughest
part was installing the driver. I liked the fact that it had pre-installed
T-nuts for the spikes and the driver but I have found that if the T-nuts are
only hammered in as they are here they can be pushed out and that is what
happened. I use T-nuts in my own
speakers but I’ve learned to put some epoxy on them to hold them in place. The
driver is very heavy and some of the holes are partially blocked by the gasket
so the bolts need to be pushed completely through the holes and then aligned
with the holes in the cabinet. Pay heed to the instruction’s warning about
cross threading the bolts, it is very easy to do. I had to back out some bolts
and retry several times. The amplifier
used standard screws but I don’t think it needed T-nuts. Although not a
detriment, I didn’t like how long the screws for the amp were and that they
protruded through the wood. The
instructions don’t mention installing the grill but it’s pretty intuitive, just
tap the sockets into the pre-drilled holes with a mallet and install the grill.
I was humored by the comment to discard the extra T-nuts; if you’re like me you
would save them for your next project.
After doing my design comparisons and concluding that
the given cabinet in the kit was very close to the suggested design by WinISD
for a closed box system it was time to put the T1503 kit together. Before I started
just pulling out the tools and connecting things up I read the assembly
instructions in the User’s Manual which can be very important for a novice
speaker builder. Well for only having a 4 page document I was extremely impressed.
After a short introduction to the kit, it lets you skip to the Features section
if a pre-built kit was purchased. To build the kit only 4 tools are required,
screwdriver, hex driver, wire stripper and a utility knife; although they
forgot to include a mallet. It gives a specific order of what to install first
and why. It even suggests sealing the threads of the spikes which I have always
done on my own but when using these spikes I think it is required since they
can only be hand tightened. The kit was very easy to put together; the toughest
part was installing the driver. I liked the fact that it had pre-installed
T-nuts for the spikes and the driver but I have found that if the T-nuts are
only hammered in as they are here they can be pushed out and that is what
happened. I use T-nuts in my own
speakers but I’ve learned to put some epoxy on them to hold them in place. The
driver is very heavy and some of the holes are partially blocked by the gasket
so the bolts need to be pushed completely through the holes and then aligned
with the holes in the cabinet. Pay heed to the instruction’s warning about
cross threading the bolts, it is very easy to do. I had to back out some bolts
and retry several times. The amplifier
used standard screws but I don’t think it needed T-nuts. Although not a
detriment, I didn’t like how long the screws for the amp were and that they
protruded through the wood. The
instructions don’t mention installing the grill but it’s pretty intuitive, just
tap the sockets into the pre-drilled holes with a mallet and install the grill.
I was humored by the comment to discard the extra T-nuts; if you’re like me you
would save them for your next project.
The Dayton Audio User’s Manual not only covered instructions for putting the kit together, it also covered some basics on subwoofer placement which were accurate and helpful. The only shortcoming I found with the manual was it had no suggestions for setting the parametric equalizer. Although, as I stated earlier, setting the parametric equalizer had no effect on a closed box of this size that puts a lot of dampening on the driver. There is another use for the equalizer though. If the room response has a bad peak, the equalizer could be used to remove it. Note that the same does not work for a room null, no matter how much you try to amplify it, the room’s characteristics will still cancel out that frequency.
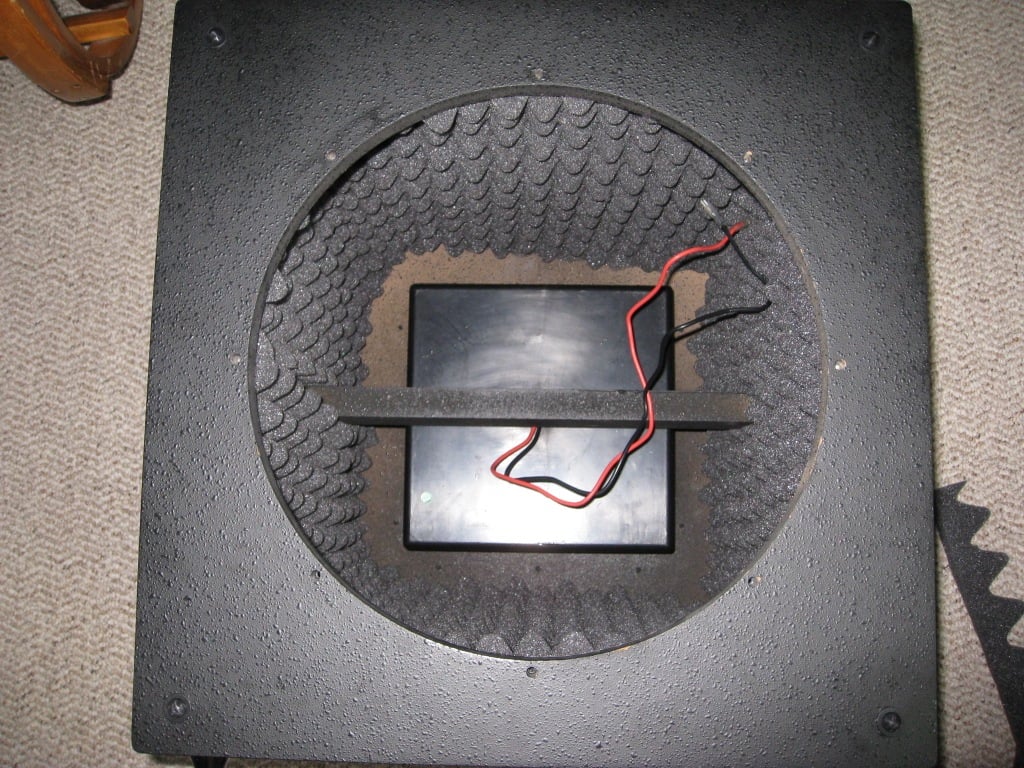
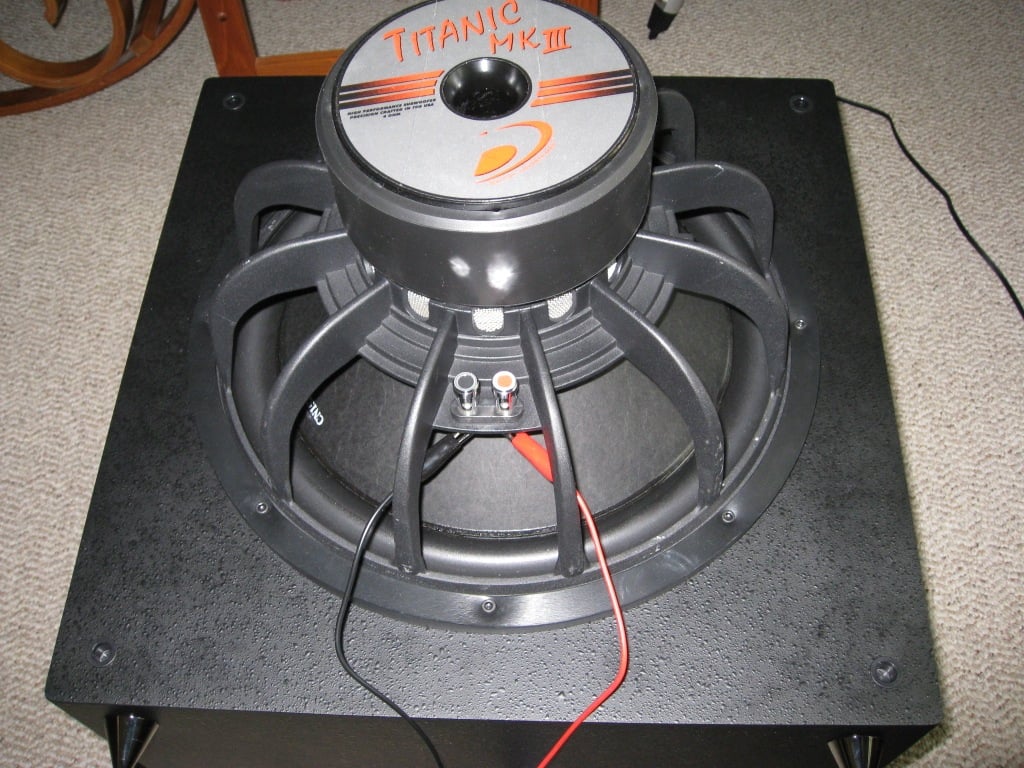 The driver itself is treated paper with a hefty cast
frame and a 136 oz. magnet. I did not see distortion measurements on this
driver from either Zaph or Mark K’s
web site so I am not sure of the distortion characteristics. The cabinet was made from ¾ inch MDF with one
brace from side to side. I typically like to see at least the front baffle at 1
inch MDF but it probably won’t make a huge difference. The cabinet also had
rounded edges and the finish was a textured flat black paint. The black chrome spikes were very versatile.
The tips could be removed or it could be used with the included metal disks if
placed on a hard floor.
The driver itself is treated paper with a hefty cast
frame and a 136 oz. magnet. I did not see distortion measurements on this
driver from either Zaph or Mark K’s
web site so I am not sure of the distortion characteristics. The cabinet was made from ¾ inch MDF with one
brace from side to side. I typically like to see at least the front baffle at 1
inch MDF but it probably won’t make a huge difference. The cabinet also had
rounded edges and the finish was a textured flat black paint. The black chrome spikes were very versatile.
The tips could be removed or it could be used with the included metal disks if
placed on a hard floor.
Listening Tests
 When it
comes to listening to a sub there are only a few characteristics. How well does
it integrate with the other speakers, how tight is the bass, how low is the
bass and how much kick does it have? The first thing I did was set my other
speakers on small to ensure all the low frequency effects were going to this
subwoofer. I listened to the Yes, The
Ladder disc briefly and Annie
Lennox’s Into the West to start. This music didn’t have anything special
about the bass but I wanted to see how well the sub integrated into the rest of
the music. A subwoofer shouldn’t sound separate from the system like it is by
itself. It turned out that the Titanic MK III
did very well in this aspect. It played seamlessly. These songs are also very
involving and I wanted to see if that were still the case with this sub and it
was. Once the songs were done I wasn’t saying to myself that something
was missing. I was quite musically satisfied.
When it
comes to listening to a sub there are only a few characteristics. How well does
it integrate with the other speakers, how tight is the bass, how low is the
bass and how much kick does it have? The first thing I did was set my other
speakers on small to ensure all the low frequency effects were going to this
subwoofer. I listened to the Yes, The
Ladder disc briefly and Annie
Lennox’s Into the West to start. This music didn’t have anything special
about the bass but I wanted to see how well the sub integrated into the rest of
the music. A subwoofer shouldn’t sound separate from the system like it is by
itself. It turned out that the Titanic MK III
did very well in this aspect. It played seamlessly. These songs are also very
involving and I wanted to see if that were still the case with this sub and it
was. Once the songs were done I wasn’t saying to myself that something
was missing. I was quite musically satisfied.
Next I put on Funhouse from Flim and the BB’s. The bass in this song played with a lot of impact but as expected from the design it didn’t really cover the lower octave even with the room gain. There is a pseudo kick drum sequence that includes some really low notes along with other harmonics. It did seem to stand out a little from the rest of the music.
 Trust from Patrick O’Hearn is the track I use for bass test. It will test and
stress a subwoofer because of its constant low synthesized bass throughout the
entire track. Again, it didn’t cover the lowest octave strongly but it did very
well in its range. It was very tight and
had plenty of output. I turned the volume up fairly loud and there were no
signs of the woofer bottoming out or breaking up. Because of the constant bass
it was a good opportunity to feel the cabinet vibrations. I could clearly feel
less vibration on the sides where the brace was as opposed to the top where it wasn’t. That’s the reason I like to use cross bracing
from bottom to top and side to side in my own designs. I mention this in case
you decide to by the parts and build your own cabinet you should consider 1
inch MDF and cross bracing.
Trust from Patrick O’Hearn is the track I use for bass test. It will test and
stress a subwoofer because of its constant low synthesized bass throughout the
entire track. Again, it didn’t cover the lowest octave strongly but it did very
well in its range. It was very tight and
had plenty of output. I turned the volume up fairly loud and there were no
signs of the woofer bottoming out or breaking up. Because of the constant bass
it was a good opportunity to feel the cabinet vibrations. I could clearly feel
less vibration on the sides where the brace was as opposed to the top where it wasn’t. That’s the reason I like to use cross bracing
from bottom to top and side to side in my own designs. I mention this in case
you decide to by the parts and build your own cabinet you should consider 1
inch MDF and cross bracing.
 A couple of
other good tracks played were from Steely
Dan’s “Two Against Nature” CD. The bass in Gas Lighting Abbie played very tight
with no lingering bass notes, which is expected from a sealed box design. The
title track, “Two Against Nature”, had even more bass and played just as tight.
I took the opportunity in this song to switch back and forth to Direct mode on
my processor. Direct mode turns off the subwoofer and plays the left and right
speakers at full range. I have two 10 inch woofers in my front speakers that
are designed to play down into the upper 20 Hz range. I wanted see if there was
a big difference when engaging the subwoofer. The difference was quite clear;
with the sub engaged the sound was deeper and much fuller as opposed to the
front speakers trying to do the job on their own.
A couple of
other good tracks played were from Steely
Dan’s “Two Against Nature” CD. The bass in Gas Lighting Abbie played very tight
with no lingering bass notes, which is expected from a sealed box design. The
title track, “Two Against Nature”, had even more bass and played just as tight.
I took the opportunity in this song to switch back and forth to Direct mode on
my processor. Direct mode turns off the subwoofer and plays the left and right
speakers at full range. I have two 10 inch woofers in my front speakers that
are designed to play down into the upper 20 Hz range. I wanted see if there was
a big difference when engaging the subwoofer. The difference was quite clear;
with the sub engaged the sound was deeper and much fuller as opposed to the
front speakers trying to do the job on their own.
 After my CD
listening session I wanted to try out some SACDs which have 5 channels of music
plus a dedicated Low Frequency Effect (LFE) output. I started with La Luna from Matt Bianco,
Matt’s Mood. The bass was smooth and filled the room well. I quickly moved
to what is the best recording I own and a phenomenal test for bass, Tchaikovsky’s Overture of 1812 with
digitally recorded cannons. The five channel recording of this piece is so well
done. It creates an ambience in the room that is unparalleled and the T1503 Titanic
MK III did a superb job of reproducing
that effect by keeping the bass notes strong and tight. But you don’t care about
that; you want to know how those cannons did.
Besides the ultra low end there are many harmonics in those cannons.
This subwoofer did a much better job playing the cannons than my own designed
subwoofers. Mainly because this is where my sub woofers unload and hence bottom
out. It is a very disturbing loud pop sound. I am going to have to go back to
the drawing board on that design and make some adjustments. Here is where the
safety of an acoustic suspension design pays off. In such a small box the woofer
just can’t compress the air enough to enable it to bottom out.
After my CD
listening session I wanted to try out some SACDs which have 5 channels of music
plus a dedicated Low Frequency Effect (LFE) output. I started with La Luna from Matt Bianco,
Matt’s Mood. The bass was smooth and filled the room well. I quickly moved
to what is the best recording I own and a phenomenal test for bass, Tchaikovsky’s Overture of 1812 with
digitally recorded cannons. The five channel recording of this piece is so well
done. It creates an ambience in the room that is unparalleled and the T1503 Titanic
MK III did a superb job of reproducing
that effect by keeping the bass notes strong and tight. But you don’t care about
that; you want to know how those cannons did.
Besides the ultra low end there are many harmonics in those cannons.
This subwoofer did a much better job playing the cannons than my own designed
subwoofers. Mainly because this is where my sub woofers unload and hence bottom
out. It is a very disturbing loud pop sound. I am going to have to go back to
the drawing board on that design and make some adjustments. Here is where the
safety of an acoustic suspension design pays off. In such a small box the woofer
just can’t compress the air enough to enable it to bottom out.
Next up was the movie test and there is really only one test I needed to push the subwoofer to its limits and that is Finding Nemo. There are two scenes that have really low and loud content and I have bottomed out every vented designed subwoofer that I’ve tried. The first scene is where the submarine slides off the ocean shelf. This scene sounded so cool through the Titanic that my girlfriend wanted me to replay it. It shook the room pretty good which is what I want when watching movies. The other scene is when Darla is tapping in the fish tank and it produces some very loud low end. The T1503 Titanic sub didn’t quite have the impact here which I am used to but again the woofer played safely. It’s kind of cool to think of the sealed-box design as a sort of high pass filter (subsonic filter) to keep the ultra low frequencies from damaging the woofer. I watched a couple of other movies using the Titanic without any critical listening and it seemed to do just fine through the movies.
After I finished all tests we found out that the amplifier was equipped with a notch filter built in and that it was not enabled.
Titanic T1503 Mk III Measurements and Analysis
The measurements were handled in two ways. First, the actual response was taken and then the room response was taken in which the speaker placement was determined. Being a sealed subwoofer the speaker frequency response measurement is quite straight forward and easy. A simple near field measurement is fairly accurate up to 300 Hz. Using TrueRTA’s quick sweep function shows the following response:
As discussed the frequency response itself is not very impressive but everything above 100 Hz should be ignored and the roll off down from 60 Hz is typical of a sealed box design. The curve was shifted -13dB to compensate for the close proximity of the microphone. The response was taken with no filters or equalizer. Again, hold your thoughts until you see the room response because that plays a big role in its performance.
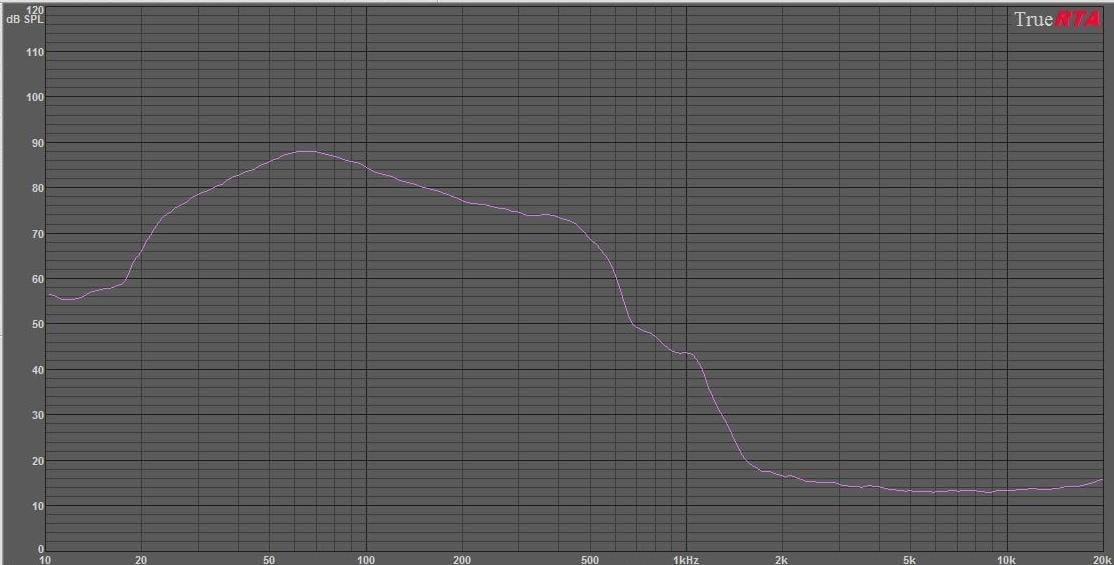
Near field Frequency
Response – Shifted -13 dB
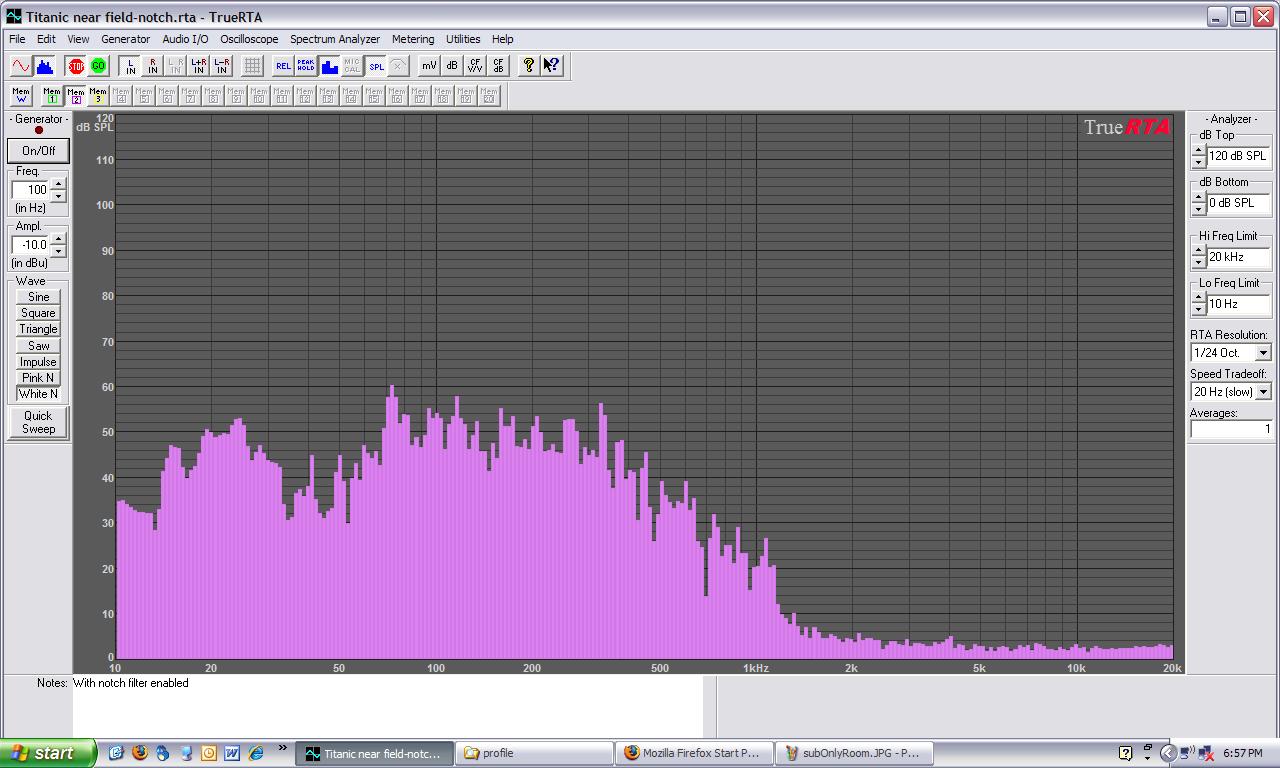
Okay finally getting to the room response, it was taken in a couple of different ways and the results were basically the same. The microphone was placed at ear level in the sweet seat. It is best to take measurements at several positions in the seating area but for the purpose of this review just the sweet seat position was used. The first graph uses the quick sweep as the near field did and the second graph used pink noise. Both signals were only played through the subwoofer with no other speakers involved.
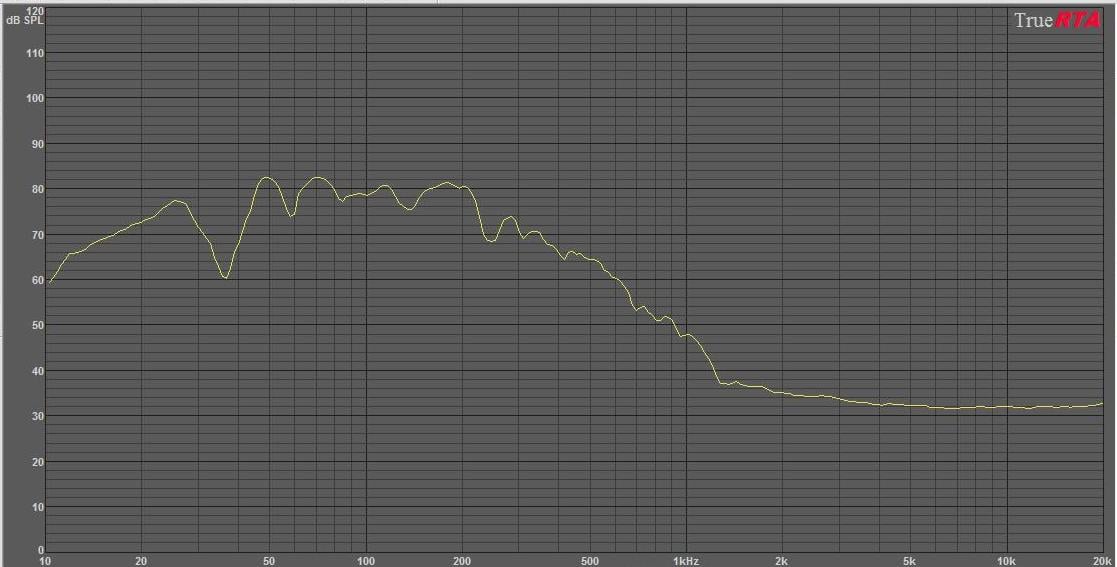
Pink Noise Room Response
As you can see there is a dip at about 38 Hz in both curves. I moved the sub to several different positions to try to integrate it into the room better and this was the best position. I used my sub woofer placement tool for the starting position and the final position was very close to the original. In comparing the room curve to the near field measurement it can be seen that they have the same general shape with the room curve showing the gain form the room. Had I had 2 subwoofers I would probably be able to do a much better job of smoothing the curve out but as it stands it is a fairly good response.
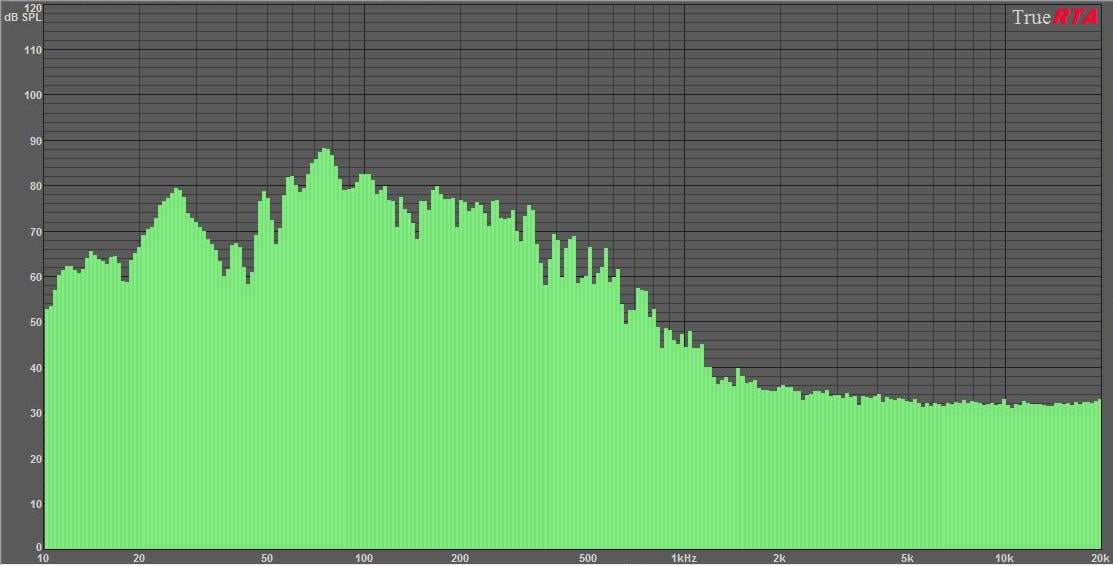
We were a little perplexed about the near field frequency response’s peak at around 60 to 70 Hz so we consulted with the Dayton people and unraveled a small problem. The amplifier has a notch filter built into the circuit board operating from about 45 to 75 Hz and it was supposed to be enabled for this kit. Upon opening the amplifier it was as disabled, as expected. To enable it only required moving a jumper which I quickly did. I took another near field response which resulted in a flatter curve.
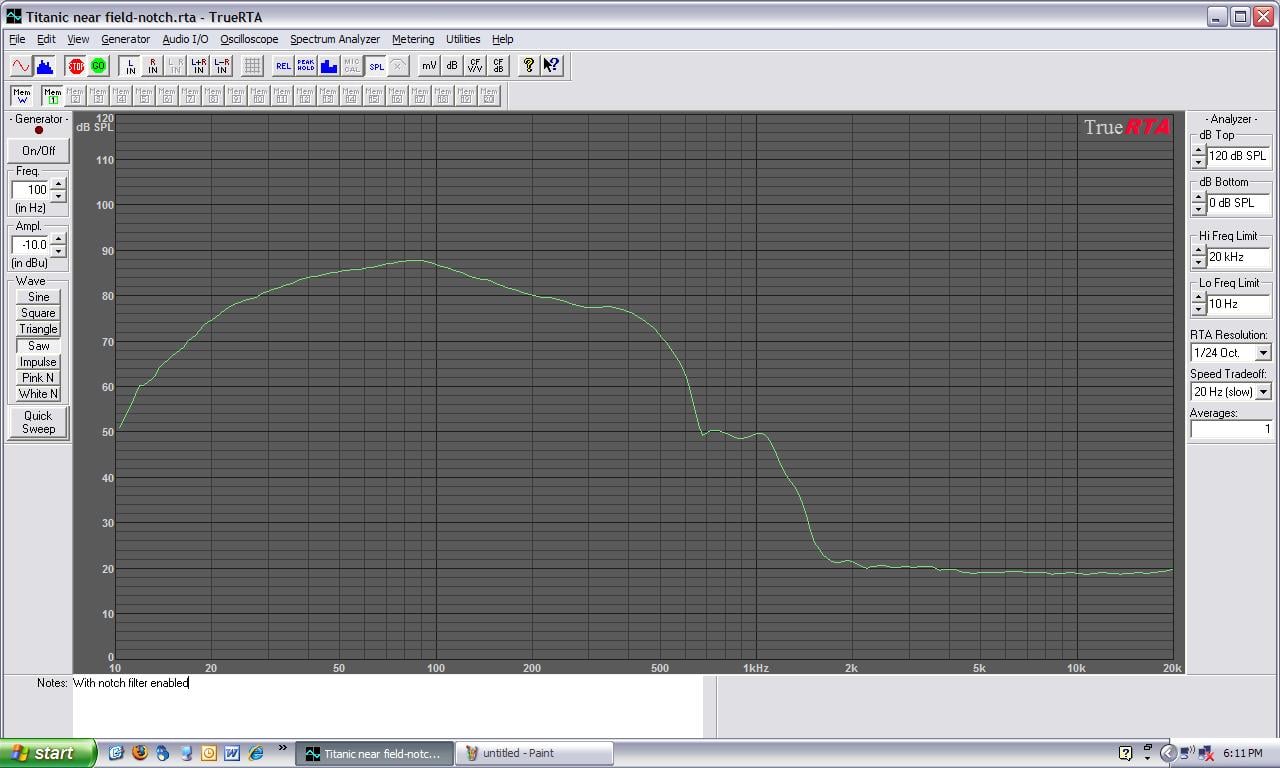
Near Field Frequency Response with Notch Filter
I also re-measured the room with the notch filter enabled using pink noise. As you can see there was not a lot of change in the room response but it does appear to be a little more flat also. And the room null at 38 Hz is not going to go away.
Room Response with Notch Filter
I did some listening again mainly to Trust from Patrick O’Hearn and I did not hear much of a difference. I took the opportunity at this point to again switch between direct mode (sub disabled) and stereo mode (sub enabled). With the T1503 sub enabled the low end was fuller and louder. It was hard to tell if it was any lower in frequency because this wasn’t switching between having the notch filter and not having the notch filter. It had been quite a few days past when I enabled the filter but I recommend following the manufacturers advice and leaving it enabled to ensure optimal performance.
Titanic T1503 Mk III Conclusion
 The Titanic T1503 MK III
kit is a good smart design that is very easy to put together. The advantage of the large 15 inch woofer is
not low end in this case but a lot of air movement. There are plenty of smaller
woofer designs that can play lower frequencies but they won’t have the impact
that a 15 inch woofer has. There are always tradeoffs in any design and the
tradeoff for the Titanic MK III is
the lowest octave frequencies for a safe playing loud subwoofer. I could really
crank up the volume on this sub without the same fear that I have with my
current subwoofers or other vented systems.
Also, for a 15 inch driver the overall cabinet size is small and
convenient. So, you get a 15 inch subwoofer in a small cabinet, a 1000 watt
amplifier and good performance all for less than $750. If I wasn’t stuck on
getting my own design right I would get a pair of these and I might have to do
just that.
The Titanic T1503 MK III
kit is a good smart design that is very easy to put together. The advantage of the large 15 inch woofer is
not low end in this case but a lot of air movement. There are plenty of smaller
woofer designs that can play lower frequencies but they won’t have the impact
that a 15 inch woofer has. There are always tradeoffs in any design and the
tradeoff for the Titanic MK III is
the lowest octave frequencies for a safe playing loud subwoofer. I could really
crank up the volume on this sub without the same fear that I have with my
current subwoofers or other vented systems.
Also, for a 15 inch driver the overall cabinet size is small and
convenient. So, you get a 15 inch subwoofer in a small cabinet, a 1000 watt
amplifier and good performance all for less than $750. If I wasn’t stuck on
getting my own design right I would get a pair of these and I might have to do
just that.
Titanic T1503 MKIII Subwoofer
MSRP: $749
P.O. Box 52
Springboro, OH 45066-052
Email: info@daytonaudio.com
Phone: 1-937-743-8248
The Score Card
The scoring below is based on each piece of equipment doing the duty it is designed for. The numbers are weighed heavily with respect to the individual cost of each unit, thus giving a rating roughly equal to:
Performance × Price Factor/Value = Rating
Audioholics.com note: The ratings indicated below are based on subjective listening and objective testing of the product in question. The rating scale is based on performance/value ratio. If you notice better performing products in future reviews that have lower numbers in certain areas, be aware that the value factor is most likely the culprit. Other Audioholics reviewers may rate products solely based on performance, and each reviewer has his/her own system for ratings.
Audioholics Rating Scale
 — Excellent
- — Very Good
- — Good
- — Fair
- — Poor
| Metric | Rating |
|---|---|
| Bass Extension | |
| Bass Accuracy | |
| Build Quality | |
| Fit and Finish | |
| Dynamic Range | |
| Performance | |
| Value |
Ken Stein is a contributing writer and reviewer for Audioholics and he really REALLY likes his speakers (which he should, since he spent countless hours hand-crafting them himself.) Ken is an engineer with FedEx and applies his diligent attention to detail to his speaker and electronics reviews here at Audioholics.
View full profile