
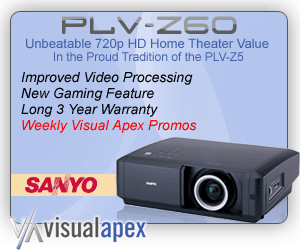
Sanyo PLV-Z60 LCD Projector Review
Sanyo PLV-Z60 projector
- Product Name: PLV-Z60 LCD Projector
- Manufacturer: Sanyo
- Distributor: VisualApex
- Performance Rating:

- Value Rating:
- Review Date: November 25, 2008 09:18
- MSRP: $ 1295
|
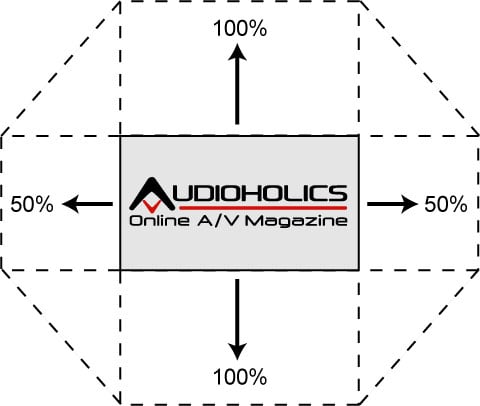
Resolution: 1280 x 720 Brightness (typical): 1,200 ANSI Lumens Uniformity: 85% (corner to center) LCD Panel System 0.7” TFT Poly-Silicon x 3 (16:9) Number of Pixels: 2,764,800(921,600 x 3) Contrast Ratio: 10000:1 (vivid mode) Projection Image (diag.): 40” ~ 300” Aspect Ratio: 16:9 Throw Distance: 3.9’~30.2’ Zoom/Focus: 1x to 2.0x, Manual driven Lens Shift (manual): 100% vertical, 50% horizontal Up/Down/Left/Right Ratio: Up/Down: 3: -1 ~ -1:3 (-1V/Center/+1V) Left/Right: 10:0 ~ 0:10 (-0.5H/Center/+0.5H) Digital Keystone Correction: Vertical: +/- 20° Projection System: Dichroic mirror & 4P prism system w/ PBS Projection Lens: F2.0 ~ 3.0 / f0.8” ~ 1.7” Lens Throw Ratio: 1.35 ~ 2.7:1 |
Projection Lamp: 145W UHP Scanning Frequency: H: 15~80kHz, V: 50~100Hz (auto sense/select) Dot Clock: 100MHz or less HDTV signal: 480i/480p/575i/575p/720p/1080i/1080p (HDMI input only) Color System: PAL/SECAM/NTSC/NTSC4.43/PAL-M/PAL-N Computer Compatibility: WXGA/SXGA/XGA/SVGA/VGA/MAC Voltage: 100V-240V AC; 50/60Hz (auto voltage) BTU Rating: 717 dB Rating: 22dBA (Eco mode) Power Consumption: 210W/185W(Nomal/Eco) Dimensions (WxHxD): 15.0” x 5.0” x 12.0” (not including protrusion) Net Weight: 11.0lbs Input Terminals 2 x Component Video (RCA x 3) S-Video (Mini DIN 4-pin) Composite Video (RCA x 1) Analog RGB (D-Sub 15) HDMI x 2 RS-232C/ Service Port (Mini DIN 8-pin) |
Pros
- Sharp image
- Rich colors
- 24p support
- Easy maintenance
Cons
- Not a lot of light output
- Not much new since the PLV-Z5
PLV-Z60 Overview, Build Quality, and Remote Control
It's been a little over two years since we played with Sanyo's last projector offering. Indeed, the company took a short break in their recent string of annual product releases to bring consumers a new 720p home theater projector in their affordable PLV line. Now that 1080p seems to be ruling the day, the 720p models from many manufacturers seem to be coming out every other year with minor changes to keep them current. The new PLV-Z60 is an incremental update to the PLV-Z5... which was an incremental release to the PLV-Z4. To be honest, our first impression is that somebody took the Z5, painted the chassis black, and threw a new release party for the Z60. While that's our honest first impression, a more complete evaluation will involve some serious Audioholics-style reviewing and lots of test material.
You know, sometimes an incremental update is just fine - especially when the predecessor is already such an excellent product. After all, I wouldn’t want GM to come out with a five wheeled car just because the old model had 4 wheels...
Differences Between the PLV-Z60 and the PLV-Z5
Much like our review of the PLV-Z5, which showed only minor updates to the PLV-Z4, the new PLV-Z60 builds on Sanyo's tried and true design and only offers slight improvements in the areas of black level and some features like video processing. Brightness has been upped by a scant 100 lumens to 1200, and we noted that the projector accepts 1080p/24 signals for judder-free film-sourced motion. Inputs of both projectors are completely identical, with the PLV-Z60 sporting dual HDMI inputs, a PC input, dual component video inputs and some standard definition fare.

Sanyo PLV-Z5 inputs
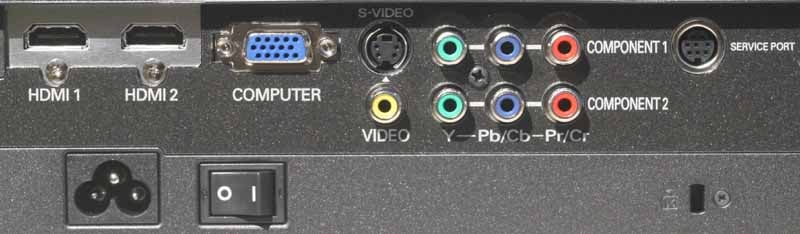
Sanyo PLV-Z60 inputs
The PLV-Z60 carries a 3-year warranty and 90-day lamp warranty as we've come to expect from Sanyo. The projector continues to offer solid features for the money, but it doesn't look like there's much beyond some minor upgrades to make any current owners of the PLV-Z5 envious. Oh wait, there is one thing. The price. When the PLV-Z5 debuted in 2006 it had an MSRP of $1,995. Two years later a slightly better model comes out and is priced at just $1,295 - a full $700 lower than the previous model. That's a nice drop in price and shows just how affordable home theater projectors are getting.
Same Chassis and Same Excellent Build Quality
Sanyo builds a nice projector. In fact, I can't believe there aren't more manufacturers stealing their automatic lens cover system. It's brilliant, actually works, and is something you really don't expect to find at a sub-$2000 price point, let alone something that has an unofficial street price of less than $1000. We liked the new black chassis immediately. Black is the new white and we hope to see more and more projectors eschew white and silver for non-reflective black. After all, if you go through the trouble of eliminating all light and reflective surfaces in your theater room, shouldn’t your projector pull its own weight? Now the PLV-Z60 does.
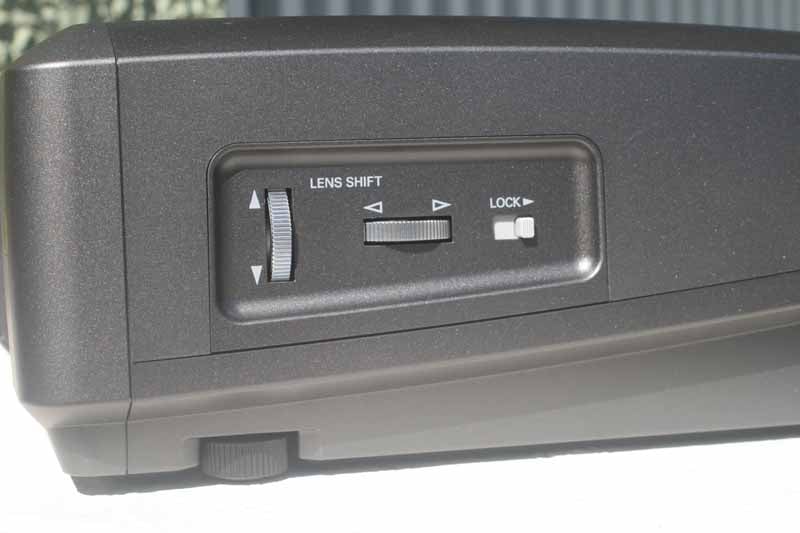 Placement of this projector is a
cinch, especially since the lens shift provided on this unit will allow 100% up
or down positioning of the screen or 50% left or right movement. Combined with
the 2x manual zoom lens, that means you can place the projector almost anywhere
and get it square to the screen without having to deal with the ill-advised
keystoning. The lens shift is facilitated by two knobs on the side of the unit
which we found to be stable and easy to rotate. Once the appropriate settings
are made and you have the exact placement you are looking for, a small locking
switch prevents the lens from drifting out of its fixed position.
Placement of this projector is a
cinch, especially since the lens shift provided on this unit will allow 100% up
or down positioning of the screen or 50% left or right movement. Combined with
the 2x manual zoom lens, that means you can place the projector almost anywhere
and get it square to the screen without having to deal with the ill-advised
keystoning. The lens shift is facilitated by two knobs on the side of the unit
which we found to be stable and easy to rotate. Once the appropriate settings
are made and you have the exact placement you are looking for, a small locking
switch prevents the lens from drifting out of its fixed position.
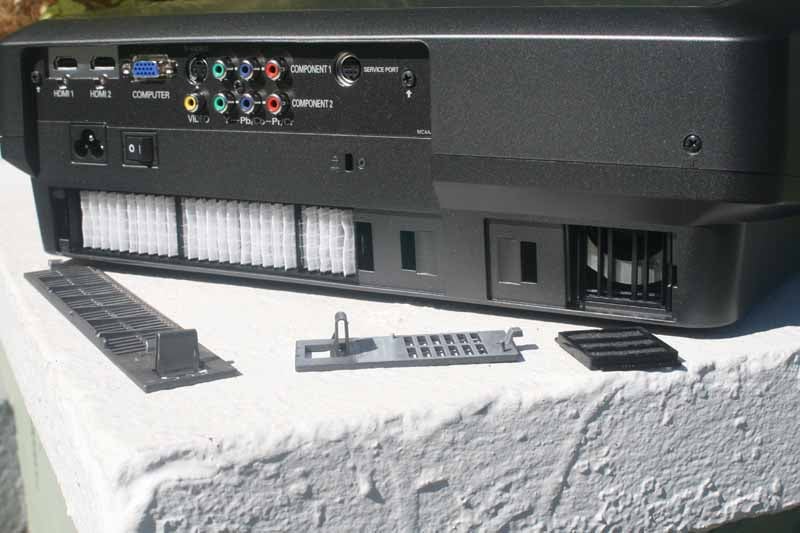 We've always been a fan of the way
Sanyo allows consumers to battle those pesky dust blobs. Their method involves
a blower tool and access into the projector to clean off the problematic area.
It's a decent design that is less sophisticated than some, but works, and
doesn't inflate the price of the projector in the process. The Sanyo also
includes easy-to-replace filters which are accessible from the back of the
projector. These are intake filters that keep dust and debris from entering the
projector as the fan takes in clean air to cool the system. The filters can be
vacuumed or brushed off, but should never be made wet.
We've always been a fan of the way
Sanyo allows consumers to battle those pesky dust blobs. Their method involves
a blower tool and access into the projector to clean off the problematic area.
It's a decent design that is less sophisticated than some, but works, and
doesn't inflate the price of the projector in the process. The Sanyo also
includes easy-to-replace filters which are accessible from the back of the
projector. These are intake filters that keep dust and debris from entering the
projector as the fan takes in clean air to cool the system. The filters can be
vacuumed or brushed off, but should never be made wet.
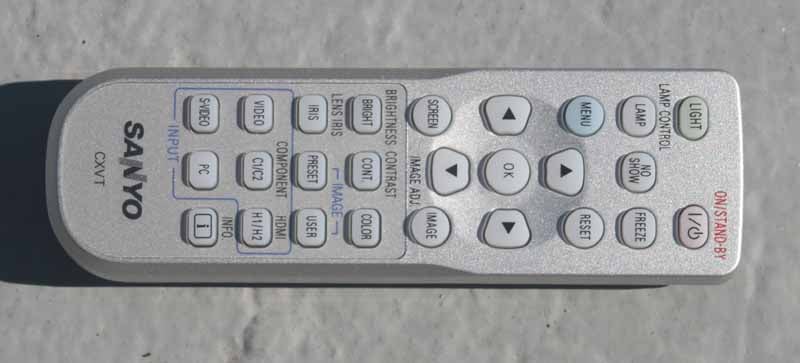
The menu system in the PLV-Z60 is essentially unchanged from the PLV-Z5 and we covered that in our other reviews so we won't rehash it here. It is extremely easy to navigate and one of the more ergonomic systems. Once an item is selected for adjustment, the menu disappears while the items are adjusted. This helps you monitor the picture in real-time as you make changes. Additionally, the menu "remembers" where you were, so the next time you activate it you are more or less where you left off. This is a boon for calibration. The remote control is also the exact same remote as was used with the PLV-Z5 projector. It's not fancy, but it is fully backlit and the light button glows in the dark for easy identification.
You can definitely hear this projector running. It's not nearly as quiet as some more expensive models we've tested and if you don't ensure it's far enough in front or behind you the ambient noise will compete a bit with quiet passages of the movie.
Measurements Calibration HQV
 This is the part I love. Seeing if my
eyes told me the truth about how this projector looks. Measuring a projector
and then calibrating it is the best way to see what you get out of the box and
what you can get when the product is tweaked. Before testing we ensured that
any "auto" modes were disabled. This included Auto Black Stretch,
Transient Improvement, Contrast Enhancement and Dynamic Gamma, all of which are
located in the Advanced menu. The
lamp Iris was also set to Close so that it didn't ramp up and down as we made
adjustments to the RGB levels. Color was excellent, and better than many
projectors I've tested at more than twice the price of the Sanyo PLV-Z60.
This is the part I love. Seeing if my
eyes told me the truth about how this projector looks. Measuring a projector
and then calibrating it is the best way to see what you get out of the box and
what you can get when the product is tweaked. Before testing we ensured that
any "auto" modes were disabled. This included Auto Black Stretch,
Transient Improvement, Contrast Enhancement and Dynamic Gamma, all of which are
located in the Advanced menu. The
lamp Iris was also set to Close so that it didn't ramp up and down as we made
adjustments to the RGB levels. Color was excellent, and better than many
projectors I've tested at more than twice the price of the Sanyo PLV-Z60.
Overscan is +10 by default, you'll want to defeat that unless the input is receiving output from a cable box. Those tend to require at least a line or two of overscan to get rid of the garbage at the very top of the visible picture signal. Another strange default was with regards to HDMI. The HDMI setting defaults to L1 (Level 1). I found that I needed to change it to L2 in order to get below black information. Once we set that we were able to get correct levels and better determine the correct Brightness and Contrast settings.
With HDMI, I had options to use Full, Zoom, Caption in, and Natural Wide scaling. This is actually unusual and very welcome since mostly you only get Full or Normal (for 4:3 discs). Zoom will likely be the most helpful as many so-called "HD" channels tend to broadcast double-letterboxed content and you can benefit from filling up the whole screen.
When setting Black Levels (Brightness) realize that your perceived black level is susceptible to total screen luminance values. For example, setting the black level while the log steps pattern gradually gained luminance caused me to actually drop the black level one more step when the luminance levels were at their lowest. If you calibrate this set with too much white on the screen, you're likely to set the Brightness a tad higher than you should. Since many dark scenes are total, and like really bright point source lighting, it's a good idea to sacrifice some detail in highly contrasting scenes in order to regain some more depth out of the truly dark areas of films.
White levels were a tad finicky, and I found that I could still barely see the third white bar in my test patterns - the "whiter than white" bar which ideally I'd make go away. The additional click needed to do so, however, also nuked my second to last bar - something I didn't want to occur as it would entail a loss of bandwidth.
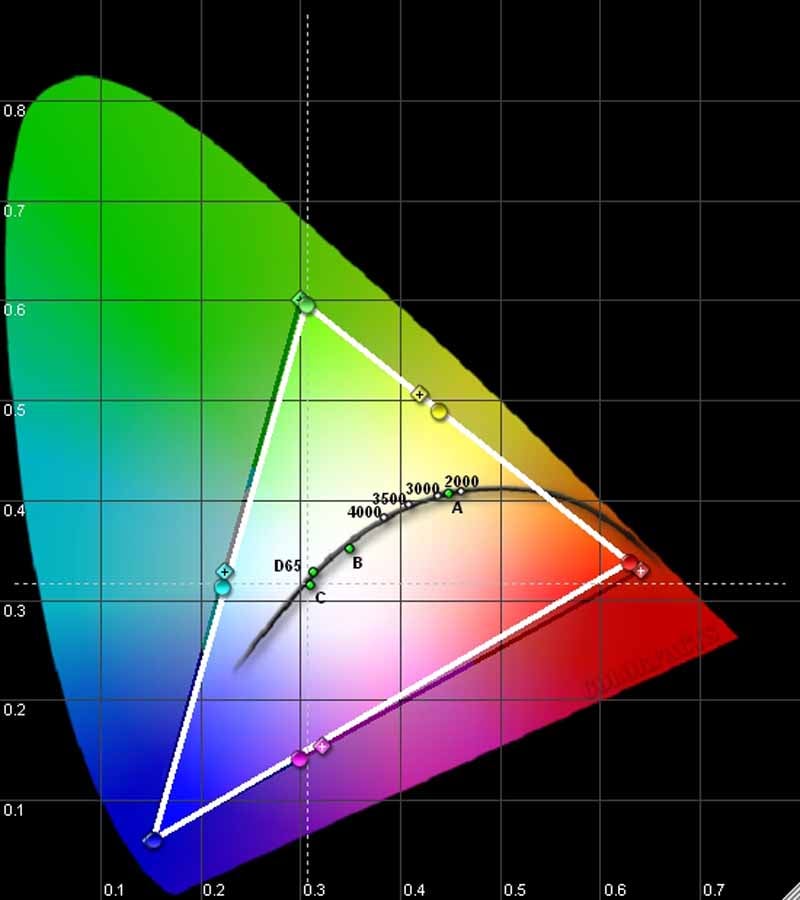
After the projector truly settled in, I read some average color temperatures in the upper range of 6550K while the average color temp for my selected mode, Pure Cinema, hovered around 7000K. The color temp and light output range at 100IRE looked like this:
- Brilliant Cinema - 61 cd/m^2 @ 7200K
- Creative Cinema - 46 cd/m^2 @ 7400K
- Pure Cinema - 32 cd/m^2 @ 7000K
- Natural - 50 cd/m^2 @ 7700K
- Living - 62 cd/m^2 @ 7500K
- Dynamic - 119 cd/m^2 @ 9800K
- Vivid - 119 cd/m^2 @ 9900K
Taking some measurements I came very close to saying that this projector really doesn't require calibration. The truth is that it doesn't - not to look good, but it can look better with some adjustments to the RGB gain and offset levels. Here are some of the before and after measurements as measured by our reference Datacolor ColorFacts Professional software:
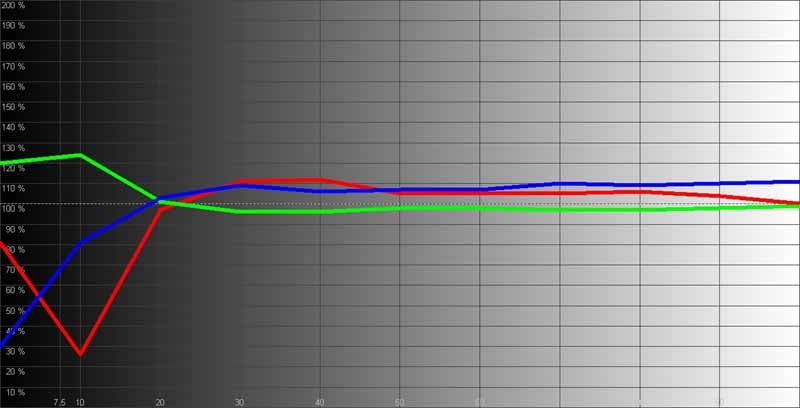
RGB levels before calibration (not bad at all)
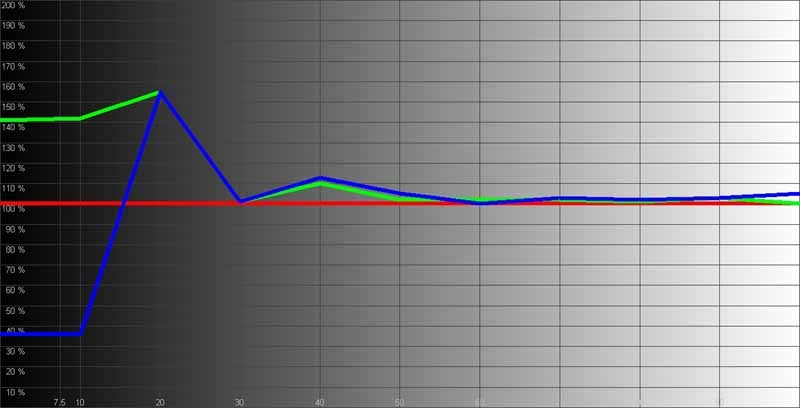
RGB levels after calibration (tighter)
If RGB levels were barely brought in line, looking at the color temperature measurements yields a similar picture:
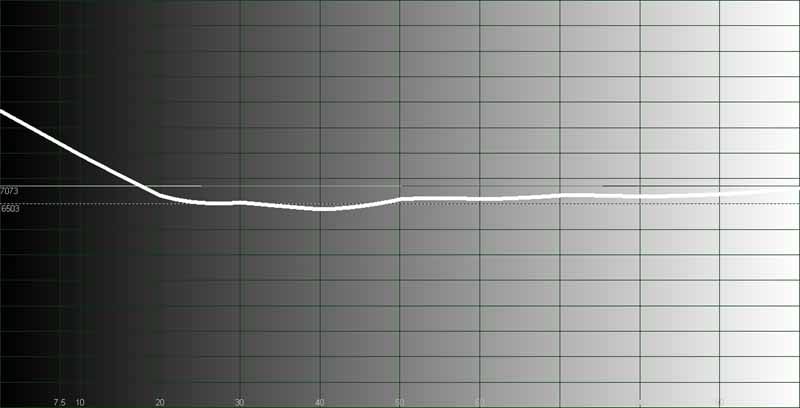
Color temp drifts above 6500K as light output levels increase

Calibration brought us nearly perfect to 6500K from 30 - 100 IRE
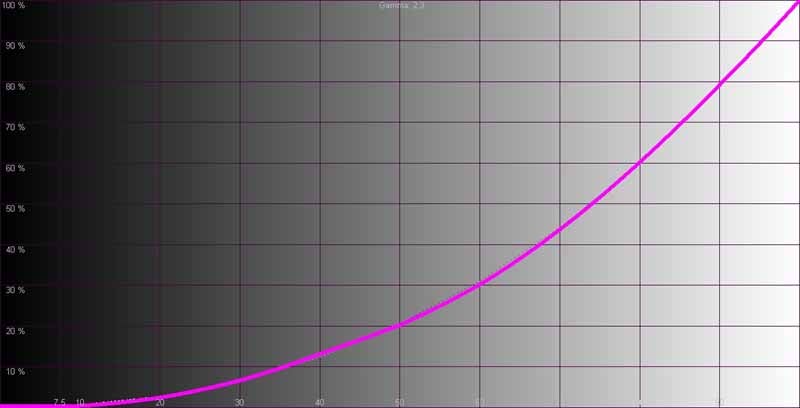
The gamma curve looked smooth and stayed almost unchanged (at ~2.3) before and after our calibrations:
Audioholics/HQV Bench Testing Summary of Test Results
Perfect
Score is 130
Sanyo PLV-Z60
Benchmark Score: 47 (score increases to 62 once Film mode is engaged)
|
Test |
Max |
Film |
Pass/Fail |
|
Color Bar |
10 |
10 |
Pass |
|
Jaggies #1 |
5 |
1* |
Pass |
|
Jaggies #2 |
5 |
1 |
Pass |
|
Flag |
10 |
0* |
Fail |
|
Detail |
10 |
10 |
Pass |
|
Noise |
10 |
0 |
Fail |
|
Motion adaptive Noise Reduction |
10 |
0 |
Fail |
|
Film Detail |
10 |
0* |
Fail* |
|
Cadence 2:2 Video |
5 |
0 |
Fail |
|
Cadence 2:2:2:4 DV Cam |
5 |
0 |
Fail |
|
Cadence 2:3:3:2 DV Cam |
5 |
0 |
Fail |
|
Cadence 3:2:3:2:2 Vari-speed |
5 |
0 |
Fail |
|
Cadence 5:5 Animation |
5 |
0 |
Fail |
|
Cadence 6:4 Animation |
5 |
0 |
Fail |
|
Cadence 8:7 animation |
5 |
0 |
Fail |
|
Cadence 3:2 24fps film |
5 |
5 |
Pass |
|
Scrolling Horizontal |
10 |
10 |
Pass |
|
Scrolling Rolling |
10 |
10 |
Pass |
|
Total Points |
130 |
47 |
Source was the Denon DVD-3930CI DVD Player.
*by default, the system sets Progressive deinterlacing mode to L1. Both L1 and L2 fail unflagged deinterlacing tests. The third mode, Film, passes this mode. Users will want to engage Film mode when feeding this projector any interlaced video from DVDs. Sanyo really needs an Auto mode that can pick up and detect unflagged 3-2 pull down sources. Engaging Film mode also further aids the system slightly in its ability to handle jaggie reduction.
Comments on Benchmark Testing
Enabling the Film mode raises the HQV benchmark score to 62 since the Jaggies 1, Flag, and Film Detail tests all get higher scores.
Moving Zone plate tests looked pretty rough once they got up to speed. The pattern tended to break up quickly in all directions, though we did see some flashing in particular diagonal and circular movements. This is actually not unusual for a basic video processing.
Users should note that there is actually a loss of resolution if you decrease the Sharpness control below 0, so you'll want to leave them at their defaults. Above 0 nets edge artifacts that are unpleasant and unnecessary for a clear, sharp picture.
The PLV-Z60 has a panel alignment setting where you can adjust the RGB panels individually for both the dark and light ranges. Transient Improvement was correctly Off by default and is basically a Sharpness enhancer which we recommend users stay away from. Color Management is another toy that allows you to tweak individual colors, similar to Sony's color software. Users who want more light output may want to experiment with the Automatic lamp Control modes (there are two). In our room we found Eco to yield the best overall results, but we weren't lacking for light output. The Lens Iris is another place to tweak. Leaving the iris Closed yielded the best black levels for us, but for greater light output you can open it up. You can also combine this with the Lamp Iris which has two Automatic modes (one of faster than the other). We actually liked the faster of the two modes (Auto2) which seemed almost instantaneous to us. The noise the iris makes when it switches is subtle, but there aren't a lot of steps either, so movement will be minimal and mostly aid in dramatic changes from light scenes to dark.
Viewing Evaluation Conclusion
The PLV-Z60 is just a great, colorful projector that redefines budget home theater. It was a pleasure to review and give myself excuses for watching DVDs and television shows just so I could snap off some shots of how good this system looked on my reference 92-inch Carada Masquerade Projector Screen Masking System. OK, less talk, more pics...
HDTV: House
Check
out House' hair and the black detail in his leather jacket. The PLV-Z60
certainly isn't the darkest projector I've seen, in fact that's probably the
area it needs the most work in, however the detail is never left out and you
can always get an accurate luma response that pulls every bit of info out of
the picture.

Looks like Dr. Wilson hasn't shaved in several hours according to this next snapshot.

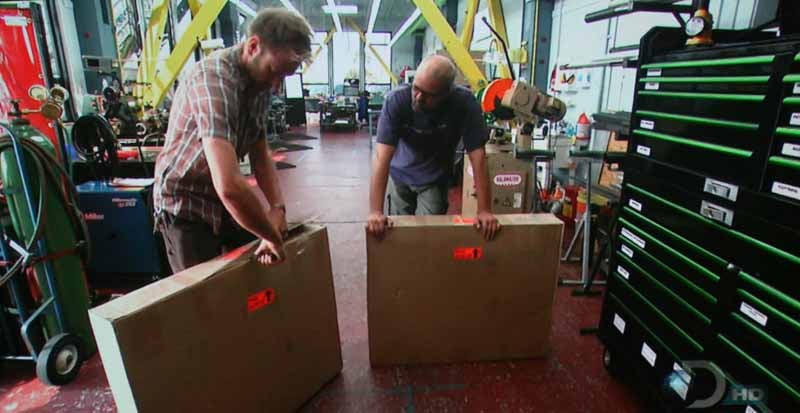
HDTV: Misc HD Shows
From
college football to Prototype This!
to... heck, television commercials,
the PLV-Z60 always found something to make us drool at the screen and wonder at
how fortunate consumers are to be able to get this kind of quality at today's
prices.
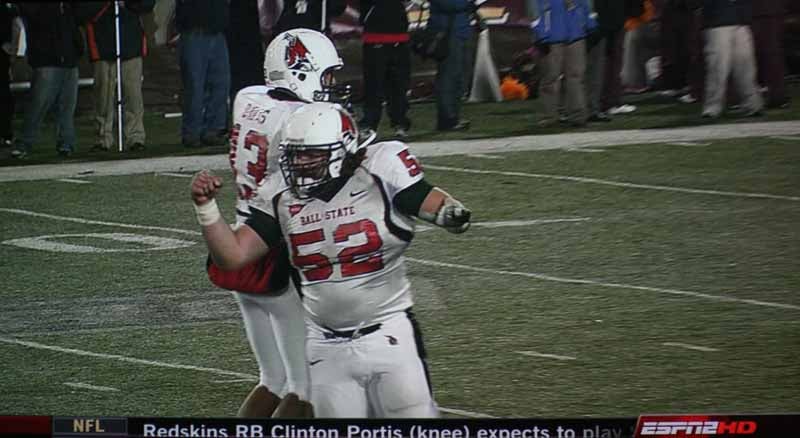
No, his arm isn't severed, he's just pointing right at you!
As the camera moved in we had ourselves a real-world jaggie test... and it
passed.
Commercials... If they look that good in real life, I'll take two!
HDTV: CSI:
NY
The
CSI shows are always a great place to get some HD stills for any projector I'm
reviewing. They're colorful.... They look good... They're on 24 hours a day.
Seriously, if you can't channel surf and find some flavor of CSI you must be in
northern Canada.

Xbox 360: Gears
of War 2
I'm
not necessarily convinced that the pics came out all that great, but Gears of
War 2 is such an incredibly cool game - and fresh off the presses - that I'm
going to include it. Just because I can. It's actually another great example of
how the PLV-Z60 can show incredible amounts of black level detail, even though it may not exactly sport the deeper blacks of
the high-end products. I guess that's why Sanyo makes three different home
theater models to satisfy all users/budgets.
Blu-ray: Iron
Man
I
saw so many clips of Iron Man recently that I have probably sat through the
movie a few times, though not in a linear fashion. It's a very detailed and
colorful movie, and detail & color are what really make the Sanyo stick out
in the crowd.
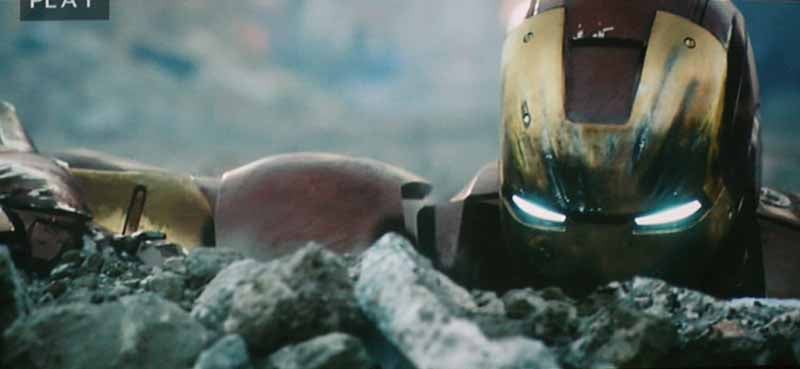
By the way, the sound in this scene is off the hook!

Conclusion
This is the same great projector consumers found in the PLV-Z5 - except cheaper and black. Sure, there are some slight tweaks, but overall you are getting a very incremental update but reaping the benefits of costs savings which Sanyo is apparently happy to pass on to its customers. If we recommended the PLV-Z5 in 2006, it's even easier to recommend this product. Street prices on this model are so low we can't publish them here for fear that the information will be obsolete by time of publication. Rest assured that for less than $1000 you can bring this unit home from an authorized dealer - and that's simply mind-blowingly cool.
Sanyo PLV-Z60 LCD
Projector
MSRP: $1,295
Sanyo North America Corp
http://www.sanyo.com/business/projectors/home_theater/
About Sanyo
North America
SANYO Group's corporate philosophy is the
guiding principle in accomplishing the key management policy of ensuring
products and services that are indispensable in creating harmony between people
and the environment. SANYO's priorities are: Customer Satisfaction and
Harmonizing with the Environment. SANYO's digital technology and core
competence (the source of our competitiveness) supply the products and services
that generate joy, excitement, and impact.
The Score Card
The scoring below is based on each piece of equipment doing the duty it is designed for. The numbers are weighed heavily with respect to the individual cost of each unit, thus giving a rating roughly equal to:
Performance × Price Factor/Value = Rating
Audioholics.com note: The ratings indicated below are based on subjective listening and objective testing of the product in question. The rating scale is based on performance/value ratio. If you notice better performing products in future reviews that have lower numbers in certain areas, be aware that the value factor is most likely the culprit. Other Audioholics reviewers may rate products solely based on performance, and each reviewer has his/her own system for ratings.
Audioholics Rating Scale
 — Excellent
- — Very Good
- — Good
- — Fair
- — Poor
| Metric | Rating |
|---|---|
| Detail and Resolution | |
| Deinterlacing & Scaling | |
| Contrast and Black Levels | |
| Color Reproduction | |
| Noise Reduction | |
| Calibration Options | |
| Build Quality | |
| Ergonomics & Usability | |
| Ease of Setup | |
| Features | |
| Remote Control | |
| Fit and Finish | |
| Performance | |
| Value |
Clint Deboer was terminated from Audioholics for misconduct on April 4th, 2014. He no longer represents Audioholics in any fashion.
View full profile