
Audioholics’ Guide in Getting Good Sound From a Desktop Audio System
Good sound From Desktop Audio
Let’s start this article by stating the obvious: Computer desk settings have become a central part of not only much of many people’s work but also their hobbies. In other words, much of people’s activity happens at a PC desktop. The problem is that this isn’t exactly a setting for great sound, and we don’t typically think of a computer desk as a place for high-fidelity audio enjoyment. This is why headphones are so often the preferred audio device of choice in a desktop setting.
 The problem is that headphones have some
significant shortcomings compared to speaker-based sound systems. You can’t
really have a realistic soundstage with headphones; the soundstage is always in
your head instead of in front of you, which sounds more natural (the term for
this is “externalization”). Headphones can’t give you the tactile feel of sound
pressure waves that can hit your entire body, which is a major drawback because
that physical sensation of sound striking your body makes it much more
immersive and realistic. Headphones also degrade immersion by locking the
soundstage in a fixed place with respect to your head position, so everywhere
you move your head, it sounds the same, which, of course, isn’t at all how we
experience sound in day-to-day life. Furthermore, unless you have some
super-comfortable cans, headphones are more fatiguing than an outboard sound
system; I would guess that most people feel some relief after removing their
headphones after watching a movie or a prolonged gaming session. Even though my
own headphones are reasonably comfortable, I still get a sense of relief after
removing them after binging some TV show episodes or spending a few hours
shooting some monsters in “Doom Eternal.” To sum it all up, for these reasons
and others, headphones just aren’t as fun or satisfying as a good loudspeaker
system (yes, I know how controversial that statement is going to be for
headphones aficionados - let’s fight about it in the comments section!).
The problem is that headphones have some
significant shortcomings compared to speaker-based sound systems. You can’t
really have a realistic soundstage with headphones; the soundstage is always in
your head instead of in front of you, which sounds more natural (the term for
this is “externalization”). Headphones can’t give you the tactile feel of sound
pressure waves that can hit your entire body, which is a major drawback because
that physical sensation of sound striking your body makes it much more
immersive and realistic. Headphones also degrade immersion by locking the
soundstage in a fixed place with respect to your head position, so everywhere
you move your head, it sounds the same, which, of course, isn’t at all how we
experience sound in day-to-day life. Furthermore, unless you have some
super-comfortable cans, headphones are more fatiguing than an outboard sound
system; I would guess that most people feel some relief after removing their
headphones after watching a movie or a prolonged gaming session. Even though my
own headphones are reasonably comfortable, I still get a sense of relief after
removing them after binging some TV show episodes or spending a few hours
shooting some monsters in “Doom Eternal.” To sum it all up, for these reasons
and others, headphones just aren’t as fun or satisfying as a good loudspeaker
system (yes, I know how controversial that statement is going to be for
headphones aficionados - let’s fight about it in the comments section!).
Tips for Getting the Best Sound From Your Desktop YouTube Overview
The problem with loudspeakers on a desktop is that they are more complex to set up and are compromised by being stuffed into a desktop environment. So are we stuck with headphones and otherwise doomed to spend our time in a place that just can’t have good sound reproduction without them? The answer (which should be clear for anyone who read this article’s title) is a resounding no! We can have great sound in a desktop environment, however, there are a few additional challenges that must be dealt with beyond that of getting a great sound in an open domestic space like normal hi-fi systems. Desktop spaces aren’t usually the best environments for good acoustics, but we can compensate for that.
Now, let’s talk about some of the things you can use to achieve a great sound from a desktop environment. There are three subjects we will discuss: desktop acoustics, proper audio gear for desktops, and the correct setup.
Desktop Acoustics
So how is a desktop space acoustically problematic? The main issue is the desktop surface and any nearby boundaries. For loudspeakers, any nearby surface is an opportunity to affect the sound from acoustic reflection and diffraction. These effects degrade the sound by causing indirect sounds from the speaker to interfere with its direct sound. Let’s unpack that a bit to give a better explanation for those not so well versed in acoustics. Loudspeakers don’t just project sound in a single direction; depending on the loudspeaker and frequency range, sound can be projected from a loudspeaker at a very wide angle, and in low frequencies, sound can be emitted in every direction. We call the angle at which loudspeakers project sound to be its “dispersion”. The smaller the loudspeaker, the wider an angle that sound is projected, and since desktop speakers tend to be on the small side, they will have a relatively wide dispersion.
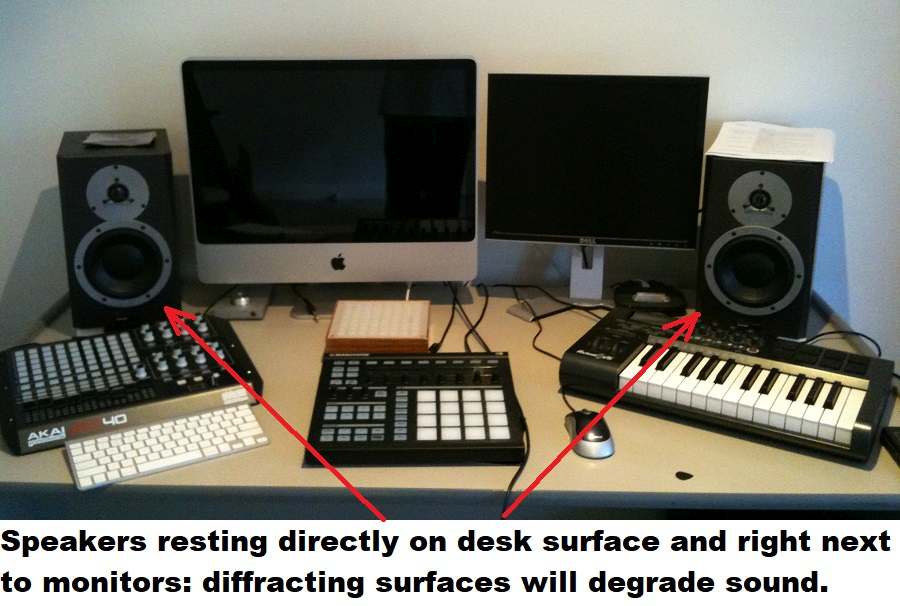
Acoustic reflection and diffraction kicks in when an off-axis sound from the loudspeaker’s dispersion bounces off of a nearby surface and collides with the direct sound from the loudspeaker itself at the listening position. This is a problem because of the different distance of the path directly from the loudspeaker versus the path of the reflected sound. The reflected sound has a longer path, naturally, and the slight delay of that longer path means that the reflected sound can be out of phase with the direct sound. In other words, they are not synchronous. The sound waves don’t line up, and this lack of phase coherence can boost or reduce the frequency response at the listening position. The result can be a shouty or glaring sound. This is one of the reasons why you see so many hi-fi loudspeakers set up out in the room rather than against a wall or in a corner; the diffraction that occurs from nearby surfaces can degrade the sound (if you want to hear the effects of diffraction, just take a loudspeaker and enclose the area around it with large objects and listen for the effects on the sound). But how can you get a loudspeaker away from surfaces in a desktop setting where there will be at least one and usually two surfaces confining the listening area?
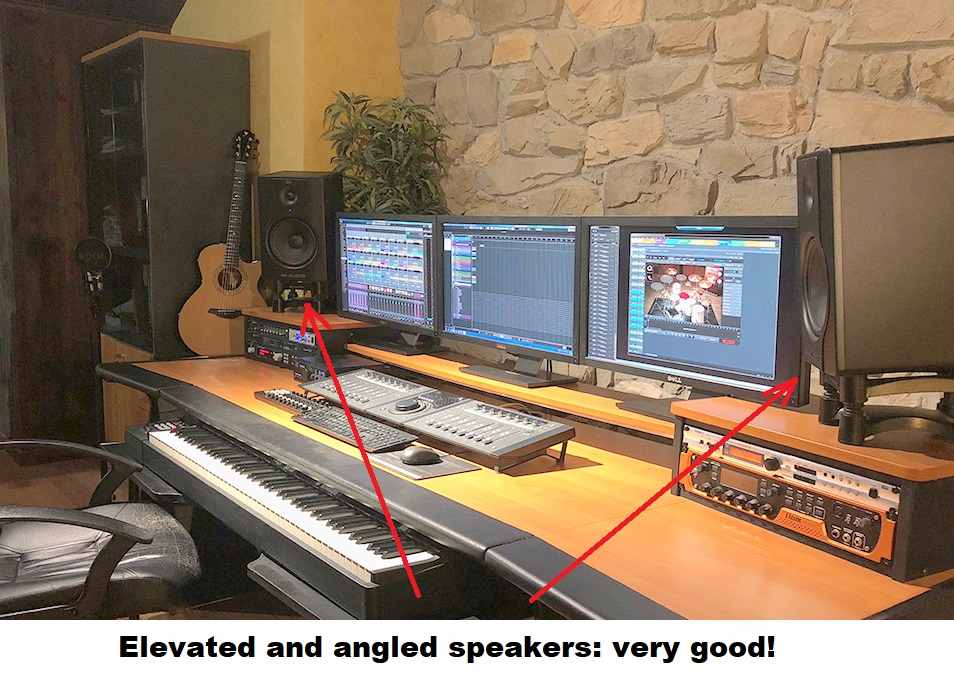
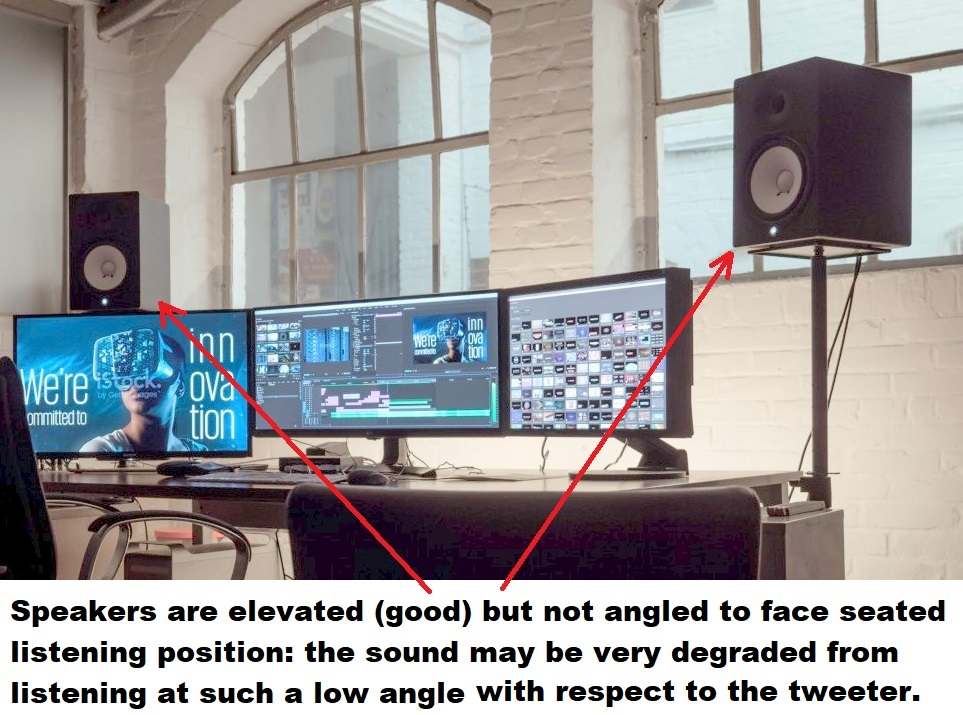
1. Elevate the speaker off of the desktop
One thing that can be done is that the speaker can be raised off the desktop surface by a desktop speaker stand or a riser of some type. The further you get the speaker away from the desktop surface, the better it will be for the acoustics. Two things that must be observed in raising the speaker off the desktop surface: the speaker shouldn’t be raised so high that it seems like the sound is coming from above rather than from the front, and the tweeter of the speaker should maintain an aim at the listener’s ear level. If you look at how many speakers are set up in recording studios, these are practices that are commonly seen: a raised speaker angled to face the recording engineer.
Editorial note by Matthew Poes:
There are a couple things going on here actually. First, we have the acoustic mirror. A speaker will create a mirror of itself off a boundary. However, with a desk, the mirror is not frequency equivalent to the speaker like it would be with a wall. The desktop isn’t large enough, so an acoustic mirror is created but only at mid/high frequencies. Further, that mirror has the response of the downward angle vertical response, which is usually pretty bad. And it’s interfering with the main wave at the listening position in a fashion that is temporally too close to the main lobe of the speaker and thus can’t be parsed out by the ear/brain. In other words, the desk acts like another speaker but in a horrific way. Raising the speaker up and away from the desk helps mitigate this because it reduces the strength of the reflection and increases the temporal spacing.
1.2 For a higher placement, turn the speaker upside down
One trick that you can use to maintain a tweeter aim on the listening position while not needing to raise the speaker really high or having to tilt it at an awkward angle is to turn the speaker upside down. Most non-floor standing speakers aren’t affected by being used upside down so long as the tweeter is aimed at the listener’s ears. It does not adversely affect the sound. So let’s say you have a speaker stand that is about a foot high, but if you place the speaker on it right-side up, the tweeter will be aimed over your head; you can always just use the speaker upside down to bring the tweeter height closer to your ears. Acoustically speaking, this type of placement and orientation may be slightly better anyway since the tweeter frequencies normally have narrower dispersion and so won’t be affected by diffraction as much from placing it nearer to surfaces.
2. Use acoustic absorption if the speaker is close to a wall
Let’s say that your desk is in a corner and so it necessitates one of the speakers being placed right next to a wall. Obviously, such a placement will incur diffraction from the speaker’s proximity to the wall, and that will degrade the sound. What is worse is that it only affects one channel, and that can really damage any sense of soundstage and imaging. One thing that can be done to help this is to use a broadband acoustic absorber on the wall next to the speaker. This will absorb much of the sound and can greatly lessen the wall’s deleterious effect. The acoustic absorption panel should be a broadband type so that it affects as much sound spectrum as possible as evenly as possible. The thicker the panel, the better, so if you have space for a 4” thick panel, that would be better than a 2” thick panel. Acoustic absorption may not completely fix the problem, but it will go a long way towards reducing it. It’s worth mentioning here that this is a good idea for any kind of speaker setup, not just a desktop sound system; if one or both speakers are right next to a wall in any kind of sound system, broadband acoustic absorbers can do a lot to improve the sound.
It should be mentioned here is that placing acoustic treatments on the wall behind the speaker isn’t nearly as critical. It can help if the speaker is very close to the back wall, and it doesn’t hurt the sound to use acoustic treatments on the wall behind the speaker, especially if you are using very thick bass trap panels, however, most of the sound that comes out of a speaker is emitted in the front hemisphere. Mostly it is just low-frequencies that are projected from the rear of the speaker, and only very thick acoustic panels can have any effect on frequencies in that range. It’s also worth mentioning that if there is unused desktop area between the listener and speakers, placing an acoustic treatment there can tame destructive reflections. The desktop treatment doesn’t have to be fancy either; a thick felt cloth, for example, would be helpful.
3. If the speaker is rear-ported, don’t place it up against the back wall.
As any audiophile knows, many speakers have their ports mounted on the back panel. One of the reasons for this is that it allows the front baffle to be smaller. It can also help load the bass a bit more for speakers that are a bit bass-shy on their own. The port should be treated like a driver, and it needs to interface with the air to work. If you move the port too close to the wall, that can “suffocate” it in a sense, depriving it of air it needs to function. Desktop spaces tend to be pretty cramped, so it might seem like a good idea to push a rear-ported loudspeaker as far back as possible to preserve space, but you will want to leave a little room for the port, so don’t push the speaker flush against the wall. Even an inch of space should be sufficient, although two inches would be better.
4. Experiment with Toe-in
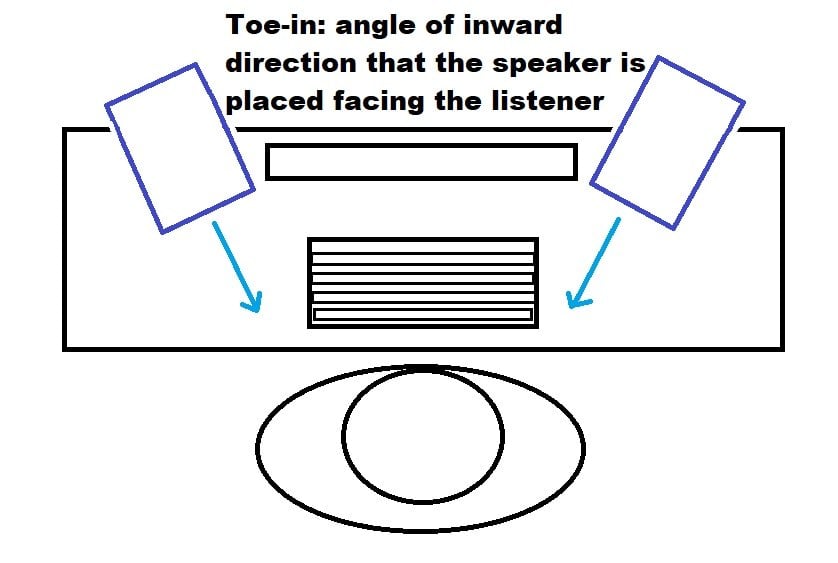 “Toe-in,” in speaker talk, is angling the
speakers toward the listener. Some speakers sound better with the speakers
facing the listener, some speakers sound worse, and some don’t really change
much in sound character. It depends on the speaker, the acoustics of the
environment, and the preferences of the listener. Experimenting with toe-in can
help listeners improve the sound not just for their desktop system, but for any
sound system. We have decided to mention it here since it is such a small thing
that can sometimes make a major difference but can often get overlooked even by
seasoned audiophiles. A good place to start is to have the speakers facing
straight ahead in parallel directions, and then angling them to face the
listener directly while trying to sense any changes in tone or soundstage. Most
speakers will have somewhat more pronounced treble when they are facing the
listener directly versus listening to them at an off-axis angle, and that may
or may not be the listener’s preference. Some other angles to try are having
the speakers angled somewhat toward the listener but not quite facing the
listener, and an extreme toe-in where the speakers are aimed so that their
facing direction crosses slightly in front of the listener.
“Toe-in,” in speaker talk, is angling the
speakers toward the listener. Some speakers sound better with the speakers
facing the listener, some speakers sound worse, and some don’t really change
much in sound character. It depends on the speaker, the acoustics of the
environment, and the preferences of the listener. Experimenting with toe-in can
help listeners improve the sound not just for their desktop system, but for any
sound system. We have decided to mention it here since it is such a small thing
that can sometimes make a major difference but can often get overlooked even by
seasoned audiophiles. A good place to start is to have the speakers facing
straight ahead in parallel directions, and then angling them to face the
listener directly while trying to sense any changes in tone or soundstage. Most
speakers will have somewhat more pronounced treble when they are facing the
listener directly versus listening to them at an off-axis angle, and that may
or may not be the listener’s preference. Some other angles to try are having
the speakers angled somewhat toward the listener but not quite facing the
listener, and an extreme toe-in where the speakers are aimed so that their
facing direction crosses slightly in front of the listener.
5. Subwoofer placement
Speakers that can fit on a desktop don’t really have the size to be chasing after deep bass. Physics dictates that getting deep bass from a small enclosure necessitates that the system will be very power insensitive. You would need a small-diameter driver with a huge amount of excursion ability, a really beefy motor, and a lot of mass, and that means you need an enormous amount of wattage to get that thing to generate any serious loudness. Apart from the sensitivity issue, there are a lot of other reasons why this is bad loudspeaker design. So modestly-sized speakers rarely attempt deep bass frequencies, and even most tower speakers don’t go much lower than 40Hz.
If you want strong deep bass in a desktop
system, you will need to add a subwoofer. The problem becomes where to put the
sub in what is normally a cramped environment. And even if you have found a
spot, it may be a distracting location for the subwoofer. In my experience,
near-field subwoofer placement becomes very localizable when they are not in
front of or behind the listener. One reason is that the low-pass filter usually
employed for subwoofer set up is not a brick wall system, and can still output
localizable frequencies, which are frequencies above 80Hz, albeit at a lower
level. A localizable sound is, as the name suggests, a sound whose location is
easy to detect, and that is not how you want a subwoofer to acquit itself. It
can be very easy to hear those localizable frequencies if the sub is very close
by, particularly if it is off to the side. That means all the bass sounds like
it’s coming right from the subwoofer rather than from nowhere in particular
,which is what it is supposed to sound like. However, if the sub is directly in
front of the listener or behind the listener, the path of sound from the sub is
equally distant to the listener’s ears, so it will not pull the sound to one
side or the other. This makes it difficult to localize, which is what you want.
If you are not able to place the subwoofer in an area where the sub is not localizable, one thing you can do to lessen localization is to reduce the subwoofer crossover frequency of the system. The traditional subwoofer crossover frequency is 80Hz, but users can try 60, 50, or 40 Hz for less localizable sound; the less upper frequencies a sub is allowed to play, the less it will be localizable. The bass ability of the main speakers should be considered in choosing these lower crossover frequencies, however. If the user’s speakers are small and roll off at 80 or 90 Hz, choosing a 40hz crossover will leave a pretty significant gap in the response.
Desktop Audio Equipment
In order to get a good sound in a desktop space, you will need appropriate equipment, to state the obvious. Some pieces of gear that work well in a standard home audio system will not be a good fit in a desktop environment. Let’s now talk about what to look for in selecting the gear for a good desktop sound system.
1. Get good Digital-to-Analog Conversion
Recommending a good digital-to-analog converter (DAC) might be a bit strange to start with; are regular DACs that bad? The answer is yes for almost anyone who owns a computer with built-in analog outputs. Most computers come with 3.5mm analog jacks that users can plug headphones or speakers into. These jacks are usually built into the motherboard of the PC. That is a problem because the internal circuitry of most PCs is an environment filled with electromagnetic noise. The sound components used in stock PCs are usually cheap parts, and they don’t exhibit proper isolation and noise rejection. Your Hewlett-Packard PC is not intended to be an audiophile device, and the result is a very noisy output signal that will have a lot of hiss, static, and electronic squelching noises. The noise may become more prominent when there is activity occurring such as mouse movement input, disc drive activity, or keyboard input.
Of course, all of that noise is incompatible with good sound. We need a clean analog output to go to the amplifier. The solution is to use some kind of outboard digital-to-analog conversion. There are a lot of different DACs and audio interfaces available in a variety of price ranges and abilities that can do this job. Even most A/V receivers can do this task (if you have somewhere to put them in a desktop system). Many desktop PCs have digital audio outputs such as optical TOSLINK or S/PDIF coaxial, and a simple, good DAC can convert that output to a clean analog signal. You can also use an HDMI audio extractor to get a clean digital output if your computer doesn’t have digital audio outputs.
 Many simple DACs intended for PCs have a USB
audio input. A good, affordable example is the Topping D10S. A good, inexpensive DAC that accepts
TOSLINK and S/PIDF coaxial is the SMSL Sanskrit 10th MK2. Those only output the
analog signal to unbalanced RCA outputs, so if you want to use those with a
powered monitor as your loudspeaker, make sure it accepts unbalanced inputs.
Most powered monitors do, but some do not. Using balanced connections and
cables is a good idea if you have a lot of wires and electronic stuff around
the audio signal cables. Balanced connections do a much better job of rejecting
noise and maintaining a clean signal from output to input, and this Focusrite Scarlett 3rd Gen Audio Interface is an affordable
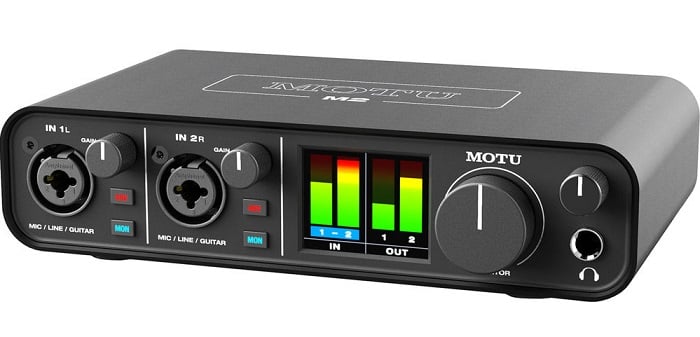
solution toward that end. I use a MOTU M2 which I have found to be a superb and solid
audio interface with balanced TRS outputs.
Many simple DACs intended for PCs have a USB
audio input. A good, affordable example is the Topping D10S. A good, inexpensive DAC that accepts
TOSLINK and S/PIDF coaxial is the SMSL Sanskrit 10th MK2. Those only output the
analog signal to unbalanced RCA outputs, so if you want to use those with a
powered monitor as your loudspeaker, make sure it accepts unbalanced inputs.
Most powered monitors do, but some do not. Using balanced connections and
cables is a good idea if you have a lot of wires and electronic stuff around
the audio signal cables. Balanced connections do a much better job of rejecting
noise and maintaining a clean signal from output to input, and this Focusrite Scarlett 3rd Gen Audio Interface is an affordable
solution toward that end. I use a MOTU M2 which I have found to be a superb and solid
audio interface with balanced TRS outputs.
A host of different factors play into what DAC or audio interface should be used, including building around existing equipment, budget considerations, and applications. For example, if you need to use your computer to record audio as well as play it back, a pro-audio interface like the above mentioned MOTU M2 would be called for. If you already have an amp that you want to use that has unbalanced inputs, you don’t need to make the stretch for a DAC or audio interface with balanced outputs. On the other hand, if you are building a system from nothing, you might want those balanced outputs for a lower noise floor.
2. Stay away from “computer speakers”
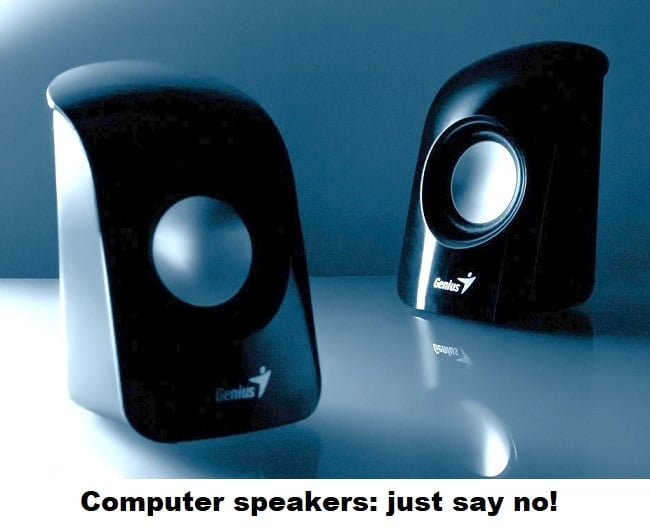 Do you know those little speakers intended for
PC setups that used to be very prevalent in the ’90s and 2000s? They typically
had small, full-range drivers housed in plastic enclosures and sometimes came
with a “subwoofer” that only had a port visible? Here is a very typical
example: Logitech Z213 (sorry to pick on you,
Logitech - hey, I like some of your other computer peripherals). Yeah, in case
you didn’t already know, those things are awful in terms of sound quality. They
are useful only insofar as you need sound but don’t have desktop space for real
speakers and aren’t able to use headphones. Just don’t expect a good sound.
Do you know those little speakers intended for
PC setups that used to be very prevalent in the ’90s and 2000s? They typically
had small, full-range drivers housed in plastic enclosures and sometimes came
with a “subwoofer” that only had a port visible? Here is a very typical
example: Logitech Z213 (sorry to pick on you,
Logitech - hey, I like some of your other computer peripherals). Yeah, in case
you didn’t already know, those things are awful in terms of sound quality. They
are useful only insofar as you need sound but don’t have desktop space for real
speakers and aren’t able to use headphones. Just don’t expect a good sound.
Those little full range drivers cannot produce mid-bass nor can they produce treble. They can only produce midrange frequencies. The less common cases of actual two-way computer speakers aren’t a lot better. For computer speaker systems with subwoofers, the subwoofers have to be tuned to a high frequency which draws attention to their location and can often make it sound boomy and sloppy. That furthermore makes the subwoofers incapable of playing any actual deep frequencies - you know, like a subwoofer is supposed to. Look, I don’t mean to be ripping on these loudspeakers too much, and they have their place; it’s just not in a good sound system.
3. So what speakers are a good fit for a desktop system?
Obviously, we are restricted to bookshelf speaker-sized speakers for most desktops, and the exact size and type should be determined by available space and intended use. If the user has a small desk, that rules out large speakers (unless there is space behind the desk to use speaker stands). If the user doesn’t listen to music at loud levels or listen to anything with deep bass, a large speaker wouldn’t be needed anyway.
Look for speakers with wider vertical dispersion.
One quality that I think is important in a speaker for a desktop system is a ‘forgiving’ vertical dispersion; by that, I mean a loudspeaker that doesn’t require the listener to have their ears in a very narrow range of height. In loudspeaker talk, ‘dispersion’ is the width of the angle at which the loudspeaker projects sound. A lot of speakers require the listener to have their ears at a height at roughly tweeter level, give or take a ten-degree angle. That isn’t bad for a living room where the average distance from speaker to listener is three meters and so that narrow angle turns into a fairly reasonable area of good coverage, but it does make for a very restrictive range when you are close to the speaker. So unless your posture is perfectly consistent, that narrow vertical range of good sound means you could spend a lot of time listening at a very subpar area of coverage where the sound output of the woofer and tweeter do not integrate well.
Vertical dispersion: woofer to tweeter spacing distance
 We then have to ask: how can you know if a
speaker has wide vertical dispersion? One thing to look for is how close the
drivers are mounted to each other. If the drivers are widely spaced from each
other on the speaker’s front baffle, that means the speaker will need more
distance for the drivers to integrate for a full sound. It also means that the
vertical angle where they integrate becomes much slimmer. The reason that the
vertical dispersion becomes more narrow as the drivers are mounted further
apart is that when drivers are separated by distance, they can conflict and
cancel out the sound from each other at off-axis angles. When a speaker is
facing you, the difference in the distance between the drivers is small
(assuming you are not right up next to the speaker). However, if the speaker is
tilted to lean back or forward, the drivers now have a greater difference in
distance from you (this is effectively what is happening when you are listening
above or below the speaker’s forward-facing direction). At that angle, the
drivers are no longer aligned so that their respective output arrives at you at
the same time. Even a small angle change can result in a big phase conflict
between the drivers if they have a significant distance from each other. That
can result in a big gap in the speaker’s response where the drivers overlap (an
area in the response that we call the crossover frequency).
We then have to ask: how can you know if a
speaker has wide vertical dispersion? One thing to look for is how close the
drivers are mounted to each other. If the drivers are widely spaced from each
other on the speaker’s front baffle, that means the speaker will need more
distance for the drivers to integrate for a full sound. It also means that the
vertical angle where they integrate becomes much slimmer. The reason that the
vertical dispersion becomes more narrow as the drivers are mounted further
apart is that when drivers are separated by distance, they can conflict and
cancel out the sound from each other at off-axis angles. When a speaker is
facing you, the difference in the distance between the drivers is small
(assuming you are not right up next to the speaker). However, if the speaker is
tilted to lean back or forward, the drivers now have a greater difference in
distance from you (this is effectively what is happening when you are listening
above or below the speaker’s forward-facing direction). At that angle, the
drivers are no longer aligned so that their respective output arrives at you at
the same time. Even a small angle change can result in a big phase conflict
between the drivers if they have a significant distance from each other. That
can result in a big gap in the speaker’s response where the drivers overlap (an
area in the response that we call the crossover frequency).
So how much of a difference in distance between drivers is too much for desktop use? It depends on certain specifications of the speaker, namely the crossover frequency and center-to-center spacing of the drivers (by center-to-center spacing, I mean how far the distance between the center of each driver). If you want a very simplified rule without all the math, speakers with center-to-center driver spacing of less than 4” probably have a wide vertical dispersion but if the center-to-center spacing of the drivers is more than 7”, that speaker probably has too narrow vertical dispersion to make a great desktop speaker. It should be said that while close driver mounting is a good sign of a wider vertical dispersion, it isn’t an absolute guarantee of wide vertical dispersion. The best way to be sure that a loudspeaker has wide vertical dispersion is to refer to reliable third-party measurements as seen in loudspeaker reviews such as we publish in Audioholics.
Technical Note by Steve Feinstein:
In order to determine the vertical dispersion characteristics of a typical speaker, what you need to do is look at the center-to-center driver spacing at the drivers’ crossover frequency. The spacing needs to be less than a wavelength apart at the crossover in order for those drivers to function as a ‘point source’ on horizontal and vertical planes which should have good dispersion behavior. So this is a specific model-dependent issue. For a two-way speaker, you need to divide 13,560 (the speed of sound in inches per second) by the crossover frequency to find out how close in inches that the tweeter and woofer centers need to be. Let’s look at an example by using a common crossover frequency of 3,000Hz: 13,560 divided by 3,000 is 4.52, so the centers of the tweeter and woofer need to be within about 4.5” of each other to have point source characteristics on the vertical axis.
Vertical
dispersion: avoid vertical MTMs
Another indicator of a speaker that has narrow dispersion and thus should be avoided for desktop speaker use is an MTM design. An MTM design is where two woofers flank a tweeter. It is commonly seen on center speakers in a horizontal orientation, however, it does sometimes appear as a vertical design in bookshelf speakers. In many MTM designs, the woofers are spaced so far apart that they cancel out each other’s output at angles where they are not equidistant. This is usually deliberate to restrict vertical dispersion in an effort to reduce acoustic reflections from the floor and ceiling. This design makes their vertical dispersion very narrow in much of the woofer’s frequency band. This is not a bad design for a home theater or living room setup, but it is not good for a desktop system unless your head tends to maintain a constant altitude with the tweeter (normal humans don’t do this).
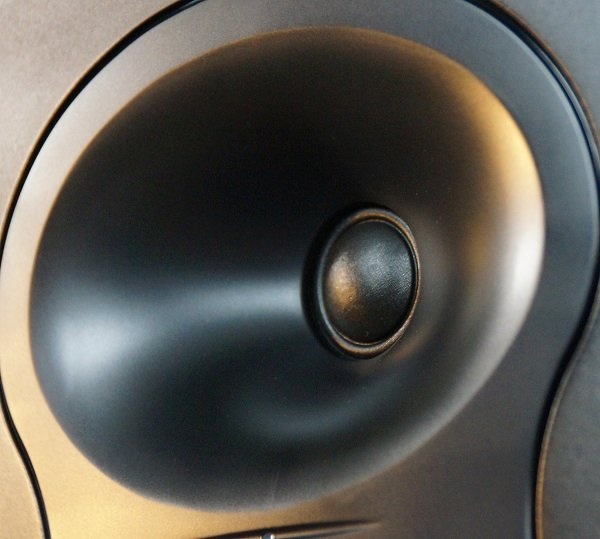
Vertical dispersion: dome tweeters for wide vertical dispersion
One component to look for in order to get a wide vertical dispersion from a loudspeaker is a dome tweeter. These are the most common type of tweeter so examples of this are not difficult to find. The reason to go for a dome tweeter is that the tweeter itself has the same wide dispersion at all angles. I am advising to stick with dome tweeters because many other tweeter types can have very narrow vertical dispersion. Ribbon tweeters and planar tweeters almost always have narrow vertical dispersion. AMTs can very often have narrow vertical dispersion as well, although not always (a spectacular exception to this rule can be seen in our recent review of the RBH Sound PM-8). In general, tweeters that have a much taller height than width tend to have narrow vertical dispersion.
Vertical dispersion: waveguides don’t affect vertical dispersion too badly.
 Some readers will see speakers with waveguides
on tweeters where the vertical shape is much more confined than the horizontal
shape and may think that means they have narrow vertical dispersion. The truth
is unless the shape of the waveguide is very pinched on the vertical axis -
which is not something that is commonly done on a bookshelf speaker or monitor-
it won’t inhibit the vertical dispersion enough to matter. Many of the
waveguides that we see in powered monitors, for example, are shallow waveguides
that attempt to constrict the vertical dispersion from around a 60-degree to
90-degree angle, and that range is plenty for a desktop sound system, even for
those who change their posture and seating position a lot. Don’t let the
presence of a waveguide deter you from looking at speakers with a fair amount
of vertical dispersion.
Some readers will see speakers with waveguides
on tweeters where the vertical shape is much more confined than the horizontal
shape and may think that means they have narrow vertical dispersion. The truth
is unless the shape of the waveguide is very pinched on the vertical axis -
which is not something that is commonly done on a bookshelf speaker or monitor-
it won’t inhibit the vertical dispersion enough to matter. Many of the
waveguides that we see in powered monitors, for example, are shallow waveguides
that attempt to constrict the vertical dispersion from around a 60-degree to
90-degree angle, and that range is plenty for a desktop sound system, even for
those who change their posture and seating position a lot. Don’t let the
presence of a waveguide deter you from looking at speakers with a fair amount
of vertical dispersion.
What about horizontal dispersion?
At this point, the reader might ask, “what about horizontal dispersion?” Almost all speakers in this size and category have wide enough horizontal dispersion that it is not a concern. What would be a concern regarding horizontal dispersion is its consistency and linearity, but that is true of every ostensibly “hi-fi” loudspeaker. Much has been written about the need for an even off-axis horizontal response to obtain a great sound, so we will not go into that here. Suffice it to say that speaker shoppers should be looking for a smooth and unbroken horizontal dispersion in loudspeaker measurements where that information is available.
4. Surround sound in a desktop space? Not easy but not impossible.
Is it possible to have a good surround sound system in a desktop environment? The answer is yes, but it is not easy to pull off. The main problem is finding a place to put a real center speaker. There are many “computer speaker” 5.1 systems where that is not a problem because the speakers were so small. Of course, as we explained above, the diminutive size of the speakers was a problem in itself. A good two-channel system sounds much better than a mediocre 5.1 system, so even if a “computer speaker” system affords you a 5.1 surround sound system whereas an approach using serious speakers forces you to omit a center speaker, it is better to have no center speaker at all rather than a bad one.
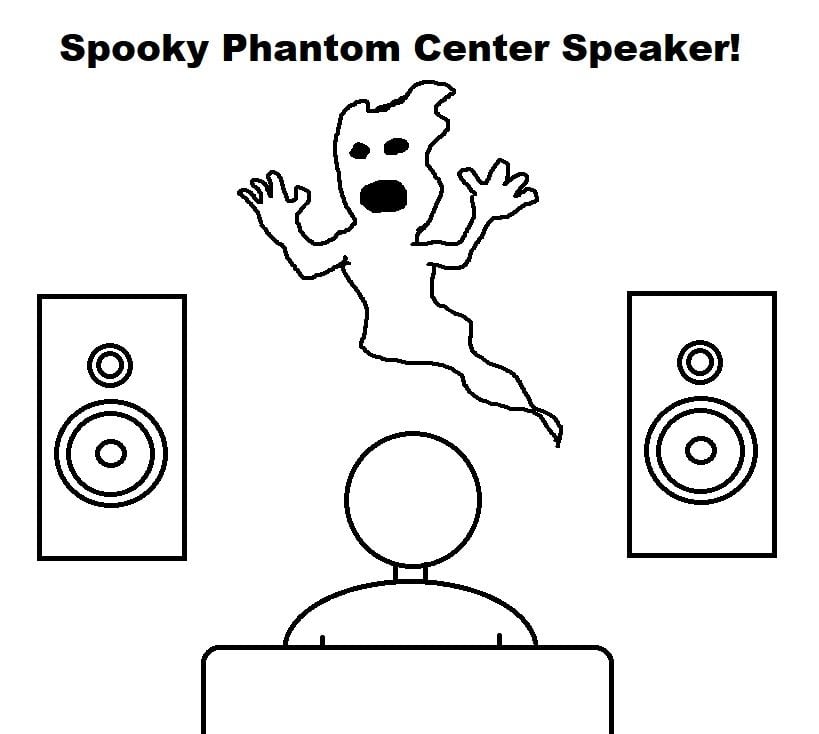 The crux of the problem is that computer
monitors don’t leave enough space for ideal center speaker placement. Pretty
much the only place where a full-sized loudspeaker can be placed as a center
channel in a desktop with a monitor is above the monitor. That means figuring
out a means of mounting a speaker that high and also angling it to be facing
down toward the listener. That is a tall order for most people’s desktop spaces
and probably not possible for most of them. A much more viable alternative is
to just skip the center speaker. Whatever sound processor that you are using
(which is very likely your PC given it is at a desktop space) should be able to
downmix audio to get a “phantom center,” where the left and
right speakers share center channel content which can simulate the presence of
a center speaker. The effect can work very well, as long as the listener is
situated at a midway point between the left and right speaker.
The crux of the problem is that computer
monitors don’t leave enough space for ideal center speaker placement. Pretty
much the only place where a full-sized loudspeaker can be placed as a center
channel in a desktop with a monitor is above the monitor. That means figuring
out a means of mounting a speaker that high and also angling it to be facing
down toward the listener. That is a tall order for most people’s desktop spaces
and probably not possible for most of them. A much more viable alternative is
to just skip the center speaker. Whatever sound processor that you are using
(which is very likely your PC given it is at a desktop space) should be able to
downmix audio to get a “phantom center,” where the left and
right speakers share center channel content which can simulate the presence of
a center speaker. The effect can work very well, as long as the listener is
situated at a midway point between the left and right speaker.
As for surround speaker placement in a desktop system, that doesn’t really differ too much from the demands of a normal surround sound setup. Just try to follow industry guidelines for optimal placement as closely as possible much like we have outlined here: Home Theater Speaker Layout. There are some PC gaming chairs that have speakers built into the sides of the backrest, and while I have not experienced those chairs, I would guess those loudspeakers are not of the highest quality. They are also placed much too close to the ears than where you would typically want a surround speaker, so chairs with built-in speakers seem like a really bad idea on the whole.
Desktop Sound Processing
You may have taken care of potential acoustic issues, and you have acquired the right equipment and have correctly set it up with good placement, but you still have to deal with how the audio is processed. In the vast majority of desktop systems, the audio processing will be done by a PC, and the PC will also be the source content player. That helps to simplify things from a hardware standpoint but it also adds some complexity from a software standpoint. Let’s go over some things that should be looked at in the software environment of a desktop computer sound system.
1. Make sure extraneous sound processing is deactivated in Windows.
Most desktop Windows operating systems have some optional sound processing features that globally alter the sound output. This audio processing is rarely an improvement when the PC is connected to a good sound system (Mac users need not worry; I haven’t seen anything like these features in Apple computers unless installed by a third-party). In a normal Windows install process, the default status of these features is off. However, I have seen instances where these features were active when it would not have been expected. In a sound system where the speakers aren’t terrible, these sound processing features should absolutely be turned off. They can only degrade the sound in a good loudspeaker. For those who are setting up a sound system around a Windows[1] PC, it’s worth taking a moment to make sure these processing features are not engaged. One word of warning: if you have deliberately installed sound processing software that treats all system audio output, disabling some of these features can deactivate those programs.
There are a few different ways to disable these audio processing features in most Windows operating systems, but we will describe the way that has a very common path in Windows 7, 8, and 10.
- In the search bar for your Windows operating system, type in the term “control panel” and the result should be a panel of a bunch of basic operating system controls.
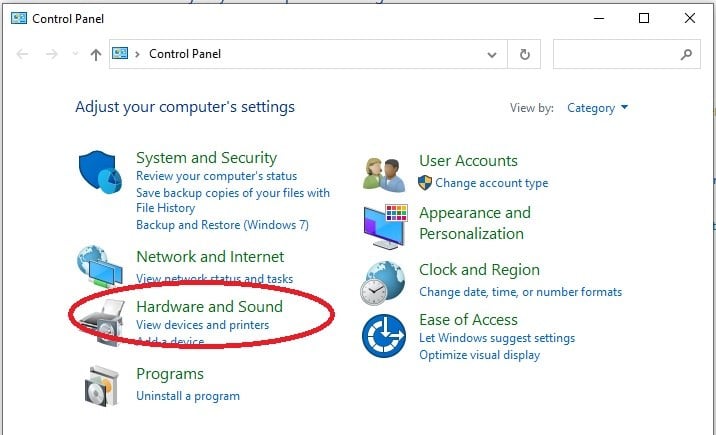
- Click on the text “Hardware and Sound” and that should bring up another panel of control options.
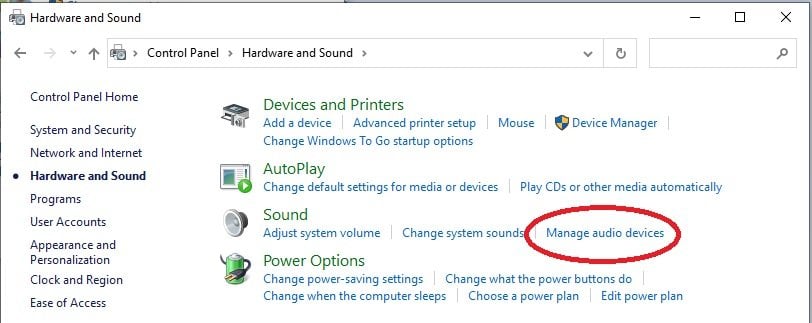
- In the ‘Sound” submenu on that panel, click on “Manage Audio Devices.” That will bring up another panel for sound controls titled “Sound.”
- Under the “Playback” tab in the Sound panel, look for your default playback device - it should be marked with a little green check.
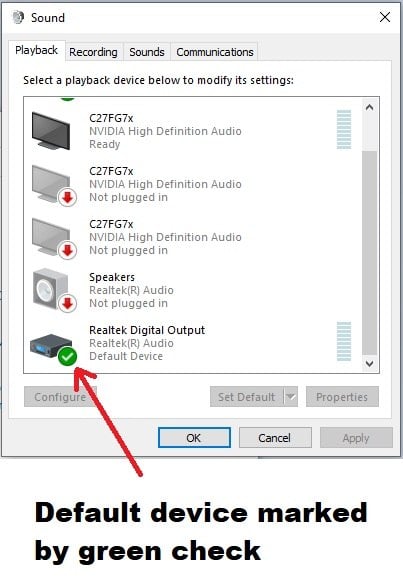
- Select the default playback device, and click on the “Properties” button which should bring up a Properties panel.
- In Windows 10 under the sound device properties panel, click on the “Advanced” tab, and there will be a section under that tab which is labeled “Signal Enhancements” that has a checkbox next to the text: “enable audio enhancements” - make sure that checkbox is blank!
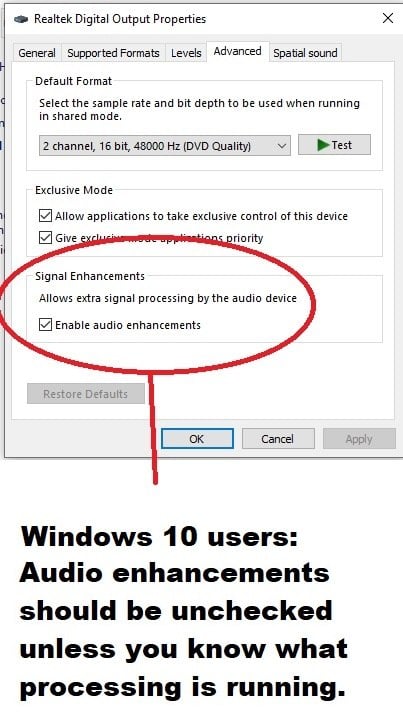
- In Windows 10 under the sound device properties panel, click on the tab labeled “Spatial sound” and make sure the spatial sound drop-down box is set to “Off.”
- In Windows 7 and 8, when you click on the “Properties” button, there will be a tab labeled “Enhancements.” In the “Enhancements” tab, there will be a list of checkboxes underneath the checkbox next to the text “Disable all enhancements.” You can either check the ‘Disable’ checkbox or simply leave all the enhancements unchecked.
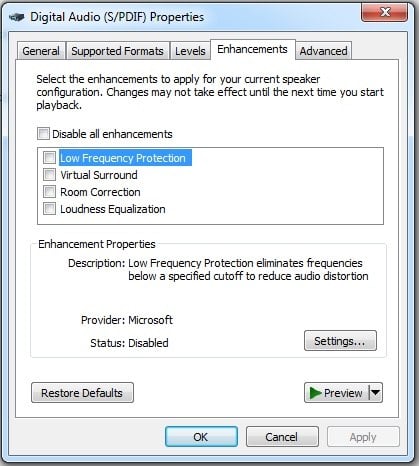
That sequence of steps will get rid of the Windows sound processing that can interfere with the quality of the sound playback. However, if you intend to use an equalizer for all output from your PC, you will probably have to set audio enhancements to “enabled”, so don’t be stuck on keeping the audio enhancements disabled if you want to experiment with equalizers.
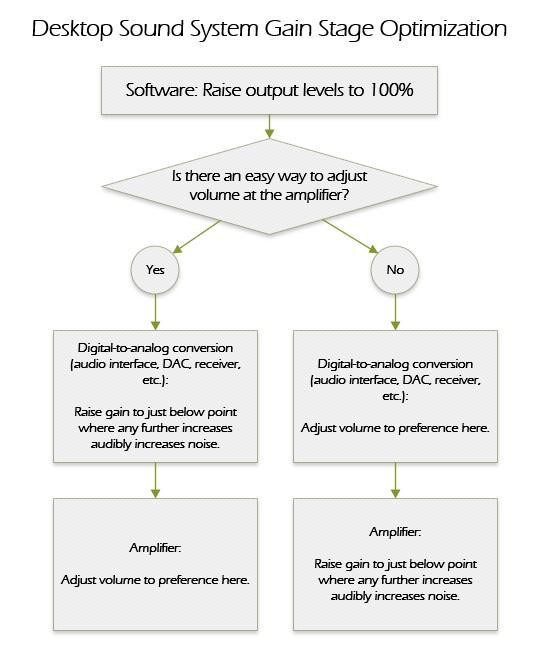
2. Software-to-hardware gain stages
This is a good place to talk about gain settings in order to get the lowest noise floor and highest dynamic range for the system. In order to maximize the dynamic range of your computer sound system, make sure the master volume within the operating system is at 100%. Running programs should also have their volume settings maxed out at 100% or at least the programs that you want to have the loudest level. The reason for this is that the signal chain in a software environment has no noise floor, so there is no sense in passing a signal level that is lower than needed in a digital output. Doing so just means that there will be less signal-to-noise ratio at points where a noise floor is introduced, so you want the highest level of clean digital signal being passed along as possible.
A good place to adjust the volume is at the digital-to-analog conversion. In a desktop system, this is likely at an audio interface, a DAC, or a receiver. Most of these devices have volume knobs or some way to adjust the gain. By sending a strong digital signal to the digital-to-analog conversion, you shouldn’t need the volume knob set very high to get a sufficiently loud level. The digital-to-analog conversion process always carries a noise floor, so if you had to crank the volume to amplify a low signal at this stage, you boost the noise floor which risks making the noise audible. Some digital-to-analog converters are much cleaner than others, so you may or may not have a lot of room to play before noise becomes audible.
Another good place to adjust the gain is at the amplifier stage for the speakers. On powered speakers, the amplifiers will be built in the speakers, of course, and some powered speakers have a volume knob on the front baffle of the speakers. Many powered speakers have the volume knob mounted in the rear, however, and that makes it a bit cumbersome to adjust on the fly. For powered speakers without immediately accessible volume knobs, I would recommend the volume knob be set at a level just below where noise can be heard to audibly increase with higher volume knob settings and to just adjust the volume at the DAC or pre-amplifier stage. One thing that should be mentioned here is that many powered speakers have a noise floor that may be audible and which is not affected by volume knob changes. That noise floor should be ignored in setting up optimal gain levels in a signal chain since there is nothing that can be done to lower the noise floor of a powered speaker’s amp (aside from getting powered speakers with a lower noise floor). We can only address the amplifiable noise in gain stages, not the noise that is not affected by amplification.
3. Equalization
 The final step in tweaking your desktop sound
system to perfection is equalization. This is optional, and if you already have
good equipment and have placed it well and set it up correctly, equalization
probably won’t make it enormously better. Equalization may be able to correct
for some loudspeaker flaws or shape the sound for your own preference. There
are a lot of software equalizers, and many versions of windows even have a
built-in graphic equalizer that can be enabled through the “enhancements” tab of
the “audio device properties” that was discussed above. Many audio playback
programs will have their own equalizers if you don’t want to EQ all sound
output from your PC. Among these programs: Roon, Foobar2000, VLC Media Player,
Winamp, and many others. Some of these programs also have third-party plug-ins
for more sophisticated equalizers. There are also equalizer extensions and
plug-ins for most popular browsers such as Equalizer for Chrome.
The final step in tweaking your desktop sound
system to perfection is equalization. This is optional, and if you already have
good equipment and have placed it well and set it up correctly, equalization
probably won’t make it enormously better. Equalization may be able to correct
for some loudspeaker flaws or shape the sound for your own preference. There
are a lot of software equalizers, and many versions of windows even have a
built-in graphic equalizer that can be enabled through the “enhancements” tab of
the “audio device properties” that was discussed above. Many audio playback
programs will have their own equalizers if you don’t want to EQ all sound
output from your PC. Among these programs: Roon, Foobar2000, VLC Media Player,
Winamp, and many others. Some of these programs also have third-party plug-ins
for more sophisticated equalizers. There are also equalizer extensions and
plug-ins for most popular browsers such as Equalizer for Chrome.
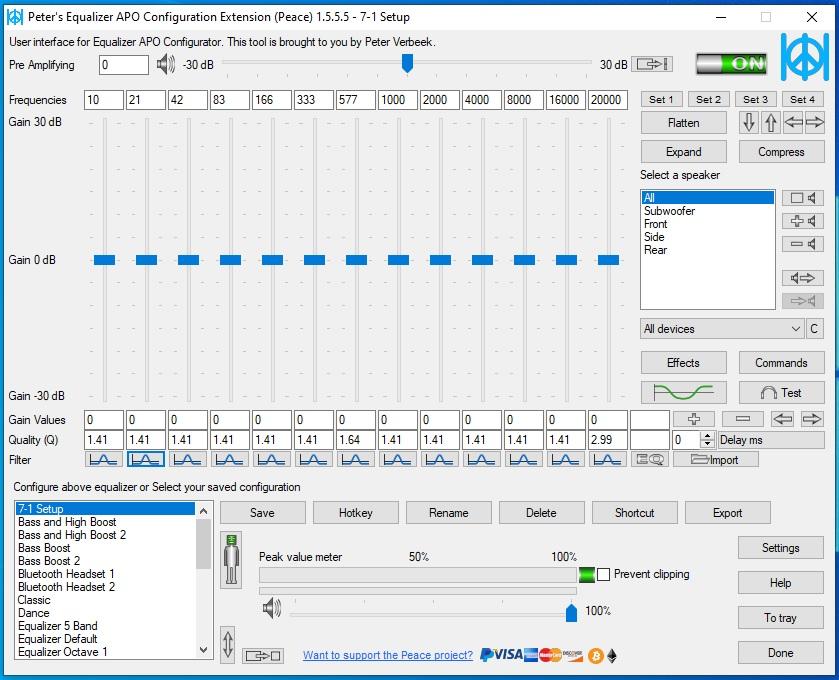
If you want to globally EQ all sound from your PC’s output, I have had luck with Equalizer APO combined with the Peace extension for a more intuitive interface for my Windows10 system. These do require you to enable audio enhancements in Windows. There are a lot of equalizers that do the same with different feature sets, different GUIs, and more or less flexibility, for both Apple and Windows OSs (here is a nicely comprehensive list of software equalizers that someone put together). Many do cost a small fee, but many are also free to use such as Equalizer APO with Peace.
 There is also automated equalization software
that will use a measured response to shape the sound toward a target response.
These tend to be expensive and are more involved since they require you to
properly use a microphone to capture the system’s acoustic profile. However,
they are far more sophisticated and can net better and more exact results when
used correctly. Examples of these include Sonarworks
Reference 4, IK Multimedia’s ARC System, and Dirac Live. While I haven’t used
Sonarworks or the IK’s ARC system (not to be confused with Anthem’s ARC room
correction system), I have had excellent results with Dirac Live. User’s who
can manage an AVR in their desktop system could also use AVR brand room
correction such as Audyssey or YPAO. While that kind of system isn’t really
intended for a desktop space, it should still theoretically work as well in
that environment as in a living room or home theater room.
There is also automated equalization software
that will use a measured response to shape the sound toward a target response.
These tend to be expensive and are more involved since they require you to
properly use a microphone to capture the system’s acoustic profile. However,
they are far more sophisticated and can net better and more exact results when
used correctly. Examples of these include Sonarworks
Reference 4, IK Multimedia’s ARC System, and Dirac Live. While I haven’t used
Sonarworks or the IK’s ARC system (not to be confused with Anthem’s ARC room
correction system), I have had excellent results with Dirac Live. User’s who
can manage an AVR in their desktop system could also use AVR brand room
correction such as Audyssey or YPAO. While that kind of system isn’t really
intended for a desktop space, it should still theoretically work as well in
that environment as in a living room or home theater room.
It should be said that equalization is really better left as a “cherry on top of the cake,” so to speak. It can’t really do much to fix poor acoustic situations, nor can it fix speakers with directivity design flaws. The fundamentals of a system should be correct first before equalization is sought as a path for improvement in the sound, and those fundamentals were what has been addressed in this article up to the discussion of equalization. For those who want a ‘flavored’ sound or a sound character that departs from neutral sound reproduction, equalization is the tool that should be used for that end rather than the use of equipment with idiosyncratic behavior. The user should first try to get a clean, accurate sound with lots of headroom because that is the kind of system that can be predictably equalized without running into problems like signal clipping or unexpectedly drastic changes in tonality or soundstage.
Conclusion
 You can have a great sound system on a desktop,
and we think that if you follow our guidelines, you will. A great sound is a
great sound, no matter where it comes from or what environment it is being
produced in. If you don’t have a lot of space and can’t have a living room
system or a dedicated home theater, you can still have high fidelity sound if
you have some desk space available. You do not have to be left out of the hi-fi
hobby if you can’t give up an entire room to a sound system. Let us know if any
of our advice proved to be useful (or otherwise) in the comments. Also let us
know if you have any additional advice in getting good sound from a desktop
audio system that we have missed including equipment recommendations. Once you
get a great sound at your desktop, in the words of Gene DellaSala, “Keep
Listening!”
You can have a great sound system on a desktop,
and we think that if you follow our guidelines, you will. A great sound is a
great sound, no matter where it comes from or what environment it is being
produced in. If you don’t have a lot of space and can’t have a living room
system or a dedicated home theater, you can still have high fidelity sound if
you have some desk space available. You do not have to be left out of the hi-fi
hobby if you can’t give up an entire room to a sound system. Let us know if any
of our advice proved to be useful (or otherwise) in the comments. Also let us
know if you have any additional advice in getting good sound from a desktop
audio system that we have missed including equipment recommendations. Once you
get a great sound at your desktop, in the words of Gene DellaSala, “Keep
Listening!”
James Larson is Audioholics' primary loudspeaker and subwoofer reviewer on account of his deep knowledge of loudspeaker functioning and performance and also his overall enthusiasm toward moving the state of audio science forward.
View full profile