
Building A DIY Sealed Subwoofer
Completed DIY Sealed Subwoofer
Here at Audioholics, we have a great affinity for bass. Unfortunately, getting copious amounts of deep bass usually requires a fair amount of cash. However, if you’re comfortable with a bit of woodworking, there is a cheaper alternative: DIY.
Here we’ll look at how to design and build a DIY sealed subwoofer. Sealed subwoofers have a few important advantages for the DIYer. First and foremost, they’re relatively easy to build compared to a vented box or a more exotic alignment like a tapped horn or transmission line. The sealed alignment is also relatively tolerant of minor changes in box volume and driver-to-driver manufacturing variations. Last but not least, they need less protection than ported subs, which can quickly overload below their tuning point. On the down side, without a port to augment system output, you need a meatier driver to achieve solid deep bass.
There are three basic components needed to build a sealed subwoofer: the driver, the enclosure, and an amplifier. Building a successful subwoofer requires some design work in terms of matching the driver to the enclosure, and specifying an amplifier that delivers enough output for your needs without the risk of smoking a voice coil or bottoming out the driver. Back in the good old days, this kind of work was no small feat. Today with modeling software like WinISD, real world data from sites like data-bass, and a little guidance, it’s a lot less complicated. So where do we start?
The Driver
The first step in building any subwoofer is selecting the driver, as this will determine how large an enclosure you need as well as what you need in terms of amplification. You can find a dizzying array of raw drivers from companies like Parts Express and Madisound, as well as from smaller shops like iST and Stereo Integrity. Driver selection is all about what you’re looking to achieve. If you want enough deep bass to rattle grandpa’s dentures you’ll need a lot of displacement, which is a fancy way of saying a large driver with a lot of cone area (aka Sd) and linear excursion (otherwise known as Xmax). If you’re living in an apartment where high SPL is a surefire way to get an eviction notice, a 10” - 12” driver might be more appropriate.
Fun fact: an 18” driver has a bit more than double the cone area of a comparable 12” model, meaning it is capable of an additional 6dB+ of output when all else is equal. As an added bonus, sensitivity will tend to be higher, while distortion tends to be lower.
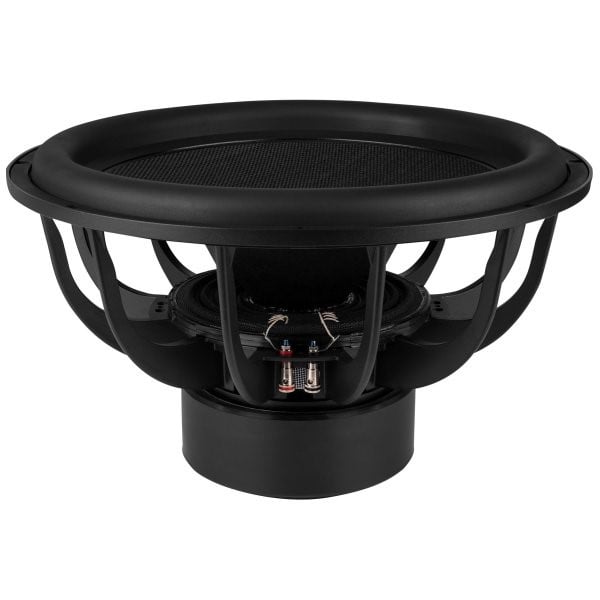
The Dayton Ultimax 18” Subwoofer driver
Of course, there’s a lot more to the driver than just size. Basic frequency response is one important consideration that can make or break the sound quality of your subwoofer. Thiele/Small parameters like Fs (resonant frequency), Qts (total Q of the driver at Fs), and Vas (equivalent compliance volume) will also determine how a driver will perform in any given box. Sensitivity and impedance are also critical considerations, since these will help determine your amplification requirements.
Note that some drivers utilize dual voice coils, which allow the end user to change the impedance of the driver as seen by an amplifier. For example, if a driver has a pair of 2 ohm coils, wiring them in series gives you an impedance of 4 ohms, while wiring the coils in parallel nets you a 1 ohm load. We recommend avoiding wiring for a lower impedance (<3 ohms), since this will place great strain on a partnering amplifier.
Crunching the Numbers
At this point you may have your eyes on a couple of drivers that look like they’d be suitable for the task. Now it’s time for the rubber to meet the road, and simulate the performance of our driver with modelling software. Regardless of which particular program you use, you enter the T/S parameters from the driver’s spec sheet into the software, and let it work its magic. Now it’s time for some actual design work.
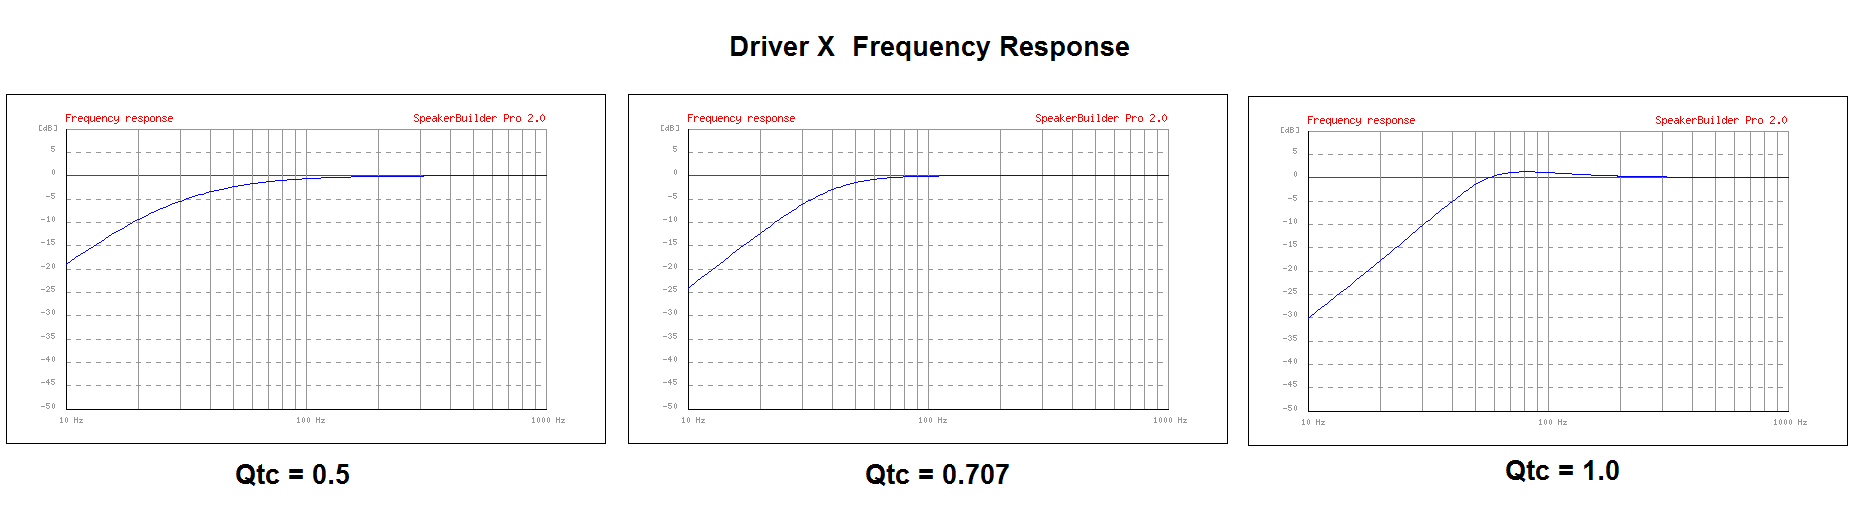
Simulated data for Driver X into Qtc’s of 0.5, 0.707, and 1.0
Above is a sample driver modelled into three different box sizes, yielding a Qtc of 0.5 (~7.75 cubic feet), 0.707 (2.7 cubic feet), and 1.0 (1.15 cubic feet). Looking at these graphs, some things stick out. Starting with a Qtc of 1.0, the first item of note is that the frequency response develops a pronounced hump, which can be further exacerbated if the woofer you selected also has a native peaky response. The smaller box also has a much lower sensitivity in the deep bass, a function of Hoffman’s Iron Law, which means more EQ and power to achieve a flat in-room response. What’s not seen here is that a Qtc of 1.0 will have some ringing associated with its humped frequency response profile. Distortion will also be higher in the deep bass relative to a larger enclosure. All taken together, one can see the problems associated with building a box that’s too small.
On the other end of the spectrum we have a Qtc of 0.5. The first thing that should catch your attention here is the enclosure size; 7.75 cubic feet worth of working volume for the driver is absolutely enormous by most standards. On the other hand, there are some dividends associated with going big. With a Qtc of 0.5, the box is said to be critically damped, meaning the driver won’t ring on and on. Hoffman also dictates that a large box will equal better low-end sensitivity, which is reflected in the response graphs. Beyond size, however, there’s an additional downside to keep in mind. As a consequence of being more efficient down low, driver excursion must go up for a given power input relative to a higher Qtc box. To put it another way, a large box does less to protect the driver, such that high powered transients at very low frequencies have greater potential to do damage.
Thankfully, subwoofer builders have a happy medium to choose from with a Qtc of 0.707. This alignment is typically referred to as maximally flat, since it provides the most extended response before the system begins to roll off. The enclosure volume of 2.7 cubic feet is by no means ultra-compact, but it’s not something you’d mistake for a refrigerator either. It’s not as efficient in the deep bass as a larger box, again blame Hoffman, but the payoff here is that the driver is at far less risk of over-excursion as well. Finally, while the design isn’t “critically damped”, ringing is nonetheless reasonably well controlled relative to a high Qtc box.
Now it’s time for a reality check. Simulations are a great starting point in understanding how Thiele/Small parameters and box size will affect performance. However, in the real world, nothing ever performs quite like the simulations suggest they should. Some of this can be explained by variations in manufacturing, or manufacturers fudging their specifications. Some of it comes down to the reality that as you push a driver to its limits, non-linear behavior creeps in to throw off the math. This is where real world data comes in handy. We recommend anyone considering dabbling in DIY to visit data-bass, which is run by bassaholic extraordinaire Josh Ricci. The site, as the name might suggest, is a database containing detailed measurements of a wide range of subwoofers, including many raw drivers in test enclosures. Raw drivers are also tested to see how closely they conform to their rated specifications.
The Enclosure
With your driver selected and knowing the internal volume needed to achieve your desired Qtc, the next step is actually building the enclosure. As with any other loudspeaker, your subwoofer enclosure will ideally be an inert structure that doesn’t add or subtract from the output of your woofer. This tends to mean a reasonably thick cabinet (>0.75” of MDF or high quality, void free Baltic Birch works well) and a reasonable amount of interlocking bracing and stuffing. Don’t forget that internal bracing will also subtract from the volume the driver sees when designing your box, while stuffing will help raise the apparent volume the driver sees. We also recommend a double thick front baffle, as this will improve cabinet rigidity as well as allow you to recess the flange of the driver for a cleaner look. If you’re using an external amp, you will need either a pair of high quality binding posts that accept heavy gauge wire or a Speakon connector as well. Finally, you’ll also need additional wire for the internal connection(s) to the driver, as well as spikes or rubber feet.
Pro Tip: It’s always easier to build a box a bit larger than you need and pad it down as necessary, than to find out the box you built is too small and have to start from scratch.
For those who only have a passing interest in woodworking, flat packs sold by Parts Express and others are also a viable option. A flat pack is to subwoofers what Ikea is to furniture. You get a bunch of pre-cut pieces to build an enclosure, which you assemble at home. Needless to say, this can save a bunch of time and effort, but they may not fit your exact requirements, i.e. building a tall, shallow subwoofer versus a basic cube.
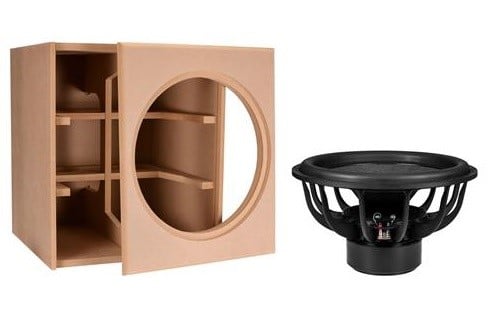
A flat pack cabinet offered at Parts Express made for the Dayton Ultimax 18” subwoofer driver
More Power!
On the face of it, picking an amplifier seems like a simple task; more power is better than less, right? However, this is an area where great care must be taken, as too much power can quite literally break your subwoofer, either by burning up the driver’s voice coil or by beating the driver to death via over-excursion. At the same time, an amplifier needs to be powerful enough to deliver the output you’re looking to achieve into the impedance load that your driver presents. Getting this balancing act right is the key to maximizing performance without putting your investment at risk. This is also an area where commercial subwoofers have an important advantage; through the use of customized DSP limiters, they can keep a woofer out of trouble while still having a boatload of power on tap.
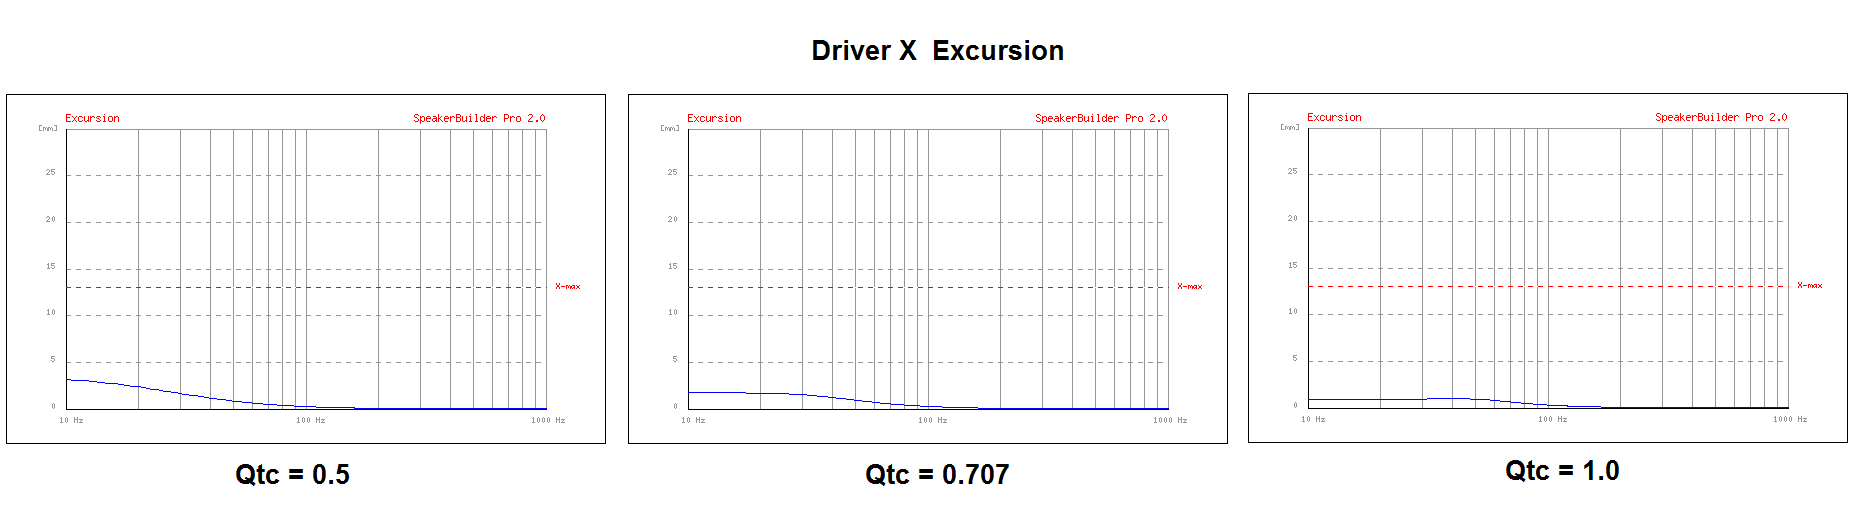
Achieving the right balance means understanding the limitations of the subwoofer you’re building. Some of this is relatively straightforward. Via the excursion graphs seen in the modelling section above, you can get an idea of how much power is required to reach the driver’s rated Xmax (maximum linear excursion) and Xmech (maximum physical excursion of the driver before damage occurs). Needless to say, if you have enough power on tap to exceed the driver’s rated Xmech, great care must be taken with playback. Also as mentioned above, over-driving a woofer tends to be a lot easier with a low Qtc alignment, versus a Qtc of 0.707 or higher. An important implication of this is that due to the displacement-limited power handling of a low Qtc enclosure, upper bass output is also limited relative to a higher Qtc box.
Pro Tip: If you’re looking to power a sub or six with thousands of watts of amplification, dedicated circuits with adequate amperage are a required accessory.
The other side of the equation is the driver’s thermal handling ability, where there’s a little more gray area. Yes, most drivers have a power handling rating, but most raw drivers that we’ve seen tested can tolerate a great deal more than rated power for short periods of time. Given the dynamic nature of real world content, this is something you can take advantage of. To put it in real terms, pumping 4kW through a driver rated to take 1kW for some fraction of a second isn’t liable to cause any harm. On the other hand, 4kW worth of sine waves for a couple minutes is a great way to end up with a melted voice coil. We can’t stress this this enough: with great power comes great responsibility.
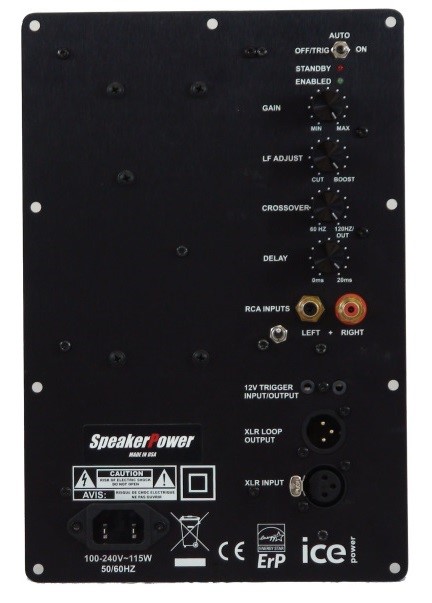
A 700W plate amplifier from SpeakerPower
In addition to raw power, one other aspect for judging an amplifier’s performance is its effective bandwidth. So what’s the deal here? As it turns out, some amplifier manufacturers include a fixed high pass filter around ~20Hz. In many cases, this can be beneficial since the high pass filter acts to remove ultra-low frequencies that most systems are ill-equipped to produce, while reducing the load on the amplifier at the same time. Win-win right? In the case of a subwoofer, this high pass filter will have the effect of neutering performance in the infrasonic range. Depending on your performance goals, this may not be a big deal. On the other hand, if you’re looking to achieve in-room extension down into the single digits, an amplifier with a fixed high pass filter is no bueno. In addition, poorly implemented filters can lead to ringing and phase anomalies, which can have a negative effect on sound quality.
Moving beyond the capability of the amplifier, there is one other question to consider: do you want a plate amplifier or an external amp? While plate amplifiers have the benefit of allowing an all-in-one-box solution, there are a lot of reasons to consider an external amplifier. First and foremost, you can buy a lot of power for cheap in the form of a pro-style external amp. If you’re building multiple subwoofers, wiring is a lot easier as you don’t need a power outlet adjacent to each subwoofer. Last but not least, it’s much easier to replace an external amplifier, as a new/different plate amplifier may require different cutout dimensions in your enclosure.
Accessorizing
As mentioned, a DIY subwoofer primarily consists of a driver, enclosure, and amplifier. Of course, there are a few additional ingredients that are worth considering as well. Measurement suites like Dayton’s Omnimic or XTZ Room Analyzer coupled with a sophisticated EQ system like miniDSP will enable you to shape the response of your subwoofer. This is especially important when it’s time to actually use your subwoofer in your room. Without any sort of EQ, even the best subwoofer will have ugly peaks in the response that are a recipe for boomy bass. EQ will also let you shape the low end of your system; depending on the amount of room gain your space exhibits, you may be able to achieve flat response well below 20Hz with little more than a low shelf filter. However, one should be careful in boosting system response, as this requires more amplifier power and excursion from the driver. Remember, a 6dB boost equals 4 times the power and 2 times the driver excursion, making it easy to run out of headroom in a hurry.

XTZ’s Room Analyzer II measurement system
Recommendations & Resources
So now the question becomes a little simpler: what the heck do you buy? Fortunately, there are quite a few solid drivers in all sizes out there from a wide range of brands. Excellent performance can be achieved with woofers from the Dayton Reference HO and Ultimax lines, products from Stereo Integrity and iST among other popular brands. An ideal driver will have a lot of linear throw (xmax), power handling, low distortion, and a reasonably flat frequency response up to at least 200Hz. In practical terms, this tends to mean a driver with a fairly large, multi-layer voice coil as well as faraday/shorting rings to improve linearity. A reasonably low Qts is desirable as well (>0.5), as system Q (Qtc as discussed above) cannot dip below the driver’s Qts.
When it comes to power, again there is no shortage of high quality power amps out there, particularly from pro-manufacturers like Crown, Crest, QSC, et al. For plate amps, we give a nod to SpeakerPower, who is the OEM supplier for Reaction Audio, Power Sound Audio, and JTR among others. Also as mentioned before, a flat pack from Parts Express can also make enclosure construction a far less laborious task. For wiring, we recommend no less than 12AWG cable, though the lower the better for high powered applications.
How Much Does it Cost?
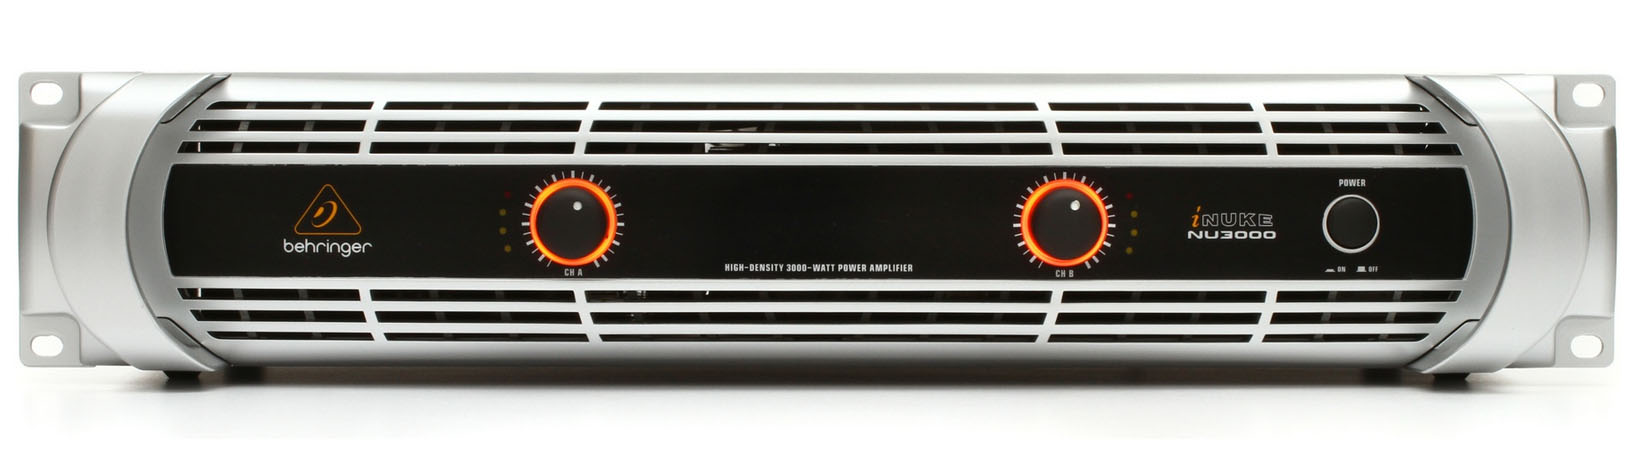 The flat pack/Ultimax 18" bundle is currently priced at $400 on Parts Express. If you use external amplification instead of the plate amp shown above, a Behringer iNuke NU3000 amp which can be bridged for a whopping 3kwatt peak output into a 4 ohm load runs $345 retail, but street price is less ($230 on Sweetwater). If you figure in a few bucks for things like paint, you'd be at around $7-800 for a very good 18" sealed sub. Cutting your own wood might be a little cheaper, but not by enough to really matter (especially if you make mistakes). You would be hard pressed to find a commercially available sub with this level of performance at this price.
Conclusion
Are you a serious bassaholic on a tight budget? A DIY subwoofer might just be the fix you’re after. For not a lot of cash it’s possible to build a sub that can compete with the very best subwoofers on the market. Beyond that, you will have the pride in knowing that you built an integral part of your home theater, and the knowledge that you have a unique piece of equipment that Joe Sixpack can’t just pick up at the local big box store. However, realizing the value proposition of DIY requires great care, both in terms of getting the design right, as well as the implementation. Don’t forget the age old tip: measure twice, cut once. Are you a DIY subwoofer enthusiast? Make sure to share on our forums, including pictures of your build.
Steve Munz is a “different” addition to Audioholics’ stable of contributors in that he is neither an engineer like Gene, nor has he worked in the industry like Cliff. In fact, Steve’s day job is network administration and accounting.
View full profile