
Building A Low-Cost Audio Media Player with Vintage Computer Parts
Can you breathe new life into an old computer, turning it into an audio media playerr?
It seems like everyone wants to add an audio media player to their home theater setup these days, only to experience sticker shock when they find out how much all those processors, hard-drives, and digital-to-analog converters (DACs) will cost. I'm always looking for new and improved ways to re-purpose/recycle old electronics equipment/hardware and decided this was one of those opportunities. Did I really need to spend $1000+ on a dedicated media (or in my case primarily music) server, or could I piece together something just as functional for much less? As you'll see, I ultimately succeeded at the latter, but that wasn't the only decision I had to make.
What The FLAC Is Going On?!
We all know that the MP3 file format has revolutionized the way we store and listen to music (not always for the better!), but the musician in me has never been able to give up on listening to the source CD (or LP, but that's another story); of course, the problem with loss-less CD ripping is that the WAV files created are extremely large (on the order of 10 megabytes per minute of music). Luckily, within the last few years, technology has come to the rescue on two fronts: larger hard-drives (on the order of terabytes, or 1000 gigabytes), and the loss-less compression technique called FLAC (Free Loss-less Audio Codec), which can reduce WAV file sizes up 40%.
While there are several CD ripping (and compression) options available, I use EAC (Exact Audio Copy) to accurately rip (extract) the WAV files out of a CD image and FLAC for compression of those ripped WAV files; both are offered free of charge for non-commercial use. In fact, EAC is setup such that the extraction process can be completed unattended from CD to FLAC file.
Assembling The Hardware
Once you've figured out how/where you're going to “rip” your CD collection, it's time to figure out how you're going to playback those CD-quality (16-bit, 44.1 kHz) FLAC files via your home theater system. The “secret sauce” to my solution is the continued availability of the Digigram VXpocket line of PCMCIA sound cards; these cards were originally intended for professional audio (TV/Radio) production in the field with features like XLR microphone inputs and SPDIF I/O support. They can still be found on the secondary market at a considerable discount; even better, the manufacturer continues to provide updated Windows and Mac driver support.
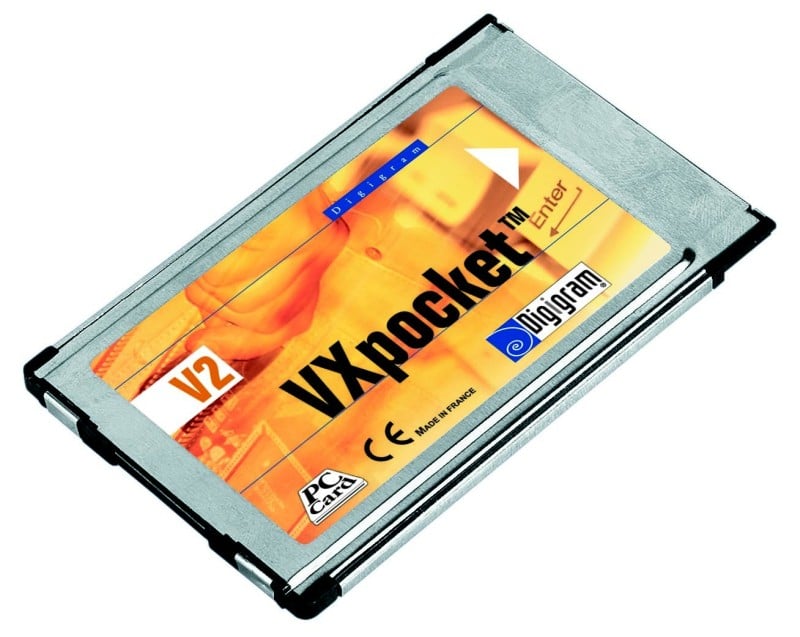
Digigram's VXpocket v2 PCMCIA sound card.
One nice thing about PCMCIA cards (and their replacement Express cards) is that they tap directly into the PC bus, much like their PCI counterparts on a desktop PC. This avoids the USB timing (sync vs. async) issues that some external DACs have to contend with. My plan all along was to use the digital (SPDIF) connection to my processor/amplifier in order to utilize the DACs I listen to everything else with. Some will debate the virtues of SPDIF (used for optical Toslink) vs. DSD (used in SACD) or I2S (an alternative external DAC interface), but the fact is there's a SPDIF interface on nearly every CD/DVD/BD/STB/DVR and high-end sound card ever built. That doesn't mean you can't get good performance out of the other interfaces, but it does ensure me interface compatibility with almost all the signal processors and integrated amplifiers currently available.
One of the big triggers for this project was the recent availability of inexpensive, super-high capacity, external hard-drives; these drives support USB 3.0/2.0/1.1 interfaces and can utilize the same plug for both power and data. After calculating that I could fit my entire CD and DVD collection (not Blu-Ray) in about 600 G bytes, I settled on a Western Digital My Passport Ultra 1 T byte drive; you can choose from a range of sizes up to 2 T Bytes (as of this writing).
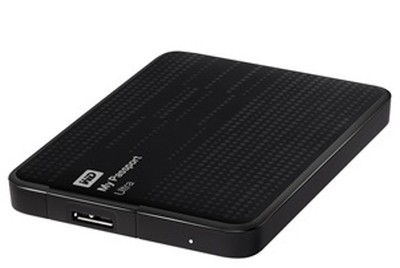
Western Digital's "My Passport" line of portable hard drives come in sizes up to 2TB, enough space to hold quite a bit of music and movie content.
It's important to note that many types of external hard-drives are sold mainly as back-up solutions; as such, they include additional software and even cloud storage alternatives for that purpose. I will never use my external media hard-drive for that purpose, so don't get side-tracked pondering those additional applications. After spending hundreds of hours ripping/compiling your media files, it's nice to have the option of taking them anywhere you can plug-in a USB drive. Of course, it’s also not a bad idea to create a backup copy of everything. Take our word for it: losing everything and having to spend another couple hundred hours re-ripping your tunes isn’t fun.
My choice of media software was also driven by the hardware I had assembled, in that there are only so many programs left that will run under Windows 2000 on a Pentium machine! I was basically forced into using Window Media Player (WMP)—and an old version at that (WMP 9.x). While it has limited database/tagging functionality, I am able to create as many play-lists as I desire. There was one major problem I had to solve in my setup, and it took me a couple days of troubleshooting to arrive at the solution. An initial audio test playing files via the external hard-drive resulted in skips and occasional drop-outs. Suspecting the (slow) USB 1.1 interface on my laptop (doesn't matter that the external hard-drive was USB 3.0), I copied a couple of files to the internal hard-drive and repeated the test. While this seemed to eliminate the drop-outs, the random skipping remained. I opened Windows Task Manager to see that the processor was indeed “maxing out” at 100% utilization, which (to no surprise) preceded every audio skip. However, closer examination of everything currently running revealed a couple of background processes stealing some of those precious clock cycles. Fearing the worst, I decided to change the priority of WMP to “high” (by right-clicking on it in the process list) and voila: the skipping stopped! Still fearing that the laptop USB interface was too slow, I then switched to a file on the external hard-drive and (again) voila: no skipping! Before you think everything turned out just fine, I discovered that occasionally—depending on whether I was accessing a new directory on the external hard-drive—the dreaded drop-out would return, but once it caught up, things would play fine after that. So it seems that in my case, were I to create a play-list that “jumped around” a lot, I might see some drop-outs; since I don't (I tend to listen to whole albums/CDs at a time), it shouldn't be a show-stopper.
Putting It All Together
While I've primarily addressed the audio side of things (mostly due to hardware limitations preventing me from actually playing DVD files), that doesn't mean that you can't apply these same principles in expanding your media server to include playing video files. There are plenty of video ripping options (AnyDVD, HandBrake) and plenty of media server programs (JRiver, PLEX) to choose from; all it requires is the additional hardware horsepower (and digital video outputs) to support them. You'll also notice that I have intentionally not addressed the issue of “CD Quality” vs. “hi resolution” (up to 24 bit, 192 kHz) audio; that's another subject for another time that is as subjective as it is technical.
To summarize, I have taken a:
- Compaq Presario 1681 laptop
- Digigram VXpocket PCMCIA sound card
- WD 1 Tb Passport Ultra external HDD
and assembled them into a high-quality, low-cost audio media player for about $100 (not counting the existing laptop PC). My current setup is proof that you can get real, practical use out of old, slow hardware, even when it doesn't necessarily meet the required specifications for clock speed, memory, etc. Sometimes you just have to take a “leap of faith” and see how it works (and sounds)! So, time to rummage around that hardware scrap heap, invest in some high-capacity external data storage, and start ripping!
Stanton was born and raised in Kansas City, where he was exposed to the rich culture of jazz at a very young age. He's a drummer and an electrical engineer and loves to review jazz music for us.
View full profile