
HAA Level I Certification Training Course Overview
This article is about HAA certification training and it also contains some great information on home acoustics from the course which I have included in this article. You may find that even a few tidbits of information can make drastic sonic improvements to your system.
I finally attended the HAA Level I certification training which was held in Orlando after EHX. A few years ago I read most of the "The Master Handbook of Acoustics." Many topics of the HAA training were based from this book. I wasn't sure what I was going to get out of the training since I already knew many of the acoustical principles from the book. I couldn't have been more wrong. The HAA training was a lot more than just principles out of the "Master Handbook of Acoustics" and Gerry LeMay, the instructor and HAA director, offered a wealth of knowledge.
Just knowing acoustical methods isn't good enough for a great sounding system. Gerry takes all the important qualities of small room acoustics and put them together in a practical and very usable form. He has taken acoustical concepts and applied them with Real Time Analyzer measurements using Sencore equipment which allows the calibration of the audio system. Audio calibration is not just changing speaker settings in a receiver or processor. It's about calibrating the entire room.
I have been in many theaters which are so over treated with absorbing material you would think you were in an anechoic chamber. These designers overemphasize the importance of dialog intelligibility for movies and over treat the room with absorption resulting in a lack of snap and liveliness for music. Next time you're in a room like that ask the designer when the last time he or she has seen a movie that didn't have music. Gerry LeMay had such a refreshing approach to theater design that I was all ears and ready to soak in all the knowledge I could.
The course started off with an explanation of Sound Quality Management (SQM). SQM is basically starting a theater project from the construction phase and taking it all the way to final room treatments and measurements. SQM also includes an explanation and education for home theater owners so that they can understand the benefit of a properly calibrated room. One of the key factors we learned was eliminating listener fatigue and my favorite quote from the course was "take away the pain so they can turn up the gain." After a discussion about distortion and listener fatigue the definition of sound quality was explained. Sound Quality includes clarity, focus, envelopment, response and dynamics. One sonic quality that many designers overlook is seating arrangement. Gerry's approach is to for all the seats to have good sound, not just the "money seat." His view is that everyone in the theater should have a good movie/music experience and we agree. That doesn't mean that every seat is perfect, but you should strive to have a smooth system response for all the seats so everyone can enjoy the experience. Next he touched on the importance of dynamics and its association with a quit room. It was fun to see how Gerry showed that Home Theater Nirvana would be achieved with a 500 Watt per channel system. The following two slides are a little out of context here but it was used to get a point across about dynamic range.
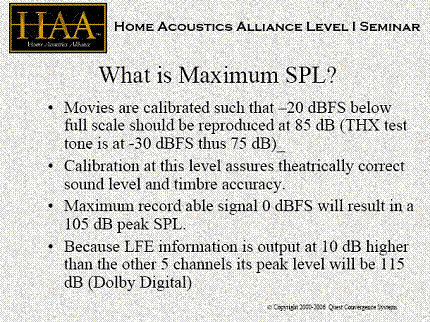
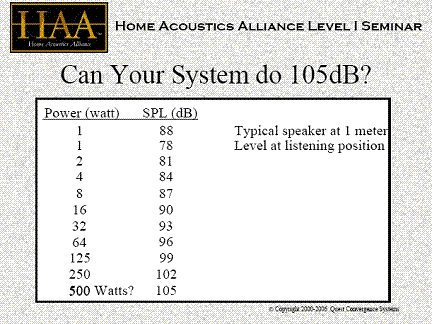
In contrast to 105db being the maximum Sound Pressure Level (SPL) the softest levels that can be heard are about 22 dB in a THX certified room. So if there is a lot of ambient noise in the room we will turn up the volume to hear above those noise levels and since most of us don't have 500W per channel systems we can now see how we have vastly limited the dynamic range of the room. With a 125 WPC system and a projector with 30 dB of fan noise, not counting the other ambient noise infiltrating the room, the usable dynamic range of the room is only about 70 db. In actuality SPL drops 3 dB for every doubling of the distance from the speaker in small rooms. So if you had a more efficient speaker say 92 db and you are 10 feet from it then the SPL would be 84dB at the listening position. Now you only need a 128 WPC system to reach Home Theater Nirvana. These types of methodologies are what made this training so interesting and enlightening.
After understanding sound quality the seminar moved into some technical aspects of sound and then progressed toward understanding the sonic goals. It started off with an explanation of the sine wave, its frequency, wave length and the phase between two waves. Then it progressed to how we hear which included equal loudness, human acuity, noise, and human adaptability. The importance of how we hear is obvious but why it is important may not be. The bullet items for human hearing are:
- We hear midrange best and deep bass worst.
- Robinson and Dadson show we hear bass better when it is louder; listening level affects tone.
- Flat Sound Pressure Level (SPL) measurements show more sound than we can hear.
- In order to make the SPL measurements more meaningful we must make the meter as deaf to bass as humans are.
The last bullet item lead the discussion into "Weighting Filters" , then into "Pink Noise" and why they are used as the standard for testing sound. It was also interesting to learn how adaptive humans are in general and how it applies to audio; meaning that we will adapt to distortions and bad sounding systems. It is very typical for the man of the house to boast about the great sound of his new system even though it may not. He may unwillingly accept mediocre performance because his ego has to justify the purchase and thus he adapts to the system as is. While his wife does not have that same ego and may not even understand what she is hearing but she will speak up and say "it's too loud" or just leave the room seeming uninterested in the movie. She too will eventually adapt. Don't think for a minute that women are not a good judge of sound. They may not get as involved but they have as keen an ear as any man. Of course with an HAA calibrated system we don't need to adapt to poor acoustics.
At this point we started using the Sencore SP295 Real Time Analyzer. Although Sencore is promoted in this seminar because they sponsor it, they really have some great equipment for audio analysis. For those of you who don't know what a Real Time Analyzer (RTA) is, it is basically test equipment that takes a feed from one or more microphones and measures a full spectrum of frequencies at one time. Thus it gives a frequency response in a few seconds without having to do a frequency sweep.
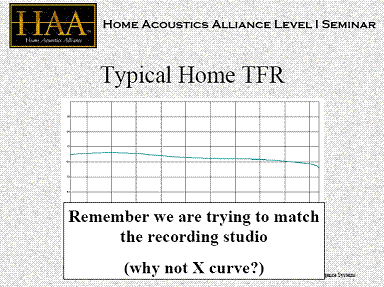
Next Gerry focused on frequency response and its major role in the calibration of the room. I was surprised to learn that a perfectly flat response is not the ideal response. A better response, referred to as the Target Frequency Response (TFR), is slightly boosted in the low frequencies and then slightly tapered off in the higher frequencies which are due to the way the music and movies are mixed.
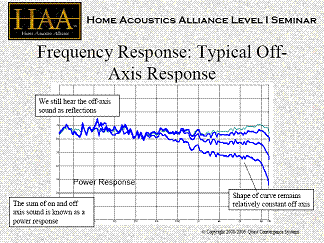 He then showed how to make the off axis measurements of the speaker and how those measurements interacted with the room. The key to all these measurements is to show not just the equipment but how the equipment interacts with the room. I never thought how important the off axis response was until this training. The off axis response is what is reflected from the walls so in measuring it, it is important to look for the same shape curve as you move off axis. That information tells the HAA designer a lot; if the off axis response is poor (dissimilar shape) then some acoustical treatment might be added instead of allowing a direct reflection. The overall goal of these measurements is to eliminate all of the peaks and dips in the response to provide the smoothest possible response curve relative to the seating positions and to achieve the TFR mentioned above.
Next, we learned about low frequency acoustics. Not just subwoofer frequencies but frequencies below 500Hz. We applied what we learned about phase to speaker placement; in particular, boundary gain and boundary interference. Gerry showed the effects of having speakers too close to any boundary, walls, floor and ceiling. We saw how reflections from the speakers at the boundaries caused path differences or phase differences which in turn created gain.
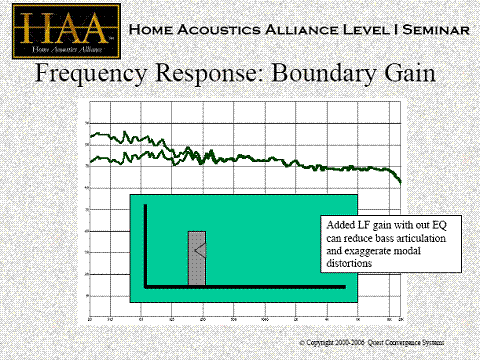
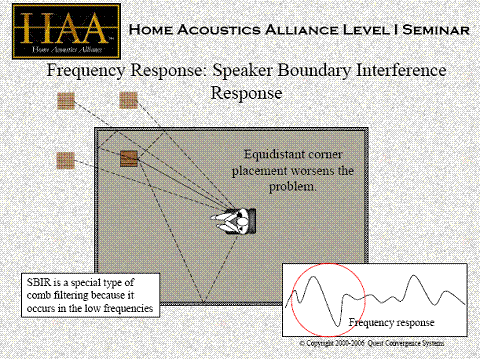
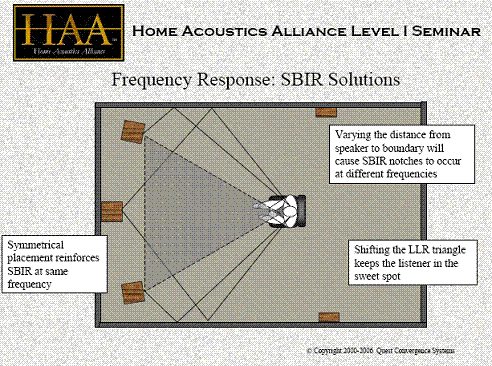
All these reflections and phase differences are what ended up producing comb filtering in case you were ever wondering. Gerry refers to the whole problem as Speaker Boundary Interference Response (SBIR). After getting a clear understanding of SBIR he showed us some techniques to correct it. One of the simple ones was to avoid having your speakers at any equal distance from opposite boundaries. In other words, don't place your speakers at 4 feet high in an 8 feet high room because then they are equal distance (4 feet) from each opposing boundary. Speaker placement was very heavily stressed throughout the training which is one of the major disadvantages of in wall speakers. While they may have excellent sound qualities you are very unlikely to be moving them around by cutting new holes in the wall. The same thought applies to floor standing speakers. They can be moved but it is much harder than a small 2-way speaker. Just think, something as simple as moving your speakers with the guidelines given you can make some big improvements in your system. I tried moving my speakers around with some of these guidelines in mind and I could hear big differences. While I improved the bass response I could also hear more edginess but this was due to the fact that my early reflections were no longer hitting my absorption panels. This edginess may indicate that the off axis response of my speakers is not ideal but I haven't measured it yet to confirm. Although there is a trade off the best thing is that I understand what is going on due to the HAA training.
HAA Level I Certification Training Course Overview - page 2
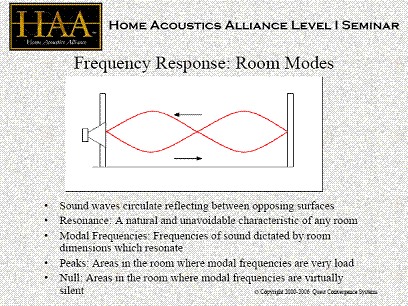
The next topic was the very low frequencies otherwise known as "Room Modes". Room Modes are basically the resonant frequencies between two boundaries which cause peaks and nulls at different places in the room. Room modes are also known as standing waves. I recently saw an ad for a subwoofer that claims it can eliminate standing waves. The only way to accomplish that is to eliminate the room. It seems that snake oil is starting to run down the esoteric cables into the speaker industry. I hope all of you at some point have walked into the corner of your room and heard the increased bass response; that's one of the peaks. In the training we calculated some of the modes from the formula given and then we played the sub at the calculated frequency. We walked around the room identifying the peaks and nulls. It was really cool to see the calculations at work but of course that's what experiments are for. Room Modes get very complex with all the reflections within a room but they are predictable in a rectangular room which is one reason why odd shaped rooms are harder to deal with acoustically. Once we understood room modes we learned how to apply them. Like me, you have probably read several articles on sub woofer placement and realize that there are several suggestions on where to place the sub. The HAA training explained the reasons of where to put the sub in relation to the room modes. What was really great was the tool used to determine sub woofer placement. It was a graphical tool that showed and let the user drag the seating position and the sub to different places in the room after the room dimensions were entered. It also showed the room modes relative to the seating position so as the seat or sub was moved we saw how the room modes were changed. On top of all of this was a small window that showed the low frequency response curve so we could see how the peaks and dips changed as the sub or seat was moved.
Well after all of this great knowledge we found out that the sub woofer ended up somewhere out into the room. Most of us aren't going to allow that kind of placement but there is a solution; two subwoofers. I have always read that it is good to have two subs but I never fully understood why until now. Two subs placed properly create a virtual sub woofer that would have been out into the room. Gerry also showed how to accomplish this task.
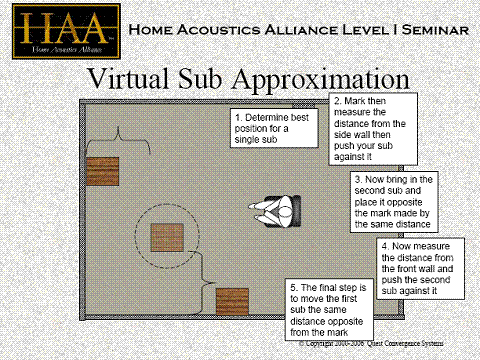
He also showed a couple of other schools of thought for sub woofer placement. Two subs in the middle of opposing walls or four subs, one in each corner.
Editorial Note on Multiple Subwoofers
Aside from the benefit of Virtual Sub approximation with two subs, installing even number of subs (2 or 4) in a listening space is beneficial for averaging modal response and smoothing out bass for a wider listening area while at the same time potentially increasing system headroom and reducing distortion.
For more information read:
Subwoofer Calibration - The Place for Bass Part I
Subwoofer Placement Guidelines
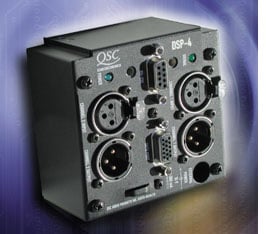 Equalization was then introduced for taking low frequency peaks out of the room response. I was never big on equalization myself but I have tried to have an open mind. In the old days an equalizer usually covered a band of frequencies and when you tried to fix one problem you usually created another. Nowadays with Digital Signal Processing you can correct a single frequency and if you look at the specs of the QSC DSP-4 it is pretty good. He pointed out that you can't EQ out a room null because it is a cancellation and if you try to boost a frequency there, it too will be cancelled resulting in loss of amplifier headroom and possible distress to the subwoofer driver.
Moving into the higher frequencies the sound waves become much more directional so we learned not to look at the sound as a wave but as a ray. The three acoustical properties that apply to rays of sound are Reflections, Absorption, and Diffusion. For drywall, do nothing and you have reflections. The rule of thumb for absorption is that 25% of the room should contain absorption. Most home theater companies that I've seen display a room which has 80% to 90% absorption which creates a dead room. A lot of reflections can confuse the sound so that leaves diffusion. Diffusion spreads the sound rays but still leaves the snap and liveliness in the room and I have understood that for a few years. The home acoustics industry has some new schools of thought on reflections though.
There is a little bit of contradiction here as with the experiment I did in my room with moving the speakers and getting more reflections. If the off axis response of a speaker is not uniform you would want to minimize early reflections. According to the new paradigm, one solution is to add a combination of absorption and diffusion at the early reflection points such as an abfussor. Several products were discussed for acoustical treatment and there were even a couple of samples presented. It's funny; before I took the course I thought it was going to be all about treating a room and room treatment turned out to be only a small piece of the pie.
So after all this information is given to someone what do they do with it. If you were a home theater specialist, it's hard to figure out where to start. Well the HAA training has taken care of that too. We were then presented with two great tools for guidance. First was the Acoustic Design Review which was the steps to take you from the beginning of the project up to and including the set up of equipment. Then the Acoustic Calibration Review was shown which walked us through all the adjustments that needed to be made including measurements.
There was a lot of acoustics covered in this two day training and at the end of the second day my brain was pretty full. I was not going to wait to take the certification test for fear of forgetting the material so I reviewed it and took the test a few days later. I am not a Home Theater Specialist but this invaluable information can go a long way. Now I will be much better at paying attention to detail when setting up equipment for future reviews. Once I get measurement equipment, I will not only be able to more accurately measure the equipment but also the equipment set up in the room. I will be able to apply techniques like the off axis speaker response so you will know whether to treat the side walls or not when using the speakers. We want our readers to feel confident that they are getting an informed review from a competent staff and the HAA training is another feather in our proverbial cap.
One last thought I'd like to give. Some of you spend thousands upon thousands of dollars upgrading and replacing equipment trying to achieve that perfect sound. The HAA training offers the knowledge on how to set up your equipment and room which could be a very worth while investment on an individual basis without being a Home Theater Specialist or Designer by trade. I highly recommend this training to anyone who wants to achieve the best sound and enjoys the intricacy of setting up audio equipment. If the detail isn't your thing but you still want that ultimate sound then I suggest you contact an HAA certified specialist.
Ken Stein is a contributing writer and reviewer for Audioholics and he really REALLY likes his speakers (which he should, since he spent countless hours hand-crafting them himself.) Ken is an engineer with FedEx and applies his diligent attention to detail to his speaker and electronics reviews here at Audioholics.
View full profile