
Denon AVR-2307CI Receiver Review
Denon AVR-2307CI
- Product Name: AVR-2307CI AV Receiver
- Manufacturer: Denon Electronics USA
- Performance Rating:

- Value Rating:

- Review Date: May 10, 2007 10:40
- MSRP: $ 799
GENERAL
- Power Output; Watts Per Channel - 100
- All Channels Rated @ 0.08 THD
- Weight: In Pounds - 28.6
- Width (inches) - 17.1
- Height (inches) - 6.75
- Depth (inches) - 16.4
SOUND MODES
- Processor(s) – Bit Depth and Type - 32-bit Floating Point
- Dolby Pro Logic IIx – with Cinema, Music, Game Modes
- Dolby Digital Surround EX Decoding
- dts ES Discrete 6.1 Decoding
- dts ES Matrix 6.1 Decoding
- dts Neo:6 Stereo-to-Surround Cinema and Music Modes
- dts 96/24 5.1 for DVD-Video Processing
- Audio Signal Delay (Sync. Audio with Video signal) – By source
- Stereo/Direct Modes w/Pure Analog Path - via Setup
- 5-Channel Stereo Mode
- Video Game Mode
- Mono Movie Surround Mode
- Rock Arena Surround Mode
- Matrix Surround Mode
- Jazz Club Surround Mode
- Virtual Surround Mode – For 2 Speakers/Headphones
- Multi-Channel Stereo Mode - 5/6/7
- DSP Effect Modes - 7
- Auto Surround Mode (Analog or Digital Input Type)
- Active Center Channel In All Surround Modes
CONNECTIVITY
- True 24-bit/96-kHz Digital Input Capability
- Assignable Digital Inputs
- Digital Inputs: Coaxial - 2
- Digital Inputs: Optical - 4 including front
- Digital Outputs: Optical - 1
- Analog Audio Inputs, Incl. Tuner - 10
- Phono Input - MM type
- Source Function Renaming
- Analog Record Outputs - 3
- Front Panel A/V Inputs w/Cover * Composite and S-Video - * with Optical
- Video Conversion – Composite to S-Video to Component
- Video Conversion – Composite to S-Video to Composite
- Video Conversion – Analog to HDMI
- DVI/HDMI Video Inputs – Compatible with 1.1 Spec. – Multi-Channel Audio *1080p HDMI *2 HDMI
- HDMI Video Outputs *1080p - *1
- Composite Video Inputs - 5 including Front
- Composite Video Outputs - 3 including Monitor
- S-Video Inputs - 5 including Front
- S-Video Outputs - 3 including Monitor
- Component Video Inputs x Bandwidth - *Assignable - *3 x 100 MHz
- Component Video Outputs - 1
- 8-Ch. External Analog Input
- Banana Plug Speaker Terminals, All Channels
- Cinema EQ
- 56 Station Auto-Preset Memory Tuning
- XM Satellite Radio 'Connect and Play' Ready – with optional antenna
- Direct Function (Tone Bypass)
- Volume Control Un-muting
- Selectable Muting Levels (Full/-40/-20)
- Video Select Control
- RS-232 Port – Third Party Remote Controllers
- IR Serial Remote In/Out terminals
- +12v Trigger Output – Assignable - 2 x 25mA
- Multi-Source/Multi-Zone (*Uses REC OUT) - 2S/3Z*
- Pre-amp Outputs for Multi-Zone
- Multi-Zone Pre-Amp Outputs – Selectable Output Levels - Fixed
- Discrete Remote Power On/Off, Source Selection and Volume for Main and Second/Third* Zones
- Assignable Amplifier Configuration of Surround Back Channels - with Volume
- Speaker Time-Delay and Level Controls: L/R, Sub, C, Surr. L/R, Surround Back
- Pre-Amp Outputs - All (8)
- iPod Dock Control Port (Using optional ASD-1R Denon iDock)
COMPONENT TECHNOLOGY
- Equal Power Amplifiers - 7 ch
- Low Impedance Drive Capability
- High-Current/Discrete Amplifiers
- Independent Power Supplies
- Dolby Digital, dts and DSP Modes – Analog Devices, HammerHead SHARC
- 24-bit/192-kHz DACs - Analog Devices - AD-1835
- Analog-to-Digital Conversion - Bit Depth/Sampling Rate - 24-bit/96kHz
- Variable High/Low Pass Crossover Points (12/24dB) 40/60/80/100/120/150/200/250
- Built In Time Based Correction
CONVENIENCE FEATURES
- Front Panel A/B Speaker Selector
- Auto Setup Calibration
- Auto/Manual Room Equalization
- Auto Setup Microphone Included/Type - Y/Mold DM-S205
- Icon-Based On-Screen Display
- Front Panel System Setup Control
- Personal Memory Plus
- System Setup/Surround Parameters Lockout
- Relay-Controlled Protection Circuits
- Microprocessor User Re-set
- Detachable Power Cord
- Pre-programmed (10 Devices) Glow Key Remote Control with Punch Through Commands - Y/RC-1043
Pros
- Lots of connections
- Plenty of power
- HDMI/Component upconversion of all video inputs
- Easy to use and customize
- Sneaky little remote
Cons
- Setup can be a little confusing at first
- Zone 2 can only accept analogue inputs
Denon AVR-2307CI
When Denon adds the CI suffix to a model number, I fear most users don’t know what to think. CI? It is more expensive so it must be better right? Well, for the most part the CI (Custom Integration) adds advanced connectivity and control features… whatever they are. RS-232? What does that do again? Just remember this; installers are interested in ease of use. They want the receiver to do more switching, more auto sensing, and assignable, renameable, and multiple inputs. Actually, I want that too. And so should you. The AVR-2307CI can convert everything up to HDMI (including composite video) so you theoretically should be able to run one cable to your display (with some caveats – see below). They have dedicated inputs for iPods and it is XM Radio ready. It’s got an auto EQ and auto calibration (not the famed Audyssey but it is something) and a manual EQ. So, while you may be uninterested in the RS-232 port on the back, don’t think that the CI designation isn’t for you. ‘Cause it is.
Denon AVR-2307CI: Build Quality and Setup
 When looking at receivers,
the first thing I look at is the number and types of inputs (no, I don’t put it
on a scale and weigh it). The Denon AVR-2307CI has more than enough for most
users including two HDMI inputs and one output, three component inputs and one
output, and more than enough S-video and composite connections for any normal
human to use (does anyone still use these?) There are pre-outs for utilizing
external amplification (or for connecting a Velodyne SMS-1 or other bass
management system), two 12-volt triggers for controlling amps or other gear, and
7.1 analogue inputs for connecting up a universal player without an HDMI
output.
When looking at receivers,
the first thing I look at is the number and types of inputs (no, I don’t put it
on a scale and weigh it). The Denon AVR-2307CI has more than enough for most
users including two HDMI inputs and one output, three component inputs and one
output, and more than enough S-video and composite connections for any normal
human to use (does anyone still use these?) There are pre-outs for utilizing
external amplification (or for connecting a Velodyne SMS-1 or other bass
management system), two 12-volt triggers for controlling amps or other gear, and
7.1 analogue inputs for connecting up a universal player without an HDMI
output.
The receiver sports 100 watts per channel and Denon says it is stable to 6-ohms (typical for Denons). More than likely, this receiver will have little problem powering an efficient 4-ohm speaker as long as you give it plenty of ventilation and don’t drive it too hard. Regardless, when you first hook up a receiver, you should test how hot it gets until you are comfortable with the amount of ventilation at different volumes. Heat is one of the biggest enemies to electronics (though having my cell phone dunked in a pool proved that water is no friend either) so better to be wary than to have to replace a new piece of gear. The surround back channels are, of course, assignable to Zone Two if you wish. There are two AC outlets that are perfect for powering external fans (if you need them) or your cable box. I typically don’t plug anything but fans into them. The power cord is removable so you can replace it with an audiophile/hospital/military grade one that costs more than the receiver itself (the perfect upgrade for the audiophile with more money than sense).
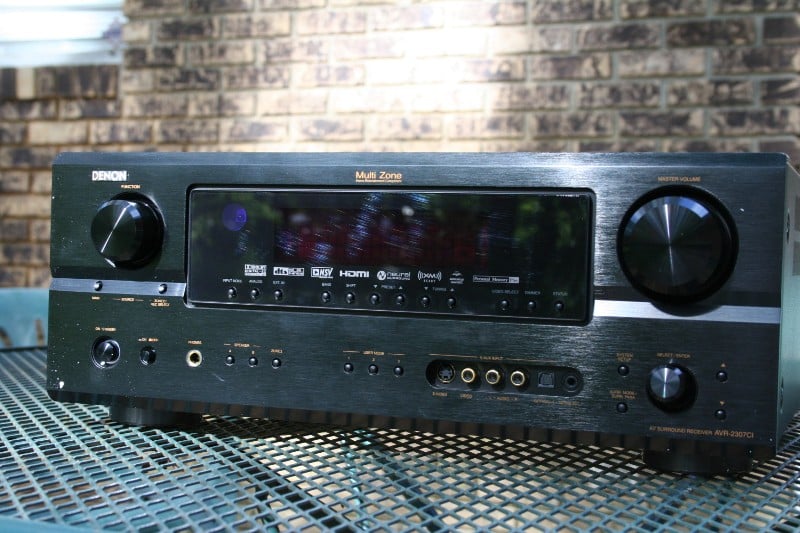 The front panel of the
AVR-2307CI looks remarkably similar to every other Denon I’ve ever seen – which
isn’t necessarily a bad thing. Receivers are utilitarian devices, having one
that is too flashy just wouldn’t be right. The volume readout shrinks up into
the top right corner and is nearly illegible from 9 feet though it takes center
stage when being manipulated (easily readable from 10-12 feet depending on your
eyesight). Additionally, the volume control is visible on the screen (if you
wish) with every output but HDMI, so this is even less of an issue. When in
use, the display shows the active input (VCR, DVD, etc.) and the audio mode (stereo,
Dolby Digital, etc). When you switch inputs, it tells you briefly what audio
input is being received and your default audio setting (stereo, Dolby Pro Logic
IIx, etc.). This is all pretty standard stuff of those of you familiar with
Denon receivers (my AVR-3805 is shockingly similar). My favorite parts of the
receiver readout are the input and output indictors. On the left you’ll notice
a number of boxes present. The number of boxes illuminated will indicate the
number of channels that are being inputted from the selected source. For ease
of reading, the boxes are configured in the standard 7.1 configuration. For the
most part, you are going to see either 2 (stereo) or 6 (5.1 surround) boxes
illuminated. With some older or foreign movies you may see 3 (2.1) though I
think the Pixar movie Cars defaults
to 2.1 as well (I find that bizarre).
The front panel of the
AVR-2307CI looks remarkably similar to every other Denon I’ve ever seen – which
isn’t necessarily a bad thing. Receivers are utilitarian devices, having one
that is too flashy just wouldn’t be right. The volume readout shrinks up into
the top right corner and is nearly illegible from 9 feet though it takes center
stage when being manipulated (easily readable from 10-12 feet depending on your
eyesight). Additionally, the volume control is visible on the screen (if you
wish) with every output but HDMI, so this is even less of an issue. When in
use, the display shows the active input (VCR, DVD, etc.) and the audio mode (stereo,
Dolby Digital, etc). When you switch inputs, it tells you briefly what audio
input is being received and your default audio setting (stereo, Dolby Pro Logic
IIx, etc.). This is all pretty standard stuff of those of you familiar with
Denon receivers (my AVR-3805 is shockingly similar). My favorite parts of the
receiver readout are the input and output indictors. On the left you’ll notice
a number of boxes present. The number of boxes illuminated will indicate the
number of channels that are being inputted from the selected source. For ease
of reading, the boxes are configured in the standard 7.1 configuration. For the
most part, you are going to see either 2 (stereo) or 6 (5.1 surround) boxes
illuminated. With some older or foreign movies you may see 3 (2.1) though I
think the Pixar movie Cars defaults
to 2.1 as well (I find that bizarre).
Also present on the front panel are function (input selector) and volume knobs, auxiliary inputs (composite/S-video with either stereo analogue or digital optical audio), headphone jack, zone 2 button, on/off button, user mode buttons (3 buttons that can be programmed to remember input source, surround mode, and input mode – basically good for installers or those that want to have one-button operation without a universal remote), and setup/menu controls. While in some of the higher models, the majority of these buttons are hidden behind a fold-down faceplate, on the AVR-2307CI there is a pop out panel that covers the unsightly inputs and the rest of the controls are exposed. Fortunately, they are innocuous enough not to be too detrimental to the feng shui of the front panel.
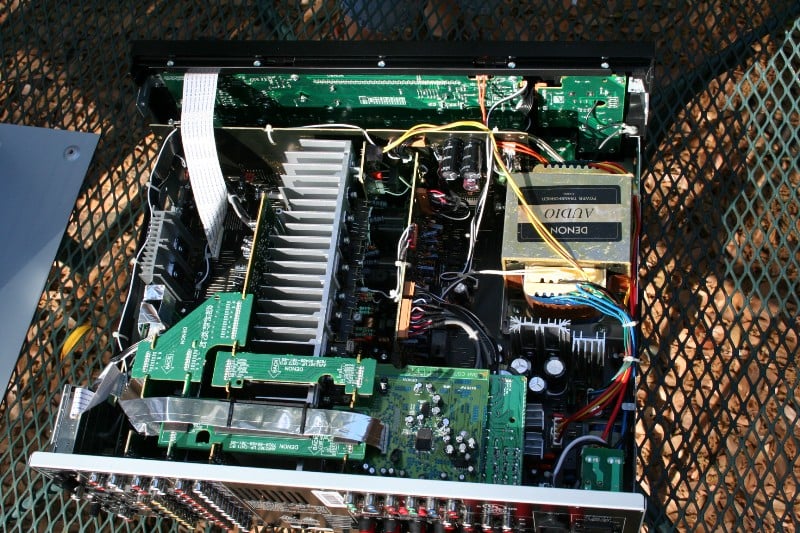
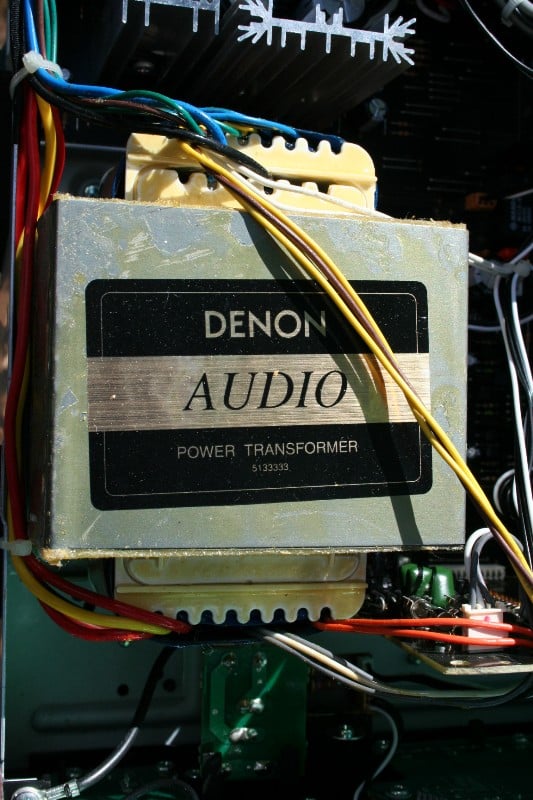
Here is a brief look at the internal components:
System Setup
I’m just going to say one thing. This one thing I will not explain nor will I explain the impetus behind. This one thing is the single most important thing you need to remember when you are setting up your receiver or diagnosing problems. This one thing may be the difference between looking like a champ (by having the right answers) or looking like a chump (asking a stupid question then realizing the answer yourself):
Check your connections. Then double check them. Then triple check them. And if you find you are having a weird problem, check them again.
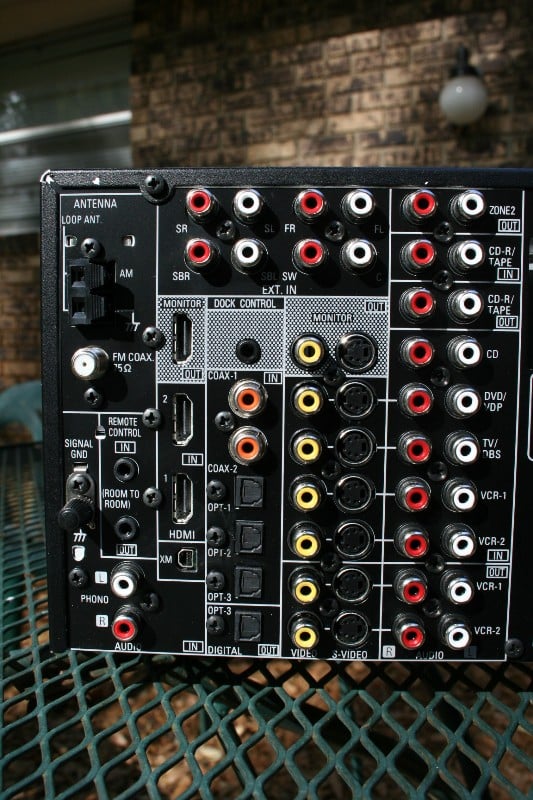
 That’s enough about that. The layout of the back of the AVR-2307CI is
typical of most receivers – way too many connections way to close together. Of
course, I understand that there are plenty of people out there that use
analogue audio and composite video… but they shouldn’t. Some part of me wants
them to do away with all but two non-digital inputs (7.1 analogue inputs don’t
count) to force people to upgrade. But we all know that isn’t going to happen.
So, for now, we’ll all just have to deal with it. The speaker terminals only
really accept bare wire, pins, and banana plugs and are close enough together
that if you aren’t using banana plugs, you’ll wish you were. None of this is
all that surprising for receivers these days where back panel real estate is at
a premium. Given the number of connections available, the back panel is laid
out fairly well. I’d wish for a little more space between the speaker terminals
and to relocate the 7.1 analogue inputs to a less busy location but other than
that, I’m pretty happy with the layout.
That’s enough about that. The layout of the back of the AVR-2307CI is
typical of most receivers – way too many connections way to close together. Of
course, I understand that there are plenty of people out there that use
analogue audio and composite video… but they shouldn’t. Some part of me wants
them to do away with all but two non-digital inputs (7.1 analogue inputs don’t
count) to force people to upgrade. But we all know that isn’t going to happen.
So, for now, we’ll all just have to deal with it. The speaker terminals only
really accept bare wire, pins, and banana plugs and are close enough together
that if you aren’t using banana plugs, you’ll wish you were. None of this is
all that surprising for receivers these days where back panel real estate is at
a premium. Given the number of connections available, the back panel is laid
out fairly well. I’d wish for a little more space between the speaker terminals
and to relocate the 7.1 analogue inputs to a less busy location but other than
that, I’m pretty happy with the layout.
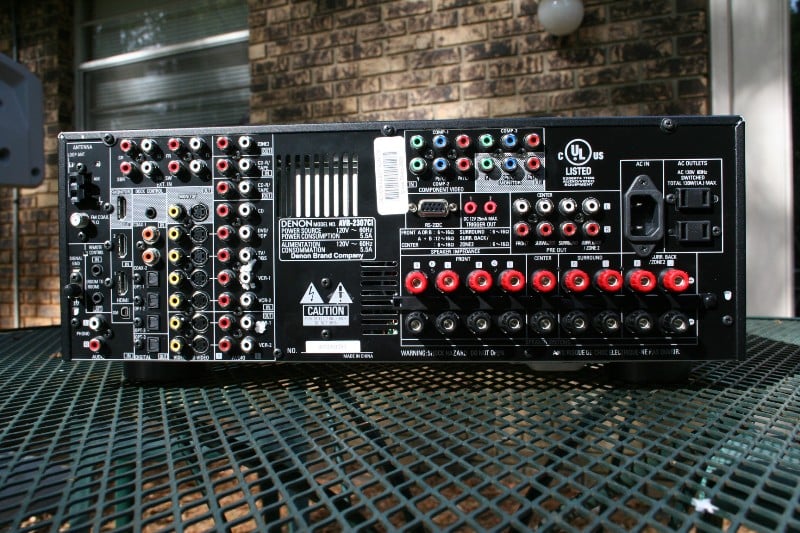 There are two coaxial and
four (five if you count the one on the front panel) optical inputs. Together
with the two HDMI inputs even a reviewer will have a hard time running out of places
to plug things in. The XM terminal and Dock Control jack (for iPods) stand out
as recent additions to Denon functionality. Having built-in iPod controls and
XM Radio receiving capability should make for an all-in-one receiver package
that a custom installer or a gadget freak will drool over. All you need for the
XM Radio service is a XM passport system (sold separately). For iPod playback,
you need to purchase a Control Dock for iPod (also sold separately). The upside
of using one of these systems is that you can control the XM Radio or iPod from
the Denon’s remote. Otherwise, you’ll need to connect whatever receiver/docking
station to the receiver and utilize its own remote/control system.
There are two coaxial and
four (five if you count the one on the front panel) optical inputs. Together
with the two HDMI inputs even a reviewer will have a hard time running out of places
to plug things in. The XM terminal and Dock Control jack (for iPods) stand out
as recent additions to Denon functionality. Having built-in iPod controls and
XM Radio receiving capability should make for an all-in-one receiver package
that a custom installer or a gadget freak will drool over. All you need for the
XM Radio service is a XM passport system (sold separately). For iPod playback,
you need to purchase a Control Dock for iPod (also sold separately). The upside
of using one of these systems is that you can control the XM Radio or iPod from
the Denon’s remote. Otherwise, you’ll need to connect whatever receiver/docking
station to the receiver and utilize its own remote/control system.
If you chose to go with a 5.1 system (rather than 7.1) you have a number of options of what to do with those two unused amplification channels. You can assign them to Zone 2, bi-amp your mains (Front A), or power a separate set of speakers (Front B). I’m not going to get into the debate about whether bi-amping through a receiver is useful – if you’ve got the extra channels and nothing to do with them, try it out and see if you notice a difference. If you have a set of speakers that you prefer for two-channel listening but a different set of speaker for movies, you can use those extra channels to switch between the two to suit your musical tastes. Regardless of the route you choose, it is nice that they provide a number of options. Nothing is worse than having extra channels of amplification and nothing to do with it.
In a move that continues to make me want to beat my head against the wall, Zone 2 will not accept digital input signals. This means that you’ll either have to have a dedicated player for your Zone 2 that is connected via analogue or you’ll have to double connect (if you want to utilize digital outs) anything that you might want to pipe to Zone 2. I understand that the additional DACs required to allow Zone 2 to accept digital inputs would increase the cost of the unit, but who cares? Get cheaper ones. They are most likely for an office or outside or something. In every receiver I’ve used or tested, Zone 2 has been the red-headed-stepchild of the input world so this isn’t as much of a slam against the AVR-2307CI as it is receiver manufacturers in general. This is one feature I'd like to see moved to lower-priced products.
Denon AVR-2307CI: Manual Setup
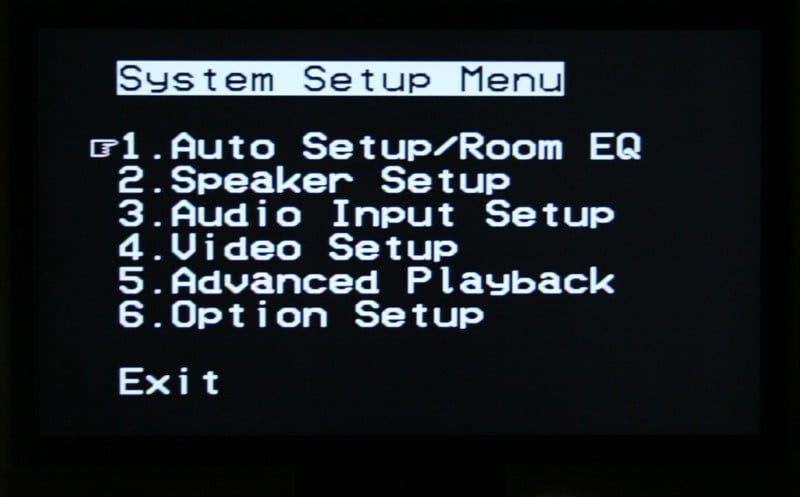 If you’ve dealt with a Denon
receiver in the last few years, you are going to be in for absolutely no
surprises here. The Denon OSD (on-screen display) menu is still white text on a
black background and while it now works over component (it doesn’t on my
AVR-3805), it doesn’t work over HDMI.
Regardless, with a little practice you can pretty much navigate it from the
front display in a pinch. This is important as many receivers with OSD require you to use a display to
configure the product. Video and audio inputs are still split up onto different
menus (as we’ve seen before with Denons) which is really the only confusing
thing about navigating the menu system. Taking it from the top, it is pretty
easy to set up your system:
If you’ve dealt with a Denon
receiver in the last few years, you are going to be in for absolutely no
surprises here. The Denon OSD (on-screen display) menu is still white text on a
black background and while it now works over component (it doesn’t on my
AVR-3805), it doesn’t work over HDMI.
Regardless, with a little practice you can pretty much navigate it from the
front display in a pinch. This is important as many receivers with OSD require you to use a display to
configure the product. Video and audio inputs are still split up onto different
menus (as we’ve seen before with Denons) which is really the only confusing
thing about navigating the menu system. Taking it from the top, it is pretty
easy to set up your system:
1)  Auto
Setup/Room EQ
Auto
Setup/Room EQ
Go here if you plan on letting the receiver set the levels, distances, etc for you. If not, skip.
- Auto Setup – Sets up your speaker sizes, distances, and levels. Make sure that you have the right configuration for the rear amps (surround backs, Zone 2, front). Also, Denons have an annoying habit of making you press the left arrow to engage things. This is one of those places. If you keep backing out of the menu, you’re probably hitting “enter” instead of “left”. Took me a few tries to figure out the problem so it isn’t just you.
- Room EQ Setup – You have the choice of All or Assign. With All, all the different surround modes will default to using the EQ. With Assign, you can pick and choose which inputs use the EQ and which don’t.
- Direct Mode Setup – On for using the EQ while in Direct Mode, Off for not. This includes multichannel music such as SACDs/DVD-A transferred over analogue or HDMI.
- Parameter Check – Lets you view but not change the parameters set by the auto setup software. Changing comes later.
2) 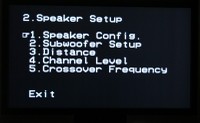 Speaker Setup

This is for manual setup though people that use the auto setup function will probably want to make an adjustment or two here.
- Speaker Config – Set the sizes (large or small) and whether or not you have surround back speakers)
- Subwoofer Setup – Choose between LFE (send the LFE to the sub and anything below the crossover to the appropriate speaker for all SMALL speakers, LARGE speakers get full range) and LFE+Main (sends the LFE channel AND anything below the crossover to the sub – regardless of speaker size – best if you have full range speakers – if you don’t know, you don’t). The upside of this is that if you set your speakers to SMALL, it really doesn’t matter which you choose, it is only really important if you decide to set something to LARGE. For most of the people buying this receiver, they should be using the SMALL setting anyhow.
- Distance – you can choose Meters (more accurate) or Feet (less accurate). Overall, we’re talking inches so choose the one you’re most comfortable with.
- Channel Level – This is where you set the levels for each speaker. You can choose to set the test tone for manual or auto (manual is better and easier to use). This is a second area where you’ll need to press left arrow to start the process. If you’ve set the test tone to manual, you’ll use the up and down arrows to navigate the different speakers and right arrow to increase the volume (0.5 dB increments) and left arrow to decrease it. Make sure you don’t accidentally hit the left arrow while on the Level Clear option or it, um, clears everything. Though if you used the auto setup, you’re out like 4 minutes of work.
- Crossover Frequency – Global only – 40, 60, 80, 90, 100, 110, 120, 150, 200, 250 Hz. For most speakers, the default of 80 Hz is fine.
3) 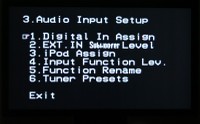 Audio Input
Setup
Audio Input
Setup
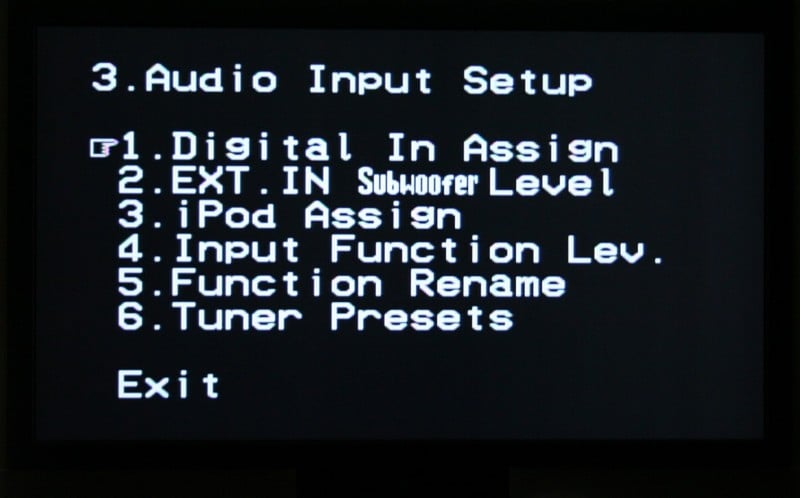
Now we’re in for the fun stuff – did you take notes when you hooked everything up?
- Digital In Assign – For each of the inputs, you can assign the different digital AUDIO inputs – Coaxial, Optical, or HDMI.
- Ext. In Subwoofer Level – Yeah baby! Bass management over your 7.1 analogue inputs! This is extremely useful for all those with universal or high def players that are doing the decoding for you. Using a test disc, you can adjust your subwoofer level if you need to.
- iPod Assign – Tells the receiver if you have a iPod connected via the Control Dock and which input it is attached to.
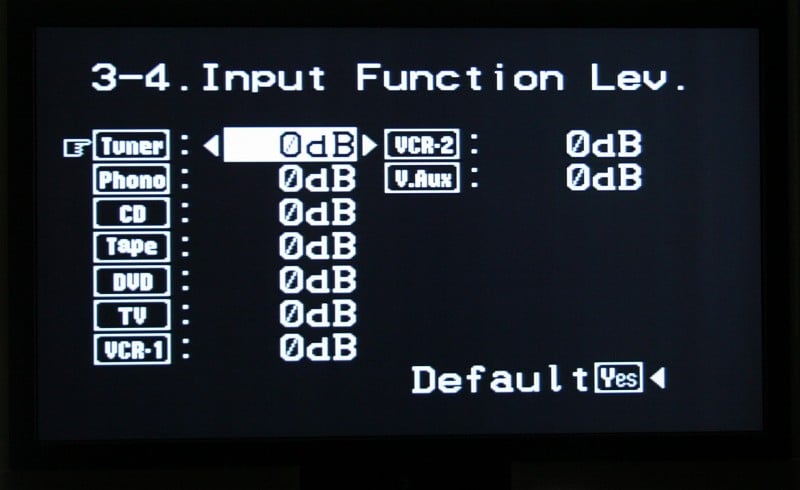
 Input Function Level – With this you can bump up or down the volume of a
specific input if you find that it doesn’t match the rest of your inputs. For
example, if your TV is super loud you can decrease the volume up to 12dB
(conversely, if it is soft, you can increase it up to 12dB). This beats the old
“hit the input and remember to dial down the volume before it locks in” method
that I’ve always employed.
Input Function Level – With this you can bump up or down the volume of a
specific input if you find that it doesn’t match the rest of your inputs. For
example, if your TV is super loud you can decrease the volume up to 12dB
(conversely, if it is soft, you can increase it up to 12dB). This beats the old
“hit the input and remember to dial down the volume before it locks in” method
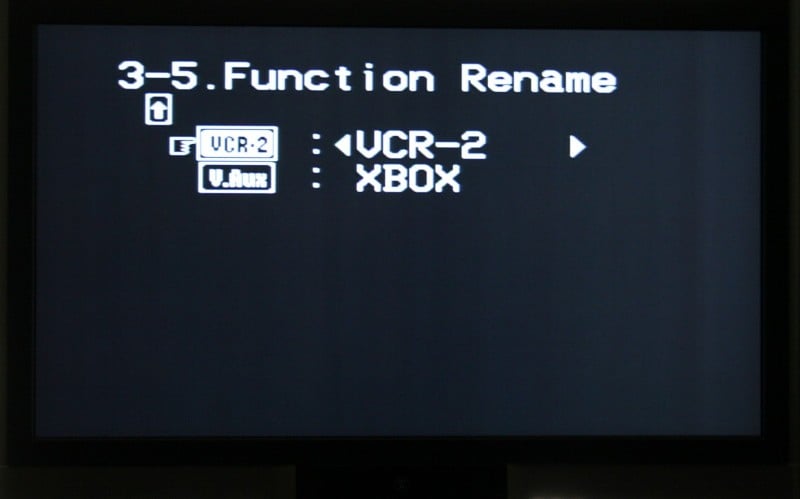
that I’ve always employed. Function Rename – I love this one. You can rename inputs so that the
display on the front of the receiver matches in the source. While this is
mostly useful for custom installers using universal remotes with LCD
readouts/touchscreens, it is still fun for the casual user. Even if your better
half doesn’t know which input is the OPPO player, she can press all the buttons
until she sees it on the screen (or on the TV if it is not using HDMI). For
many, that would be a great help.
Function Rename – I love this one. You can rename inputs so that the
display on the front of the receiver matches in the source. While this is
mostly useful for custom installers using universal remotes with LCD
readouts/touchscreens, it is still fun for the casual user. Even if your better
half doesn’t know which input is the OPPO player, she can press all the buttons
until she sees it on the screen (or on the TV if it is not using HDMI). For
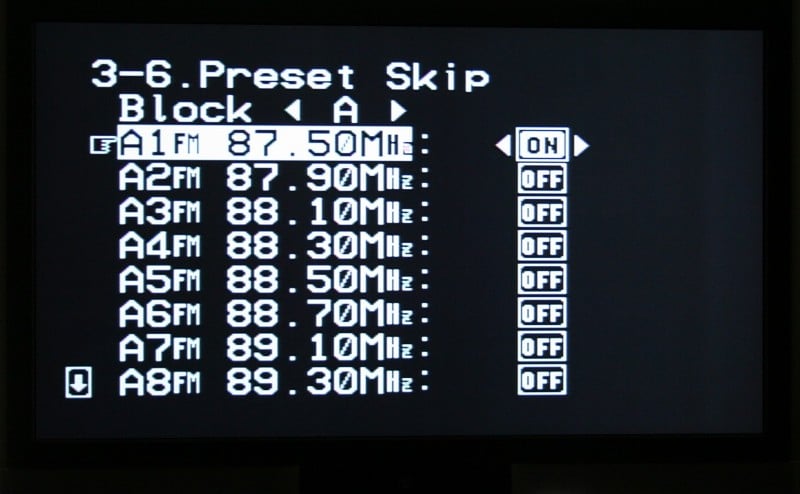
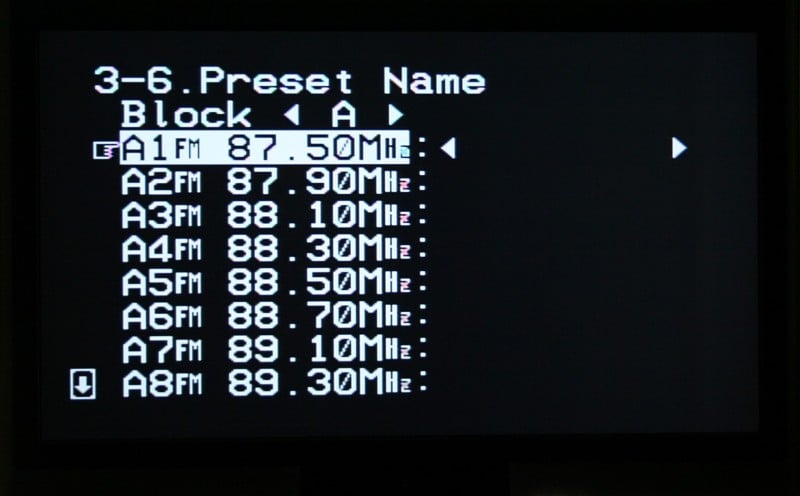
many, that would be a great help. Tuner Presents – Sets up the FM tuner. What I really like about the Auto
Preset Memory function is that it works while other inputs are playing. That’s
kinda nice – you can listen to a CD or something while you are setting your tuner.
You can then use the Preset Skip menu to delete those stations that you don’t
want (if you have a lot of stations in your area, it may not have enough slots
for all of them – I could only get as high as 105.5). Last you can rename
stations of your choice (eight characters max). If you want to program in more
stations that weren’t picked up from the Auto Preset, you’ll have to select the
Tuner on the remote, hit the proper band (FM, AM, or XM), search for the proper
station, press memory, then Shift (until the proper memory block is located),
Channel to select the desired preset (1-8) and Memory again to store it. Wow,
that sounds a lot more confusing than it is. Let’s break it down. When you Auto
Tune,
Tuner Presents – Sets up the FM tuner. What I really like about the Auto
Preset Memory function is that it works while other inputs are playing. That’s
kinda nice – you can listen to a CD or something while you are setting your tuner.
You can then use the Preset Skip menu to delete those stations that you don’t
want (if you have a lot of stations in your area, it may not have enough slots
for all of them – I could only get as high as 105.5). Last you can rename
stations of your choice (eight characters max). If you want to program in more
stations that weren’t picked up from the Auto Preset, you’ll have to select the
Tuner on the remote, hit the proper band (FM, AM, or XM), search for the proper
station, press memory, then Shift (until the proper memory block is located),
Channel to select the desired preset (1-8) and Memory again to store it. Wow,
that sounds a lot more confusing than it is. Let’s break it down. When you Auto
Tune, it fills up all your memory slots until they are full – there are 7
blocks (labeled A-G) each with 8 (labeled 1-8) channels. That’s a grand total
of 56 memory slots. If you used the Auto Tune, a lot of those will be useless.
You can go back through and replace some of the useless ones with channels that
you want to hear. You can break down the different blocks/channels however you
want but at the very least, I’d consider splitting FM, AM, and XM into
different blocks. For me, I could probably combine FM and AM (I don’t like that
many channels) but XM I might even use multiple blocks differentiated by the
type of music or perhaps the setting. So Block A might be for FM and AM while
Block B is for XM Talk, Block C for XM Energetic (uptempo music), Block D for
XM Mellow (background music for guests), etc. Note, the Auto Preset is for FM
only.
it fills up all your memory slots until they are full – there are 7
blocks (labeled A-G) each with 8 (labeled 1-8) channels. That’s a grand total
of 56 memory slots. If you used the Auto Tune, a lot of those will be useless.
You can go back through and replace some of the useless ones with channels that
you want to hear. You can break down the different blocks/channels however you
want but at the very least, I’d consider splitting FM, AM, and XM into
different blocks. For me, I could probably combine FM and AM (I don’t like that
many channels) but XM I might even use multiple blocks differentiated by the
type of music or perhaps the setting. So Block A might be for FM and AM while
Block B is for XM Talk, Block C for XM Energetic (uptempo music), Block D for
XM Mellow (background music for guests), etc. Note, the Auto Preset is for FM
only.
4) Video Setup
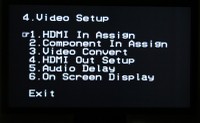 HDMI In Assign – duh
- Component In Assign – double duh
- Video Convert – This allows all composite, S-video, and component video inputs to be sent out via HDMI. You can select which inputs you’d like to have converted – see the Video Setup portion of this review for more on this function and its limitations.
- HDMI Out Setup – This section may appear confusing but the bottom line is that it allows analogue 480i signal sot be output over HDMI. You would only want to enable this if your display can accept 480i via HDMI - the Denon does not deinterlace the signal to 480p. You can also select RGB or Y Cb Cr color modes as well as select the Normal (recommended) or Enhanced modes for RGB.
- Audio Delay – If you are havingproblems with lip syncing – you can use this menu to delay the audio up to 200 ms in 1 millisecond increments.
- On Screen Display – The default is for the AVR-2307CI to display whichever input you selected as well as volume changes on the screen. If this bugs you, you can disable it (independently) here. The bottom Display Mode choice defaults to Mode 1. If you find you are experiencing a lot of flickering of the menu when there isn’t a video signal present, change it to Mode 2.
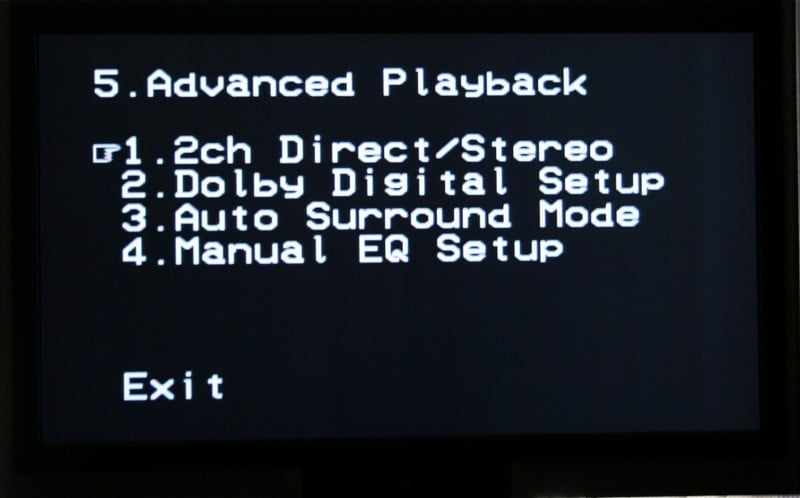
5) Advanced Playback
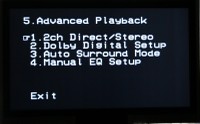 2ch Direct/Stereo – Wow, talk about flexibility! If
you desire different settings when listening in stereo or two-channel mode, you
can do it here. You can change the speaker sizes, whether or not you have a
sub, the subwoofer mode (LFE or LFE+Main), the
crossover, and the distances to your front speakers. This is perfect for
audiophiles who have full range (or near full range) speakers and want to
listen to two-channel sources without the use of a subwoofer.
2ch Direct/Stereo – Wow, talk about flexibility! If
you desire different settings when listening in stereo or two-channel mode, you
can do it here. You can change the speaker sizes, whether or not you have a
sub, the subwoofer mode (LFE or LFE+Main), the
crossover, and the distances to your front speakers. This is perfect for
audiophiles who have full range (or near full range) speakers and want to
listen to two-channel sources without the use of a subwoofer.- Dolby Digital Setup – You can turn the Dolby Digital Downmix Compression on or off. I’d suggest Off unless you frequently find yourself turning down the volume during loud passages.
- Auto Surround Mode – If you want your receiver to default to the more appropriate surround mode when presented a signal (Dolby Digital +PLIIx for a Dolby Digital signal or DTS+Neo:6 for a DTS signal) then enable this. I personally like this so I made sure it was On.
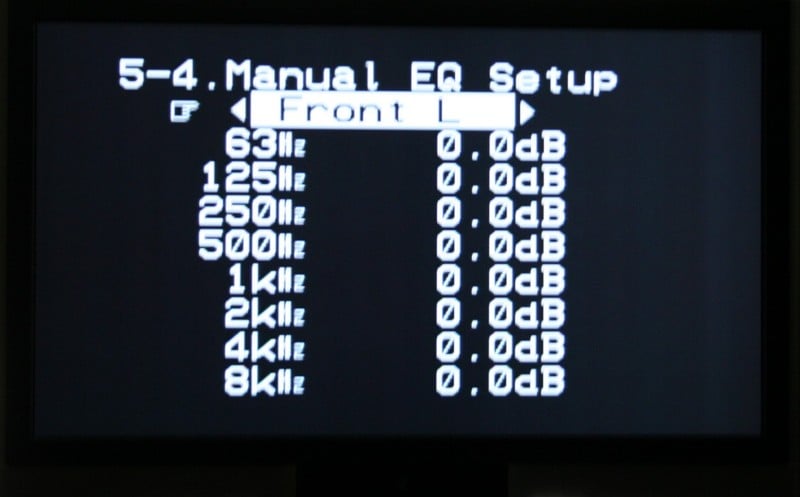
 Manual EQ Setup – (I told you we’d get here!) Now, if
you’ve used the Auto Setup function, you’ve got an EQ curve and a number of
different settings (Flat, Normal, Front, Off). Rather than giving you the
option of adjusting those settings, you can enter your own here. So, if you
like one of the EQ settings but want to tweak it, you’ll have to write it down,
enter it manually, and adjust it here. You have the option of manipulating each
channel individually (for maximum control), all channels at once (if you
globally want to tone down (or up) some aspect of your system), or the left and
right speakers together (front left and right, surround left and right,
surround back left and right, and center). While this is probably more useful
for custom installers with fancy-dancy measuring equipment, the average Joe
with a bit of research or perhaps a penchant for experimentation might find
themselves dialing in their systems. The manual EQ does have some limitations –
see the Auto Setup section below for more details.
Manual EQ Setup – (I told you we’d get here!) Now, if
you’ve used the Auto Setup function, you’ve got an EQ curve and a number of
different settings (Flat, Normal, Front, Off). Rather than giving you the
option of adjusting those settings, you can enter your own here. So, if you
like one of the EQ settings but want to tweak it, you’ll have to write it down,
enter it manually, and adjust it here. You have the option of manipulating each
channel individually (for maximum control), all channels at once (if you
globally want to tone down (or up) some aspect of your system), or the left and
right speakers together (front left and right, surround left and right,
surround back left and right, and center). While this is probably more useful
for custom installers with fancy-dancy measuring equipment, the average Joe
with a bit of research or perhaps a penchant for experimentation might find
themselves dialing in their systems. The manual EQ does have some limitations –
see the Auto Setup section below for more details.
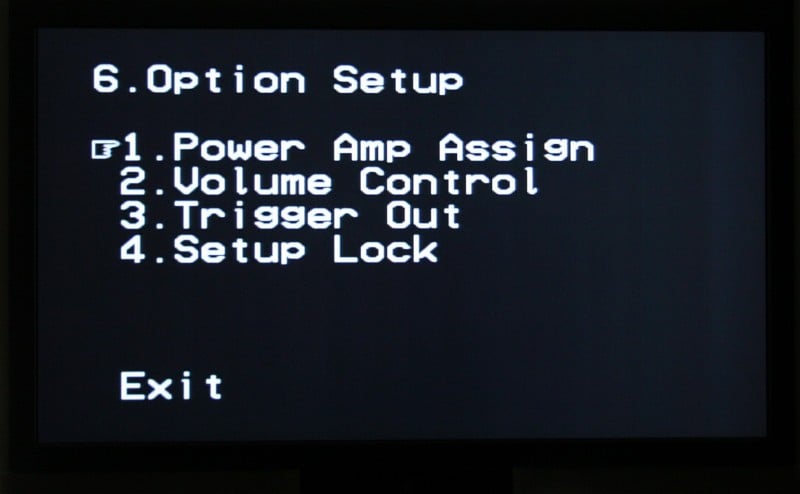
6) Option Setup
 Power Amp Assign – Front A (bi-amp), Front B,
Surround Back, or Zone 2.
Power Amp Assign – Front A (bi-amp), Front B,
Surround Back, or Zone 2.- Volume Control – You can limit the maximum volume to -20dB, -10dB, or not at all. Great if you live in an apartment, condo, or live with your parents. You can also set the Power On volume (configurable to 'Last', or you can choose any full dB increment from -80 to +18) and the mute level (full, -40dB, -20dB).
- Trigger Out – Assign each 12-volt trigger on or off for each input and zone
- Setup Lock – Keep your kids, wife, and guests from “fixing” your settings.
Denon AVR-2307CI: Auto and Video Setup, Remote
While purists and do-it-yourselfers may thumb their collective noses at it, auto-calibration sells receivers. It doesn’t matter how easy you think setting levels is with an SPL meter, Joe Consumer doesn’t want to do it. And why should he? He just paid $800 for a new receiver; the least it can do is calibrate itself. While the Denon AVR-2307CI doesn’t sport the highly touted Audyssey Room Correction System (you need to jump to the AVR-2807 for that) it does have an auto-calibration system. Using bursts of pink noise, the hockey puck-shaped mic sets the distance, size, level, and EQ for each speaker. The results are listed in the table below:
|
Speaker |
Size |
Distance (in feet) |
Level |
|||
|
Auto |
Manual |
Auto |
Manual |
Auto |
Manual |
|
|
Left |
Large |
Small |
7.3 |
9.9 |
+1.0 |
+1.0 |
|
Center |
Small |
Small |
7.4 |
9.6 |
-0.5 |
-0.5 |
|
Right |
Large |
Small |
7.3 |
9.9 |
+1.0 |
+1.0 |
|
Surround R |
Small |
Small |
5.1 |
6.7 |
-2.5 |
-2.5 |
|
Surr. Back R |
Small |
Small |
5.2 |
5.8 |
+0.5 |
+0.5 |
|
Surr. Back L |
Small |
Small |
4.1 |
5.0 |
+0.0 |
+0.0 |
|
Surround L |
Small |
Small |
4.1 |
7.0 |
+1.5 |
+1.5 |
|
Sub |
Yes |
Yes |
22.7 |
10.6 |
-7.0 |
-7.0 |
As you can see, the AVR-2307 pretty much got all the distances wrong (surprisingly – usually they just mess up the sub) but hit the speaker sizes and channel levels dead on (and I do mean dead on – I didn’t have to adjust it even a little). The Axiom m60 v2’s are a large speaker that I choose to run Small with an 80 Hz crossover (I’d run the crossover lower for the mains but the Denon AVR-2307CI has a global crossover) so I don’t consider that a “wrong” measurement. It doesn’t seem that the auto calibration sets the crossover point for the system which I find to be a pretty glaring omission. More than likely, since the unit defaults to 80 Hz that should be more than fine but it seems that is should have the ability to set the crossover point as well - especially for those with smaller satellite speaker systems.
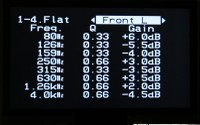
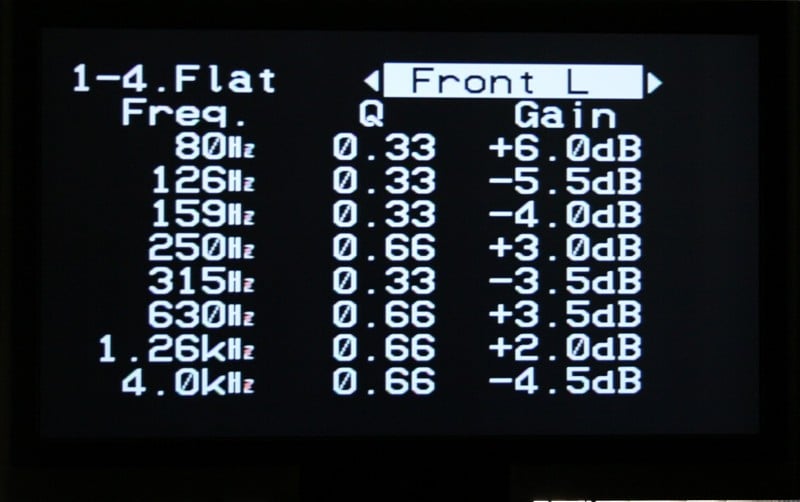
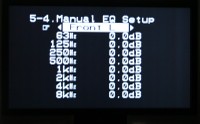
Now the auto calibration also sets an EQ up for you (see the table below). Now, looking at the table two things become readily apparent – first that the EQ seems to think my Axioms are bright (notice the reduced output on the upper end of almost all my speakers. Secondly, the EQ is NOT locked into a set of frequencies. On the other hand, when using the Manual EQ, you can only adjust 63, 125, 250, 500, 1000, 2000, 4000, and 8000 Hz. Obviously the Auto EQ has a lot more flexibility than the Manual EQ does. With the Manual EQ you can only really adjust the dB change, not the Q which means that either the manual EQ is NOT parametric or that the Q is preset within the receiver (I’m guessing the latter).
Flat EQ Setting
|
Frequency |
Left |
Center |
Right |
Surr Right |
Surr Back Right |
Surr Back Left |
Surr Left |
|||||||
|
Q |
gain |
Q |
gain |
Q |
gain |
Q |
gain |
Q |
gain |
Q |
gain |
Q |
gain |
|
|
80Hz |
.33 |
6.0 |
|
|
.33 |
8.0 |
.33 |
4.5 |
|
|
|
|
.33 |
3.0 |
|
100Hz |
|
|
.66 |
2.0 |
.33 |
-5.0 |
|
|
|
|
|
|
|
|
|
126Hz |
.33 |
-5.5 |
.66 |
-6.5 |
.50 |
-4.5 |
|
|
|
|
|
|
.33 |
-2.0 |
|
159Hz |
.33 |
-4.0 |
|
|
.33 |
-3.5 |
.66 |
-6.0 |
|
|
|
|
.66 |
-6.0 |
|
200Hz |
|
|
|
|
|
|
.33 |
-3.0 |
.50 |
-6.0 |
.50 |
-4.5 |
.50 |
-4.0 |
|
250Hz |
.66 |
3.0 |
.33 |
-2.0 |
|
|
|
|
.33 |
-4.5 |
.33 |
-6.0 |
|
|
|
315Hz |
.33 |
-3.5 |
|
|
.33 |
-3.0 |
|
|
.33 |
-3.5 |
|
|
.33 |
1.5 |
|
400Hz |
|
|
|
|
|
|
.83 |
-4.0 |
|
|
.50 |
2.0 |
|
|
|
500Hz |
|
|
|
|
|
|
|
|
2.0 |
3.5 |
|
|
|
|
|
630Hz |
.66 |
3.5 |
.33 |
4.0 |
.66 |
4.5 |
|
|
|
|
|
|
1.33 |
3.0 |
|
800Hz |
|
|
.33 |
-2.5 |
|
|
.33 |
2.5 |
.33 |
-7.5 |
.33 |
-6.5 |
|
|
|
1.0kHz |
|
|
.33 |
-3.0 |
|
|
.83 |
6.5 |
|
|
2.0 |
2.0 |
|
|
|
1.26kHz |
.66 |
2.0 |
|
|
|
|
.66 |
-5.5 |
.66 |
5.0 |
.66 |
2.0 |
|
|
|
1.59kHz |
|
|
|
|
|
|
|
|
|
|
|
|
1.59 |
3.5 |
|
2.0kHz |
|
|
|
|
.66 |
2.5 |
|
|
|
|
|
|
|
|
|
2.5kHz |
|
|
|
|
|
|
|
|
|
|
.66 |
2.5 |
|
|
|
3.15khz |
|
|
.66 |
6.0 |
|
|
|
|
|
|
|
|
|
|
|
4.0kHz |
.66 |
-4.5 |
.66 |
-3.5 |
.66 |
-5.0 |
.66 |
5.5 |
.66 |
-1.0 |
|
|
|
|
|
6.3kHz |
|
|
|
|
|
|
|
|
|
|
|
|
.66 |
-3.5 |
Video Setup
HDMI handling is a big deal for many consumers and the Denon AVR-2307CI didn’t skimp. Not exactly an entry-level receiver (the price point is a little high for that); the AVR-2307CI provides upconversion from composite up to HDMI. The downside? No deinterlacing or upscaling. That means that your high definition display is going to need to be able to handle 480i over HDMI if you want to take full advantage of the upconversion. On the Westinghouse LVM-42w2, it can’t so I ran into a number of interesting problems. The menu for the AVR-2307CI wouldn’t display over HDMI (no problems over component), the Escient DVDM-300 movies would show over HDMI (as long as the DVD player was set to “Progressive”) but the Escient menus are all sent out via 480i, so I couldn’t see them either. I also had a problem with my Xbox 360. While it is sending a 1080i signal out over component, I couldn’t get it to show up over HDMI. There is a cryptic statement in the manual that warns that video game systems may have problems upconverting. I like the way the AVR-2307CI lists all the different inputs so that you can select which ones to upconvert. It is very intuitive.
One nice little feature is that you can hit the V. Select button on the remote to switch the video inputs while keeping the same audio input. So you could, if you want, set up some background music playing on your music server and then manually switch the video to something else (a documentary with sweeping vistas perhaps) if you like. I’ve done just that at dinner parties before where I wanted to show off the display with some good HD content but I didn’t want to listen to the droning: “And see how the desert beetle lays its eggs in the decaying corpse of the Gila monster…” and all that. Better that we don’t know what exactly that beetle is doing during dinner if you know what I mean.
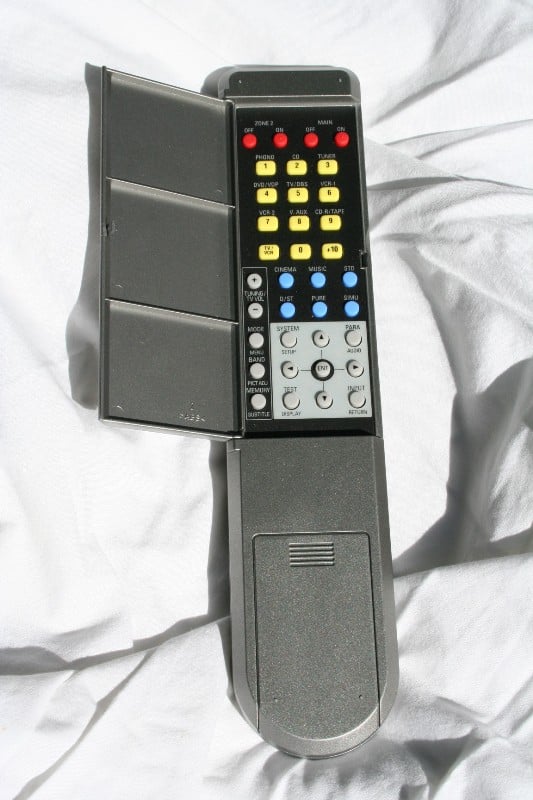
Remote Control
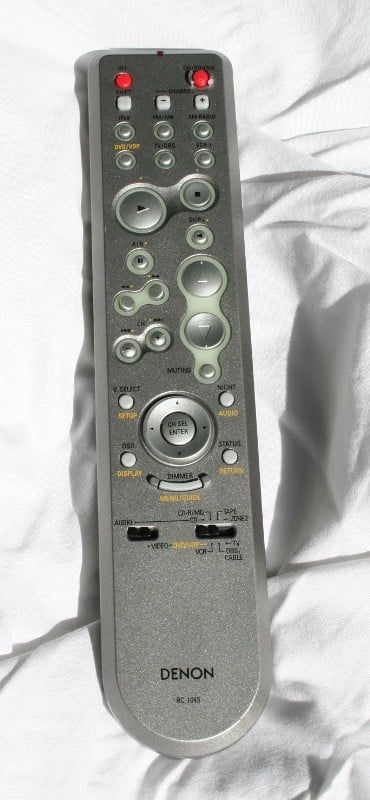 Remotes, I love to hate
them. There are a lot of reasons (mostly because they are an afterthought and
universally stink) but in the case of the Denon AVR-2307CI I’m finding a lot to
like here. First of all, it is shaped like a scrap piece of 1”x3” with
absolutely no ergonomics. It’s ugly, grey, the mute button is too close to the
“night mode” button, and not back lit (well, kinda – it has some
glow-in-the-dark material around a few of the buttons but it wasn’t until I
took the remote outside that it absorbed enough light to actually glow – and
this was after weeks of testing). The
last one is really the only thing that brings it down in the ratings for me.
Why? A number of reasons:
Remotes, I love to hate
them. There are a lot of reasons (mostly because they are an afterthought and
universally stink) but in the case of the Denon AVR-2307CI I’m finding a lot to
like here. First of all, it is shaped like a scrap piece of 1”x3” with
absolutely no ergonomics. It’s ugly, grey, the mute button is too close to the
“night mode” button, and not back lit (well, kinda – it has some
glow-in-the-dark material around a few of the buttons but it wasn’t until I
took the remote outside that it absorbed enough light to actually glow – and
this was after weeks of testing). The
last one is really the only thing that brings it down in the ratings for me.
Why? A number of reasons:
- The buttons for the volume, directional arrows, and play/stop/channel/pause/etc are easily remembered and located – even in the dark – based on their shape and location.
- The remote has a good weight to it which I find to be reassuring in this age of disposable accessories and planned obsolescence.
- But most of all because there is a second control panel under a cover on the back of the remote.
The second panel is great in that it houses all the inputs buttons on the front plus a few that aren’t, the DSP and Surround mode buttons, Zone 2 power, and the System Menu button. This has a number of glorious applications in my mind including:
- The ability to “hide” some inputs from unknowledgeable guests and prying children
- It keeps most of the setting buttons away from everyone else (an extra layer of protection above the Setting Lock in the menu)
- It is just a nice elegant way to free up real estate on the front of the remote
Now however un-ergonomic the shape of the remote is, using the back makes it worse. But as they’ve mostly put buttons back there you a) don’t want people to have access to or b) won’t use very often, I’m OK with it. My wife hates the remote (says it isn’t as responsive as she’d like) but all in all, I like this sneaky little remote.

Denon AVR-2307CI: Listening Tests, Recommendations
There are a lot of different listening tests that a receiver needs to go though. Rather than try to summarize up front I’m just going to take you through each one. Before that, let’s talk about power. The Denon had no problem pushing my Axiom m60 v2’s (not exactly a hard load). For most people in the market for an $800 receiver, this should be more than adequate. From a sonic standpoint, I’m hearing no real difference between this and my Denon AVR-3805 (no surprise there). For 90% of the users out there, this receiver will have more than enough power reserves.
Movie: Immortel (ad vitam) – Dolby Digital Stereo to Prologic IIx Conversion
 When you are setting up your
receiver, and you need to view a source to ensure that you’ve got everything
hooked up correctly, do yourself a favor and make sure it is playing a movie
that you’re familiar with. While I was hooking up the Denon AVR-2307CI for the
first time, I grabbed the closest movie to me, Immortel, and stuck it in. It is an odd mix of CGI and human actors
all set in a somewhat confusing future. Given all the special effects and the
money they must have cost, I assumed they would have a surround track. Not the
case. It was only presented in Dolby Digital 2.0. Of course, I thought I had
something set wrong on the OPPO DV-970HD or on the Denon setup menu.
Eventually, I checked the ‘net and found out it was the disc.
When you are setting up your
receiver, and you need to view a source to ensure that you’ve got everything
hooked up correctly, do yourself a favor and make sure it is playing a movie
that you’re familiar with. While I was hooking up the Denon AVR-2307CI for the
first time, I grabbed the closest movie to me, Immortel, and stuck it in. It is an odd mix of CGI and human actors
all set in a somewhat confusing future. Given all the special effects and the
money they must have cost, I assumed they would have a surround track. Not the
case. It was only presented in Dolby Digital 2.0. Of course, I thought I had
something set wrong on the OPPO DV-970HD or on the Denon setup menu.
Eventually, I checked the ‘net and found out it was the disc.
Some stereo sources lend themselves well to surround sound decoding, others don’t. The difference? You’ll keep checking the display of the receiver to make sure that it wasn’t encoded in surround. Immortel, was one of those cases where I would have sworn that the disc was surround. Ships that flew over my shoulder on the screen had their sound effects follow them perfectly. Off-screen talking was well anchored and, when the camera panned to them, moved convincingly in space. For one of the few times in my life, I didn’t feel like I was corrupting the listening experience by forcing a surround mode on a two-channel recording. I really don’t think they could have done much better with a dedicated surround track. It was that good. The movie, on the other hand, kinda stunk – mostly because the CGI was weird and out of place, the story disjointed, and the history and characters either flat or completely missing. Funny though, it wasn’t until the end of the movie that I felt this way. I kept expecting everything to be explained. It wasn’t.
CD: Rives Test CD 2 (Mapleshade Recording) – DSP modes
 Honestly, I’m more of a “purity of encoding” kind of guy. If it was
encoded in stereo, I listen to it in stereo (well, 2.1 – I let the receiver
split off the low frequencies to the sub), if it is recorded in Dolby, I use
Dolby (rather than try to force DTS or some DSP). As such, DSPs and me
generally don’t spend a lot of quality time together. But for the purposes of
this review, I’ll just suck it up and bear through it. I decided that what I
needed as a very short, high quality two-channel piece of music that had enough
dynamic range and variation to be a good test. Enter the Mapleshade snippets at
the end of the Rives Test CD 2. I chose the last track on the CD, Sunny Sumter Nick of Time for a lot of reasons,
mostly because it had vocals. At 95 seconds, it was the perfect length so I set
it on repeat and went to work. Here are my listening impressions from each of
the DSPs offered on the Denon AVR-2307CI:
Honestly, I’m more of a “purity of encoding” kind of guy. If it was
encoded in stereo, I listen to it in stereo (well, 2.1 – I let the receiver
split off the low frequencies to the sub), if it is recorded in Dolby, I use
Dolby (rather than try to force DTS or some DSP). As such, DSPs and me
generally don’t spend a lot of quality time together. But for the purposes of
this review, I’ll just suck it up and bear through it. I decided that what I
needed as a very short, high quality two-channel piece of music that had enough
dynamic range and variation to be a good test. Enter the Mapleshade snippets at
the end of the Rives Test CD 2. I chose the last track on the CD, Sunny Sumter Nick of Time for a lot of reasons,
mostly because it had vocals. At 95 seconds, it was the perfect length so I set
it on repeat and went to work. Here are my listening impressions from each of
the DSPs offered on the Denon AVR-2307CI:
- 7 Channel Stereo (plays the stereo source in all the speakers – all left speakers get the left channel etc) - This is really a mode for a party where you’re looking for an expansive sound. I’ve found that if you want to impress your friends with your new surround sound system, use this DSP (mostly because the surrounds are much louder than usual). There isn’t much of the way of a soundstage or imaging but there isn’t supposed to be. It is loud thoughout.
- Rock Arena (supposed to recreate the atmosphere of a live concert in an arena) – Apparently “live concerts in an arena” sound like echo chambers. Tons of hold over of each and every note/word. The rear speakers are used to pull the sound around you. I’m not really sure what application I’d recommend this mode for… it just sort of sounds weird.
- Jazz Club (recreates the atmosphere of a live concert in a club with low ceilings, hard walls and the artist just in front of you) – Given the nature of the track, this was really the best choice. When I initially switched from stereo to “Jazz Club” it sounded a bit strange but it took only seconds for it to sound mostly OK. There is still a lot of holdover and echo but it is not nearly as bad. With the right music, this isn’t a bad choice. Test it out with a Jazz or ballad track of your choice and see what you think.
- Mono Movie (takes a mono track and expands it out to 5/7.1 speakers) – I don’t own a mono anything so you’re on your own here.
- Video Game (provides a rich sense of presence for video games) – With the next-generation of consoles (PS3, Xbox 360) sporting digital outs and 5.1 surround, this mode is becoming less and less useful. Even you Wii owners would do better to use Dolby Pro Logic as the Wii is optimized for it. This mode is even more “echo-y” than Rock Arena (didn’t think that was possible) and it softened the sound a little. Thinking back to some of the music in the SNES days, this might not be such a bad thing. When you are playing your legacy games, give it a try. I imagine that it will work really well with some games but not with others.
- Matrix (recreates music sources recording in stereo with an enhanced sense of expansion) –Finally, a good DSP! I didn’t think they existed! This is the first DSP I’ve EVER heard that left the vocals alone and focused on pulling the music around you. And it worked. Very well. Try it. I’m going to be using it a lot from now on.
- Virtual (used to enjoy surround sound with only front speakers or when using headphones) – When using this mode with the Axiom m60 v2’s, I found that the high-end tended to be a bit attenuated and flat. The soundstage took a big step back, and the overall presentation was just a little too muffled and compressed sounding. Through the Denon AH-D1000 headphones, I found that there weren’t as many detrimental effects on the sound. It did sound different than the straight stereo presentation but I don’t think I’d call it “Virtual” anything.
DVD-A: Lowen & Navarro – Carry on Together – Auto EQ Test
 To test the Auto EQ’s sound, I decided to grab
a high quality recording from AIX Records – Lowen & Navarro Carry on Together. I had heard a lot
about AIX but I didn’t know much about their offerings until I picked this up.
WOW! Nice high quality DVD-A. I am really impressed. But I really wanted to
test out the Auto-EQ on a good quality multi-channel track to see how it
performed. Using “Off” as my baseline, I went ahead and flipped the EQ between
flat, front, and normal to see how it affected the music playback:
To test the Auto EQ’s sound, I decided to grab
a high quality recording from AIX Records – Lowen & Navarro Carry on Together. I had heard a lot
about AIX but I didn’t know much about their offerings until I picked this up.
WOW! Nice high quality DVD-A. I am really impressed. But I really wanted to
test out the Auto-EQ on a good quality multi-channel track to see how it
performed. Using “Off” as my baseline, I went ahead and flipped the EQ between
flat, front, and normal to see how it affected the music playback:
- Flat – Significantly less bass. Presentation a bit more forward and immediate. Other than the bass suckout, this setting seemed to add a little without being detrimental in any way.
- Front – It was really hard to hear a difference between this mode and Off. That probably had to do with the recording of the music. Since the Front Left and Right channels are unmodified by this setting, if the music relies too heavily on them, the difference might be hard to detect. The only thing that I could say definitively is that a) the bass isn’t as reduced as the other settings and b) the surrounds seem a bit muted compared to the other settings.
- Normal – Sounded a little drier than OFF… maybe clearer. Seemed to lack some of the warmth of the OFF presentation. Definitely a little crisper. As with flat, significantly less bass.
Not to steal a catchphrase, but I’m a kind of “set it and forget it” kind of guy. If it were me, I’d copy down the settings from the Flat setting and transfer them as best as possible to the Manual EQ screen (bumping up the bass setting on the lowest frequency) and turn it on for all inputs. But that’s just me.
Recommendations
With a slew of new receivers coming out, it is hard not to think about Dolby TrueHD and DTS Master Audio. But this receiver isn’t really meant to compete with that. Nor does it need to. I know that people are all, “I wouldn’t buy another receiver until it can decode the new formats,” but that doesn’t make any sense. Over HDMI, the player does the decoding, the receiver recognizes it as an uncompressed PCM multi-channel input (as if you hooked up the 8 analogue cables) and that’s it. Why does it need to decode? It doesn’t. Get over it.
The manual is written like they took each of the section names, wrote it on a flash card, threw the whole lot of them up in the air, and organized the manual based on the order they were picked up. Why oh why can’t Denon manuals take you through the setup menu in order? Why must we be redirected to different pages 5 or 6 times when researching one setting? Why?
Denon AVR-2307CI: Conclusion
Denon is
known for solid offerings and the AVR-2307CI is no different. Plenty of power,
great sound, tons of configuration options, HDMI, Auto EQ that almost works
right, not stuffed to the gills with DSPs and other stuff you won’t use… This
is a pretty great little package. If I was on the market for a new receiver and
I didn’t want to break the bank, this one would be at the top of my list. You
end up with this receiver and you’ll be sitting pretty for years to come. Just
make sure your players can do the HD audio decoding for you.
Denon AVR-2307CI
MSRP: $799
Denon Electronics
100 Corporate Drive
Mahwah, N.J. 07430-2041
About Denon
Electronics
Denon is a world leader in the manufacture of the highest quality home theater,
audio and software products. Denon is recognized internationally for
innovative and groundbreaking products and has a long history of technical
innovations, including the development and first commercialization of PCM
digital audio. Denon Electronics is owned by D&M Holdings Inc.
About D&M
Holdings Inc.
D&M Holdings Inc. (TSE II: 6735) is based in Tokyo and owns the Denon,
Marantz, McIntosh Laboratory, Boston Acoustics, Snell, D&M Professional,
ReplayTV, Rio, and Escient brands. Denon, Marantz, McIntosh and D&M
Professional are global industry leaders in the specialist home theater,
audio/video consumer electronics or professional audio markets, with a strong
and long-standing heritage of manufacturing and marketing high-performance
audio and video components. Boston Acoustics, with its signature Boston
Sound, is a leader in premium loudspeakers for home and audio markets.
Snell is a super premium speaker brand. The ReplayTV, Rio and
Escient brands represent award-winning technologies in digital home
entertainment. Additional information is available at www.dm-holdings.com.
The Score Card
The scoring below is based on each piece of equipment doing the duty it is designed for. The numbers are weighed heavily with respect to the individual cost of each unit, thus giving a rating roughly equal to:
Performance × Price Factor/Value = Rating
Audioholics.com note: The ratings indicated below are based on subjective listening and objective testing of the product in question. The rating scale is based on performance/value ratio. If you notice better performing products in future reviews that have lower numbers in certain areas, be aware that the value factor is most likely the culprit. Other Audioholics reviewers may rate products solely based on performance, and each reviewer has his/her own system for ratings.
Audioholics Rating Scale
 — Excellent
- — Very Good
- — Good
- — Fair
- — Poor
| Metric | Rating |
|---|---|
| Multi-channel Audio Performance | |
| Two-channel Audio Performance | |
| Bass Management | |
| Build Quality | |
| Fit and Finish | |
| Ergonomics & Usability | |
| Ease of Setup | |
| Features | |
| Remote Control | |
| Performance | |
| Value |
As Associate Editor at Audioholics, Tom promises to the best of his ability to give each review the same amount of attention, consideration, and thoughtfulness as possible and keep his writings free from undue bias and preconceptions. Any indication, either internally or from another, that bias has entered into his review will be immediately investigated. Substantiation of mistakes or bias will be immediately corrected regardless of personal stake, feelings, or ego.
View full profile