
Visual Apex ProjectoScreen120 Outdoor Projector Screen Review
VAPEX ProjectoScreen120
- Product Name: ProjectoScreen120 Outdoor Projector Screen
- Manufacturer: Visual Apex
- Performance Rating:

- Value Rating:
- Review Date: March 17, 2013 17:05
- MSRP: $ 199
- Viewable Area: 99(w) x 54(h) inches
- Screen Diagonal w/ Border: 120 inches
- Screen Aspect Radio: 16:9
- Weight: 26 lbs
- Portable Bag Dimensions: 40"x8"x8"
Pros
- Big beautiful image from a portable screen
- Sturdy construction
- Good value
Cons
- Challenging assembly for first time install
VApex ProjectoScreen120 Build Quality and Installation
Visual Apex (a.k.a. VAPEX) is no stranger to the Audioholics website. In fact, we often acquire projector review samples from them as their very impressive online store carries most of the major brands. Visual Apex has the capacity and distribution line to not only offer indoor home theater options, but outdoor ones as well. This is why I turned to them for guidance while I was looking for a portable screen options to host Audioholics presentations. They suggested the ProjectoScreen120, which is their own house brand portable screen.
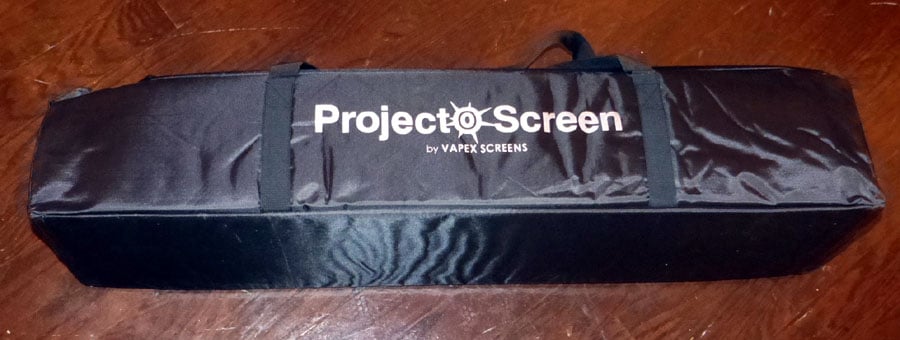
VAPEX ProjectoScreen120 Bag
My first glimpse of the VAPEX ProjectoScreen120 outdoor projector screen impressed me—and that from just the packaging alone. It came housed in a compact bag that was easy to carry and not too heavy. It weighs around 26 lbs.
The frame of the screen is made of square aluminum tubing that looks lightweight but stable. The premium, high-resolution Matte White screen fabric looks very professional and has a 3.5 inch border designed to let you overscan the image slightly and really fill the screen. It's also UV-protected, mildew-resistant, flame-retardant and has anti-static properties. but the best thing about this screen is that it’s washable! That’s right, if you pitch a screen outdoors for a kids party and they spit watermelon seeds at it or spill their soda, just take the hose and gently wash it down. You can even use soapy water for extra dirty clean ups. The screen also comes in its own black canvas bag for further protection.
Watching movies on a windy day? No problem, the ProjectoScreen120 comes with "tent" stakes and guide cables for additional stability if needed. This also comes in handy for non-flat outdoor surfaces.
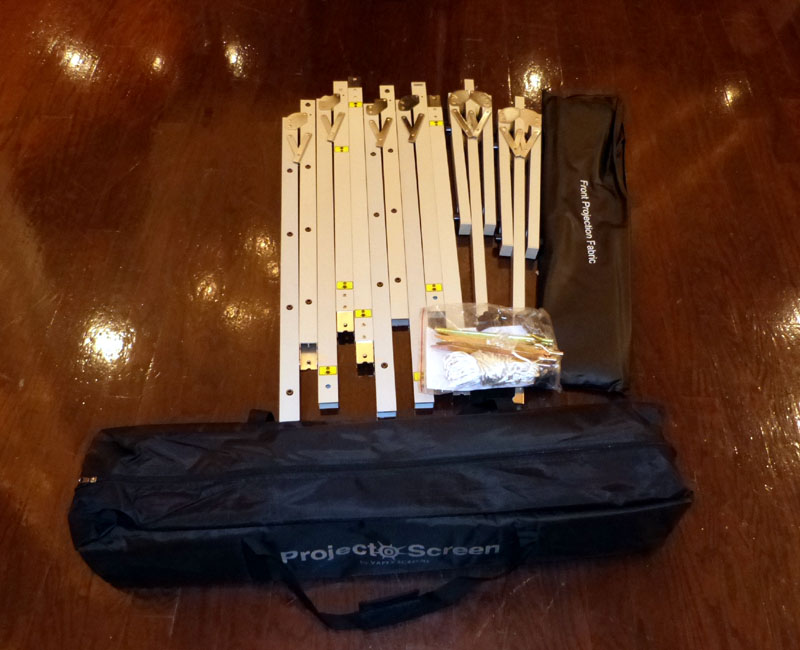
Here you can see we laid out all of the VAPEX Projectoscreen120 parts on a smooth clean surface.
The frame pieces include 2 frame legs, 2 corner pieces and 4 straight legs. There are also 9 black/silver screws knobs (with an extra supplied as a spare.) These are used to secure the frame together during assembly. The screen came neatly folded and stowed in its own canvas cover for protection. While the aforementioned stakes and string harness were provided, we obviously didn't need to use them for our indoor testing.
Installation
For those new to these types of projection screens, we recommend watching the handy installation video produced by Visual Apex. The video is a bit limited, and it won’t give you all of the guidance necessary to assemble this screen, but it heads you in the right direction. Visual Apex also gave us some guidance prior to the review. One thing we learned was to NOT engage the corner braces before assembling the frame or stretching the screen material to the frame. You want to engage the corners at the very end. This step is a bit tricky so you may want to solicit a helping hand at least for your first assembly until you get the hang of it. For assembly, we laid the frame pieces on a flat wood floor and began interconnecting them. Most of them joined without a hitch, but a few were very tight and hard to push together (and even more difficult to pull apart after usage.) I suggest bringing a rubber mallet (and maybe some axle grease!) just in case you run into this difficulty.

ProjectoScreen120 Frame Assembly
After connecting most of the frame pieces, we unrolled the screen with the black side facing down and began snapping it to the frame. We tried our best to not fully assemble the frame until all of the buttons on the screen snapped into the frame but it was nearly impossible to keep the screen buttoned down while trying to finish assembling the frame as Visual Apex recommends. We had to stretch the screen and snap it down while someone else held the frame in place. This was a bit tricky but it was a good thing we had a helping hand to make it easier to complete the assembly. It’s likely that this process would become easier with each install as the screen becomes slightly less stiff and breaks in from usage.
Reviewer's Note: Use care when snapping the metal connector pieces with the leg corners to avoid scraping your fingers. In fact, it would be good measure to wear gloves when assembling the frame of this screen.
Once the entire screen is snapped over the frame, you can tighten down all of the screw knobs and expand the legs to stand the screen upright. If you want to use the screen outdoors, we'd recommend installing the stakes and string harness for greater stability. It doesn't take much wind to turn a projector screen into a giant sail! one other fun note: You can also hang the ProjectoScreen120 on a wall or suspend it from a cable for even more installation options.
Visual Apex informed us there may be a prominent wrinkle in the screen (usually) down the center of the material when you first stretch it onto the frame. While we've noticed this before with other screens, we actually didn’t observe it with this screen. If you do encounter a wrinkle or fold line, just know that it will go away entirely in a short amount of time, especially if you have the screen outside and exposed to direct sunlight (and if you want to speed the process, a hair dryer works—but don't overdo it!) It’s also worth mentioning that the wrinkles, even if they are present, go mostly unnoticed once there is a projected image.
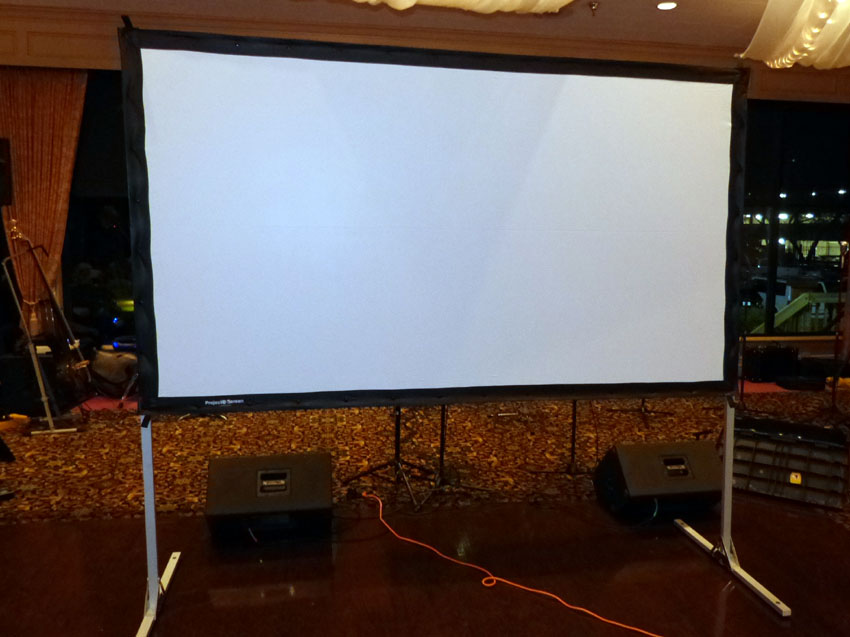
VAPEX ProjectoScreen120 Fully Assembled
VApex ProjectoScreen120 Testing and Conclusions
 For our presentation, we utilized the compact, but excellent-performing Epson
H331A LCD business projector and our laptop connected via HDMI courtesy of
Impact Acoustics.
For our presentation, we utilized the compact, but excellent-performing Epson
H331A LCD business projector and our laptop connected via HDMI courtesy of
Impact Acoustics.
The Projectoscreen120 is quite an impressive sight once it's fully assembled. 120” diagonal is a huge screen indoors and perhaps overkill for hosting small business presentations. Of course, we’ve always felt that with video: bigger is almost always better. The Projectoscreen120 screen was very taut. We almost felt like we were projecting images on an upscale fixed frame screen used in a home theater environment. The attendees at our event were impressed with the presentation and the event was kicked off with great success. We are looking forward to using the Projectoscreen120 at future Audioholics functions.
Conclusion
Whether you need a portable screen for business functions or outdoor parties, the Projectoscreen120 from Visual Apex is a great choice. It’s relatively easy to setup once you get the hang of it. It offers excellent build quality and performance and is quite affordable. Next time you host an outdoor kids party and want some entertainment, why not spice things up with a monster sized projector screen, an outdoor sound system and a good movie or music concert? Heck you can even throw on some embarrassing and obscure vintage family pictures for all to see blown up on a big screen.
For more information, visit Visual Apex
The Score Card
The scoring below is based on each piece of equipment doing the duty it is designed for. The numbers are weighed heavily with respect to the individual cost of each unit, thus giving a rating roughly equal to:
Performance × Price Factor/Value = Rating
Audioholics.com note: The ratings indicated below are based on subjective listening and objective testing of the product in question. The rating scale is based on performance/value ratio. If you notice better performing products in future reviews that have lower numbers in certain areas, be aware that the value factor is most likely the culprit. Other Audioholics reviewers may rate products solely based on performance, and each reviewer has his/her own system for ratings.
Audioholics Rating Scale
 — Excellent
- — Very Good
- — Good
- — Fair
- — Poor
| Metric | Rating |
|---|---|
| Build Quality | |
| Ergonomics & Usability | |
| Ease of Setup/Programming/Integration | |
| Features | |
| Fit and Finish | |
| Performance | |
| Value |
Bertha DellaSala, a Registered Nurse with a BSN, specializes in Preventative and Occupational Health, particularly in Ergonomics and Hearing Loss Prevention. Her expertise has been a valuable addition to Audioholics, where she combines her passion for home theater with her dedication to helping enthusiasts enjoy their hobby safely and protect their most important asset: their hearing.
View full profile