
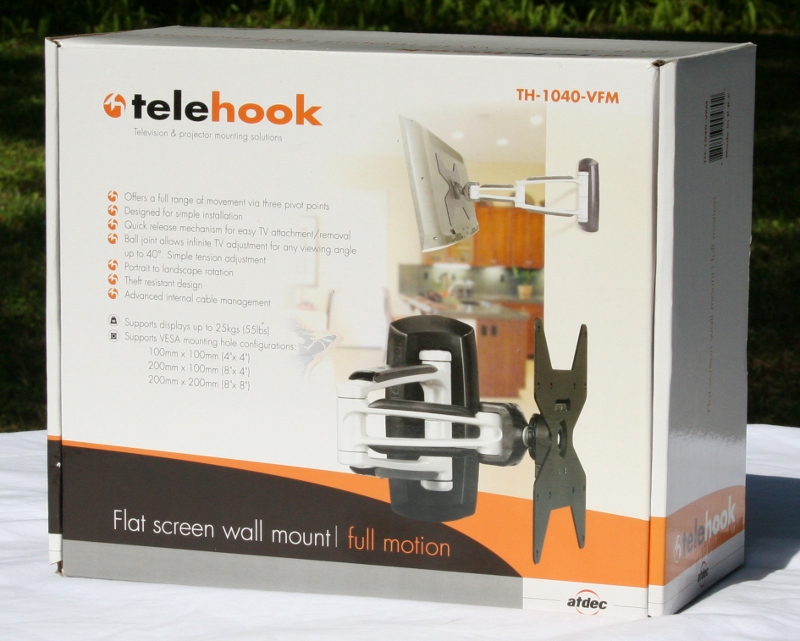
Atdec Telehook TH-1040-VFM Display Mount Review
Atdec Telehook TH-1040-VFM
- Product Name: Telehook TH-1040-VFM Display Mount
- Manufacturer: Atdec
- Performance Rating:


- Value Rating:
- Review Date: April 29, 2010 20:30
- MSRP: $ 99.99
-
Offers a full range of movement via three pivot points
-
Designed for simple installation
-
Quick release mechanism for fast TV attachment/removal
-
Ball joint allows infinite TV adjustment for any viewing angle up to 40°. Simple tension adjustment
-
Portrait to landscape rotation
-
Supports VESA mounting hole configurations: 100mm x 100mm (4" x 4"), 200mm x 100mm (8" x 4"), 200mm x 200mm (8" x 8")
-
Supports displays up to 25kgs (55lbs)
-
TV tilt adjustment +20°/-5°
-
TV horizontal adjustment of -/+5°
-
Maximum reach from wall 444mm (17½")
-
Minimum distance from wall 102mm (4")
-
Advanced internal cable management
-
Theft resistant design
-
Masonry and timber stud wall mounting hardware included
Pros
- Easy installation
- Great articulation
- Great aesthetics
- Integrated wire management
- Versatile - holds up to 55lbs, VESA 100/200 compatible
Cons
- Single connection point
- Closest to the wall it can retract is 5"
- Expensive
TH-1040-VFM Build Quality
There comes a time in everyone's lives where they run out of space. It might be in the closet, the tool shed, or the office, but it is bound to happen. If you are into a certain area, if you tend to collect more than you need, it is inevitable. If that "something" is shoes... well, you're going to need more closet space, if it is tools, a bigger shed, but if it is office equipment, it's a bigger desk or office. But what if you can't afford to get a bigger office, more closet space, or a larger shed? What if you have to make due with what you have?
The obvious solution is organization. You have to make better use of the space that you have. If you can maximize that, then you can keep your collection at a certain (or even growing) size without having to spend a ton on major upgrades or renovations. My problem was my office - specifically my desk. You see, podcasting equipment takes up a lot of room. I've got speakers, mics, preamps, and compressors to deal with. That doesn't include all the normal gear like my modem, router, keyboard, printer, and laptop. Add in a few pairs of headphones, a notepad and random writing utensils, a dock for my wireless mouse, and all the other clutter and you can see that space really is at a premium. Recently, I'd upgraded from an aging CRT (so old I bought it when you could get 3rd party MacIntosh computers) to a flat panel. That was a help but I still needed (my wife would put "needed" in quotes but I don't agree) more. Wall mounting the new flat panel was the perfect solution.
First Impressions and Build Quality
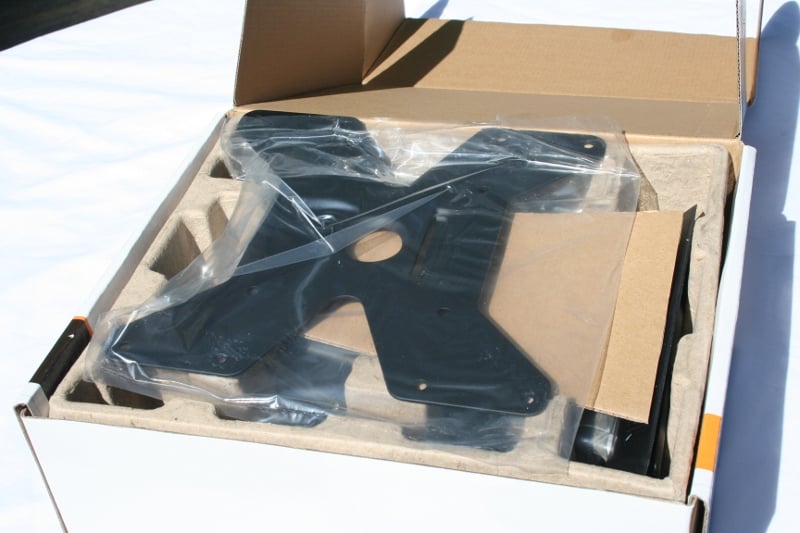
The Atdec Telehook TH-1040-VFM came in a rather bulky but attractive box. The TH-1040-VFM was protected by loads of cardboard and covered in a plastic bag to protect it from the elements. With it came two multi-section bags. One contained display mounting hardware including screws of various sizes and washers. The second contained everything you'd need to mount the TH-1040-VFM to the wall. Also included in the packaging is a drill guide, a tightening tool, and an installation guide.
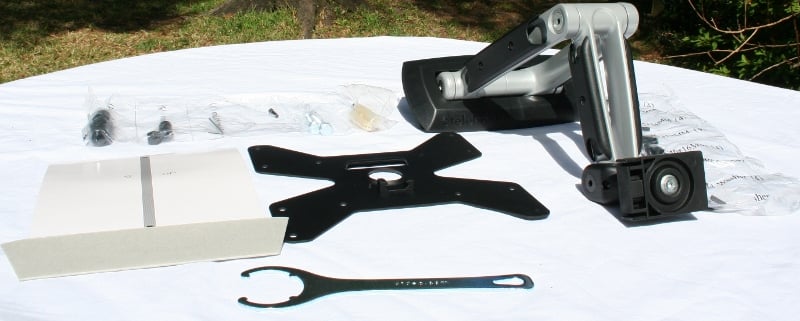
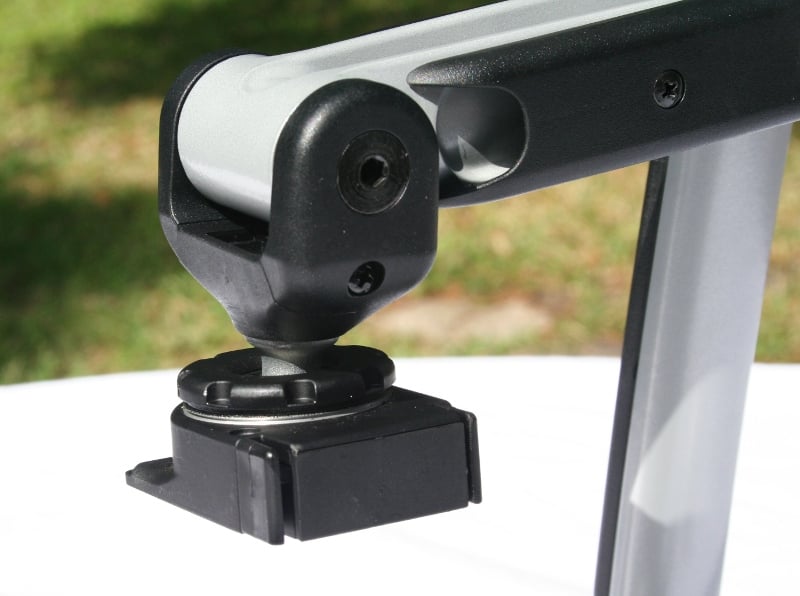
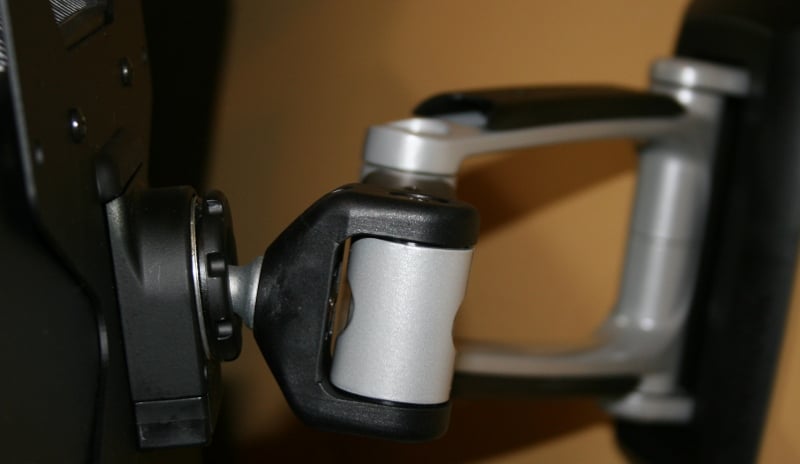
The TH-1040-VFM is an attractive mount that comes in a combinaton silver and black color scheme. The articulated arm has three pivot points - one at the wall, one in the middle of the arm, and the last just behind the mounting plate. Between the last pivot joint is a ball joint for up to 20 degree (one direction) angling and 360 degree rotation. This gives the TH-1040-VFM a range of motion that needs to be experienced to be believed (check out the Atdec TH-1040-VFM page for a Flash movie showing it in action).
 While
the main structure is all silver, the display mounting plate, the
last pivot joint, and the wall cover are all black. There are also
black plastic trim/coverings that run the length of the arms. This
black and silver motif is very industrial in design and goes well in
conjunction with most flat panel displays. My overall first
impression of the Telehook TH-1040-VFM mount was one of quality. It
isn't overly heavy but instills a feeling of something that is built
to last. The plastic cover for the wall mount was the least
impressive part of the mount in that it felt a little flimsy but,
then again, it's a cover. It's not like it is a structural element.
While
the main structure is all silver, the display mounting plate, the
last pivot joint, and the wall cover are all black. There are also
black plastic trim/coverings that run the length of the arms. This
black and silver motif is very industrial in design and goes well in
conjunction with most flat panel displays. My overall first
impression of the Telehook TH-1040-VFM mount was one of quality. It
isn't overly heavy but instills a feeling of something that is built
to last. The plastic cover for the wall mount was the least
impressive part of the mount in that it felt a little flimsy but,
then again, it's a cover. It's not like it is a structural element.
TH-1040-VFM Installation
Rather than dwell on the aesthetics, I'd rather get right into the installation. I guarantee that you'll open up the TH-1040-VFM box and think, "I can do this, I don't need no stinking directions," and you're probably right. That said, you'll probably end up looking at them for a few of the specifics. To start with, the TH-1040-VFM is rated for a wide range of displays up to 55 lbs as long as they have the right VESA hole configuration (4"x4",. 4"x8", or 8"x8"). My monitor was only 21.5" and really wasn't taxing the mount at all.
There are a few things you'll need to consider when choosing this mount. First, the TH-1040-VFM requires either a stud or concrete anchor point. Since it comes from a single point, you'll want to make sure you have something near where you'd like the display to be mounted. That being said, you don't necessarily want a stud directly behind your preferred position. If you look at the mount, you'll notice that it doesn't fold back to the center. Basically, the point of connection to your display will line up very close to the edge of the wall cover. This means that the center of your display can be pushed back so that it is about 2" off to the side of the center of the wall mount. This is not a flaw at all - it allows the arm to fold back into itself for the flushest possible orientation. From a planning standpoint, the perfect stud placement would be 2" to one side of the place where you'd want your display centered.
As long as you don't really care how flush the display goes to the all (and if you did, you probably wouldn't have purchased a TH-1040-VFM in the first place), you've got a lot of options. The arm is very articulate and can extend up to 17" off the wall (straight out). This means that if your wall stud is a few inches (or even more) off from the "perfect" orientation, you'll still be able to get the display where you want it, it just won't be very flush when you do.
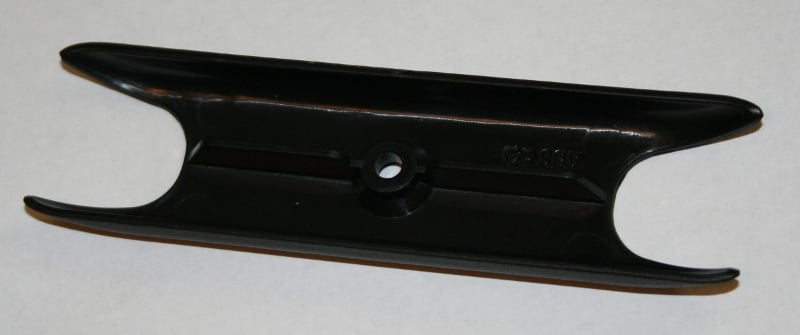
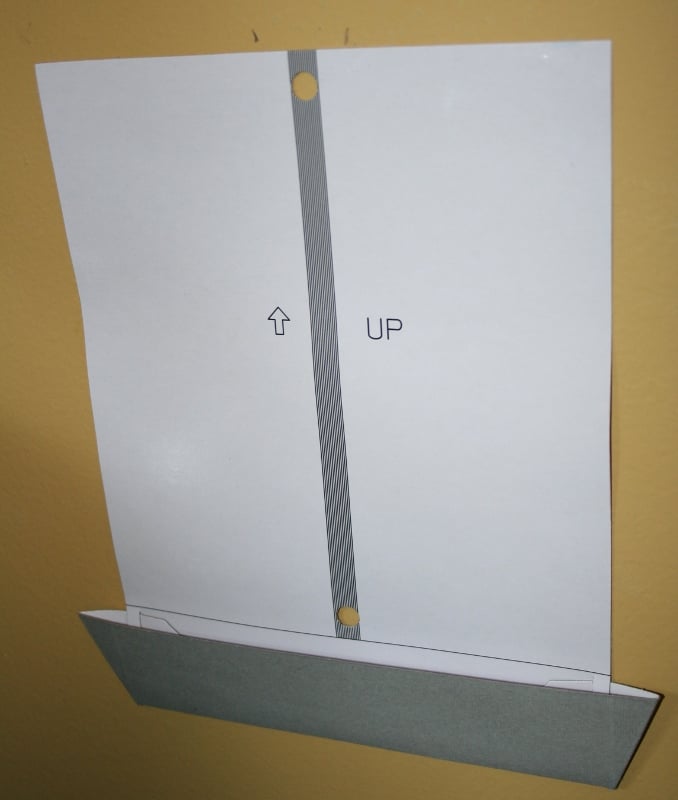 As
mentioned, there is a drilling guide included with the TH-1040-VFM.
This guide is constructed out of flimsy cardboard, has a pocket to
catch dust, and sticky strips on the wall to hold it in place. The
idea is that you locate your stud, orientate the guide, level it with
a torpedo level, and drill your holes. The sticky strips keep it in
place. In my experience, it worked slightly differently. I got it in
place, leveled it, stuck it to the wall, turned to retrieve my drill,
and turned back to find it on the floor behind the desk. It only
burned me twice before I decided to hold it in place. Other than the
sticky strips, the rest worked just fine (meaning the hole were
properly placed.
As
mentioned, there is a drilling guide included with the TH-1040-VFM.
This guide is constructed out of flimsy cardboard, has a pocket to
catch dust, and sticky strips on the wall to hold it in place. The
idea is that you locate your stud, orientate the guide, level it with
a torpedo level, and drill your holes. The sticky strips keep it in
place. In my experience, it worked slightly differently. I got it in
place, leveled it, stuck it to the wall, turned to retrieve my drill,
and turned back to find it on the floor behind the desk. It only
burned me twice before I decided to hold it in place. Other than the
sticky strips, the rest worked just fine (meaning the hole were
properly placed.
To install the TH-1040-VFM you're going to need a few tools:
-
Power Drill with the appropriate sized bit
-
Phillips Head Screwdriver
-
Level
-
Socket wrench (or socket bit for your drill which is what I used)
In my case, I was installing the mount into wood studs. For this you'll need a 9/32" bit but if you are installing into concrete you'll need a 7/16" bit for the masonry anchors included with the mount. After you install the mount on the wall with the included bolts, you pop the black cover over it. At first I thought I'd just press on it and it'd snap into place - and it did. Within moments, however, it'd snap right back off. Turns out I needed to put a bit more pressure (i.e. bang on it) to keep it in place. Once I did that, it stayed without a problem.
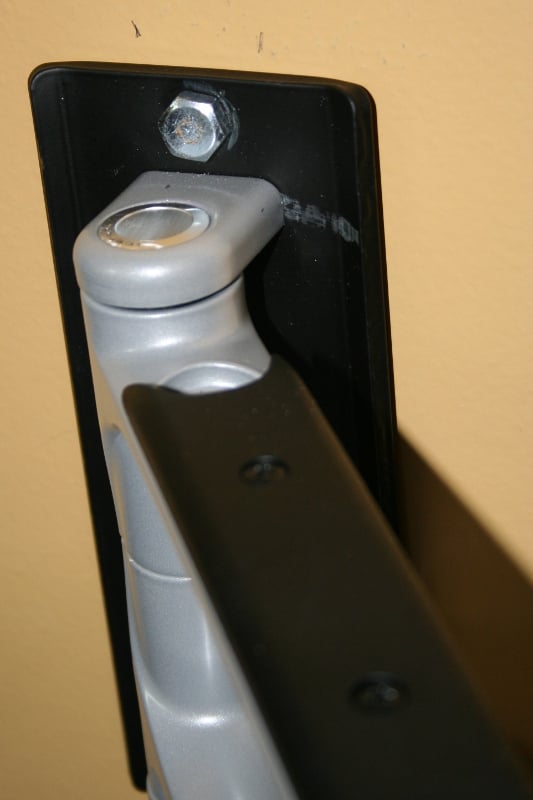
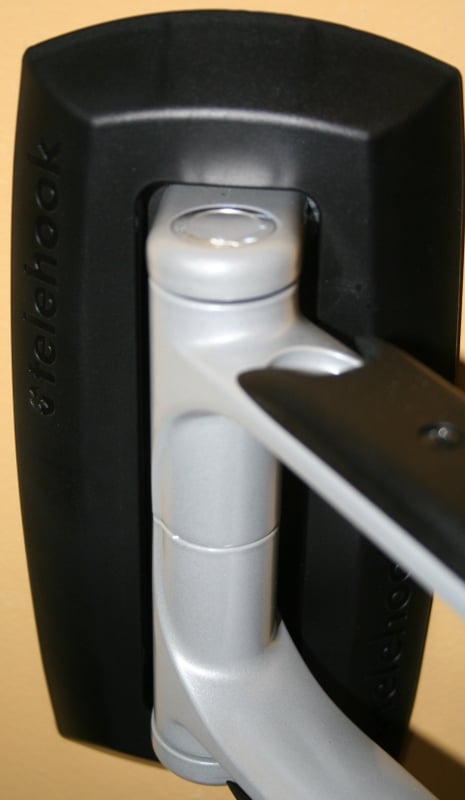
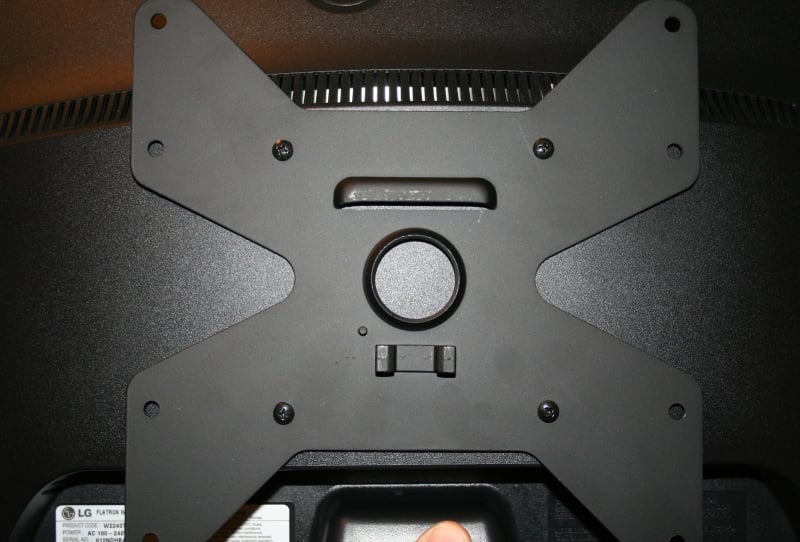
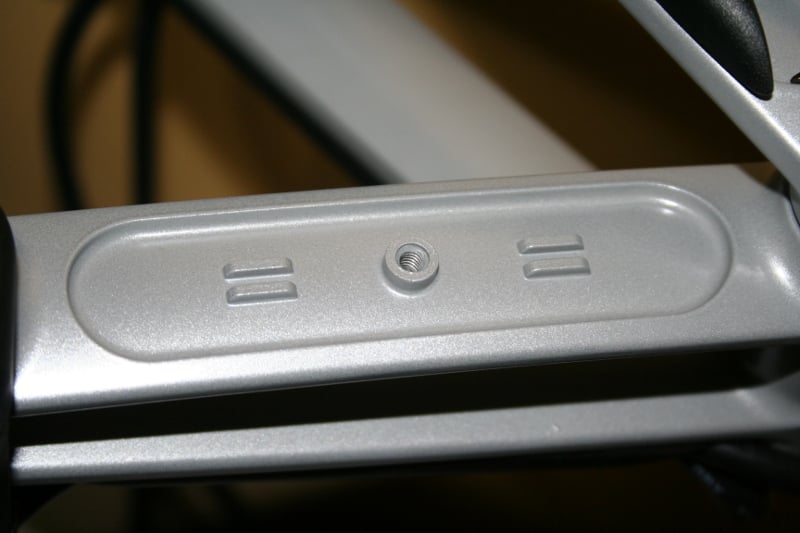
The next thing to do is to install the plate on your monitor. There is included hardware for all of that including various sized screws and washers. There are also spacers included in case you need to deal with an uneven mounting surface or recessed bolt holes. You can consult your user manual for the specifics of what you need or just eyeball it like I did. The only thing to be careful of is that the "cup" side of the plate is out and the opening is facing down. This part grabs the arm with the two protrusions on the other side used for the locking mechanism. As long as you've installed that correctly, you'll be fine.
The last thing you'll want to do is connect the display to the arm. This is done by sliding the plate onto the tab on the arm and pushing the protrusions into the locking mechanism. You'll notice that there is a little play in the connection which might concern you at first. This is where I actually had to read the manual. There is a locking screw that locks the two in place. While it is not really needed to keep the display on the arm, it does keep it from being removed and eliminates that play. To separate the arm and the display, remove the locking screw, depress the tabs on the locking mechanism on the arm, and tilt the monitor back. This will unlock it and you just need to lift it off.
Now that you have a mounted monitor, you're done right? Wrong. Don't forget wires. Luckily, Atdec didn't forget the wires either. Remember those plastic back covers on the arms? Those are actually wire tracks. With the removal of a screw or two you can run your wires down the arms. The longer arm near the wall has two screws and the shorter arm has only one. The longer arm has two plastic tabs that come down from the black plastic cover and insert into the arm. This helps keep the wires in place (on either side) and make it much easier to install the screws (especially upside down on the lower arms). The shorter arm doesn't have this and it is much harder to install the covers back especially when you are pushing the limits of what the covers can handle. Those limits are basically two wires about the size of a normal power cable. For me, that meant that on one side I could run a DVI and power cable but I had a heck of a time getting the cover on the smaller arm back on.

Atdec Telehook Use and Conclusion
I can't tell you how much I've been enjoying the TH-1040-VFM mount. I think the thing that I've been enjoying the most is the articulation. If you notice I mentioned how you needed to be careful about how you mounted the plate on the display but not how you mounted the arm to the wall. That's because of the ball joint at the end. I know that some people have a problem with the ball joint because they have a tendency to loosen up over time, but I haven't found that to be the case. The wrench that Atdec supplied for adjustments has been great. If I had a complaint about it, it would be that it is overly large and really can't be used for anything else. If I had a suggestion for Atdec, it would be to include some storage on their mount. With the TH-1040-VFM, the perfect spot would be the back of the plate. With the allen wrench they supply for the locking screw, I could just store that in the wire tracks without problem. The ball joint wrench is way too big for that.
If you are on the market for the TH-1040-VFM, you likely want articulation. You want to be able to pull your mount away from the wall. You might also want to be able to shift your display from landscape to portrait mode. The TH-1040-VFM can do all that without a problem. What it can't do is allow you to push the display too flush. The closest I could get the back of the display was just over 5". For some, that might be a problem but for me it wasn't. I wasn't worried about how close I could get the monitor to the wall, I was concerned with how close I could get it to me. With how good the TH-1040-VFM looks, I don't really care if people see it. It has such a good aesthetic, I'm proud to show it off.
At 17 inches of extension, that's pretty close to the user. I could basically decrease the distance between me and my monitor by half. If you are typing all day long like I do, this is a huge plus. If you are working with large graphics and pictures, it's even better. This way, you can physically zoom by moving it toward you rather than having to lean forward or magnifying the image.
Conclusion
![]() Let's
be honest, if you are going to pay upwards of a C-note for a mount,
you should get something for it. It should be the hottest, coolest
thing around. I don't know if the Atdec Telehook TH-1040-VFM
is that for you, but for me, it seems like a very reasonable price. I
did a quick search online and I couldn't find anything at any price
that has all of it's features (almost nothing has a ball joint). From
an ease of installation standpoint, the Atdec Telehook TH-1040-VFM is
tops. The only caveat is that you need to have a wall stud in the
vicinity. For just south of $100, you expect a lot. In my opinion,
the TH-1040-VFM delivers.
Let's
be honest, if you are going to pay upwards of a C-note for a mount,
you should get something for it. It should be the hottest, coolest
thing around. I don't know if the Atdec Telehook TH-1040-VFM
is that for you, but for me, it seems like a very reasonable price. I
did a quick search online and I couldn't find anything at any price
that has all of it's features (almost nothing has a ball joint). From
an ease of installation standpoint, the Atdec Telehook TH-1040-VFM is
tops. The only caveat is that you need to have a wall stud in the
vicinity. For just south of $100, you expect a lot. In my opinion,
the TH-1040-VFM delivers.
Atdec Telehook TH-1040-VFM Flatpanel Mount
$99.99
Atdec
Level
1, 26 Castlereagh St
Liverpool NSW 2170
Australia
Phone:
+61 (02) 8729 5000
About
Atdec
Atdec
is an Australian company that designs and manufactures flat screen
(LCD and plasma) mounting systems providing a better visual
experience in the home, office and public space. Established in 1998,
Atdec is Australia’s largest flat screen mounting company and a
world leader in mounting innovation and design. Exporting to over 15
countries in North America, Asia, Middle East and Europe, Atdec
product can be seen worldwide. Our mounting systems boast superior
design, unique features and product flexibility make our products
ideal for a broad range of applications in various markets including
commercial space and POS, home entertainment, education, digital
signage, healthcare, and the audio visual marketplace.
The Score Card
The scoring below is based on each piece of equipment doing the duty it is designed for. The numbers are weighed heavily with respect to the individual cost of each unit, thus giving a rating roughly equal to:
Performance × Price Factor/Value = Rating
Audioholics.com note: The ratings indicated below are based on subjective listening and objective testing of the product in question. The rating scale is based on performance/value ratio. If you notice better performing products in future reviews that have lower numbers in certain areas, be aware that the value factor is most likely the culprit. Other Audioholics reviewers may rate products solely based on performance, and each reviewer has his/her own system for ratings.
Audioholics Rating Scale
 — Excellent
- — Very Good
- — Good
- — Fair
- — Poor
| Metric | Rating |
|---|---|
| Build Quality | |
| Ergonomics & Usability | |
| Build Quality | |
| Features | |
| Fit and Finish | |
| Performance | |
| Value |
As Associate Editor at Audioholics, Tom promises to the best of his ability to give each review the same amount of attention, consideration, and thoughtfulness as possible and keep his writings free from undue bias and preconceptions. Any indication, either internally or from another, that bias has entered into his review will be immediately investigated. Substantiation of mistakes or bias will be immediately corrected regardless of personal stake, feelings, or ego.
View full profile