
Impact Acoustics Multi-Function Converter with Tuner and Picture in Picture Review
Impact Acoustics Multi-Function Converter
- Product Name: Multi-Function Converter
- Manufacturer: Impact Acoustics
- Performance Rating:


- Value Rating:
- Review Date: June 06, 2007 13:10
- MSRP: $ 119
-
Converts S-Video or composite video to VGA
-
181 channel cable ready tuner
-
Display home theater sources, gaming systems and camcorders on your flat panel
-
Use in a school dorm to turn a standard PC monitor into a television
-
MTS stereo output for a complete theater experience
-
Output resolution up to 1024 X 768 for 24 bit RGB true color
-
Plug-n-Play, no software required
Pros
- Completely cool
- Totally convenient
- Not at all reliant on MCE or Vista (yea!)
- Small and unobtrusive
Cons
- Terrible remote
- Picture in Picture a little small
- Can’t switch audio on the fly
- No digital cable or cable card support
- PC volume affected by the TV volume even when the unit is off
Impact Acoustics Multi-Function Converter Introduction
The first thing I thought when I saw the Impact Acoustics Multi-Function Converter with Tuner and Picture-in-Picture was, “Wow, that’s a mouth full!” I knew two things, first, that I had no idea what it was and what it did, and two, that there had to be a better name. Well, I now know what it is but I can’t say I’ve come up with a better name. In short the MFCwT&PnP (I don’t think that acronym is going to catch on) stands between your computer and your display. When activated, it mutes the volume from your computer, overlays a TV signal on your display, and sends the audio to your speakers. Sounds easy right? Well, what to call it? Computer hijacker? No people aren’t going to like the sound of that. How ‘bout TV Blaster? No that sounds a little too destructive. Ok, I’ve got it, TV Overlay for your Computer! Alright, I know, it isn’t any shorter than Multi-Function Converter. I’ll keep working on it.
Impact Acoustics Multi-Function Converter Build Quality and Setup
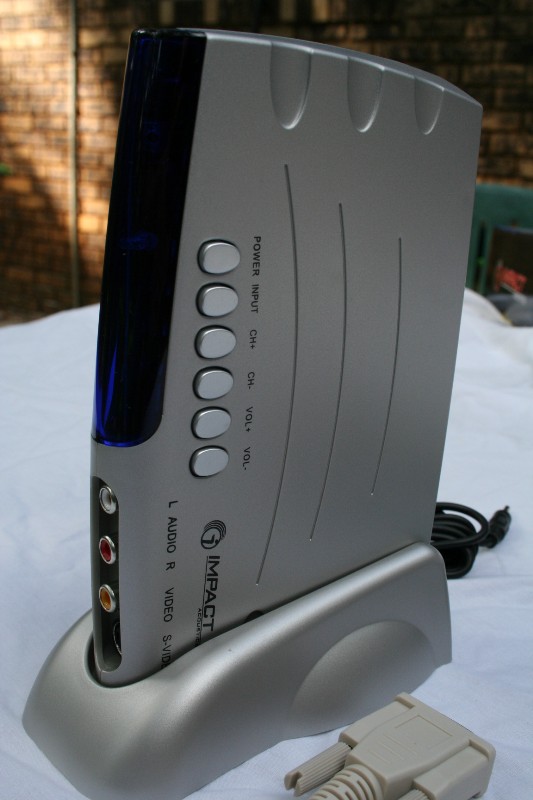
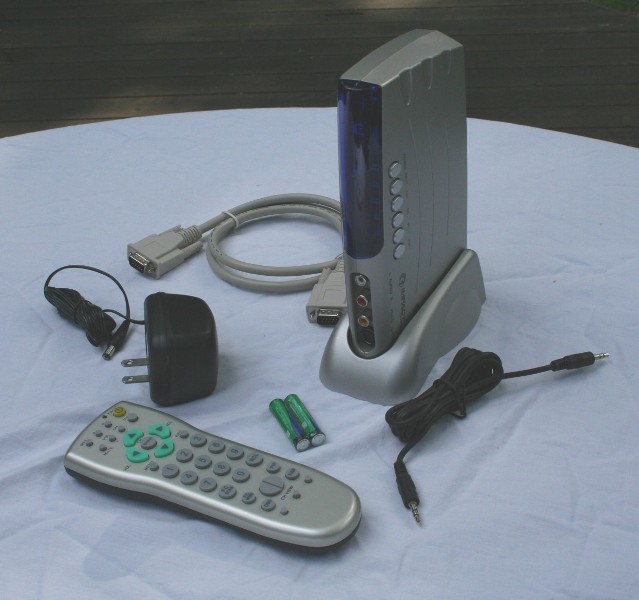 The Multi-Function Converter lives in a
little plastic grey housing with analogue audio, composite video, and s-video
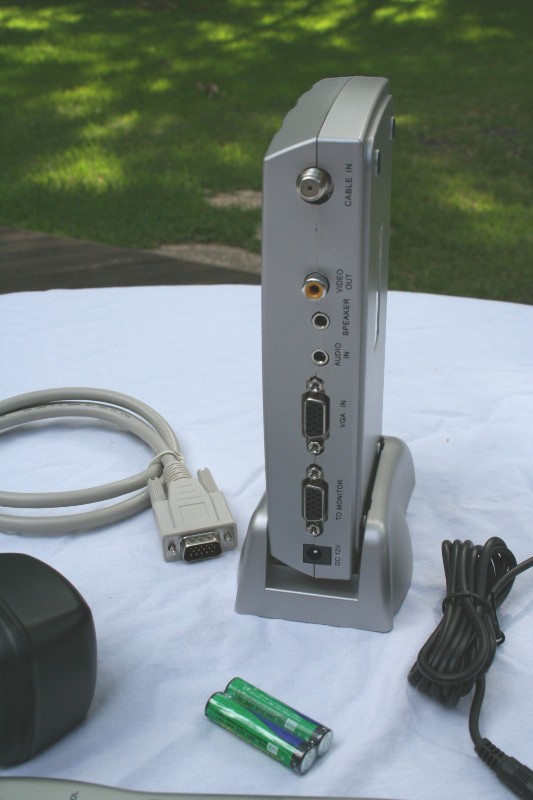
inputs on the front (they aren’t outputs) of the unit. On the “top” of the unit
are power, channel, volume, and an input button. The back of the unit has a
power cord receptacle, monitor in and outs, audio in and outs, composite video
out, and cable/antenna in. The unit is extremely light and can be setup
vertically or horizontally. For the vertical orientation, a small matching
plastic base is provided with two tabs to hold the unit in place. Personally,
I’d have liked the unit to snap into the base. The tabs may keep the unit in
place when it is moved back and forth, but if you raise the unit, the base
immediately falls off. The light weight of the unit means that the two VGA
cables you’ll most likely be using will have to be orientated carefully to keep
the unit from moving under the weight of the much heavier cable. If you
orientate the unit vertically (like I did) you’ll have to be especially
careful. It isn’t impossible to set it up securely but a heavier connected base
would definitely help.
The Multi-Function Converter lives in a
little plastic grey housing with analogue audio, composite video, and s-video
inputs on the front (they aren’t outputs) of the unit. On the “top” of the unit
are power, channel, volume, and an input button. The back of the unit has a
power cord receptacle, monitor in and outs, audio in and outs, composite video
out, and cable/antenna in. The unit is extremely light and can be setup
vertically or horizontally. For the vertical orientation, a small matching
plastic base is provided with two tabs to hold the unit in place. Personally,
I’d have liked the unit to snap into the base. The tabs may keep the unit in
place when it is moved back and forth, but if you raise the unit, the base
immediately falls off. The light weight of the unit means that the two VGA
cables you’ll most likely be using will have to be orientated carefully to keep
the unit from moving under the weight of the much heavier cable. If you
orientate the unit vertically (like I did) you’ll have to be especially
careful. It isn’t impossible to set it up securely but a heavier connected base
would definitely help.
 The remote is small, plastic, and nearly useless. The
manual states that you’ll want to be within 20 feet and no more than 15 degrees
off axis from the IR receiver. Well, from a couple of feet away (sitting at my
desk) I got about a 1 to 2 or 1 to 3 work to not-work ratio. Frankly, that
isn’t so hot. The buttons seem unresponsive, as if there is too much resistance
when you hit them. I ended up mashing them and in the process hurting my
fingers after prolonged usage. I guess my career as a hand model is over. Oh
well. Ergonomically, the remote works. It has a good hand feel and the
batteries up front actually seem to help balance it. It isn’t back lit though
which may not be a problem as long as you have a bright screen or prefer to
watch TV with the light’s on. Since there are buttons on the top of the unit
for the basic controls, if you find yourself at your desk when viewing, you may
not need to use the remote all that often.
The remote is small, plastic, and nearly useless. The
manual states that you’ll want to be within 20 feet and no more than 15 degrees
off axis from the IR receiver. Well, from a couple of feet away (sitting at my
desk) I got about a 1 to 2 or 1 to 3 work to not-work ratio. Frankly, that
isn’t so hot. The buttons seem unresponsive, as if there is too much resistance
when you hit them. I ended up mashing them and in the process hurting my
fingers after prolonged usage. I guess my career as a hand model is over. Oh
well. Ergonomically, the remote works. It has a good hand feel and the
batteries up front actually seem to help balance it. It isn’t back lit though
which may not be a problem as long as you have a bright screen or prefer to
watch TV with the light’s on. Since there are buttons on the top of the unit
for the basic controls, if you find yourself at your desk when viewing, you may
not need to use the remote all that often.
There is a large blue section on the front of the unit that would seem to be some sort of display. At least that’s what I assumed when I first saw the unit. But it isn’t. The only illumination I ever saw shining through was a little pinpoint green light that indicated power. It seemed like this would be a perfect place for a channel or clock display.
Setup
 With even a
modicum of understanding of how this unit will work, it is immediately apparent
how to connect it all together. If you think of it as an intermediary between
your computer and your monitor/speakers, it may help. What you do is run the audio
and video wires from your computer up to the Multi-Function Converter and then
from the Multi-Function Converter out to the speakers/monitor. The extra input
in the front can be used for a gaming system, camcorder, or maybe a DVD player
(it doesn’t matter). The only other wire you need is from a cable/antenna
outlet. Now, if you are like me and over 28 million others, you use a cable
modem. You’re only a splitter and an extra cable away from being done with this
whole process. If you’re using DSL or *gasp* dial-up, you’ll want to make sure
you have some sort of antenna or cable outlet near your desk (or be willing to
purchase rabbit ears).
With even a
modicum of understanding of how this unit will work, it is immediately apparent
how to connect it all together. If you think of it as an intermediary between
your computer and your monitor/speakers, it may help. What you do is run the audio
and video wires from your computer up to the Multi-Function Converter and then
from the Multi-Function Converter out to the speakers/monitor. The extra input
in the front can be used for a gaming system, camcorder, or maybe a DVD player
(it doesn’t matter). The only other wire you need is from a cable/antenna
outlet. Now, if you are like me and over 28 million others, you use a cable
modem. You’re only a splitter and an extra cable away from being done with this
whole process. If you’re using DSL or *gasp* dial-up, you’ll want to make sure
you have some sort of antenna or cable outlet near your desk (or be willing to
purchase rabbit ears).
The Multi-Function Converter comes equipped with a VGA cable (for your video) and a cable terminated with 3.5mm jacks (for your audio). You’ll only need to provide the extra coaxial cable for the connection to the wall. If you are setting up your computer for the first time, I imagine you’re looking at a maximum of 10 extra minutes of work (most of which will be spent locking down the VGA and Coaxial cables – why do they have to be so difficult?). On the other hand, if you are like me, you’ll be integrating this into an existing setup. A setup that’s already had MULTIPLE things integrated, un-integrated, moved, shifted, fallen, broken, and Lord knows what else. You’re looking at a tangle of wires so intense that it has its own gravitational pull. This will increase the install time to around a half an hour as you hold a flashlight in your mouth and try to figure out what is attached where.
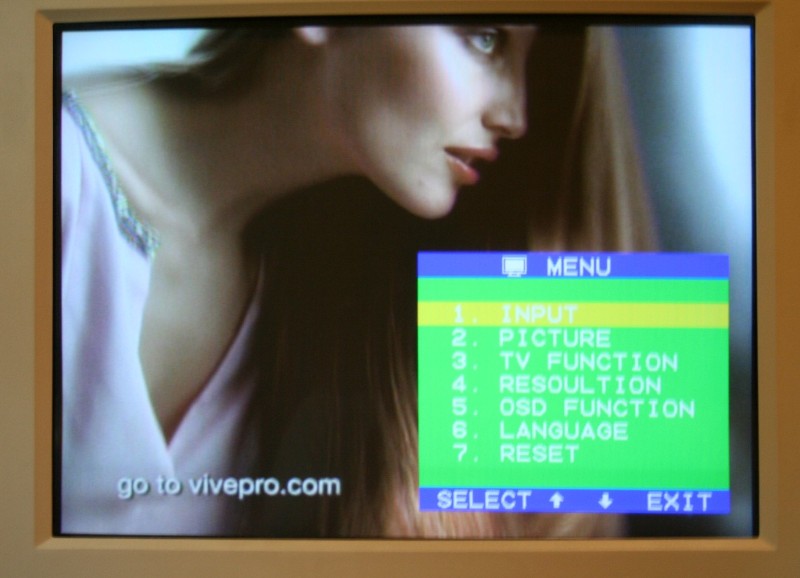
Once you get it integrated, you’ll find a number of different menu items. Nothing is too surprising here so I’ll run through them quickly:
-
Input (choose TV, CVBS, S-Video, PC)
-
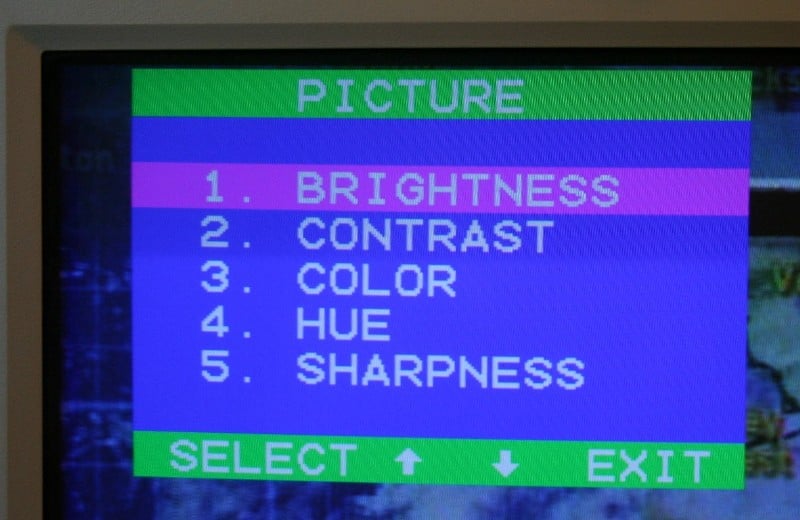
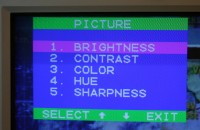 Picture (If I were you, I’d
hook up a test disc like AVIA through a DVD player connected to the front
inputs to calibrate they Multi-Function Converter)
Picture (If I were you, I’d
hook up a test disc like AVIA through a DVD player connected to the front
inputs to calibrate they Multi-Function Converter) -
Brightness
-
Contrast
-
Color
-
Hue
-
Sharpness
-
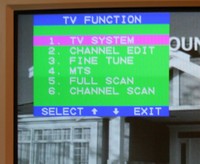 TV Function
 -
TV System (CATV or AIR – only for NTSC areas)
-
Channel Edit (add or delete channels – goodbye HSN!)
-
Fine Tune (fine tunes the channel frequency – default is 50)
-
MTS (can select Mono, SAP, or Stereo audio output)
-
Full Scan (Scan the available television channels)
-
Channel Scan (Scan the available channels with internal frequency map)
-
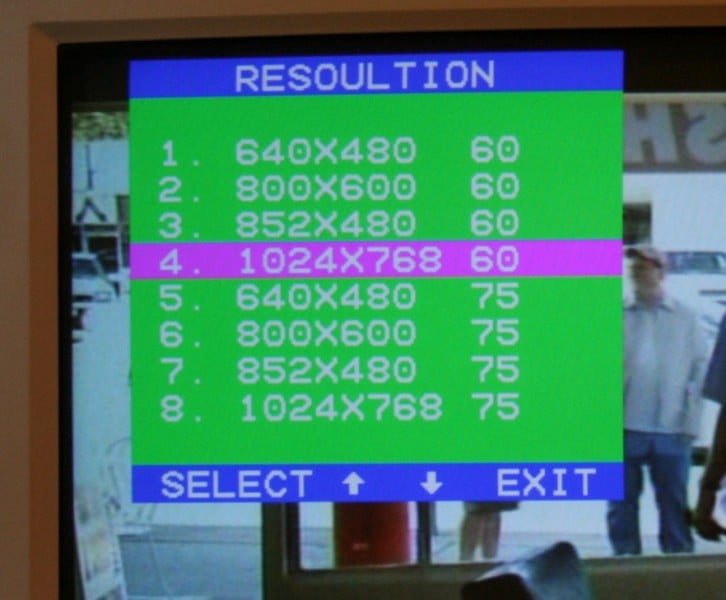
 Resolution (choose)
 -
640x480, 60Hz
-
800x600, 60Hz
-
852x480, 60Hz
-
1024x768, 60Hz
-
640x480, 75Hz
-
800x600, 75Hz
-
852x480, 75Hz
-
1024x768, 75Hz
-
OSD Function
-
OSD Position (will only move about a third of the way down the screen)
-
OSD Color (choose your favorite combination of highlighter blue, light-blue, yellow, green, and pink)
-
Language (English or Chinese - gee I wonder where the Multi-Function Converter was manufactured?)
-
Reset (Resets all settings to their factory defaults)

The only real confusing setting here is the Full Scan versus Channel Scan. From what I could tell, the Full Scan grabs all the channels that are available and collapses them down into a strict numerical order. So the first available channel becomes 1 (even if that is really channel 3), the next one 2 and so on. If you are used to using a normal cable box or TV tuner, then this will be VERY confusing. Suddenly SciFi is on channel 37 instead of 66. If you go with the Channel Scan, it will preserve the “normal” numbers including all the dead/blocked channels (though it still skips the dead ones if you are scrolling up or down via the channel buttons on the remote or on the top of the unit). Personally I preferred the Channel Scan as I didn’t really feel like learning a whole new set of channel numbers.
The only problem I ran into is that at first the Multi-Function Converter attenuated the PC volume. Basically, music and sound effects that would be loud enough to wake the dead on the Swans S200 now weren't loud enough to interrupt a conversation with the PC and Window's Media Player's volume maxed. The volume from the Multi-Function Converter for the TV was fine. Just as I was about to tank the ratings, I noticed that the volume was gone! Well, that had never happened before so I went to check it out. I turned back on the Multi-Function Converter and the TV volume was extremely low. So I turned it up and then I turned it off. Poof, I've got PC sound again (still low). So I turned the Multi-Function Converter on again and turned it WAY up and off again. Voila, I've got normal PC volume. It seems that the volume level of the PC is predicated on the volume setting on the Multi-Function Converter even when it is off. While this is annoying and a terrible setup, it isn't like you can't get around it.
Impact Acoustics Multi-Function Converter Use and Conclusion
 As clunky as my description above may sound, don’t
let it deter you. The Multi-Function Converter totally rocks. Turning it on
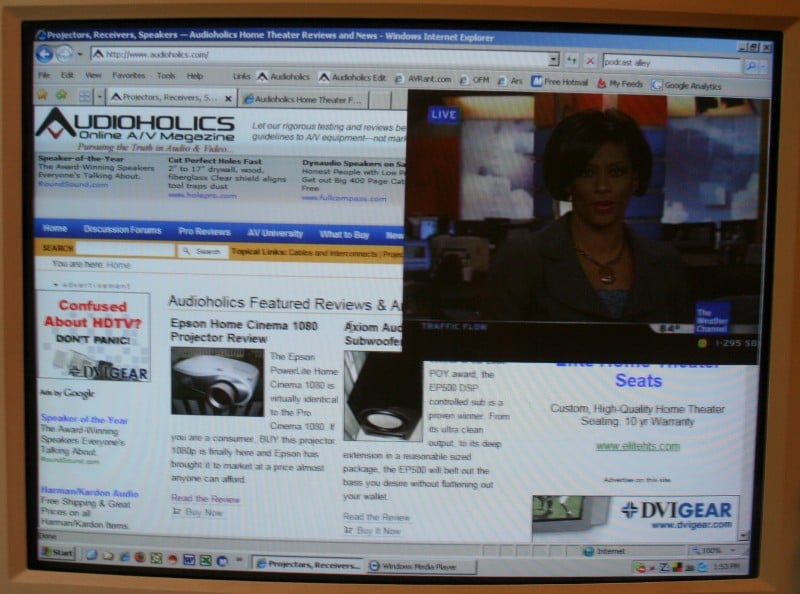
immediately discards the PC picture and sound in favor of the TV signal. This
is initially full screen but you can hit the PiP (Picture-in-Picture) button to
reduce the screen size. Once it is reduced, you can move it around the screen
with the arrow keys on the remote. Pressing the PiP button once reduces the
picture to 1/4th its size and subsequent presses will change it to 1/9th,
1/16th, and completely off. While in PiP mode, hitting the Select button will
cycle back and forth from the TV audio and the PC audio (a nice feature that I
wished worked in full screen mode too). The only problem with the PiP is that
it doesn’t cycle back to full screen. The only way I could find to get it back
to full screen was to turn the unit on and off again.
As clunky as my description above may sound, don’t
let it deter you. The Multi-Function Converter totally rocks. Turning it on
immediately discards the PC picture and sound in favor of the TV signal. This
is initially full screen but you can hit the PiP (Picture-in-Picture) button to
reduce the screen size. Once it is reduced, you can move it around the screen
with the arrow keys on the remote. Pressing the PiP button once reduces the
picture to 1/4th its size and subsequent presses will change it to 1/9th,
1/16th, and completely off. While in PiP mode, hitting the Select button will
cycle back and forth from the TV audio and the PC audio (a nice feature that I
wished worked in full screen mode too). The only problem with the PiP is that
it doesn’t cycle back to full screen. The only way I could find to get it back
to full screen was to turn the unit on and off again.
 The picture
out of the Multi-Function Converter is as good as any you’re going to see with
a standard definition cable. The different available resolutions mean that
you’re going to be able to find the right one for your display. In my setup, I
use two displays (a bit unusual for most but I do a lot of work in here). What
is cool in my setup is that I can switch my work screens over to the secondary
display while watching TV on the primary. It’s like PiP but full screen. For
most people the 1/4th screen size will be fine for multitasking and the ability
to move the TV display out of the way on the fly is very convenient. The only
real problem? I don’t need any more distractions in my office.
The picture
out of the Multi-Function Converter is as good as any you’re going to see with
a standard definition cable. The different available resolutions mean that
you’re going to be able to find the right one for your display. In my setup, I
use two displays (a bit unusual for most but I do a lot of work in here). What
is cool in my setup is that I can switch my work screens over to the secondary
display while watching TV on the primary. It’s like PiP but full screen. For
most people the 1/4th screen size will be fine for multitasking and the ability
to move the TV display out of the way on the fly is very convenient. The only
real problem? I don’t need any more distractions in my office.
This product, to my mind, is not really marketed to someone like me (perhaps someone that needs (for work reasons) to keep up on current news on a minute by minute basis though). The Multi-Function Converter is a complete no-brainer for a college student with limited space. You’re going to need a computer (that’s a given) and finding room for a second display can be a problem. Of course, you could pick up a computer with Windows Media Center Edition or Vista but then you have to deal with all the problems that those operating systems entail (they have a lot more functionality too but that isn’t the point). Not to mention that college students may not have the money for a new computer and at $120, this is practically tailor made for a Christmas present.
 One of my favorite features is engaged by hitting
the left side of the Ch View button (at the bottom of the remote). Basically,
it puts up some still images of nine channels in a grid formation (just like
the numerical buttons on the remote). Then when you see the channel you want,
you hit the corresponding number on the remote and you are taken directly to
it. It starts with the current channel you are on as #1 and continues up from
there. If you don’t like any of the channels displayed, you simply hit the left
side of the Ch View button again and it will shoot up to the next 9 channels on
the list. So, for example, if you are on channel 51, it will display 51-59 when
you hit the button. If you hit the button again, it will display 60-68 (or wrap
to the beginning once you reach the end of the scale). Now, I keep saying, “Hit
the left side of the button,” because it is obviously double sided. Why you
can’t scroll up through the channels with the right button and down with left
is beyond me.
One of my favorite features is engaged by hitting
the left side of the Ch View button (at the bottom of the remote). Basically,
it puts up some still images of nine channels in a grid formation (just like
the numerical buttons on the remote). Then when you see the channel you want,
you hit the corresponding number on the remote and you are taken directly to
it. It starts with the current channel you are on as #1 and continues up from
there. If you don’t like any of the channels displayed, you simply hit the left
side of the Ch View button again and it will shoot up to the next 9 channels on
the list. So, for example, if you are on channel 51, it will display 51-59 when
you hit the button. If you hit the button again, it will display 60-68 (or wrap
to the beginning once you reach the end of the scale). Now, I keep saying, “Hit
the left side of the button,” because it is obviously double sided. Why you
can’t scroll up through the channels with the right button and down with left
is beyond me.
Recommendations
The Multi-Function Converter is a strange mix of coolness and design compromises. It seems that the remote and box was OEM’ed and almost fits the functioning of the device. Almost. I think the idea of the device is very cool and for the most part it works really well (if a bit clunky). Still, there are a couple of things I’d change:
-
I’d love to have the base attach to the unit better and perhaps be a bit heavier for more stability
-
Right now, it passes MTS only (Dolby ProLogic). That is fine for the standard definition TV but it is possible that someone is utilizing 5.1 analogue outputs. A pass-through of this (and others) type of audio would be a nice addition.
-
True pass through of audio (no change in the volume) is a must
-
Cable card or digital cable/satellite support would be nice
-
The front of the unit should have a display. It looks like it does, why doesn’t it?
Conclusion
 Despite all
its quirks, the pure functionality of the Multi-Function Converter makes it a
winner in my book. The space saving quality lets you utilize that computer
display that has a much higher resolution than any TV a college student might
have. For $120, you can have your computer do double duty and perhaps bump up
your monitor budget to the next size monitor. As a parent, when the
over-the-air broadcasts transitions to digital broadcasting on February
17th, 2009,
this unit will need an ATSC tuner or adapter box. Perhaps making your kids pony
up for one will be just the motivation they need to get out of college and get
a real job.
Despite all
its quirks, the pure functionality of the Multi-Function Converter makes it a
winner in my book. The space saving quality lets you utilize that computer
display that has a much higher resolution than any TV a college student might
have. For $120, you can have your computer do double duty and perhaps bump up
your monitor budget to the next size monitor. As a parent, when the
over-the-air broadcasts transitions to digital broadcasting on February
17th, 2009,
this unit will need an ATSC tuner or adapter box. Perhaps making your kids pony
up for one will be just the motivation they need to get out of college and get
a real job.
About Impact Acoustics
Since 1984, Lastar has been a leader in
the computer connectivity industry. Under the brand name Cables To Go, Lastar created
a line of computer connectivity products known for quality and value. CTG uses
the finest components and the latest construction technologies to maximize
cable performance and ensure compliance to industry specifications for each
cable and its designated application. From PC Cables and Adapters to Networking
and Data Sharing products, Cables To Go has delivered the best products at an
always-competitive price.
In 2002 Lastar created Impact Acoustics
in order to deliver its expertise in computer and data connectivity products to
the consumer and commercial communications electronics industry. Tasked with a
single goal – to manufacture and deliver the finest performing products at the
most competitive price possible – Impact
Acoustics has the ability to leverage its
manufacturing facilities, sales team, service team and engineering
professionals to bring you state-of-the-art audio and video performance at
prices that define value.
Unlike many of our competitors, Impact Acoustics does not repackage generic product to call its own. Each and every Impact Acoustics product is designed from the ground up to meet meticulous construction and rigorous engineering standards. We won’t compromise, and neither should you!
The Score Card
The scoring below is based on each piece of equipment doing the duty it is designed for. The numbers are weighed heavily with respect to the individual cost of each unit, thus giving a rating roughly equal to:
Performance × Price Factor/Value = Rating
Audioholics.com note: The ratings indicated below are based on subjective listening and objective testing of the product in question. The rating scale is based on performance/value ratio. If you notice better performing products in future reviews that have lower numbers in certain areas, be aware that the value factor is most likely the culprit. Other Audioholics reviewers may rate products solely based on performance, and each reviewer has his/her own system for ratings.
Audioholics Rating Scale
 — Excellent
- — Very Good
- — Good
- — Fair
- — Poor
| Metric | Rating |
|---|---|
| Build Quality | |
| Ergonomics & Usability | |
| Ease of Setup | |
| Features | |
| Remote Control | |
| Fit and Finish | |
| Calibration Options | |
| Performance | |
| Value |
As Associate Editor at Audioholics, Tom promises to the best of his ability to give each review the same amount of attention, consideration, and thoughtfulness as possible and keep his writings free from undue bias and preconceptions. Any indication, either internally or from another, that bias has entered into his review will be immediately investigated. Substantiation of mistakes or bias will be immediately corrected regardless of personal stake, feelings, or ego.
View full profile