
Building a Spouse Approved Home Theater Solution
My family and I have been going to a friend for all of our dental work for the last 12 years or so. He is simply the finest dentist I’ve ever been to, very meticulous about the quality of his work and the products he uses on his patients. It pained me each time I’d visit his office to see Bose speakers sprinkled all over the place. When I told him what my line of work was, of course his reaction was to let me know the brand of speakers he uses throughout his office and at home, and how proud of them he was. My knee jerk reaction was to say “People that don’t know audio know Bose.” At first he smiled as if it were a compliment, but after about 1.5 seconds, it kicked in and he asked me “So what do you recommend?” The conversation continued over the course of the next year or so with each bi-annual visit. Finally with my last visit, he mentioned he was ready to build a new surround system in his family room. With that I went to his home to scope out the environment and assess his needs.
The room is not without its problems. It has tiled flooring and opens to a kitchen. Since his wife is extremely concerned with aesthetics, I knew it would be an uphill struggle to get them to make any acoustical improvements to the room. So, I had to carefully choose the components based on the environment. What made this struggle even greater was the fact they built an existing on-wall unit to house all of the equipment and didn’t want to have big speakers anywhere in the room. In fact, if I didn’t come up with a similar sized alternative to the very popular “cubed” system, that was going to be the route they would have taken. Knowing this, I had two options, a small cubed speaker system alternative, or in-ceiling/in-wall speakers. In-wall speakers for the front wall wasn’t an ideal option since the wall was completely redone with an internal solid structure to support the on-wall cabinet and 60” LED display, and I didn’t have enough space to route an in-wall center channel below the TV anyways.
Design Objectives
The goal of this system was design a compact, reasonably priced solution that provided surround sound in the main family room and distributed audio throughout the home. There were 5 pairs of additional speakers located in other parts of the home.
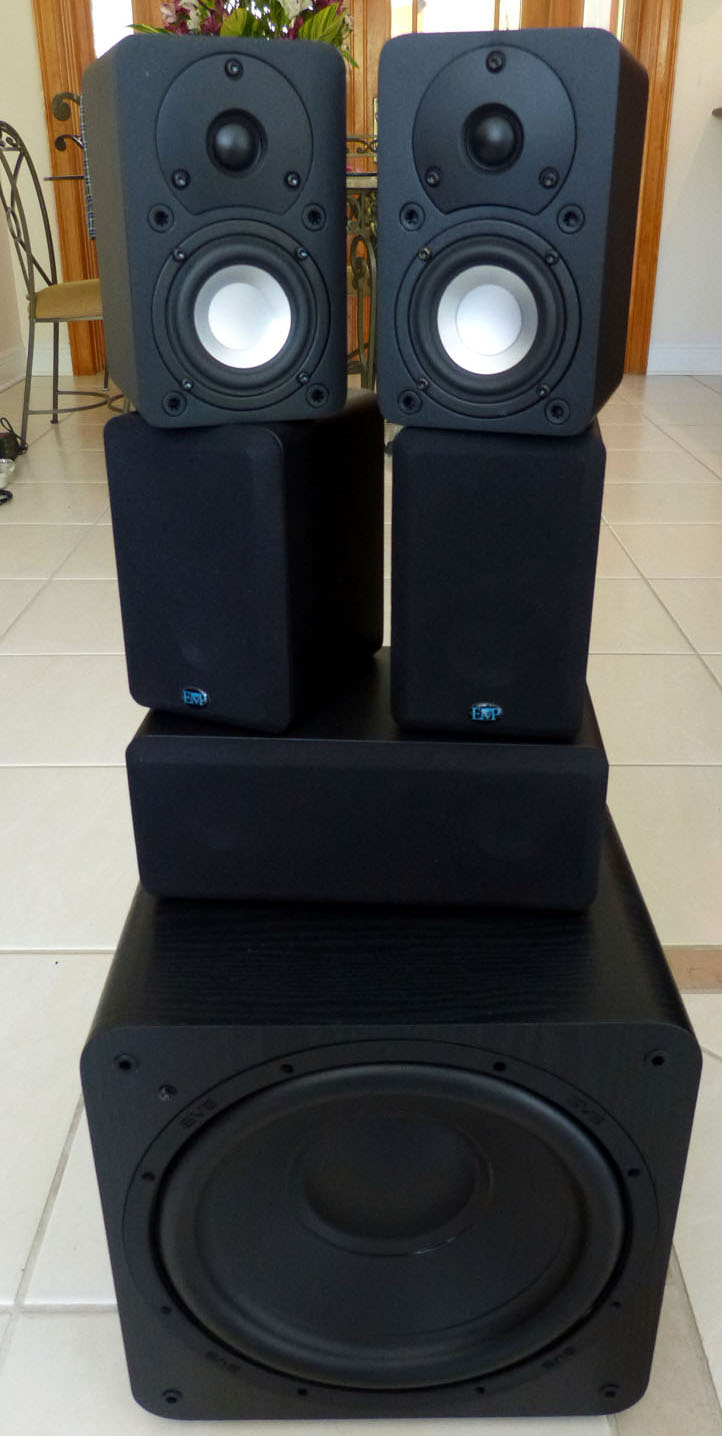
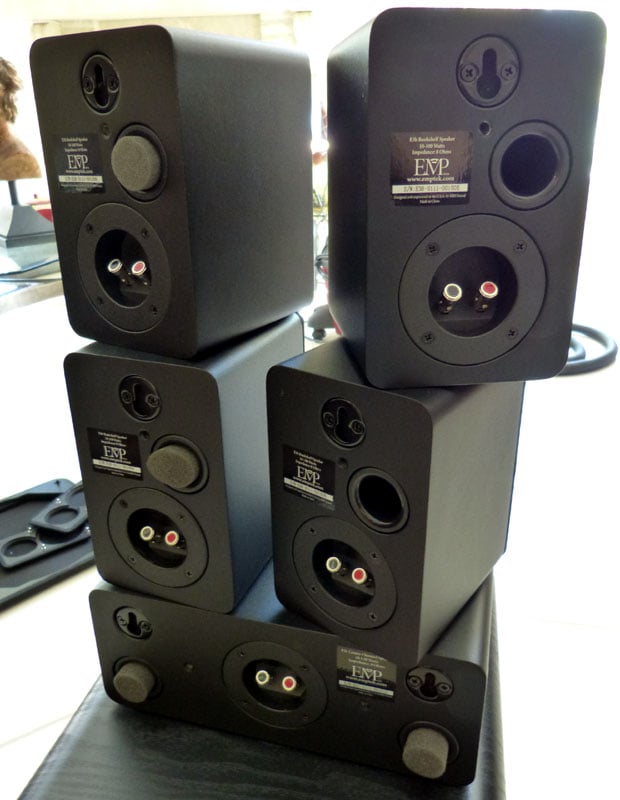
The Speaker Selection: EMP Cinema Compact System & SVS SB-1000 Subwoofers
 I
proposed a few speaker options to our friend and he was insistent upon having the smallest speakers
possible. This led me to recommend the new Cinema
Compact 5 Home Theater system from EMPtek. The E3b mini-monitor is roughly
the same size as the Bose Acoustimass satellite speaker and the E3c center
channel is a bit deeper and wider than the Bose counterpart, but the height is the
same. Considering the center channel was to be placed on top of the wall unit
which had tons of horizontal and vertical space, this worked out nicely. Our dentist
friend wanted the sub to be placed inside of the cabinet, which was roughly a
14” enclosure. This meant the matching EMP e10S subwoofer wasn’t an option, nor
ironically was the Bose bass module they wanted to use from the very beginning.
The new SVS SB-1000 fit the bill nicely being a 13” cube and also being a very
affordable $500/ea shipped!
I
proposed a few speaker options to our friend and he was insistent upon having the smallest speakers
possible. This led me to recommend the new Cinema
Compact 5 Home Theater system from EMPtek. The E3b mini-monitor is roughly
the same size as the Bose Acoustimass satellite speaker and the E3c center
channel is a bit deeper and wider than the Bose counterpart, but the height is the
same. Considering the center channel was to be placed on top of the wall unit
which had tons of horizontal and vertical space, this worked out nicely. Our dentist
friend wanted the sub to be placed inside of the cabinet, which was roughly a
14” enclosure. This meant the matching EMP e10S subwoofer wasn’t an option, nor
ironically was the Bose bass module they wanted to use from the very beginning.
The new SVS SB-1000 fit the bill nicely being a 13” cube and also being a very
affordable $500/ea shipped!
I explained to our dentist friend that a small speaker system like this doesn’t produce much bass and needs dual subs to compensate. In addition, having dual subs would produce a more consistent and even bass response throughout the room. He understood this very well, especially considering the subs wouldn’t be obtrusive sitting inside of the on-wall cabinet. I did ask him to leave the two subwoofer locations completely open at the front and sidewalls for performance reasons and he obliged. Success so far.
Editorial Note about Small Speakers with Dual Powered Subs
Anytime I do an install of a small speaker system (especially in large listening spaces, I always employ dual subs located on the front wall directly under the main left/right speakers. This allows you to set a higher crossover point (say 120-150Hz) and run the subs in mono without any concerns of localization. In fact, if properly set up, it will produce the illusion of listening to a pair of large speakers.
The Components: Denon, Samsung, Panamax, & Dayton Audio
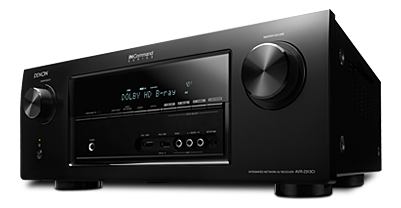 Denon AVR-2313CI A/V Receiver
MSRP: $899
I’m a big fan of Denon A/V receivers. They have solid amplification, great bass management, high reliability and
they’re jam packed with features. The AVR-2313CI is rated at 105wpc x 7,
supports all the latest HD audio and video formats with 4k video pass-thru for
the future. It has dual subwoofer output
connections so you don’t need a y-splitter when installing dual subs. The
inclusion of Air Play allows you to stream audio to the receiver from your
Apple device. The Denon Remote App also allows you to control the receiver from
your Apple or Android device.
Samsung
Display & Blu-ray Player
I
won’t even bother to mention the model# of either of these devices as they will
likely be obsolete by the time this posts. The Samsung Display was a 60” LED
that had all of the latest networking features and great picture quality. The
Samsung Blu-ray player was probably the cheesiest Blu-ray players I’ve ever
seen. It was literally about the size of a small box of chocolates and had no
analog audio connections on it whatsoever. This is a real bummer for those
wanting to use the player for a zone 2 analog device, which is what I was
planning until I realized that this player simply didn’t support it. I strongly
encouraged my dentist friend to consider upgrading to an Oppo
BDP-103 in the near future.
![]()
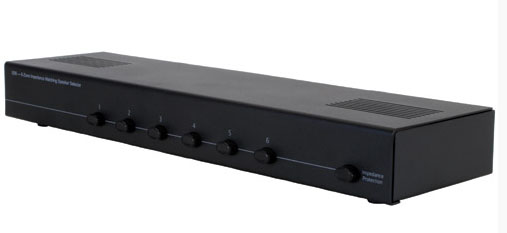
Panamax MR4300 (left pic) ; Dayton Audio SS6 (right pic)
The
Panamax MR4300 Power Center
MSRP: $299
This is a neat, affordable power conditioner/surge suppressor that boasts 8
outlets and 1 USB charger. It also has
front panel rotary lights for easy viewing and is designed to meet UL safety
and regulatory tests, which is often not the case with competitor products at
this price point.
Dayton
Audio SS6 Speaker Selector
MSRP: $49
There is nothing fancy about the Dayton Audio SS6 Speaker Selector. It is basically a 6 zone speaker selector
switch box with manual (and defeatable) impedance matching protection. It accommodates up to 14 AWG speaker cable
and also features a loop-through output so you can directly connect the
amplifier to an additional pair of speakers without being in the selector loop.
I would have liked to utilize a separate amplifier to drive the whole home
audio system, as be less taxing on the Denon receiver, but budget restrictions
kept this from being possible.
Cables
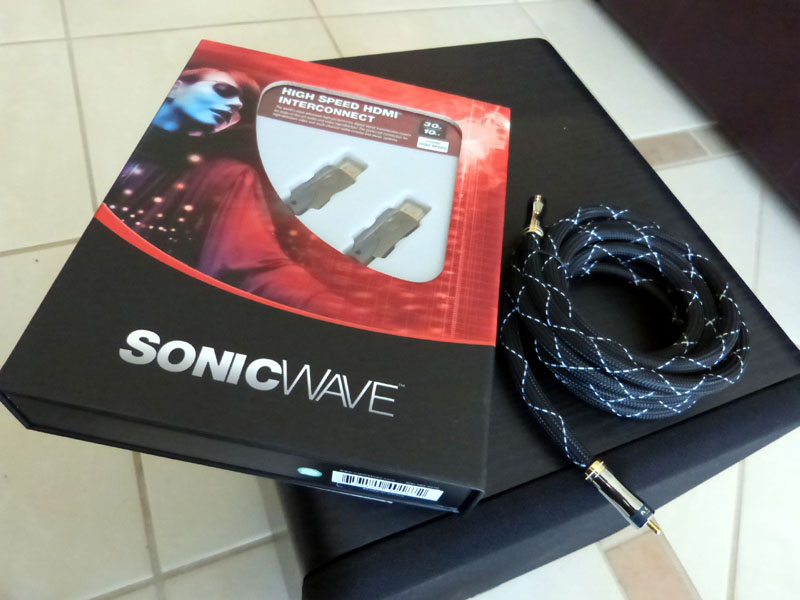 I used Impact Acoustics Sonicwave HDMI cables for all HDMI connections, Dayton
Audio 16/2 white speaker cable (part# 101-223), Diamondback banana plugs
(available from Sewelldirect.com) and the new SVS Soundpath subwoofer cables to
connect the SB-1000 subwoofers to the Denon A/V receiver. I really like
Sonicwave HDMI cables and the new SVS Soundpath subwoofer cables are both
beautiful and very functional. They don’t rip off connectors on your A/V
equipment like some “turbine” connectors often do. Instead, these cables make a
great connection, and are very flexible and durable in use.
I used Impact Acoustics Sonicwave HDMI cables for all HDMI connections, Dayton
Audio 16/2 white speaker cable (part# 101-223), Diamondback banana plugs
(available from Sewelldirect.com) and the new SVS Soundpath subwoofer cables to
connect the SB-1000 subwoofers to the Denon A/V receiver. I really like
Sonicwave HDMI cables and the new SVS Soundpath subwoofer cables are both
beautiful and very functional. They don’t rip off connectors on your A/V
equipment like some “turbine” connectors often do. Instead, these cables make a
great connection, and are very flexible and durable in use.
Packaged System
This is a breakdown of all of the components sans the display
and Blu-ray player which my dentist already had in his possession.
|
Category |
Manufacturer |
Model# |
MSRP |
|
A/V Receiver |
Denon |
AVR-2313CI |
$899 |
|
Power Center |
Panamax |
MR4300 |
$300 |
|
Speaker Selector |
Dayton Audio |
SS6 |
$51 |
|
Speakers |
EMP |
Cinema 5 Compact |
$500 |
|
Brackets |
RBH |
SB-1B x 4 |
$160 |
|
Subwoofers |
SVS |
SB-1000 x 2 |
$1,000 |
|
Remote |
Harmony |
900 |
$299 |
|
Cables |
HDMI x 4, Analog & SPK Wire |
Various |
$240 |
|
Total |
$3,449 |
Spouse Approved Home Theater Install & Set-Up
 I originally bid the installation to be a 3-4 hour job max which 12 hours after
completion, I realized was a gross
underestimate. Lesson learned. When I showed up to do the install everything that could go wrong, did go wrong. The
entertainment center didn’t have all of the necessary routed holes I requested
to pass cables through and the surround speaker wires ran through the ceiling
were 24 AWG telephone cable. I insisted that these cables would need to be
swapped out else I wouldn’t proceed with the installation. I was impressed to
see my dentist friend jump in into the attic and snake out the old cable while
routing the new 16/2 cable. It was a challenge for him to route it down the
in-wall conduit, but I was there to help pull it through. Next, speaker cable
had to be routed up the front wall to the front speakers. The problem was that
the drywall was already in-place and in fact the wall itself wasn’t just
drywall but the entire wall had a giant sheet of plywood underneath the
drywall. The wall was reinforced to handle the weight of the suspended 60”
Samsung LED TV and the wall unit where all of the equipment was being installed
it. I was fortunate his cabinet guy was
still there to drill through the walls and help route the speaker cables where
they needed to go, but it was quite time consuming. Fortunately, they did have
the foresight to install a plastic conduit up the center of the wall to route
HDMI and power to the display.
I originally bid the installation to be a 3-4 hour job max which 12 hours after
completion, I realized was a gross
underestimate. Lesson learned. When I showed up to do the install everything that could go wrong, did go wrong. The
entertainment center didn’t have all of the necessary routed holes I requested
to pass cables through and the surround speaker wires ran through the ceiling
were 24 AWG telephone cable. I insisted that these cables would need to be
swapped out else I wouldn’t proceed with the installation. I was impressed to
see my dentist friend jump in into the attic and snake out the old cable while
routing the new 16/2 cable. It was a challenge for him to route it down the
in-wall conduit, but I was there to help pull it through. Next, speaker cable
had to be routed up the front wall to the front speakers. The problem was that
the drywall was already in-place and in fact the wall itself wasn’t just
drywall but the entire wall had a giant sheet of plywood underneath the
drywall. The wall was reinforced to handle the weight of the suspended 60”
Samsung LED TV and the wall unit where all of the equipment was being installed
it. I was fortunate his cabinet guy was
still there to drill through the walls and help route the speaker cables where
they needed to go, but it was quite time consuming. Fortunately, they did have
the foresight to install a plastic conduit up the center of the wall to route
HDMI and power to the display.
I plugged the ports on the rear firing ports of the EMP E3c center channel with the supplied foam plugs since it was being placed directly against the wall but I left the ports open for all of the E3b satellite speakers since they had ample clearing from the backwall once installed on their mounting brackets.
Editorial Note about In-Wall Wiring
Whenever you are drilling holes in a wall or running wire, you need to be conscious of the local fire and electrical code, as well as what might be hidden inside the wall. In this scenario we were fine running power through an existing conduit, but that is not always the case. Whenever you run any cables in the wall it is imperative to ensure they are in-wall rated. Here is a great guide by our friends over at Blue Jeans Cables about how to determine if your cables are in-wall rated. You don’t want an inspector to show up to a job site and tell you to rip out all of your wiring.
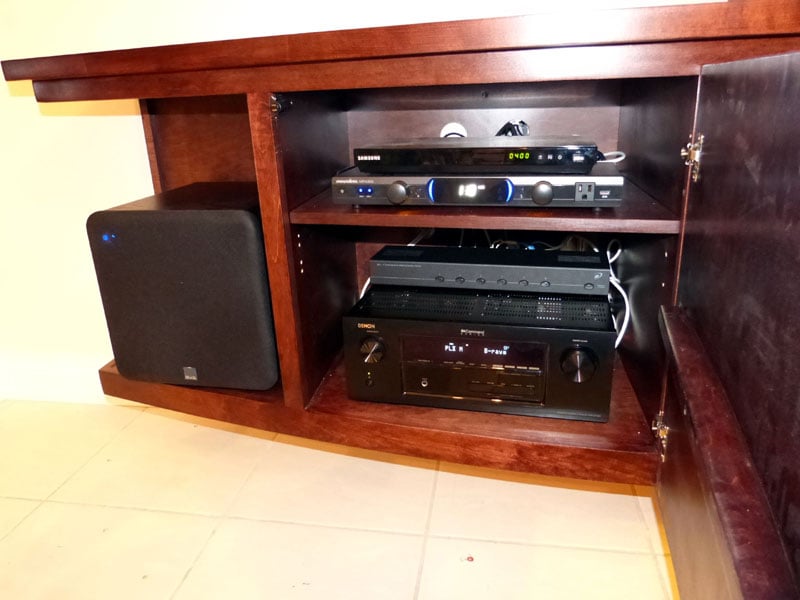
Components Installed into Wall-unit
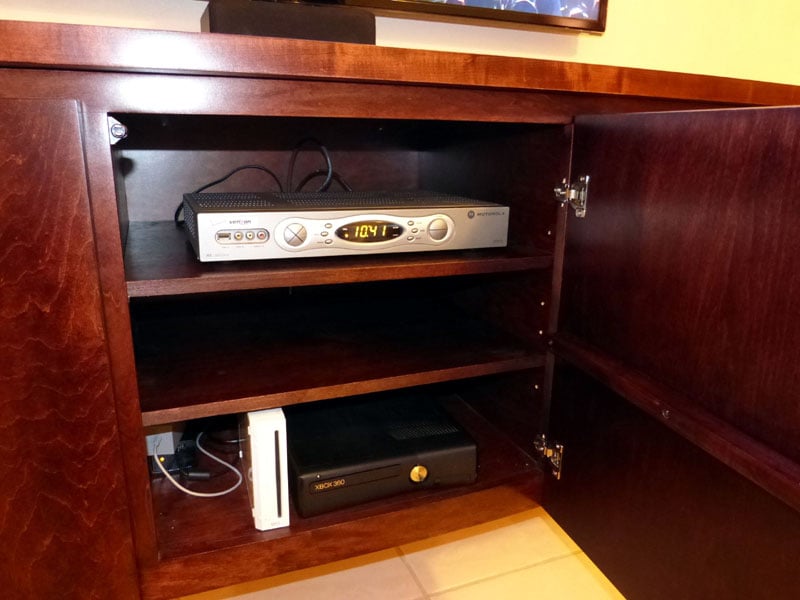
As you can see in the above image, I placed the Denon A/V receiver and Dayton speaker switch box on the bottom shelf, and the Panamax power center and Samsung Blu-ray player on the top shelf. The adjacent bay housed the Verizon Fios box, Xbox360 and Nintendo Wii. The SVS SB-1000 subwoofers were each placed on the open shelf on opposite ends of the wall unit. They fit snug as a bug and you couldn’t see any cables since they were routed into the cabinet behind all of the components.
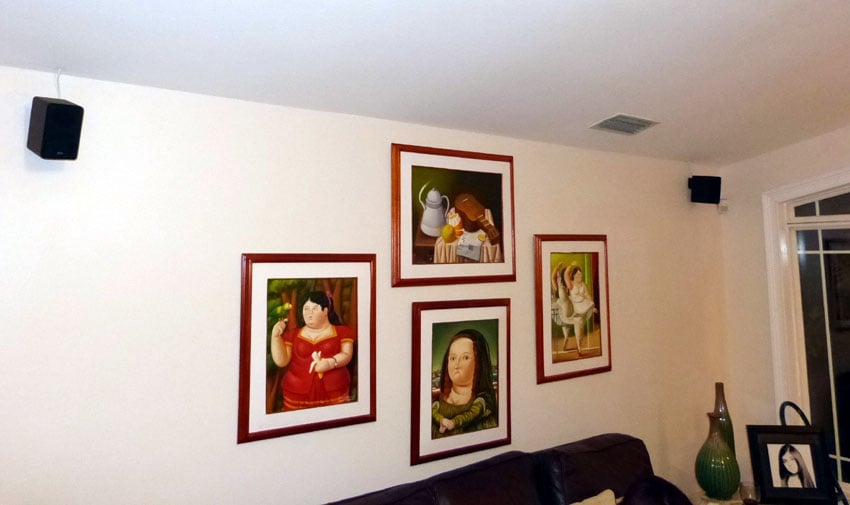
I was getting ready to install the EMP E3b front channels centered between the top and bottom of the Samsung display when the boss (dentist wife) decided she did NOT want the speakers at the same level as the TV. She thought it would make the TV look like it had ears. So, I installed them above the TV as shown below explaining to her that this does compromise sound quality and in the end I think it looks more like ears this way. She was happy, he was happy, so I didn’t press the matter.
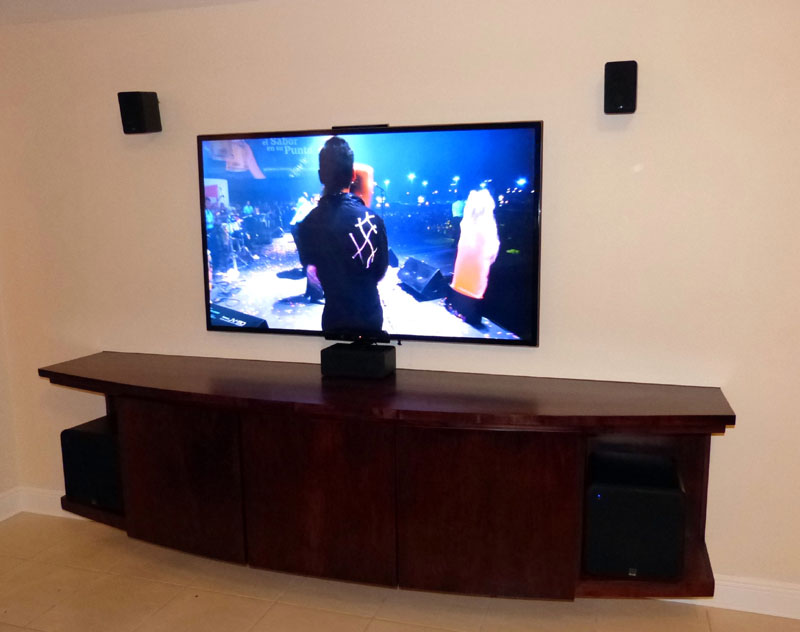
Front View of System Install – Looks like Mickey Mouse?
Back Wall Surround Speakers Mounted
I utilized the RBH SB-1B speaker brackets for the front and back channels while the E3c center channel was set on the shelf just below the display.
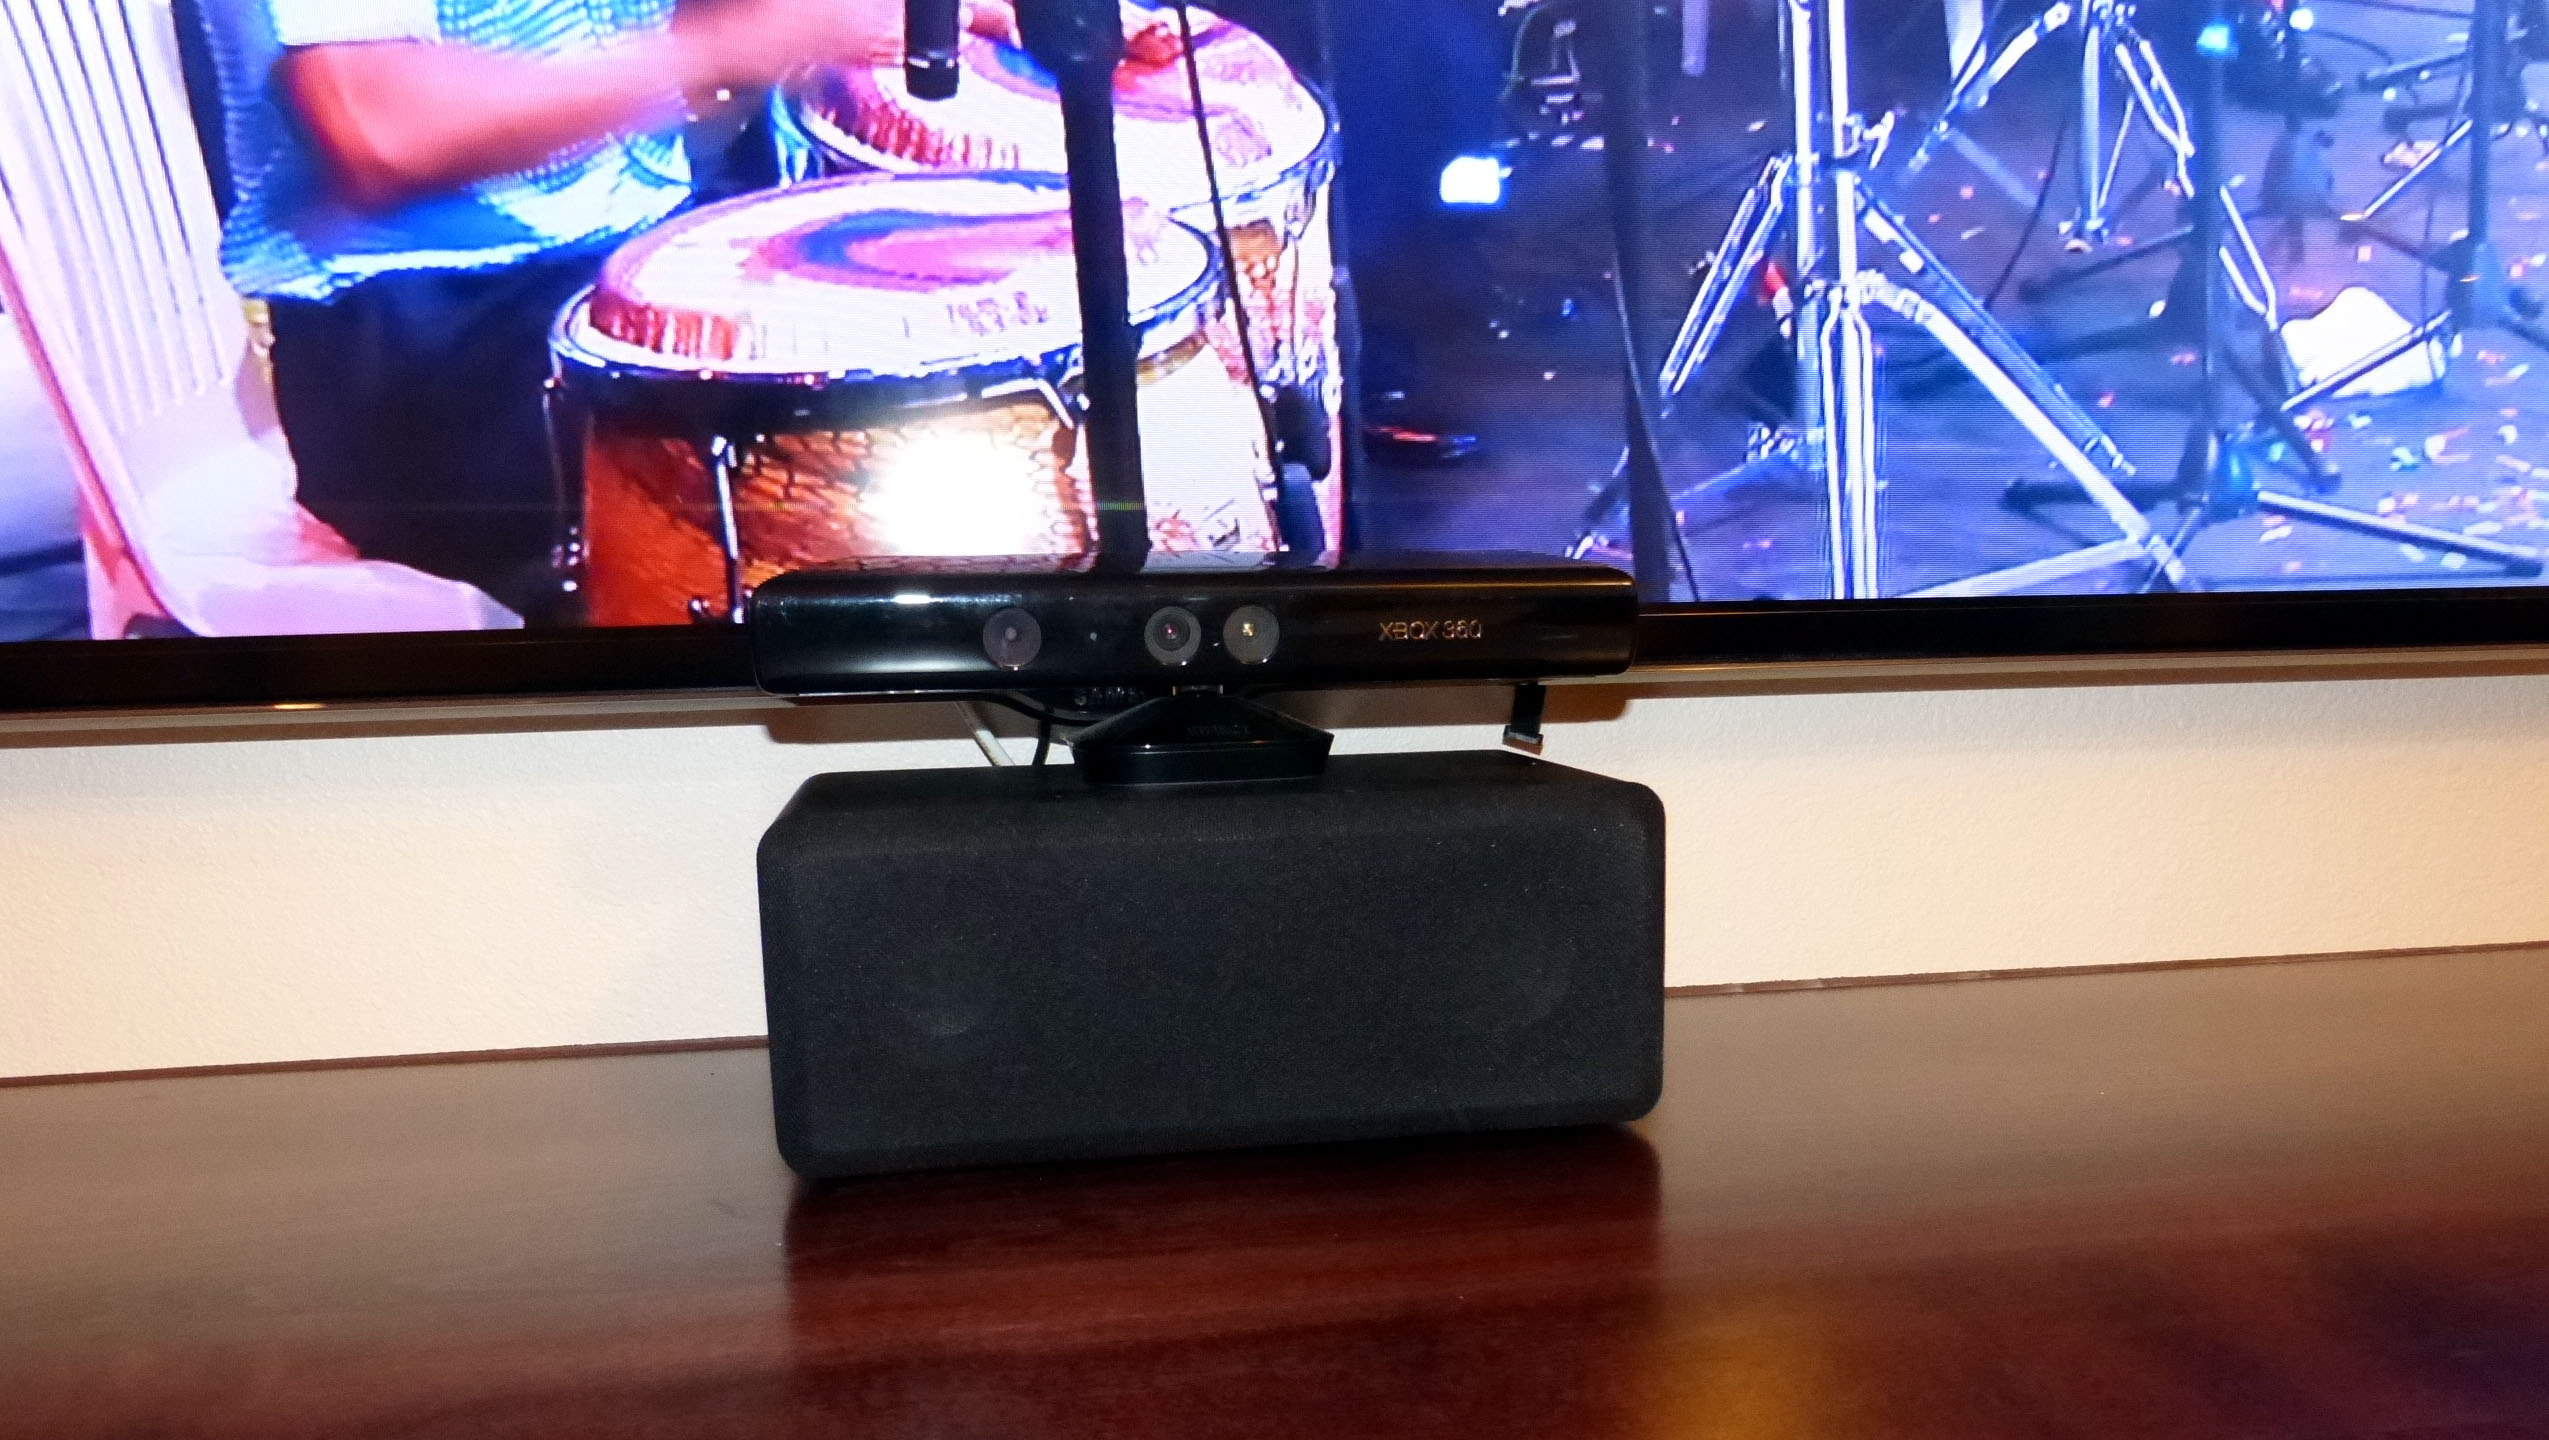
EMP E3c Center Channel with Xbox Motion Bar mounted below the Samsung Display
Multi-Room
Since the main theater room was running a 5.1 speaker system, I had two amplifiers left unused in the Denon AVR-2313CI. I reconfigured these amplifiers to run Zone 2, which was fed to the SS-6 Dayton speaker selector. This provided the ability to switch on all 6 pairs of speakers for multi-room audio while also impedance matching them when running simultaneously to avoid overdriving the amplifiers.
Since I didn’t install the in-ceiling speakers or volume controls, I really didn’t know what to expect. Mistake #1. I assumed the previous installer actually had a clue when doing this. Mistake #2. What I found was quite a disaster of an install. Each pair of speakers was apparently wired in series to their associated volume control and a single speaker cable was fed back to the theater room from each zone. I managed to hook up all of the speakers to the SS-6. Although five of the six zones worked, they didn’t play exceedingly loud. The sixth zone wouldn’t pass any audio at all but it did pass noise via a battery test. I honestly was at a loss with this one. But, I did learn a lesson. Never assume the installer prior to you did competent work and never assume you can use existing gear for a new install. My dentist was happy enough with how it was working and didn’t wish for me to further troubleshoot it. So, I left it alone, though it did vex me a bit as I wouldn’t personally be satisfied with such a solution if it were my own home. He was happy enough that for the first time he’s been in this house (for nearly 10 years), he had all of the speakers working. He also had the ability to run a 5.1 source in the theater room while listening to music in the other zones. This is a capability he never had prior to my intervention.
Calibration
I didn’t get a chance to run Audyssey, mostly because of the time constraints and the inability to have a totally quite house long enough to run the setup. So I broke out my old fashion tape measure and Radio Shack SPL meter. I calibrated using the internal pink noise generator of the Denon receiver and also did some spot checking measurements with my Dayton Audio Omni-mic system to ensure I achieved good integration between the satellite speakers and subwoofers. All speakers were set to “small” and the best crossover setting I found to use was 120Hz for this system.
I configured their Blu-ray player to output HD audio for the very first time. It’s amazing how many people’s homes I visit never do this, and more often than not never even have their source devices set to 1080p resolution despite their new state of the art displays having the ability to support it. I also configured the XBOX to pass 5.1 surround sound and 1080p resolution. The Wii was connected via component video and set to 480p.
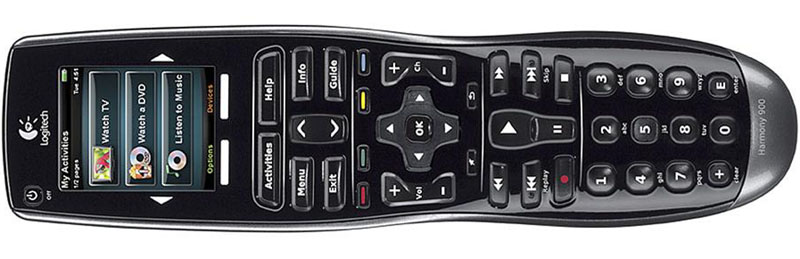
Harmony 900 Universal RF Remote Control
Remote Control
Since all of the equipment was installed into a wall unit, the IR signals were blocked, meaning the stock remotes weren’t able to operate them. My dentist friend loves setting up devices so I instructed him to purchase a Harmony 900 remote. I was impressed to see him actually configure it all by himself via the web interface. I also connected up Ethernet to his Denon A/V receiver and downloaded the Denon app so he could control the receiver from the convenience of his iPad.
The Results
I
brought over a couple Blu-ray discs to demo the new system. We started out with Animusic HD, which brings
bass that quickly separates the men from boys in subwoofers. I went right to
track #9 “Heavy Light” which really kicks in as the pillars rise out from under
the ground after the short keyboard intro. I watched my friend’s face light up
as the sound from beams of light surrounded the room. Once the bass drums
kicked in, he was hooked. Even his wife stood up at attention. They never experienced sound quality of this
caliber in their home and I was happy to have them realize that there are
alternatives to “cubed” systems that not only sound much better but also don’t
occupy more space. We flipped over to “Dark Knight Rises” and watched the
airplane scene where Bane’s superplane ripped apart the smaller airplane he was
temporarily occupying. Bane’s voice came in clear, much clearer than on the big
screen actually, thanks to the remastering for Blu-ray. After about 30 minutes of skipping around
this disc it was time for me to part ways as it was pushing 11pm. Suffice it to say, our friends were quite
pleased with the end result and they started ordering Blu-rays from Amazon as I
was leaving.
Although this installation wasn’t perfect, I managed to take a pretty grim situation and turned it around to a workable solution. Knowing the caliber of dentist my friend is, I asked him if the sound quality and function of the system met his expectations and he confidently told me “NO! They exceeded them!” Now I’m just waiting till the audiophile bug really hits him and he manages to convince his wife that they should build a dedicated two-channel listening room. Perhaps a topic of discussion for my next office visit ;)
Gene manages this organization, establishes relations with manufacturers and keeps Audioholics a well oiled machine. His goal is to educate about home theater and develop more standards in the industry to eliminate consumer confusion clouded by industry snake oil.
View full profile