
High Performance Home Theater Calibration
The Custom Electronics Design and Installation Association (CEDIA) was founded in 1989 in recognition of the increasing complexity of integrating audio and video systems into the home environment. Coincidently, Dolby Pro Logic was gaining solid momentum in 1989. Pro Logic was a four-channel system with five speakers; left, center, right, and two rear mono surrounds. In retrospect, the change from the previous three-channel Dolby Surround, which had no center channel, was profound. The addition of a center channel marked the first true step in the convergence of audio and video. And the founders of CEDIA recognized that a new and more complex world had emerged.
From its humble first show with vendors huddled under tents in the rains that hit the 1990 convention on Amelia Island, the founders of CEDIA envisioned an organization which offered a university-style teaching format to enable their members to stay current with the ever more complex products which would drive the custom home theater installation market.
CEDIA's mission statement reads "To educate, certify and inspire installers in the global custom electronics industry". Expanding upon this theme, CEDIA's mission statement relating to education states "To promote and expand the educational opportunities available to all levels of management and employees in the industry, in order to further the professional, business, management, technical design and installation skills of all involved in the industry."
Emerging from CEDIA's mission statement in this, their fifteenth year, are five course tracks each ultimately leading to a recognized and respected certification. The tracks are Electronics Systems Technician, Electronics Systems Customer Relations, Electronics Systems Business, Electronic Systems Project Manager and Electronic Systems Designer.
Since we at Audioholics are aware of our readers' intense interest in assembling the finest home theater or music systems, it made perfect sense that we should monitor CEDIA's courses directed specifically to setting up such systems.
Before I discuss the individual classes attended, I'd like to stress how strongly I believe in both the absolute correctness of the audio principles being taught in these CEDIA courses and in the integrity and knowledge of the instructors. To us at Audioholics, CEDIA's core courses and seminars represent the current "state-of-the-art" thinking as regards the proper design of home theater rooms, listening/viewing spaces and the equipment that goes into them. So I intend that my reports on these courses serve as a base line for correctly installed and calibrated products as we go forward with product reviews of loudspeakers and room treatments.
With CEDIA's encouragement, I chose five classes to monitor which I thought would be of most interest to our Audioholics readers. The five classes selected from the Electronic Systems Designer track were:
- "High Performance Home Theater Calibration" taught by Anthony (Tony) Grimani
- "Room Acoustics: Acoustics Treatment" also taught by Anthony Grimani
- "Acoustics 101" taught by John Dahl
- "Room Acoustics: Isolation and Noise Control" taught by Steve Haas
- "Room Acoustics: The Room and Loudspeaker System" taught by Dr. Floyd Toole
At the conclusion of these five seminars I came out with one outstanding paradigm which was echoed by each of the presenters. That is, a signal from the airwaves or through some form of recorded media passes through all the associated wiring and electronics. It emerges from the speakers and travels through the air to your ears at your listening position. The sound of that signal at your ears is 50% the direct sound from the speakers and 50% the sound generated by the room.
That bears repeating: The sound of that signal at your ears is 50% the direct sound from the speakers and 50% the sound generated by the room.
Since this assumption leaves out the associated electronics it will be our stance at Audioholics to add that cost back in a more representative proportion. Therefore, the cost of a dollar-wise- efficient system geared toward maximum bang-for-the-buck performance will be allocated thusly; 20% for all electronics, 40% for all loudspeakers and 40% for the room and the treatment to the room that will allow the loudspeakers and electronics to function optimally.
I'll address these ratios in another Audioholics column in the near future. For now though here's an overview of what the installation professionals learned in the first of the Electronics Systems Designer level 300 and 400 courses I attended:
High Performance Home Theater Calibration - page 2
Audioholics review of "High Performance Home Theater Calibration"
Taught by Anthony Grimani of PMI Ltd.
Tony Grimani started his career in consumer electronics with a five-year stint at Dolby Labs in San Francisco after having graduated from UC Davis with an EE degree. He then went on to work for Lucasfilm THX from 1990-99. Tony started Performance Media Industries, Ltd (www.pmiltd.com) in 1999 and today continues to design and engineer high end home theaters on an individual basis. Like all CEDIA instructors, Tony volunteers to teach so that others can learn about what it takes to be successful in this rapidly growing field.
At 8am on September 9th, the day before the CEDIA exhibits opened, Tony addressed a standing room only group of around 300 installers with "Does the noise inside my head bother you?" said to no one in particular. The installers got that Tony was making reference to an attitude that installers will need if they are to be successful problem solvers. Tony's question had grabbed everyone's attention so he began...
Home Theater Calibration must start with an appreciation of what is to be accomplished, then follow on to how the room and components in the room need to be positioned and installed in order to extract their maximum performance potential. The installer must have a regimen to verify that performance before a job is considered done and ready to be given back to the home theater owner.
Audio Calibration starts with a standard, film-studio mix rooms, because it is in these rooms that the director, working with the sound mixer, crafts the movie's sound. Eliciting that sound most faithfully can be broken down to Tony's "Eight Performance Goals of Home Theater Audio"
![[P1_slide2]](/images/p1_slide2.gif)
Assuming for now that the installation is complete, the installer begins with his arsenal of tools and test discs. The recommended test discs are a set called the "5.1 Audio Toolkit". And the hardware required for this level of work is mainly available from three vendors; Goldline, Ivie and Sencore and includes the following:
![[P1_slide3]](/images/p1_slide3.gif)
Tony estimates that testing, debugging and verifying a system will usually take about one and a half days. That is barring any major complications. Referring back to the first slide, the last bullet point "every seat a good seat" is where the art and skill of the installer come into play because this "every seat a good seat" requires tuning and equalization be done at multiple locations using broadband test signals. Then, the installer must have enough experience and knowledge to understand where compromises in the overall system tuning will need to be made. Tony then refers to standards set by the film industry which are used as guidelines such as SMPTE 202M and ISO 2969.
Before leaving "goals" to be achieved with system calibration Tony gives the best reason of all for striving for "every seat a good seat". Women tend to be much more sensitive to distortion or anything that doesn't sound quite right in the midrange frequencies. So if you set up your room for one listening position only, yours, you may never understand why your significant other is less than enthusiastic when you want to watch another movie.
High Performance Home Theater Calibration - page 3
Configuring the System
Much of this part of the lecture started as you might guess with the settings inside your typical surround processor receiver. Tony then expanded on the nuts and bolts that anyone can read in the owner's manual and gave us a sense of configuring the speakers as a separate and distinct entity - when to use, for instance, a point-source speaker (always for left-center-rights) versus a dipole or bipole design or another point-source (monopole) for the surrounds.
The goal of the left-center-right for instance is to be able to hear pans as they were heard in the mixing studio. So in the case of Mix Studio D at Skywalker Ranch that meant front left channel and right channel positioned at -22.5° and +22.5° from the 0° center speaker. (Editor's note; Those last bits of info were gleaned from a talk Tom Holman gave a few years back.) The goal of the surrounds is to find a balance between spaciousness and localization.
The subwoofer(s) are last to be set up in a calibration because they operate and interact in a modal manner within the room. So they are treated and set up separately.
Tony, by the way, says that you must absolutely positively operate from a "to-do" checklist every step of the way throughout this calibration process. Much like a pilot goes through his checklist before takeoff, the proper diagnosing and calibration of a home theater system requires one step built upon another in a predetermined sequence if you want to keep that set-up and calibration time down to one and one-half days and avoid frustrating reworks.
System Verification
Now the test gear comes into play. You need to verify signal presence, then level, on both the satellites and sub(s). You need a system diagram to help you stay on track as you methodically go through your checklist of setting input voltages at the speaker terminals using your AC voltmeter and pink noise from your test discs. (BTW- Tony had a checklist available to the CEDIA students who took the class.)
You need to verify that your amp is not oscillating at frequencies between 1 MHz and 2MHz from some tough speaker loads or some “Voodoo Logic” speaker cable that has way too much capacitance. (Here’s where that ‘scope comes in handy.) The point here though is that Tony is teaching us to stay with known good cables that are cost effective.
Did you remember to check that the speakers are functioning properly and that the in-wall’s speaker frame didn’t somehow get too tweaked when you bolted it into the wall? Buy the inexpensive no-name speakers from your local lumber emporium and you’ll likely end up with a flexy plastic frame which can cause the speaker to rub and buzz when bolted to a less-then-flat wall OR, if it actually does play okay, it won’t sound very good.
Have you verified speaker polarity at all locations? Do you know how to use the 5.1 Audio Tool Kit’s test discs to verify that left and center and right are all properly in phase with each other? The list goes on…
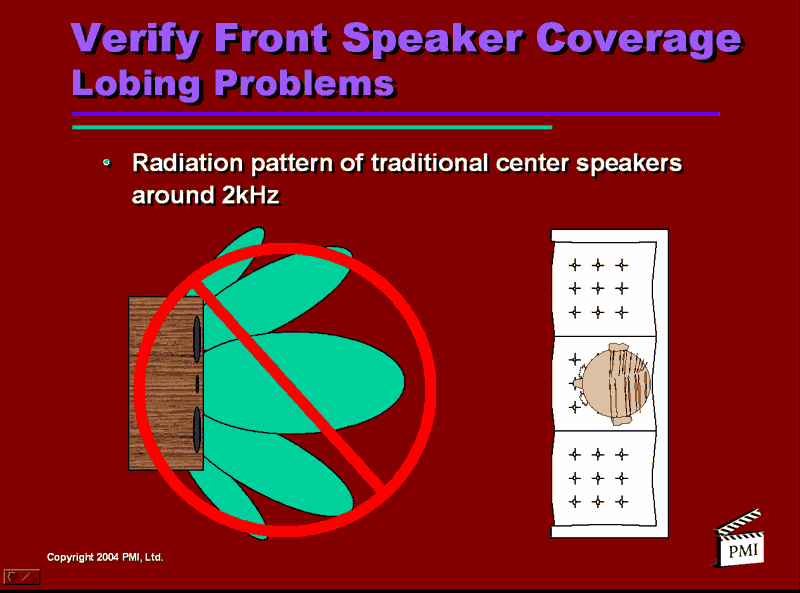
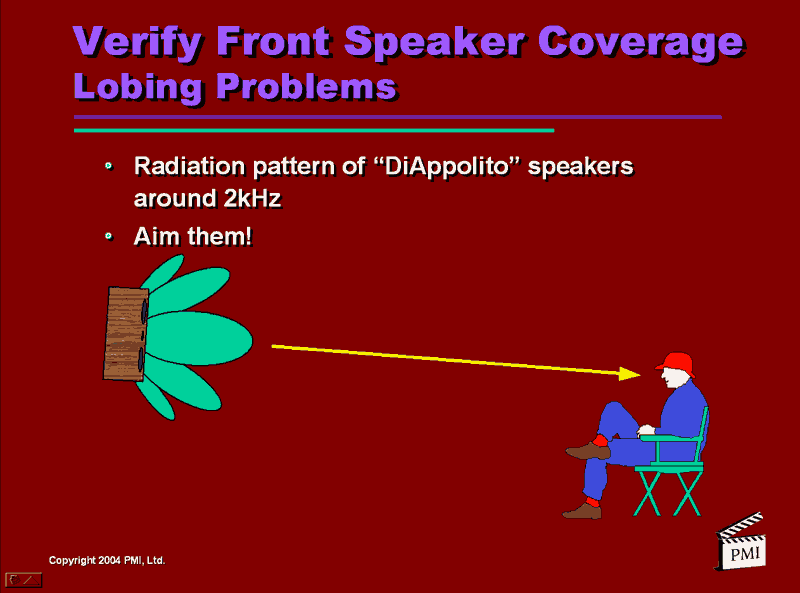
How about what was probably a real shocker to many of the installers; the configuration of the center channel speaker...

That’s right. Tony contends that the most common two-way center channel speaker layout, that of a D’Apollito on its side is incorrect. I absolutely agree. Remember your significant other sitting right beside you on the couch? See how the green lobe in the illustration which carries all that dialog information is pointed right toward you and that seat cushion beside you is hearing the signal from a null (the white space to either side of the main green finger)?
How about a trick that can at least partially take nasty room reflections out of the equation; aiming with door stops! Don’t laugh. This works big time. For me this one trick alone was worth its weight in gold record sound. Here’s what my Infinity Modulus left-center-right set-up looks like from the rear with the addition of two large door stops under the center channel and a small doorstop under the left and right corners of the Modulus custom TV bracket.
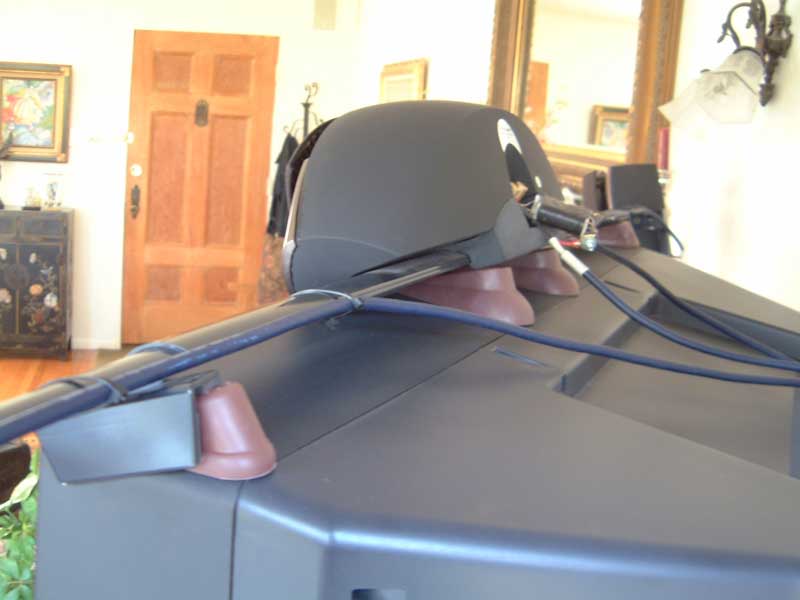
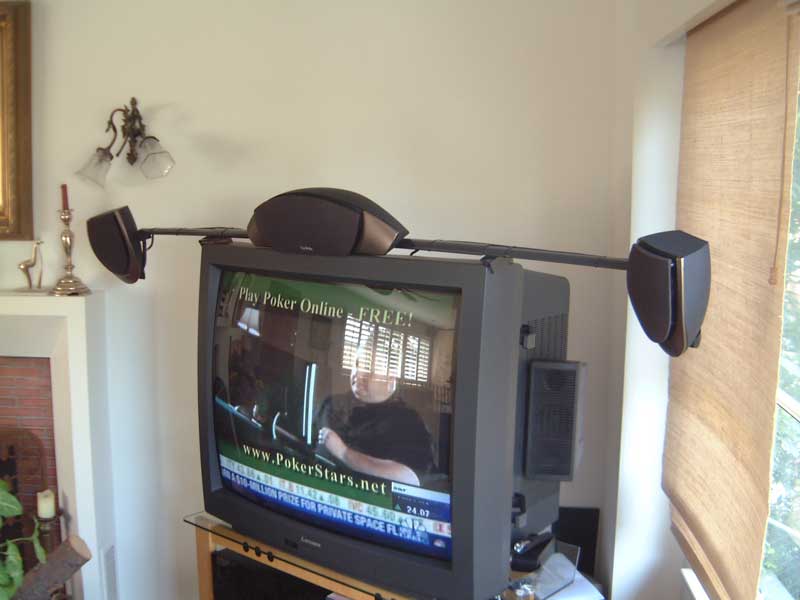
The addition of the soft rubber doorstops performed three sound-improvement functions at once:
- All three speakers were now pointed to exact ear level from our listening position on the sofa 8 feet away. (Note: These speakers and bracket sit atop a 40” Mitsubishi tube TV. Note also that this system is mounted into a corner at a 45° angle so first order axial reflections had not been a concern beforehand.)
- The second problem alleviated by the tilt was that of moving the delayed ceiling bounce reflection I was getting at the listening position from all three speakers. What became immediately apparent is that I was now receiving a slightly louder more articulated direct sound while the sound from the ceiling bounce was seriously attenuated.
- Lastly, I shimmed the outboard bracket holding each of the left and right speakers so that the speakers are now aimed more inward directly across the width of the couch listening area. There’s now a much more cohesive soundstage across the five foot couch with more of a sense of balanced sound from, for instance the left speaker when you’re sitting on the right side of the couch.
High Performance Home Theater Calibration - page 4
Subwoofer Placement and Tuning
The
subject of subwoofers, how many are required and their proper placement
and tuning ended up being a topic taught just slightly differently by
Tony, John Dahl of THX whose seminar I’ll cover in round three and Dr.
Floyd Toole of Harman International who taught the last seminar I
attended. This is not surprising when you consider that Tony has
performed over 150 installations in the last five years using products
available at the time. John Dahl teaches subwoofers in a more cursory
manner because his level 300 course is a bit more global in scope. And
Dr. Toole is teaching multiple-subwoofer calibration from the
prospective of a research scientist.
What I would like to point out to attendees of these three courses are the slight perceived differences in how these three men teach this confounding subject. If you heard each of these men speak for the first time it is probably not obvious that they are talking about the same basic difficulties frequencies below 100Hz bring to the home theater. Rather, my take is that new information is coming to the forefront on a relatively continuous basis. So what we are learning is how to do bass correctly from the perspective of THX (John Dahl) who has put their sound into thousands of theaters, from Tony who performs his bass magic on a day-by-day basis for an ever expanding base of satisfied home theater owners and from Dr. Floyd Toole who continues with his research staff to unravel more deeply, wavelengths that measure anywhere from 11.3 feet to 56.5 feet, and how they react into rooms that are considered “small spaces”.
Here then are a few “constants” that always exist when we speak a bass reproduction in small listening spaces-
- If you have a rectangular room you’re in luck. A room-mode modeling program is available for free at www.harman.com
- If your room isn’t a rectangle, all modeling programs go out the window. You’ve got to be able to diagnose proper room placement for the sub or subs in real time.
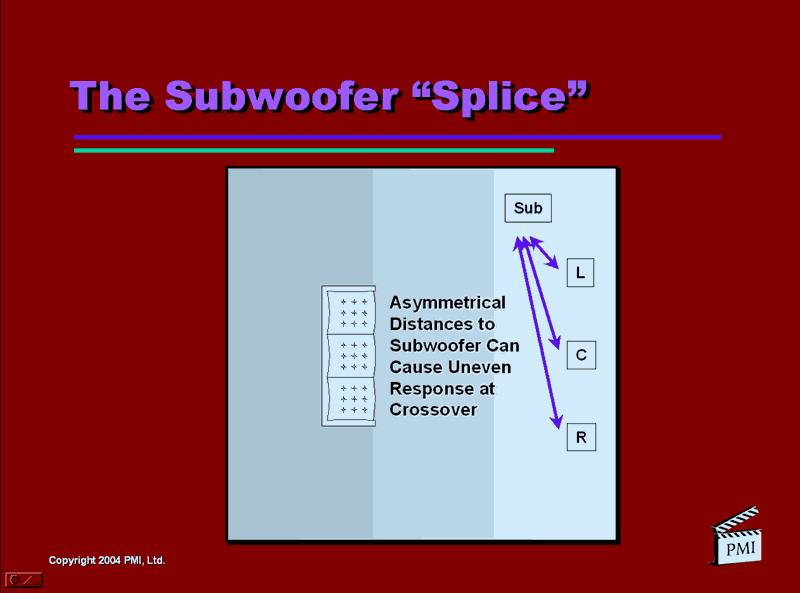
- Keep a single sub in the front area of the room and close to the center channel to avoid sat/sub blending problems at the crossover frequencies caused by asymmetry.
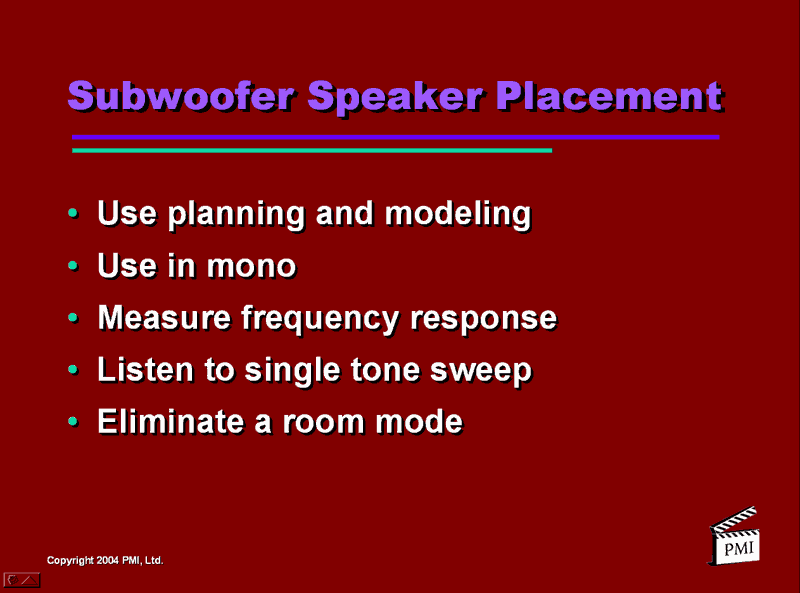
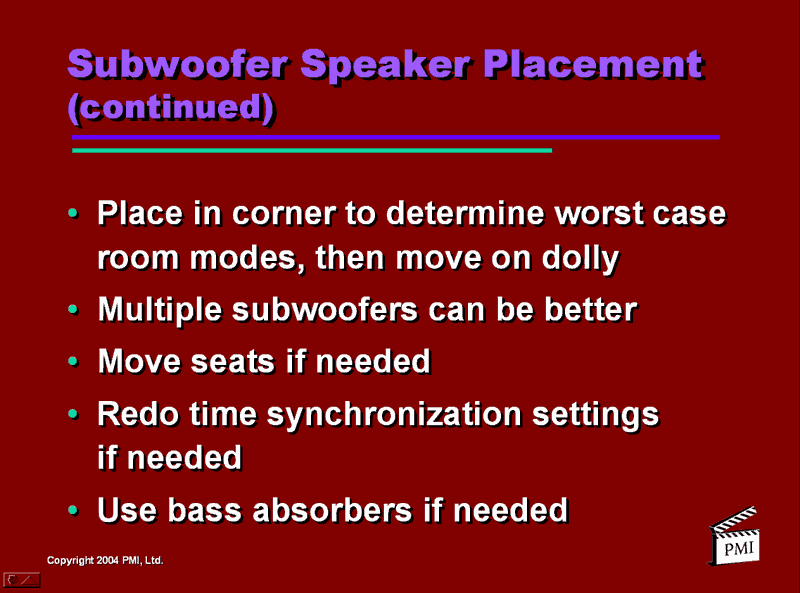
- Multiple subs are better
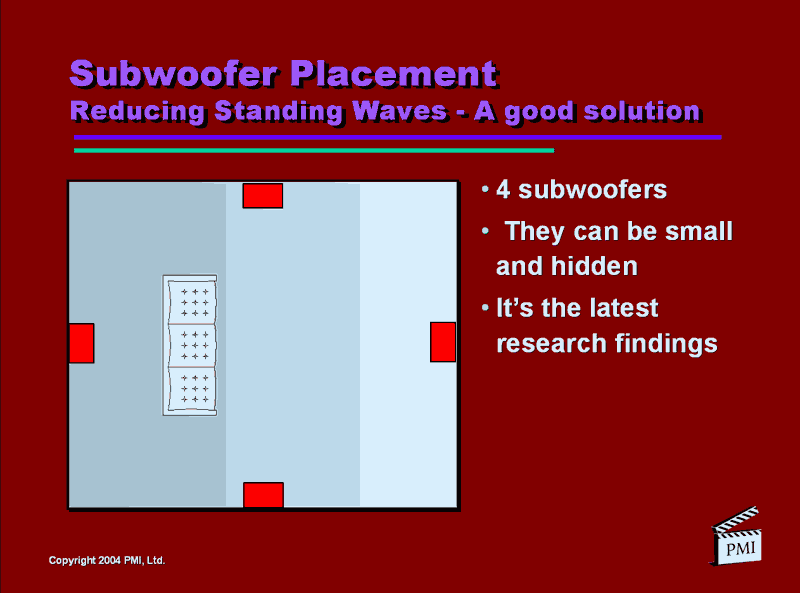
- If you don’t have at least a 1/12 octave single band equalizer which will allow you to place a subwoofer pretty much at any floor-wall junction you please, you’re going to have to figure out the best bass performance location by moving it (use a dolly for the big subs!) and charting the response from the listening position.
- Bass traps are a slight misnomer as their purpose is more to smooth the bass response across the 2 ¼ octaves (20Hz – 100Hz) so that you hear multiple tuneful bass notes, from real sounding instruments such as a kick drum and a bass guitar playing together.
- Forget foam for a bass trap. Even 4”-thick, solid, flat, open-cell foam will cause absorption down to only about 125 Hz.
- More info on subwoofers and rooms to follow in John Dahl’s and Dr. Floyd Toole’s seminar reviews.
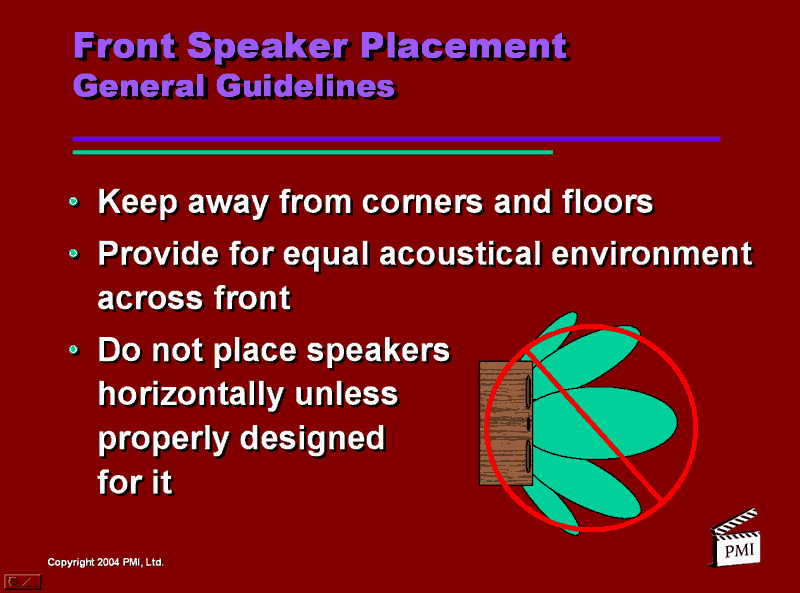
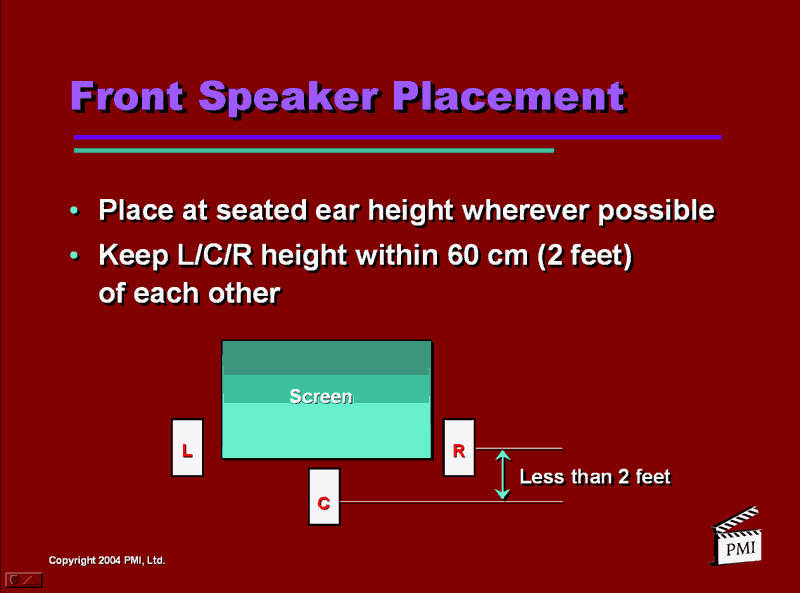
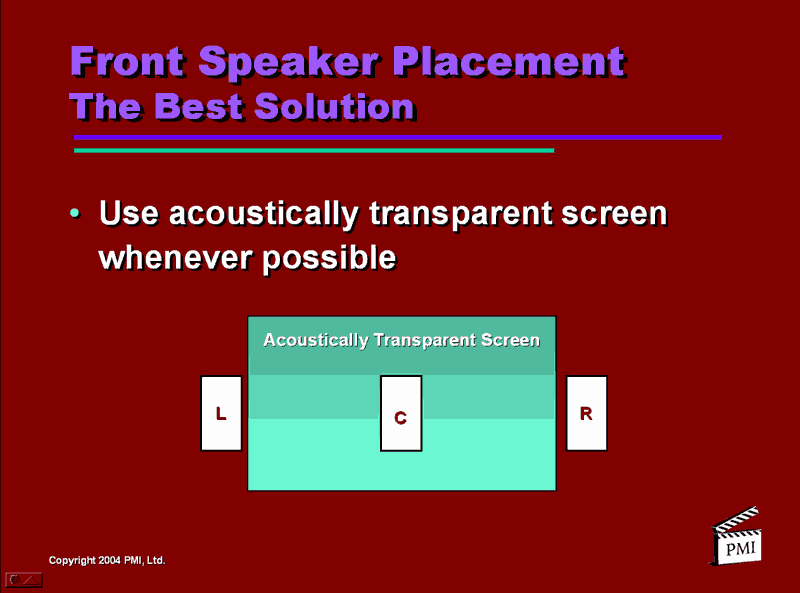
Front and Surround Speaker Placement
Most
of the speaker placement is done during the design phase. Here are a
couple of slides which show the basics for the front left-center-right
speakers.
For surround speaker placement we were given the following slide:
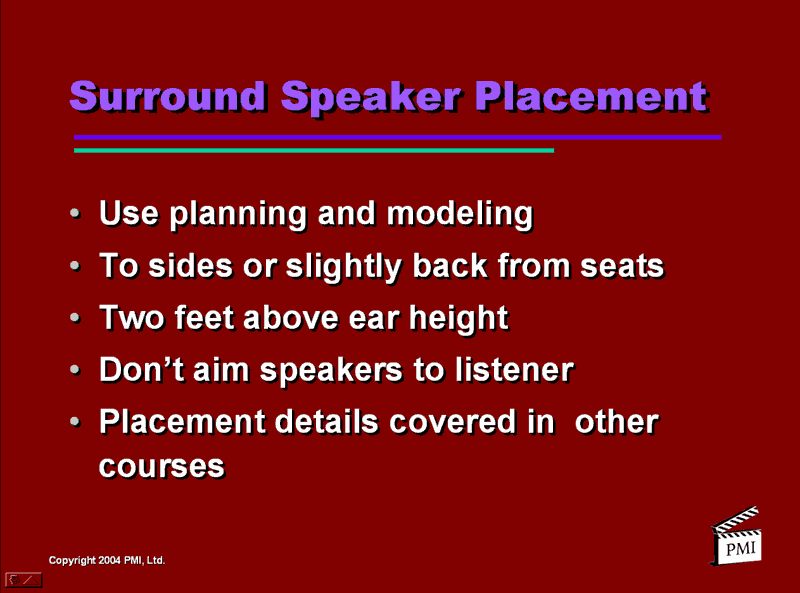
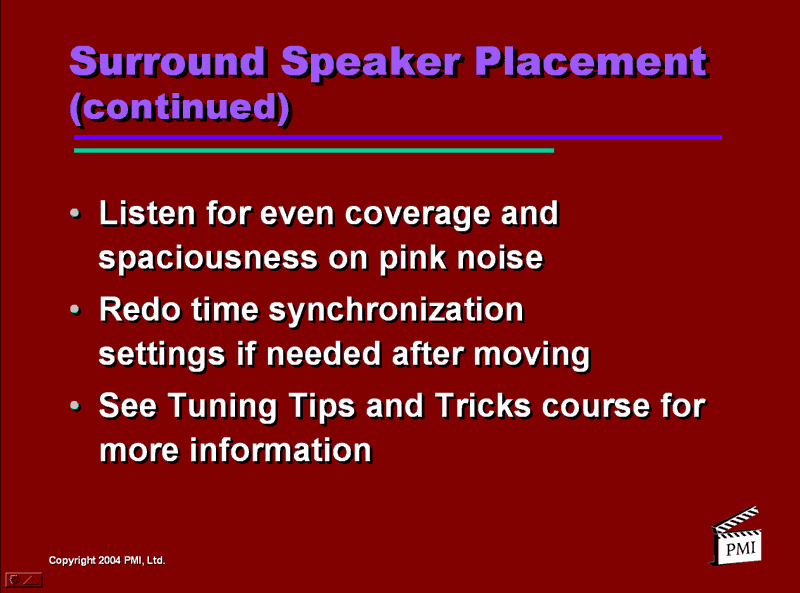
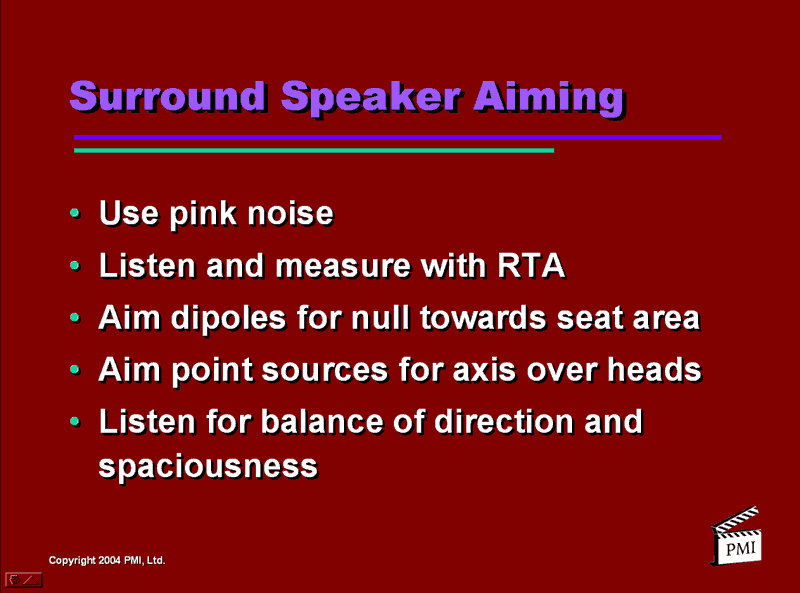
We were also advised that “placement details would be covered in other courses”. (Which we’re getting to also.)
High Performance Home Theater Calibration - page 5
Level and Frequency Response Calibration
We were now about 2 ½ hours into Tony’s course when we finally get to “calibration”. (Editor’s note: And I’ve skipped an awful lot of slides and information along the way also! This isn’t the course; it’s a review of some of the course’s highlights.)
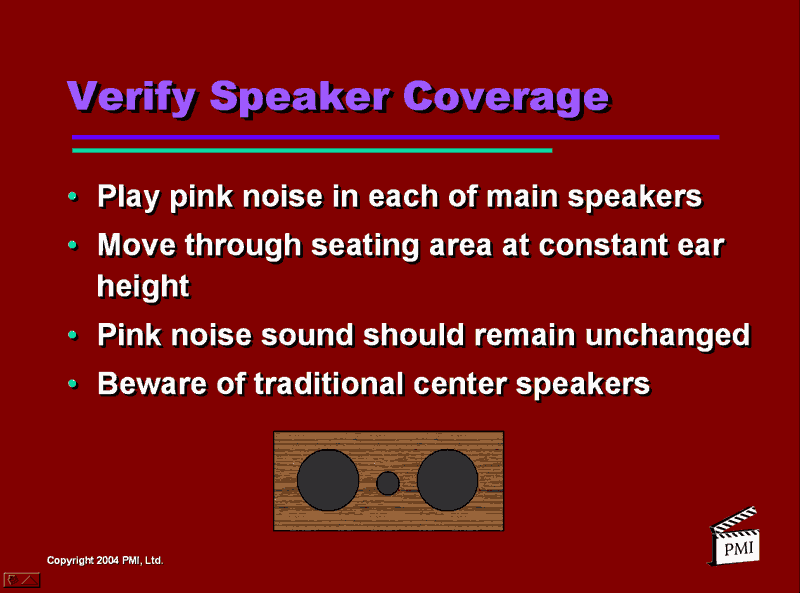
To start our calibration procedure we go back to the test signal found in the receiver’s set-up menu. We calibrate each channel for 75dB SPL. Many newer receivers have an auto calibration feature with the microphone being embedded in the receiver’s remote. Tony has found however that many of the auto-cal, internal pink-noise generation programs, in conjunction with a very inexpensive microphone embedded into the remote can end up giving readings as much as 4dB off! That’s why he recommends using the well known Radio Shack analog SPL meter in conjunction with accurate test discs such as the 5.1 Audio Tool Kit.
Frequency response calibration is done after analysis with a Real Time Analyzer (RTA). The idea is to first optimize to a flat frequency response through speaker placement and room treatment (covered in next review, “Room Acoustics: Acoustic Treatments”). Then equalize using spatial averaging, one third octave for the mains and a minimum of 1/12 octave parametric for the subs.
Spatial and temporal averaging refers to inputting multiple response curves (multiplexing) from all seating positions and averaging the results to yield as flat a curve as possible from all seating positions. Remember, all equalization is always done with all controls on the source unit set to flat. And never EQ a system at the surround decoder input.
A note about equalization; Tony and John Dahl of THX recommend avoiding any equalization of known flat-response speakers above 1KHz. Dr. Toole contends that you should never have to equalize above 700-800Hz at the most. Surround speakers may need equalizing depending on placement. At this point in the discussion Tony laid out a step-by-step procedure for EQ’ing the system using a professional RTA. (If you own or have access to an RTA Tony’s tweaking procedure will make perfect sense but I’ll skip past that part of the course for now.)
Documenting the Room Calibration and Final Listening Tests
It
is important to note that data on all the calibration and tuning of the
system can be documented and given to the customer upon completion in
the form of the checklist which you’ve methodically worked through.
Plus you’ll have a set of curves you’ll be able to show off that verify
the performance of your room/system calibration procedures.
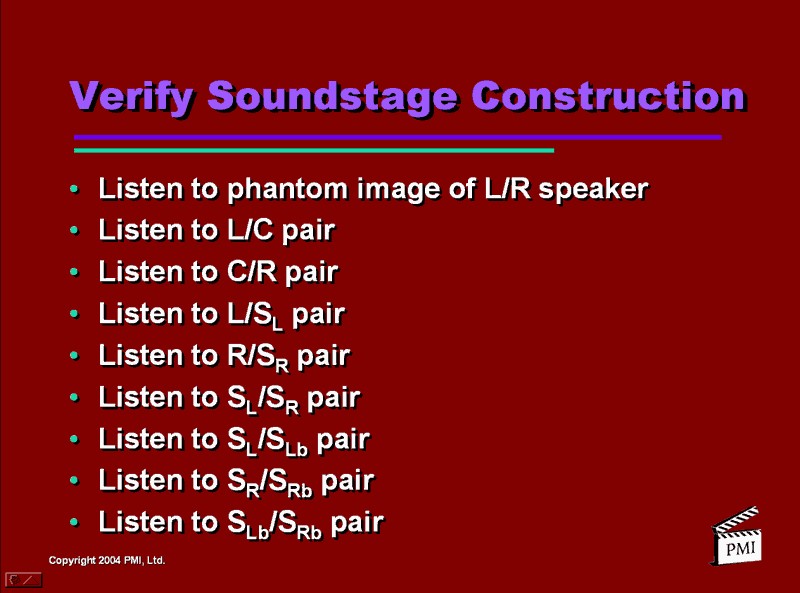
The last steps now are the listening tests starting with the Soundstage Construction:
![[P1_slide18]](../../../../images/p1_slide18.gif)
Now refer back to the very beginning of this review for Tony’s “Eight Performance Goal’s of Home Theater Audio Systems”. And using test software found on the 5.1 Audio Toolkit DVD, Ovation software’s “Avia” DVD or a disc like Delos’ “Surround Spectacular” check that the system can indeed deliver on each of the goals. You’re done!
Note: Information on much of the hardware and software which Tony Grimani talks about in his classes (and uses everyday himself) can be found on his website at www.pmiltd.com.
For more information on becoming an installation professional or having a home theater built contact CEDIA at www.cedia.org.