
Panasonic PT-AE900U LCD Projector Review
Panasonic PT-AE900U projector
- Product Name: PT-AE900U LCD Projector
- Manufacturer: Panasonic
- Performance Rating:


- Value Rating:
- Review Date: October 27, 2005 20:00
- MSRP: $ 3199 (discontinued)
|
Brightness:
1100 ANSI
lumens |
Projection
Lens: 2x
optical zoom; f = 21.7 - 43.1 mm. F/1.9 - 3.1, manual focus &
zoom Uniformity Ratio: 85% (center-to-corner) Remote Control:
Learning
remote; 7m range on axis, 3 VDC power supply, AAA x 3
batteries Operating Noise: 26dB (minimum)
Dimensions: 13.2" x 3.7" x 10.6" in (335 x 95 x 270 mm) Weight: 7.9 lbs (3.6 kg) |
Pros
- ZERO screen door effect from real viewing distances
- Excellent contrast
- Deep, rich colors
- Consumer adjustment of RGB gain, cut and gamma
- Backlit LEARNING remote
- Finely adjustable color temperature
- 3000 hour lamp life
- Can move OSD position
Cons
- Requires calibration out of the box
- IR sensor on front only
- Overscan enabled by default
- More optical zoom would be welcome
- Friends may show up unexpectedly to watch movies
- No 12V trigger
New D5 LCD Panels
We got our first glimpse of the Panasonic PT-AE900U at this year's CEDIA Expo in Indianapolis . While the projector wasn't displaying picture at the booth, we were excited to see that it sported the new D-5 LCD panel and had a significantly improved contrast metric, a tweaked ANSI lumen output and dynamic iris optical system. What really, mattered, of course, was whether it outperformed the PT-AE700U. We quickly lined up a review unit. Being a fan of LCD projection technology already, I was curious to see how much better the Panasonic performed with its "Smooth Screen" pixel-smoothing technology and enhanced contrast ratio spec.
New D5 LCD Panels
As everyone is likely aware, LCD projection systems have been getting better and better with each new panel generation. The new D5 panel featured in the PT-AE900U sports a higher fill factor, meaning that the pixels are spaced closer together. This makes the proverbial "screen door effect" (SDE) almost a non-issue at any reasonable viewing distance. In the case of the 900U, I'd put that distance at 1.5 times the screen width. The new D5 panels also feature a 50% increase in contrast, faster response time, greater aperture ratio (higher brightness) and they are even cheaper to boot... He's a quick comparison of D5 to the previous generation D4 panels:
|
Technology |
D5 Panel (PT-AE900U) |
D4 Panel (PT-AE700U) |
|---|---|---|
|
Effective Pixels |
1284 x 724 (720p) |
1284 x 724 (720p) |
|
Screen Size (diagonal) |
0.7-inch (1.8cm) |
0.7-inch (1.8cm) |
|
Pixel Pitch |
12 microns |
12 microns |
|
Aperture Ratio |
60% |
50% |
|
Contrast |
750:1 |
500:1 |
PT-AE900U Features, Connections & Remote Control
Features and Favorites
There is a lot to like about the Panasonic PT-AE900U 3LCD projector. For starters, I had to rack my brain to come up with any negatives on this unit, given its price point and inclusion of some pretty excellent features. Let's get a quick overview of the highlights (those of you familiar with the PT-AE700U will recognize most of these). In addition to the D5 panel specifications shown earlier, the AE900U features:
-
Horizontal and Vertical Lens
Shift
Keystoning is for office projection systems... For home theater you either need to install the projector flawlessly to line up the image to the screen (use an easily adjustable mount), or you'll want to get a model with horizontal and vertical lens shift. The Panasonic PT-AE900U allows 65% vertical and 24% horizontal adjustment. These numbers don't really do the function justice, so understand that the adjustment ranges (64% and 24%) represent the mount of "play' you have from center in each direction. That gives you well over an entire screen height of adjustment in total (130%).
-
Smooth Screen Technology
LCD panels have been associated with "screen door effect" - a phenomenon caused by the presence of a certain amount of blank space between individual panel pixels. This often makes the image appear is if you're watching it through a screen door if you sit too close to the screen (generally less than 2-2.5 times the screen width on most systems). Panasonic's Smooth Screen technology eliminates the gap between pixels, providing a smooth, film-like image. I would compare it to LCoS and note that no resolution or sharpness is lost using this technology. All 3LCD projectors should use this technology - screen door effect now seems to be a thing of the past.
-
Fully Backlit LEARNING Remote
Control
It's unusual enough to find a projector with a fully backlit remote control, but to add learning functionality seems almost overkill (and I'm happy to find an overkill remote for once). This remote is a significant update from the one included with the former PT-AE700U projector and sports an LCD screen for source selection and setup assist. I had all of my components' basic functions configured on the remote in about 5 minutes using the preset codes.
-
Dynamic Iris
Taking its cue from the input signal, the Dynamic Iris system adjusts the iris, gamma and even lamp power to make dark scenes deeper and bright scenes brighter - enhancing the perceived range of contrast.
Some of these items will receive additional attention later, but let's just say that for a projector that has a street price of around $2200, Panasonic's PT-AE900U is a strong contender in the realm of competent yet inexpensive home theater front projection systems.
Basic Setup and
Installation
The presence of a lens shift assembly makes this projector easy to mount, or if you prefer, place it on a tabletop. For this review we utilized a 100" diagonal Stewart Luxus Deluxe ScreenWall (with ISF-certified Studiotek 130 screen). This is a very high quality screen with very even dispersion characteristics and color uniformity and is optimized for excellent white levels while allowing for deep, rich blacks in a light-controlled room. For those considering the Panasonic PT-AE900U in their home theater room, take a look at the 16:9 throw chart:
16:9 Throw Chart for Distancing the Projector from the Projection Screen
|
Screen Size
|
Size (Inches) |
Distance (Feet) |
||
|---|---|---|---|---|
|
|
width |
height |
wide |
tele |
|
70 |
61.0 |
34.3 |
6.8 |
14.1 |
|
80 |
69.7 |
39.2 |
7.8 |
16.1 |
|
90 |
78.4 |
44.1 |
8.8 |
18.1 |
|
100 |
87.2 |
49.0 |
10.1 |
20.3 |
|
110 |
95.9 |
53.9 |
11.1 |
22.2 |
|
120 |
104.6 |
58.8 |
12.1 |
24.3 |
|
130 |
113.3 |
63.7 |
13.1 |
26.3 |
|
150 |
130.7 |
73.5 |
15.2 |
30.5 |
|
170 |
148.2 |
83.3 |
17.2 |
34.4 |
|
200 |
174.3 |
98.1 |
20.3 |
40.7 |
If you want to do the exact calculations, use this (in meters):
Maximum distance (telephoto) = 2.4449 x diagonal screen distance (meters) - 0.056
Minimum distance (wide) = 1.2244 x diagonal screen distance (meters) - 0.056
Note: 1 meter = 3.281 feet
We are not particularly fans of gray screens, however if you are in a room that cannot be completely light controlled (or has a lot of reflective or bright surfaces) then you will most certainly benefit from a high contrast gray screen material. The Studiotek 130 screen has a gain of 1.3 meaning that on-axis it is about 30% brighter than standard matte white surface materials (the half gain point occurs at 40 degrees). It supports practical viewing angles of up to 160 degrees - very good for home theater use and one of the widest possible viewing angles for front projection screens.
We positioned the projector in a temporary, but workable location. It was centered horizontally with the screen and set back about 12' 4" - towards the minimum of the throw distance range. We faced the projector so that the image would not keystone on the screen and utilized the lens shift to make final adjustments, taking care to not extend the function towards any of the extremes.
Editor's Note: Digital Keystoning
As seemingly handy as digital keystoning may seem in a fixed pixel display, it results in loss of resolution and detail and should be avoided at all costs. Lens shift, which moves the entire lens assembly, is a much more effective, though more expensive, solution. Always try to relocate the projector before giving in to digital keystone adjustments. We personally would accept a slightly off-axis picture rather than engage keystoning. To understand the significance, simply place an image on the screen that possesses crisp detail or text. Then stand up close to the screen (you can see it from the seated position, but up close is even more obvious) and toggle keystoning on and off. You will immediately see the text/detail blur when keystone is in any position but the default. Keystoning is an easy fix, and is likely here to stay, but those who know better leave it alone whenever possible.
We ran two different cables to the projector for our tests. A well-shielded component video cable was supplied by Impact Acoustics and gave us an excellent analogue connection from the Denon DVD-3910 player's component outputs (we also tested HDTV). A well-built SHR HDMI cable, supplied by DVIGear, enabled us to compare the digital video connection from the Denon DVD player as well.
A couple things to note about the "starter" settings for the Panasonic include making sure you set the Picture Mode to Cinema1, leave Dynamic Iris On , and set Lamp Power to Low . This will get you in the ball park in terms of dynamics, color and contrast and enable you to have the best starting position from which to calibrate using common tools such as AVIA Guide to Home Theater or Digital Video Essentials .
Connections
The Panasonic projector comes with a remote, batteries and power cord - no cables are provided. Should you have the desire, however, you can fill up a composite, s-video, HDMI-HDCP, RGB/HD15, and two component video inputs to your heart's content. A serial connector is provided which, with an adapter (ET-ADSER) that is sold separately, allows you to connect the projector to an RS-232C-based control system. A pinout diagram and basic control signal info are provided in the manual.
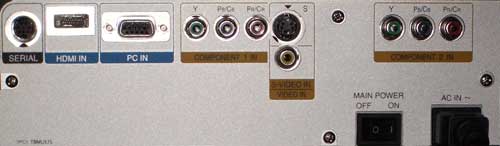
As previously mentioned, we utilized the component video inputs (YPbPr) as well as the HDCP-enabled HDMI input for our tests. We sent 480i interlaced signal from the Denon DVD-3910 to the Panasonic projector and allowed the onboard deinterlacer to convert the signal to progressive scan, performing all deinterlacing functions as well as 2:3 pulldown (more on this later). The connections are almost ostentatiously spaced out and are much easier to utilize than some other projectors I've worked with.
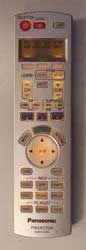
Remote Control
 I could just say that I didn't really find anything
wrong with the remote... Then, after everyone picked themselves up off the floor I could go on my merry
way and complete the review. But I guess I'll go over some of the highlights to explain my lack of
criticism.
I could just say that I didn't really find anything
wrong with the remote... Then, after everyone picked themselves up off the floor I could go on my merry
way and complete the review. But I guess I'll go over some of the highlights to explain my lack of
criticism.
First off, the remote is completely backlit. This alone scores highly in my estimation. Add to that direct access to: inputs (toggle for component), ASPECT ratio, picture adjustment settings ( MAIN, ADVANCED, and C.C.M .), and MEM .LOAD to load memory modes - and you're starting to look really good. Continue by adding learning functions for up to 8 devices and you've just jumped well above average in my book. Learning can be input via device codes which are provided in the separate Remote Control Operating Guide or you can learn a completely custom set of codes in any of the three User settings. M y favorite quote from the manual: "Do not use the learning function to record remote control signals from other learning remote controls that have been learnt by those remote controls." Say what? Basically, Panasonic recommends using the original device remotes rather than, say taking another learning remote and shooting those codes into the Panasonic remote. One nice thing that is provided is a rather obvious, centrally located PROJECTOR button that quickly resets the remote back to the projector source - allowing you to quickly control the projector after having just entered commands to another device.
Then one thing I would have recommended to Panasonic - since this is a learning remote - would have been to rearrange the lower buttons such that a number pad could have been integrated. While I was able to program my cable box into this remote, I had to use the navigational pad to get around as there was no way to directly enter channels. But seriously, I think that both people who actually use the learning features of this remote will come up with a sufficient workaround.
The most commonly used functions will be the input selection and aspect ratio button, both of which are conveniently located. Once you enter the menu system, either through one of the direct-access keys or via the large MENU button, the directional keys can take you from there. This remote can only be criticized for having way more than it needs to - but I'm not prepared to dock an overachiever.
PT-AE900U Setup Menu and Calibration
PICTURE MenuThe PICTURE Menu is where I spent most of my time - and for good reason. It allows access to contrast, brightness, color, tint, sharpness, color temperature and iris settings as well as access to an ADVANCED Menu and memory load/save options. Engaging the MENU button on the remote or projector brings up the rather large menu, but it can be moved to one of seven quadrants of the screen (including the center). Engaging any of the picture controls hides the menu and allows you to view the screen with only a smaller bar graph representation of the control at the bottom of the screen. This makes using calibration discs such as AVIA Guide to Home Theater or Digital Video Essentials possible. Put your running shoes on, though, as the mini menu only stays up for about 3.5 seconds unless you make an adjustment (then you get a 3.5 second extension). This applies to when you directly access a menu function from the remote control as well. I found this only mildly annoying as simply hitting ENTER or moving the directional pad brought the mini control back to the front, hiding the larger menu (not so with the direct access control, obviously).
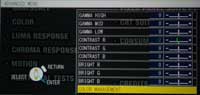 At the bottom of the PICTURE Menu is an option to engage the ADVANCED Menu which provides controls
for Gamma, Black and White Levels for the red/green/blue colors. This is also where you can gain access
to the Cinema Color Management function (C.C.M.) - a system whereby users can select which colors they
want to blow out of whack by specifically tweaking their Color, Tint, and Brightness settings. If the
Panasonic hadn't already provided access to red green and blue Gamma, Black, and White levels I suppose
the C.C.M. system could potentially be utilized to compensate for color decoder issues. I found it to be
a fun tool that could be used to give Monday Night Football and televised golf games exceptional greens.
Take a look at an over-exaggerated use of this function:
At the bottom of the PICTURE Menu is an option to engage the ADVANCED Menu which provides controls
for Gamma, Black and White Levels for the red/green/blue colors. This is also where you can gain access
to the Cinema Color Management function (C.C.M.) - a system whereby users can select which colors they
want to blow out of whack by specifically tweaking their Color, Tint, and Brightness settings. If the
Panasonic hadn't already provided access to red green and blue Gamma, Black, and White levels I suppose
the C.C.M. system could potentially be utilized to compensate for color decoder issues. I found it to be
a fun tool that could be used to give Monday Night Football and televised golf games exceptional greens.
Take a look at an over-exaggerated use of this function:
You engage C.C. M . which freezes the screen and allows you to move a cursor around to grab the color to which you want to apply correction.
Once selected the color controls for Color, Tint, and Bright[ness]
appear, allowing you to modify the color and see the update after
pressing the ENTER key.
Calibration - Get Those Black Levels Right!
We wanted to ensure that the Panasonic PT-AE900U was fully capable of reproducing a decent range of luminance information from deep blacks to bright whites. The goal, of course, is to maximize the contrast ratio while not crushing blacks or whites and losing resolution. Speaking of contrast, I was able to get 670:1 ANSI rating using my standard configuration for front projection systems. This is extremely good for a front projection system and shows how far Panasonic has come with this latest LCD panel.
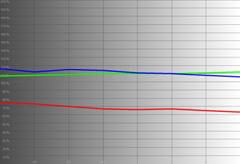
The Datacolor ColorFacts software provides a CIE Chart which shows the colors for the PT-AE900U's HDTV color reference, as well as the gamut of colors that it is capable of creating. I was able to get better color reproduction, but only at the expense of black levels and sacrificing overall accuracy. The real ticket was attaining compromise of best color, along with a solid grayscale uniformity and deep black and white levels.
Here are some of the before and after measurements as shown by the Datacolor ColorFacts Professional 5.5 software:
|
Before Calibration |
After Calibration |
|
|
|
|
Holy lack of reds, Batman! The default color mode for the Panasonic is " Normal ". I'd recommend using this only if you plan on watching sports like football and golf religiously where bold greens/bright whites are the most important aspect of your viewing enjoyment. Go for Cinema1 and start adjusting from there. |
After calibrating the PT-AE900U were able to get the colors more into the ballpark but saw a consistent issue whereby red would creep into the higher gain levels. Playing with the red gamma is what we would recommend here for those of you who absolutely must have perfection. |
|
|
|
|
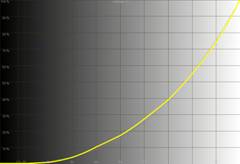
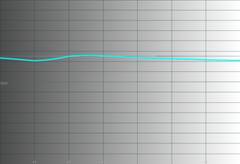
When the unit is stepped through levels of grey from 0 IRE to 100 IRE, the measurements hold a rather uniform luminance histogram. |
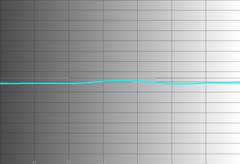
No surprise here. After adjusting the set we have an equally uniform luminance performance. |
|
|
|
|
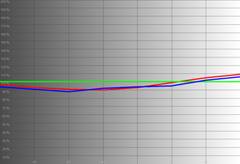
Got color? The Panasonic (in ' Normal ' mode) was a bit off form the desired 6500K reading we were looking for. |
After calibration, the PT-AE900U got right down to business, settling in about where we wanted it to. It doesn't typically get much flatter than this without some serious tweaking. |

I was pleasantly surprised by the Panasonic and found it to be very easy to calibrate using the user controls. The only negative we found was a tendency for red to creep into the higher luminance windows. As the gain increases, the amount of visible red grows disproportionately. The provided gamma controls are where you may spend some time in dialing that in a little bit to attain an even more tweaked performance.
Audioholics/HQV Bench Testing Summary of Test
Results
Perfect Score is 130
Panasonic PT-AE900U Benchmark Score:
71
(room for improvement, but darn good from what we've
tested to date)
|
Test |
Max
|
Component
|
Component
|
|
|---|---|---|---|---|
|
Color Bar |
10 |
10 |
Pass |
|
|
Jaggies #1 |
5 |
3 |
Pass |
|
|
Jaggies #2 |
5 |
3 |
Pass |
|
|
Flag |
10 |
5 |
Pass |
|
|
Detail |
10 |
10 |
Pass |
|
|
Noise |
10 |
0 |
Fail |
|
|
Motion Adaptive Noise Reduction |
10 |
0 |
Fail |
|
|
Film Detail |
10 |
10 |
Pass |
|
|
Cadence 2:2 Video |
5 |
5 |
Pass |
|
|
Cadence 2:2:2:4 DV Cam |
5 |
5 |
Pass |
|
|
Cadence 2:3:3:2 DV Cam |
5 |
0 |
Fail |
|
|
Cadence 3:2:3:2:2 Vari-speed |
5 |
0 |
Fail |
|
|
Cadence 5:5 Animation |
5 |
0 |
Fail |
|
|
Cadence 6:4 Animation |
5 |
5 |
Pass |
|
|
Cadence 8:7 animation |
5 |
0 |
Fail |
|
|
Cadence 3:2 24fps film |
5 |
5 |
Pass |
|
|
Scrolling Horizontal |
10 |
5 |
Pass |
|
|
Scrolling Rolling |
10 |
5 |
Pass |
|
|
Total Points |
130 |
71 |
|
|
Comments on HQV Testing
I'd have to say I was impressed with the Panasonic's overall video processing performance for a front projection system. In fact, it outclassed the progressive scan output from a Sony ES DVP-CX777ES in our first round of testing; leading us to select feeding it interlaced 480i output from the Sony rather than allowing the 400-disc changer to handle the task of deinterlacing (the back end of the review was done using a Denon DVD-3910). The noise reduction feature of the Panasonic, in real world use, seemed to do very little. I could see some noise reduction, mostly around the very edges of objects, but never enough to qualify as passing the HQV noise tests. Jaggie reduction was acceptable, but not quite as smooth as Faroudja or HQV chipsets. There was a bit of wobbling around the center and at extreme angles. This also translated to the more real-world flag test. Detail was excellent and the Panasonic handled more cadences than the FLI 2310. 2:3 pull-down, needless to say, was perfect, with a faster lock-on time in the Film Detail test than most DVD players I have tested to date (the DVD-5910 excepted.)
PT-AE900U Viewing Evaluation & Conclusion
The summary for the viewing evaluations would be a simple, but firm: Wow. The system was ISF-calibrated prior to the viewing evaluation using Datacolor's ColorFacts 5.5 software. All calibration was done in the light-controlled Reference System 2 on the Stewart Studiotek 130 projection screen.
I sit pretty close to the picture in my theater room. My theory is that if you're going to do movies at home, they better be big. In most cases, the perceived image is bigger than the local movie theater. As a result you need a good quality display, lest you end up looking at lots of pixels, rather than the content on the screen. The Panasonic PT-AE900U's Smooth Screen technology is no gimmick. It really works, and the result is a 3LCD projector that more closely resembles LCoS. The screen door simply isn't there - it's gone. The edges of the pixels are instead blended to the next, creating a very soft edge. The results are more than a little impressive:

This is about as good as it gets regarding putting two pixels next to each other without spacing.
DVD: Honey
This hip, hip-hop movie stars Jessica Alba... I'm
sorry, what were we talking about? Um, well anyway, this movie goes from club to dark alley, to music
video - pushing lots of dark scenes and presenting a real challenge for meeting the required black
levels. The Panasonic stretched itself and didn't seem to be afraid of the dark. Blacks can get deeper,
and I am already looking forward to the D9 panels that should actually suck light from the room and make
a cup of cappuccino on command, but for now the D5 panels seem to be a real step up from what I've seen
to date. In the three captured scenes below take note of the shadow levels as well as the fine hair and
facial detail.


HDTV: CSI:
Miami
CSI:
M
iami
is quite simply a beautiful
show to watch. Even though I am watching it on cable TV's flavor of HDTV, it does not seem to be nearly
as soft or compressed as what I've viewed on DirecTV. In contrast, the picture is quite vivid with plenty
of detail and great spots for checking out white and black levels. I grabbed some clips below that show
the excellent color and image fidelity as well as some white lab coats that could pose a problem for an
uncalibrated display. David Caruso has some, shall we say, "detailed" skin textures and is always a good
object for looking at skin tones (ok,
tanned
skin tones). As this show is a mixture of live
action and CG, there is always something fun to be seen in terms of intricate models and scenic
backdrops. Characters are well lit and a projector must be colorful and able to handle smooth gradients
(in motion) for results to be truly pleasing. The Panasonic PT-AE900U didn't miss a single detail and I
was able to get pulled into the story without distraction.


HDTV: House
I'm not sure if it's Hugh Laurie's sardonic style that attracts me to this show, or
just seeing Robert Sean Leonard back in a decent on-screen role since he took a period of time to delve
into theater.
House
is a show that is generally bright, similar to
CSI:
Miami
but, if it's possible, even more detailed -
with a propensity to show extreme close-ups of the main actors when delivering important lines. HDTV
looks positively crisp on this display, even from my seated position which is only about 1.5x the screen
width away. While the interior hospital scenes struggle to provide color and diversity, the occasional
outdoor scene makes for a refreshing look at what the Panasonic can do when given the right source
material.


Conclusion
Settling back in and enjoying the Panasonic PT-AE900U I realized that this just might be one of the best price-for-performance projectors I've seen in a long time. By far, the best attribute of this product is the Smooth Screen technology that puts the nail in the coffin for screen door effect. Add to those decent blacks, exceptional color reproduction and a slew of features like lens shift and user-calibration of RGB brightness/contrast/gamma levels and you've got a winner for its $2200 street price. I would have no problem recommending this projector to anyone in the < $2500 budget range looking for an excellent front projection system.
Secaucus , NJ 07094
http://www.panasonic.com/
Best known by its Panasonic brand name, Matsushita Electric Industrial Co., Ltd. is a worldwide leader in the development and manufacture of electronic products for a wide range of consumer, business, and industrial needs. Based in Osaka, Japan, the company recorded consolidated net sales of US$81.44 billion for the year ended March 31, 2005. The company's shares are listed on the Tokyo, Osaka, Nagoya, New York (NYSE:MC), Euronext Amsterdam and Frankfurt stock exchanges. For more information on the company and the Panasonic brand, visit the company's website at http://panasonic.co.jp/global/index.html.
The Score Card
The scoring below is based on each piece of equipment doing the duty it is designed for. The numbers are weighed heavily with respect to the individual cost of each unit, thus giving a rating roughly equal to:
Performance × Price Factor/Value = Rating
Audioholics.com note: The ratings indicated below are based on subjective listening and objective testing of the product in question. The rating scale is based on performance/value ratio. If you notice better performing products in future reviews that have lower numbers in certain areas, be aware that the value factor is most likely the culprit. Other Audioholics reviewers may rate products solely based on performance, and each reviewer has his/her own system for ratings.
Audioholics Rating Scale
 — Excellent
- — Very Good
- — Good
- — Fair
- — Poor
| Metric | Rating |
|---|---|
| Detail and Resolution | |
| Deinterlacing & Scaling | |
| Contrast and Black Levels | |
| Color Reproduction | |
| Noise Reduction | |
| Calibration Options | |
| Build Quality | |
| Ergonomics & Usability | |
| Ease of Setup | |
| Features | |
| Remote Control | |
| Performance | |
| Value |
Clint Deboer was terminated from Audioholics for misconduct on April 4th, 2014. He no longer represents Audioholics in any fashion.
View full profile