
Sanyo PLV-Z4 Projector Review
Sanyo PLV-Z4
- Product Name: PLV-Z4 Projector
- Manufacturer: Sanyo
- Performance Rating:


- Value Rating:
- Review Date: February 25, 2006 19:00
- MSRP: $ 2995
|
Brightness: 1000 ANSI lumens
(max) |
Projection Lens: 2.0x optical zoom; f =
21.3 – 42.6 mm/F2.0 – 3.0, manual focus & zoom |
Pros
- Very detailed image
- Usable picture/color controls for HDMI input
- Extremely quiet
- 3000 hour bulb life (max)
- Excellent LCD panel adjustment and maintenance options
- Reduced screen door effect
Cons
- Requires calibration out of the box, specifically for white and black levels
- No 12VDC trigger
PLV-Z4 Build Quality & Inputs
Lately I've found myself delving more and more into the differing aspects of projectors and the advantages and disadvantages of each format and brand over others. To say that this has been educational as well as fun would be like saying multi-channel audio is somewhat nicer than mono - it's a dramatic understatement. It has offered the opportunity to compare and contrast features, and to adjust (and greatly raise) my expectations for what projectors should do at their price points. That's the problem with reviews - they're somewhat fleeting and easily obsoleted by new advancements and models. The only consolation is that this also means new models are consistently coming to market which raise the bar.
Sanyo is an interesting company. I mean, they make rice cookers, vacuum cleaners and massage chairs in addition to electronic AV products. I think that somewhere in the world there is a room with two guys in it from LG and Sanyo talking about how they will one day open up a market for Internet-enabled WiFi latrines. The Sanyo PLV-Z4 debuted last September and took the industry by storm. Its reputation for excellent color, contrast ratio and image quality quickly made it one of the year's top sellers in the under-$3000 category. With Audioholics publishing reviews on most of the competition, we wanted to get the Sanyo - on the books - so prospective buyers could compare and contrast against the other models we've reviewed (plus it looked cool and I wanted to chastise other manufacturers for not having a nifty automatic sliding shutter...)
Out of the Box and Build Quality
The PLV-Z4 arrived with few frills, just the main projector, power cable, remote control, squeeze-blower (more on this later), and user manual. The projector weighs in at just over 10 pounds and has a decent looking set of optics. A manual focus surrounds the lens (f/2.0 - 3.0) as does a zoom lever which adjusts the focal length from 21.3 - 42.6mm (2x optical zoom). At this price I now expect lens shift and the Sanyo delivers, even adding a unique "lock" lever to keep the lens assembly from drifting once positioned. The PLV-Z4 can accommodate a generous 100% vertical and 50% horizontal lens shift. While we recommend aiming the unit for the center, you could almost mount this projector in the next room and still hit the screen.
We don't recommend keystoning a projector (either physically or digitally), but if you are unable to correctly hit the screen with lens shift (which with this projector's range means that you practically insisted on bolting the unit to the floor...) there is a +/- 20 degree digital keystone. You may also want to experiment with simply using the adjustable projector feet and not engaging keystoning unless absolutely necessary. A slightly skewed image may be clearer than one affected by digital keystoning.
As with most Sanyos I've seen, the lamp access is located on the bottom of the unit. If the unit is ceiling-mounted, you'll need to take the projector down before being able to swap out the bulb. The manual is purposefully vague in terms of bulb life, but Sanyo puts the number at 3000 hours. This number may decrease depending upon whether you are using the projector to watch movies or warn ships away from the harbor. You can also expect much better lamp life if you run the projector on a dedicated line with power conditioning and voltage regulation.
One of the pleasant surprises you'll find on the Sanyo (as opposed to most other models) is a set of RGB panel cleaning holes which are located on the bottom of the projector and protected by a removable cover. After a period of time, some LCD projectors can accumulate dust on the LCD panels which can show up on the screen as smudges or colored blotches. Detailed cleaning instructions are included in the manual (hint: it does NOT involve soap and water!) and a manual squeeze-blower is included.
Inputs, Controls and Connections
The usual suspects are found on the rear of the Sanyo PLV-Z4: HDMI, VGA (HD15), component video (2), s-video and composite inputs are available. There is also an 8-pin service port which is not user- or installer-centric.

Conspicuously absent was a 12VDC trigger or IR port. As such, this is probably not the best projector if you are hoping to do a custom install where the projector initiates the activation of an electric projector screen. For most who are shopping at this price point I certainly don't see this as a deal-breaker.
The HDMI and component video inputs accept all HDTV, NTSC and PAL resolutions up to 720p/1080i. It will not take a 1080p input. This would be significant were it not for the subtle fact that only 5 people in the western hemisphere use 1080p regularly as of this writing (I'm pretty sure they all work for Microsoft). The HD15 input can handle PC resolutions up to 1152x900, plus the popular 1024x768 and HDTV resolutions.
PLV-Z4 Menu System & Throw Chart
In setting up and reviewing any projector I generally take some time to go through and explore the entire menu system. I'd recommend this to any new user as it demystifies many of the functions you will use to customize the projector to your needs. Remember, you can always engage the 'Factory Reset' function to get back to your starting point. After you have a feel for what is possible in terms of adjustments you can go through each of the relevant areas and tweak the settings as needed.
Image Menu
Here you can select from the seven presets Sanyo
offers for various uses. The names are somewhat deceptive, but in general you will probably use either
'Pure Cinema'
for watching movies in a light controlled environment, or
'Dynamic'
when you are entertaining a sporting event in a well-lit environment. Four
'User'
presets are
also located on page 2 of this menu where you can recall your stored settings following calibration.
To take a sneak peek at what the Image Menu settings really did to the projector output, we took some 'on-the-fly' measurements using the Datacolor ColorFacts 6.0 software, capturing the color information associated with each Image mode at 80 IRE as opposed to the calibrated default (based on Pure cinema):
Creative Cinema (left) and Natural (right)
Creative Cinema mode shows a warmer picture overall while Natural mode provides a bit more blue, rendering a cooler image that has the feel of "whiter" whites along with warmer skin tones.
Living (left) and Dynamic (right)
Living mode, though it appears to be very similar to Natural mode differs in that it adjusts the color temperature for a cooler presentation and at the same time, boosts reds and saturation. It also opens up the lens and lamp irises all the way. The result was not very pleasing to my eye, though some may find it helpful for a more colorful representation of on-screen elements.
Powerful (left) and Vivid (right)
Powerful mode is very handy for use with sporting events and whenever you really need to eke out every last bit of light from the projector. It puts the bulb on full (normal) power with no automatic adjustment or iris. If you run the unit in this mode it is likely that your bulb life will be shortened somewhat. Dynamic range is not the point here, but total output power at all times. Vivid mode is another alternative, but it turned reds orange and rendered poorer color response overall.
Pure Cinema mode is represented most closely by the flat white line (though it wasn't that pristine when we began) and was the default setting we used as a starting point when calibrating the unit in a light-controlled environment. It is the only mode which runs the bulb at Eco (economy) mode which, in addition to gaining better black levels, garners the longest life expectancy for the bulb.
Image Adj (Level Adjust) Menu
The
Image Adj
menu
is ground zero for all of your calibration settings. Here you can make adjustments to Color, Brightness,
Contrast, and Tint. You can also select a color temperature (Low3, Low2, Low1, Mid, High) which upon the
system's default settings (Low2 at PureCinema) yielded a 6580K reading at 80IRE which is where I
recommend you start. You may want to store a calibrated setting using Low3 as a base if you tend to watch
black and white films -
then try to coax it down to around 5000K -
5400K for a nice,
authentic black and white film look. I personally tend to do this and store it under a custom user
setting.
After enabling the 'Advanced Menu' in the Setting menu you will have access to RGB Gain, Offset and Gamma adjustment parameters. General RGB and Gamma controls are also provided for course modifications and so that entry-level users can modify color parameters without having to delve into more detailed adjustments.
If you happen to be feeding the Sanyo an interlaced signal, you will be able to select from three deinterlacing ('Progressive') modes. One is designed for 30fps video, one is for stills and one is for 2:3 pull-down conversion. The only useful setting is Film (see our HQV test results).
A lamp control setting provides for a couple auto modes that vary brightness according to the input signal. The lower the lamp power, the lower the fan noise and the PLV-Z4 even offers an economy lamp mode for longer lamp life and the lowest fan output. The lens iris is adjustable to allow for greater dynamic range into blacks, but this is a setting you will want to adjust carefully to ensure you don't sacrifice too much in terms of overall output.
There is a Color Management system which allows selection and adjustment of certain colors - levels, phase and gamma. While I could blow a couple pages outlining its use and implementation, my summarized thoughts are that 99.9% of users will not really benefit from this type of feature, especially since the Sanyo does such a great job of supplying the required color configuration and gamma settings in the user menu. Before leaving the Image Adj menu be sure to store your settings into one of the 4 available presets.
Picture Adj (Picture Adjust) Menu
The
Picture Adj
menu will be of most use when inputting either computer or interlaced sources. The
'Overscan'
setting is available to all video inputs, however, and can be set to taste. I found myself putting it at
+3 to eliminate the overscan artifacts displayed on many cable TV shows but found the 0 or +1 setting
adequate for most DVDs. With PC and some interlaced inputs you will be able to adjust horizontal and
vertical image position as well as horizontal pixel mapping (called
'Total dots') in order to
get as close as possible to 1:1 pixel mapping.
Screen (size) Menu
There are eight
Screen
size
settings available on the PLV-Z4. Several of them are even quite useful. I found myself parked mostly on'Full'which is the proper setting for anamorphic DVDs and 4:3 content you want stretched to
fill a 16:9 screen.
'Zoom'
mode can be used to better fit letterboxed TV content to fill more
of the screen. Finally, a
'Normal'
mode will show 4:3 source material in its proper aspect
ratio. One other mode I utilized was'Natural Wide 1'which is an excellent nonlinear scalar,
keeping the center of a 4:3 source image in proper perspective while steadily expanding the image to the
sides of a 16:9 screen. One issue I found that I didn't like was the inability of the system to
allow for
'Normal'
mode while taking in a progressive image via HDMI. This would be nice for
the majority of Special Features and Deleted Scenes appearing on DVDs which, for some unknown
reason, are rarely ever filmed in widescreen. When inputting a progressive signal via HDMI, the only
available options are: Full, Zoom, Caption In, and Natural Wide 2.
Input Menu
The Input menu simply allows the user to select
from the six available inputs: Video (composite), S-video, Component 1, Component 2, HDMI and Computer
(HD15). These inputs are also directly accessible from the remote control making it easy to program
macros to select the proper projector input. This is a rare find and a cherished
feature.
Setting Menu
Within the
Setting
menu you can
configure some of the major projector controls including orientation (as a ceiling or table unit),
keystoning, power management, and lamp counter reset. This is also the place where you unlock the
'Advanced Menu'
or reset the PLV-Z4 to the factory default settings.
The Sanyo PLV-Z4 has a panel adjustment feature which helps eliminate potential vertical noise or line issues in the picture. A cleaning mode shuts the lamp iris and engages the fan to clear out internal dust that may find its way onto the LCD panels. There's more (custom startup image, blue background, startup display mode, etc) but you get the idea.
Information Menu
This section of the user menu shows
the current input signal (handy for configuring the often obscure digital cable box output resolution
settings), horizontal and vertical frequency, and lamp time.
Throw Chart for Distancing the Projector from the Projection Screen
The Sanyo PLV-Z4 has an incredible 2x optical zoom. This is somewhat larger than most I've seen and allows you a very wide range of positioning options. Think of it like this: You can set this projector anywhere from 10 feet back to 20 feet back and watch the action on a 100" diagonal 16:9 screen. That's a 10' area of play you have to utilize the optical zoom function and hit your target. If you can't reach a reasonably-sized screen in your room with this projector you must have very unusual requirements.
|
Screen Size
|
Size (Inches) |
Distance (Feet) |
||
|---|---|---|---|---|
|
|
width |
height |
wide |
tele |
|
70 |
61.0 |
34.3 |
6.9 |
14.0 |
|
80 |
69.7 |
39.2 |
7.9 |
16.0 |
|
90 |
78.4 |
44.1 |
8.9 |
18.0 |
|
100 |
87.2 |
49.0 |
9.9 |
20.1 |
|
110 |
95.9 |
53.9 |
10.9 |
22.1 |
|
120 |
104.6 |
58.8 |
11.9 |
24.2 |
|
130 |
113.3 |
63.7 |
13.0 |
26.2 |
|
150 |
130.7 |
73.5 |
15.0 |
30.3 |
Ambient Light Control and Screen Recommendations
We recommend this projector for use in light-controlled environments. With the right screen you can do some effective daytime viewing, but for the most part, you'll want to draw the shades and keep to the dark. An ambient "light controlled" room should:
- Not have more than 4-5% ambient light entering it at any time it is being used for watching movies
- Not have an abundance of bright or reflective surface areas. I have known a couple people who painted their entire theater rooms a neutral medium-dark color only to realize that their ceiling, furniture and adjoining room cast so much reflective light it rendered their paint choice useless.
If you cannot do a thorough job of controlling ambient light, not all is lost. You can compromise by using a reduced gain gray screen (like the Stewart GrayHawk RS, FireHawk G2, or Carada's High Contrast Gray ) which will aid in attaining black levels and delivering a more pleasing picture. For those who can control light (including the ceiling) we recommend a white screen similar to the Carada Brilliant White or Stewart Studiotek 130.
We ran two different cables to the projector for our tests. A well-shielded component video cable was supplied by Impact Acoustics and gave us an excellent analogue connection from the Denon DVD-3910 player's component outputs. A well-built SHR HDMI cable, supplied by DVIGear, enabled us to compare the digital HDMI input of the Sanyo as well. We ran all of the HDMI source components through a PureLink HDMI Switcher (HDS-41R) which allowed us to send the projector a myriad of sources including multiple DVD players and HDTV from our Scientific Atlanta 8300HD cable box.
Editor's Note
Set up the Sanyo PLV-Z4 in 'Pure cinema' mode for home theater use in a light-controlled environment. This will set the lamp to economy mode and will place the color temperature setting very close to D65. While this projector isn't perfectly calibrated out of the box, it is in pretty good shape and you can watch movies with a good picture right off the bat. If you are using a bright white screen around 1.4 gain then you can try implementing some of the settings listed later that resulted from our calibration of this projector with our Studiotek 130 projection screen from Stewart Filmscreen.
If you're unpacking this projector for Monday Night Football - forget what I said. Engage 'Powerful' mode. You don't really need to set anything else as the projector adjusts the iris and lamp power for you. This is a suitable mode for sporting events or program material without a lot of black detail.
PLV-Z4 Remote & Calibration
I really liked the Sanyo CXTS remote control. It's small, fully backlit, and has all of the buttons you'll need to efficiently operate the projector. Most importantly perhaps, it has direct input buttons as well as handy screen size adjustment controls to flip between Full, Normal, and Natural Wide modes when watching standard definition cable TV. The unit fits easily in the hand and your thumb, unless you have very small hands, can easily reach all of the buttons. This is exactly what I look for in a projector remote control.
Pros
- Fully backlit
- 'Light' button on the remote glows in the dark
- Direct input selection for all 6 inputs
- Extensive Image Controls
Cons
- None
Projector Calibration
We ran a thorough 'before and after' test on the PLV-Z4 and were pleased to see that the projector nearly nailed the CIE chart right away, showing that it has the capability of producing very rich primary colors in accordance with HDTV standards. This was quite impressive and started us off on the right foot with respect to calibrating the unit.
We also took a quick contrast measurement (full field, not ANSI) and found it to be 126:1. This was in the projector's default factory configuration and set in the 'Pure Cinema' mode. We also measured a healthy 37.98 cd/m^2 off the 100" diagonal Studiotek 130 screen with the projector placed 10' away.
After calibration, contrast was 575:1 - which promptly dropped back down to 126:1 if we went back to the default 'Pure Cinema' mode. Black and white levels definitely need to be tweaked for best picture results.
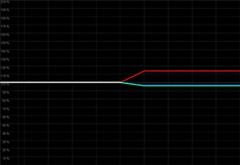
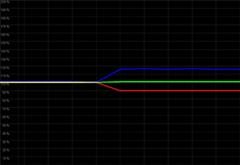
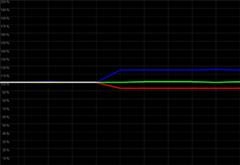
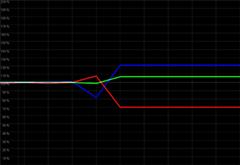
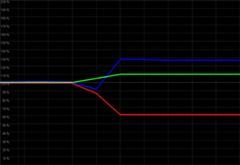
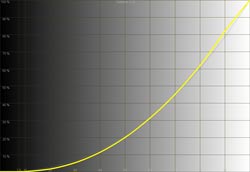
Here are some of the before and after measurements as shown by the Datacolor ColorFacts Professional 6.0 software:
|
Before Calibration |
After Calibration |
|
|
|
|
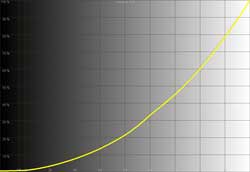
While not ridiculously off, we wanted to see if we could get a bit more consistency throughout the IRE range, especially with respect to red and blue levels which do much to control our perception of color temperature. |
The 'after' results were spot on - at the calibration points of 30 and 80 IRE. Unfortunately red wanted to take a dip at 40IRE and all of the colors diverged somewhat at 90IRE. Could this be improved? You bet - but overall the color and image quality was improved. |
|
|
|
|
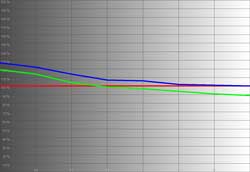
If you look closely you can note that the black levels are a tiny bit crushed and there is a slight loss of perfect gradation between 80 and 90IRE. |
After calibration the luminance histogram just about nails the desired gamma curve. |
|
|
|
|
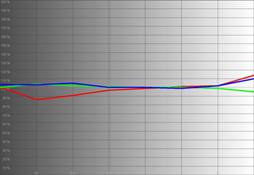
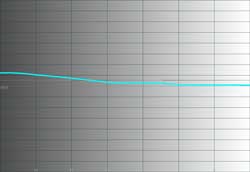
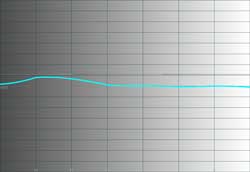
Here we were very surprised and pleased. There is a bump that gradually brings the color temperature back down to near-D65 around 80IRE. And this is without any calibration - not bad. |
After our adjustments, the color temperature still wants to jump up around 40 and 50IRE (take a look at that RGB levels chart above and you'll see why) but is otherwise relatively flat at 6500K. |
Calibration Notes
We were very pleased with the performance of the Sanyo PLV-Z4 projector. We've seen better 'out-of-the-box' results, but these marks demonstrate this projector is no slouch. For someone looking to get a good picture without having to do any setup, the Sanyo will perform very well. One thing you will want to attend to, however, are the black and white (brightness and contrast) levels which we found were not spot on during our initial tests. In Reference System 3, we had Brightness set to -12, and Contrast set to +3. Red was set at +9, Blue at -1 and Color temp was on Low1. The lens iris was at -44 (default for Pure cinema mode). In the advanced menu, our settings for RGB Gain were (-4, -7, -9) and RGB offset was (-13, 0, -4). We did not adjust RGB gamma for this review.
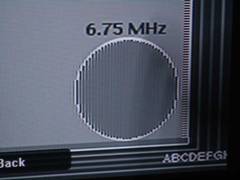
Pixel cropping tests showed 1 pixel cropped on the left and 1 on the right with both component and HDMI inputs. The resolution test easily passed our 6.75MHz video test with perfect clarity and pixel separation. The Sharpness control was a tough one, but I would recommend putting it at -3. If you still feel it is perking up the edges a bit too artificially or you want a softer image, try -5. Anything below that and the image actually begins to visibly soften. While softening the image is not necessarily a bad thing on an LCD projector, I prefer to direct users to defocus using the lens optics to further lower the visibility of SDE (screen door effect). Take a look at the min and max Sharpness control effects as seen using an Avia Pro resolution pattern:
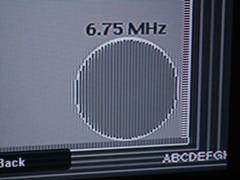
Notice the differences between the Sharpness settings. Minimum (left) and normal (right)
Audioholics/HQV Bench Testing Summary of Test Results
Perfect Score is 130
Sanyo PLV-Z4 Benchmark Score:
60
(not bad, but unflagged film deinterlacing was unimpressive)
| Test | Max
Points |
Film | Film
PF |
L1 | L1
PF |
L1 | L1
PF |
|---|---|---|---|---|---|---|---|
| Color Bar | 10 | 10 | Pass | 10 | Pass | 10 | Pass |
| Jaggies #1 | 5 | 0 | Fail | 0 | Fail | 0 | Fail |
| Jaggies #2 | 5 | 0 | Fail | 1 | Pass | 0 | Fail |
| Flag | 10 | 5 | Pass | 5 | Pass | 5 | Pass |
| Detail | 10 | 5 | Pass | 5 | Pass | 5 | Pass |
| Noise | 10 | 10 | Pass | 10 | Pass | 10 | Pass |
| Motion adaptive Noise Reduction | 10 | 5 | Pass | 5 | Pass | 5 | Pass |
| Film Detail | 10 | 10 | Pass | 0 | Fail | 0 | Fail |
| Cadence 2:2 Video | 5 | 0 | Fail | 0 | Fail | 0 | Fail |
| Cadence 2:2:2:4 DV Cam | 5 | 0 | Fail | 0 | Fail | 0 | Fail |
| Cadence 2:3:3:2 DV Cam | 5 | 0 | Fail | 0 | Fail | 0 | Fail |
| Cadence 3:2:3:2:2 Vari-speed | 5 | 0 | Fail | 0 | Fail | 0 | Fail |
| Cadence 5:5 Animation | 5 | 0 | Fail | 0 | Fail | 0 | Fail |
| Cadence 6:4 Animation | 5 | 0 | Fail | 0 | Fail | 0 | Fail |
| Cadence 8:7 animation | 5 | 0 | Fail | 0 | Fail | 0 | Fail |
| Cadence 3:2 24fps film | 5 | 5 | Pass | 0 | Fail | 0 | Fail |
| Scrolling Horizontal | 10 | 5 | Pass | 5 | Pass | 0 | Fail |
| Scrolling Rolling | 10 | 5 | Pass | 5 | Pass | 0 | Fail |
| Total Points | 130 | 60 | 46 | 35 |
Comments on HQV Testing
It keeps being brought up in forum discussions and in casual conversation that the HQV tests are troublesome to many. While the Sanyo actually scored pretty well, the HQV tests are mostly a concern for those looking for their projectors, source components, or displays to handle deinterlacing and noise reduction. The PLV-Z4 had some of the best noise reduction circuitry I've seen in a budget projector (just look at past reviews and see how many times that test is failed by the competition). The flower and scenery detail in the HQV disc was well preserved and noise was greatly reduced, without the "floater" effect that can occur if noise reduction is overdone. When viewing HQV test results, be sure to not use them as a litmus test for comparing projectors 舑 to the exclusion of calibration data, usability and everything else discussed in the review. HQV scores -on any product - are just a small part of the whole evaluation. With that said, a score of 60 is no slouch, but I would definitely like to see better jaggie reduction and handling of mixed mode deinterlacing. If you are feeding the Sanyo interlaced signal, be sure to set the Progressive mode to 'Film'.
We did our moving zone plate test whereby we evaluate a "stress test" of 2:3 pulldown edits and found it handled it up to +/-3 speeds with breakup occurring at +/-5 in the horizontal direction. There was almost instant moiré in the vertical zone plate movement with breakup at +/- 8. Diagonal zone plate movement showed those subtle jaggies that liked to creep in with this display.
PLV-Z4 Viewing Evaluation & Conclusion
I liked this projector - a lot. It had very respectable black levels for LCD. The D5 panel used in the Sanyo has a high fill factor, rendering screen door effect at normal viewing distances almost nonexistent unless you sit on top of the screen. With bright background elements I found 1.75x-2x the screen width was the target seated position to avoid any screen door effect. The real champion, however, was the sharpness and detail of the picture. The optics on the PLV-Z4 are very impressive. You can also defocus the image slightly to achieve a better overall viewing experience should you require a closer seating arrangement, at the expense of some detail. Below is a comparison of the Sanyo PLV-Z4 pixel output and a competing LCD projector product which uses a D4 panel. With the Sanyo providing an extremely sharp picture, and having a decent fill factor (as you can see it is much improved over most D4 panels) the results are predictable.
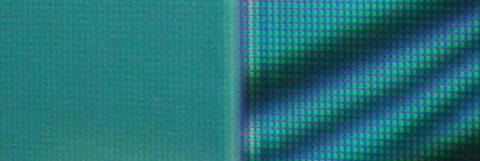
Here is a side-by-side comparison of the Sanyo PLV-Z4 (left) and a D4 panel projector of the same resolution (right)
DVD: Elizabethtown
Being a member of a DVD rental-by-mail
program helps me to include some of the more recent films on my reviews. Elizabethtown was not the best
quality transfer I've seen in a while. While it didn't have excessive edge enhancement, it
seemed as if the DVD transfer from film was somewhat lackluster (perhaps the guy had something better to
do that night). It did have some good color, however, and I was able to use it to see how well the Sanyo
handled black levels and lots of real world film detail. This is a good example of how HQV scores
don't have much effect on picture quality. Since I was feeding the Sanyo digitally upconverted 720p
video from my Denon DVD-3910 source player, there was no deinterlacing being performed by the projector.
What I was focusing on was color and its ability to render intricate objects in motion and relatively
deep blacks. While I have seen deeper blacks from an LCD projector, the overall picture quality was more
than satisfactory and I was looking forward to a better DVD to check out sharpness and detail (which
seemed to vary by scene in
Elizabethtown
).
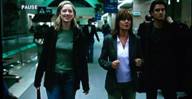

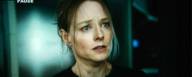
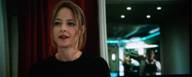
DVD: Flightplan
The
Flightplan
DVD was a
home run. It had a TON of dark scenes and a decent transfer quality that gave me a lot of detail to look
at, especially with facial close-ups and clothing. The first thing I noticed was that the post-calibrated
Sanyo was able to peer into the darker parts of the picture without losing resolution or appearing
blocky. There was also no graininess in the deeper blacks. Dark areas of the picture had depth and
retained detail
舑
a visual characteristic that I have seen other projectors do a lesser job at
reproducing. Sharpness and fine detail, once I got a reliable DVD to base my real-world opinions on, was
phenomenal. This is possibly one of the better projectors I've seen in terms of picture clarity and
optics.

Misc HDTV via Digital Cable
We watched plenty of HDTV programs
including
CSI: Miami,
House, and a recent favorite of ours,
Bones
. I was
unable to watch the Oscars this year (or the
"Hollywood self-love-fest"
as I call it), but
the sampling of shows I did see gave me clear examples of the picture this projector is capable of
producing. Consistently color was impressive, blacks and whites were full of detail and sharpness and
detail were above average. Screen door effect during practical viewing was nonexistent at my seated
position.
Conclusion
I believe I may have already said everything there is to say about the Sanyo PLV-Z4. This projector is practical in price, flexible in its functionality, and robust in its capabilities. It can reproduce blacks well for an LCD projector (though it did not strike me as a "DLP-killer") and it can put out color as well as some LCoS displays I've seen. The real strength is in being able to put forth a great amount of sharp picture without significant screen door effect. I was able to watch and enjoy this projector from a very close proximity and only by truly straining my eyes could I pick out the screen door (and I just had my eyes checked, they're fine). The Sanyo is a tough competitor and I now know what all the fuss has been about - it's warranted.
Sanyo PLV-Z4 LCD Projector
MSRP: $2995
www.sanyo.com/business/projectors/home_theater/
About Sanyo North America
SANYO Group's corporate philosophy is the guiding principle in accomplishing the key management
policy of ensuring products and services that are indispensable in creating harmony between people and
the environment. SANYO's priorities are: Customer Satisfaction and Harmonizing with the Environment.
SANYO's digital technology and core competence (the source of our competitiveness) supply the products
and services that generate joy, excitement, and impact.
The Score Card
The scoring below is based on each piece of equipment doing the duty it is designed for. The numbers are weighed heavily with respect to the individual cost of each unit, thus giving a rating roughly equal to:
Performance × Price Factor/Value = Rating
Audioholics.com note: The ratings indicated below are based on subjective listening and objective testing of the product in question. The rating scale is based on performance/value ratio. If you notice better performing products in future reviews that have lower numbers in certain areas, be aware that the value factor is most likely the culprit. Other Audioholics reviewers may rate products solely based on performance, and each reviewer has his/her own system for ratings.
Audioholics Rating Scale
 — Excellent
- — Very Good
- — Good
- — Fair
- — Poor
| Metric | Rating |
|---|---|
| Detail and Resolution | |
| Deinterlacing & Scaling | |
| Contrast and Black Levels | |
| Color Reproduction | |
| Noise Reduction | |
| Calibration Options | |
| Build Quality | |
| Ergonomics & Usability | |
| Ease of Setup | |
| Features | |
| Remote Control | |
| Performance | |
| Value |
Clint Deboer was terminated from Audioholics for misconduct on April 4th, 2014. He no longer represents Audioholics in any fashion.
View full profile