
Planar PD7150 DLP Projector Review
Planar PD7150 DLP Projector
- Product Name: PD7150 DLP Projector
- Manufacturer: Planar
- Performance Rating:


- Value Rating:
- Review Date: March 07, 2007 13:37
- MSRP: $ 5,999
|
Microdisplay: Texas Instruments DLP® DarkChip3™ 0.8 720p 12o LVDS DMD Native Resolution: 1280 x 720 (921,600 pixels) Video Inputs: DVI-D, component (2), RGB/PC (HD15), S-video, composite Aspect Ratios: Native (Pixel-to-Pixel), 16:9, Letterbox, 4:3, Anamorphic compatible (standard definition sources) Projection Lens: All glass, F/2.4~2.50, f=19.1~23.9 mm, 1:25x manual zoom, made in Japan Throw Ratio: 1.3 - 1.7 (distance/width) Lens Shift: +/-15% (horizontal), + 100%, -65% (vertical, ceiling mounted) Cooling Performance: High efficiency adaptive voltage side-to-side cooling with low system acoustic noise level (29dBA) and low light pollution cabinet |
Video Lumens: 1000 ANSI max Contrast Ratio: 5000:1 (max full on/full off) Projection Modes: Front, Rear, Ceiling (front/rear) Keystone (digital): +/-5 (horizontal), +/-5 (vertical) Lamp: User replaceable 200/250W HPM (selectable), 3000 hour (eco) lifetime* Video Processing: Pixelworks™ PW463 8-bit chip Calibration: Full RGB gain/offset control (White Balance), Gamma (1.0, 1.5, 1.8, 2.0, 2.2, 2.35, 2.5, 2.8), Contrast, Color Temp (Presets 5K~10K and X,Y control for R,G,B,Y), Brightness Misc: 12VDC trigger, RS-232 (9-pin) Dimensions: 17.5" (445mm) L x 16.5" (420mm) W x 7.1" (180mm) H Weight: 17.6 lb (8 kg) |
Pros
- True native 720p DLP
- Deep blacks, rich colors
- Consumer adjustment of RGB gain, cut
- Variable gamma settings
- Backlit remote with discrete power codes
Cons
- No HDMI input (does have DVI-D with HDCP)
- No support for downscaling 1080p/60 source material via DVI-D (support of 1080p/24 and 1080p/60 supported via component)
- No 480i support via DVI-D
- Awkward remote configuration and labeling
Planar PD7150 Technology Overview and Setup
Planar's Existing 16:9 HD Projector Lineup
|
|
PD7150 |
PD7130 |
PD7060 |
PD7010 |
|
Resolution |
720p DLP |
720p DLP |
720p DLP |
720p DLP |
|
Lumens |
1000 |
900 |
1000 |
1000 |
|
Contrast |
5000:1 |
4500:1 |
3500:1 |
2500:1 |
|
Price (est.) |
$5,999 |
$3,999 |
$2,999 |
$1,999 |
The PD7150 is a 720p DLP product; however it offers such advanced features as horizontal and vertical lens shift, large optical glass assembly, and robust (Pixelworks) video processing (plus it has discrete on/off IR remote codes). Even their near-entry-level PD7010 sports RS-232 support, dual digital inputs (HDMI and DVI-D), and a 12VDC trigger, making it more suitable for custom install use and advanced applications.
Overview of the Technology
The PD7150 doesn't offer any particularly groundbreaking advances, but it implements exiting technologies quite well:
- Pixelworks PW463 Chip Video Processing
The PW463 is an all-in-one 8-bit video processing, deinterlacing and scaling chip that handles all of the duties required to correctly display an incoming standard definition or high definition image on the PD7150. Pixelworks chips are found in many name brand projectors. - DarkChip3 0.8-inch LVDS DMD
This newest 720p chipset from Texas Instruments promises to increase contrast ratios through a steeper (12-degree) mirror tilt for the on/off pixel positioning and a slightly smaller fill factor for less interpixel spacing. - Professional Features for Custom Installers
The new Planar DLP projectors offer some custom installer-friendly options, such as discrete IR codes for on/off functions, 12VDC trigger output and RS-232 control. Many of these features exist not only at just the high-end of the line, but also for Planar's entry-level products as well.
Basic Setup and Installation
The Planar PD7150 is an easy projector to use. The vertical and horizontal lens shift makes it easier to line up the image to the screen. Though there is no "lock" function, once we had set the position of the lens, the image did not seem to drift or come out of adjustment during our testing. Vertically, the PD7150 has a maximum extension of +100% shift vertical and -65% vertical and a +/-15% horizontal shift. Both cannot simultaneously be used to their extremes as the assembly will have to account for the curved lens housing. Take a look at the throw chart to see how this projector might be mounted in your room to fit your screen size:
Throw Chart for Distancing the Projector from a 16:9 Projection Screen
|
Screen
Size |
Size (Inches) |
Distance (Feet) |
||
|
|
width |
height |
wide |
tele |
|
70 |
61.0 |
34.3 |
6.9 |
8.8 |
|
80 |
69.7 |
39.2 |
7.9 |
10.1 |
|
90 |
78.4 |
44.1 |
8.9 |
11.3 |
|
100 |
87.2 |
49.0 |
9.8 |
12.6 |
|
110 |
95.9 |
53.9 |
10.8 |
13.8 |
|
120 |
104.6 |
58.8 |
11.8 |
15.1 |
|
130 |
113.3 |
63.7 |
12.8 |
16.3 |
|
150 |
130.7 |
73.5 |
14.7 |
18.8 |
|
170 |
148.2 |
83.3 |
16.7 |
21.3 |
|
200 |
174.3 |
98.1 |
19.7 |
25.1 |
We fired the projector onto an ISF-certified 100-inch Stewart Filmscreen Studiotek 130 with 1.3 gain. The projector has a rather short throw lens in comparison to other systems utilized recently in this reference configuration. Coupled with a nice zoom lens, we could place this unit anywhere from 9.8 feet to 12.6 feet away to hit the screen correctly. We had ours positioned at about 11.5 feet from the screen and mounted so that lens shift was kept to a minimum (keystoning, of course, was kept off).
We utilized HDMI cables (from DVIGear) for the majority of our testing and also utilized component video cables (courtesy of Blue Jeans Cable). Our reference source player was the Denon DVD-3930CI which was able to output 1080p as well as 480i via HDMI – and the Planar correctly handled and identified both formats with no problems.
Planar PD7150 Connections, Remote and Menu System
While there is no HDMI input (a bit odd in this day and age) the PD7150 does sport a DVI-D input in addition to dual component inputs and standard definition s-video and composite connections. A 12V trigger and dedicated RS-232C port separates this from many other entry-level units. Custom installers will have a unit designed with them in mind. For those looking to truly hide the wiring on an installation, DVI-D is a big potential problem, however with modular, field-termination-capable products like Impact Acoustics' RapidRun Digital this might not be such an issue.
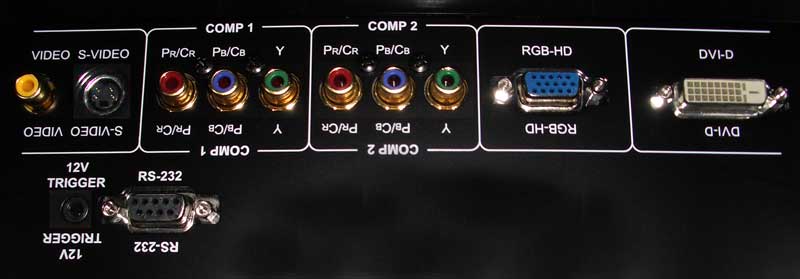
The PD7150 has a unique door in the back that clicks open to allow access to the connections. Cables can be run underneath the door through a provided opening (in a ceiling mount scenario this would allow cables to come directly into the unit while hiding the connections from view. This is a very nice design and shows that Planar is doing more than just throwing in some projectors to the competition; they are listening and responding to their target market.
Remote Control
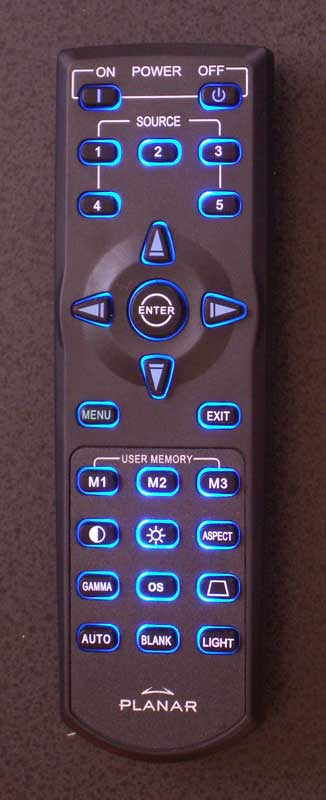 This remote is elegant, but has a few flaws. First and foremost, the 'light' button is located at the bottom right. Ergonomically this is easy to remember, but very had to get to with your thumb. Backlighting also doesn't engage automatically when a button is pressed - I've always liked this function on home theater projector remotes since they almost always get utilized in the dark.
The presence of discrete power 'On' and 'Off' buttons on the remote is a VERY welcome sight and it seems that Planar listened carefully to requests from custom installers. The programmable source buttons are a feature, but they are almost overkill. Labeled direct inputs might be a better way to go rather than having to remember which input is assigned to a number. In terms of importance, this rates about a '1' on a scale of 100… The remote was more than a tad finicky on angle and at times I had to stretch to get the unit to respond when mounted in a front projection, floor-oriented position. Menu delay was also an issue at times, though this was unpredictable and typically limited to such items as recalling the Memory Picture Settings.
The Menu System
There's nothing too confusing about the Planar menu system except that I kept looking for more. It is very succinct and does its job without being too confusing. It also doesn't have endless regressed levels of embedded menus within menus. Just about everything is a maximum of one step below the Main Menu items. The 'Menu' button activates the menu and using the arrow keys takes you into the submenu area. At that point making any horizontal movements adjusts parameters while vertical movements navigate between the various settings. Pressing the 'Enter' button removes the menu and allows access to only the current control while allowing a full screen presentation. Pressing the 'Menu' button again causes the menu to go away.
I found the menu system to be a bit quirky at times. For example, the way to "back out" of an area is to hit the 'Exit' button on the remote. Intuitively, you would simply arrow left, however this activates the parameter control instead. Most menu systems we've used seem to favor the "click to activate" functionality with the left and right controlling parameters only once activated to that adjustment mode. One thing I did appreciate was that the Menu system did remember where you were last. So re-entering the menu and navigating with the 'right arrow' got you immediately to the place you were, even if it was half way down the submenu listing.
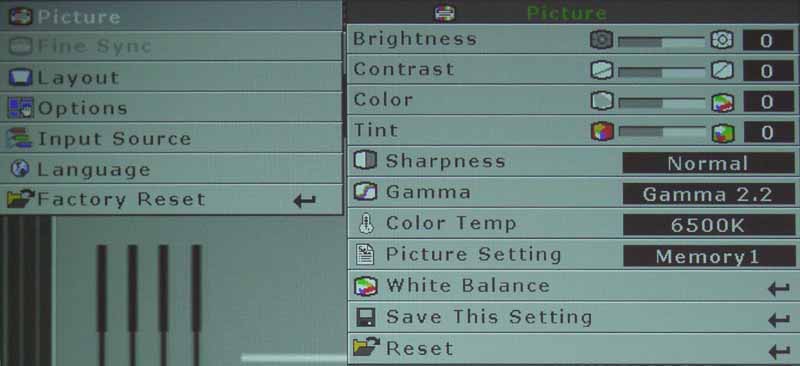 Picture Menu
Browsing through the Picture menu you'll have access to all main picture controls including Brightness, Contrast, Color and Tint. You'll also be able to adjust Sharpness (keep this on 'Normal' and Gamma as well as Color Temp settings. The Picture Setting control is for recalling one of the Memory positions (we could only get 2 working despite the 3 hard buttons on the remote control.)
Since the Planar PD7150 has no "Picture Modes" per se (i.e. Sports, Vivid, Daytime, Cinema, etc) you'll likely want to use the Gamma controls to adjust the unit for day and night viewing - at least until you can set up some stored calibrated Memory settings. Setting a Gamma of 1.0, for example, gives you the brightest image for daytime viewing of television in a room that is not light controlled. For cinema watching we found the default Gamma 2.2 to be a very good starting point. You may find different results depending upon your screen type and viewing room. RGB Gain and Offset controls are available under the designation "White Balance".
Layout Menu
The Layout menu should be unused by most. It sets the system to 16:9 or 4:3 (not adjustable for HD input at the correct mode) and allows for control over horizontal and vertical positioning and keystoning.
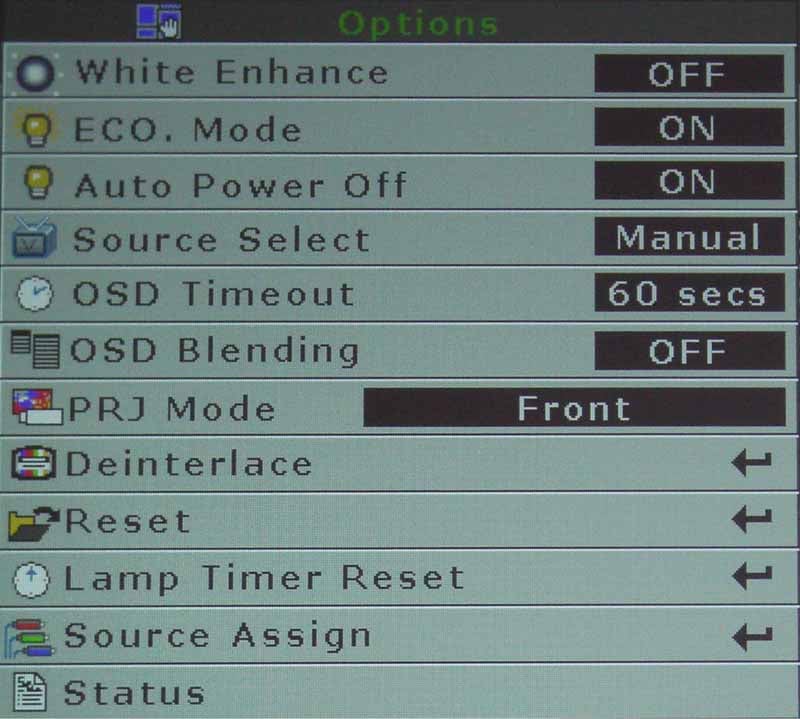 Options Menu
You may spend some time in the Options menu. Serving as a sort of 'catch-all' for important adjustment items, this menu permits access to lamp modes (ECO and Auto power off) and a White Enhance mode that basically steps up the Contrast to allow whites to appear more vibrant.
The Projection mode (front, rear, etc) as well as On-screen display settings can be found here as well. Deinterlacing mode settings, an important aspect of the PD7150 for proper functionality with DVDs, are also found here. It is very important to ensure you have the right settings here in order for 24 frame-per-second film-sourced DVDs to be accurately converted to 30 frame-per-second video. Another feature is the ability to assign sources to each of the 5 remote key positions.
Editor's Note: All of our primary evaluations were done using the 3:2 pull down Film Mode with Video on film (VOF) set to 'On' excepting times when we played with settings and gamma to tweak the projector and find out its capabilities and flexibility.
Everything else in the menu system is self-explanatory. Language can be selected for the on-screen menu system and you can do a factory reset from the top menu (unusual and a tad dangerous for overzealous 'clickers'). There is a nice way to monitor the input source format with horizontal and vertical timings (as well as the lamp timer). It also provides the firmware version (258.11.157 as of this review).
Planar PD7150 Daytime Viewing and Calibration
I would not consider this to be a good projector for daytime viewing. While the Gamma can be set to 1 and White Enhance set to 'On', allowing the full lumens to be output from the unit, it still does not perform well in ambient situations. Stick with a light-controlled room, but know that you have some options in the event that you have some light leakage during the day.
Calibration – Getting Those Black Levels Right!
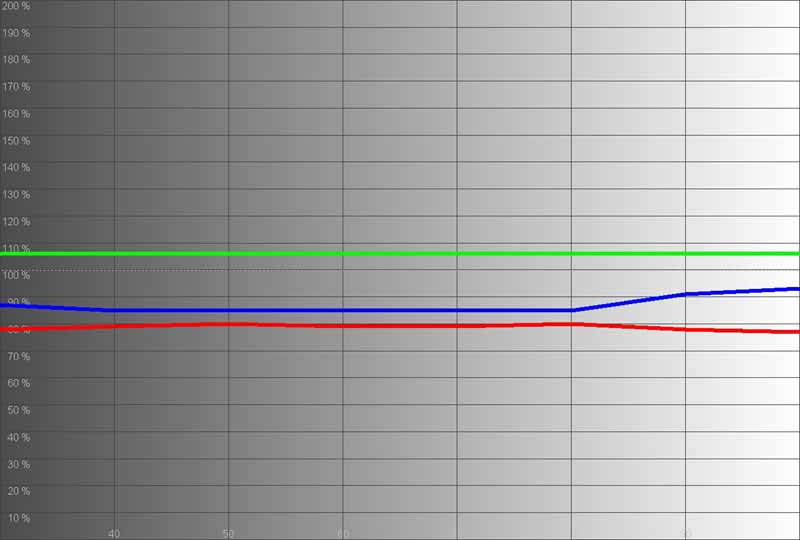
 Quite simply put - the Planar PD7150 is an EXCELLENT projector out of the box. When we calibrated Brightness and Contrast and set the unit to 6500K color temperature mode, we measured 6500K at 30IRE and 6400K at 80IRE. While the RGB chart may show heightened green levels, this wasn't readily apparent in the perceived picture. The Brightness setting was spot on, but our Contrast levels needed to be bumped to '11' (yes, 'this one goes to 11').
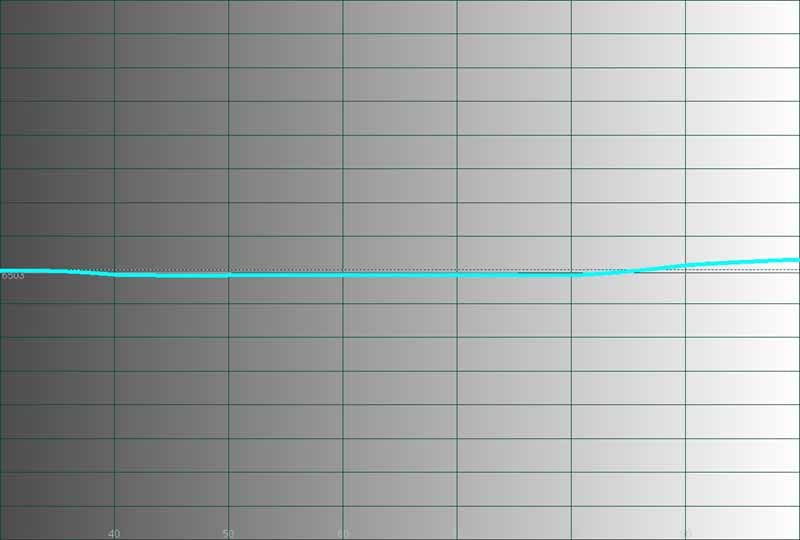
We utilized datacolor’s ColorFacts Professional 6.0 software to calibrate and measure the grayscale response of the PD7150. I was very pleased with both the starting configuration of the projector and the end-results of calibration. The process was painless and we were able to dial in our desired settings very easily.
|
Before Calibration |
After Calibration |
|
|
|
|
You don't want green to be your dominant color. Just about any other color would be better. When viewing real world images, the picture didn't appear to have a green tint. |
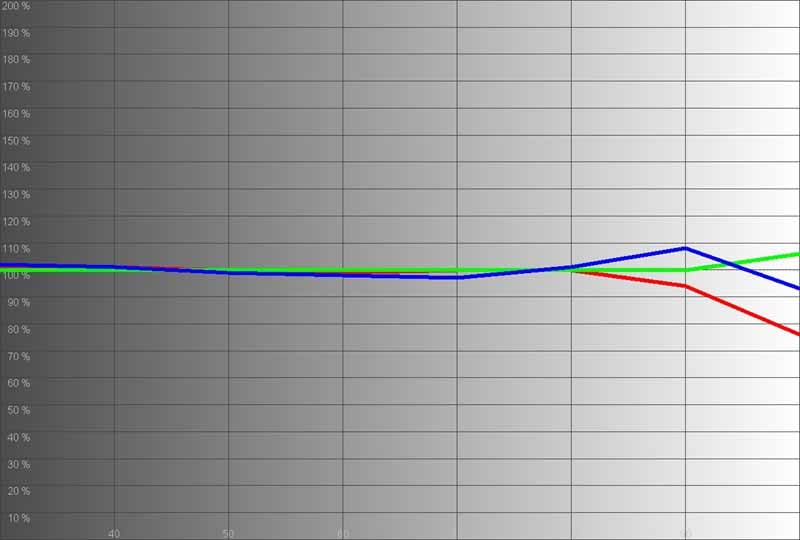
We were able to really dial in all but the highest extreme of the Planar projector. The calibration "stuck" better than most projectors I've tested of late. |
|
|
|
|
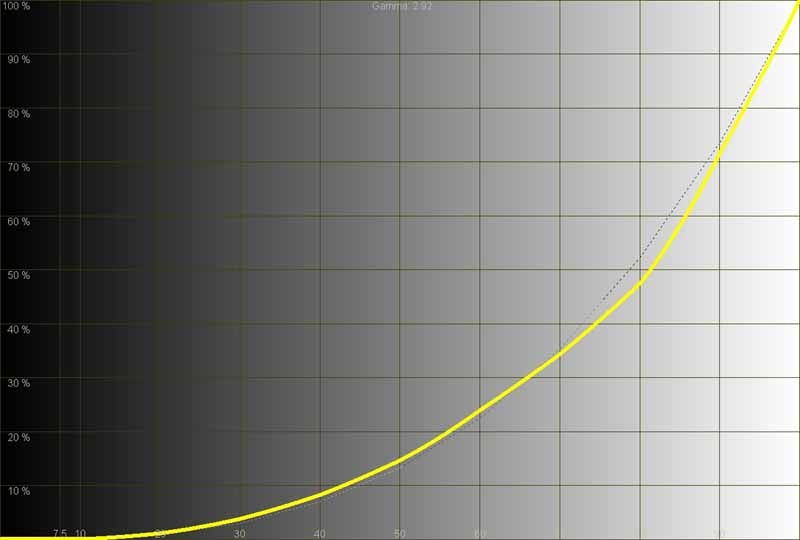
The initial luminance graph isn't bad except for a slight dip around 80IRE from what we'd be looking for. |
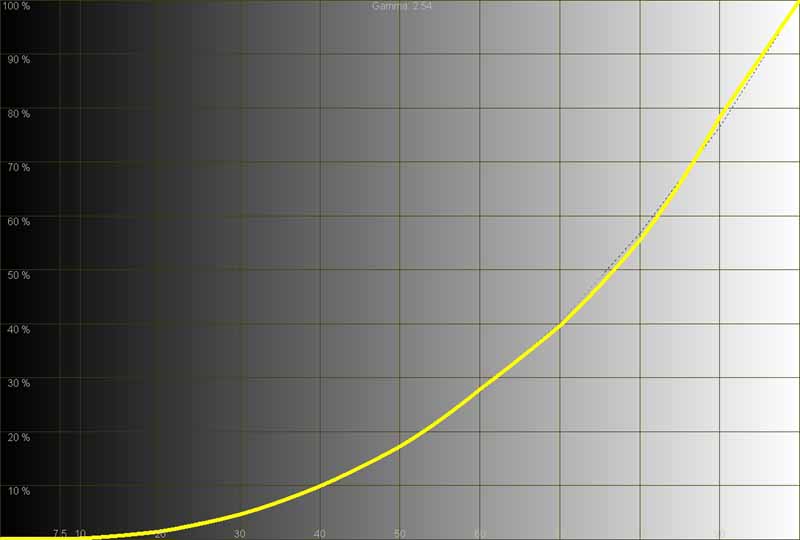
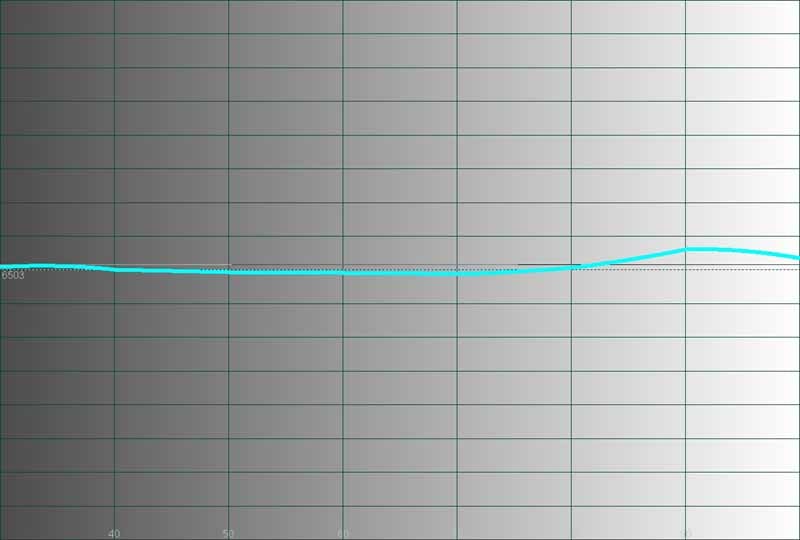
After calibration the chart is nearly spot on. |
|
|
|
|
Color temp measured an incredibly "out of the box" accurate 6400K across most of the range. |
You can argue that dialing in the projector, while balancing the levels up to 80IRE, actually caused a slight shift into the 6800K range for 90 and 100 IRE. |
Only the very top end of the projector seemed to go a bit off during calibration and we noticed that backing down the Contrast and re-running calibration seemed to do the trick. Keep this in mind when you run this projector. Full Contrast ratio measured "off the charts" for my sensor's reliability but we know that the real world reading was better than 1400:1.
At maximum output, we measured over 36 cd/m^2 reflected off the 100-inch Stewart Studiotek 130 screen. Not the brightest projector we've measured, but it certainly does the job in a home theater setting. In ECO mode we showed a max of 29 cd/m^2 at 100 IRE. White Enhance mode should actually be 'On' according to our measurements as it yielded better and consistent color response overall.
Planar PD7150 Benchmark Tests
Perfect Score is 130
Planar PD7150 Benchmark Score: 75 (The Planar should be considered a suitable video processor for almost all uses. If you happen to have a high end player, simply feed progressive out of that device and the projector will handle the scaling of the input signal to its native resolution)
|
Test |
Max |
Results |
Pass/Fail |
|
Color Bar |
10 |
10 |
Pass |
|
Jaggies #1 |
5 |
5 |
Pass |
|
Jaggies #2 |
5 |
5 |
Pass |
|
Flag |
10 |
10 |
Pass |
|
Detail |
10 |
10 |
Pass |
|
Noise |
10 |
0 |
Fail |
|
Motion adaptive Noise Reduction |
10 |
0 |
Fail |
|
Film Detail |
10 |
10 |
Pass |
|
Cadence 2:2 Video |
5 |
0 |
Fail |
|
Cadence 2:2:2:4 DV Cam |
5 |
0 |
Fail |
|
Cadence 2:3:3:2 DV Cam |
5 |
0 |
Fail |
|
Cadence 3:2:3:2:2 Vari-speed |
5 |
0 |
Pass |
|
Cadence 5:5 Animation |
5 |
0 |
Fail |
|
Cadence 6:4 Animation |
5 |
0 |
Fail |
|
Cadence 8:7 animation |
5 |
0 |
Fail |
|
Cadence 3:2 24fps film |
5 |
5 |
Pass |
|
Scrolling Horizontal |
10 |
10 |
Pass |
|
Scrolling Rolling |
10 |
10 |
Pass |
|
Total Points |
130 |
75 |
|
Comments on Benchmark Testing
The Planar PD7150 does not support true 480i input via DVI-D, so all deinterlacing and video processing tests were done by feeding the projector a 480i signal via its component inputs. When feeding 480i via DVI-D, the projector converted the image to 1440x480, presumably line-doubling it from what we saw. Deinterlacing was not performed and the resulting picture would fail all detail and deinterlacing tests we had on hand. This probably isn't significant for most users, but should be noted. We utilized a Denon DVD-3930CI for our 480i component source inputs since it provides pristine interlaced component output.
Overall, this projector performs above par where it counts. Jaggie reduction was excellent, among the best we've seen, in both testing and practical examples. The flag test, for example, passed with flying colors (no pun intended). The Film Detail test passed with full credits, but without any leeway, the timing was just in time to get full credit. This is, however, an unflagged test and definitely shows that the Pixelworks 2:3 film deinterlacing system is an intelligent one.
It seems that failing the noise reduction tests is becoming a new trend. While many new discs are doing better and better jobs of mastering content and reducing practical noise, there are still a lot of places where good quality noise reduction is appreciated - when it's not overdone. The PD7150 did nothing noticeable for noise reduction.
The PD7150 passed the AVIA Pro 2-3 Moving Zone Plate tests, but failed the Standard and 2-2 Zone Plate tests. I have not seen many systems pass the non 2-3 tests. The Deinterlacing settings had no affect on performance in this area (except of course for 2-3 where you need to have the 2-3 film mode engaged.)
We tested for rainbow effect (RBE) using the AVIA Pro Rainbow Dither test and found the PD7150 to be pretty good unless you darted your eyes around the screen. As with many other DLP systems, if you have a “white on black” shape or edge and you dart your eyes quickly across the viewing area, you’re going to see rainbows (if you are susceptible to this). In a lot of ways this is like the man who walks into the Doctor's office and says, "Doc, it hurts when I do this." Well, then, don't do that.
Planar PD7150 Viewing Evaluation and Conclusion
I found this projector to be exceptional in color and contrast. I also noticed screen door effect at close seating distances - perhaps an acceptable trade-off for a very sharp picture. This is an extremely sharp-looking picture, and if you sit at least 1.75x the screen width away from the projected image you will have a very enjoyable experience.
I went with a couple darker DVDs that would show off the contrast potential of this projector. With a stated 5000:1 contrast (see our measurements) I wanted to get an idea of just how well the PD7150 would recreate black levels in my light-controlled room.
DVD: Jet Li's Fearless
There's nothing better than a good martial arts (Wushu) film - except for maybe a Samurai movie… Well, regardless, this action flick wasn't the best looking picture I'd seen all year, but it did have lots of great color and image depth. We viewed some other films for detail, but take a look at these images and note the excellent black levels captured to the best of my camera's abilities:


DVD: The Illusionist
This movie was the "clone" to The Prestige (in Hollywood all movies come out in topically-related pairs as an initial idea leaks and multiple studio clamor to get on board).


DVD: Shark Tale
It was now time for some color and edge detail. An obvious choice was Disney's Shark Tale, which has an exceptionally good range of colors and edges to check out the real world performance of the DCTI color edge enhancement feature. As with the test patterns, we still recommend this be set to 1 or 0, depending on whether you feel the enhancement bothers you, or simply makes colors pop more. It can do either based on your perspective. We noticed a tad more vibrancy when it was engaged, but it also had the effect of occasionally coming off as bad edge enhancement artifacts.


DVD: The Fifth Element
I wanted to toss in a reference disc example to my viewing sessions and The Fifth Element Superbit seemed to be a good place to start. This Superbit DVD actually looks worlds better than its Blu-ray counterpart due to noise-free mastering. Color is superb and there is no edge enhancement to speak of. As a reference standard definition disc, there is little out there that comes close to this quality. The Planar PD7150 showed off its attention to detail with this disc. Edges were clean and crisp, without being artificially enhanced (depending on your DCTI setting of course). Pay attention to the color edges and facial detail in these shots as well as background and texture detail.


HDTV: House, Bones, Discovery HD
As a final series of viewing tests we watched several episodes of HD cable shows. House is one of the better shows on television in terms of clarity and detail (CSI: Miami is also very good).


Conclusion
Planar is definitely going after the higher-end custom install market with this fine piece of machinery. The PD7150 has exceptional color and contrast (real-world) and phenomenal optics that make for a razor-sharp picture on screen. There are cheaper alternatives, however they may not be as well positioned and feature-rich for the custom install community. They also may not come as well calibrated "out of the box".
Planar has hit a home run with this unit and we're excited to see them address nearly the full range of products at every price point. The next time you're in a grocery store checkout, modernized gas station or hospital and see a Planar screen, you might want to think about getting that logo into you home as well.
MSRP: $5,999
Planar Systems, Inc.
1195 NW Compton Dr.
Beaverton, OR 97006-1992, USA
www.planar.com
About Planar
Planar Systems, Inc. (NASDAQ:PLNR) is a leading provider of valued-added display hardware and software for a variety of specialty display markets worldwide. Hospitals, shopping centers, banks, businesses, and other discriminating consumers depend on Planar to provide unique display-based solutions to exacting requirements leveraging its operational excellence, technical innovation, and go-to-market capabilities. Founded in 1983, Planar is headquartered in Oregon, USA, with offices, manufacturing partners, and customers worldwide. For more information, visit www.planar.com.
The Score Card
The scoring below is based on each piece of equipment doing the duty it is designed for. The numbers are weighed heavily with respect to the individual cost of each unit, thus giving a rating roughly equal to:
Performance × Price Factor/Value = Rating
Audioholics.com note: The ratings indicated below are based on subjective listening and objective testing of the product in question. The rating scale is based on performance/value ratio. If you notice better performing products in future reviews that have lower numbers in certain areas, be aware that the value factor is most likely the culprit. Other Audioholics reviewers may rate products solely based on performance, and each reviewer has his/her own system for ratings.
Audioholics Rating Scale
 — Excellent
- — Very Good
- — Good
- — Fair
- — Poor
| Metric | Rating |
|---|---|
| Detail and Resolution | |
| Deinterlacing & Scaling | |
| Contrast and Black Levels | |
| Color Reproduction | |
| Noise Reduction | |
| Calibration Options | |
| Build Quality | |
| Ergonomics & Usability | |
| Ease of Setup | |
| Features | |
| Remote Control | |
| Fit and Finish | |
| Performance | |
| Value |
Clint Deboer was terminated from Audioholics for misconduct on April 4th, 2014. He no longer represents Audioholics in any fashion.
View full profile