
Hitachi PJ-TX100 Projector Review
Hitachi PJ-TX100
- Product Name: PJ-TX100 Projector
- Manufacturer: Hitachi
- Performance Rating:

- Value Rating:

- Review Date: October 12, 2006 20:00
- MSRP: $ 1099
|
Key Features Inputs/Outputs |
Convenience Features Dimensions |
|
Pros
- Very clear picture – excellent optics
- Basic horizontal & vertical lens shift
- Motorized Iris control
- Backlit remote control
- Versatile inputs (including DVI-HDCP)
- 1080p compatible
- Sleek, high-tech looking chassis
- Bright
Cons
- Intrusive fan noise
- Somewhat confusing menu system
- Poor (240p) deinterlacing via DVI-D at 480i
PJ-TX100 Features and Basic Setup
LCD projectors have been a favorite recommendation of mine for some time. While I love the deeper black associated with most DLP models, the lens shift functionality and lack of rainbows make LCD recommendations easy. Hitachi is not a manufacturer I have reviewed frequently on Audioholics and we'd like to remedy that in the future (after all, we want to give ALL companies' products a chance to influence our readers, not just the usual suspects). This first pass with the PJ-TX100 projector left us wondering where we've been all this time. While it didn't start out this cheap, at a $999 street price (at the time of this review) this is one projector that should be on everyone's short list.
Features and Favorites
Every model has its features that set it apart form the others. In the case of Hitachi's budget LCD home theater projector, there are a few items you will want to specifically note:
-
PRICE
This is a $999 projector, people - and it has lens shift and the ability to calibrate RGB cut and gain controls for accurate grayscale tracking. A LOT of people should be considering going HD via this unit rather than spending a lot more for a much smaller display. If you have the ability to do front projection, this model should get you into the game. -
3:2 pull down and deinterlacing
No, really - While many projectors boast about having progressive upconversion, the Hitachi actually pulls it off - and far better than a lot of units I've seen at this price. Jaggie reduction was above par for this level of projector as was its surprising ability to handle some unusual cadences. -
Undocumented 1080p support
What's that? 1080p support from a projector that's around 2 years old? Yeah, we were surprised as well. While we don't recommend feeding a 720p projector 1080p - the feature is there if you need it (and it helps us as at least make note of products that can handle the highest resolution outputs of next-generation DVD formats - for those who fear 1080p will render 720p and 1080i obsolete before they can upgrade, lol.) -
Backlit remote control
It's simple. It's basic. It's a missing feature on most projectors: the backlit remote control. Let's give Hitachi its props. They provide a backlit unit that also provides direct input selection. Now that's some useful stuff. -
Lens Shift
The lens shift feature on the PJ-TX100 isn't the best we've seen and provides only 3/4 screen height adjustment up or down and 1/4 screen adjustment left and right, BUT for what is now priced as an entry-level projector this is better than most. In addition, a reduced lens shift range ensures better overall color accuracy in all available positions.
This is just the beginning and we'll get into more of the available features throughout the review.
Basic Setup and Installation
The Hitachi PJ-TX100 was very easy to place, assuming you can get it in the ballpark and allow the lens shift option to be utilized in a minimal fashion to line up the projector with the screen. As always, we recommend making all possible attempts at placing the unit so that the lens shift settings can be in the default position 舑 giving you the greatest brightness uniformity and the most light output. Take a look at the 16:9 throw chart below to see how this projector might function in your room:
Throw Chart for Distancing the Projector from a 16:9 Projection Screen
|
Screen Size
|
Size (Inches) |
Distance (Feet) |
||
|---|---|---|---|---|
|
|
width |
height |
wide |
tele |
|
60 |
52.3 |
29.4 |
5.4 |
8.9 |
|
70 |
61.0 |
34.3 |
6.4 |
10.4 |
|
80 |
69.7 |
39.2 |
7.3 |
11.9 |
|
90 |
78.4 |
44.1 |
8.3 |
13.4 |
|
100 |
87.2 |
49.0 |
9.2 |
14.9 |
|
110 |
95.9 |
53.9 |
10.2 |
16.5 |
|
120 |
104.6 |
58.8 |
11.1 |
18.0 |
|
130 |
113.3 |
63.7 |
12.1 |
19.5 |
|
150 |
130.7 |
73.5 |
14.0 |
22.5 |
|
170 |
148.2 |
83.3 |
15.8 |
25.5 |
|
200 |
174.3 |
98.1 |
18.7 |
30.1 |
May not be bright enough for typical screen sizes over 130" diagonal
There is ample zoom on this unit so placement and screen size will likely not be an issue unless you attempt to exceed a 130" screen and use a low gain screen. The bottom line is that the lumen output was more than sufficient for home theater viewing. We measured 28.5 cd/m^2 on our 100" diagonal Stewart StudioTek 130 screen from just over 12 feet away. That's plenty of light output and resulted in a real-world post-calibration contrast ratio that was very impressive (more below).
PJ-TX100 Connections, Remote, Menu System & Calibration
Whether you are connecting analogue or digital to this projector, the Hitachi comes prepared for anything you might need. While I like DVI-D connectors in projectors for their screw-down terminals and secure connections, they may be a pain if you are planning on running your cables through a mount. Just be sure to measure or check it out prior to making a projector mount purchase to see if everything will fit. In addition to DVI-D (with HDCP compatibility) you can plug in a component video cable or even choose to go "low-fi" by using s-video or composite cables (please don't do that!) If you have an HTPC, the HD-15/VGA input is available and should deliver excellent quality results in 1280x720 resolution.
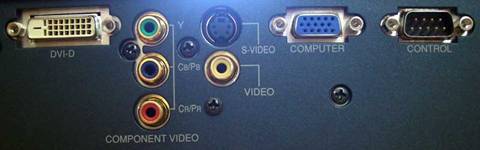
We did all of our testing using the DVI-D inputs with the exception of the HQV tests, where we needed to utilize the component video inputs in order to get a clean 480i input signal to the projector. While the DVI-D inputs handled both 1080p and 480i, at 480i resolution, the projector converted the incoming signal to 240p and removed about 1/2 the resolution in the process. Not a big deal, but something to note in the event that you want to check out the deinterlacing capabilities of your own unit. To circumvent this issue we fed 480i to the component inputs which seemed to work very well and you can read about the results later in the review.
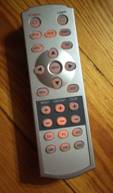
Remote Control
 A plus on the
remote. The Hitachi remote passes my minimum requirements by providing a backlit unit with direct input
access. I don't really ask for much more in a projector remote. The presence of an
"Aspect"
(ratio) button on the remote, along with a sensibly-placed menu and enter button
round out the unit -
making it one of the better remotes I've utilized this year. I found it
fit comfortably in the hand. It was easy to light (the light button is located on the top right -
which is almost becoming a standard), and all of the buttons were easily accessible with one hand. Kudos
and amen.
A plus on the
remote. The Hitachi remote passes my minimum requirements by providing a backlit unit with direct input
access. I don't really ask for much more in a projector remote. The presence of an
"Aspect"
(ratio) button on the remote, along with a sensibly-placed menu and enter button
round out the unit -
making it one of the better remotes I've utilized this year. I found it
fit comfortably in the hand. It was easy to light (the light button is located on the top right -
which is almost becoming a standard), and all of the buttons were easily accessible with one hand. Kudos
and amen.
The Menu System
The Hitachi menu system is a bit enigmatic in the sense that there are 6 main sections, plus an "Easy Menu" that gives you access to a different, simpler, view of the main features. What was confusing was the presence of an "Optical Black" mode which affected both the Iris setting and "Whisper" mode of the projector. I don't want to belabor the menu system - it wasn't all that confusing, but it actually took me some time to figure out how to get the blacks as deep as they could go (crank down the Iris to "0" and enable "Whisper" (low lamp) mode in the Easy menu). Hitachi never fully explains how "Whisper" mode reduces the brightness specifically, but we are under the assumption that it reduces lamp output (thus enabling a lower fan speed in the process). Rather than go through all of the menu items, I'll focus on some of the more prominent ones that you'll need to address to get optimal results.
Picture menu
This, and its submenu, is
where you will spend most of your time while calibrating the projector's display output. The
Picture
menu grants access to Brightness (black level) and Contrast (white level) controls as
well as Color, Tint, Sharpness and Memory Settings recall and storage. Selecting a
"Custom"
Color Temp will get you into the RBG Gain/Cut settings where you can really fine tune the Grayscale
tracking of this projector to near perfection. We found the Sharpness controls to be near-useless (as
usual for digital technology) and I'd recommend a setting no greater than 2-3. The Progressive
setting should be set to
"Film"
if you are using the projector to deinterlacer 480i input
signals.
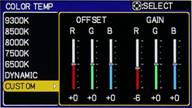 In the Custom
Color Temp
settings submenu you'll have direct control over
the color temperature and a custom configuration for adjusting RBG Offset (cut) and Gain. With these
controls we quickly dialed in the PJ-TX100 to what we felt were very respectable settings. This is a
feature I expect to see now on most projectors and I was pleased that it was so easily accessible with
the Hitachi. A Custom Gamma adjustment is also available which will allow you to dial in the Gamma for
even better control over light to dark. We actually left that setting alone due to time constraints, but
it is possible that it could help alleviate some of the s-curve gamma response we found in our luminance
testing shown later in the review.
In the Custom
Color Temp
settings submenu you'll have direct control over
the color temperature and a custom configuration for adjusting RBG Offset (cut) and Gain. With these
controls we quickly dialed in the PJ-TX100 to what we felt were very respectable settings. This is a
feature I expect to see now on most projectors and I was pleased that it was so easily accessible with
the Hitachi. A Custom Gamma adjustment is also available which will allow you to dial in the Gamma for
even better control over light to dark. We actually left that setting alone due to time constraints, but
it is possible that it could help alleviate some of the s-curve gamma response we found in our luminance
testing shown later in the review.
Image menu
This menu allows setting of overscan (most significant) and
vertical/horizontal positioning of the image within the LCD panels (for use with DVI-D only).
Setup menu
Within the
Setup
menu you can control Keystone
settings as well as the Whisper (lamp) and Iris modes. This is also the location to set up the unit for
front rear, floor or ceiling mounting using the Mirror submenu. Keystoning is still not recommended as
the image quality will decline. Whenever possible change the projector location or use the manual lens
shift options to get the image square to the projector screen.
Option menu
The
Option
menu is the place to find controls for
setting the sleep timer ("Auto Off") and checking the lamp and filter time. In addition, the
Service submenu allows you the ability to set the Fan Speed to high (high altitude), Normal or Low and
perform a Factory Reset of all menu settings (something I do before any calibration or review).
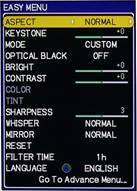
Easy
 menu
menu
The
Easy
menu is an aggregation of settings from the
Picture
,
Image
,
Setup
and
Option
menus. It provides a very easy method of adjusting
many of the key features of the projector and is certainly the way to go for most entry-level users. You
can always jump to the bottom and return to the
Advanced
menu, so nothing is lost by using this
rather convenient, simplified interface.
My confusion with the menu system stemmed from the presence of a setting called "Optical Black" (Off/Natural/Deep Black) which is present in the Easy Menu but not referenced in the Advanced menu system anywhere. Basically, it is simply a combined setting that affects both the Iris and lamp (Whisper) settings found in the Setup menu. After realizing this, the menu system cleared up a bit and getting the correct settings became a simpler process of calibration in conjunction with video test patterns.
Calibration - Get Those Black Levels Right!
 We always encourage users to get their black and white levels set
correctly in order to experience the most their projector has to offer. I ran into Joel Silver at CEDIA
this year and he handed me one of his new HDTV Calibration Wizard DVDs. This is a product I highly
recommend to novice users wanting to find a simple non-technical way to get the best color and detail out
of their display devices. It really is almost too simple to use, though we got a kick out of the blatant
and hilarious plugs by none other than Noel Lee himself (here's a tip: use the disc, but
don't plan on rushing out to buy the certified cables). The DVD is available for just $29.95 direct
from the
Imaging Science
website so consider making it one
of your
"reference"
DVDs.
We always encourage users to get their black and white levels set
correctly in order to experience the most their projector has to offer. I ran into Joel Silver at CEDIA
this year and he handed me one of his new HDTV Calibration Wizard DVDs. This is a product I highly
recommend to novice users wanting to find a simple non-technical way to get the best color and detail out
of their display devices. It really is almost too simple to use, though we got a kick out of the blatant
and hilarious plugs by none other than Noel Lee himself (here's a tip: use the disc, but
don't plan on rushing out to buy the certified cables). The DVD is available for just $29.95 direct
from the
Imaging Science
website so consider making it one
of your
"reference"
DVDs.
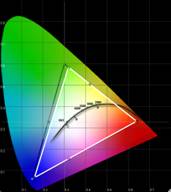
The CIE Chart is used to display the colors for the Hitachi PJ-TX100's HDTV color reference, as well as the gamut of colors that it is capable of creating. We observed that the Hitachi LCD projector had slight deficiencies in all three primaries, but Red seemed to be the most affected in practical viewing.
Contrast ratio measured in at 467:1 after calibration - that's pretty good in my opinion. Color temperature varied quite a bit out of the box: Normal (8475K), Cinema (7750K), Music (8850K), Sports (9300K), and Dynamic (7250K). Music? Yeah, we laughed about that one, too - I have no idea what they were thinking there. In either case, the Cinema mode is off more than Dynamic on color temperature, but provides better black levels so it's a great place to start for home theater calibration.
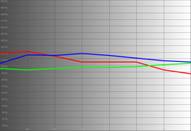
Here are some of the before and after measurements as shown by the DataColor ColorFacts Professional 6.0 system :
|
Before Calibration |
After Calibration |
|
|
|
|
This looks like a blurred image of three cars going around a NASCAR circuit. We can say that the lack of green as the dominant force in the RGB profile was good, but we wanted to calibrate the unit to perfection if possible. |
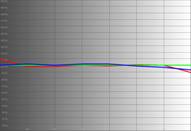
After calibration, the PJ-TX100 lined up beautifully with our expectations. The results looked incredible and the smooth line seen here lent itself to a practical demonstration of how accurate this projector could be. |
|
|
|
|
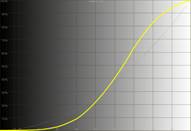
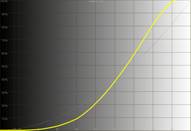
The before and after of the luminance graph were disappointing, but in all honesty the Custom Gamma settings might be able to help (we were unable to take the time to adjust the gamma during our review.) |
Black levels got a bit better, though we later went back and rechecked the system after making some white level corrections. Gamma correction is almost a necessity on this unit if you want the absolute smoothest response. |
|
|
|
|
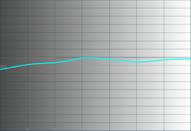
Pre-calibration color temperature of
Cinema
mode was a nice 7750K -
not exactly
what we were looking for |
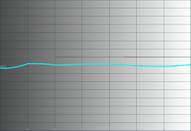
Bingo, smooth 6500K all the way from 30 to 80 IRE. |
PJ-TX100 Benchtesting, Viewing Tests and Conclusion
Audioholics/HQV Bench Testing Summary of Test Results
Perfect Score is 130
Hitachi PJ-TX100 Benchmark Score: 63
(room for improvement, but this is still an excellent
performer)
|
Test** |
Max
|
FILM*
|
Pass/Fail |
|---|---|---|---|
|
Color Bar |
10 |
10 |
Pass |
|
Jaggies #1 |
5 |
3 |
Pass |
|
Jaggies #2 |
5 |
0 |
Fail |
|
Flag |
10 |
5 |
Pass |
|
Detail |
10 |
10 |
Pass |
|
Noise |
10 |
0 |
Fail |
|
Motion adaptive Noise Reduction |
10 |
0 |
Fail |
|
Film Detail |
10 |
10 |
Pass |
|
Cadence 2:2 Video |
5 |
0 |
Fail |
|
Cadence 2:2:2:4 DV Cam |
5 |
0 |
Fail |
|
Cadence 2:3:3:2 DV Cam |
5 |
0 |
Fail |
|
Cadence 3:2:3:2:2 Vari-speed |
5 |
0 |
Fail |
|
Cadence 5:5 Animation |
5 |
0 |
Fail |
|
Cadence 6:4 Animation |
5 |
5 |
Pass |
|
Cadence 8:7 animation |
5 |
0 |
Fail |
|
Cadence 3:2 24fps film |
5 |
5 |
Pass |
|
Scrolling Horizontal |
10 |
10 |
Pass |
|
Scrolling Rolling |
10 |
10 |
Pass |
|
Total Points |
130 |
63 |
|
*
"Film"
Progressive mode was utilized for all HQV tests since it best
handled 2:3 pulldown artifacts.
** All tests were done via Component inputs at 480i (480i via the DVI-D inputs resulted in a
half-resolution 240p signal with poor detail results)
Comments on HQV Testing
We did all tests at 480i resolution using the component inputs of the Hitachi PJ-TX100 with an Oppo DV970HD as the source. Jaggie reduction was acceptable, but not stellar and we'd say that this is a unit you want to feed progressive scan to if possible. We also tested 1080p into this projector, which is passed as a (surprisingly) supported format. The scaler on the PJ-TX100 did a very good job of allowing the 1080p/60 to fit into its native display and we noticed only a slight softening of the image overall. Whenever possible, you'll want to give the PJ-TX100 a 720p native source.
Viewing Evaluation
This is a very clean projector. The presence of screen door effect is more pronounced than some units, but the Hitachi makes up for it with a stunningly clear picture. The optics on this unit are simply above-par. Remember, when this unit first came out it was priced at $2,999. Now, for a ~$999 street price, you're looking at a first-class bargain product that is sure to impress.
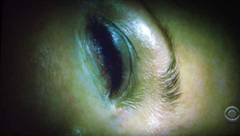
HDTV:
CSI: Crime Scene
Investigation
I've shot screen captures of CSI before in my viewing evaluations
and the Hitachi provided some of the best pictures I've seen (though my camera certainly
isn't the best visual descriptor you'll find). Skin looked natural -
not oversaturated
or washed out -
and texture was abundant. Shadow detail was present provided you were in a
light-controlled room. Brighten the lights and, like with any projection system, your black resolution
will be lost in the shuffle. Note the vibrant, but realistic colors available from this system -
it
was stunning to watch -
and indeed we viewed a ton of prime time shows, quickly losing track of
time.


HDTV: Shark
Shark is a new show on network TV and stars one of
my favorite actors: James Woods. Aside from lending his voice to numerous animated movie villains, Woods
does an incredible job on-screen as well. Of course, having Jeri Ryan (Star Trek: Voyager, Boston Public,
The O.C.) as a co-star certainly doesn't hurt the show one bit, either. This show had some pretty
poor HD shots (blurry, poor lens choices, etc) but occasionally they'd get a shot right and you
could really read the detail in the scene or spy some of the actors -
natural facial definition
(something that would more than likely bring horror to their publicists'
faces if they knew). This
is a great show, and don't get me wrong -
it looks fine in HD, but it was one of the more
difficult screen capture sessions I've had due to there not being a ton of clear footage to select
from.


Though the color here appears a bit muted (Woods) and accentuated (Ryan) this is a result of the camera. Overall everything appeared well-saturated, but not overly so, with excellent black level detail (for LCD) and smooth color gradients.
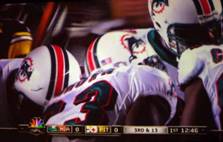
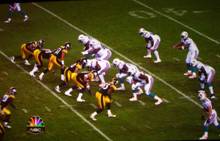
Thursday Night NFL Kickoff Game
This was it -
the day we
were all waiting for -
the opening game of the NFL's regular season.
With the Superbowl
champions, the Pittsburgh Steelers going up against the Miami Dolphins it was sure to be a good game. We
weren't disappointed -
with the game that is. As for NBC, I am now declaring them an official
"HD-laughingstock"
as the problems they experienced throughout pre-season now made their way
into the regular season. Consistent throughout the entire game was an apparent resolution/focusing
problem that would suddenly, and without explanation, blur the picture nearly every time the camera went
to instant replay or showed the teams set for a snap. How no one noticed this is beyond me, but I
surveyed enough people to know that it is at least present throughout multiple affiliates here in
Florida. The problem was so bad that even
"non-videophiles"
like my father-in-law questioned
what was going on (it's hard to miss the effect sitting 13 feet away from a 100-inch screen).
Nevertheless, we grabbed some screen shots of non-blurry moments, which appeared exceptionally detailed
and colorful (but without the artificial green push you might see in many uncalibrated
"sports
mode"
settings).

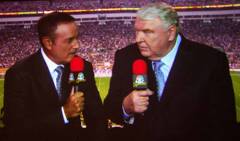
Check out the shot of Charlie Batch. Close-ups like this were outstanding, and watching the tried and true commentary by none other than Al Michaels and John Madden was great. Now, if Joe Theismann would just retire from his tired "overstating-the-obvious-and-getting-his-facts-wrong" Monday Night commentary, all would be well. I swear, the idiot who put Theismann on Monday Night Football should be forced to actually listen to him provide commentary on a game - just once they should do it.
Conclusion
For $2999 this projector would have a TON of competition and would be difficult to recommend - but with a street price of $999 it's a no-brainer. The Hitachi provides lots of features and an incredibly detailed lens system that delivers precise resolution and clarity. This is a projector I think can fit into any entry-level system and provide years of enjoyment. The remote gets our "kudos" award for hitting all of the basic requirements and basic 2:3 pull-down features means that even standard definition video will be passable on this system. The PJ-TX100 is a solid performer, so be sure to put it on your "short list" when shopping for a sub-$1000 projector that works well in the home theater environment.
MSRP: $1099
Hitachi Corp
P.O. Box 3900
Peoria, IL 61612
800-HITACHI.
www.Hitachi.us
About Hitachi
Hitachi America, Ltd. markets and manufactures a broad range of electronics, computer systems and
products, IT services and industrial equipment and services throughout North America. Hitachi
America, Ltd., the administrator of this web site, was established as a wholly owned subsidiary of
Hitachi, Ltd. on October 28, 1959. Today, Hitachi
America and its 10 subsidiary companies in
North America have approximately 4,400 employees.
The Score Card
The scoring below is based on each piece of equipment doing the duty it is designed for. The numbers are weighed heavily with respect to the individual cost of each unit, thus giving a rating roughly equal to:
Performance × Price Factor/Value = Rating
Audioholics.com note: The ratings indicated below are based on subjective listening and objective testing of the product in question. The rating scale is based on performance/value ratio. If you notice better performing products in future reviews that have lower numbers in certain areas, be aware that the value factor is most likely the culprit. Other Audioholics reviewers may rate products solely based on performance, and each reviewer has his/her own system for ratings.
Audioholics Rating Scale
 — Excellent
- — Very Good
- — Good
- — Fair
- — Poor
| Metric | Rating |
|---|---|
| Detail and Resolution | |
| Deinterlacing & Scaling | |
| Contrast and Black Levels | |
| Color Reproduction | |
| Noise Reduction | |
| Calibration Options | |
| Build Quality | |
| Ergonomics & Usability | |
| Ease of Setup | |
| Features | |
| Remote Control | |
| Performance | |
| Value |
Clint Deboer was terminated from Audioholics for misconduct on April 4th, 2014. He no longer represents Audioholics in any fashion.
View full profile