
Atdec Telehook TH-3060-LPT TV Tilt Mount Review
Atdec Telehook TH-3060-LPT TV Tilt Mount
- Product Name: Telehook TH-3060-LPT TV Tilt Mount
- Manufacturer: Atdec
- Performance Rating:


- Value Rating:
- Review Date: November 01, 2011 03:30
- MSRP: $ 159
- Max Display Weight: 110lbs
- VESA Compatibility: Universal
- VESA Pattern Support (WxH): 200-800mm x 100-500mm)
- Clearance: 1"
- Number of studs required: 2
- Display Bracket: Removable with quick-attach system
- Tilt: up to 15º forward, adjustable spring loading
- Horizontal left / right positioning
- Color: Black
- Includes: installation guide, tension adjustment tool, display mounting hardware (hardwood & masonry) Warranty: 10-yr limited
Pros
- Simple installation
- Adjustable tilt
- Slim
Cons
- Difficult to get initial connection to back plate
TH-3060-LPT Full Review and Conclusion
 Atdec is really coming into maturity as one of a few premier mounting solutions companies. There are some big names, but Atdec is ....They are making some really elegant systems, and their product line has expanded in recent years to include both typical and atypical mounts and stands. In particular, we've been impressed by their flat panel TV mounts that take into account the new thinner televisions as well as the attention they pay in other products to cable management and positioning requirements. The Atdec TH-3060-LPT is actually one of their "stealth technology" models. It looks like a simple solution, but it offers some pretty impressive features that are part handy, part brilliant. We ravenously tore into this mount while placing a 60-inch Sharp LED backlit television on the wall of Andrew Gash, our highly esteemed Internet-famous video reviewer.
First Impressions and Build Quality
The Atdec TH-3060-LPT is part of their Telehook line-up. The Telehook line of TV and projector mounts are designed to be both aesthetic and tough. Form meets function, would be a better way to describe it. The range also crosses the line between commercial and residential, really working well for both. It also encompasses any size product, from small 12" TVs to those over 63" in size, and it allows wall or ceiling solutions. But Telehook also provides full motion mounts, simplistic mounts and tilt solutions. They tend to be both simple to install and have pretty robust features.
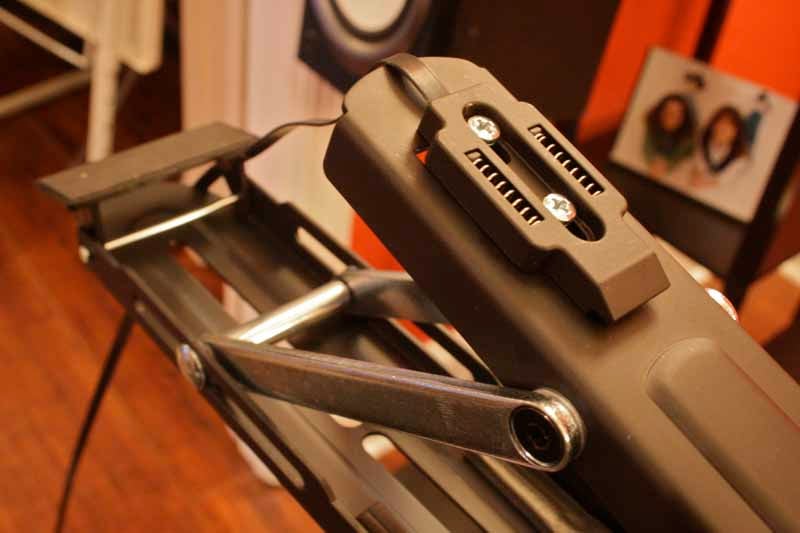
Opening up the TH-3060-LPT we were greeted with the expected back plate, mounting hardware and tilt arms. In any basic flat panel tilt mount, you mount the base plate to the wall (either studs or masonry) and affix the tilt arms to the back of the TV using the supplied hardware. This is fairly standard fare, but what we found interesting was how thin the tilting mechanism was and, more importantly, how well it seemed like it would work on an oversized screen. Unlike many tilt mounts, which are merely friction-based hinges, the TH-3060-LPT uses a spring-assisted twin arm mechanism that lets you adjust tension until you can literally control the tilt of even a heavy display with a single finger.
Installation & Use
The Atdec installation process makes a lot of sense and follows the rule that "once you've installed one tilt mount, you're good for all of them". While the components are different, the process follows the same basic steps:
- Place the back mounting plate
- Locate and run your wiring and power
- Mount the tilt brackets to the flat panel TV
- Attach the TV to the mounting plate
- Make your A/V connections and enjoy!
For this installation we used the following components. Consider this a parts list of sorts:
- Atdec TH-3060-LPT Low Profile Tilt Mount
- Dayton 23.1 ft (5m) High Speed CL3 HDMI Cable info
- Dayton 6.6 ft (2m) High Speed HDMI Cable w/Ethernet info
- Bulk Cable Feedthrough with Remote Power Interface info
- 2 x Dayton Audio HDMI-WP1 Single HDMI Wall Plate (optional) info
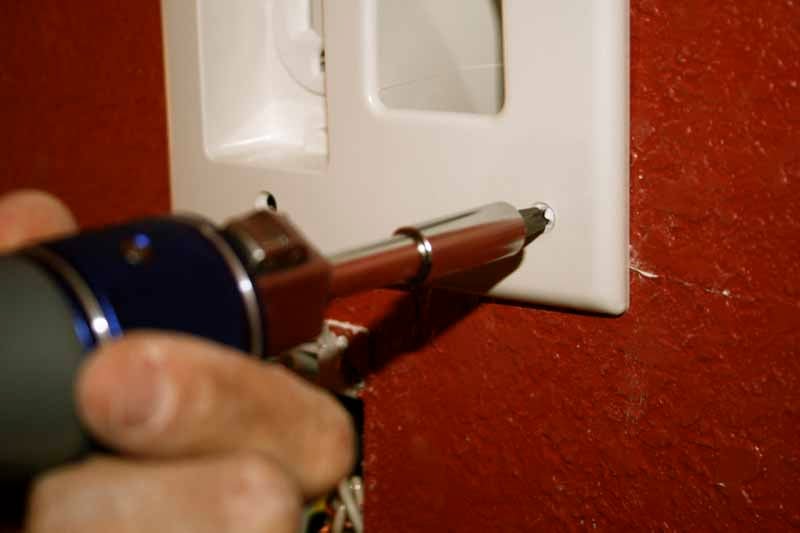
The first step was to attach the wall plate to the desired viewing position. We located the studs using a Bosch GMS120 Digital Wall Scanner (cool tool!) and decided upon the proper height for the mount (the mounting plate will be located approximately in the middle of the screen, so it's easy to position). We then used a level to mark the vertical lines of the central studs. With an assistant, we positioned the mount and marked our holes. We pre-drilled using a cordless 12V drill and fastened the plate to the studs using the supplied hex bolts.

In our installation we needed to put the TV overtop of where an old outlet had been positioned. We opted to place a blank plate over the outlet and mount the rear plate so that it covered the plate. This wasn't a big problem since we had four very strong anchor points for the plate and everything still fit fairly flush to the wall. In a normal installation (where someone didn't attempt to "helpful" by adding power in the wrong place) you would add your own power afterwards - as we did later.
 We next attached the brackets to the TV, making sure that the spring tension bolts were positioned towards the outside of the TV so we could get to them later with the supplied tension adjustment wrench. The correct screws and even the required spacers were included in the kit and it was a simple matter to get everything assembled. About the only hang-up was when one of the screws wanted to be located right underneath one of the pivot points of the arms. Pulling the tilt mechanism outward, shifted that pivot point and granted us access to the screw hole. It was almost a pleasure to work with this mount.
Before lifting the TV onto the bracket and installing it, we needed power. To accomplish this we utilized a Bulk Cable Feedthrough and Remote Power Interface from Parts Express. With this system you can "jump" power from a standard AC receptacle to a "feeder" outlet down below and then run it up the wall using 12/2 power cable. You can also opt to simply hard-wire the top receptacle in place, feeding it power from an existing electrical circuit. The only downside with this method is that you may still want to insert a power filter or surge protector between the TV and the recessed power receptacle. Behind the TV, you then mount the recessed receptacle in the wall. Now what we like about this system is that it comes with a bulk cable feeder (as the name implies). That means you can run your HDMI cables, component cables, networking, etc right up the wall. It's perfect for interior walls where there is no insulation and you don't have to worry about sealing up the wall from exterior air egress.
That was pretty much all there was to it. We lifted the TV onto the wall plate (using two people) and massaged it in place until it clicked into place. This was a bit harder as the lower clips didn't want to pop into place, even when pulling down on the two clip-release straps, which we later cut to length so they didn't stick down past the bottom of the TV. After a tiny bit of finagling, we got it to click and everything was ready to go.
The thing about this mount that is pretty cool is that you can slide the unit left and right quite easily to get it perfectly positioned on the wall. You can also grasp the television at the top and bottom and literally pull it out from the wall until it's able to be tilted downward as needed (up to 15 degrees of forward tilt). This also allows you excellent access to the connections for HDMI, component, networking, or whatever you need to get it up and running. And that's just what we did. We picked up a 5 meter High Speed CL3 HDMI cable from PartsExpress and fed it through the cable port we had just installed.
There are other ways to dress up this type of installation as well. For one, you can get a custom wallplate that has the exact connectors you need, allowing you to bypass the bulk cable pass-through and jump directly to a finished plate with actual terminations (we included this in our parts list above). In our case, we weren't certain what the future might hold, so we kept our options open with the use of the bulk pass-through solution.
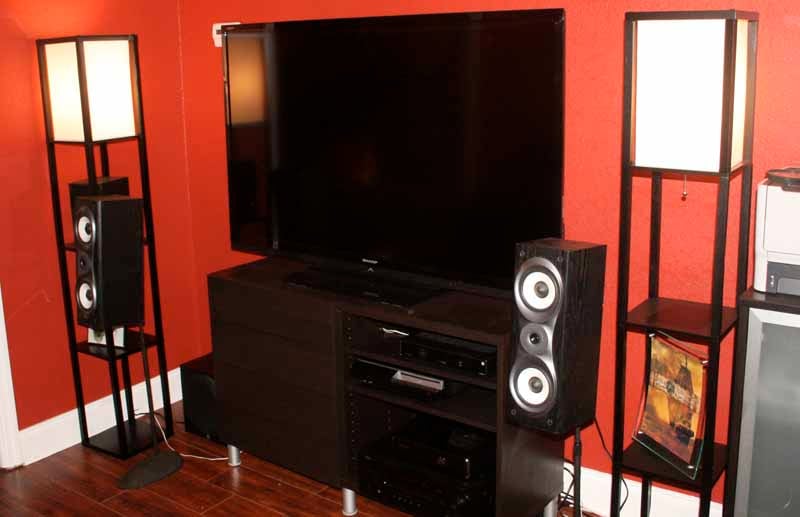

Before (left) and after (right)
Conclusion
The finished install couldn't have been better. It looked fantastic - much better than where we started - with a beautiful 60-inch TV tethered atop a component shelf. Floating your TV on the wall just makes it look that much more... flat. I mean, what's the point of a flat panel TV if it's sticking atop a piece of furniture. It's meant to be hung, and the cost and effort to put it up it is well worth it, particularly when the materials and products to do so keep getting better and better. Atdec continues to impress us with their ability to produce innovating and useful products that get the job done - with an eye to both aesthetics and ease of installation. That's a great combination to have at the Telehook TH-3060-LPT continues a fine tradition.
The Score Card
The scoring below is based on each piece of equipment doing the duty it is designed for. The numbers are weighed heavily with respect to the individual cost of each unit, thus giving a rating roughly equal to:
Performance × Price Factor/Value = Rating
Audioholics.com note: The ratings indicated below are based on subjective listening and objective testing of the product in question. The rating scale is based on performance/value ratio. If you notice better performing products in future reviews that have lower numbers in certain areas, be aware that the value factor is most likely the culprit. Other Audioholics reviewers may rate products solely based on performance, and each reviewer has his/her own system for ratings.
Audioholics Rating Scale
 — Excellent
- — Very Good
- — Good
- — Fair
- — Poor
| Metric | Rating |
|---|---|
| Build Quality | |
| Ergonomics & Usability | |
| Ease of Setup/Programming/Integration | |
| Features | |
| Fit and Finish | |
| Performance | |
| Value |
Clint Deboer was terminated from Audioholics for misconduct on April 4th, 2014. He no longer represents Audioholics in any fashion.
View full profile