
Olevia 232V LCD TV Review
Olevia 232V LCD TV
- Product Name: Olevia 232V LCD TV
- Manufacturer: Syntax-Brillian Corporation
- Performance Rating:

- Value Rating:
- Review Date: June 16, 2008 19:44
- MSRP: $ 599
|
Video
|
Audio
Dimensions: 37.8" x 22.2" x 9.4" Weight: 35.5 lbs |
Pros
- Excellent quality/cost ratio
- Good color saturation
Cons
- Limited video input options
- limited user controls for calibration
- Crushes whites
- No source-specific buttons on remote
232V Build Quality and Remote Control
The Olevia 232V comes in a pretty standard rectangular cardboard box. While a removable lid would have made getting the display out a bit easier, I was able to get it out easy enough with a little help from my wife. Because this display was purchased and would be staying in my house permanently, we installed it in the recessed area over our fireplace.
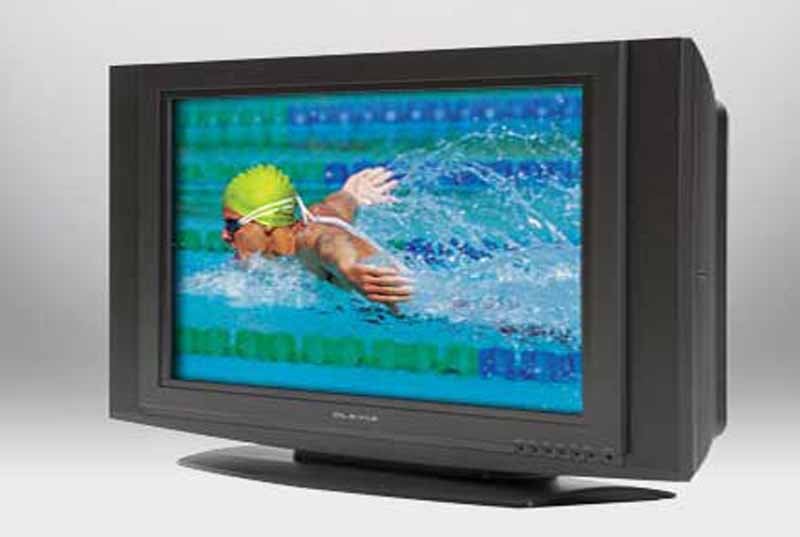 The outer frame of the 232V is made of black plastic with a recessed black plastic frame around the 32” diagonal thin film transistor (TFT) liquid crystal display (LCD). On power up, a bright blue LED light comes on indicating that the display is receiving power. For those who find these lights to be irritating, the user menu will allow you to disable this light. The front of the display includes buttons along the bottom right that include: Power, Menu, Channel up and down, Volume up and down, and Source. The Olevia emblem is in raised silver on the bottom middle of the black plastic frame. The stand is also made of black plastic. Each of the two speakers are approximately 3 inches wide and run vertically along the left and right side of the display. Over all the build quality of the 232V seems very solid with a pleasant enough aesthetic.
The video and audio inputs are all located on the back panel of the television. They are set up in a down facing configuration and were fairly easy to access during my set up.
Remote Control
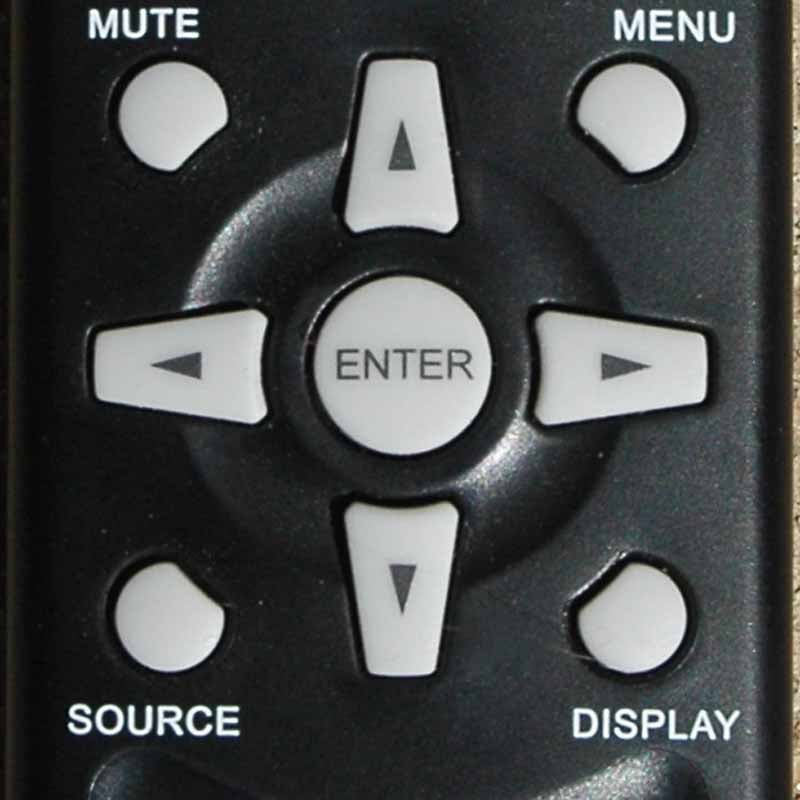
![]() The remote control is of the standard, unimpressive variety and was easy enough to use during calibration and day-to-day use of the display. The remote control has individual buttons for some functions (lighting, aspect ratio, freeze frame, and favorite television channels. However, it only has a single button for the source so you have to toggle through all the potential inputs (VGA, VGA-component, Tuner, Composite, S-video, component, and HDMI) to switch sources. Fortunately there are not that many sources to select from, so it isn’t the headache it could be, but can still be irritating over time and makes for more difficult universal remote control programming. Other quirks involve scenarios where there are separate buttons, for example Display and Time, which appear to give you exactly the same information in default use. With space being such a precious commodity on a remote control, the Time button (presumably tied to the Sleep function) seemed superfluous.
The remote control is of the standard, unimpressive variety and was easy enough to use during calibration and day-to-day use of the display. The remote control has individual buttons for some functions (lighting, aspect ratio, freeze frame, and favorite television channels. However, it only has a single button for the source so you have to toggle through all the potential inputs (VGA, VGA-component, Tuner, Composite, S-video, component, and HDMI) to switch sources. Fortunately there are not that many sources to select from, so it isn’t the headache it could be, but can still be irritating over time and makes for more difficult universal remote control programming. Other quirks involve scenarios where there are separate buttons, for example Display and Time, which appear to give you exactly the same information in default use. With space being such a precious commodity on a remote control, the Time button (presumably tied to the Sleep function) seemed superfluous.
232V Set Up and Menu System
The menu is based on a wheel system set up around the following primary options:
- Setup
- Picture
- Screen
- Audio
 The menu was not the most intuitive system I have ever seen on a display; however, once you get the hang of how it works, it is fairly easy to manipulate. All the controls you need to manipulate the wheel-based menu system for setup and calibration are centrally located on the lower part of the remote. During set up and calibration, the controls I used most often were easy enough to get to. However, its lack of memory (having to start the whole wheel cycle over every time) became a nuisance if you happened to let the menu display timeout. On the positive side you can increase the delay in the timeout for the menu display in the Set up menu.
Setup
This is the initial menu that can be used to configure all the basic information for your display. This portion of the menu includes options for setting:
- Date and Time
- Menu Timeout
- Language
- LED Setting (this is for turning off the bright blue LED power light on the front of the display)
- Factory Settings
- Factory Settings by Input
- Firmware Version
- Parental Control
- Timers
Picture
The picture menu controls most of the picture quality controls you will need to calibrate the television to make sure you are getting the best image available. The mode controls the basic setup for the television and includes two options. The default setting is the Power Up setting that is typically optimized for the bright conditions of a big box electronics store (and little else). You will almost certainly want to select the Home setting.
The Input menu allows you to indicate what type of source video you are sending the display from each input (HDMI or Component). The options available in this menu include: Interlaced DVD, Progressive DVD, Standard Definition TV, High Definition TV, and User
The Lighting menu includes three different controls designed to optimize settings based on the ambient light in a room (Bright Room, Medium Room, and Dark Room). If you install your television in a room with a lot of windows, and fairly bright ambient light conditions during the day, the Bright Room option can be useful for daytime television watching. Then by toggling through to Dark Room you are ready to watch movies at night in a relatively light-controlled environment.
Other settings in the Picture menu include:
- Brightness
- Contrast
- Color Temp – the options under this settings are Native or 6500K (see the calibration and Bench testing section for details on the differences between these settings)
- Color
- Tint
- Sharpness
Screen
The Screen menu contains three more options to help you get your display set up to properly align and adjust the physical aspect of the picture. The main Picture Source allows you to tell the Olevia how your primary source is connected to the television (HDMI, Component, S-video, Composite, or Tuner). The Adjustment submenu allows you to shift the picture vertically or horizontally to make sure the center of the picture is in the middle of the screen and you aren’t cropping either side. There are also submenus here to change the aspect ratio based on the source signal and for cropping to make sure you are seeing the entire picture on your screen.
Audio
The Audio menu is fairly limited and includes submenus to adjust the Treble, Bass, and Balance of the audio. You also have submenus to turn on or off the speaker and mute functions.
232V Calibration and Bench Testing
We began our calibration by using the Digital Video Essentials Pro discs and set our Contrast, Brightness and Sharpness. This is the first step where we noticed some shortcomings with the user controls. When attempting to set the Brightness, just one click went from being able to clearly see all 3 dark bars on the test pattern to being able to see only one. This forced us to make a decision on which side of right we wanted to set our brightness. A similar problem with fineness of control was found in trying to set the Contrast. In attempting to set the White levels we were never able to produce whiter than white levels.
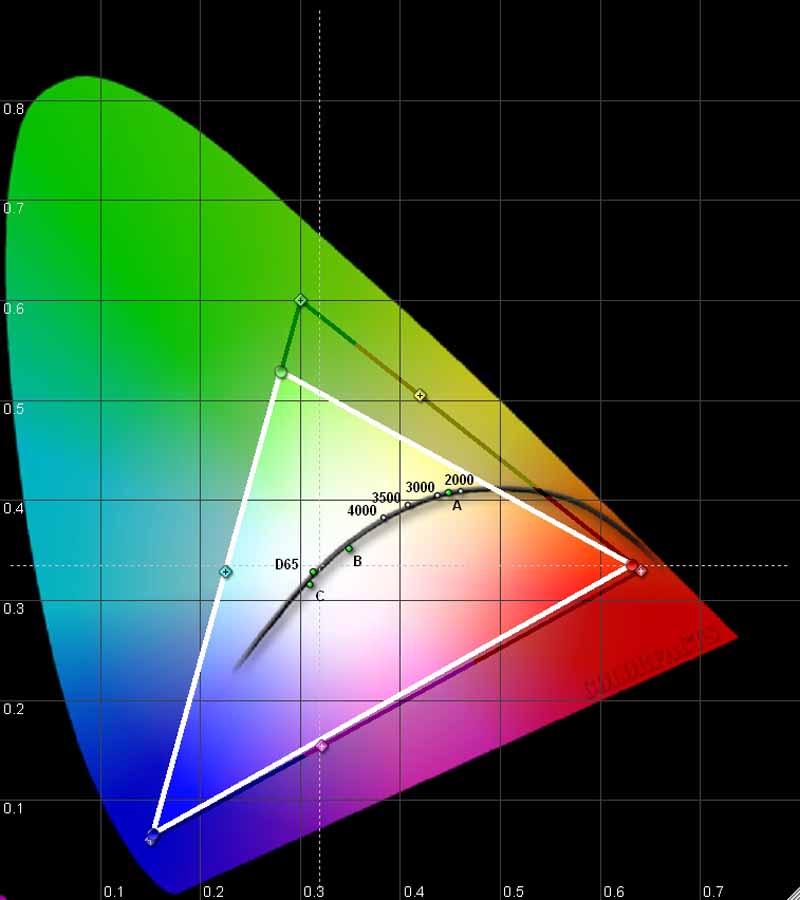 We used Datacolor’s Colorfacts Professional 6.0 software to measure the 232V's performance in various modes and Color temperature settings. The CIE Color chart shows the 232V is pretty close to right on with both red and blue, but is a little deficient in green. We should point out however that two very important factory presets in the Picture menu that need to be changed to set the display for home use. Under Picture/Mode there are two options (Home and Power Up). The factory default is Power Up (so it looks as bright as possible when powered up in show room settings); but as usual, the preferred setting for use in our home was, oddly enough, Home. The other factory default we recommend changing is also in the Picture menu under the submenu Color Temperature. The two options are Native (the factory default) and 6500K. Prior to changing this default, we got a color temperature of around 9200 (again heavy blue in an attempt to make it stand out in the showroom). Making this simple change gave us a measurement of 6255K, much closer to the goal of 6500K.
We prefer displays be capable of producing at least 400:1 contrast. This display couldn't quite live up to that expectation and produced the following ANSI contrast readings in our room:
- Dark Room 273:1
- Medium Room 271:1
- Bright Room 269:1
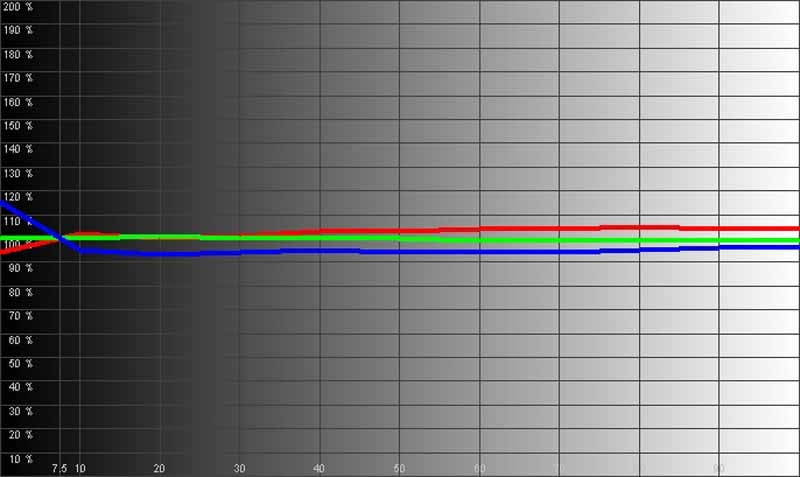
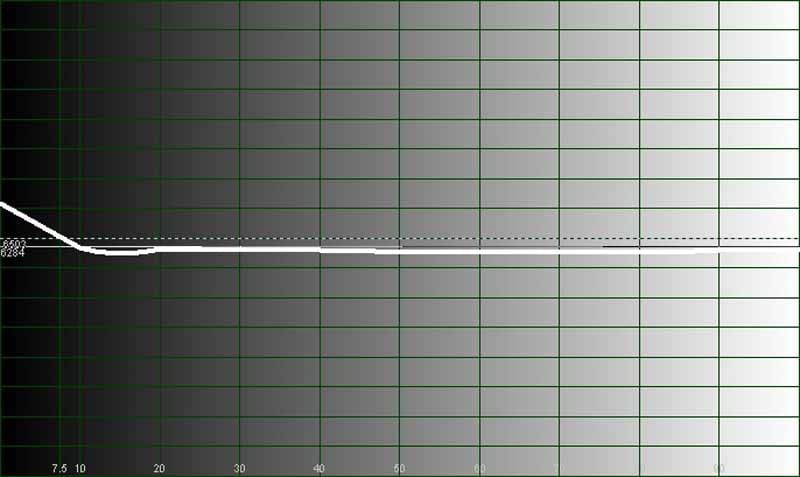
When we first tested the RGB performance out of the box prior to making these changes the display showed a heavy bias toward blue. Simply changing the mode setting to Home, and the Color Temp to 6500K brought the blue back down and we got a very acceptable grayscale performance with this setting. You can see the RGB levels look pretty stable across the entire spectrum from about 10 IRE through 90 IRE. Unfortunately, there are no User calibration controls for RGB Cut and Gain so other than making a few basic changes there is little you can do to alter the out of the box RGB performance.
With the color temperature set to 6500K (rather than native) the color temperature of the display also stayed pretty stable in the range of 6300K. Not bad, actually, though some prefer a picture that is a bit less red.
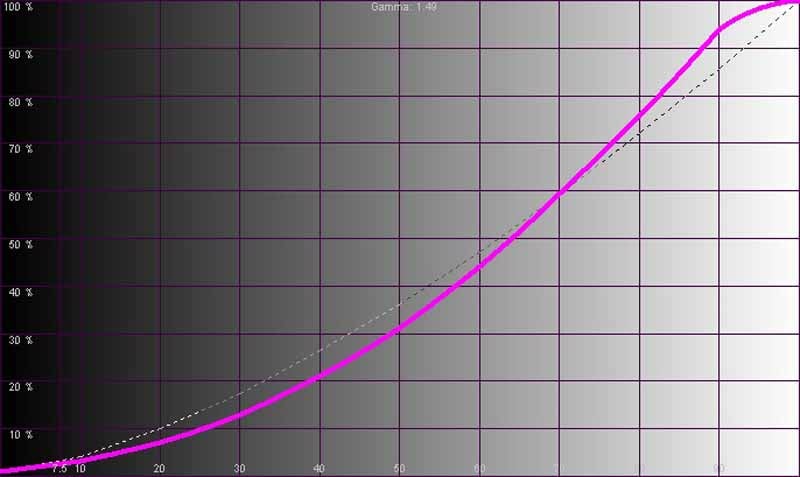
The Gamma reading (1.49) was a bit off the target of 2.2 to 2.5 and it suffers slightly from S-curve issues. As a result the blacks do not get black quickly enough and then the whites take off a little to quickly. I could quickly see why my Contrast and Brightness settings resulted in quick clipping of the top and bottom end.
Audioholics/HQV Bench Testing Summary of Test Results
Perfect Score is 130Olevia 232V Benchmark Score: 61
| Test | Max Points |
Score |
Pass/Fail |
|---|---|---|---|
| Color Bar |
10 | 5 | Pass |
| Jaggies #1 |
5 | 3 | Pass |
| Jaggies #2 |
5 | 3 | Pass |
| Flag | 10 |
0 |
Fail |
| Detail |
10 |
5 |
Pass |
| Noise |
10 |
0 |
Fail |
| Motion Adaptive Noise Reduction |
10 |
0 |
Pass |
| Film Detail |
10 |
5 |
Pass |
| Cadence 2:2 Video |
5 |
5 | Pass |
| Cadence 2:2:2:4 DV Cam |
5 | 5 | Pass |
| Cadence 2:3:3:2 DV Cam |
5 | 5 | Pass |
| Cadence 3:2:3:2:2 Vari-speed |
5 | 0 | Fail |
| Cadence 5:5 Animation |
5 | 5 | Pass |
| Cadence 6:4 Animation |
5 | 0 | Fail |
| Cadence 8:7 Animation |
5 | 5 | Pass |
| Cadence 3:2 24 fps film |
5 | 5 | Pass |
| Scrolling Horizontal |
10 | 5 | Pass |
| Scrolling Rolling |
10 | 5 | Pass |
| Total Points |
61 |
Comments on HQV Testing
Not a great score, but really pretty solid at the important things like Film Detail and 2:3 cadence tests. The jaggies tests really exposed some weakness on producing straight lines. So you are really going to want to feed this display a good progressive signal (480p or 720p) to really enjoy great video.
232V Viewing Evaluation and Conclusions
In case you've forgotten, I bought this TV with money out of my own family's budget. So, it's been in my home for a while and I have gotten to view a lot of material on it. I'll have to say that while it isn't a TV that has a big "wow" factor in the picture, it is a solid (consistent) display that does a good job with just about any material.
HDTV: Sports
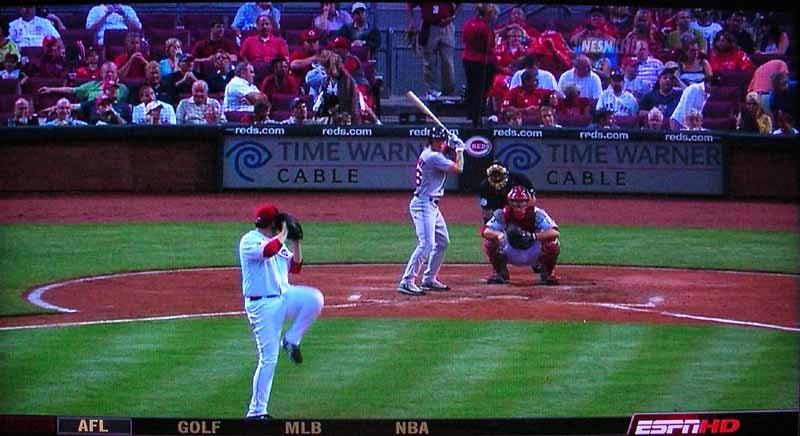
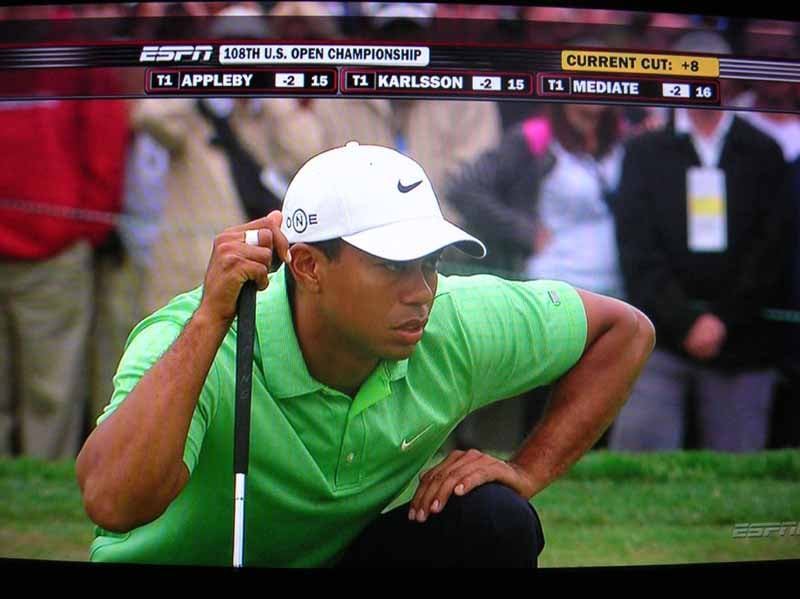
If you spend any amount of time in my house you're going to wind up watching sports. If it's summertime, there's a good chance the sport of choice will be baseball. I love the game. I also love to watch the game in high definition! Great color saturation. Although I did notice some blur and/or ghosting when trying to track the ball. On the other hand, I do not particularly care for golf. But hey if it's in HD, of course I'll make an exception. If for no other purpose than to make sure the display passes the golf ball test, and yes I could make out the dimples of the golf ball lying on the green.
This is a great demo disk for audio and video I picked up for free at last year's Audioholics State of the CE Union. There are some great options on this disc to challenge just about any display. Since I'm a big aviation fan, I particularly enjoyed the rich colors and contrast in One Six Right. The animation in Ghost in the Shell exposed the display's tendency to be a little bit soft.


Recently my wife and children went on a trip and I found myself with the opportunity to watch whatever I wanted. So of course I loaded up the Netflix list with plenty of blood & guts! Yep some good old carnage. 300 delivers plenty of that and it also gave me the opportunity to grab some screen shots with good contrast. As we saw in the bench testing, the display struggles with bright whites, but it still did a good job of reproducing the bright and dark scenes in this movie.

Conclusion
Overall this is a pretty solid display that does a surprisingly good job with any progressive scan source. If you want a better display you can certainly find one. If you want a better display for the money, you'll be able to do that as well - but you'll have to do your homework. While the picture is a little soft at times, the color is pretty close to right on, and I found the overall quality to be very pleasant. Not a standout, but if you need a solid display for a second video room, the office, or the bedroom this display is certainly worth investigating.
The Score Card
The scoring below is based on each piece of equipment doing the duty it is designed for. The numbers are weighed heavily with respect to the individual cost of each unit, thus giving a rating roughly equal to:
Performance × Price Factor/Value = Rating
Audioholics.com note: The ratings indicated below are based on subjective listening and objective testing of the product in question. The rating scale is based on performance/value ratio. If you notice better performing products in future reviews that have lower numbers in certain areas, be aware that the value factor is most likely the culprit. Other Audioholics reviewers may rate products solely based on performance, and each reviewer has his/her own system for ratings.
Audioholics Rating Scale
 — Excellent
- — Very Good
- — Good
- — Fair
- — Poor
| Metric | Rating |
|---|---|
| Detail and Resolution | |
| Deinterlacing & Scaling | |
| Contrast and Black Levels | |
| Color Reproduction | |
| Noise Reduction | |
| Calibration Options | |
| Build Quality | |
| Ergonomics & Usability | |
| Ease of Setup | |
| Features | |
| Remote Control | |
| Fit and Finish | |
| Performance | |
| Value |