
Arylic Up2Stream DIY Boards: Build Your Own Media Server
Arylic Up2Stream DIY Boards
First it was Personal Computers (PCs), then it was telecommunications, and now it is happening to the audiophile world: technology has shattered the cost vs. performance ratio for key pieces of audio equipment by an order of magnitude. Things like audio amplifiers and Digital-to-Analog Converters (DACs) are now available in modular form to hobbyists and serious audiophiles alike for tens-instead of hundreds-of dollars. A company called Arylic now offers what they call a DIY line of audio equipment that can serve as the basis of a low-cost home stereo system.
Setup and Configuration
I received the following hardware from Arylic to test:
- Wi-Fi Stereo Receiver for DIY Speakers Up2stream Pro V3
- Bluetooth Amplifier Board with WiFi Up2stream Amp V3
I also received the following accessories, which are included in this review:
- IR remote control
- Clear acrylic cases for the PRO V3/AMP V3 boards
- ACPWorkbench Tool
- Power adapters:
5V/1A micro USB (for the PRO V3)
24V/4A AC/DC adapter (for the AMP V3)
- Expansion boards:
DAC Board
SPDIF IN board (both optical/Toslink and coax)
SPDIF OUT board (both optical/Toslink and coax)

The unboxing was straightforward: each board comes enclosed in an electrostatic bag in its own plastic container, complete with instruction manual and the necessary interconnect cables (more on that later). One suggestion right off the top: the instruction manuals for the PRO V3/AMP V3 boards are way too small to read (at least with the naked eye), so I would download the PDFs from Arylic’s website for viewing on a computer screen (where you can magnify the view). Also, I wouldn’t attempt removal of the Wi-Fi and/or Bluetooth (BT) antennas (they are essential to proper operation), as the U.FL (also known as IPEX or AMC) connectors are fragile and only rated for about 30 mating cycles.
I recommend keeping your Wi-Fi access point, board(s), and phone in close proximity to each other for the initial setup which requires the following:
- 4Stream app (download from Apple or Google store)
- Available (2.4 GHz) Wi-Fi network (have your password handy)
Warning: the initial firmware update takes a long time!
Tip: check the app volume (or use the IR remote control) to turn up the volume after the initial connection, no matter the source (Wi-Fi/BT/USB/Aux). I also discovered that you may need to check the volume setting every time you remove/apply power to the board.
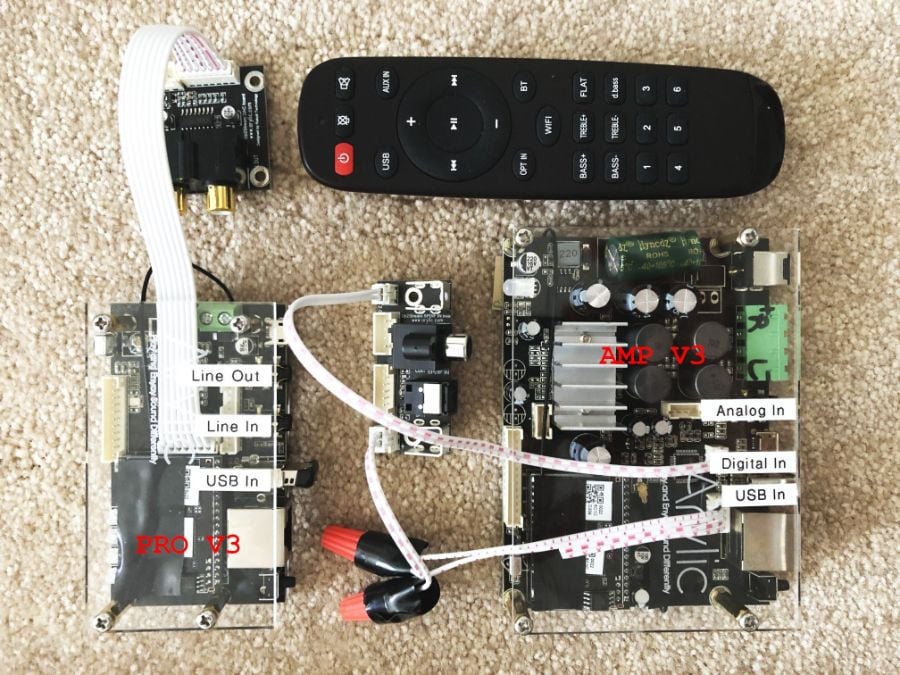
One of the most complicated aspects of using the DIY boards is sorting out all the different configurations and interconnect cables. In fact, I had to create a custom ribbon cable to power the SPDIF IN board from the AMP V3 Board (notice the cable splices in the figure above). I used this configuration for listening tests later on. In order to draw 3.3v from the AMP V3 board, the 2-pin power connector on the SPDIF IN board needed to mate with a 4-pin connector on the AMP V3 board (for an interface I had no intention of using), and no such “cross-type” cable was provided. If this sounds confusing, it’s because it was...and will only make sense when you inspect the Input/Output (I/O) connectors for both boards. I suspect this was an oversight because of the special voltage requirements of the SPDIF boards, as they included all other cabling with the various board types.

The 4Stream app is a necessary part of the setup and a way to select I/O sources (along with the IR remote control). You’ll notice in the figure above that I have named my boards “Media Room” (AMP V3) and “Portable” (PRO V3); the comment how to switch between solo and multi-mode leads to a help screen that shows how you can configure a multi-zone music system from a single source (the app), a key feature of the Up2Stream system.
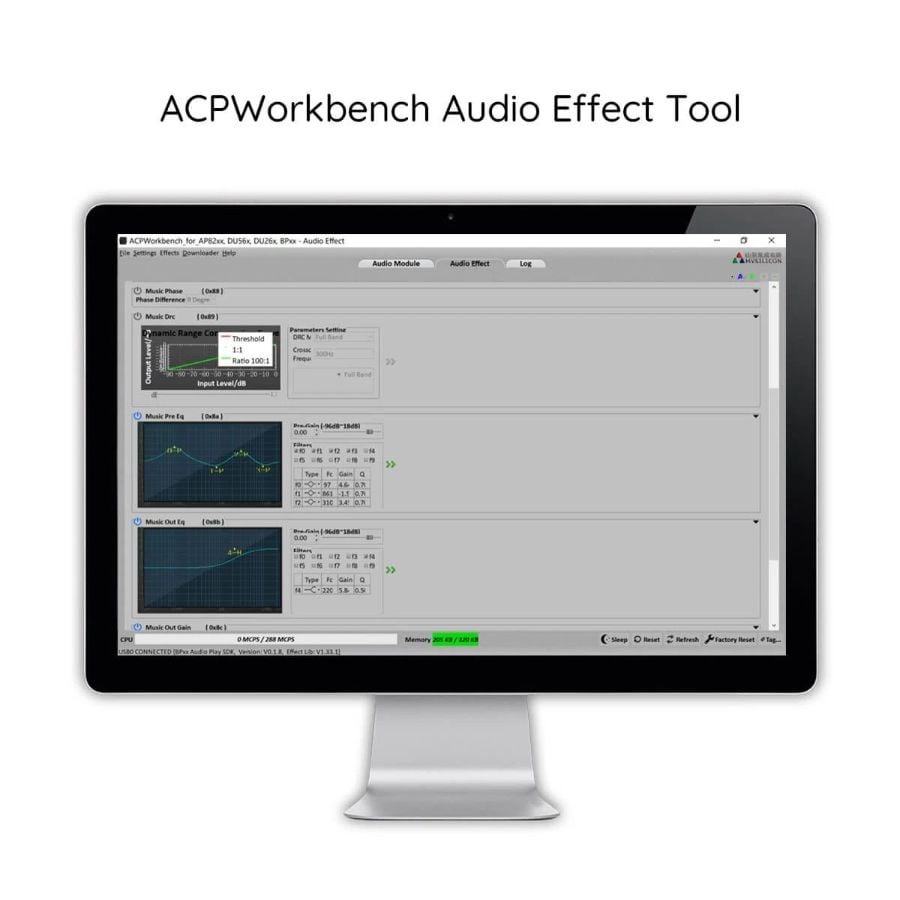
Finally, the ACPWorkbench shown above is an optional Windows-based program that allows you to modify Up2Stream configurations like:
- EQ settings
- I/O settings
- Audio effects
In my case, I needed to change the (default) SPDIF OUT port to IN for use with the AMP V3 board. I like to play my music “flat’ (no EQ), but there are literally thousands of effects combinations possible if you want to use this tool.
Functionality
I think it’s important right up front to clarify what the DIY family of boards are...and are not. They can establish both wired and wireless (Wi-Fi/BT) connections to multiple audio sources (both analog and digital), but they only support wired connections to local speakers (powered or otherwise). For example, you can remotely connect multiple (wireless) receivers to a single source, but each receiver must have a wired connection to local speakers. Let’s look at all the ways you can source the audio.

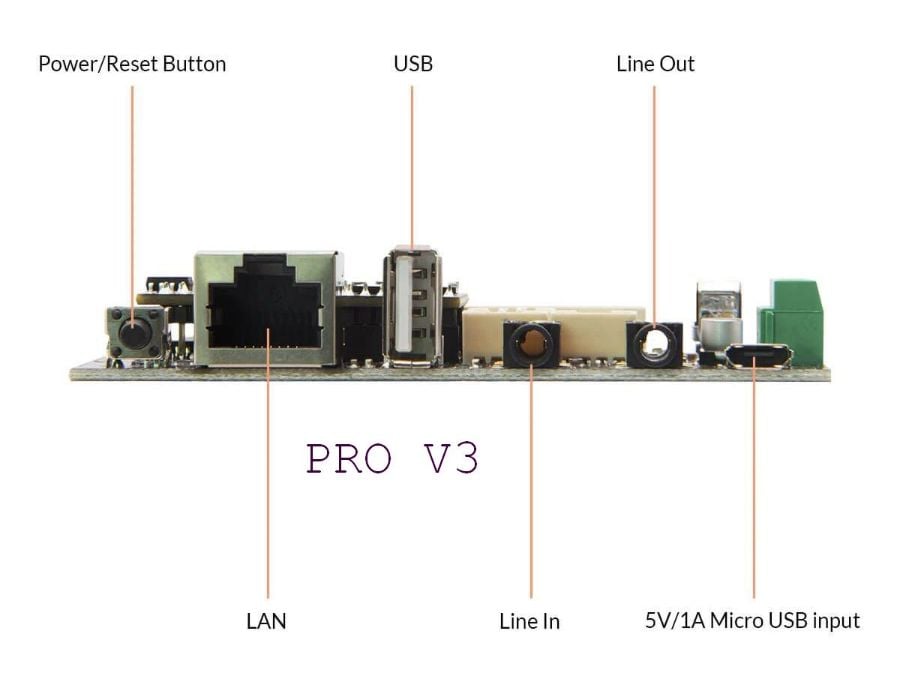
Input options for PRO V3

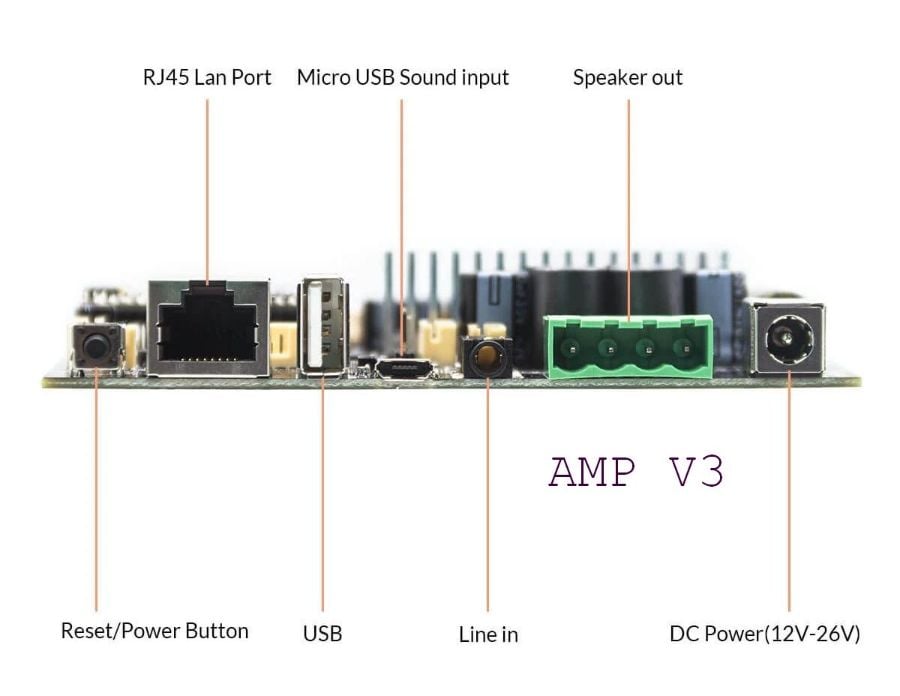
Input options for AMP V3
- Line-in/green LED for audio via the 3.5mm stereo analog input
- Wi-Fi/white LED for audio via the 4Stream app (only)
- Bluetooth/blue LED for similar functionality to a BT speaker
- USB/red LED for stand-alone high-resolution audio: plug-in a flash drive and fuggedaboutit!
Editorial Note: while the PRO V3 board has 4 separate LEDs, the AMP V3 has a single (larger) LED that changes colors according to the input.
The primary difference between the two boards is their outputs. Where the PRO V3 board has a line-out that can drive active (powered) stereo speakers, the AMP V3 board can drive passive external stereo speakers up to 50 Watts/channel—impressive in 12 square inches of board real estate. Figure #9 demonstrates how I used a 30+ year old portable cassette player (via 3.5mm stereo line-in) to drive a pair of standard speakers (via the green pin block) using the AMP V3 board; this “nouveau retro” setup will also accept digital inputs via USB and Toslink (the SPDIF IN board is not visable in this photo, but can be seen in figure #8).
Listening Tests
- Steely Dan: Aja
- Dave Grusin: Migration
- Donald Fagen: Morph The Cat (24 bits/96 kHz)
- Yellowjackets: Timeline (24 bits/96 kHz)
I suspect most users will leverage the streaming capabilities of a connected phone via either the 4Stream app, music app, or other supported streaming services (Pandora/Spotify/etc). This is the most straight-forward use and allows for things like multi-zone music broadcast. Sound quality is as good as the compression limitations of the wireless medium (e.g. Wi-Fi has more bandwidth than Bluetooth) or music source. It’s adequate. In order to test the three additional configurations below, I loaded a USB flash drive with FLAC files of my “go to” list for critical listening selections; I used the HD tracks to verify stated functionality beyond standard CD rates (16 bit/44 kHz).
- FLAC file from a Windows media player sounds exactly the same as USB input on AMP V3
- This would be a great way to source a high-resolution music library from either local or cloud-based storage
- FLAC file from USB flash drive sounds exactly the same as USB input on AVR
- This would be a great way to add a USB input to any (old) AVR with digital inputs (either Toslink or coax)
3. DAC comparison via PRO V3 (using AVR Aux Input):
- Internal DAC via 3.5mm line-out (see figure #5)
- External ES9023 chip via DAC board RCA out (see figure #8)
As expected, the external DAC performs much better than the internal DAC; in fact, it even holds its own when playing the identical FLAC file through my AVR. As a frame of reference, the ES9023 DAC (112dB DNR) used in the external DAC board goes for around US$1, while the SABRE9006A DAC (120dB DNR) in my Yamaha RX-A2050 AVR goes for around US$6 (and there is more than one). While my AVR clearly sounds better, that’s not bad for something that costs significantly less with less support circuitry and lower power consumption.
Editorial Note: you must use the interconnect cables that come with the DAC and SPDIF boards (they use the same interface), as they are made from solid copper core wire; the stranded wire cables that come with the PRO V3/AMP V3 boards output nothing but noise! In fact, I would discard the 7-pin interconnect cables that come with the PRO V3/AMP V3 boards so you never get them mixed up with the “good” ones.
Some Final Observations
If you want a solid amplifier board with common pre-amplifier interfaces to drive a stereo setup, the AMP V3 is great. Even better, it drives low-impedance loads (like my vintage Polks) and standard 8 Ohm speakers. But for sheer flexibility, the PRO V3 can’t be beat! To be clear, both products are suitable if you want to configure a low-cost multi-zone media server. These boards don’t have sealed enclosures, which means they don’t have a lot of protection, and there isn’t a lot of mechanical reinforcement for connectors. I would use caution when connecting/disconnecting I/O and avoid repeated actions when possible. One other tip: the “optional” remote control should be a “required” purchase with any Up2Stream DIY board, as it makes for straightforward operation of both basic controls (play/pause/volume/etc) and I/O selection. Similarly, the acrylic cases are unnecessary for operation of the Up2Stream DIY boards, but they will help prevent accidental contact with the electronics, avoiding potentially damaging electrostatic discharge (ESD). Whether you are looking for a simple wireless speaker extension or multi-zone control, there is an Up2Stream DIY project waiting for you!
Stanton was born and raised in Kansas City, where he was exposed to the rich culture of jazz at a very young age. He's a drummer and an electrical engineer and loves to review jazz music for us.
View full profile