
Audioholics Showcase Home Theater Overview and Virtual Tour
Status Acoustics 8T Audioholics Theater Room
originally published: June 4, 2013
The Audioholics Showcase Home has gone through a lot of changes since its creation almost 15 years ago. With over two miles of cable run behind dry wall, 50+ speakers located around the house, 50+ channels of associated amplification comprising of almost 10,000 watts of power, and over 1/4 of a million dollars in equipment, we’ve got enough AV gear to make an IMAX envious. There are three state of the art home theaters and distributed audio throughout the house with home automation handled by Control4 which really simplified the operation of all of the equipment in this home so much that even my mother-in-law could use it. Having a good control system really comes in handy for parties or corporate functions when you want to stream music throughout the house simultaneously and independently in different zones when needed. Check out what we use as our reference test bed for conducting reviews and writing technical articles.
Recent updates as of 5/13/19 include:
- Anthem STR separates for two-channel listening.
- Yamaha CX-A5200 and MX-A5200 in theater room for full 7.2.4 Dolby Atmos/DTS:X Immersive Surround Sound and 4K Processing.
- Marantz SR8012 11.2CH AV receiver in the family room system.
- 2 pairs of RBH SI-615 in-ceiling speakers (Theater room) and 2 pairs of RBH MC-615 in-ceiling speakers (family room) for top front & rear height channels.
- Control4 home automation was added throughout the entire home to control all of the gear, including lighting.
Our YouTube Video virtual tour gives you a peek inside our showcase theater room prior to the Atmos/DTS:X and Control4 home automation upgrades.
Audioholics Showcase Home YouTube Video Virtual Tour Prior to Atmos/DTS:X Upgrades
While there are those that consider reviewers lucky because we get to try out all of the latest gear the industry has to offer, as Audioholics we often find ourselves getting attached to equipment that we really like. And swapping out old gear for new can be more of a hassle than it’s worth. Parting with old gear can be such sweet sorrow, but we usually find a way to keep the “golden” gear integrated into our systems. It was with great sadness that we had to say good bye to our beloved Denon AVP-A1HDCI 10CH Preamp and matching POA-A1HDCI 10CH power amp but the lack of Dolby Atmos/DTS:X immersive surround and 4K UHD video support forced our hand. With that in mind, let’s take a tour of the Audioholics Showcase home as of April 15, 2019. Check out what we use as our reference test bed for conducting reviews and writing technical articles.
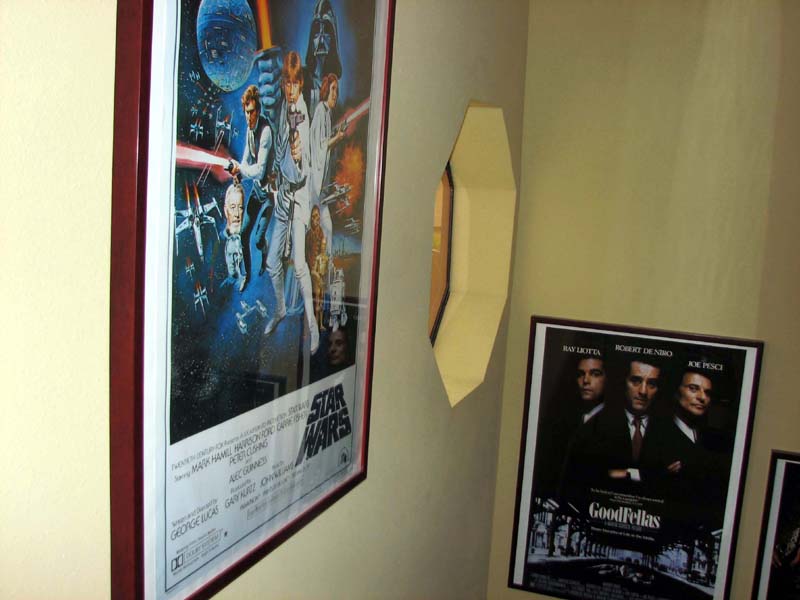

The wall of movie theater posters to walk you up the flight of steps to the Audioholics Showcase Theater Room
We begin our journey climbing the stairs towards the Main Theater room. As you walk up the stairs, you will be greeted with memorable movie posters hung on the wall to put you in the mood for watching a great movie. Wanna comedy romance, try 50 First Dates, or fantasy, try Narnia. What about if youʼre just hanging with the boys and wanna watch Goodfellaʼs? With nearly 500 DVDʼs and 100's of Blu-ray's and Ultra-HD Blu-ray's, SACD's and DVD-A's, in our collection, weʼve got you're entertainment needs covered.
The Main Theater Room
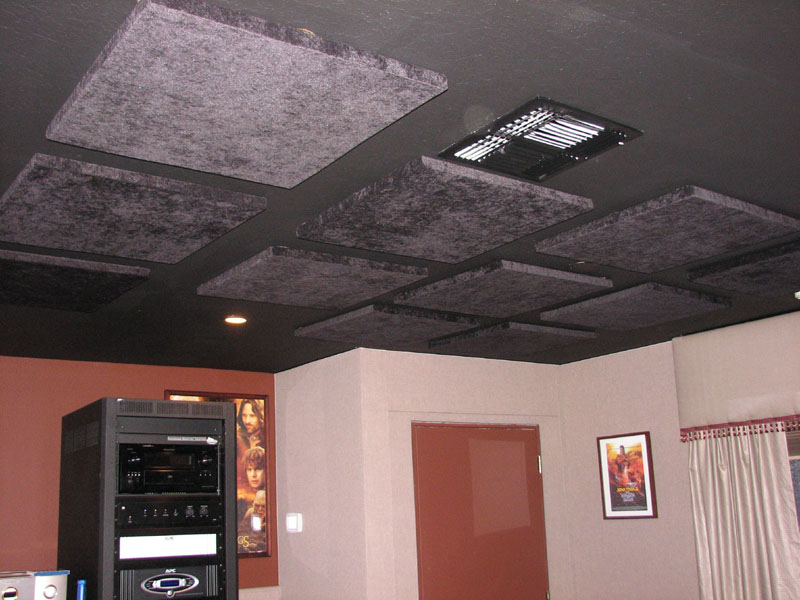 This is the Audioholics “reference” room where we do flagship product reviews and conduct our yearly speaker face off articles. We use this room because it's acoustically the best sounding theater room among our staff reference systems. Auralex sent a crew of two who spent nearly 14 hours/day for 4 days treating this room to achieve the best possible sound in the listening space. After Auralex was done, we added customized curtains built to block out the light from the windows and also carry that theater theme throughout the room. We also painted the ceiling black for light control. To finish the look, we installed some sconces from Home Depot and dimmer switches from Control4.
See the Auralex Treatment Plan for the Audioholics Showcase Home for more information on the initial acoustic treatments.
We have also recently treated the far right ceiling with 1" Auralex Sonolite absorption material which was much needed after we changed the flooring from carpeted to laminate.
Since this is truly the Audioholics “reference” room, it's also where only the very best gear gets admission to be part of the primary reference system – one of the perks of being company President :)
The Video Side
 We've recently upgraded this system with the Epson Pro Cinema 6040 3LCD 3D UHD projector. This baby is a significant step up in picture quality from the 6020 model that used to grace our reference room, especially with it's e-shift technology to give near 4K UHD resolution. THX mode has a near prefect color and with only minor adjustments to black level, we hit the target ISF calibration level with ease.
A Carada Criterion 112” screen is being utilized to eek out the best black levels the Epson 6040 can offer. You will also notice the Furman power conditioner strapped to the ceiling. This is plugged directly into a dedicated 20A line and feed to the projector. A power conditioner is an essential measure to protect your projector from surges and low line conditions which tend to wreck havoc on lamp life. If we had the chance to do it over again, we would have instead run the power line directly to our APC S20s that offers battery backup and line regulation as well.
For the source, we are using an Oppo UDP-205 audiophile reference Ultra-HD Blu-ray player. This player does everything right and represents a reference standard at ANY price point. With Oppo stopping production, both the UDP-203 and UDP-205 are sought after players that you'd have to pry out of our dead hands to give up. We also have a 4K UHD FireTV for streaming Netflix and Amazon Prime as well as Verizon FIOS.
The Audio Side
For the past year we've been using the Yamaha CX-A5100 11.2CH Atmos/DTS:X AV processor and matching MX-A5000 11CH Amplifier as the primary equipment in the theater room. We are in transition now to updating to the new Yamaha CX-A5200 11.2CH Atmos/DTS:X 4K Preamp/Processor and matching MX-A5200 11CH amplifier so stay tuned for full test reports on both units. The MX-A5000 currently powers ALL of the speakers with aplomb in this system except the Status 8T mains which are powered by the Anthem STR amplifier.
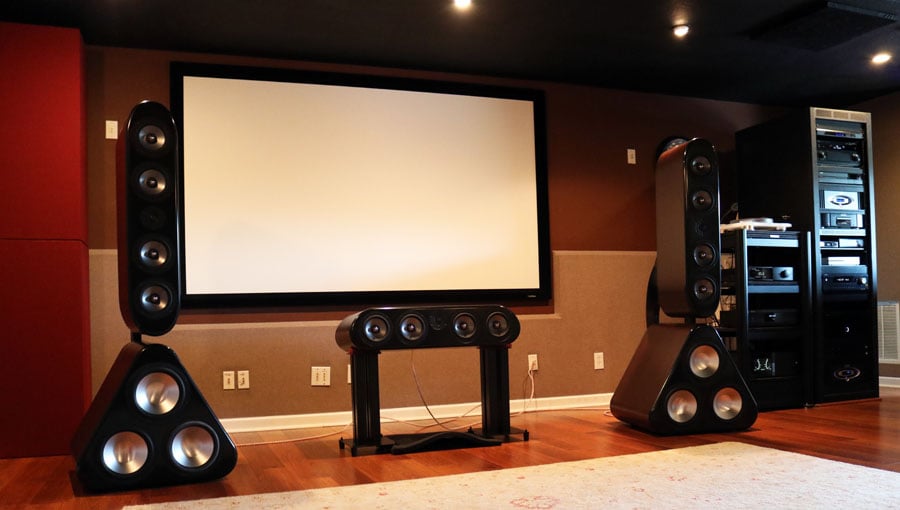
Status Acoustics 8T Towers and 8C Center Channel
The Yamaha manual PEQ via the web editor proved invaluable in tuning the bass response of the Status Acoustics 8T Speaker system coupled with the other subwoofers in the system. This is truly a unique speaker system that few, if any, other commercially made loudspeakers can match. The 8T's are effortless at any listening level. In our review, we found distortion levels below the actual acoustical analyzer equipment we use for measurements. Compression doesn't exist in these speakers at even above humane listening levels. The linearity is so superb that we found room correction to not be needed. However, this is something we may explore with more advanced room correction systems in the future.
The Equipment Racks
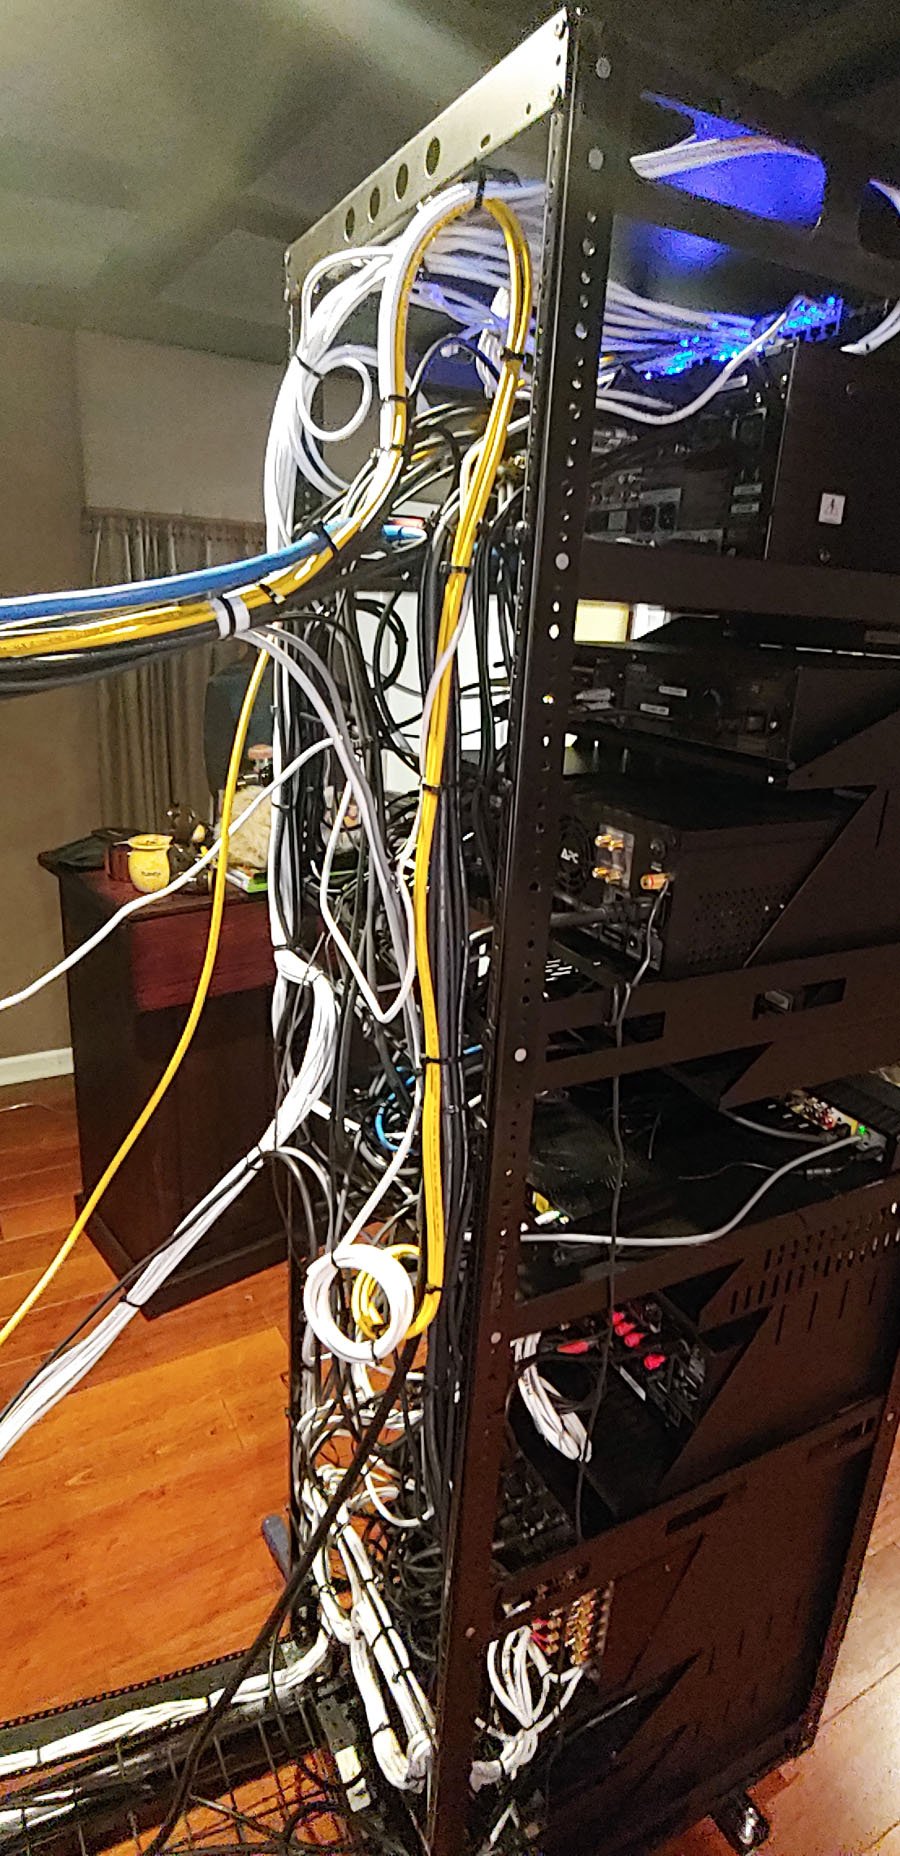
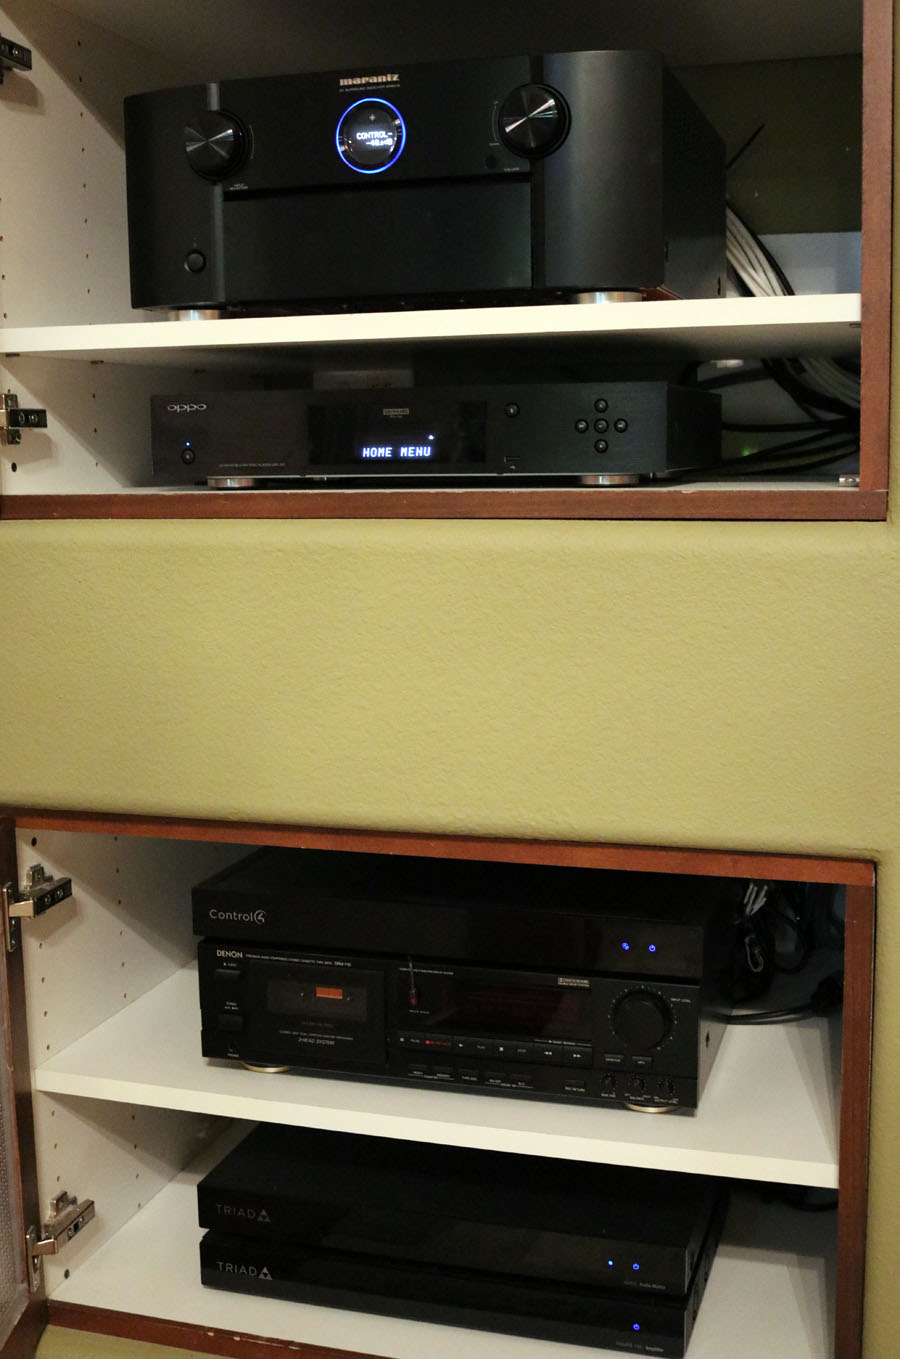
There are two equipment racks in this room which host the equipment for the main theater, two-channel and the bedroom systems. The primary rack in this room is from Middle Atlantic and stands nearly 7ft tall. It’s truly a unique rack in that it has a built in wire management system and slides out on rails to make servicing equipment easier. It's also built like a tank and can hold up to 2,500lbs. This is a good thing because when all of the equipment was tallied up, it weighed in at roughly 600lbs. It's comforting to know we’ve got some wiggle room for the future in case we upgrade to some heavier gear. Currently, the Middle Atlantic rack houses the Yamaha CX-A5100 and matching MX-A5000 11CH amplifier, two RBH SA-500DSP subwoofer amplifiers (powers bedroom system in-wall subwoofers and SI-1010 sub in the main theater room), 2 APC AV S20s (each separately run on dedicated 20A lines), Yamaha MCX-2000 MusicCAST, an Integra DRX-4.2 9.1CH HD-BaseT AV Receiver, Marantz UD7007 Blu-ray player, Verizon FIOS Motorola HD DVR, XBOX OneS & XBOX360 along with a Control4 EA-3 controller, Pakedge SX-24P8 1Gig 24 port managed switch and WAP. With all of this power protection and battery backup, no Florida thunder storm can threaten this system and there’s enough juice to power the entire theater for nearly two hours should we lose power. Yes we’ve got our priorities straight! This is the room we go to during brown outs.
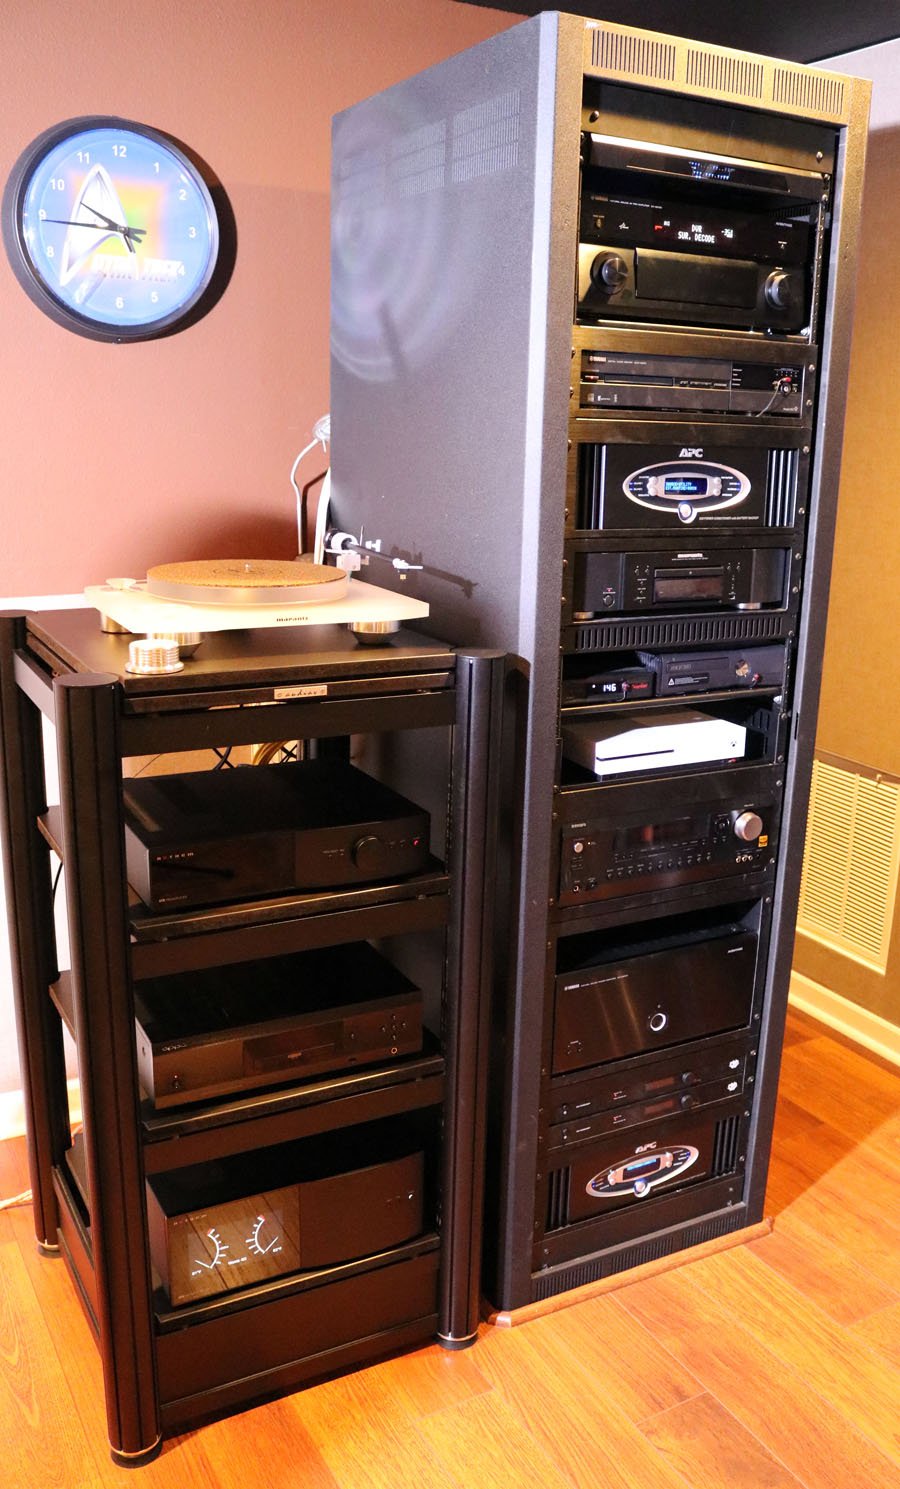
Audioholics AV Racks: Middle Atlantic (left pic); Audiav & Middle Atlantic Racks (right pic)
The secondary rack is an Audiav Crystal which is elegant and also extremely sturdy; capable of holding the heaviest gear the industry has to offer. In this rack, resides the Marantz TT-15S1 turntable, Anthem STR Preamp,and STR power amplifier, and Oppo UDP-205 UHD Universal player. The Oppo UDP-205 is used in the primary theater system to play UHD Blu-rays and stream video content from my network computer. The balanced outputs of the UPD-205 are utilized for critical two-channel listening of SACD's and high resolution streaming from my network drive for the Anthem two-channel system.

Audioholics Two-Channel Rack
In order to properly power the Status Acoustics 8T speaker system, we needed an amplifier capable of delivering uncompressed output at all listening levels. We recently replaced our Emotiva XPR-1 Mono block amplifiers that unfortunately died with the Anthem STR power amp. The Anthem STR gear is really special in terms of function, performance and build quality. We love how it effortlessly integrates with the home theater system in this room allowing for easy switching between theater and two-channel modes of operation.
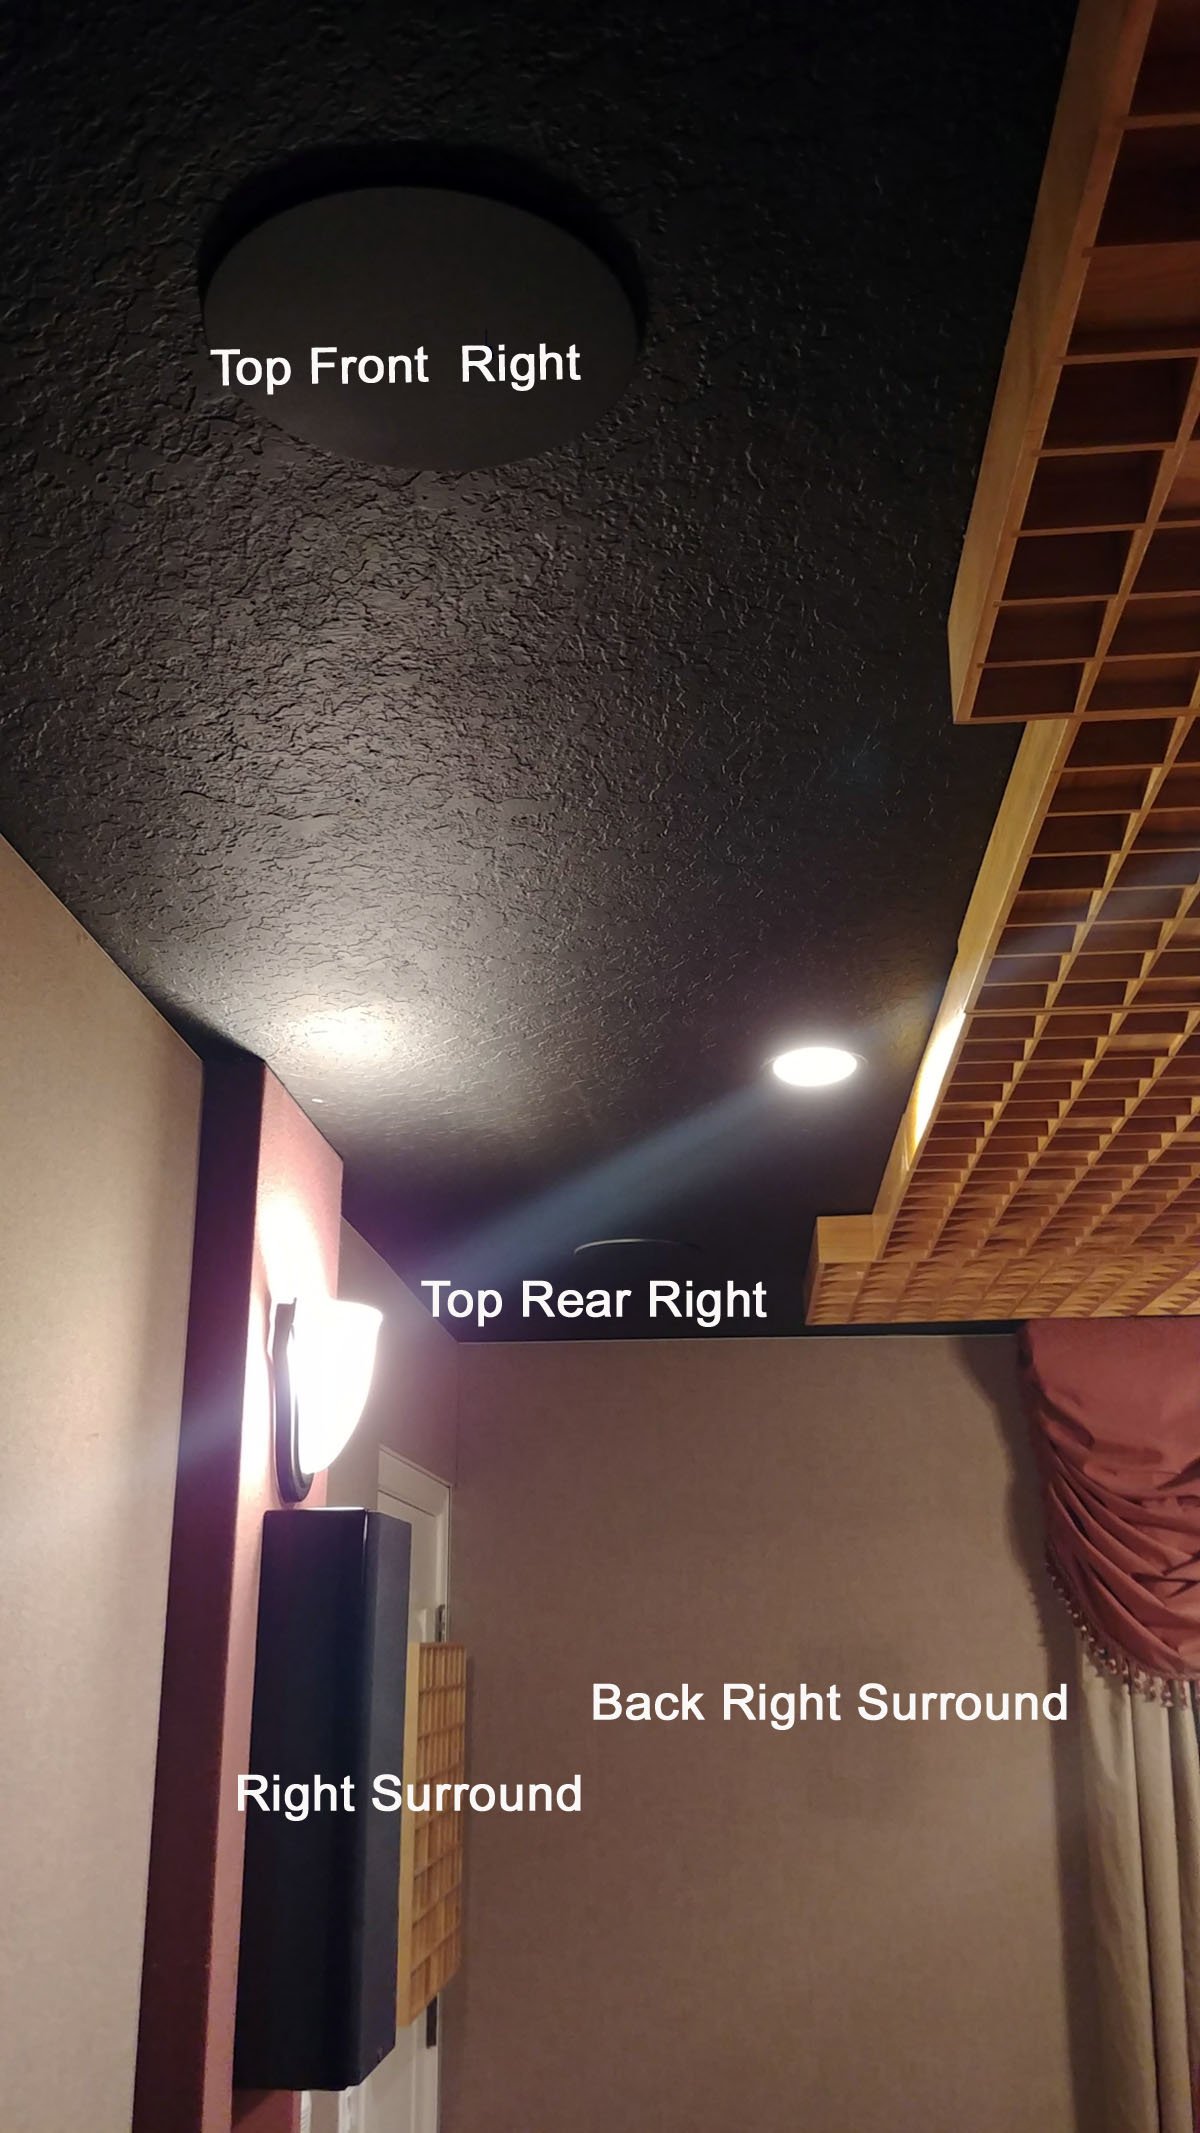
Surround Speaker Layout Audioholics Theater Room
The surround speaker system was completely revamped to accommodate Dolby Atmos and DTS:X immersive surround formats. We switched out the 66-SE/R bipole side surrounds for RBH's new monopole SV-661WR on-wall speakers with dual 6" drivers and an AMT tweeter in a MTM configuration. We added 2 pairs of SI-615 in-ceiling speakers for height channels and retained the SI-740 in-wall speakers for the surround backs. The end result is we have 8 surround speakers providing a fully discrete immersive bubble for both rows of seating. All 8 surround speakers and the Status 8C center channel are powered by the Yamaha MX-A5000 11CH power amplifier.
For two-channel sources, we are spinning vinyl on a Marantz TT-15S1 turntable and using the balanced analog outputs of the Oppo UDP-205. Two-channel Valhalla is achieved in this setup. No need for powered subwoofers, DSP processing or any multi-channel gimmicks. Sometimes the wife and I like to just sit back with a nice glass of Riesling and really focus on how wonderful a top notch two-channel setup can sound. I also have full capability to enable Anthem's ARC room correction to both digital and analog sources. I tweaked it so the room correction is limited to 500Hz and added a slight boost below 20Hz and the end result is simply a sonic marvel.
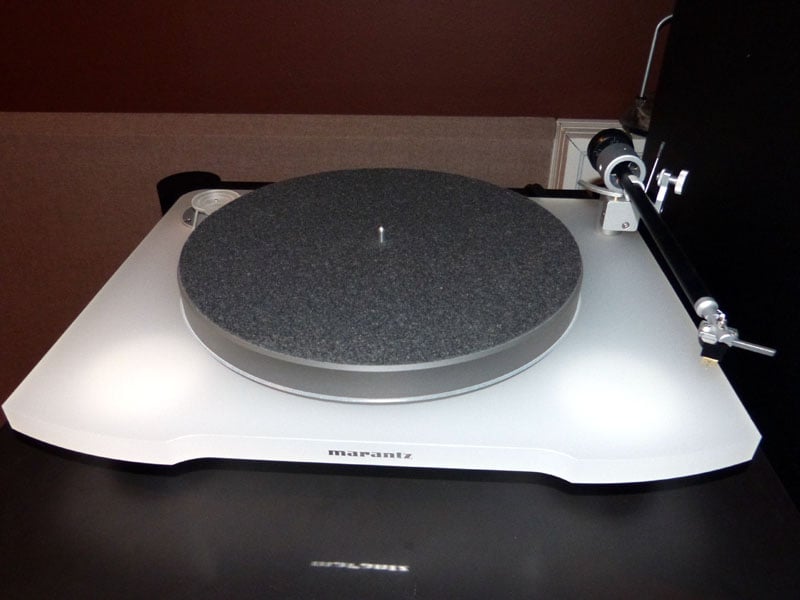
Marantz TT-15S1 Turntable
I have to admit, I thought it was a bit cliche adding a turntable to our system in this day and age. In every measurable way, vinyl is inferior to CD, let alone higher resolution formats like SACD or DVD-A. Yet, the vinyl experience is so immensely enjoyable that unless you hear it for yourself, you won't know what you're missing. Adding a turntable to my rig was one of the best decisions I've made. The Marantz TT-15S1 turntable is manufacturer by Clearaudio and features their very own Virtuoso wood cartridge. This table sounds fabulous especially with the recent calibration tweaks we've done to it. Listening to high quality 180G records gives you that sense of a live performance that is sometimes lacking in digital recordings, especially when they are hyper compressed. Sure vinyl is a bit noisier than the CD equivalent, and the stereo separation isn't as good either, but it's also more organic sounding too. In addition, listening to vinyl makes you do something you typically don't do with digital music - commit to listen to the whole album. My wife loves the sound and feel of vinyl and it gets her up here more often listening to music with me which is a good thing.
Bassaholic?
You betcha! To round out the system, we've thrown in a pair of Velodyne DD-15+ subwoofers, which are only used for the multi-channel system. We have these tuned to just smooth out bass response across all listening seats for a more consistent and even sound. We could literally turn them off and just run the Status 8T's fullrange and still get earth shattering bass for movies, but extra cone area distributed around the room is always a good idea. Besides, I take pride in the fact I can literally make my wife nauseous when watching LFE heavy movies like Dark Knight Rises on Blu-ray or Spider-Man: Into the Spider-Verse on UHD Blu-ray :)
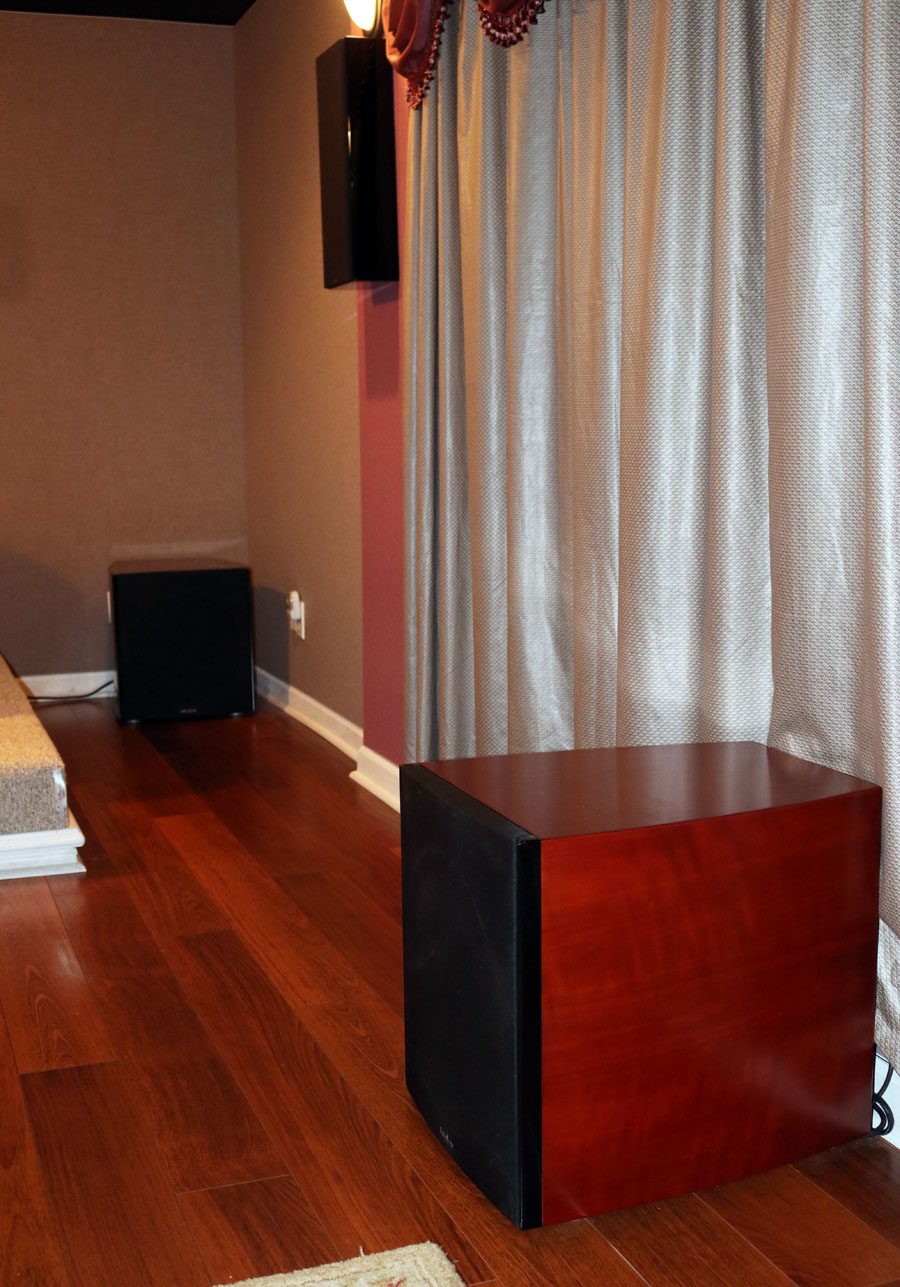
Velodyne DD-15+s located to the side and back walls
We actually don't have a dedicated subwoofer channel configured for the Yamaha CX-A5100. Yes. there is reason for this madness. The Status 8T Speaker System is so well integrated as a fullrange speaker that we decided to run it like that even for multi-channel applications. If we were to run the DD-15+'s via the subwoofer outputs of the Yamaha processor, it would unfortunately not be able to route LFE info back to the Status speakers. We found the best and most tactile bass response by running bass from all channels + LFE to the Status 8T towers and Velodyne DD-15+ subwoofers simultaneously. We accomplished this by bypassing the sub outs of the Yamaha and running each DD-15+ sub to the main Left and Right channel outputs, respectively. We employed the DD-15+'s own LPF and EQ processing to smooth out the bass response and better integrate it with the Status 8T speaker system.
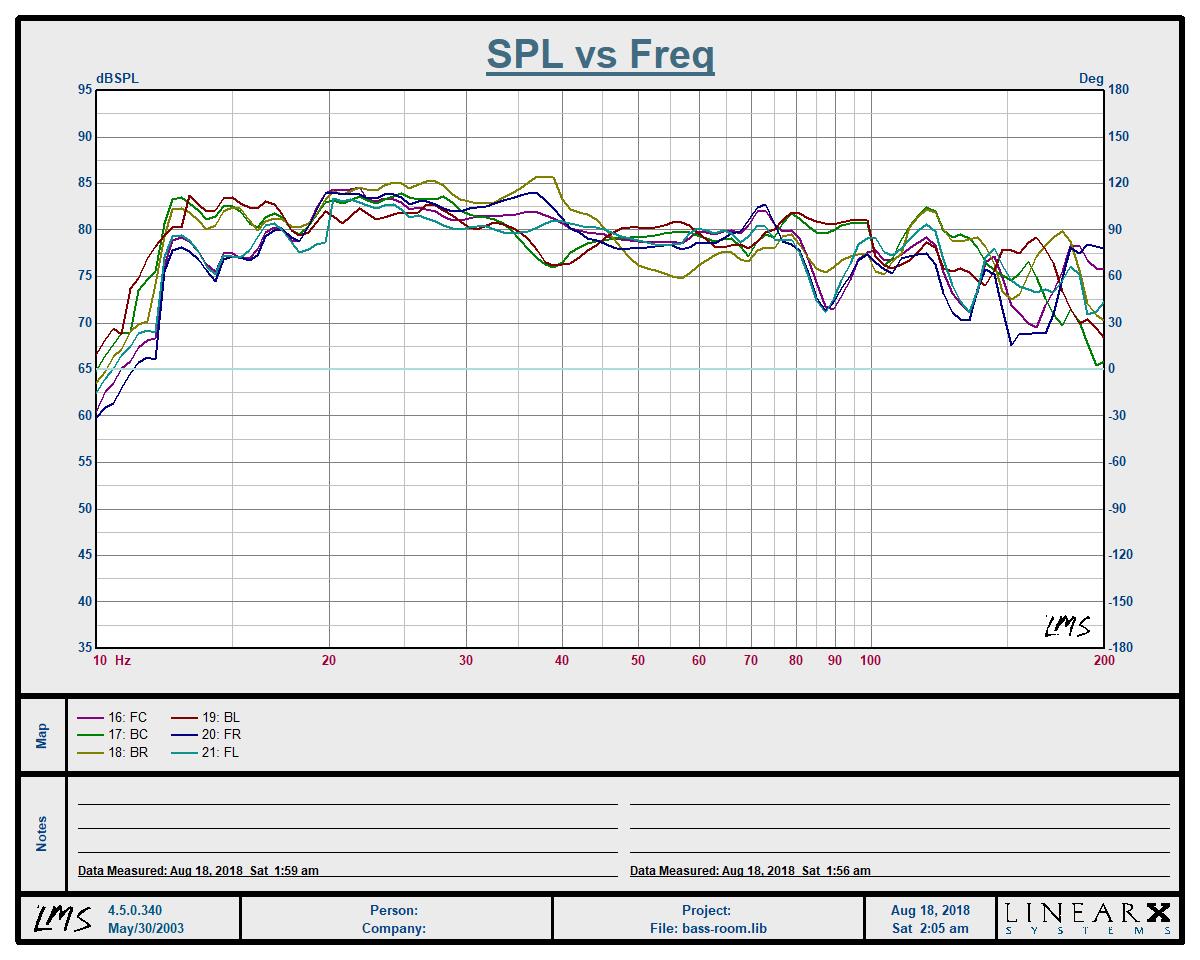
In-Room Bass Frequency Response Across both Rows of Seating (no smoothing)
The bass response is superb at +- 5dB from 12Hz to 100Hz across all 6 seats, 2 rows of seating and this is just with a little tweaking of the manual PEQ built into the Yamaha CX-A5100 along with 5 subwoofers in the system (recently added an RBH SI-1010i in-wall sub behind 2nd row). You can read more about how this was achieved: Bass Optimization & Multi-Sub
The Cables
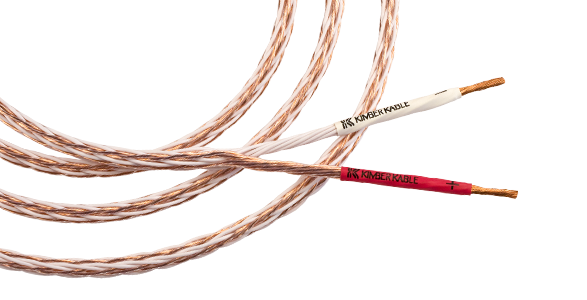 You won’t find any cable snake oil in our systems; just the most durable and best measuring cables dawn all of the systems in the Audioholics showcase home. For speaker cables we used Blue Jeans CL2 approved 10AWG speaker cable throughout the entire house, including all of the in-wall pre-wires and outdoor speakers. The interconnects are all Bluejeans 1694A with Canare terminations. All of the digital toslink and HDMI cables are from Bluejeans cable. For the Status 8T and 8C speaker system, I utilize the beautiful Kimber 8TC speaker cables. They may be audio jewelry but they also measure great too! The Kimber cables provide a low resistance, low inductance connection between our amps and speakers to minimize losses. This is exactly what you want speaker cables to do.
The Theater Chairs & Riser Platform
To round out the room, we carefully selected what we feel to be some of the best home theater chairs on the market back in 2005. These chairs are from Continental Seating and are among the most comfortable reclining theater chairs we’ve ever sat on. They are a micro fiber design, which have better acoustical properties than leather and prevent sweat build up from prolonged sitting typically experienced with leather. They are also very easy to keep clean. Most importantly, the contoured headrest ensures they don’t muffle the sound or block off your surround speakers like most theater chairs tend to. These chairs are 15 years old and have held up pretty well considering. It speaks volumes for their durability.
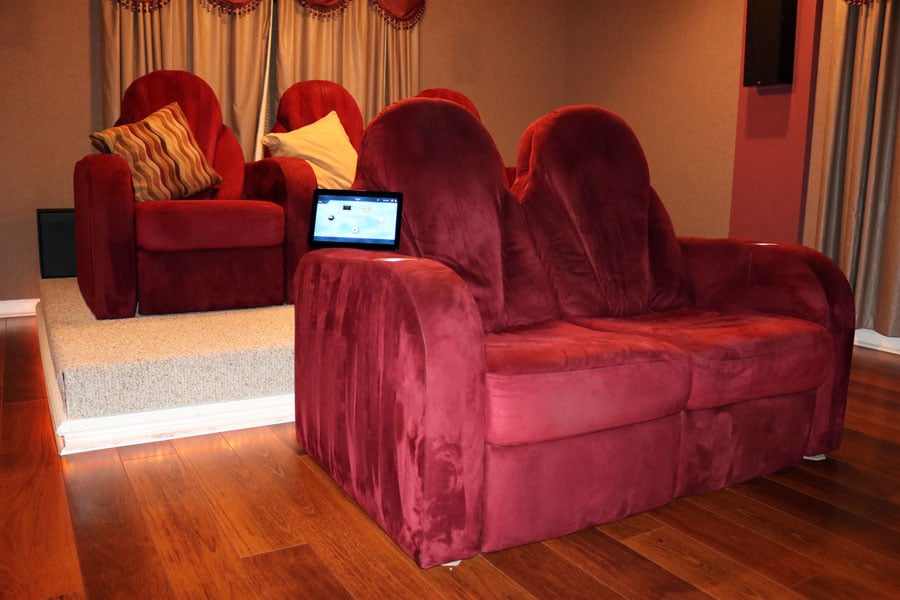
Continental Seating (two-rows, second row on DIY Riser)
We built a custom riser to raise the height of the back row while also designing it to serve as a bass trap and natural tactile transducer, which adds a lot of excitement with every bone crushing punch dealt by Optimus Prime and other explosive movies. If you haven't considered building a riser platform for your theater and you've got more than one row, we strongly encourage you to reconsider.
See: Building a Multi Function Riser Platform
Also see: Tips on calibrating a Multi Row Theater and Multi Subwoofer Connections Guide
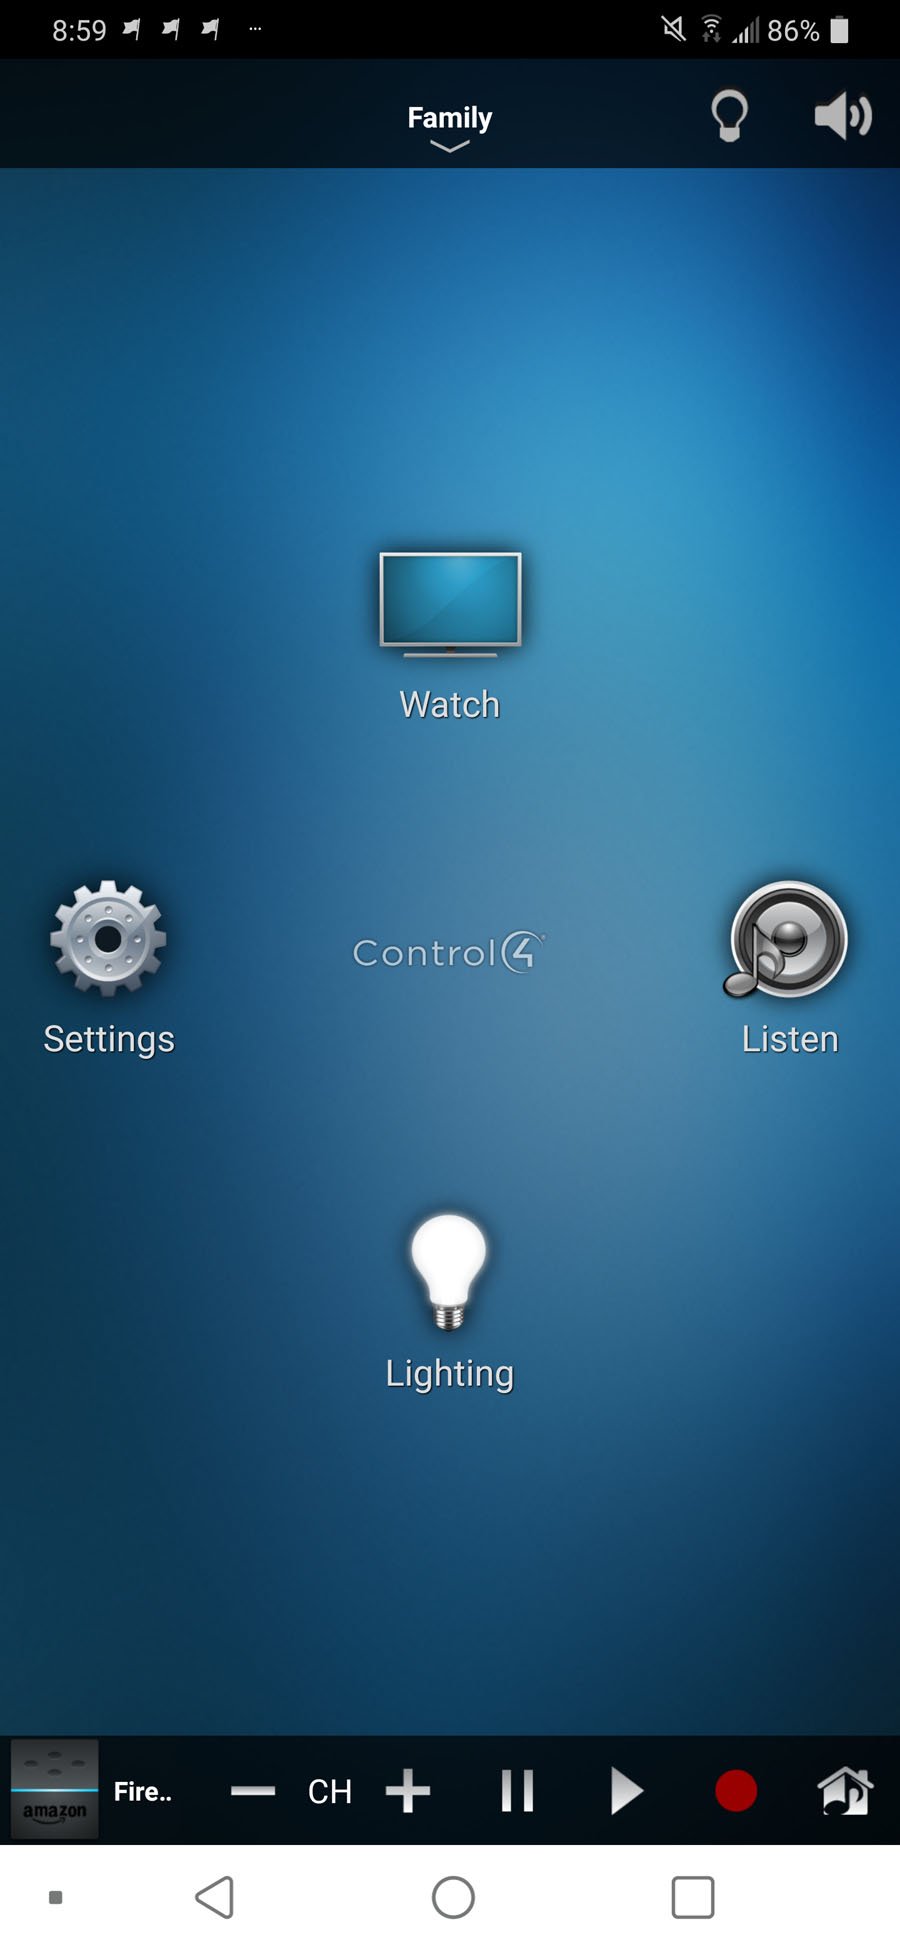
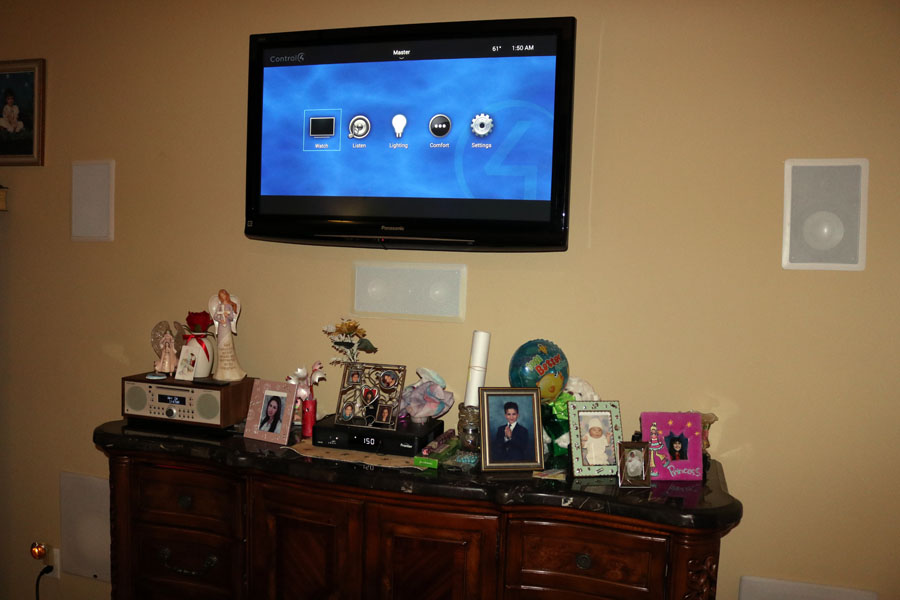
Home Automation by Control4
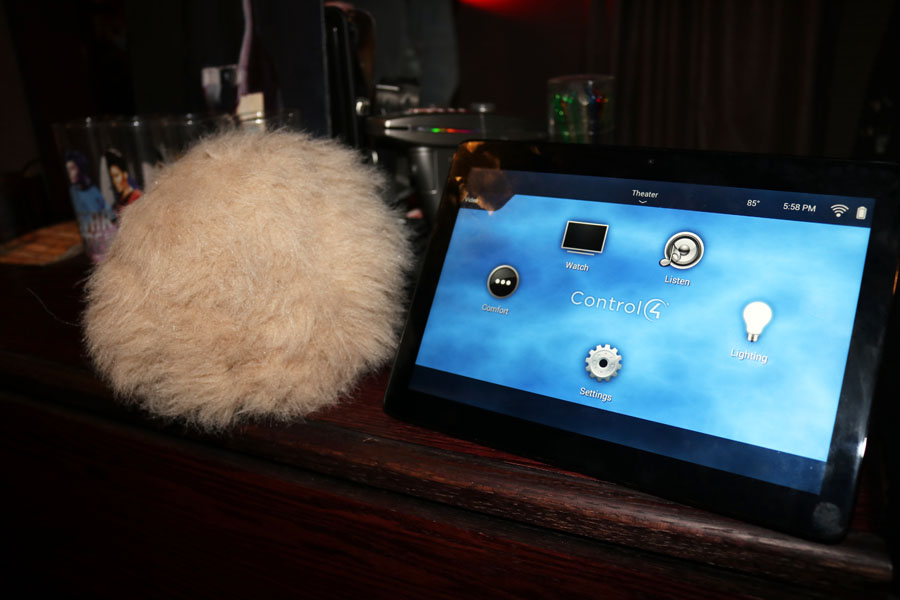 For the past 15 years I struggled with finding a whole home control system and was mostly wrestling with the multiple OEM remote controls haphazardly to operate my theater systems. This needed to end so I contacted our friends at Control4 and they agreed to put me through a rigorous four days of training of their Composer Pro software to learn how to program their home automation products. With the installation help of our friends at HD2020, we were on the right path for controlling ALL three of my theater systems including distributed audio and lighting. The backbone of the system was a complete revamp of my wireless network using Pakedge 1GB network gear including their: RK-1 7-port router, SX-24P8 24-port and SE-8 8-port switches and 3 WK-2 802.11ac Wireless Access Points spread throughout the home. A complete rewiring of my entire home from CAT5e to CAT6 was done to ensure full potential and stability of this system was achieved. The main theater room features a Control4 EA-3 controller which allows high resolution music streaming to both the theater and 2CH systems digitally while also controlling the lighting in the room. Using their Zigbee network, the lighting control handles ALL ceiling lights, the sconces, and the riser platform. Scenes were created to turn specific lights on/off when hitting pause or resume on a movie. We even integrated Alexa Home for voice controls and I changed my voice prompt to "computer" as a homage to Star Trek. It's a nice feeling to enter my office in the afternoon and say "Computer, turn on main lights" and it obliges without me ever having to flip a switch. The EA-3 controller also handles the Integra Research DRX-4.2 AV receiver that powers the master bedroom system in coordination with the main EA-5 controller located in the family room. An additional EA-1 is located in that room to control the Panasonic Plasma TV and local lighting functions. We have both a Control4 10” Tabletop Touch Screen and 3x SR260 handheld remotes to operate the systems around the house. The Control4 touch screen is nice for its visual representation but the SR-260 is much easier to handle and preferred in the bedroom systems and when quick operation over fancy operation is the priority.
Please check out our YouTube video on Setting Up a Home Network to see exactly how we have everything configured for the entire Audioholics Showcase home.
Setting Up a Wireless Network - Audioholics Showcase Home
Music Streaming
 Control4
has really taken our ability to stream music around the house to the
next level. The Control4 EA-5 and EA-3 controllers give us direct access to Tidal,
Pandora, Spotify, Tunein and more to any location in the home that has
speakers all from the convenience of our phones. Best of all, it's high
res for sources like Tidal so you're getting the very best sound quality
along with the convenience of streaming and remote controlllability.
With the Control4 Sight feature we're even able to turn music
on remotely for guests in our home if we are out of town. Just ask my
mother-in-law how appreciative she is when I have her bedroom speakers
turn on to the provocative lyrics of Cupcakke as a wake up call in the
morning when she babysits for us ;)
Control4
has really taken our ability to stream music around the house to the
next level. The Control4 EA-5 and EA-3 controllers give us direct access to Tidal,
Pandora, Spotify, Tunein and more to any location in the home that has
speakers all from the convenience of our phones. Best of all, it's high
res for sources like Tidal so you're getting the very best sound quality
along with the convenience of streaming and remote controlllability.
With the Control4 Sight feature we're even able to turn music
on remotely for guests in our home if we are out of town. Just ask my
mother-in-law how appreciative she is when I have her bedroom speakers
turn on to the provocative lyrics of Cupcakke as a wake up call in the
morning when she babysits for us ;)
We also added a 4TB harddrive filled with high resolution FLAC and DSD files to stream directly into the Oppo UDP-205 and UDP-203 blu-ray players from my desktop computer. we utilize the Control4 touchpad to navigate the Oppo players to access the music on the remote HDD. We still have a Yamaha MCX-2000 MusicCAST system which is connected to all three systems via digital coax in our theater room, analog to our bedroom system and digitally to our family room system though the EA-5.
Test Lab and Office
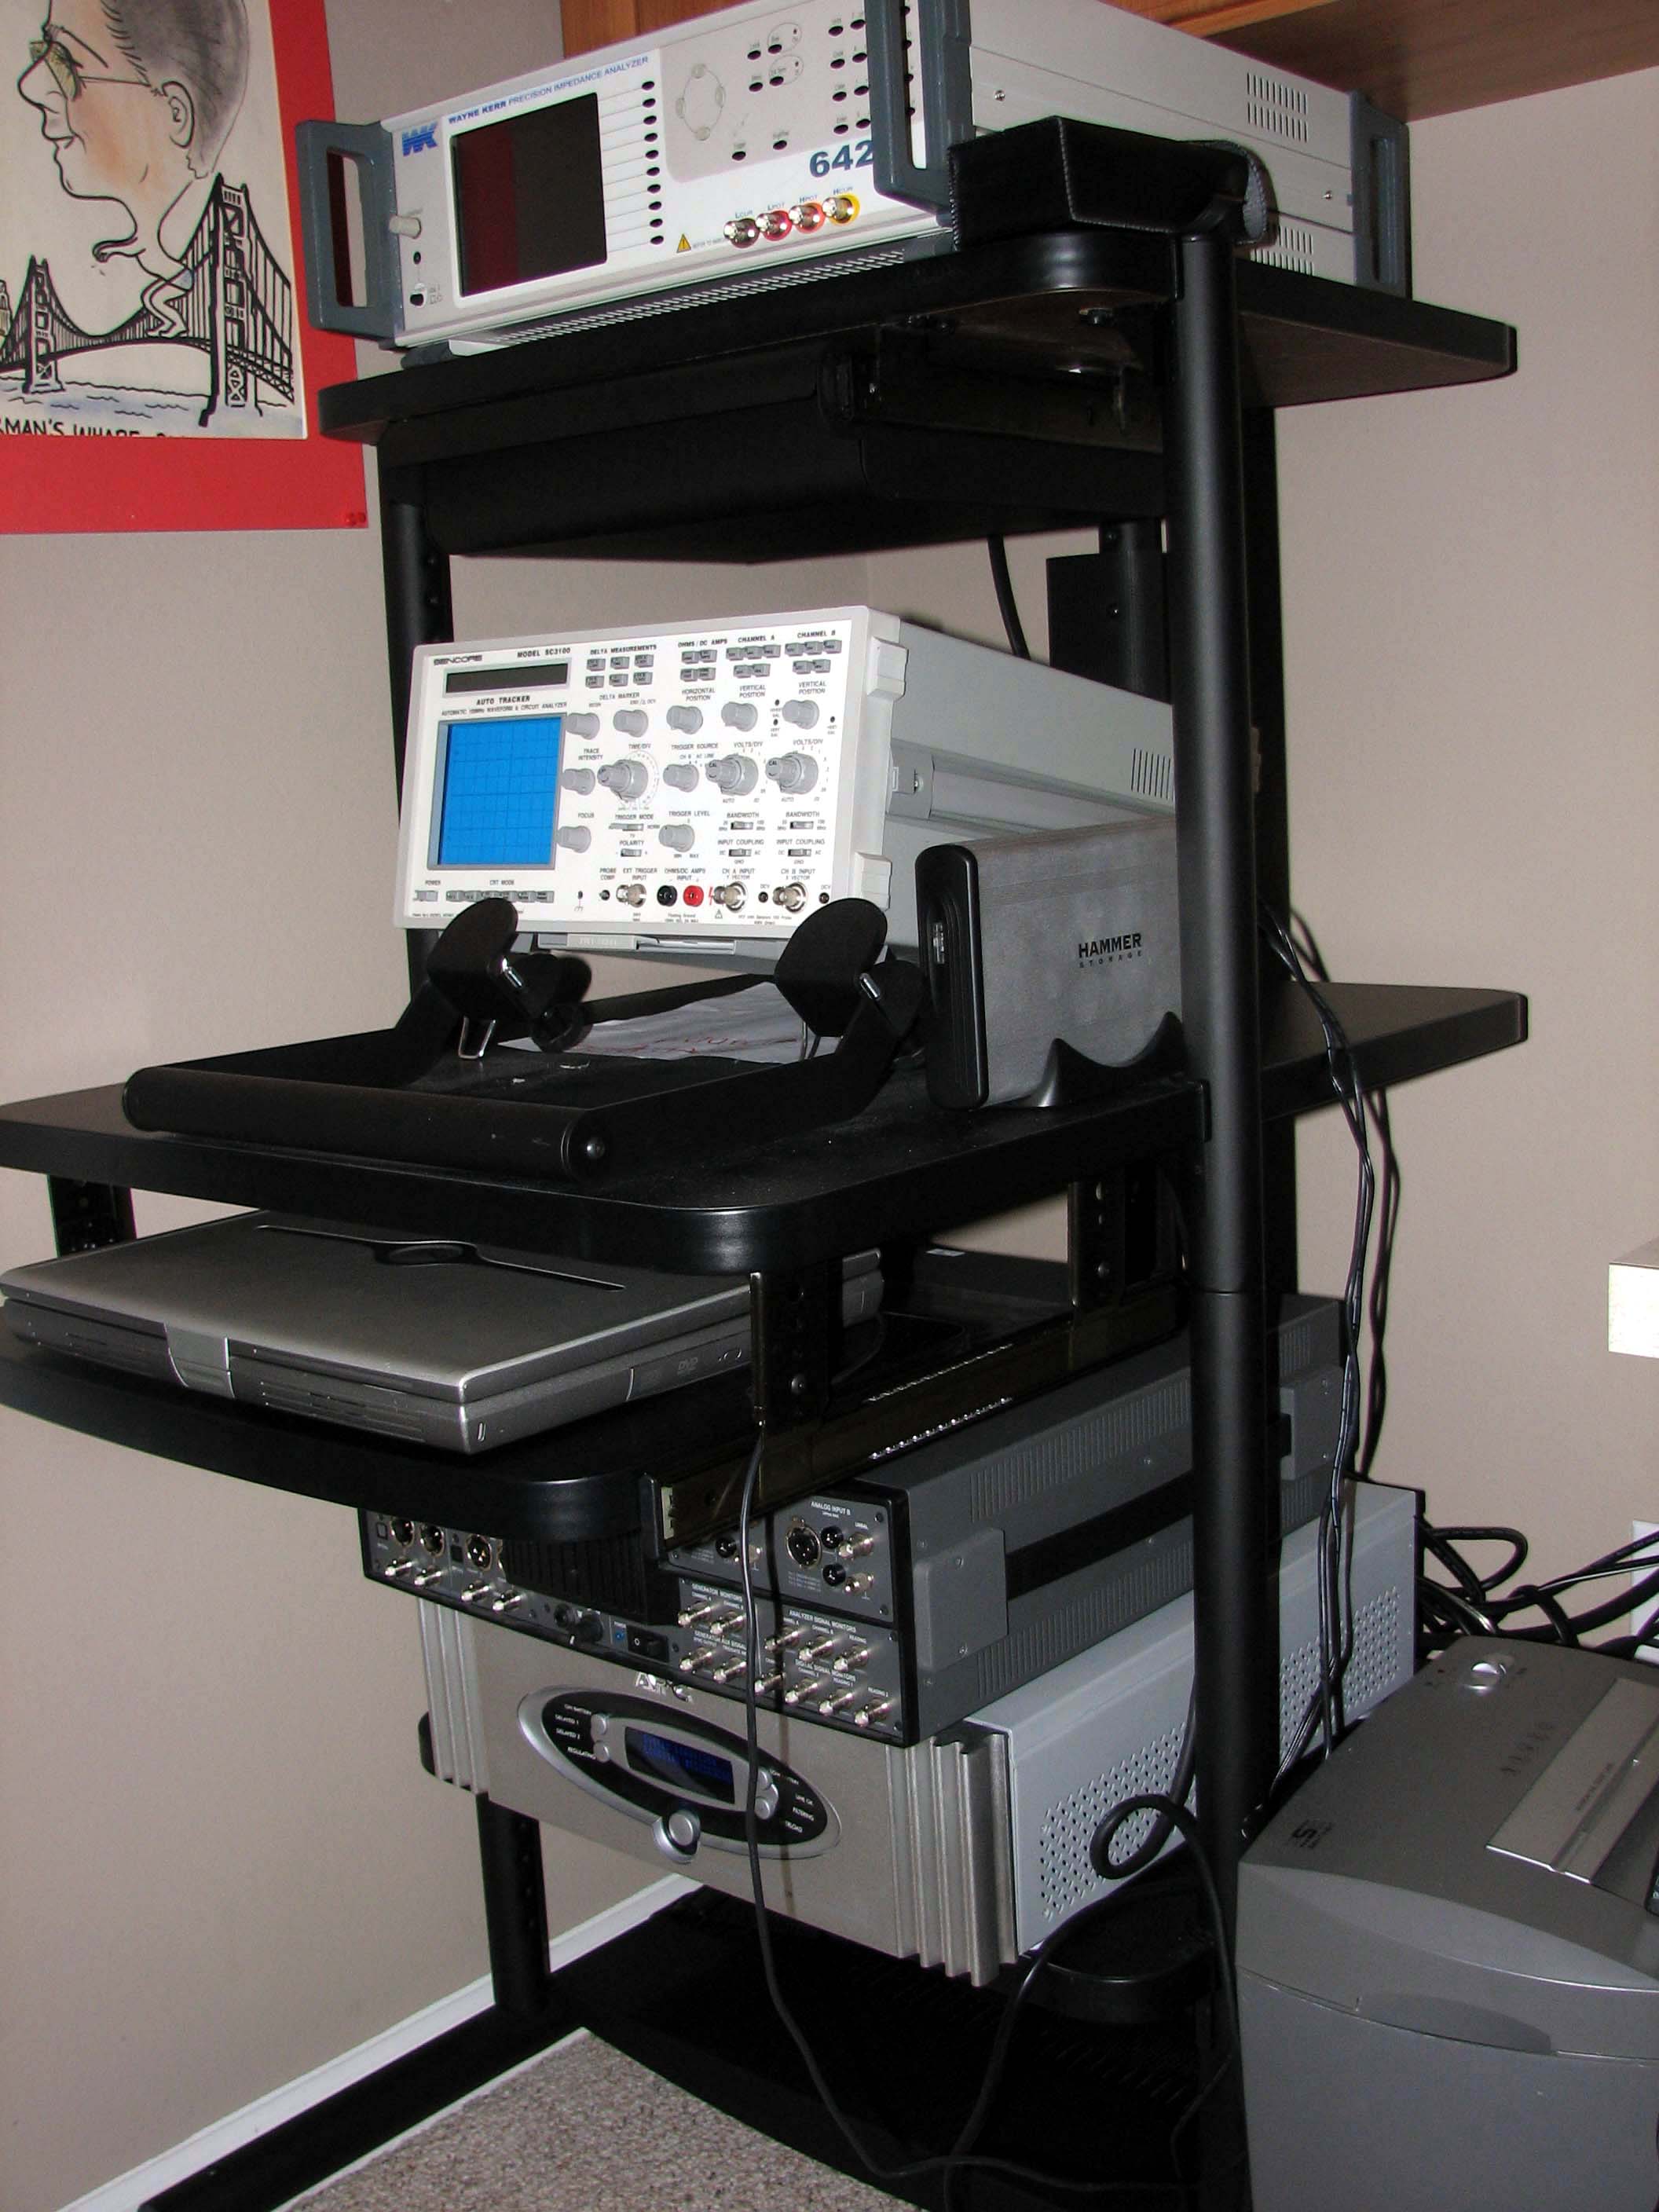 A separate test lab was created in the theater room which has 6 COAX and Ethernet connections tied directly into the main theater room. When we do high SPL testing of loudspeakers, we typically setup the test equipment in the theater room, and run like hell into the test lab, slamming the door shut before the first sweep blows us out of the room.
The test lab consists of some of the industries finest measurement equipment including:
- Audio Precision APx585 8-channel HDMI Audio Analyzer (for receiver/amplifier/Blu-ray measurements)
- Wayne Kerr 6420 Magnetic Analyzer (cable and loudspeaker coil measurements)
- Sencore SP495 Audio Analyzer (room and loudspeaker measurements)
- Sencore SC3100 Oscilloscope
- LMS (room and loudspeaker measurements)
- Dayton Audio UMM-6 Microphone
All of this equipment is protected by an Furman F1000 UPS which is run to a dedicated 20A line.
Suffice it to say with this level of precision, we can measure the noise level increase on a piece of gear if a nearby gnat in the room decides to break wind.
Of course, we have our priorities straight even in our test lab. Integrated into our Desktop PC system is the RBH E-41SE/B speakers powered by a Yamaha A-S801 integrated amplifier The E-41SE/B speakers feature upgraded Beryllium woofers and Scan Speak tweeters. To provide bottom end, we also have a Velodyne Mini-Vee sub integrated. We bypassed the internal soundcard of our PC by utilizing the Headroom Micro USB preamp and DAC system. This two-channel rig rivals many so called audiophile systems and we are just in sonic nirvana all day long while cranking out quality content for our readers.

EMP VT-40.2 Tube Amp and 41-SE/B Speaker System
Audioholics Rock Band and Bar?
Not quite, though when we’re not doing Audioholics related stuff in this room, some of us are enjoying our flirtations at being amateur drummers and piano/keyboard players. We use a Yamaha Clavinova CLP-440 digital piano and the drum kit is a Roland TD-V6. A Velodyne micro-vee subwoofer is also connected to the Yamaha CLP-440 to add a sense of depth to pipe organ and synthesizer sounds. We use the Edifier S2000 Pro active speakers for the Roland drum kit along with a FocusRite audio controller to interface with PC and or additional equipment like microphones.
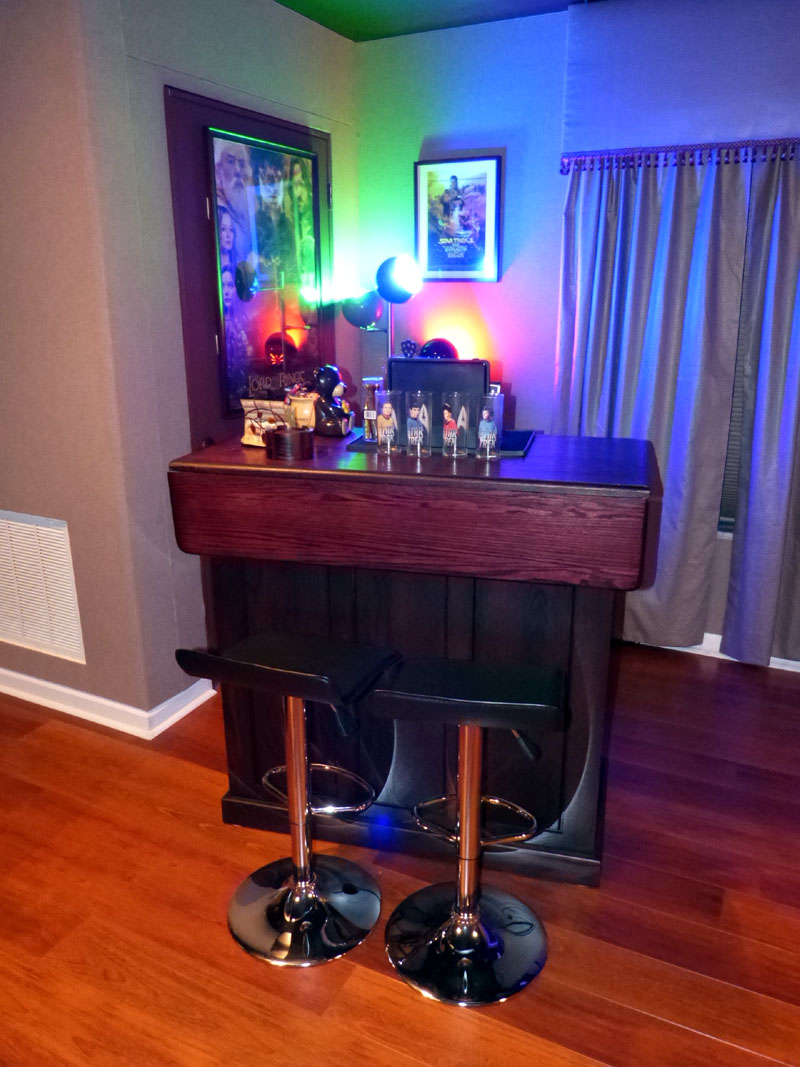
Drum Area of Audioholics Showcase Room (left); Custom made bar built by Amish (right)
What good is a theater room without refreshments? We had this bar custom made to our design and hand built by the Amish. Over the last few months we've learned enough about mixing Margaritas (all from scratch ingredients) to open up a top flight Mexican restaurant. Carrying this 300+ lbs bar up two flights of steps should never be attempted before consuming any of the contents it's meant to contain. Behind the bar we have a mini wine refrigerator keeping all of the white and red bottles that our guests bring (admission price for a listening session) at their proper temperatures. To the left of the bar is our electronic dart board tucked away into a little corner nook of the room. Don't worry, it is free and clear from the Status speakers and isolated by the Middle Atlantic rack. Even the most intoxicated guest couldn't possibly hit one of the speakers :)
The End Result
This AV equipment in the Audioholics Showcase home represents over a ¼ million dollar investment and is a collaboration of some of the finest home theater and measurement equipment available today. Our theater room listening space is nearly an ideal acoustical environment which allows us to discern the quality of components we evaluate for reviews and comparison testing. During off duty hours, we also get to enjoy an unparalleled theater experience that rivals all of the local Cineplex’s. Adding immersive surround sound and 4 discrete in-ceiling speakers was a worthwhile upgrade. The Dolby Atmos upmixer is excellent even when listening to two-channel sources. If you're considering getting into Atmos/DTS:X, we highly recommend doing it the right way with discrete ceiling or height speakers instead of the compromised bouncy house Dolby Atmos-enabled speakers.
Since we are audiophiles at heart, this system was designed to favor the audio side of the equation more than anything else. As a result, watching an Ultra HD Blu-ray like Thor Ragnarok in Dolby Atmos or listening to a high quality multi-channel Blu-ray concert performance (ie. Pat Metheny or Porcupine Tree) really provides us that “better than being there” experience. Cozying up to an audiophile grade vinyl record like Miles Davis - Kind of Blue (180G) or Sade is always a sonic treat. you just can't beat the intimacy of a good two-channel listening session. It’s also quite enjoyable to see and hear fellow victims, I mean fellow Halo gamers, last cries for help as we stick them with a grenade or get off a clean headshot.
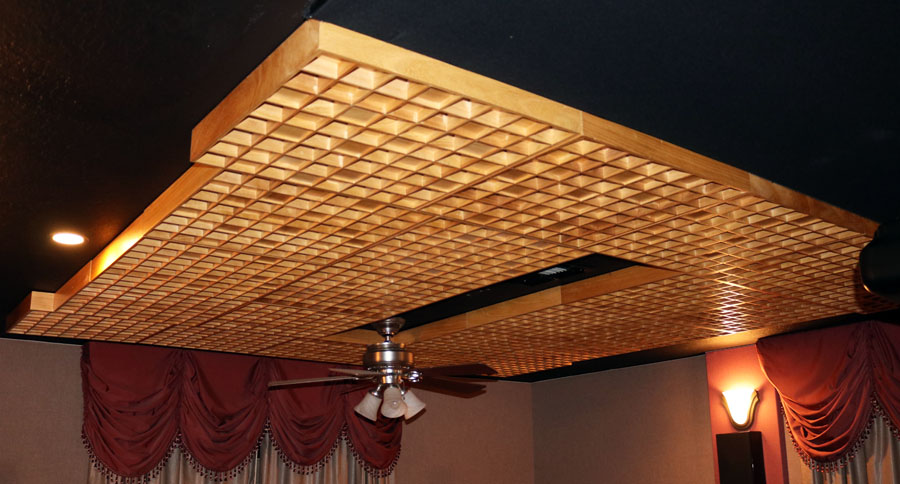
Auralex Space Array Diffusor Ceiling treatment above the listening area
Please continue reading to see what type of equipment we have in our Family and Bedroom systems.
Audioholics Showcase Home Family Room System
This system was primary setup to keep visitors (especially children) away from the main theater room. It’s also a great place for social gatherings since it’s near the kitchen and is augmented by the karaoke system and old but still fun Nintendo Wii. With the recent Control4 upgrades, it also serves as the primary hub for streaming and routing high resolution music throughout the entire home.
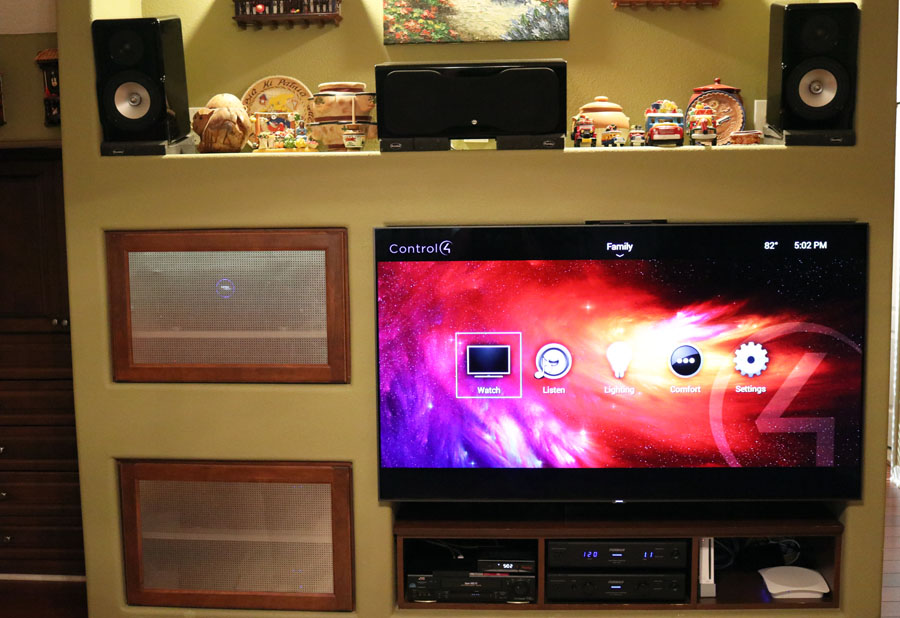
Audioholics Family Room System
At the heart of the system resides a Marantz SR8012 11.2CH AV receiver which powers the main 5.2.4 surround zone of this room. This system was recently upgraded to immersive surround with two pairs of RBH Sound MC-615 in-ceiling height speakers. An Oppo UDP-203 UltraHD Blu-ray player and 4K FireTV provide all of the 4K HD source material while a Verizon FIOS box gives us local and premium channels in 1080P.

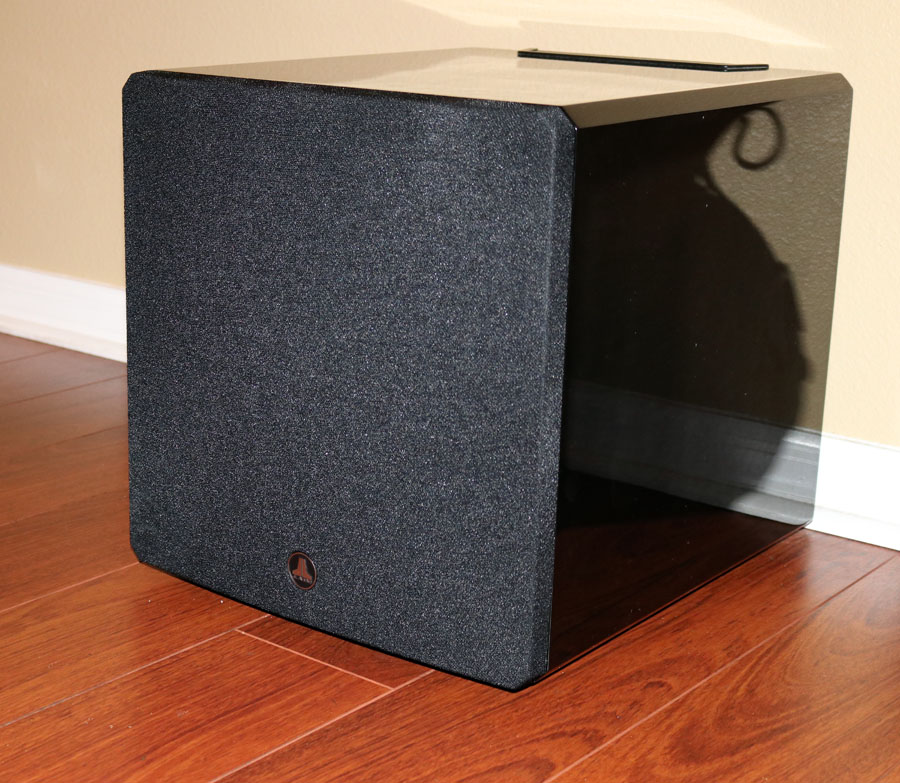
JL Audio e112 sub tucked behind left couch ; 2nd JL Audio e112 sub back right wall
Family Surround Speakers RBH 44-SE Side Channels and 2 pairs of RBH MC-615 Top Front and Top Rear Speakers
The AV Equipment
The speakers consist of the Status Acoustics Decimos, RBH Sound 661-SE/R center channel, 44-SE bipoles for the side channels and two pairs of MC-615 in-ceilings speakers for the height channels. The front and center channel speakers were placed in the cavity above the TV to keep them out of reach which is especially important during parties when a few well liquored guests get a little carried away with their dance moves. Auralex MoPADs are used to isolate the speakers from cabinet resonance and also angle them down to the listening area. Bass is provided by dual JL Audio e112 subwoofers which, despite this room being open to the rest of the house, still manage to provide excellent tactile response that can even be felt upstairs. Bass is smoothed out with good subwoofer placement, time alignment and Audyssey MultEQ tweaked with the Marantz editor App to achieve the most linear response across the 3 seats of the front couch.
Family Room System AV Equipment (left pic) ; Control4 SR260 Remote Control (right)
 We built custom in-wall shelves to house the A/V equipment as you can see the Marantz SR8012, Oppo UDP-203, Control4 EA5, Triad TS-AMS8 8CH Audio Matrix and 16CH TS-Pamp-100 amplifier, 2 Furman Elite-15 DMi and Elite-20 PFi power conditioners, Motorola FIOS HD DVR, Denon 3-head Tape deck, JVS SVHS, and Nintendo Wii. The downside to integrating all of your equipment into a customized in-wall rack is difficult access. Should you decide on doing this, we highly recommend you create an access point behind the equipment. I had a friend do just that where his in-wall rack backed directly into his bedroom closet. This is the way it should be done if you have that luxury.
HD2020 helped me clean up my cabling when they assisted with the Control4 equipment install. We also used extra long cables with plenty of slack so each device could be taken out of the cavity and propped up on a chair to change connections or upgrade and rewire with newer gear. The 65” Samsung UltraHD QLED display is larger than the cavity it occupies so we used a Sanus retractable mount that extends 2 feet out allowing it to be flush with the wall.
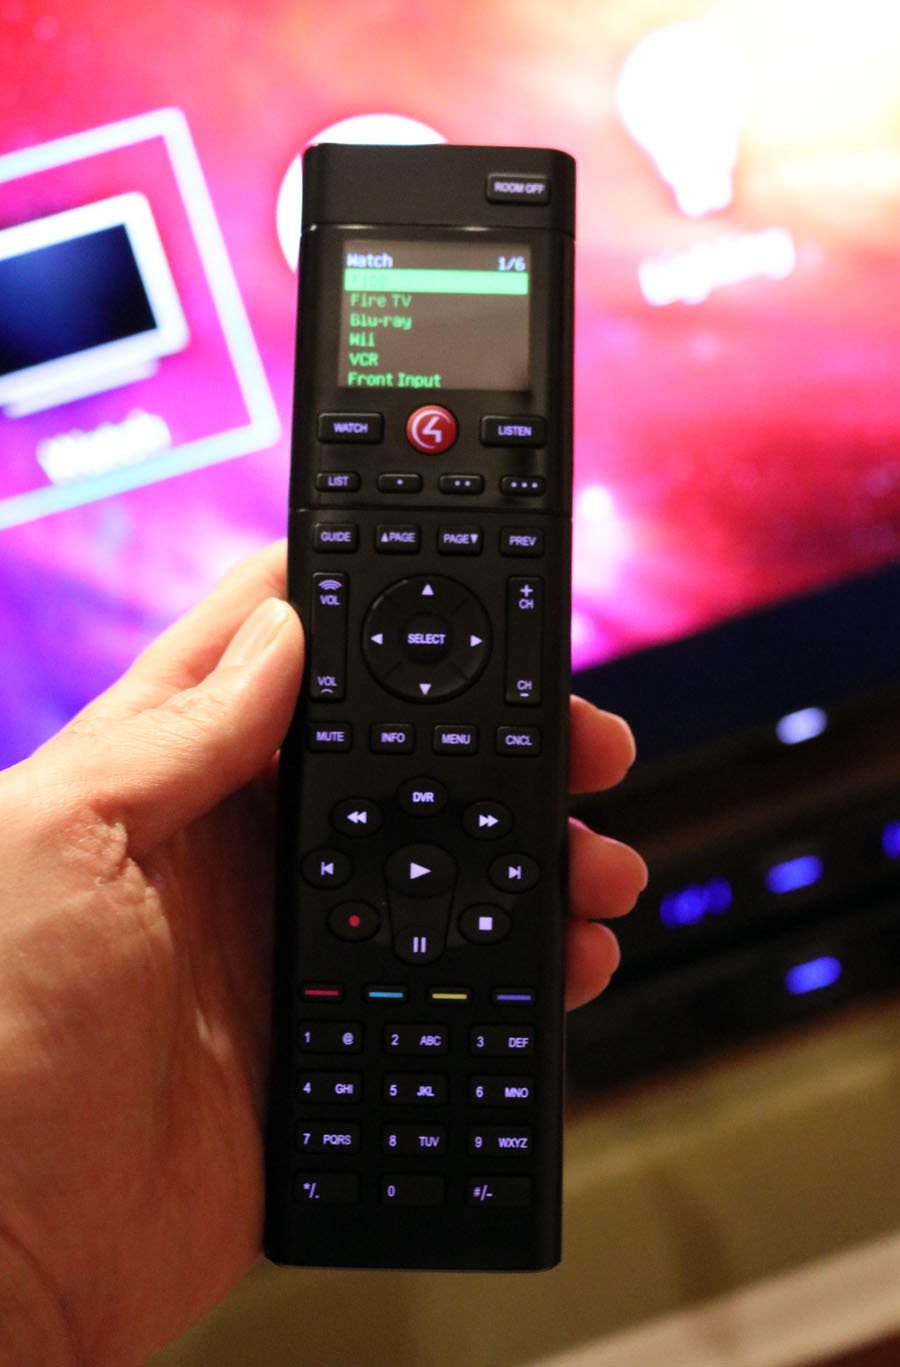
The Control4 SR-260 remote control is fully programmed to operate ALL of the equipment in this system and can also control the other two systems and distribution audio simply by selecting which system or zone you want to control. Similar functionality is had via your smartphone though we prefer the tactile buttons of the SR-260. It's a very intuitive remote control to use and the backlighting makes it easy to see all functions in a dark room.
The End Result
There are no acoustical treatments in this room other than a large padded throw rug, couches and furniture. The room has a very spacious and natural sound quality despite this and provides a very enjoyable surround experience for movie watching and a nice overall sound for music as well. It’s great demoing to people the differences they will hear coming from a typical family room acoustics with dual subs vs. a properly treated room with four subs. The idea of this room is to NOT intimidate wives or newbies getting that tend to have the misconception that home theater equipment is typically ugly and obtrusive.
 The Samsung QLED display is an absolute wonder in that it has a great picture, great viewing angles, isn’t noisy and, at a little over a year old now and has been 100% reliable. The Marantz SR8012 receiver is really an incredible performer and it puts a smile on my face anytime I use it. Having a fully discrete 5.2.4 immersive surround sound speaker setup
really puts you into an acoustic sound bubble that is just so enjoyable
to share with the family.
The Samsung QLED display is an absolute wonder in that it has a great picture, great viewing angles, isn’t noisy and, at a little over a year old now and has been 100% reliable. The Marantz SR8012 receiver is really an incredible performer and it puts a smile on my face anytime I use it. Having a fully discrete 5.2.4 immersive surround sound speaker setup
really puts you into an acoustic sound bubble that is just so enjoyable
to share with the family.
The majority of use this system gets is binge watching Netflix and Amazon Prime content. We can't get enough of The Tick, or watching old Star Trek shows. Having the kitchen close-by makes it easy to pop some popcorn between episodes or for me to make a dagwood style sandwich while the family argues, I mean agrees, over what they want to watch next.
Believe it or not, the family room system gets the most usage out of all of the systems in the house. Between watching movies, karaoke, or gaming, our social gatherings typically wind up in this room. Say what you want about Nintendo Wii not being a serious gaming machine, but all of our guests, including myself typically prefer playing this over XBOX 360 or or OneS. Why? Because the games are simple, interactive and offer very enjoyable multi-player experiences.
Distributed Audio with Control4
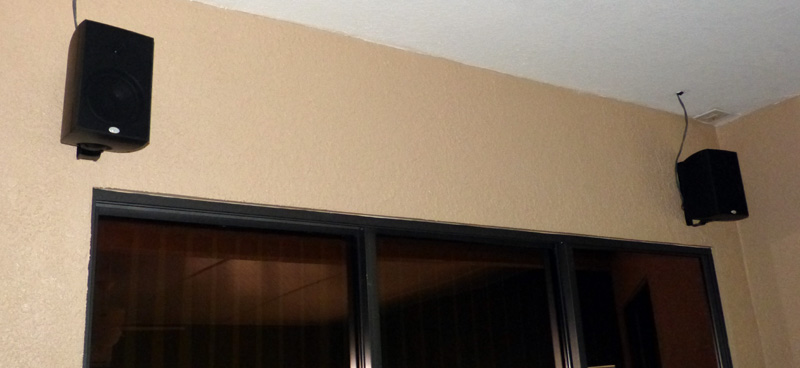
 We wanted to ensure the whole home had audio for when we’re entertaining guests or simply want to relax outside and hear good tunes. As a result, we pre-wired audio connections in the dining room, guest bedroom, workout room, front and back yard. Each room is wired in Bluejeans 10AWG CL5 speaker cable with CAT5e and power runs to each spot in case we decide to upgrade to touch panel control solutions.
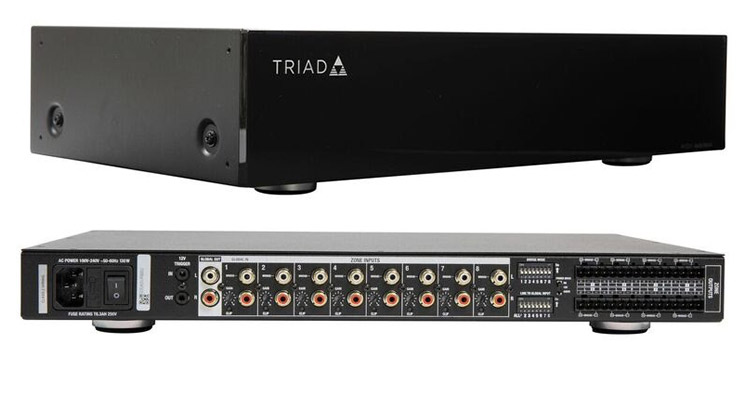
A Control4 EA-5 controller and Triad 8 zone audio matrix and 16CH Class D power amp powers all of the distribution speakers throughout the home. The EA-5 is also the main controller for the entire house and seamlessly coordinates with the EA-3 in the theater room for full automation of all three systems, lighting and music streaming.. The EA-5 features five independent audio outputs—two digital coaxial, two RCA stereo analog, and one HDMI—with an audiophile-grade signal-to-noise ratio of 118dB.
The Control4 system handles 5 independent zones of distribution audio which includes:
- Boston Acoustics Voyager RK6T2 Rock speakers in the front yard. They look and sound great!
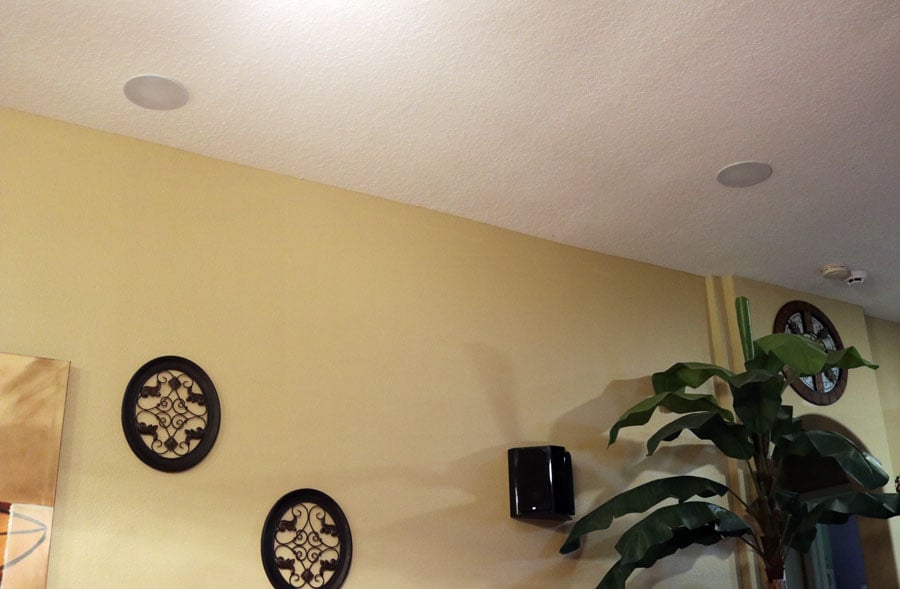
- RBH MC-615 in-ceiling speakers in the dining room. These are the same speakers we use for Atmos height channels in the family room system.
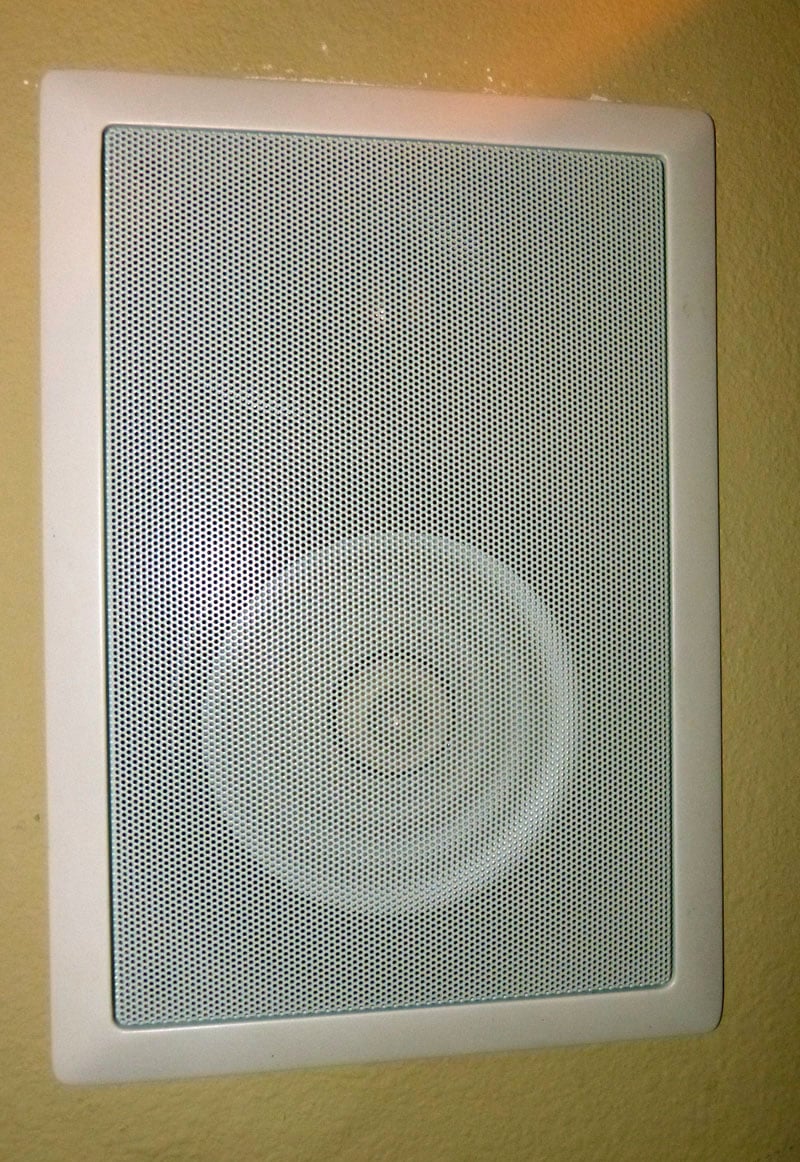
- Paradigm SA-25 in-wall speakers in the guest room. These are really kick ass in-walls. Too bad Paradigm discontinued them.
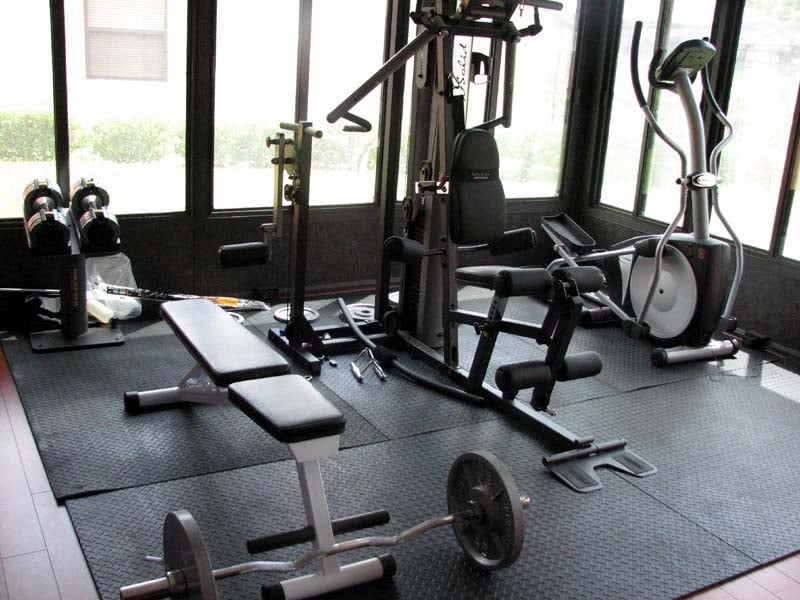
- NHT 02-ARC outdoor speakers in the gym. These are extremely inert and sound great especially when powered by the bridged channels of the Triad Amp for more power.
- Sonance Mariner 86 outdoor speakers in the back yard. These are surpise additions and we've been really impressed with how loudly and cleanly they crank. The 8" woofer is the key for the increased sensitivity and why they can really pump out the SPL in a large open space.
The Triad PAMP was bridged for 2X the power for the Sonance backyard, NHT gym and Paradigm guest room speakers as these three zones are the ones that get played loudest or are used for more critical listening, or both. The SPL we get from the Sonance backyard speakers is really impressive and it's just awesome to grille some burgers or ribs while jamming to Donald Fagen Nightfly or George Benson greatest hits. It's a real convenience to be able to access music in any location of the house from your phone thanks to the Control4 system. We often listen to high-res music in Tidal or just stream from Pandora if convenience is priority over sound quality.
Paradigm SA-25 In-wall Speakers(left); workout room (center); NHT 02-ARC Speakers (right)
See our instructional video on: How to Install the Paradigm SA-25 In-Wall Speakers
For the guest room, we’re running Paradigm SA-25 In-wall speakers which ensure visiting friends/family aren’t deprived of top notch audio. The workout room has the new NHT 02-ARC outdoor speakers which sound fabulous despite being placed out of sight. Being placed near the wall gives them plenty of bass reinforcement to not require a sub in that room. And yes, here at Audioholics, we have a strict regimen for physical fitness. If you can't lift the gear you're reviewing, you aren't qualified to review it.


RBH Sound MC-615 In-ceiling (left) ; Boston Acoustics Voyager RK6T2 (right)
The dining room is running RBH Sound MC-615 in-ceiling speakers which do a great job of piping in music during dining events. The front yard contains a pair of Boston Acoustics Voyager RK6T2 rock speakers which to date are the finest pair of rocks we’ve ever heard. During holidays, our entire outside is rocking with holiday theme music which always draws neighbors that enjoy sharing some food and wine while listening to some tunes.
What makes this system so powerful is the ease of use thanks to the visually intuitive Control4 interface. With the Control4 App loaded on your smartphone, you simply select what zone you wish to listen to music on and what streaming service you want to stream music from. You can then add other zones to play the same source or run independent music sources to each of the zones.
Bedroom System
Since we polluted nearly the entire house with audio gear, a compromise was made for the bedroom system. Our goal was no visible equipment other than a wall mounted flat panel display to prove that you can have quality audio that doesn't destroy a room decor or draw attention to itself when its not powered on. Thus during the pre-construction phase, we pre-wired the entire room to route directly upstairs to the main theater room. We also installed two RBH Sound SI-10 in-wall subwoofer enclosures. The rest of the speakers consist of a pair of RBH Sound MC-6 and 1 MC-414 in-wall speakers for the front LCR's. A pair of MC-615 were used for the surround speakers making this a 5.2 speaker system.
We retrofit back boxes after the drywall was up per our article: In-Wall Speaker Selection & Installation Basics
Audioholics Bedroom System
We are still rocking a 1080p 42" THX Certified Panasonic Plasma (model TC-P42G15) which is a fabulous display for both HD and standard definition video sources. We have no plans on changing this display till it dies. There are 6 COAX feeds and two Cat5e running from the bedroom to the main theater room for all of the A/V connections. The AV connections were no longer needed after upgrading to the Integra DRX-4.2 HDBaseT AV receiver which allows all sources to be located with it in the main theater room while routing 1080p video to the display in this room via ethernet. A Control4 EA-1 is located behind the display to provide the OSD interface to the system. HD sources streaming to this system include Verizon FIOS, Amazon FireStick TV and a Marantz UD7007 Blu-ray player.
Check out our: Tips for a Clean HDTV Install where we show how to clean up that cabling mess for the most aesthetically pleasing installation possible.
The End Result
For a bedroom, this system doesn’t disappoint. It allows us to have a very good theater like experience in the comfort of our own bed when we simply don’t feel like going upstairs. The dual subs really slam well in the room thanks to them being ideally located ¼” length of the front wall and equidistant to our bed which is located on the direct opposite wall. This provides excellent room gain to get those little 10” subs really pounding and feeling more like larger boxed subs. Having Control4 integrated in this system is instrumental in its function and ease of use. For years I struggled with finding a reliable RF remote solution that would allow me to locate all of the AV equipment in another room while operating it from the bedroom and all have been a disappointment in terms of programmability, or reliability. Control4 operation has been rock solid and the streaming functions just add so much to the enjoyment of this system especially when we just want to do some relaxing late night listening in bed.
Conclusion
 After years of plotting, planning, installing and configuring, we’ve proud to present the Audioholics Showcase Home. Yes we've got a lot of speakers, amps, cables, electronic devices, you name it. But isn't that what being an Audioholic is all about? I can't tell you how many audiophytes I've brought over to our place that soon turned into raging Audioholics as a result. I've been even had at least 3 of my local neighbors upgrade from their Bose cubed speaker systems as a result of experiencing something truly more pleasant sounding.
All of the hard work has paid off as we are happy to report this project has gone pretty much according to design. Sure we ran into some snags during the way such as HVAC noise issues, some non-ideally located speaker pre-wires, and a couple of not so great choices in components, but for the most part if we had the chance to do it all over again, we would change very little. One thing we do recommend is going with 14/4 CL2 approved in wall speaker cable instead of 10/2. It’s much easier to work with and terminate and you have a redundant pair in case a cable runs into a snag when being run through the walls. If you parallel 14/4 you get an effective 11AWG cable resistance which is very close to the 10AWG cable we used. Working with 10AWG cable is a challenge especially when trying to terminate to the Triad Distribution amp. We simplified this by breaking out the speaker cables from the walls to thinner 14AWG cables and it worked out just fine.
 With three independent theater rooms and distributed audio around the house, the Audioholics Showcase home often sounds like you’re in a local Hi-Fi store. This is a good thing as it means we are bringing our friends and family together, educating them on quality A/V and saving money on unnecessary traveling to the local theaters. Our only pre-request when people come to watch a movie in the main theater room is to bring the organic kernels for our popcorn machine. We've got some great recipes for popcorn that are healthier and tastier than any of the local movie theaters. Those that bring good wine and spirits get first dibs at sitting in the front row. However I reserve the back center seat when watching movies as that is the secret money seat for multi-channel music and movies.
The three major updates (Immersive Surround, 4K, Home Automation) we made to the Audioholics showcase home really added immeasurable enjoyment. Immersive surround sound is definitely a worthy upgrade if you can install height speakers. Going from 1080p to 4K was noteworthy but not as dramatic as the immersive surround upgrades. Adding a stable, easy to use control system from Control4 perhaps had the biggest impact from day to day usage of the equipment and is something we definitely recommend budgeting for when planning out your home theater system.
See an up to date Equipment List for the Audioholics Showcase Home
Gene manages this organization, establishes relations with manufacturers and keeps Audioholics a well oiled machine. His goal is to educate about home theater and develop more standards in the industry to eliminate consumer confusion clouded by industry snake oil.
View full profile