
How To Calibrate a Multi Row Home Theater
Theater Chairs
If you’ve got a multi row theater room, you’re probably wondering what the best method of calibration would be. Setting channel trims and delay settings properly are paramount to ensuring good sound quality, but at what seated position should they be set too?
In my situation, I have a two row theater and I am a firm believer in following the THX mantra of making “all seats good seats” instead of calibrating to one money seat like so many often do.
I spend most of my two channel listening in the front row (in the middle of the love seat) since it reveals a more intimate experience while my multi channel listening mostly occurs in the back row for a more enveloping experience (mainly because it has a center seat and envelopment is best at the point of left/right symmetry). The problem I face is if I calibrate for the front row, the back row surround channels are too overpowering and the center channel level is too low whereas if I calibrate for the back row, the center channel is too loud while the surrounds aren’t pronounced enough when sitting in the front row. So what does one do?
You have two options:
#1. Independent calibrations for each row retrievable via a memory preset in your AVP / receiver
#2. Compromise
Option #1: Independent
Calibrations
If you choose option #1 independent calibrations, this only works for
one listener at a time and creates the hassle of remembering to toggle your AVP presets depending
on where you are sitting. Unless you
live alone or listen alone, I don’t recommend this solution. Heck most of the time I
listen alone and I still rarely use this option. Instead, in extreme cases I used the fader
control of my Denon AVP-A1HDCI to shift
the balance from back to front on recordings that
tend to overemphasize the surrounds while I am sitting in the back row. If your receiver/processor has this feature,
let it be your friend, but don’t forget to default it back after you're done
listening. If option #1 isn’t practical
for you, I highly recommend option #2 which is my preferred choice for most
situations.
Option #2: Compromise
In
my situation, I set my calibration reference point dead center between the two
rows and my primary two money seats (front row center and back row center). After I calibrate channel trims and delays, I
further tweak a bit by boosting the center channel up a little and knocking the surround
speakers down a hair. The reasoning
behind this is it’s usually acceptable and often preferred to have the center
channel a bit hot in the primary listening area. This helps combat the common issue of not
being able to hear dialogue in very dynamic movies without having to rely on
adding compression (via dynamic range limiters in the processor or DVD player) or turning the volume up only later to be blown out of your
seat during an explosive scene. Thus for
late night viewing or more emphasis on hearing the voices, try sitting in the
front row, especially since it puts you closer to the display which is
something I often prefer when watching “how to” or “concerts” videos. The surrounds won’t stand out as much in the
front row, but they also won’t blast you in the back row either. Cranking the surrounds too loud will collapse
the front soundstage and destroy directional cues which our ears are far more
sensitive to in front of us then they are behind us. If you prefer a more enveloping multi channel
experience, I’d recommend sitting in the back row. I built a theater riser for my back row to elevate the
seating position and also take advantage of the enhanced bass energy due to the
closer proximity to the back wall. The end result is if I want to really get
shaken up and feel the explosions, I sit in the back row which also has
a greater surround envelop for more WOW effect during movie watching but the
front row is still well balanced and will surely satisfy.
So how do you adopt this solution to your situation?
 First,
I recommend calibrating your system somewhere at the midpoint between both
rows. Next, using an analog SPL meter (set to slow response, c-weighted) check the SPL of each
speaker at the primary front row position and the primary back row position. Now it’s time for the compromise.
First,
I recommend calibrating your system somewhere at the midpoint between both
rows. Next, using an analog SPL meter (set to slow response, c-weighted) check the SPL of each
speaker at the primary front row position and the primary back row position. Now it’s time for the compromise.
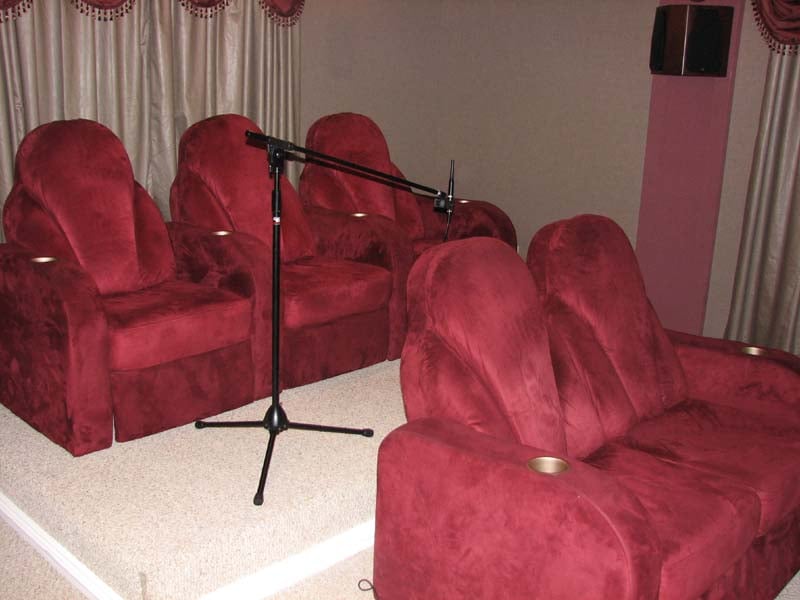
Editorial Note on Microphone Position
Make sure your mic is pointing straight up and is not being obstructed by the sofa backseat. If needed, recline your sofa to avoid it being in close proximity of the microphone.
Remember the goal is to have a center channel that’s a bit hot in the front row, while the surrounds aren’t overpowering in the back row. Thus, I suggest boosting the center channel about +1dB hot at the front row while knocking the side surround channels down .5-1dB and the back channels about -2dB all relative to the front channels.
Now measure the back row primary seated position. Depending on the distance between your two rows, you should observe the center channel to be about 1-1.5dB too low, the side surrounds around 1dB low, and the surround back channels about 1 -2 dB hot. Make sure none of the four surround speakers measure higher than +1.5dB relative to the front channels and the center channel is no less than 1.5dB lower than the front channels. Tweak the adjustments as needed to attain this goal.
Important Note: Try to keep the distance between both rows so that the target response is to be within +-1.5dB for the center and surround speakers relative to the front main speakers for both rows.
Set the channel delays based on that midpoint distance between the two rows previously discussed. Now do some listening tests of 2CH and multi channel sources in both seating areas to determine if you like the end result or if you need to tweak a bit further.
The final calibration results in my theater were as follows:
| Speaker | Front Row | Back Row |
| FL | 75.2 dB | 75.1 dB |
| C | 76.5 dB | 73.8 dB |
| FR | 75.4 dB | 74.5 dB |
| Sur R | 74.9 dB | 74.2 dB |
| Sur BR | 73.5 dB | 75.5 dB |
| Sur BL | 73.7 dB | 75.9 dB |
| Sur L | 74.1 dB | 74.8 dB |
| Sub1 | 74.2 dB | 75.5 dB |
| Sub2 | 77.2 dB | 76.0 dB |
| Sub3 | 78.9 dB | 80.0 dB |
Editorial Note about Sound vs Distance
Keep in mind that the inverse square rule of thumb that sound falls off -6dB for every doubling of distance applies only to the direct sound - the first sound to arrive at the listening location. In real world rooms, with reflected sounds included, this figure is more like 3dB (it is a steady-state measurement). This is basically what I observed since the distance between my front and back rows is about 6 feet, thus 10* log (15/21) = 1.5dB which wasn’t the exactly the case with my main speakers (RBH Sound T-30LSE’s) since they are a dispersing averaging array and behave a bit differently than conventional loudspeaker driver topologies but it did hold true for my direct radiating surround back speakers.
Editorial Note about Sound Calibration Devices:
I recommend using an analog SPL meter set to “slow” response and C-weighted. Using the internal test tone noise generator of your processor, increase the master volume until you read 75dB from the front channels. Bass measurements aren’t very accurate using an SPL meter and I recommend getting your hands on a FFT based audio analyzer with at least 1/12th octave resolution if you have the know how on using them to properly calibrate the bass levels.
Notice how my side surrounds are pretty well balanced for both rows. This is mostly due to the fact I am using well executed bi/di-pole surround speakers (RBH Sound 66-SE's - tweeters out of phase, woofers in phase) properly placed midpoint between both rows and slightly above ear height. If you’re on the fence about going direct radiator vs bi-pole for your side channels and you’ve got multiple rows of seating, I strongly encourage you to take the plunge for the bi-pole option.
My surround back channels are direct radiator in walls, exhibiting the -3dB drop off in SPL for every doubling of distance, and since the back row is only about 4 ft from the back wall, I’d opted to tone them down so that they didn’t overpower the listeners sitting in the back row. Normally I would encourage the user to set sub levels within a few dB of the other channels, but if you’re like me using multiple subs with active equalization, you can get by with boosting the bass below 80Hz as long as the response is flat and linear. This will greatly enhance tactile response and allow the listener to enjoy the bass impact without having to turn the volume up to uncomfortable levels.
What about multiple rows?
 If
you’re running a multi row (3 or greater) theater than you definitely need to
consider multiple sets of side surround speakers. This will allow for a broader and more
enveloping surround envelop across all listening seats. Many modern AVPs and receivers allow for dual
pairs of side channels with independent level trims and delay settings. In such a situation, it is advisable to set
your calibration point dead center and tweak from there based on frequency of
usage of the seats. Your target should
be keeping the center and surround speakers within +-1.5dB relative to the
front channels for each row. If you spend more time towards the front of the
row, than tweak the levels using the methods previously stated to favor that
area more.
If
you’re running a multi row (3 or greater) theater than you definitely need to
consider multiple sets of side surround speakers. This will allow for a broader and more
enveloping surround envelop across all listening seats. Many modern AVPs and receivers allow for dual
pairs of side channels with independent level trims and delay settings. In such a situation, it is advisable to set
your calibration point dead center and tweak from there based on frequency of
usage of the seats. Your target should
be keeping the center and surround speakers within +-1.5dB relative to the
front channels for each row. If you spend more time towards the front of the
row, than tweak the levels using the methods previously stated to favor that
area more.
That’s a Wrap
This article assumes you have optimal speaker placement already worked out in a similar configuration as this diagram. Before one can engage in proper home theater calibration, it’s important to choose the right speakers for your room as well as the optimal location. Check out the related links at the end of this article for more relevant information on this topic. If you pick your equipment carefully and set it up and calibrate it properly, you will be on the right path to building a home theater that will rival most of the local Cineplex’s so you and your company can equally enjoy that great movie theater experience in the comforts of your own home.
Editorial Note About the Measurement Tool Used in this Article
I use a Sencore SP495 Audio Analyzer to do my system calibrations and also take room measurements with up to 1/30th octave resolution. This is a great product for someone looking for portability and accuracy when doing in room loudspeaker measurements to properly calibrate the subwoofer response of their system.
Gene manages this organization, establishes relations with manufacturers and keeps Audioholics a well oiled machine. His goal is to educate about home theater and develop more standards in the industry to eliminate consumer confusion clouded by industry snake oil.
View full profile