
Mitsubishi LT-46148 1080p LCD HDTV Review
Mitsubishi LT-46148 1080p LCD Flat Panel HDTV
- Product Name: LT-46148 46-inch LCD HDTV
- Manufacturer: Mitsubishi Electric
- Performance Rating:


- Value Rating:
- Review Date: August 28, 2008 08:58
- MSRP: $ 2599
- 10-Bit LCD Panel Full Spectrum Color
- Wide Color Gamut LCD
- x.v.Color
- Deep Color
- 6-Color Processor
- High Contrast Picture
- Smooth120Hz Film Motion
- Plush1080p 12-Bit Digital Video Processing
- Tru1080p Processing
- Color 4D Video Noise Reduction
- PerfectColor Video Modes: Brilliant / Bright / Natural / Game
Pros
- Thin Frame cabinet really puts focus on the image
- 120Hz smooth film motion
- 4 HDMI Video Inputs
- 3 Component Video Inputs
Cons
- Cannot make blacker than black or whiter than white
- Uneven light bleed through on dark screens
LT-46148 Build Quality and Remote Control
The display arrived in a well-protected box that opened by sliding the box up over the display and off the separate bottom part of the box. This eliminates any awkwardness in trying to get a large display out of the typical box. With a nice assist from my wife we quickly had the display out of the carton and set up on the AV rack. The display is referred to by Mitsubishi as a SuperSlim LCD HDTV, and has the following measurements: 46" diagonal screen size, height with base was 28" (w/o the base, just the display measured about 26-1/2"); width on the base is about 11" (w/o the base, just 5"); and the width is 42". SuperSlim describes the area around the display more than it does the thinness/depth of the total display. The total weight of the display is almost 62 pounds.
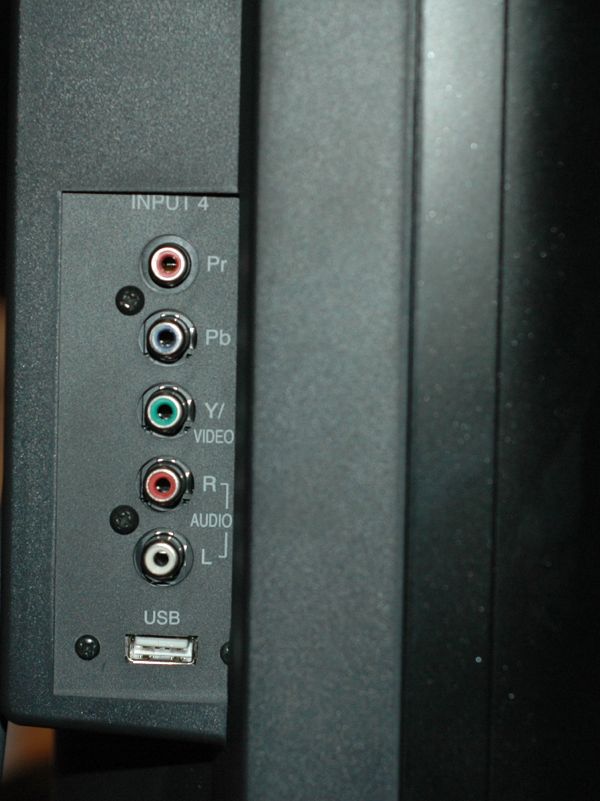 The cabinet features the platinum black Ultra-Thin Frame (bevel), which around the top and sides of the picture is only about 3/4" thick. This feature leaves little to distract you from the sharp 1080p picture. The swivel base (+/- 30 degrees) gives you a little advantage when connecting cables to the back or side of the unit during setup. If you utilize the display in a multipurpose area, it could also improve the view from several different viewing spots. Not the case in my viewing room, but this feature could also be very useful for applications where you might have more than one viewing area - sofa, kitchen, etc. Also, the left side of the cabinet includes a component and composite video input, analog stereo input, and USB input. These well-placed inputs makes it very convenient to hook up a camcorder or video game console for occasional use. The USB input is utilized for viewing photos (JPEG images) from a thumb drive or even, apparently, a USB card reader.
If you opt to wall mount the unit, Mitsubishi recommends the Peerless Wall Mounting Kit, model ST650.
Remote Control
 The remote control for this display is a pretty basic, vanilla remote. There was nothing to complain about, but it also had nothing that really blew me away either. It was nice to see that it was at least partially backlit, so you weren't stuck fumbling in the dark to do basic tweaking, or channel surfing. The basic video menus were all accessible either by the Menu button, bringing up the main menu, or you could scroll through all the available options by pressing the Video button. During my calibration process I typically found myself scrolling through Video menu options until I got to the one I needed using the Video button. The remote also features NetCommand with IR learning capabilities. This allows the Mitsubishi's remote to control other components in your system by way of external IR emitters (supplied).
LT-46148 Setup and Menu System
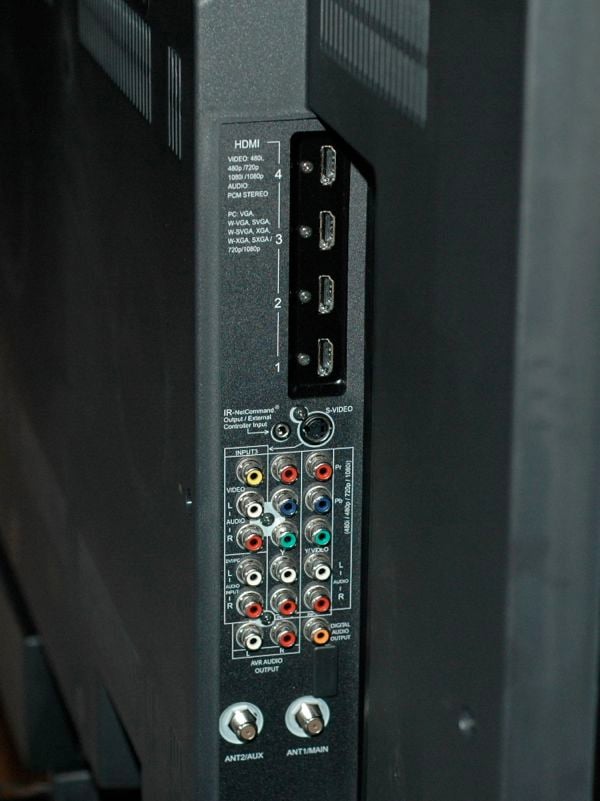 One of the big positives of this display is its options for connecting all your favorite sources. The back panel contains 4 SimplayHD certified HDMI 1.3a inputs (with Consumer Device Control); 2 component video (YPbPr) inputs (one input doubles the Y input for 1 of the 2 composite video inputs); 2 antenna inputs which can receive digital and analog OTA channels or non-scrambled digital/analog cable signals (QAM); and a third component input on the side of the display. The back panel also offers an IR NetCommand Output/External Controller Input to assist with control of other IR remote controlled devices.
Menu System
The menu system is pretty straightforward and easy enough to navigate. The top of the display cabinet contains hard buttons for the most commonly used control functions including: Power, system reset, Volume +/-, Channel +/-, Format, Menu, Guide, and Input. While having access to commonly used controls in some form other than the remote is a nice idea, placement along the top of the cabinet may put them out of reach in many installations.
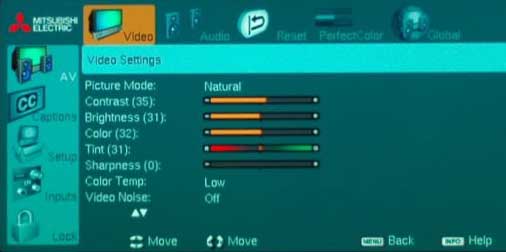 The menu you need most (A/V) is the first option in the menu. The video submenu holds all the typical user controls for picture control (Contrast, Brightness, Color, Tint, Sharpness, Color Temp, Backlight level as well as the PerfectColor controls and the 120Hz options. Each control is a numerical on-screen slider ranging from 0 (minimum) to 63 (maximum) with 31 set as the mid-point for each video control. On a positive note, all the changes made in each of these submenus are stored independently for each source and mode. On the downside, the video controls offer no user adjustable RGB controls. For a display in this price range with features that include x.v.color support and Deep Color I would expect user controls that allow you to dial the white balance in. More on this in the calibration section of this review.
Also included in the video menu are the four available video modes: Brilliant, Bright, Natural, and Game. The color temperature setting allows only two options - high and low. Mitsubishi states in the Owner's Guide that the low setting should display video at approximately 6500K - however we were never able to produce 6500K during this review.
One of the other submenus under the video Menu is PerfectColor. According to the marketing material this 6 color control is suppose to offer you greater ability to adjust the intensity of all 6 colors (red, blue, green, cyan, yellow, magenta) the display can generate. I was excited to test out exactly what these controls offer, but was disappointed when I figured out that regardless of how you set these controls, you can only reduce the colors the display is capable of making - nothing I did increased the deficiencies we measured in particular areas. My advice is to leave these color settings at the factory default.
Other submenus available when you select the menu button on the remote control include: Captions menu, Setup Menu (basic set up stuff here like language, channel naming, setting the clock, energy menu for those conservationists out there, timer, etc.), Inputs Menu (allows you to name all the inputs, change the order of inputs, and to perform NetCommand IR learning), and the lock menu. The lock menu gives you the ability to block shows that may not be age appropriate for the children living in your home. You simply set the program ratings you want to allow or the time of day, set a pass code and anytime something outside the parameters you have already "approved" come up, you have to enter the passcode to get the program to display. Another bonus is it disables the control panel buttons, which keeps the other junior calibrators in your home from monkeying around with your settings.
 One last feature not really related to television or movie viewing was the Gallery Player. This feature allows you to view photographs (up to 5 megapixel) in a slide show view. I had pretty much passed this off as a side feature and was not going to include it in this review. Luckily a friend and fellow reviewer said I should try it out, so we loaded some of my favorite photos onto a USB thumbdrive. I’ve got to say, as an amateur photographer it’s pretty cool to see your photos that big. I’m not sure it’s a terribly eco-sensitive option since it would entail running the display as a "live" picture frame, but it's certainly good-looking.
LT-46148 Calibration and Bench Testing
We used Datacolor’s Colorfacts Professional 6.0 software to measure the LT-46148's performance in various modes and color temperature settings. While we were disappointed with many of the results we got from our measurements during this portion of the review this display actually made some amazing images during our viewing evaluation. So - unless you plan to only view calibration patterns with the display, I'd highly recommend you make sure you read the whole review before coming to any conclusions about this display.
We started off by measuring the default color temperature of the various picture modes available utilizing the the 80 IRE pattern from Avia Pro DVD via HDMI 1 input. (Note: Remember the game setting is not available unless the input you use is named game, so it was not evaluated during this portion of the calibration). The default for each of the modes below included: Backlight +63 (the brightest setting); Contrast +63 (highest possible setting); and Color Temperature was set to High. All modes were skewed toward blue regardless of which mode was selected; but here are what the various modes yield in their default settings:
- Brilliant Mode - 11,051K
- Bright Mode - 11,776K
- Natural Mode - 11,544K
To see if we could get anything closer to the target 6500K we also tested each setting in the Low color temperature setting and got these results.
- Brilliant Mode - 6,811K
- Bright Mode - 7,146K
- Natural Mode - 7,053K
I know this seems counter intuitive, given these naming options we completely expected to wind up using the Natural setting with the low color temperature, but the numbers do not lie. So, like all good calibrators we went with the settings that got us closest to 6500K (Brilliant with low temperature setting) and did the rest of our tweaking from that starting point.
Real world contrast on this display was tested with the backlight at full on (63 - the default), half (31), and it's lowest setting (0) and gave pretty impressive results at each of the three picture modes tested.
Brilliant Mode
Backlight Level Contrast Luminance
0 469:1 29.4 fL
31 1,541:1 139.2 fL
63 2,842:1 240.5 fL
Bright Mode
Backlight Level Contrast Luminance
0 493:1 37.7 fL
31 1,571:1 118.5 fL
63 2,622:1 195.3 fL
Natural Mode
Backlight Level Contrast Luminance
0 583:1 46.97 fL
31 2,015:1 143.8 fL
63 3,177:1 231.8 fL
Note: During our contrast measurements, we noted that anytime we had a black screen up, the LT46148 suffered from very obvious light bleed through. It was splotchy and showed up over the entire screen. We rarely noticed it while viewing movies or TV, but it could be an annoyance during very dark scenes.
Utilizing the Avia Pro calibration disk we started trying to dial in the contrast and brightness settings using the needle pulse patterns. It quickly became obvious that the display could not make blacker than black or whiter than white. So after going back and forth, we finally settled on the following settings: Contrast - 29, Brightness 45, and the Backlight set to 0. These settings offered the best all around performance we could get from the display. We also changed the following default values: Sharpness - default was set at 31, we reset to 0; Video Noise was set to high, we reset to off. After we got all our settings tweaked on the Brilliant setting, we took another round of ANSI contrast measurements and lumen readings and got a pretty good real life contrast ratio of 469:1 with luminance reading of 26.94 (at 80 IRE).
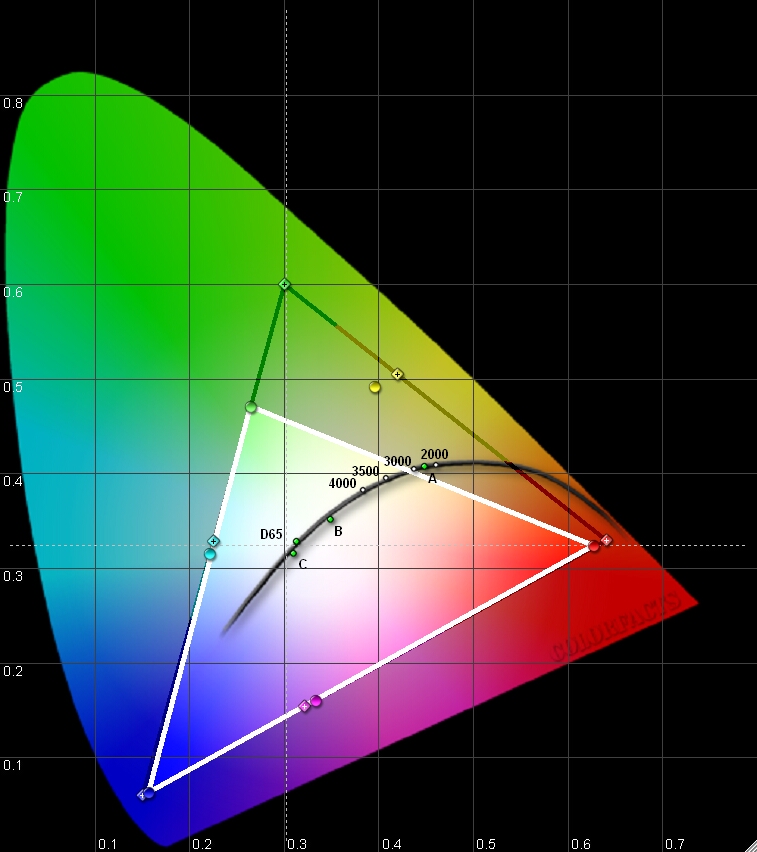 The CIE color chart measurements for the Toshiba 46LX177 were not up to what we had been expecting, especially with its claim of xvColor support. Red and blue are pretty much dead on, but green falls far short. During my calibration I attempted to see if I could expand this performance utilizing the 6 color processor settings in the video menu. Regardless of what changes I made, I could only shrink the triangle - never increase it to include more colors.
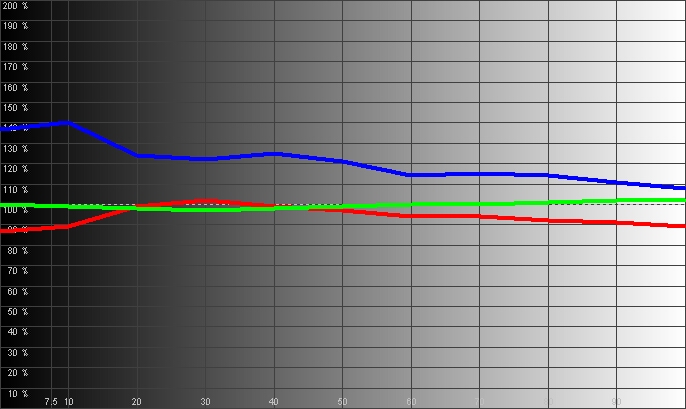
Other measurements were also a little disappointing during the bench tests. The gray scale measurements shows RGB levels set heavy on the blue throughout the IRE range. Green stays pretty steady throughout the range, and red dip slightly from about 30 IRE throughout the rest of the range.
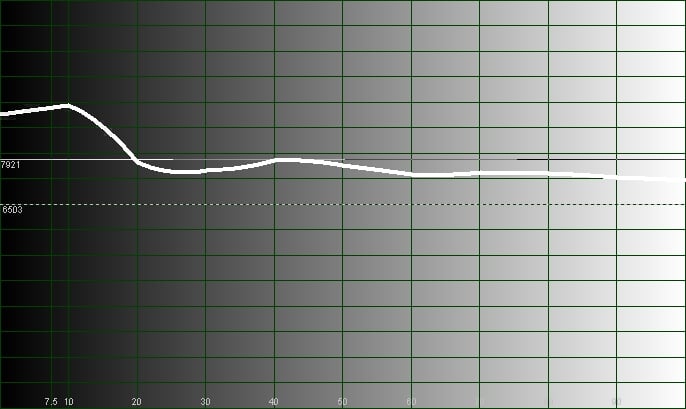
The temperature history shows it starting high (almost 7900K at 40 IRE) and gradually going down as you increase through the IRE scale - though it is always above the 6500K target throughout the range.
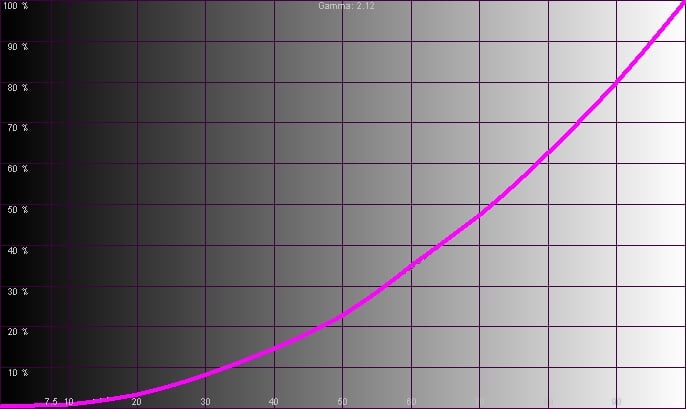
The gamma reading (2.12) came in on the low end of the target range (of 2.2 to 2.5) but still at a pleasing level - very similar, in fact to how a CRT display performs (thought by some to be the model example for gamma). This smooth gamma curve produces a very even transition from bright to dark and makes for a very watchable picture that is carried out by real-world testing and viewing sessions.
Audioholics/HQV Bench Testing Summary of Test Results
SD Perfect Score is 130Mitsubishi LT-46148 SD Benchmark Score: 68
HD Perfect Score is 100
Mitsubishi LT-46148 HD Benchmark Score: 65
| Test | Max Points |
Score |
Pass/Fail |
| Color Bar |
10 | 10 | Pass |
| Jaggies #1 |
5 | 5 | Pass |
| Jaggies #2 |
5 | 3 | Pass |
| Flag | 10 | 5 | Pass |
| Detail | 10 | 0 | Fail |
| Noise | 10 | 5 | Pass |
| Motion Adaptive Noise Reduction |
10 | 5 | Pass |
| Film Detail |
10 | 5 | Pass* |
| Cadence 2:2 Video |
5 | 5 | Pass |
| Cadence 2:2:2:4 DV Cam |
5 | 0 | Fail |
| Cadence 2:3:3:2 DV Cam |
5 | 0 | Fail |
| Cadence 3:2:3:2:2 Vari-speed |
5 | 0 | Fail |
| Cadence 5:5 Animation |
5 | 0 | Fail |
| Cadence 6:4 Animation |
5 | 0 | Fail |
| Cadence 8:7 Animation |
5 | 0 | Fail |
| Cadence3:2 24fps film |
5 | 5 |
Pass |
| Scrolling Horizontal |
10 | 10 | Pass |
| Scrolling Rolling |
10 | 10 | Pass |
| Total Points |
130 | 68 |
Note: Tests were done at 480i via HDMI input #1. *Smooth 120Hz mode OFF.
The biggest thing that jumped out during our HQV testing was how soft the 480i feed from our Toshiba HD-A2 was on this display. Based on that I would hesitate to feed this display any source less than 480p via HDMI - it doens't seem to fully support it properly. We should also note that while the film detail test passed with the Smooth 120Hz feature turned Off, when we retested with it On, it failed this test. We also noted artifacts and increased jaggies with the 120Hz feature On during both of the jaggies tests. This has been a continuing problem with high speed refresh rates.
| HD Tests (via Toshiba HD-A1 @ 1080i) |
Max Points |
Results |
Pass/Fail |
| HD Noise |
25 | 15 | Pass |
| Video Resolution Loss |
20 |
20 |
Pass |
| Video Reconstruction |
20 |
20 |
Pass |
| Film Resolution Loss |
25 |
0 |
Fail |
| Film Resolution Loss Stadium |
10 |
10 |
Pass |
| 100 | 65 |
LT-46148 Viewing Evaluation and Conclusion
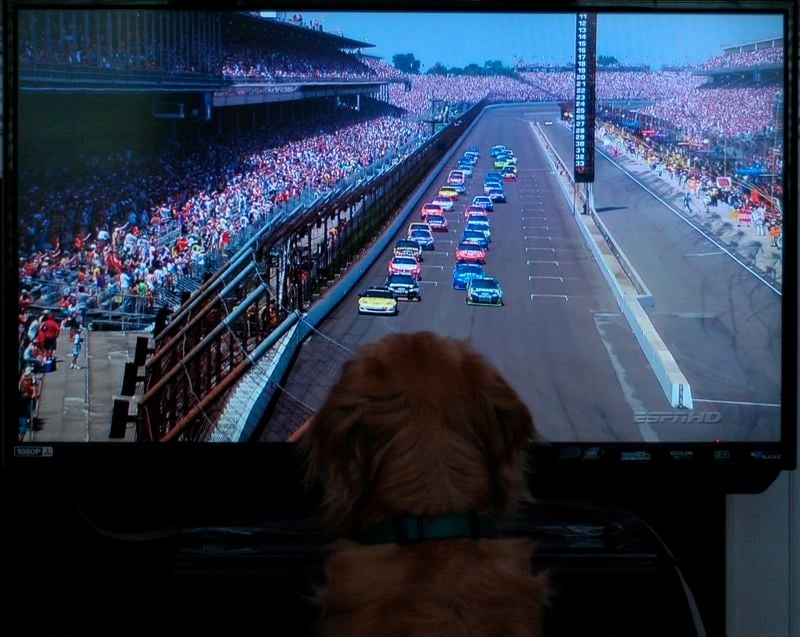 Despite the short comings noted previously in this review, this display produced some amazing 1080i images. So much so that I feel I need to start my viewing evaluation by posting this warning: Images in this display are so clear and crisp they may cause your dog to become a couch potato and never want to leave the front of the television. Just like in people, a good HD picture will make even a dog watch something they have no interest in.
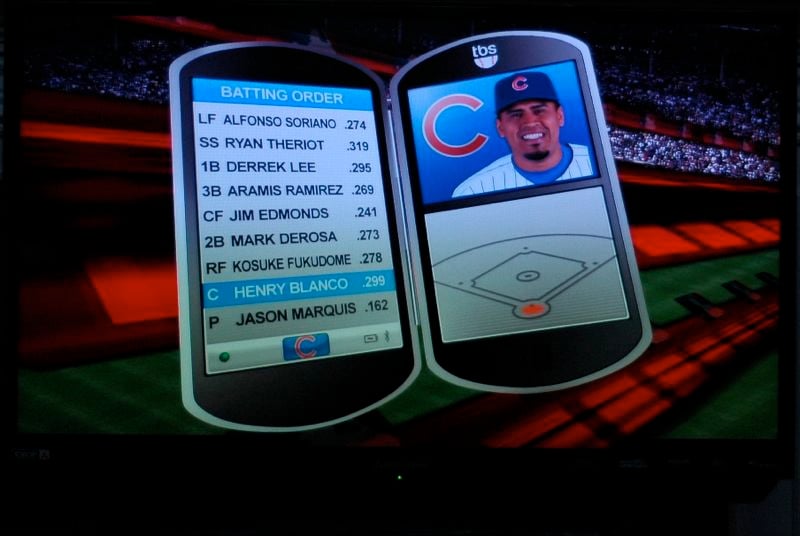
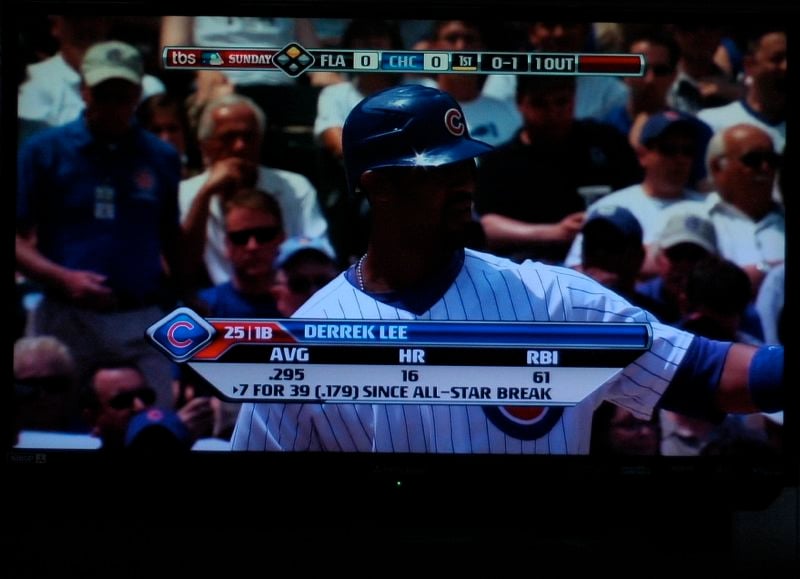
Various HDTV Shows (via Comcast Cable)
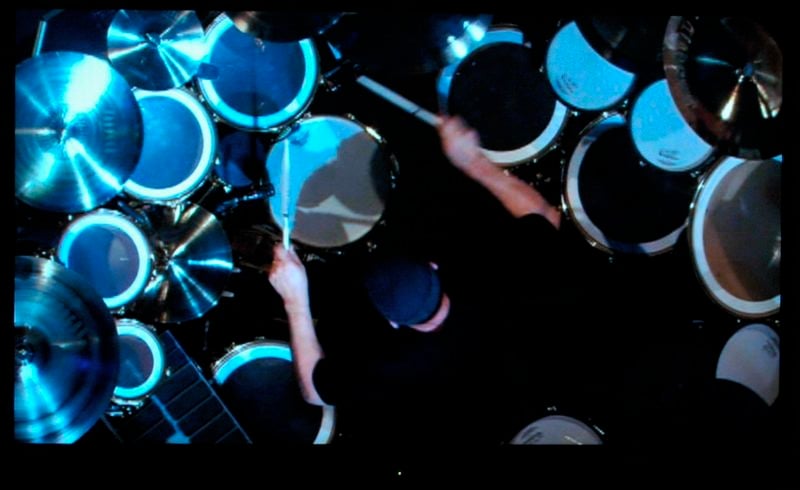
No review is complete without a little HD Discovery Channel. I think the guy in the closeup is from Mongolia - can't remember what the program was about, but I do remember the vivid pictures of the people and the landscape. You can notice a little contrast issue in the shadow of his face where you just lose all detail. This was a recurring problem with dark scenes or portions of a frame. Office, besides being one of the funniest shows I watch all week, also has some amazing HD pictures. They've got that almost 3D quality that once you've seen it, you wonder why anyone ever settles for less. And then why even get a 1080p display with 120Hz refresh rate if you're not going to watch some sports! We did notice that setting the Smooth 120Hz film motion setting to high did help reduce the blur of things like baseball pitches and volley ball spikes (thanks to the Olympics for providing the opportunity to view fast moving objects).


HD DVDs
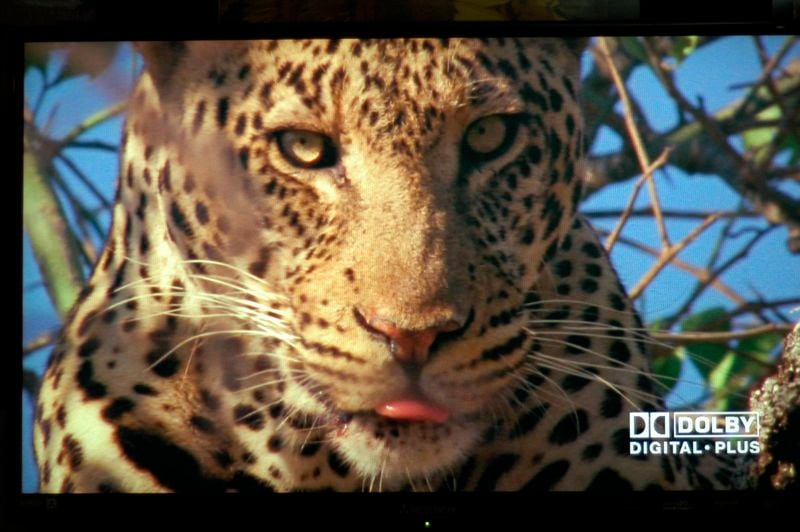
The HD DVD Sound of High Definition is a sampler disk that provides a bunch of great video that makes a reviewers job a lot easier. If you want to show off your HD DVD capabilities to your friends without having to get up 20 times to put in a new disk, I'd recommend you get this disk or a similar one. Talk about clear pictures and colors that really pop! The close up of the leopard and the elephant are also from this disk on the Safari 7.1 track. Fortunately the dog was not in the room when the close up of the leopard came up!

Standard Definition DVDs (upconverted to 1080i)
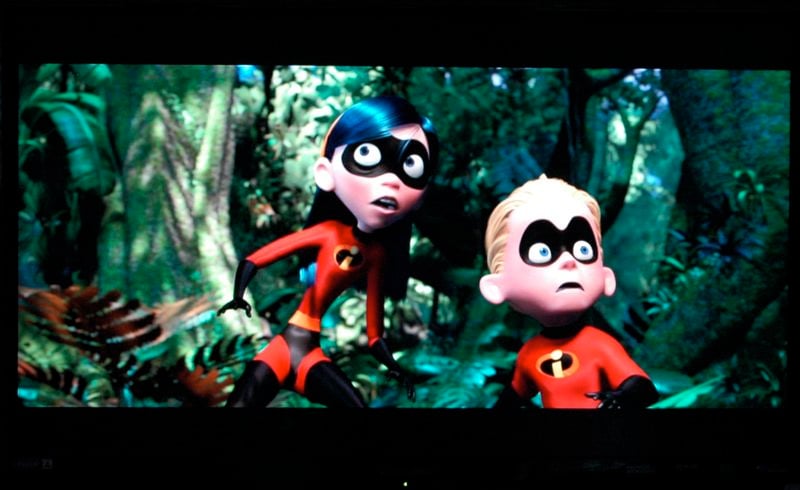
One of my favorite series ever was the HBO special Band of Brothers. With all the fighting scenes shot in the dark, its a great test of any displays ability to produce detail in dark scenes. The display also had trouble with detail in the dark scenes of the Rush R30 disk. You can see, the display did not do a good job presenting these dark scenes. However, with material like The Incredibles, the picture really pops with anything that has deep vibrant colors.


Conclusion
While this display had some issues with dark scenes and probably isn't the right choice for anyone not planning to feed it a HD source, it also produced some amazing pictures during this review. At this price point, I would really like to see more user controls to help with the color temperature and the RGB levels (though we're sure installers could care less). While technically this display had some issues, it is capable of head turning, eye-popping pictures if fed the right source material.
The Score Card
The scoring below is based on each piece of equipment doing the duty it is designed for. The numbers are weighed heavily with respect to the individual cost of each unit, thus giving a rating roughly equal to:
Performance × Price Factor/Value = Rating
Audioholics.com note: The ratings indicated below are based on subjective listening and objective testing of the product in question. The rating scale is based on performance/value ratio. If you notice better performing products in future reviews that have lower numbers in certain areas, be aware that the value factor is most likely the culprit. Other Audioholics reviewers may rate products solely based on performance, and each reviewer has his/her own system for ratings.
Audioholics Rating Scale
 — Excellent
- — Very Good
- — Good
- — Fair
- — Poor
| Metric | Rating |
|---|---|
| Detail and Resolution | |
| Deinterlacing & Scaling | |
| Contrast and Black Levels | |
| Color Reproduction | |
| Noise Reduction | |
| Calibration Options | |
| Build Quality | |
| Ergonomics & Usability | |
| Ease of Setup | |
| Features | |
| Remote Control | |
| Fit and Finish | |
| Performance | |
| Value |