
Gateway XHD3000 30-inch LCD Display Review
Gateway XHD3000 LCD Display
- Product Name: XHD3000 LCD Display
- Manufacturer: Gateway
- Performance Rating:

- Value Rating:

- Review Date: October 07, 2007 00:00
- MSRP: $ 1699.99
|
Brightness:
400
cd/m^2 Lamp
(backlight) Life:
50,000 hours (min) Scanning
Formats:
480i/576i/1080i and 480p/576p/720p/1080p Audio Inputs: 2 x 3.5mm (DVI-D and VGA), 3 x RCA (component, S-video, composite) Misc Connections: 2.5mm IR emitter, 6 x USB 2.0 output and 1 input, 12V/2A speaker bar power output |
Speaker Bar Power: 7 Wrms x 2 (8-ohm) Class-D THD+N: <10% (10Hz – 22kHz, 12VDC input) SNR: >65 dBa (1W into 8-ohms) Output
Impedance:
>10kohms Dimensions: 22.2” x 17~22.2” x 15.4” in (565 x 432~563 x 563 mm) Weight (display): 20.8 lbs (9.4 kg) Weight (speaker bar): 3 lbs (1.3 kg) Weight
(stand):
6.4 lbs (2.9 kg) |
Pros
- Cool capacitance touch controls
- Highest resolution PC monitor available
- HQV Realta processing
- Component supports 1080p
Cons
- Poor black levels (no backlight adjustment)
- Auto-input mode gets fooled by hibernation
- PIP only works with dual-link DVI-D
- Mediocre remote
- Most picture controls disabled for DVI-D
XHD3000 Introduction and Basic Setup
I like big computer monitors and always have. Back in my editing days I utilized a Mac-based AVID video edit workstation and got very accustomed to dual 20-inch CRT screens. That turned out to be a curse and, until recently, I always surrounded myself with a dual-monitor system at home as well. Through the years the sizes have gone from 15-inch to 19-inch and the technology from CRT to LCD but I always needed a lot more real-estate than a single monitor could give me.
Until now.
Gateway's new 30-inch 2560x1600 behemoth XHD3000 monitor is like a dream come true. Finally, I can actually get more than two (large) screens worth of content onto a single screen. My desk is cleaner, sleeker and let's face it – a giant 30-inch display sitting a scant 20-inches away from your face is a sight to behold. It turns heads, heck – it almost breaks necks.
Basic Setup and Installation
Setup is easy, except for the expected difficulties of finagling cables and connections to the bottom of a rather large monitor. Each of the inputs and connections are labeled on the back of the display, however the think white text and graphics may be difficult to make out in dim light, so bring a flashlight if you're not in a brightly-lit room.
The display comes pre-mounted on its stand – a very robust and futuristic-looking assembly that would make any industrial engineer proud. It was too bad that the robust and slick-looking tilt/swivel assembly has to exist on the back – it was so beautiful I wanted to show it off. If you don't have your desk up against a wall as I do, you'll have the opportunity to do just that.
Note on Dual-Link DVI-D: DVI-D (dual-link) is a unique and special connection. It requires three things: 1) a compatible video card that supports dual-link output, 2) A dual-lnk DVI-D cable, and 3) a monitor that is dual-link compatible. The ONLY way you will get 2560 x 1600 resolution on the XHD3000 is through a dual-link chain.
Every time you boot the XHD3000 you will be treated to a melodic succession of 7 tones which greet you and welcome you to the world of uber-large displays with enough resolution to show not only the adorable mole on Milla Jovovich's face but its texture. In my initial setup I quickly realized that the ATI Radeon X600 PCI-Express video card installed in my PC simply wouldn't cut it. My maximum resolution was 1920 x 1200 – the same as with my current 24-inch LCD monitor. I had utilized the dual-link cable supplied with the XHD3000, so I was a bit confused until I realized that my video card didn't support dual-link DVI-D output, thus choking the resolution. Gateway came to the rescue by shipping me an nVidia GeForce 8600 GT PCI-Express card. That did it. OK, so I needed a $200 video card to run it – actually you can get dual-link for a less than that, so don't fret it.
Connections
There are a plethora of inputs on the rear of the the XHD3000, however duplicates are not something Gateway considered critical. What this means is that while you have one each of HDMI, DVI-D, VGA/HD-15, component, etc – if you have two DVI-D outputs from two different PCs you're out of luck. I personally run a Mac Mini and a PC. To get both connected I simply utilized the VGA input for the Mac. I am completely satisfied with this arrangement (the Mini won't support 2560 x 1600 resolution regardless) but those users hoping to pipe two DVI-D outputs into this monitor will need to get a separate switcher.

The availability of separate audio inputs for each of the analogue and the DVI-D inputs means that this is a true multi-source display. I have seen many displays that “share” audio inputs, especially between composite and S-video. The dxp Speaker Bar (DXP stands for “Digital eXplosive Power” – just kidding I made that up) plugs into the rear of the display and requires both an audio and power connection which are provided.
XHD3000 Remote Control and Menu System
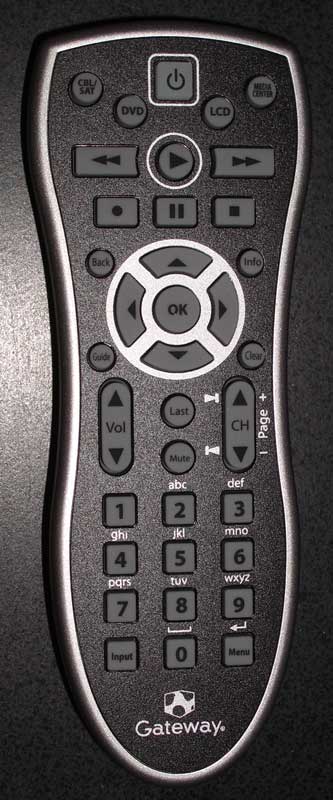 The
Gateway remote does it's job... barely. It has no discrete input
buttons and also lacks discrete power on/off buttons. It is not
backlit. It is a
programmable remote so you can, if you're a masochist, program other
device remotes into it. There is no learning possible with this
remote. I'd love to say more, but after using it for a little bit I
put it down and played some more with the cool blue buttons...
The
Gateway remote does it's job... barely. It has no discrete input
buttons and also lacks discrete power on/off buttons. It is not
backlit. It is a
programmable remote so you can, if you're a masochist, program other
device remotes into it. There is no learning possible with this
remote. I'd love to say more, but after using it for a little bit I
put it down and played some more with the cool blue buttons...
If this LCD display is close to your sitting position as it is with me, I think you'll do the same. If you are using this as a main display and are sitting on a couch (aside form being crazy since all that high-resolution is wasted) I'd recommend a universal remote to accompany your purchase.
One nice associated technology is the IR emitter that comes with the display. The IR "Blaster" allows control of a device that may not be in direct IR range. It works by relaying the IR information from the monitor to the connected emitter (included) thus allowing you to control a single device that may be, for example, under your desk.
The Menu System
 I
loved the contextual menu system. I think I really liked not having
any physical buttons to press. You have no idea how frustrating it is
to click-click-click forever to get where you need to be. On the
Gateway XHD3000, you simply slide your hand around or casually brush
a button area to select the option you need. And it's laid out in a
fairly intelligent manner. Once I got into the PIP functions, I found
that the first menu enabled me to activate or deactivate the function
– I didn't have to drill down 3 levels to turn it on or off. They
obviously did some human testing on this product to check ergonomics.
I
loved the contextual menu system. I think I really liked not having
any physical buttons to press. You have no idea how frustrating it is
to click-click-click forever to get where you need to be. On the
Gateway XHD3000, you simply slide your hand around or casually brush
a button area to select the option you need. And it's laid out in a
fairly intelligent manner. Once I got into the PIP functions, I found
that the first menu enabled me to activate or deactivate the function
– I didn't have to drill down 3 levels to turn it on or off. They
obviously did some human testing on this product to check ergonomics.
With regard to the buttons, I found myself noticing that I had 4 different styles used for activating the illuminated touch controls:
-
The Run
Used for quickly running your thumb along the slider buttons in order to increase or decrease a variable like Volume or PIP Size. -
The Swipe
My most common 'move' The Swipe is a casual flick of the finger across a particular control. This was most typically used on the Power button to boot up the display. -
The Tip-Tap
This was the lackadaisical tapping of multiple buttons as needed to navigate up and down through the menu system to get to a more obscure area and make adjustments. -
The Push
On those rare occasions where I got serious about my button-pressing I would utilize a more firm command of my finger to ensure that activation occurred as expected and without delay.
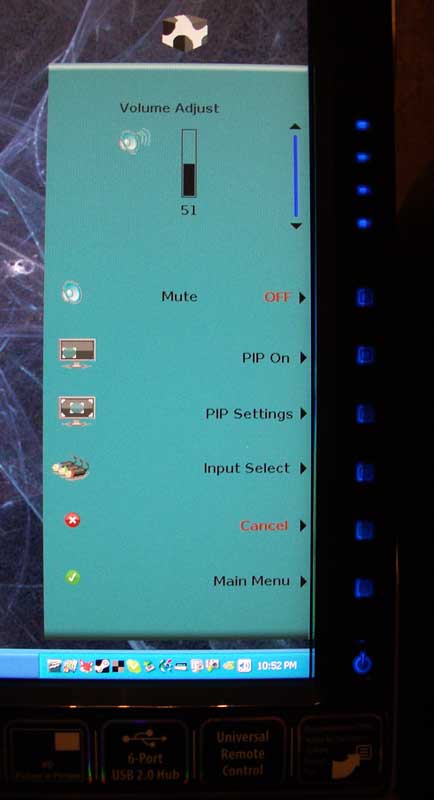
The first time you select the menu you'll be presented with the ability to adjust the volume, mute the system, control PIP functions, select a different input and also advance to the Main Menu. This method of giving you instant control over the most used-functions is a great, practical solution that ensures you're not wasting time clicking around menus to get the most basic tasks done.
Main Menu
Here you can adjust picture settings (limited to Brightness with DVI-D input), PIP settings, Geometry, Audio settings and access Advanced menu controls.
Advanced Menu
Color adjustments can be made here (though not when using DVI-D) and it is here that you can set the front panel LED mode to Day or Night which makes sure those blue lights aren't blinding you at night. Some housecleaning functions are also located here, including the Resolution Reminder, IR Training, Input (auto)Search, Integrated Product Tour (turn this OFF quickly!), and Information (shows current input and frequency). You can also reset the display here and change the Language.
 Picture
Settings
Picture
Settings
Brightness, Contrast, Sharpness, Gamma, Black Level, Hue and Saturation can all be adjusted here. With DVI-D you can only adjust Brightness, however.
PIP Settings
The PIP Settings menu is where the magic happens. The PIP features of the Gateway XHD3000 are only available when 2560x1600 PC video over dual-link DVI-D is selected as the primary video source. Those options, however are very cool. Users can select the PIP source (ANY of the remaining inputs) to be overlaid over the DVI-D input, vary the position (Upper Left, Upper Right, Lower Right, Lower Left) and even vary the Size and Transparency of the PIP window. Varying the size and Transparency of the PIP utilizes the top touch control which operates in a slider mode, allowing you to quickly adjust the parameters smoothly and in real-time.
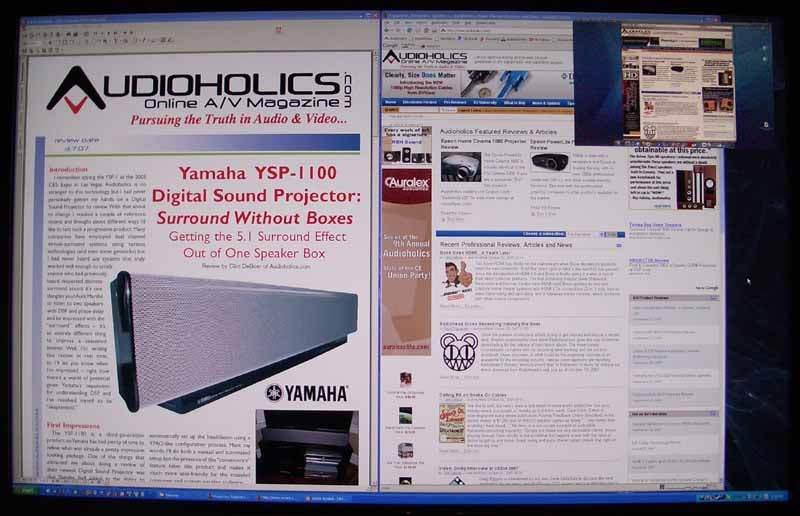
The
guy in The Matrix could have used this screen instead of the 9
scattered 15-inch monitors...
Video Adjust
This menu function only applies to standard definition sources (480i signals). The options include a Theme Mode which is your picture modes for automatic preset color settings (there are 4 presets and a Custom mode). Color Temp allows you to flip between Cool, Neutral and Warm. A Sharpness control is there (leave it at it's lowest setting) and Film Mode Detection enables 2:3 pull-down correction for 24 frame film sources like DVDs. Scaling options include Wide Mode (fits to width), Zoom (good for 2.35:1 anamorphic film material), and 1:1 mode which is good for 4:3 aspect ratio sources. Noise Reduction was decent, however I'd keep it at the lowest setting in order to reduce “floater” artifacts which arise from the edges of objects being artificially protected from the removed noise. The last feature I found useful was Overscan, which I left off for most sources I utilized.
Geometry
Sometimes an image needs to be moved right or left, possibly due to a mismatch of the video signal or some other anomaly with respect to a source or a piece of software. The Geometry menu lets users alter the horizontal and vertical position of the on-screen image. There are also Clock and Phase adjustments which, as Gateway actually recommends in their manual, should probably not be utilized unless you really know what you are doing.
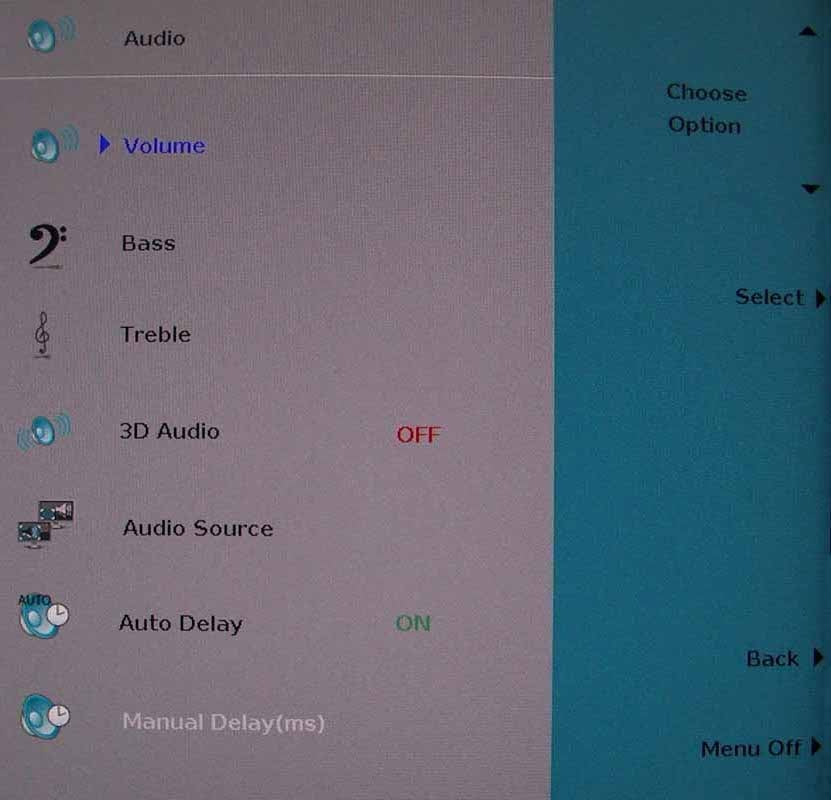 Audio
Audio
Under the Audio menu you can adjust Bass and Treble and also enable 3D Audio, a DSP-based pseudo-surround mode that gives depth to two-channel soundtracks. This type of phase-based DSP, while nifty in small doses, tends to give me a headache so I left it off. The audio menu also allows you to switch the Audio Source from the Main source to the PIP audio. This is beyond cool as it allows you to work while watching AND listening to the television... not that I'd ever do that while writing a review (Go Eagles!) The last two options in this menu involve audio and video sync. Auto Delay (on by default) adjusts the audio to be in sync with the video – compensating for advanced video processing which often introduces delays. Manual Delay allows you to manually delay the audio in ms.
XHD3000 Calibration and Bench Testing
I was excited going into this review that someone had finally combined the best of both worlds: a slamming computer monitor and a high-quality display. Once the honeymoon was over I settled down to do some evaluations
I began by configuring white and black levels. There is no backlighting control (ouch) so you can't dim the panel to allow for deeper, darker blacks. This would be very useful – especially for nighttime viewing (see below) I also played with the Video Adjust settings to see how they interacted with the different inputs. I do this to see what, if any, controls are shared and which are independently controlled by each of the inputs. What I found was that the Theme Mode and Color Temperature are shared by the composite, S-video, component and HDMI inputs. Settings like Film Mode detection are separate for each input.
You can set the Red Green and Blue levels on the display, so fine tuning is possible and you can eventually dial in the color temperature. I found that the 'Warm' setting worked best for me as a starting point. Overall the system is easy to use and has enough calibration options to make it effective.
Audioholics/HQV Bench Testing Summary of Test Results
Perfect
SD Score is 130
Perfect
HD Score is 123
(nearly perfect)
Gateway
XHD3000 Benchmark SD Score: 80
(you are going to get an excellent picture)
Gateway
XHD3000 Benchmark HD Score: 80
(you are going to get an excellent HD picture)
| SD Test | Max Points |
Results | Pass/Fail |
| Color Bar | 10 | 10 | Pass |
| Jaggies #1 | 5 | 5 | Pass |
| Jaggies #2 | 5 | 3 | Pass |
| Flag | 10 | 10 | Pass |
| Detail | 10 | 10 | Pass |
| Noise | 10 | 10 | Pass |
| Motion adaptive Noise Reduction | 10 | 5 | Pass |
| Film Detail | 10 | 10 | Pass |
| Cadence 2:2 Video | 5 | 5 | Pass |
| Cadence 2:2:2:4 DV Cam | 5 | 5 | Pass |
| Cadence 2:3:3:2 DV Cam | 5 | 5 | Pass |
| Cadence 3:2:3:2:2 Vari-speed | 5 | 5 | Pass |
| Cadence 5:5 Animation | 5 | 5 | Pass |
| Cadence 6:4 Animation | 5 | 5 | Pass |
| Cadence 8:7 animation | 5 | 5 | Pass |
| Cadence 3:2 24fps film | 5 | 5 | Pass |
| Scrolling Horizontal | 10 | 10 | Pass |
| Scrolling Rolling | 10 | 10 | Pass |
| Total Points | 130 | 123 |
The XHD3000 was sent 480i via component from a Helios HVD2085.
| HD Test | Max Points |
Results | Pass/Fail |
| HD Noise Reduction A & B | 25 | 25 | Pass |
| HD Video Resolution Loss | 20 | 20 | Pass |
| Jaggies A & B | 20 | 20 | Pass |
| Film Resolution Loss | 25 | 25 | Pass |
| Film Resolution Loss Stadium | 10 | 10 | Pass |
| Total Points | 100 | 100 |
The XHD3000 was sent 1080i via HDMI from a Sony PS3 Blu-ray player.
Comments on HQV Testing
There were few surprises with the results of the onboard HQV Realta video processing. The only question I had going in was how well the scaling would work since the native resolution of this monitor was so high. It turns out that my fears were unfounded – mostly. The patterns technically passed both jaggy tests as well as the flag test, however it was apparent that scaling to 1600p wasn't as smooth as many 1080p monitors I've seen. I utilized both 1:1 mode as well as Wide (we recommend 1:1 if you want the correct aspect ratios.) Those extra scaling steps to 1600p yield the occasional rough edge. The other anomaly involved Motion Adaptive Noise Reduction, which I know HQV's Realta is proficient at. We noticed some minor streaking in the picture and felt that we could quite give it a full score. I'd hesitate to assign a reason for this, but we wanted to note it.
XHD3000 Viewing Evaluation and Conclusion
I watched the Gateway XHD3000 in both day and nighttime settings. During the day the system functioned beautifully for computer use – and it's clear, bright display was a joy to work with. I did find, however that both color and brightness (black levels) varied with movement up and down or side to side. This means that the tonality of the image can change depending upon where you are sitting when you view the on-screen image. From 20-inches away you'd be surprised how much you can move your head just looking around the screen. This tonal shift still occurred at night, but at much less noticeable levels. In the evenings I played with the black levels to see if I could knock them down a bit, but with no backlighting control I found that, at best, blacks were merely dark gray.
Blu-ray: Dave Matthew and Tim Reynolds Live at Radio City Music Hall
This was a selection I felt showed off some very nice live concert footage. The setting was intimate so you're looking mostly at face detail, guitars and the stage. Note the detail in the black shirt Dave is wearing. While the black levels are a bit high, detail is not a problem and I noticed no real-world crushing or banding.

Blu-ray: Safari (BBC)
I'm a sucker for wildlife in HD. If I'm flipping channels and come across a nice lion attacking a herd of water buffalo – I'm going to be drolling in front of the screen in a stupor of wildlife-driven mindlessness for an entire hour... The DiscoveryHD channel is a place I need to avoid lest I misuse my time and end up trapped by the dozens of incredible looking shows they run 24/7. In this BBC show titled Safari, there was plenty to gawk at and I took several shots. Here are some of the nicer ones that exemplified the color, detail and noiselessness possible with this monitor:

He looks hungry... think I'll move along.

This guy reminds me of my cousin Wade for some reason.
Blu-ray: Harry Potter and the Goblet of Fire
I love the Harry Potter movies. While it's funny that we're literally watching Harry grow facial hair and have his voice change it's a good series that hasn't yet descended into the “Ah, screw it, let's just make money” phase. Potter movies aren't terribly colorful, but they are laced with tons of CG – and that means perfectly crisp imagery and loads of fun and interesting video material. In the dragon sequence I couldn't take my eyes off the scene where we notice the full resolution of the dragon's skin textures as well as the minute detail of the tiled roof he tears up pursuing Harry.

Not the greatest shot of Harry, but look at those tiles!

This
is one seriously cool-looking dragon. Note not only the spine
texture, but the veins in his wings and ability to still see the roof
detail beyond.
Blu-ray:
Sahara
I
really liked this movie, mostly because of the fact that Steve Zahn
takes the role of “sidekick” and turns it into something more
than just the tired “idiot who gets hero in trouble” routine. It
was a fun movie and there was plenty of opportunity for exemplary
display material.

Conclusion
I am both impressed and a tad disappointed in the XHD3000 display from Gateway. It definitely hits more than it misses, but the lack of a backlight control means that you'll never truly have those deeper blacks that are difficult – but possible – with LCD technology. The HQV was engaged and worked very very well, though it was obvious that at least some remnants of jaggies will exist when scaling 480i all the way up to 1600p. I can live with the results. The resolution of this monitor and the sheer joy of the touch interface and ergonomic controls are beyond cool – they are trend-setting. I can say without reservation that this is the 30-inch LCD monitor to beat in today's marketplace. If you're wanting to step up to a larger screen – take a very hard look at the XHD3000.
Gateway XHD3000 LCD Display
MSRP: $1,699
Gateway,
Inc.
7565 Irvine Center Drive
Irvine, CA 92618
http://www.gateway.com/
About
Gateway
Since
its founding in 1985, Irvine, Calif.-based Gateway has been a
technology pioneer, offering award-winning PCs and related products
to customers worldwide. Gateway is the fourth largest PC company in
the U.S. and among the top ten worldwide.
The Score Card
The scoring below is based on each piece of equipment doing the duty it is designed for. The numbers are weighed heavily with respect to the individual cost of each unit, thus giving a rating roughly equal to:
Performance × Price Factor/Value = Rating
Audioholics.com note: The ratings indicated below are based on subjective listening and objective testing of the product in question. The rating scale is based on performance/value ratio. If you notice better performing products in future reviews that have lower numbers in certain areas, be aware that the value factor is most likely the culprit. Other Audioholics reviewers may rate products solely based on performance, and each reviewer has his/her own system for ratings.
Audioholics Rating Scale
 — Excellent
- — Very Good
- — Good
- — Fair
- — Poor
| Metric | Rating |
|---|---|
| Detail and Resolution | |
| Deinterlacing & Scaling | |
| Contrast and Black Levels | |
| Color Reproduction | |
| Noise Reduction | |
| Calibration Options | |
| Build Quality | |
| Ergonomics & Usability | |
| Ease of Setup | |
| Features | |
| Remote Control | |
| Fit and Finish | |
| Performance | |
| Value |
Clint Deboer was terminated from Audioholics for misconduct on April 4th, 2014. He no longer represents Audioholics in any fashion.
View full profile