
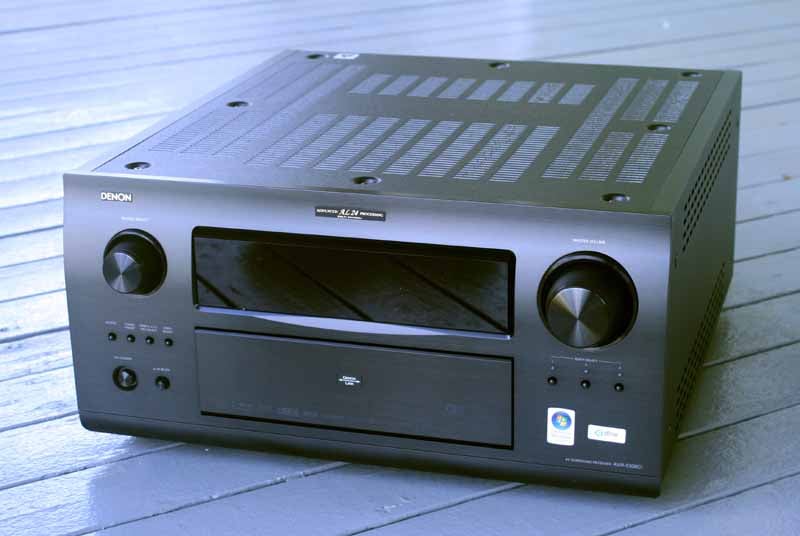
Denon AVR-5308CI AV Receiver Review
Denon's AVR-5308CI Flagship Receiver
- Product Name: AVR-5308CI AV Receiver
- Manufacturer: Denon Electronics USA
- Performance Rating:


- Value Rating:
- Review Date: August 11, 2008 04:00
- MSRP: $ 5500
|
POWER
& PROCESSING
|
GENERAL
|
Pros
- Dual HDMI outputs
- Independent control of HQV Realta video processing on each input
- THX Ultra2 Certified
- Assignable amplification
- Digital to analogue conversion for multi-zone outputs
- Component video for Zone 2
Cons
- No anamorphic output scaler for video inputs
- Doesn't make espresso
Denon AVR-5308CI Introduction
 Most
people love the idea of getting a new toy to play with. An AV receiver sounds
like the perfect way to start off the week, however as a reviewer bent on
dissecting any important feature and function contained in Denon's new flagship
AVR-5803CI receiver I had my work
cut out for me. In fact, reviewing this product entailed a complete
reorganization of my entire AV equipment rack.
Yeah, I know, poor me. I get it. Bottom line is that it didn't take long to
realize that the best way to conduct this review would be to follow the same
steps anyone would take when deciding how best to integrate this product into
their listening room.
Most
people love the idea of getting a new toy to play with. An AV receiver sounds
like the perfect way to start off the week, however as a reviewer bent on
dissecting any important feature and function contained in Denon's new flagship
AVR-5803CI receiver I had my work
cut out for me. In fact, reviewing this product entailed a complete
reorganization of my entire AV equipment rack.
Yeah, I know, poor me. I get it. Bottom line is that it didn't take long to
realize that the best way to conduct this review would be to follow the same
steps anyone would take when deciding how best to integrate this product into
their listening room.
The AVR-5308CI shares nearly all of the same features found on Denon's $7500 AVP-A1HDCI flagship processor. While it lacks the balanced circuitry design, class A audio drivers and several other upgrades which did actually show some measureable results, the AVR-5308CI sells for about $2,000 less than this preamp and has seven respectable built in power amplifiers, I’d say it makes it quite a bargain.
Denon AVR-5308CI Build Quality and Guts
 Typically I'd
begin with the overview, but since I'm reworking this review around a more
procedural format that walks you through every step of the install and
configuration process, this is a good time to talk about the build quality of
the AVR-5308CI. As you'd expect,
the flagship receiver from Denon is built like a tank - however it comes in a
bit lighter than the well-regarded (if not ridiculously overbuilt) AVR-5805. I don't know about some users, but I'm
actually glad that I'm not stuck
inserting an 11-inch tall 97-pound behemoth into my AV equipment rack.
Typically I'd
begin with the overview, but since I'm reworking this review around a more
procedural format that walks you through every step of the install and
configuration process, this is a good time to talk about the build quality of
the AVR-5308CI. As you'd expect,
the flagship receiver from Denon is built like a tank - however it comes in a
bit lighter than the well-regarded (if not ridiculously overbuilt) AVR-5805. I don't know about some users, but I'm
actually glad that I'm not stuck
inserting an 11-inch tall 97-pound behemoth into my AV equipment rack.
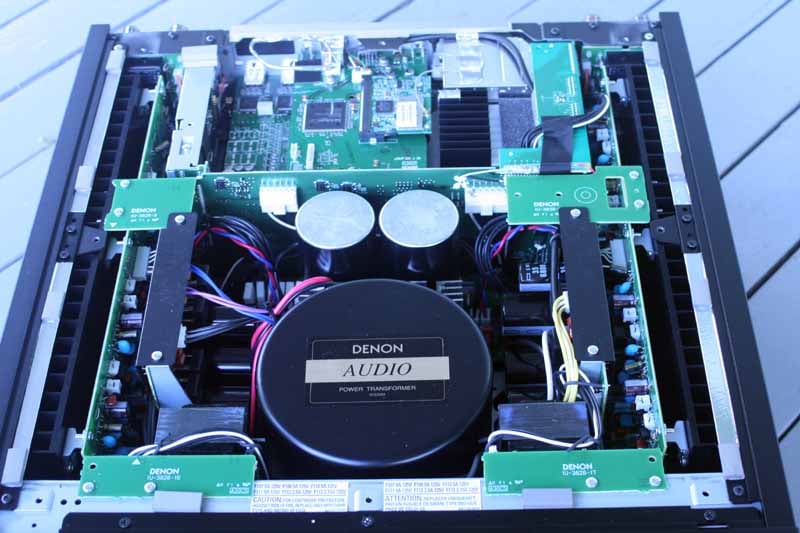
Of course, at 62.7 pounds, the AVR-5308CI is still no lightweight. In fact it's dangerously close to a two-man lift - but true to my Audioholics roots (and fear of being called a pansy) I instead opted for the solo dead-lift to the top shelf in my rack. Of course, before I slotted the unit into my system I tore off the top and had a look.
A toroidal and twin EI transformers… power and then some.
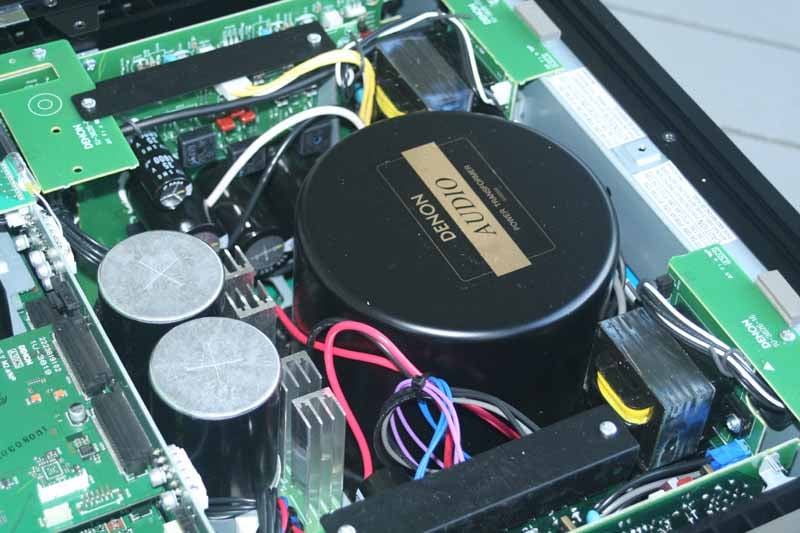
Denon didn't skimp on the power supplies. This flagship receiver comes with three - a massive toroidal, centrally located towards the front of the unit, and twin EI core transformers flanking each side. A couple of 71V, 33,000 uF capacitors are situated just behind and present an imposing look to the central power supply area. The entire chassis is flanked by heat sinks down each side - an efficient, if not standardized, method of heat dissipation. The receiver does tend to run hot, so be sure to provide plenty of ventilation in your final installation (we recommend using perforated racks in addition to providing space around the component. Internally, circuit boards appeared well laid out and were sandwiched together in layers to maximize the use of space throughout the entire enclosure.
The back of the AVR-5308CI looks like a connector factory had a fire sale and Denon was buying. Far be it for me to complain about having more inputs that anyone could possibly need… ah what the heck, I'll go ahead and complain. Why on earth anyone would purchase a $5500 AV receiver and still be using up to 7 composite or S-video connectors is beyond me. I think it's time for the industry to move on. Manufacturers, listen up: Please start making all audio and video inputs assignable on your flagship and near-flagship products and begin backing off on the number of standard definition inputs. Nobody is using them. It really is past time and I think customers will really begin to appreciate getting back to a somewhat cleaner rear panel. And by all means keep composite and S-video aplenty on your lower-end models.
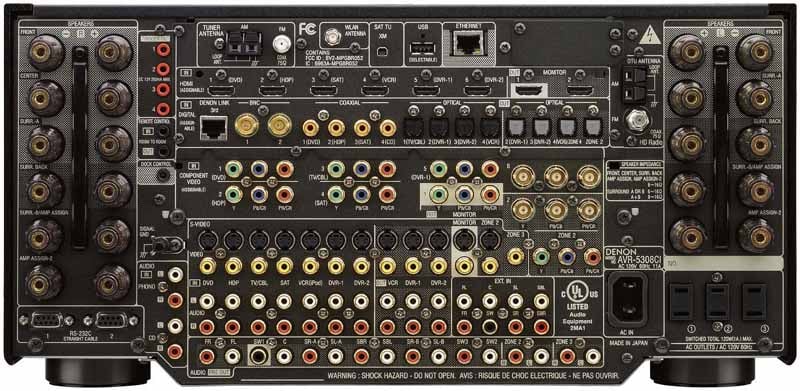
Sure it looks cool, but I've seen Space Shuttles with less cluttered panels
Denon AVR-5308CI Overview, Speaker Options and Firmware
I began with a bird's-eye view of the product at hand. This is a good idea for anyone integrating a new AV receiver (really the "brains" of any system) into your home theater, Here is a brief feature comparison (focusing on things we thought would be of particular interest to some):
|
AVR-5308CI |
AVR-4308CI |
AVR-3808CI |
|
150wpc rating (x7) |
140wpc rating (x7) |
130wpc rating (x7) |
|
THX Ultra-2 Certified |
- - |
- - |
|
toroidal power transformer |
toroidal power transformer |
EI core transformer |
|
Dolby Digital + |
Dolby Digital + |
Dolby Digital + |
|
HD Radio/XM/USB
x 2 |
HD Radio/XM/USB |
XM/USB (flash only) |
|
4 digital outs |
3 digital outs (incl. Zone 2) |
2 digital outs |
|
6 HDMI inputs (v1.3a) |
4 HDMI inputs (v1.3a) |
4 HDMI inputs (v1.3a) |
|
2 HDMI outputs |
2 HDMI outputs |
1 HDMI output |
|
6 component video inputs (incl. 1 BNC) |
3 component video inputs |
3 component video inputs |
|
3 component video outputs (1 BNC + 1 Zone 2) |
3 component video
outputs |
2 component video outputs |
|
time base correction (TBC) |
time base correction (TBC) |
time base correction (TBC) |
|
analogue to HDMI
upconversion |
analogue to HDMI
upconversion |
analogue to HDMI
upconversion |
|
video upscaling to 1080p |
video upscaling to
1080p |
video upscaling to
1080p |
|
Denon Link III |
Denon Link III |
Denon Link III |
|
Audyssey MultEQ
Pro |
Audyssey MultEQ
Pro |
Audyssey MultEQ
Pro |
|
4 x Assignable 12V triggers (250mA) |
2 x Assignable 12V triggers (150mA) |
2 x Assignable 12V triggers (150mA) |
|
Zone 2/3 preamp
out |
Zone 2/3 preamp
out |
Zone2/3 preamp outs |
|
62.7 lbs. |
41.6 lbs. |
39.2 lbs. |
|
17.1” W x 8.5” H x 19.25” D |
17.1” W x 7.7” H x 17.9” D |
17.1” W x 6.75” H x 16.5” D |
The AVR-5308CI would handle all AV switcher duties, but it could also do much more. Since it had dual HDMI outputs I could eliminate an entire component - a Next Generation Home Products 4x2 HDMI Matrix Switcher I had used to get signal simultaneously to both my theater and living rooms. While excellent for a reviewer, this also does wonders for Super Bowl parties. Looking further, we can see that the AVR-5308CI has six (count 'em) HDMI inputs and six component (YPbPr) inputs. One of the component inputs is BNC, as is one of its dual outputs. I chose to use three small BNC-to-RCA adapters to convert these to something that would mate to my existing arsenal of cables. The receiver has 7 amplifiers, each capable of driving 150W into 8-ohms. With seven channels, home theater virgins have a ton of options:
- 5.1 surround + powered Zone 2 OR Zone 3 (or Zones 2 & 3 in mono)
- 5.1 surround + bi-amped mains
- 7.1 surround
- 7.1 surround OR 2-channel bi-amped
- 9.1 surround (for larger rooms via SR-A + SR-B in parallel)
- 3.1 + powered Zone 2 AND Zone 3
Since Denon allows so many configurations, though surprisingly not some of the more useful ones I'd expect, we'd like to spend some time here to help users understand the possibilities this receiver offers. If you were to simply throw this into your rack without understanding the options you'll likely miss out on all that it can do - or presume it can do something it cannot.
9.1 - Got a Big Room?
Starting with the biggest rooms you'll note that you can, in fact, run a sort of 9.1 surround system. Go to a movie theater and look around and you'll see that the Side Surround "channels" are made up of an array of loudspeakers. This is great for long rooms (let's say over 25 feet) with multiple rows of seats. Now let's see what other options you have in this 9.1 configuration. Without moving a single cable you can operate your system in either of these modes:
9.1
(left), "7.1" + Powered Zone 2 or 3, "7.1" + Powered Zone 2
AND 3 in mono
In the above example, Denon runs the Surround A and B speakers in parallel, so it gets it's a 9.1 designation even though the receiver only has 7 amplifiers. While the system does deliver an array, it's not discretely amplifying those channels. This should be noted for those looking to run 4-ohm surrounds, which would put a 2-ohm strain on the amplifiers (not recommended.)
Denon can also shift the system into a 3.1 audio scenario in the main room when using powered Zone 2 and Zone 3 simultaneously in stereo mode. This allows for a powered three zone system for time that you simply want your whole house filled with sound during dinner events or parties.
Bi-amping Made Easy
 Moving on, we see that Denon is paying
attention to those who wish to use the Amp Assign-2 connections to bi-amp the
Front speakers. The AVR-5308CI takes
the Surround Back channel amplifiers
and re-routes them to biamp the mains. This leaves a 5.1 + array system with
the extra channels utilized up front.
Moving on, we see that Denon is paying
attention to those who wish to use the Amp Assign-2 connections to bi-amp the
Front speakers. The AVR-5308CI takes
the Surround Back channel amplifiers
and re-routes them to biamp the mains. This leaves a 5.1 + array system with
the extra channels utilized up front.
Two-Channel Ecstasy
Two-channel fans will be pleased to know that the AVR-5308CI has a special mode designed for use with those who have a separate, dedicated pair of speakers for Stereo listening. By enabling Direct/Stereo mode and configuring a bi-amp (or Bi-wire if you so choose) connection to the dedicated speakers, you can switch from a true 7.1 system to your biamped stereo speakers with the press of a button.
Press
a button and literally jump from a 7.1 system (left) to your dedicated bi-amped
2.0 system (right) without moving any wires.
Firmware Updates
Having the ability to download firmware updates directly via the Internet is a mixed bag for me. To put it into perspective let's take 2 different companies. Company 'A' has a product that has no firmware update capabilities and never needs it. It always works and there are no bugs. The quality control is simply stellar. Company 'B' puts out a product that has a firmware update every few weeks for the first several months of its life and then takes user feedback (ie. free beta testing) to update the product and release new fixes and modifications for the next year. Company 'A' gets almost no recognition for putting out a solid product with no required updates, while Company 'B' is endlessly praised by the Internet community for its "attention" and "responsiveness" to its customers and heralded as a great company. Go figure. Denon now seems to be somewhere in the middle. They put out a solid product with relatively few bugs (we actually appear to have discovered one or two) and seems to be forced into the firmware update cycle simply because of how many advanced features the receiver possesses. In the end I suppose it's hard to complain about that.
Denon has two tiers of firmware updates: "Firmware Updates" and "New Feature" updates. Denon hasn't announced any upcoming feature updates, but it has reserved the ability to charge money to add additional functionality to the AVP and AVR flagship products by using this feature.
 Since its debut both the AVP-A1HDCI
and AVR-5308CI have received two
firmware updates, and presumably a third is in the works. The first was a
small update that corrected some minor but important audio and video issues.
The second was a mammoth 60 minute update that scared the daylights out of me
and anyone else who has ever "bricked"
a product waiting for a firmware update to install. Fortunately everything
functioned correctly and the system received a ton of updates and corrections
to the Rhapsody software, HDMI issues, HD audio issues, and much more (around
12 in all). Updating the system's firmware is simple. First, ensure that you
have a solid connection to the Internet via Ethernet (we don't recommend using
Wi-Fi for firmware updates (just say 'No' to bricks).
You go to the Option Setup menu which is part of the Manual Setup menu in the
GUI. From here select Firmware Update and you're good to go. During firmware
updates the GUI will shut off along with all audio and video, but the front
panel gives you the current status. Don't expect to update your firmware while
catching up on lost episodes of Friends.
The Denon is smart in that it fully downloads the firmware completely before
applying the update. This means that a glitch in the download process won't
leave you helplessly staring at an expensive doorstop. Both firmware updates I
applied went smoothly, though the second 60-minute marathon firmware update was
a bit of a nail-biter.
Since its debut both the AVP-A1HDCI
and AVR-5308CI have received two
firmware updates, and presumably a third is in the works. The first was a
small update that corrected some minor but important audio and video issues.
The second was a mammoth 60 minute update that scared the daylights out of me
and anyone else who has ever "bricked"
a product waiting for a firmware update to install. Fortunately everything
functioned correctly and the system received a ton of updates and corrections
to the Rhapsody software, HDMI issues, HD audio issues, and much more (around
12 in all). Updating the system's firmware is simple. First, ensure that you
have a solid connection to the Internet via Ethernet (we don't recommend using
Wi-Fi for firmware updates (just say 'No' to bricks).
You go to the Option Setup menu which is part of the Manual Setup menu in the
GUI. From here select Firmware Update and you're good to go. During firmware
updates the GUI will shut off along with all audio and video, but the front
panel gives you the current status. Don't expect to update your firmware while
catching up on lost episodes of Friends.
The Denon is smart in that it fully downloads the firmware completely before
applying the update. This means that a glitch in the download process won't
leave you helplessly staring at an expensive doorstop. Both firmware updates I
applied went smoothly, though the second 60-minute marathon firmware update was
a bit of a nail-biter.
Denon AVR-5308CI Video Processing and Routing
OK, now that you've decided on the loudspeaker and surround configuration, it's time to factor in your video routing. This is key for several reasons. For starters, the AVR-5308CI may be (probably is) a better video processing device than your DVD player or even your display. This goes doubly if your display is a store-brand or made by a company known for instant photo cameras. Let's look at what happens when we feed it a 480i signal and output 1080p.
Audioholics/HQV Bench Testing Summary
Denon AVR-5308CI Benchmark Score: 130/130 (perfect score – it doesn’t get any better than this!)
|
Test |
Max Points |
AVP-A1HDCI |
Pass/Fail |
|
Color Bar |
10 |
10 |
Pass |
|
Jaggies #1 |
5 |
5 |
Pass |
|
Jaggies #2 |
5 |
5 |
Pass |
|
Flag |
10 |
10 |
Pass |
|
Detail |
10 |
10 |
Pass |
|
Noise |
10 |
10 |
Pass |
|
Motion adaptive Noise Reduction |
10 |
10 |
Pass |
|
Film Detail |
10 |
10 |
Pass |
|
Cadence 2:2 Video |
5 |
5 |
Pass |
|
Cadence 2:2:2:4 DV Cam |
5 |
5 |
Pass |
|
Cadence 2:3:3:2 DV Cam |
5 |
5 |
Pass |
|
Cadence 3:2:3:2:2 Vari-speed |
5 |
5 |
Pass |
|
Cadence 5:5 Animation |
5 |
5 |
Pass |
|
Cadence 6:4 Animation |
5 |
5 |
Pass |
|
Cadence 8:7 animation |
5 |
5 |
Pass |
|
Cadence 3:2 24fps film |
5 |
5 |
Pass |
|
Scrolling Horizontal |
10 |
10 |
Pass |
|
Scrolling Rolling |
10 |
10 |
Pass |
|
Total Points |
130 |
130 |
|
*Source component was the Denon DVD-3930CI set to 480i via HDMI output upscaled by the AVR-5308CI to 1080p and fed to a Marantz VP-15S1 1080p DLP Projector.
 With
these results, only those with truly exceptional sources may want to bypass the
upconversion and video processing capabilities offered natively in the AVR-5308CI. The additional reason for this is that
each input of the AV receiver can customize the Contrast, Brightness, Chroma Level,
Noise Reduction, Detail (Enhancer) and Sharpness of the source video. This
basically makes the AVR-5308CI a
video processor and AV receiver all rolled into one. About the only thing
missing is an anamorphic scaler for use with special cinemascope projector
lenses. Hue can
only be adjusted with composite or S-video sources, so let's assume (correctly,
we hope) that you'll never use those.
With
these results, only those with truly exceptional sources may want to bypass the
upconversion and video processing capabilities offered natively in the AVR-5308CI. The additional reason for this is that
each input of the AV receiver can customize the Contrast, Brightness, Chroma Level,
Noise Reduction, Detail (Enhancer) and Sharpness of the source video. This
basically makes the AVR-5308CI a
video processor and AV receiver all rolled into one. About the only thing
missing is an anamorphic scaler for use with special cinemascope projector
lenses. Hue can
only be adjusted with composite or S-video sources, so let's assume (correctly,
we hope) that you'll never use those.
Enhancer, Sharpness and Hue were difficult for me to spot with HD sources at 1080i. After further experimentation I concluded that they have no effect on anything that doesn't originate in standard definition (480i). In taking DVD input at 480i I was finally able to see the excellent video processing quality of the AVR-5308CI. It was now that I got to really experience the DNR, Enhancer & Sharpness controls. Enhancer really brought out detail and didn't seem to affect anything negatively in the process. For example, when using the Detail video test pattern on the HQV Benchmark DVD you could clearly see an improvement in detail on the bridge. I'd recommend setting this to at least +6 and experiment on your own to see if it results in any negative issues.


Enhancer at 0 (left); Enhancer at +6 (right)
Some of the other controls, like Sharpness should be used sparingly - as is the case with most video processors. While the default setting of 0 is fine for Sharpness, if you crank it up into the positive range you're likely to encounter some artifacting on closely patterned objects (see pics below.) If you drop it below 0 the image actually blurs noticeably.


Sharpness Defaulted (left); Sharpness +3 (right) - notice the jaggies
The DNR noise reduction system is incredibly effective - so much so that it was hard to decide between Medium and High. I didn't notice any additional motion artifacts even at the highest levels, but purists may want to hang back before setting it to the maximum value.
 For
most, 6 independent and fully-routable HDMI and component inputs will be more
than you'll ever need. As an aid to those using a Universal Remote Control, Inc
product like the MX-3000 (which I use) or MX-950,
you'll want to note that anything related to the DVR-2 source/input will need
to be learned. It simply doesn't show up in the known IR codes list. Best
practice might be to skip that input (#6) and use the others unless you
actually need to use every HDMI and component input (we know who you are).
For
most, 6 independent and fully-routable HDMI and component inputs will be more
than you'll ever need. As an aid to those using a Universal Remote Control, Inc
product like the MX-3000 (which I use) or MX-950,
you'll want to note that anything related to the DVR-2 source/input will need
to be learned. It simply doesn't show up in the known IR codes list. Best
practice might be to skip that input (#6) and use the others unless you
actually need to use every HDMI and component input (we know who you are).
Lay Out Your Components
A good next step would be to lay out (on paper) all of your AV components and decide on a plan of attack. In my case I had an HD cableTV set-top box, a Sony PS3 Blu-ray player, a Toshiba HD-XA2 HD DVD player, a Denon DVD-3930CI DVD player, and an Xbox 360. With the exception of the Xbox 360, all of these sources can utilize HDMI, however I wanted to connect the cableTV set-top box with component video as well. The reason for this is that since component video lacks HDCP, channel switching between different resolutions is much faster with component video. Until the industry mandates HDCP use for all HD channels I'll continue to grab component video whenever possible. My room also has a series of tie-lines which connect both my office and living room to the AV components in my equipment closet. Here's what my AV routing chart looked like:
|
Device |
Receiver Input |
Video |
Audio |
|
DVD-3930CI |
DVD |
HDMI1 |
DenonLINK/HDMI1 |
|
Xbox 360 |
DVR-1 |
Component 5 |
Optical 2 |
|
Explorer 8300HD |
TV/CBL |
Component 3 |
Coax 1 |
|
Desk Tie-line (HDMI) |
DVR-2 |
HDMI 2 |
HDMI 2 |
|
Desk Tie-line (YPbPr) |
HDP |
Component 2 |
Coax 2 (NC) |
|
Shelf 1 |
SAT |
HDMI 3 |
HDMI 3 |
|
Shelf 4 |
VCR |
HDMI 4 |
HDMI 4 |
As for my outputs, I connected up the expected HDMI to the projector in the theater room, but I also have a line going to my living room LCD display and a second component video feed to the projector:
|
Device |
Video Output |
Audio Output |
|
Projector (HDMI) |
HDMI 1 |
HDMI1 |
|
Living Room (HDMI) |
HDMI 2 |
HDMI 2 |
|
Projector (YPbPr) |
Component 1 |
- - |
|
Living Room (YPbPr) |
Z2 Component |
- - |
In this way I can send the same program material to the living room, choose either the theater or living room to watch shows, or use the Zone 2 component output to check the status of my second Zone audio from the living room (you can find far more advanced ways to use the Zone 2 YPbPr).
Denon AVR-5308CI Installation and Setup Menu
Enough with the paperwork - it was time to install and execute the plan. This entailed making the physical connections and also getting into the GUI setup system to correctly configure the Denon to behave as it should given my room and the particular requirements I had for the system.
I hefted the behemoth into my rack and made all of the necessary connections, including power, HDMI, component video, Ethernet and attaching my IR emitter to the face of the receiver. Those without an Ethernet connection can opt for the integrated wireless networking with the included antenna which attaches to the back. Whenever possible, however, use a hard line for best performance and more reliable software updates. I used the charts above to set all of my inputs as needed, but quickly became overwhelmed with the flexibility of the system and everything that needed to be configured. It's really up to you as to the order with which you'll take in setting up the receiver. I chose to continue with my routing - getting all of my inputs and sources configured properly before moving on to the speaker setup. To break it down, here is my order of installation:
- Configure inputs
- Set speaker levels, distance/delay, crossover(s)
- Tweak video settings
- Enjoy!
Configuring the Inputs
 You can easily
flip several of these steps, but this is a good outline of how we'll proceed.
To set each input, select the input in the GUI. You can then assign HDMI,
digital audio, component video and even the iPod dock
to that input. You can then decide whether you want that input to be
upconverted and scaled. If Video Convert is set to "Off" then you
cannot send analogue video sources to the HDMI output - and all options are
blank (hidden). In general you'll want to upconvert standard definition to the
native resolution of your display. In our case that was 1080p to match our
reference Marantz
VP-15S1 DLP video projector. Once your video settings are configured you
may need to go and assign audio for any non-HDMI sources. The Assign menu also
takes care of this and allows you to choose which coaxial or optical (TOSlink)
digital input you are using for the input.
You can easily
flip several of these steps, but this is a good outline of how we'll proceed.
To set each input, select the input in the GUI. You can then assign HDMI,
digital audio, component video and even the iPod dock
to that input. You can then decide whether you want that input to be
upconverted and scaled. If Video Convert is set to "Off" then you
cannot send analogue video sources to the HDMI output - and all options are
blank (hidden). In general you'll want to upconvert standard definition to the
native resolution of your display. In our case that was 1080p to match our
reference Marantz
VP-15S1 DLP video projector. Once your video settings are configured you
may need to go and assign audio for any non-HDMI sources. The Assign menu also
takes care of this and allows you to choose which coaxial or optical (TOSlink)
digital input you are using for the input.
When audio and video are configured completely, don't forget that you can set the levels for both analogue and digital audio per input. This is great since you can ensure that all inputs have the same volume regardless of where they originate.
Loudspeakers and Subwoofers
 I was now ready to
set up the receiver for my speakers and configure the sound for everything it
needed to work perfectly in my listening room. Like all AV receivers, the AVR-5308CI allows you to set the size, distance and
levels of each speaker. The notable elements that call attention to the quality
and advances of this product come into play in several key areas:
I was now ready to
set up the receiver for my speakers and configure the sound for everything it
needed to work perfectly in my listening room. Like all AV receivers, the AVR-5308CI allows you to set the size, distance and
levels of each speaker. The notable elements that call attention to the quality
and advances of this product come into play in several key areas:
- 0.1 foot distance settings
- Independent speaker crossover settings
- Extensive subwoofer configurations
We set distances first, followed by speakers size and the crossover. At that point we were able to begin the test tone process, which we set to Manual in order to be able to get to exactly which speakers we needed. Be sure to turn Off any speakers you aren't using so that the test tone doesn't attempt to get sound out of an inactive channel.
 Expanding on the
last of these configurable niceties, the 3-subwoofer outputs have
near-unlimited configurability:
Expanding on the
last of these configurable niceties, the 3-subwoofer outputs have
near-unlimited configurability:
- 1SP (single sub with LFE and bass managed frequencies)
- 2SP L/R (stereo subs + LFE to both)
- 2SP MIX (dual subs with identical LFE + bass managed frequencies)
- 3SP L/R/LFE (stereo subs + LFE only) [this is nice for a bass shaker but you will also need a dedicated subwoofer connected here as LFE will not go to the other 2 subs in your system)
- 3SP MIX (three subs with identical LFE + bass managed frequencies). This is the setting we recommend for 99% of installs using 3 or more subwoofers.
 Each subwoofer configuration
can use LFE-THX (LFE plus bass
managed signal from speakers set to Small) or LFE+MAIN (LFE and all low range signals
from all channels). The former is the standard method we recommend for most
users, however some with larger or full range speakers may find some success
with the latter as it provides another source for bass material which may alter
the room response for low frequencies. My preferred setting was the 2SP MIX
setting configured to LFE-THX. The
crossover frequency we left at Fixed-THX
(80Hz), though the AVR-5308CI
allows users to configure a different crossover for each channel type (Front,
Center, Surround A, Surround B, and Surround Back)
plus a separate setting for the LFE channel. Keep in mind that Denon allows
separate bass management settings for 2-channel direct mode, so be sure to set
that up as well so you get the desired results.
Each subwoofer configuration
can use LFE-THX (LFE plus bass
managed signal from speakers set to Small) or LFE+MAIN (LFE and all low range signals
from all channels). The former is the standard method we recommend for most
users, however some with larger or full range speakers may find some success
with the latter as it provides another source for bass material which may alter
the room response for low frequencies. My preferred setting was the 2SP MIX
setting configured to LFE-THX. The
crossover frequency we left at Fixed-THX
(80Hz), though the AVR-5308CI
allows users to configure a different crossover for each channel type (Front,
Center, Surround A, Surround B, and Surround Back)
plus a separate setting for the LFE channel. Keep in mind that Denon allows
separate bass management settings for 2-channel direct mode, so be sure to set
that up as well so you get the desired results.
It didn't take long before the entire system was humming along smoothly and with plenty of bass to rumble my chair during intense movie or music passages. While we utilized Audyssey's MultEQ XT system for our room and listening tests, we've covered the system in such extensive detail that it doesn't require any additional explanation here. If you'd like more information on how Audyssey performs, feel free to check out our review of the similar AVP-A1HDCI processor.
Denon AVR-5308CI Network Audio, USB, Internet Radio and iPod
One of the realizations any owner of a networked AV receiver will come to is the fact that you will never run out of music to fill your home. The AVR-5308CI is particularly efficient at allowing music from nearly any source to grace the speakers in your listening room. It works well with all of the expected sources, and actually adds some advanced features you typically only find in specialty media server & streaming products.
Internet Radio
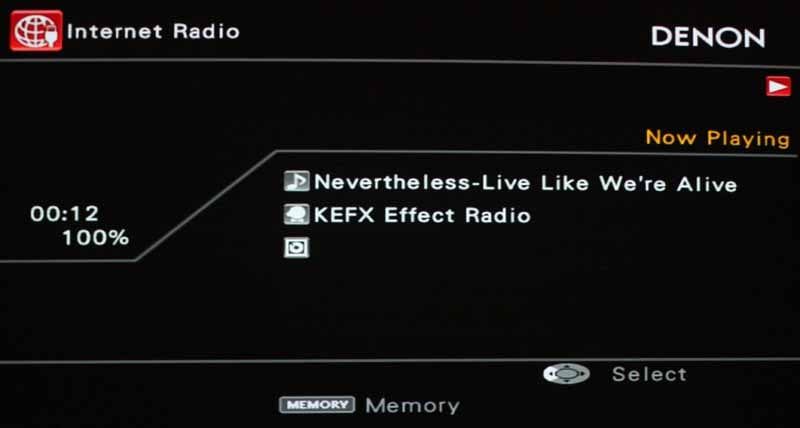 I began with
Internet radio since that is the quickest
and most immediate way you can bring up music in your system that doesn't
originate in your home library. I like Internet radio in that it offers a great
way to quickly dial in genres of
music that are entertaining and appeal to your current mood or situation. As
for quality - it various but certainly Denon's implementation was at least as
good as any other source for Internet radio stations I've heard. I liked the
meta data which some stations used (others ignored this handy feature) and you
could add stations to memory as desired which made for easy recall - important
since there must be thousands of stations available, most of which you'd have
no interest in unless you're a fan of international fare. At times I felt that
the 30 second screensaver timeout was a bit abrupt and terribly short for most
purposes. If I looked away for a second to adjust something, I had to re-enable
the display to see what was playing (which also seemed to defeat the purpose of
having meta data in the first place.) Though you can disable the GUI
screensaver, you cannot remove this particular screen blanking which occurs on the
USB/Internet audio screens. With an
AV receiver any kind of screensaver delay of this type should probably be defeatable
and measured in minutes, not seconds.
I began with
Internet radio since that is the quickest
and most immediate way you can bring up music in your system that doesn't
originate in your home library. I like Internet radio in that it offers a great
way to quickly dial in genres of
music that are entertaining and appeal to your current mood or situation. As
for quality - it various but certainly Denon's implementation was at least as
good as any other source for Internet radio stations I've heard. I liked the
meta data which some stations used (others ignored this handy feature) and you
could add stations to memory as desired which made for easy recall - important
since there must be thousands of stations available, most of which you'd have
no interest in unless you're a fan of international fare. At times I felt that
the 30 second screensaver timeout was a bit abrupt and terribly short for most
purposes. If I looked away for a second to adjust something, I had to re-enable
the display to see what was playing (which also seemed to defeat the purpose of
having meta data in the first place.) Though you can disable the GUI
screensaver, you cannot remove this particular screen blanking which occurs on the
USB/Internet audio screens. With an
AV receiver any kind of screensaver delay of this type should probably be defeatable
and measured in minutes, not seconds.
Rhapsody Music
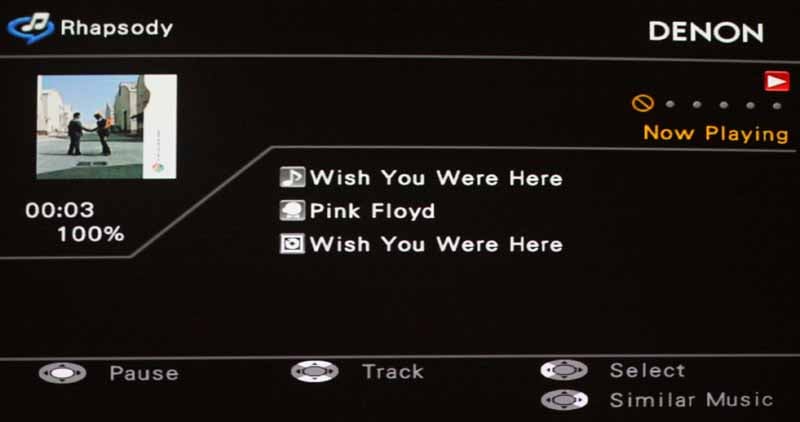 What I really
liked about the Rhapsody Music service was the fact that Denon got permission
to deliver a hassle-free no-registration-required 30-day free pass to all
owners of the AVR-5308CI. You have
no idea how refreshing it was not to have to sign up for the 30-day trial
online before experiencing the service. It's good for all parties involved and
will be a sure-fire way to ensure that all Denon owners at least try out the
service to see if they want to opt for the recurring $15/month subscription. I
quickly queued up some tunes and was
jamming away with the likes of Pink Floyd and even some bands I'd never heard
of before. In fact, under "Staff Picks"
there were some titles (see image) that made me wonder just what the Staff were
doing on the day those songs were chosen...
Rhapsody continued to work consistently throughout my testing and I
liked how it accurately showed the meta data for each song, including the album
cover.
What I really
liked about the Rhapsody Music service was the fact that Denon got permission
to deliver a hassle-free no-registration-required 30-day free pass to all
owners of the AVR-5308CI. You have
no idea how refreshing it was not to have to sign up for the 30-day trial
online before experiencing the service. It's good for all parties involved and
will be a sure-fire way to ensure that all Denon owners at least try out the
service to see if they want to opt for the recurring $15/month subscription. I
quickly queued up some tunes and was
jamming away with the likes of Pink Floyd and even some bands I'd never heard
of before. In fact, under "Staff Picks"
there were some titles (see image) that made me wonder just what the Staff were
doing on the day those songs were chosen...
Rhapsody continued to work consistently throughout my testing and I
liked how it accurately showed the meta data for each song, including the album
cover.
"Speedy" is not a word I'd use to describe the Rhapsody implementation on the AVR-5308CI, so if you're expecting it to fly through track selections and navigation you might want to put more emphasis on some of the other music sources Denon provides. Seven seconds was the average time I counted in switching from a given track to something else. Another strange thing was that after a minute or so (repeated for each new song) the screen saver would black out the OSD except for the album art which would hover isolated in space. Not a huge bug, but probably not by design either.
USB Audio
USB Audio was also easy to access, though the controls seemed more than a little sluggish, possibly due to the speed and type of USB thumb drive I utilized. Compared to Internet Radio, the USB audio seemed like a breath of fresh air in terms of quality (I ripped it myself into 320kbps files). Like nearly all these section, artist and album information is displayed, provided the standard meta tag information is properly stored within the file. What I began referring to as "the timeout bug" kept nagging me - nuking the display to complete black every 30 seconds. I found that the AVR-5308CI played by nearly every file type I could throw at it - including WMA, AAC and various flavors of MP3 files. I played around with the Restorer functionality and found that I really liked it, though on occasion I felt the nagging of white noise at the top extremes of the frequency ranges being reproduced which let me know that it's not infallible. Overall, though I decided to keep it on - which means it did very well a majority of the time.
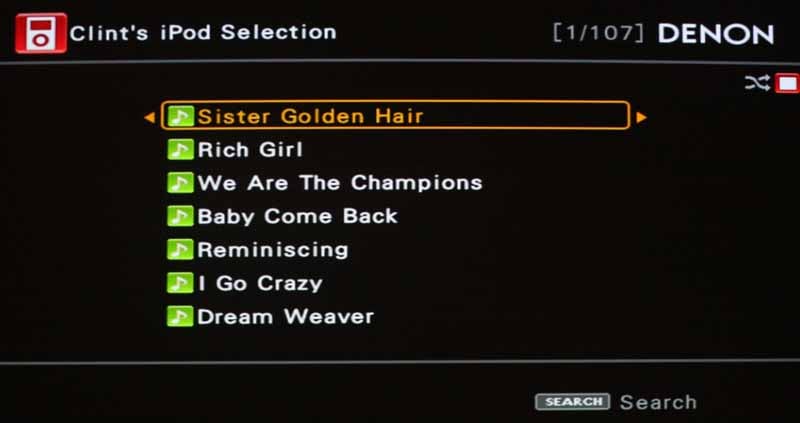
iPod Control
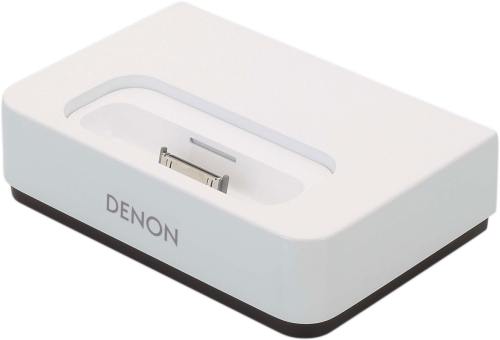 I am no longer the
only person in North America without an iPod.
My son has taken over that role (but he's only 5, so I guess that's OK). Denon
was kind enough to include an ASD-1R
iPod dock so that I could test the
receiver with my 4GB 2nd-generation Nano (be quiet - it’s still an iPod!) I
really liked this functionality. Using the default inputs on the AV receiver
and connecting the 1/8-inch control cable meant that the iPod was immediately
recognized as a source and I could use the primary remote control to navigate
the unit while it displayed all of the contents of the iPod via the OSD. It
even allowed access of my Playlists, so I could really use iTunes and my iPod
to create some excellent playlists which the AVR-5308CI
faithfully reproduced. I'll save the main listening tests for more
high-definition sources, but I was extremely happy with the dock and how it worked. This is a must-have accessory
for anyone who owns a compatible Denon receiver.
I am no longer the
only person in North America without an iPod.
My son has taken over that role (but he's only 5, so I guess that's OK). Denon
was kind enough to include an ASD-1R
iPod dock so that I could test the
receiver with my 4GB 2nd-generation Nano (be quiet - it’s still an iPod!) I
really liked this functionality. Using the default inputs on the AV receiver
and connecting the 1/8-inch control cable meant that the iPod was immediately
recognized as a source and I could use the primary remote control to navigate
the unit while it displayed all of the contents of the iPod via the OSD. It
even allowed access of my Playlists, so I could really use iTunes and my iPod
to create some excellent playlists which the AVR-5308CI
faithfully reproduced. I'll save the main listening tests for more
high-definition sources, but I was extremely happy with the dock and how it worked. This is a must-have accessory
for anyone who owns a compatible Denon receiver.
HD Radio
The HD Radio implementation on the AVR-5308CI is a bit redundant and convoluted since HD Radio defaults back to standard FM when it cannot get a signal. Basically you would connect the standard AM/FM antennas only if you are utilizing multiple Zones and/or if you require dual tuners. Another issue is that the tuning controls are different (in terms of IR) between standard AM/FM and HD Radio. I found that my universal remote control was configured for only normal AM/FM, so I had to go back and tweak the settings. I can understand this, since with a four-zone system there is a chance you would have a different tuner going to different zones - so there's little to complain about here except my lack of initial research.
XM Radio
The AVR-5308CI has it. It's not new and I didn't test it since I don't have a subscription.
Network Audio
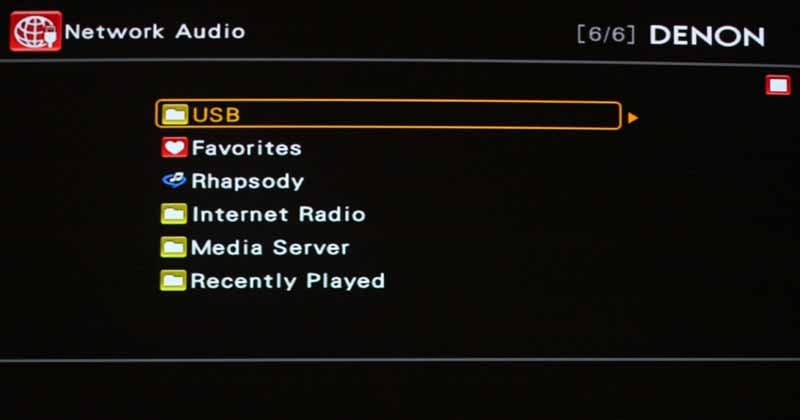 Punch down that NET
button and you've got access to all of your DLNA or Windows Media Player
11-served audio files. The AVR-5308CI
can network to your PC and pull music so that you can enjoy it in any of your
four zones. As long as you have taken care to follow the instructions for
managing DRM-laden Windows and Apple-based files, you can route that audio
anywhere you have speakers connected to the receiver. I found it to be a bit
slow in navigation (some of which I could attribute to my RF remote control)
but it was certainly nice to be able to pull music from my PC and play it. The
audio sounded pristine (much of my music is ripped as WMA lossless) and I was
quickly enjoying some of my favorite
tunes in my theater room cranked up to levels they hadn't been in quite some
time.
Punch down that NET
button and you've got access to all of your DLNA or Windows Media Player
11-served audio files. The AVR-5308CI
can network to your PC and pull music so that you can enjoy it in any of your
four zones. As long as you have taken care to follow the instructions for
managing DRM-laden Windows and Apple-based files, you can route that audio
anywhere you have speakers connected to the receiver. I found it to be a bit
slow in navigation (some of which I could attribute to my RF remote control)
but it was certainly nice to be able to pull music from my PC and play it. The
audio sounded pristine (much of my music is ripped as WMA lossless) and I was
quickly enjoying some of my favorite
tunes in my theater room cranked up to levels they hadn't been in quite some
time.
Denon RC-1067 Hybrid Electroluminescent Universal Remote
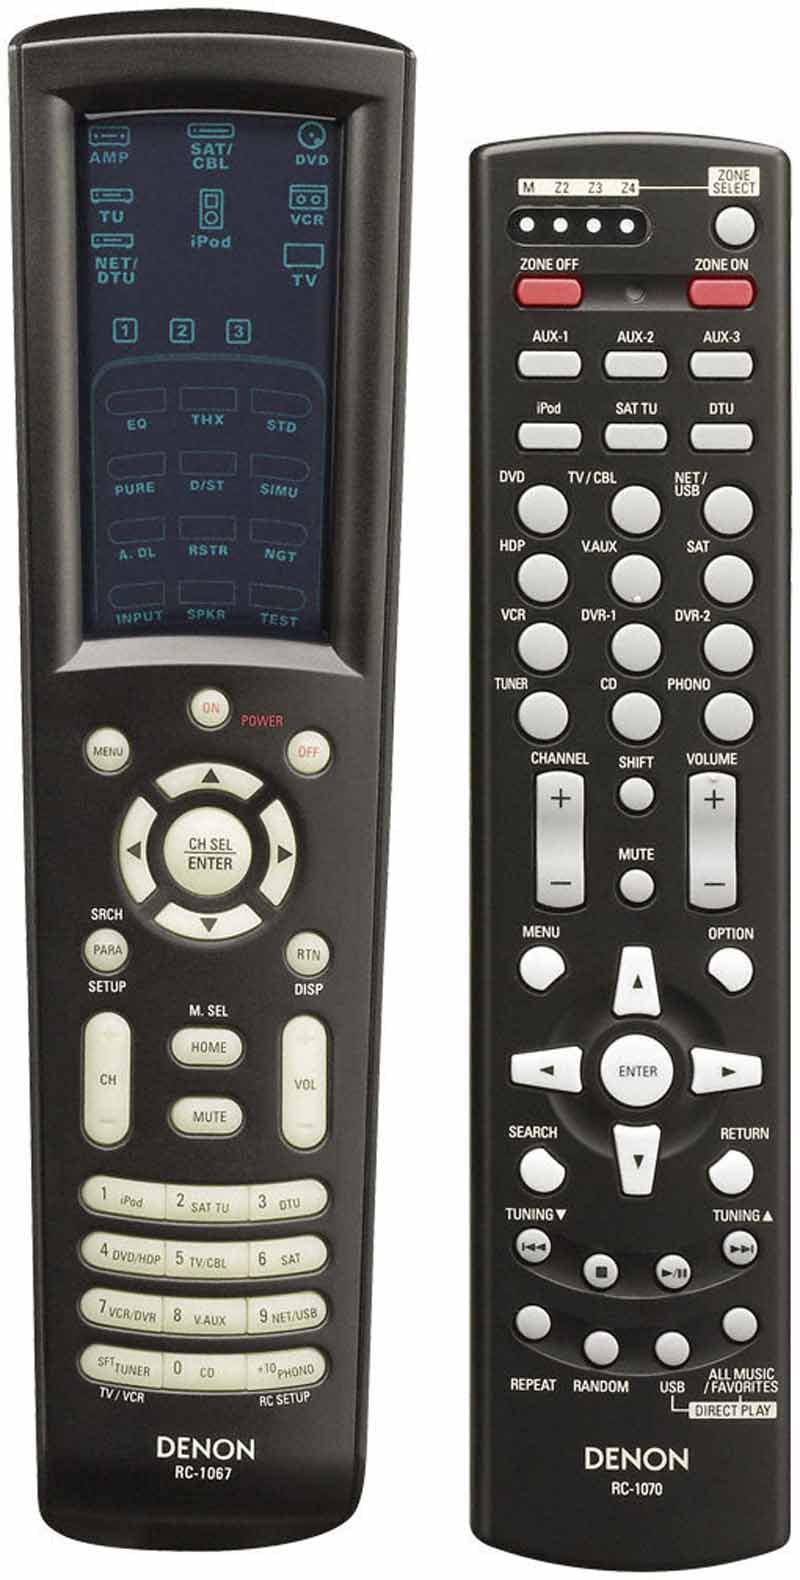 I
just like saying hybrid electroluminescent. Kinda rolls off the tongue, don't
you think? In contrast to the descriptive name, there's not much to write home
about with regard to the new RC-1067 remote. It's essentially identical to the AVR-4306's remote with the exception that it has
glow-in-the-dark hard keys and has some minor cosmetic/label changes (the
addition of Zone 4 activation, for example.) Programming the remote isn't
terribly difficult, though in my system I am utilizing an RF-based remote
control system. Denon also offers a 2-way RF solution that gives users feedback from the AV receiver to the remote control - a
definite advantage to most systems and one that we found impressive when we
first saw it at a Denon line show in New
Jersey. There is also an RC 1070 remote which can be
used for Zones 2-4 provided you have an IR repeater in that room which relays
the signals back to the AVR-5308CI. This second Zone remote has all of the
features you'll need to select sources and power on and off the 4 Zones, adjust
volume and control functions like the tuner and USB
audio.
I
just like saying hybrid electroluminescent. Kinda rolls off the tongue, don't
you think? In contrast to the descriptive name, there's not much to write home
about with regard to the new RC-1067 remote. It's essentially identical to the AVR-4306's remote with the exception that it has
glow-in-the-dark hard keys and has some minor cosmetic/label changes (the
addition of Zone 4 activation, for example.) Programming the remote isn't
terribly difficult, though in my system I am utilizing an RF-based remote
control system. Denon also offers a 2-way RF solution that gives users feedback from the AV receiver to the remote control - a
definite advantage to most systems and one that we found impressive when we
first saw it at a Denon line show in New
Jersey. There is also an RC 1070 remote which can be
used for Zones 2-4 provided you have an IR repeater in that room which relays
the signals back to the AVR-5308CI. This second Zone remote has all of the
features you'll need to select sources and power on and off the 4 Zones, adjust
volume and control functions like the tuner and USB
audio.
Since Denon's AVR-5308CI allows for a dedicated TOSlink Zone 2 and Zone 4 output, you can use the remote to control a secondary 5.1 surround system sourced from the master receiver. Got an extra AV receiver lying around unused?
Denon AVR-5308CI Listening Tests
We recently updated Reference System 2's RBH Sound CinemaSITE system with new Signature SI-760/R speakers for the front and center channels. This system has incredible midrange detail and exceptional tweeter response that doesn't distort or sound brittle, even during high volume passages of challenging material. The room is modestly treated with RPG Diffusor Systems Absorbors and Skyline Diffusors to preserve a natural sound but eliminate some problematic areas. For this review we disabled all external Room EQ devices and used only the internal Audyssey MultEQ XT system. The system is connected with analogue cables from Impact Acoustics and all HDMI cables are made by DVI Gear.
Listening Tests: Music
With these listening tests we calibrated the room using Audyssey and confirming the setting using our brains. What that means is that we ensured all speakers were set to Small and that the crossover was set to a correct position (in our case THX/80Hz.) We left Audysseys MultEQ XT engaged since we felt it did a decent job at diminishing the room's effects on the overall sound. Playback levels averaged between 85-89 dB SPL levels, C-weighted. It was rather loud, but intensely enjoyable and never overbearing.
DVD-Audio: Seal IV "Love's
Divine" is a track I use quite
frequently when performing listening tests. The decay in Seal's lead vocal was
smooth as a baby's toot baffle and there was no perceived truncation. Mid-bass
was tight and the dual SI-1010 subwoofers drove this song with an underlying
power that I loved experiencing. During the break, a thick
piano introduced a reverberant vocal line and the decay seemed to last forever
until it was finally overcome by the drum track
and resounding bass lick. "Waiting
for You" had that funk groove and a brassy ensemble that built to the
chorus, yet allowed it to poke through. The brass had a clean top end that I've
heard get leveled (compressed) more than once on lesser AV receivers. The AVR-5308CI drove the bass in this song to
incredible levels and it tied together the subwoofers and mains extremely well.
"Love's
Divine" is a track I use quite
frequently when performing listening tests. The decay in Seal's lead vocal was
smooth as a baby's toot baffle and there was no perceived truncation. Mid-bass
was tight and the dual SI-1010 subwoofers drove this song with an underlying
power that I loved experiencing. During the break, a thick
piano introduced a reverberant vocal line and the decay seemed to last forever
until it was finally overcome by the drum track
and resounding bass lick. "Waiting
for You" had that funk groove and a brassy ensemble that built to the
chorus, yet allowed it to poke through. The brass had a clean top end that I've
heard get leveled (compressed) more than once on lesser AV receivers. The AVR-5308CI drove the bass in this song to
incredible levels and it tied together the subwoofers and mains extremely well.
DTS
(CD): Eagles - Hell Freezes Over "Love Will
Keep Us Alive" is a gentle song that provides some very revealing material
which can be problematic for an amplifier or receiver that doesn't provide
enough control and dynamic headroom. As I listened to Timothy B. Schmidt's soft
vocals, the midrange and treble detail was showed off in spades and I was able
to hear the natural breakup of his voice as it lead into the first chorus.
Subtle? Yes. Hard to spot? Oh, yeah. Denon handle it OK? You betcha. Backing vocals during the chorus filled the room and
really made me want to just close my eyes and enjoy a few moments as Don Felder
used a slide to make his rig sound like a steel guitar. Behind the vocals the
bass rolled out smooth and clean and the percussion track
really put forth loads of detail. The bass in "Wasted Time" revealed
the minutia of fingers on the strings of the guitar and the lead vocal had a
very live presence. Lead guitar was positioned far left, and the Denon was able
to make the soundstage sound extremely wide and totally transparent. One other
thing I quickly realized is that my
particular system sounded considerably better the more I pushed it. The AVR-5308CI provided more control and certainly more
detail at higher levels of output. I was taken aback
as I could cleanly envision Don Henley on stage during this song. Don't get me
wrong - he sounded good at normal listening levels, but when pushed, the tracks suddenly sounded live. Decays of the cymbals and vocal reverb poured more easily
into the room and even overhead as this track
played on. "In the City" gave me a chance to hear yet another voice -
Joe Walsh's - and his raw performance and the snappy kick/snare
combo sounded awesome on the Denon. Elliot Scheiner's wide-panned drums made
for a very large soundstage and a solid electric guitar line kept the tune rocking into my theater room.
"Love Will
Keep Us Alive" is a gentle song that provides some very revealing material
which can be problematic for an amplifier or receiver that doesn't provide
enough control and dynamic headroom. As I listened to Timothy B. Schmidt's soft
vocals, the midrange and treble detail was showed off in spades and I was able
to hear the natural breakup of his voice as it lead into the first chorus.
Subtle? Yes. Hard to spot? Oh, yeah. Denon handle it OK? You betcha. Backing vocals during the chorus filled the room and
really made me want to just close my eyes and enjoy a few moments as Don Felder
used a slide to make his rig sound like a steel guitar. Behind the vocals the
bass rolled out smooth and clean and the percussion track
really put forth loads of detail. The bass in "Wasted Time" revealed
the minutia of fingers on the strings of the guitar and the lead vocal had a
very live presence. Lead guitar was positioned far left, and the Denon was able
to make the soundstage sound extremely wide and totally transparent. One other
thing I quickly realized is that my
particular system sounded considerably better the more I pushed it. The AVR-5308CI provided more control and certainly more
detail at higher levels of output. I was taken aback
as I could cleanly envision Don Henley on stage during this song. Don't get me
wrong - he sounded good at normal listening levels, but when pushed, the tracks suddenly sounded live. Decays of the cymbals and vocal reverb poured more easily
into the room and even overhead as this track
played on. "In the City" gave me a chance to hear yet another voice -
Joe Walsh's - and his raw performance and the snappy kick/snare
combo sounded awesome on the Denon. Elliot Scheiner's wide-panned drums made
for a very large soundstage and a solid electric guitar line kept the tune rocking into my theater room.
DVD-Audio: The Brand New Opry - Another
Time The Brand New
Opry's Another Time album is a hodgepodge of mostly known classics re-arranged
into Bluegrass format and recorded onto the
wonderful DVD-Audio format
courtesy of AIX Records. The recording is "super clean" with no
significant compression or effects boxes to disturb the 96kHz/24-bit
recording/mixing process. "Lowlands"
remains my favorite track on this
album. Jaime Hanna's opening lyric is so gentle and the AVR-5308CI
really captured every vocal nuance and played it back
for me in pristine detail. The effect was one of hearing Jaime singing about 3
feet into the room in front of my right speaker. When Johnathan McEuen's verse
chimed in I almost had to force myself to keep my eyes closed and not check to see if he'd perhaps stopped by for a visit.
Violins and a banjo poked into the mic from around the room and I was able to
really enjoy the "stage" mix to its fullest. "Grand Ole
Opry" was an amazing song that included a very good but imperfect lead
vocal that just gave more power to the live feel the AVR-5308CI
was rendering for this disc. Again, violin in the left surround blew me away
with its clarity (bow and string noise being faithfully reproduced) while an
exuberant banjo leapt from the opposite room corner. The Denon AVR-5308CI never had any difficulty putting out
this barrage of sound from all channels at once - in fact, it rather seemed to
enjoy it.
The Brand New
Opry's Another Time album is a hodgepodge of mostly known classics re-arranged
into Bluegrass format and recorded onto the
wonderful DVD-Audio format
courtesy of AIX Records. The recording is "super clean" with no
significant compression or effects boxes to disturb the 96kHz/24-bit
recording/mixing process. "Lowlands"
remains my favorite track on this
album. Jaime Hanna's opening lyric is so gentle and the AVR-5308CI
really captured every vocal nuance and played it back
for me in pristine detail. The effect was one of hearing Jaime singing about 3
feet into the room in front of my right speaker. When Johnathan McEuen's verse
chimed in I almost had to force myself to keep my eyes closed and not check to see if he'd perhaps stopped by for a visit.
Violins and a banjo poked into the mic from around the room and I was able to
really enjoy the "stage" mix to its fullest. "Grand Ole
Opry" was an amazing song that included a very good but imperfect lead
vocal that just gave more power to the live feel the AVR-5308CI
was rendering for this disc. Again, violin in the left surround blew me away
with its clarity (bow and string noise being faithfully reproduced) while an
exuberant banjo leapt from the opposite room corner. The Denon AVR-5308CI never had any difficulty putting out
this barrage of sound from all channels at once - in fact, it rather seemed to
enjoy it.
Perfectly synchronized violins began and continued throughout "Moving Out" and kept up the string of exceptional sound brought to life by the Brand New Opry. I absolutely loved how the AVR-5308CI nailed the attack on the acoustic guitar, even reproducing - with perfect precision - the sub-like hits of the guitar body as it was repeatedly (mercilessly) struck during heavy downbeats.
Listening Tests: Movies
I don't consider movies to be as much of a test as multi-channel music, however there's a good chance you'll spend a lot of your time watching movies and so I decided to include a couple of my favorites for testing. The AVR-5308CI is an excellent receiver for movies in that it provides tons of dynamic power for even the most complex scenes, and the ability to really customize the subwoofer output means you'll never run out of options for getting the best bass-managed sound.
DVD: Star Wars Episode III - Revenge of the Sith
 I decided to pull
up the "best" of the new Star Wars movies (which is a lot like
choosing the "best" Fast and the Furious movie...) Beginnign with
"Rescuing the Chancellor" I loved how well the Denon reproduced the
echoey environment of the Star Destroyer's main chamber. Lightsaber hits were
exceptionally crisp and powerful, and they flew into the surrounds as the
camera kept pace with the on-screen action. When the battle droids fire on the
Jedi, the bolts flew seamlessly from the front to the surrounds. I also noted
that the AVR-5308CI had no trouble
allowing the background noise of the
in-space saga that was ensuing outside of the ship to peek in around the crisp
dialogue.
I decided to pull
up the "best" of the new Star Wars movies (which is a lot like
choosing the "best" Fast and the Furious movie...) Beginnign with
"Rescuing the Chancellor" I loved how well the Denon reproduced the
echoey environment of the Star Destroyer's main chamber. Lightsaber hits were
exceptionally crisp and powerful, and they flew into the surrounds as the
camera kept pace with the on-screen action. When the battle droids fire on the
Jedi, the bolts flew seamlessly from the front to the surrounds. I also noted
that the AVR-5308CI had no trouble
allowing the background noise of the
in-space saga that was ensuing outside of the ship to peek in around the crisp
dialogue.
In "Confronting Grievous" a series of explosions rocked the theater room and tossed debris in every direction (OK, not really, but that's what the sound was conveying.) The lightsaber battle that followed with Grievous' body guards is one of the coolest-sounding of them all due to their choice of weapons - a sort of lightning stick that would react unusually with the sabers.
DVD: The Matrix In "Getting
the Bug Out" the scene starts with a rather distinct and arresting
analogue phone ring. The following outdoor sequence filled the theater with a
downpour, complete with rolling and crashing thunder. I live in Central Florida and understand the sound of rolling
thunder. This was as lifelike as I've ever heard thanks to the Denon's
incredible amplifiers and its ability to handle delicate and dynamic content
alongside powerful mid-bass and bass output. Even the most mundane sounds like
door closes and foley footsteps were now almost hyper-real in this system. In
"Slimy Rebirth," the scene where Neo wakes up from the Matrix and is
flushed by the machines, the foley effects and sweeteners used to convey Neo
breaking free from his bonds were incredibly real and pronounced. During this
sequence the surrounds virtually exploded with the sound of the power plant
releasing him from the Matrix and sending him down the shoot.
In "Getting
the Bug Out" the scene starts with a rather distinct and arresting
analogue phone ring. The following outdoor sequence filled the theater with a
downpour, complete with rolling and crashing thunder. I live in Central Florida and understand the sound of rolling
thunder. This was as lifelike as I've ever heard thanks to the Denon's
incredible amplifiers and its ability to handle delicate and dynamic content
alongside powerful mid-bass and bass output. Even the most mundane sounds like
door closes and foley footsteps were now almost hyper-real in this system. In
"Slimy Rebirth," the scene where Neo wakes up from the Matrix and is
flushed by the machines, the foley effects and sweeteners used to convey Neo
breaking free from his bonds were incredibly real and pronounced. During this
sequence the surrounds virtually exploded with the sound of the power plant
releasing him from the Matrix and sending him down the shoot.
The martial arts match between Morpheus and Neo was a great experience. The AVR-5308CI pumped out a full throttle mix of music and impacts that had me raising the volume even more to see how incredible it could get. The louder it got, the more excellent the soundtrack became. The Denon simply didn't cave in when pushed - it always seemed to have more reserved and we had to struggle to find new ways to really tax the system.
Denon AVR-5308CI Measurements and Conclusion
Preamp Section
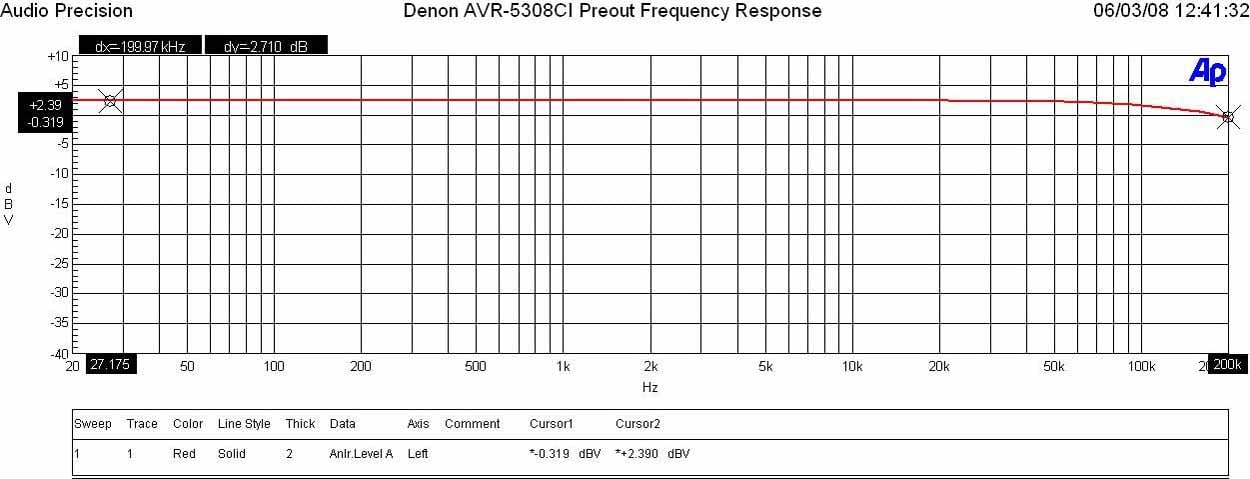
Denon AVR-5308CI Preamp Frequency Response
I measured a ruler flat frequency response with a -3dB point around 200kHz in “Pure Direct” mode. This is similarly good frequency response exhibited on the more expensive AVP-A1HDCI processor.
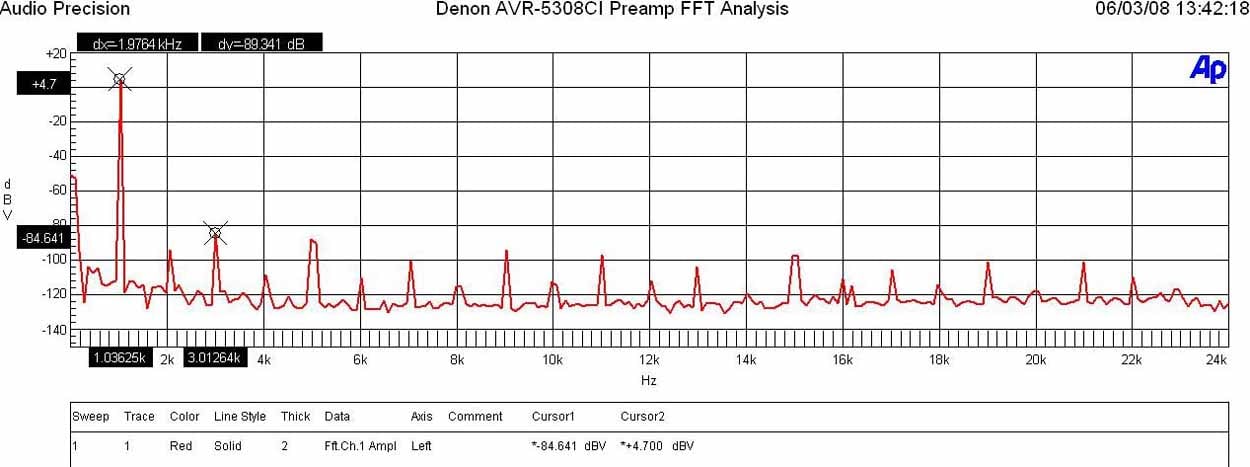
Denon AVR-5308CI Preamp FFT Distortion Analysis
With 200mVin, I set the master volume until I reached 1.7Vrms out of the preamp. The output was so pristine that I couldn’t measure any appreciable harmonics. I had to run the preamp up to 2Vrms out and 400Mv in to start measuring something appreciable but beyond the limits of audibility. Low distortion hardly qualifies for what I measured (4.7+84.641)dBv = 89.3dBv or 100*alog^-1(-89.3/20) = .003% THD + N which is very good, though not as pristine as I found on the AVP-A1HDCI processor or similarly priced Yamaha RX-Z11 receiver.
I measured a maximum of 3.8Vrms out (<0.1% THD + N) with a maximum allowable input of 8Vrms (<0.1% THD + N) though preamp gain was a bit lower than I’d expect to see which was in this case only 13dB. You may find the necessity to boast source level via the inputs should you couple this receiver with an external amp that is also low voltage gain.
Power Amp Section
Power Bandwidth & Distortion
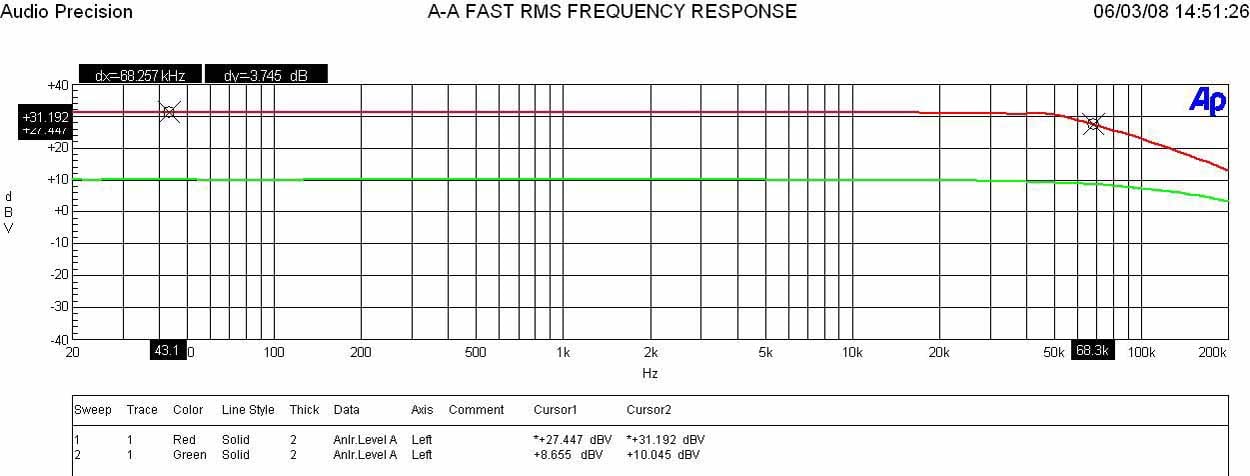
Denon AVR-5308CI
Frequency Response at 1 watt & Full Power
The AVR-5308CI exhibited very good frequency response uniformity at high power levels (-3dB of 68 kHz) though not quite as steady with varying power levels as we’ve seen on the Yamaha RX-Z11.
Denon AVR-5308CI Power output: < 0.1% THD + N
- 1CH, 8 ohms: 160watts
- 2CH, 8 ohm, 150wpc
- 1CH, 4 ohms: 240wpc
- 2CH, 4 ohm 220wpc
For a rated power of 150wpc x 7, the AVR-5308CI delivered the goods, though not quite so well as the 140wpc similarly priced Yamaha RX-Z11 that under the same test conditions delivered as follows:
Yamaha RX-Z11 Power output: <0.1% THD + N
- 1CH, 8 ohms: 190wpc
- 2CH, 8 ohms: 172wpc
- 1CH, 4 ohms: 300wpc
- 2CH, 4 ohms: 256wpc
Overall the amp section of the AVR-5308CI is very good, though no match for the venerable AVR-5805CI monster 10CH receiver. Performance is probably a halfway point between the old AVR-4802 and the old flagship AVR-5803 - and not quite as robust as the amps found in Yamaha's similarly priced receiver.
Keep in mind most review publications don’t do continuous power measurements and they usually publish power measurements into clipping at 1% THD + N. Our measurements are very conservative and it is clear that Denon is meeting and exceeding the 150wpc power rating.
For more info on amplifier measurements, see: The All Channels Driven (ACD) Test
Amplifier Output Impedance & Damping Factor
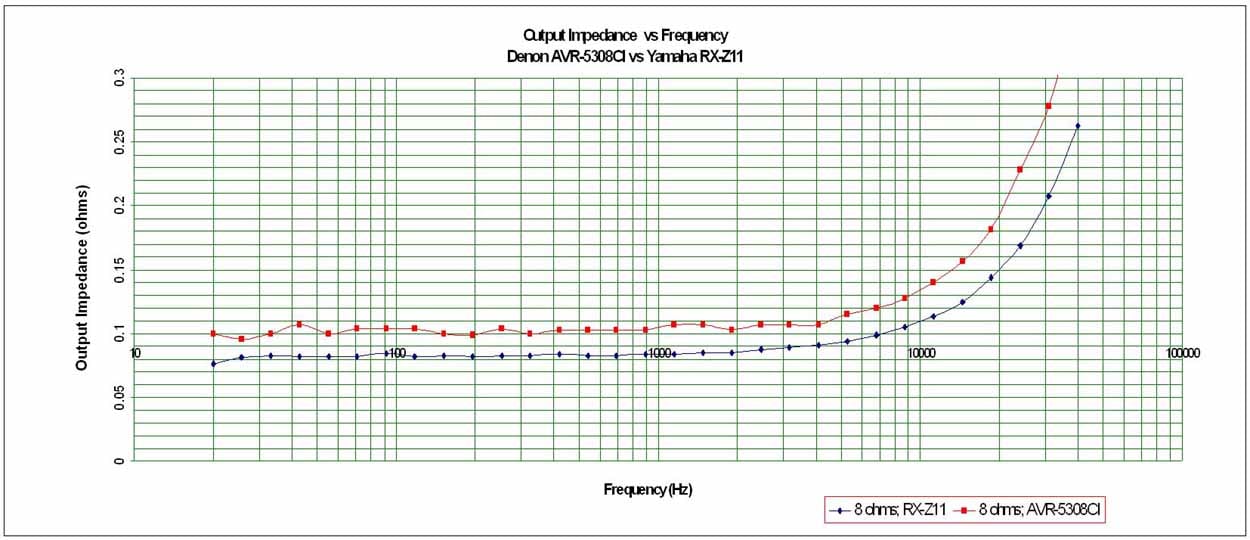
Denon AVR-5308CI Amplifier Output Impedance
The AVR-5308CI exhibited commendably low output impedance second only to the Yamaha RX-Z11 in this class of product. It floated right around our desired 100 mohm or less mark for the entire audible bandwidth up to 20kHz and maintained itself even when driving at max sustained power levels into 8 ohm and 4 ohm loads. This implies this receiver should sound consistently good no matter what loudspeaker load it is driving.
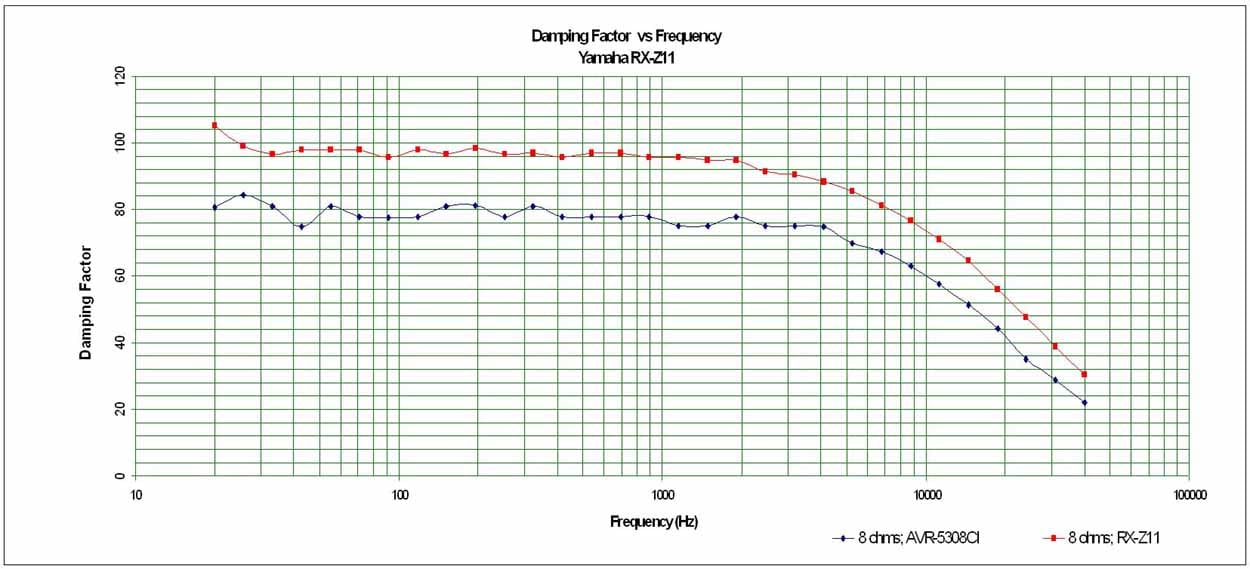
Denon AVR-5308CI Amplifier Damping Factor
The amplifier damping factor is about what I expected based on the measured output impedance. It is uniformly good across the entire audio frequency range at around the 80 mark (50 is a minimum we like to see in all amplifiers of uncompromising design) when driving an 8 ohm loads.
Crosstalk
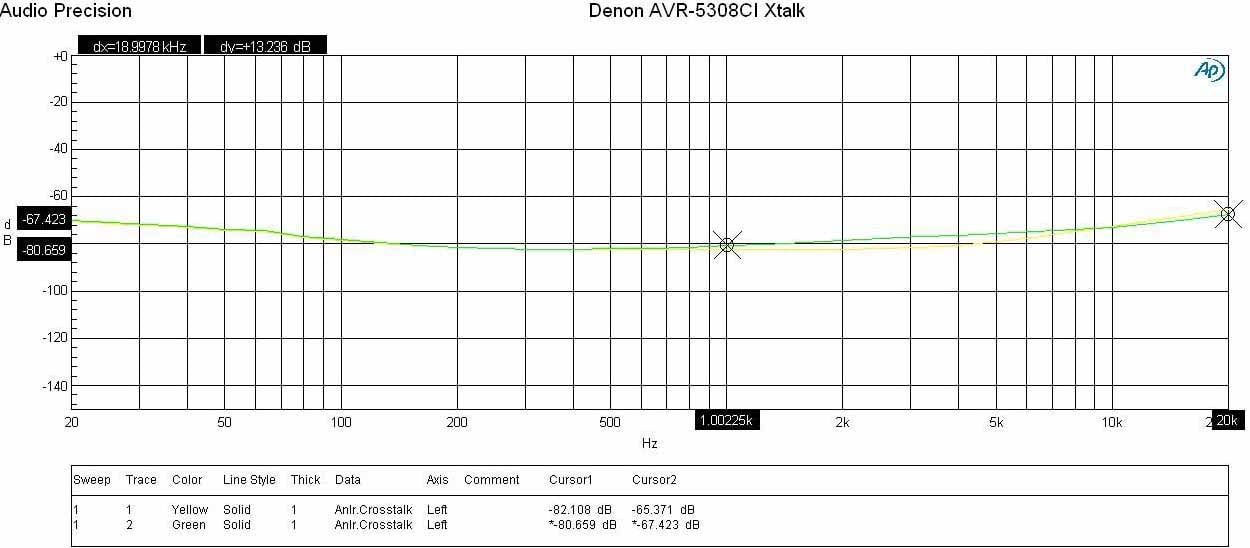
Denon AVR-5308CI Crosstalk Measurement at Full Rated
Power vs Frequency
Running a full range frequency sweep from the preamp all the way through the power amp at full rated power (140wpc @ 8 ohms), I measured channel to channel crosstalk on two adjacent channels where one channel was the disturber and the other was the DUT. The Audio Precision plotted crosstalk of both channels over frequency by varying the Disturber/DUT channels. You can see the AVR-5308CI produced excellent crosstalk measurements (80dB at 1kHz) with only a slight increase up at the frequency extremes (low frequency because of magnetic coupling and high frequency because of capacitive coupling). This test really exemplifies the careful board and magnetics layout of this 7 channel receiver.
Conclusions and Overall Perceptions
Here's the thing. This receiver is absolutely the most top-of-the-line product you can pick up for $5500. With a built-in Silicon Optix HQV Realta processor included, it's hard not to look at it as a $3500 receiver plus a $2000 video processor. Or is that a $5500 receiver with a free processor? It's also so ridiculously similar to the AVP-A1HDCI (sans balanced outputs but including 7 amplifiers) that it begs the question: Is it really enough of an audible difference to warrant paying an additional $2000 for the separates processor? I'd have to say 'No' but ultimately you can read the AVP-A1HDCI processor review and decide for yourself. The AVR-5308CI is a powerhouse receiver that delivers the goods whether they come from DVD, Blu-ray, SACD, USB, PC, HD Radio, XM or the Internet. That's a lot of music. THX Ultra2 processing and certification means that this product was also put through the ringer by the folks at THX. We know some of them; they're insane but in a good way - you can trust their work. I found this to be the most enjoyable receiver I've ever had in my AV rack and one that I'll likely purchase for my reference system. If that's not a good enough endorsement then I'm all out of ideas.
Denon AVR-5308CI
MSRP
$5500
Denon Electronics
19
Chapin Road, P.O. Box 867
Pine
Brook
NJ 07058 -9777
973-396-0810
973-396-7459 (fax)
usa.denon.com
About Denon Electronics
Denon
is a world leader in the manufacture of the highest quality home theater, audio
and software products. Denon is recognized internationally for innovative
and groundbreaking products and has a long history of technical innovations,
including the development and first commercialization of PCM digital
audio. Denon Electronics is owned by D&M Holdings Inc.
The Score Card
The scoring below is based on each piece of equipment doing the duty it is designed for. The numbers are weighed heavily with respect to the individual cost of each unit, thus giving a rating roughly equal to:
Performance × Price Factor/Value = Rating
Audioholics.com note: The ratings indicated below are based on subjective listening and objective testing of the product in question. The rating scale is based on performance/value ratio. If you notice better performing products in future reviews that have lower numbers in certain areas, be aware that the value factor is most likely the culprit. Other Audioholics reviewers may rate products solely based on performance, and each reviewer has his/her own system for ratings.
Audioholics Rating Scale
 — Excellent
- — Very Good
- — Good
- — Fair
- — Poor
| Metric | Rating |
|---|---|
| Frequency Response Linearity | |
| SNR | |
| Output Impedance | |
| Measured Power (8-ohms) | |
| Measured Power (4-ohms) | |
| Multi-channel Audio Performance | |
| Two-channel Audio Performance | |
| Network Features | |
| Video Processing | |
| Bass Management | |
| Build Quality | |
| Fit and Finish | |
| Ergonomics & Usability | |
| Ease of Setup | |
| Features | |
| Remote Control | |
| Performance | |
| Value |
Clint Deboer was terminated from Audioholics for misconduct on April 4th, 2014. He no longer represents Audioholics in any fashion.
View full profile