
Impact Acoustics Video to PC Converter Review
Impact Acoustics Video to PC Converter
- Product Name: Video to PC Converter
- Manufacturer: Impact Acoustics
- Performance Rating:

- Value Rating:
- Review Date: February 07, 2008 10:00
- MSRP: $ 99.99
- Converts S-video and composite video to VGA HD15 output
- Compatible with VGA, SVGA, XGA and SXGA Monitors
- Small Footprint allows placement in tight spaces
- No software required
Pros
- Plug and play - no software required
- Easy setup and installation
- Decent deinterlacing performance
Cons
- Audio setting attenuates PC volume
- Single audio input makes multiple video less useful
- Basic calibration options
Impact Acoustics Video to PC Converter (VtPC) Introduction
 Impact Acoustics is single handedly trying to confine me to my office. First
the Multi-function Converter (which sends a cable signal to your computer
monitor) and now the Video to PC Converter. What does it do? It simply allows
you to connect up to two analogue video sources to your computer monitor.
What's cool about that? Not a lot, really, until you realize that it performs
deinterlacing on that analogue signal as well! The real question is how well it
does that deinterlacing…
Impact Acoustics is single handedly trying to confine me to my office. First
the Multi-function Converter (which sends a cable signal to your computer
monitor) and now the Video to PC Converter. What does it do? It simply allows
you to connect up to two analogue video sources to your computer monitor.
What's cool about that? Not a lot, really, until you realize that it performs
deinterlacing on that analogue signal as well! The real question is how well it
does that deinterlacing…
Impact Acoustics Video to PC Converter: First Impressions and Setup
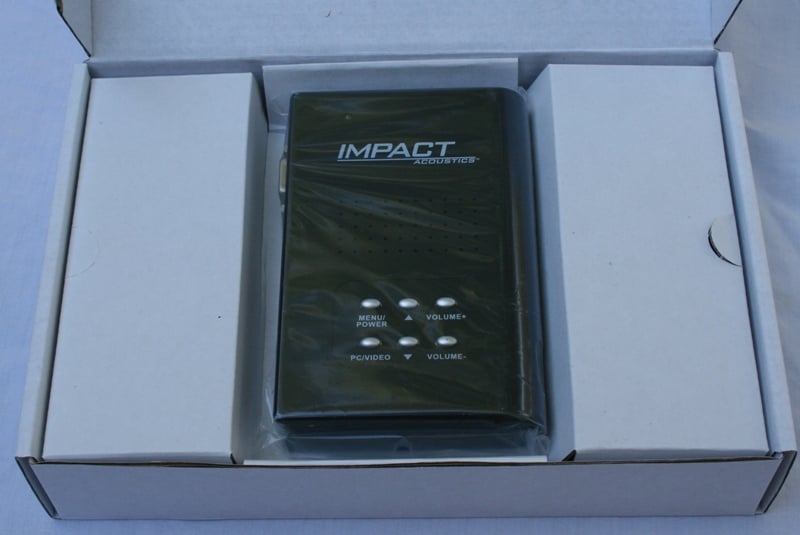
 As with every single product
I've ever received from Impact Acoustics
(including their cables) the Video to PC Converter (VtPC) was well packaged in
an attractive box. The VtPC case is small (about the size of one of those
pocket bibles or 3.25 x 1 x 5 inches) and light (0.3 lbs). It has a nice matte
black finish on the top (I'm not sure what is the top of this thing - let's
call it the side with the words and controls) and bottom with a gloss finish
around three of the sides. The forth side is rounded which actually makes it
look like a little book.
As with every single product
I've ever received from Impact Acoustics
(including their cables) the Video to PC Converter (VtPC) was well packaged in
an attractive box. The VtPC case is small (about the size of one of those
pocket bibles or 3.25 x 1 x 5 inches) and light (0.3 lbs). It has a nice matte
black finish on the top (I'm not sure what is the top of this thing - let's
call it the side with the words and controls) and bottom with a gloss finish
around three of the sides. The forth side is rounded which actually makes it
look like a little book.
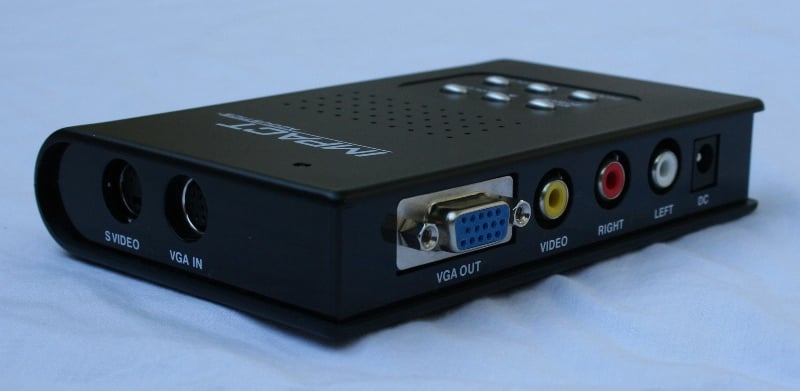
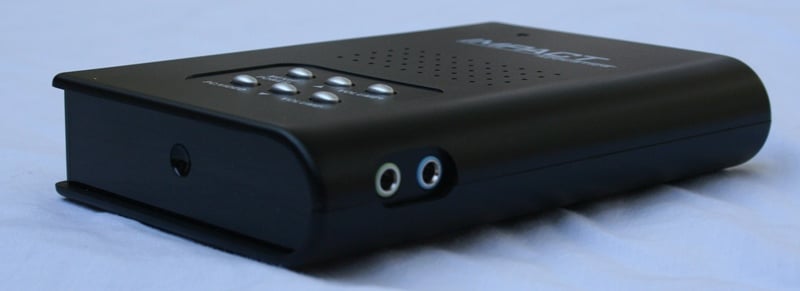
While the VtPC is light, I felt like it was well constructed. The plastic used seemed sturdy and resisted all but my most vigorous attempts to bend it. I wouldn't stand on it but if you accidentally propped your foot up on it I feel confident that it would survive. The sides contain all the inputs and outputs. There is one composite video and RCA audio input, an S-video input, a VGA input, and a 3.5mm audio input. For outputs there is simply a VGA for video and 3.5mm jack for audio. A small removable power cord also connects to the side. The top has all the controls including a Menu/Power, PC/Video selection, and up and down volume and arrow buttons. The same area also has a number of holes - presumably for cooling.
Set-Up & General Use
 Once again, if you think about the VtPC as an intermediary between your
computer and monitor (like the Multi-function Converter) you'll instantly see
how to hook the device up. Essentially, it hijacks your computer monitor and
speakers at your command in order to play back video and audio from a different
source. This means that you'll need to send your computer audio (in the form of
a 3.5mm cable - they supply you one) to the unit as well as your video (VGA
cable - again, they provide one for you). You have two separate video inputs -
composite (Yellow RCA) and S-video. Use one for each video source (if you only
have one, use the S-video if that is an option - it should have the better
resolution). The next step is to connect the source that you will need the
audio for to the analogue audio inputs (Red/White RCAs). This audio will be
played when either the S-video or composite input is selected.
Once again, if you think about the VtPC as an intermediary between your
computer and monitor (like the Multi-function Converter) you'll instantly see
how to hook the device up. Essentially, it hijacks your computer monitor and
speakers at your command in order to play back video and audio from a different
source. This means that you'll need to send your computer audio (in the form of
a 3.5mm cable - they supply you one) to the unit as well as your video (VGA
cable - again, they provide one for you). You have two separate video inputs -
composite (Yellow RCA) and S-video. Use one for each video source (if you only
have one, use the S-video if that is an option - it should have the better
resolution). The next step is to connect the source that you will need the
audio for to the analogue audio inputs (Red/White RCAs). This audio will be
played when either the S-video or composite input is selected.
Using the VtPC is about as easy as can be. Once you hook it up you're pretty much good to go. Since this is a hardware solution, there is no software to install, no drivers to configure, no conflicts to work out. Provided you have all your connections correct, all you'll need to do is power the thing on and you're good to go. Three presses on the PC/Video button will cycle you through each of the inputs (PC, CVBS (composite), S-video). Each of the inputs cycles quickly with the audio (when present) almost immediately playing and the video only a second or two later. The volume buttons only work on the composite and S-video inputs. The Menu/Power button will give you access to each of the menus. The same button also works (in most cases) as "select" or "enter" while in the menu system. The arrow keys will navigate and the volume buttons will sometimes change values (it's a little confusing at times). If your picture looks funny at first, you might need to adjust the display resolution. My unit defaulted to XGA (1024x768). Let's take a look at the menus:
Author's Note: Volume Control
One issue that I encountered was that the volume on the VtPC affects the PC volume. The way it seems it should work is that the volume control should ONLY affect the volume of the video source. When you switch to the PC source, it should defeat the volume control on the unit for the volume level on the PC. Not so. Whatever volume level you were last listening to affects how loud your PC volume can get. This means that if you were listening to something very low, no matter how loud you adjust your PC volume, it will never get very high. The danger in that is if you adjust up your PC volume and then turn around and bump up the volume on the VtPC. When you switch back to the PC input, you could very likely damage your speakers, ears, and/or relationship with your neighbors. The real issue is that you can't bump up or down the volume while on the PC input. You have to switch to one of the other inputs, change the volume, and switch back to the PC input in order to hear the effects.
Menus
 The menu system is accessible by pressing the Menu/Power button (you can
power off the unit by holding the power button - as long as the unit is plugged
in it will still pass the PC video and audio). These are global settings which
apply equally to the s-video and composite inputs. There are no specific
settings for each. The Video menu
allows you to select between the various PAL/NTSC/SECAM formats. The Display menu allows you to select the
resolution of your display from VGA (640x480) to SXGA (1280x1024) and W1440S,
W1280 and W1440P. The Language menu
lets you select between English, Portuguese and two different Chinese dialects
(not sure which).
The menu system is accessible by pressing the Menu/Power button (you can
power off the unit by holding the power button - as long as the unit is plugged
in it will still pass the PC video and audio). These are global settings which
apply equally to the s-video and composite inputs. There are no specific
settings for each. The Video menu
allows you to select between the various PAL/NTSC/SECAM formats. The Display menu allows you to select the
resolution of your display from VGA (640x480) to SXGA (1280x1024) and W1440S,
W1280 and W1440P. The Language menu
lets you select between English, Portuguese and two different Chinese dialects
(not sure which).
With the Color menu you can adjust the Brightness, Contrast, Saturation and Hue of an image. Use the arrow buttons to navigate to the correct setting and the volume buttons to change the values. The values have odd default values at around the high 120's low 130's and a max value of 255 and minimum of 0. They also loop meaning you can go directly from 0 to 255 (and back) if you want. Since there are so many levels of adjustment (not sure why that is), this can make evident the differences between the extremes of both settings. There is also the ability to reset these values to their factory default. Overall, this is pretty much the bare-minimum of calibration options.
Impact Acoustics Video to PC Converter: Testing and Conclusions
The big deal with the Video to PC Converter is that it deinterlaces the input video. This can make a huge difference in the video quality. While I hooked up the VtPC in my office at first, I wasn't really comfortable using that monitor to determine the quality of the deinterlacing. For the purposes of this test, I connected it to my Westinghouse LVM-42w2 through the VGA input. I set the Display setting to SXGA (1280x1024) and calibrated the VtPC with AVIA. Lastly, I ran the HQV tests using both the S-Video and Composite inputs from my OPPO DV-970HD.
The first thing I noticed was that the picture with the S-video appeared to be much sharper and brighter in comparison to the composite input. With the AVIA disc in, I was able to snap a couple of shots of the resolution screen:
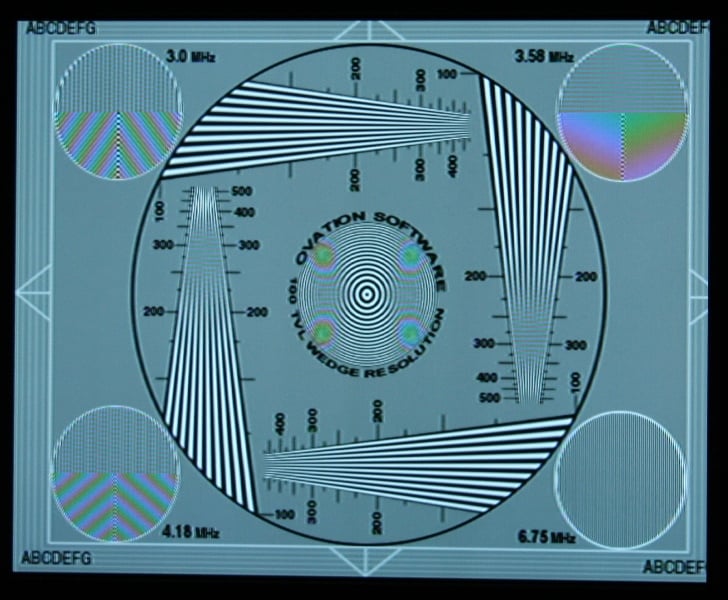
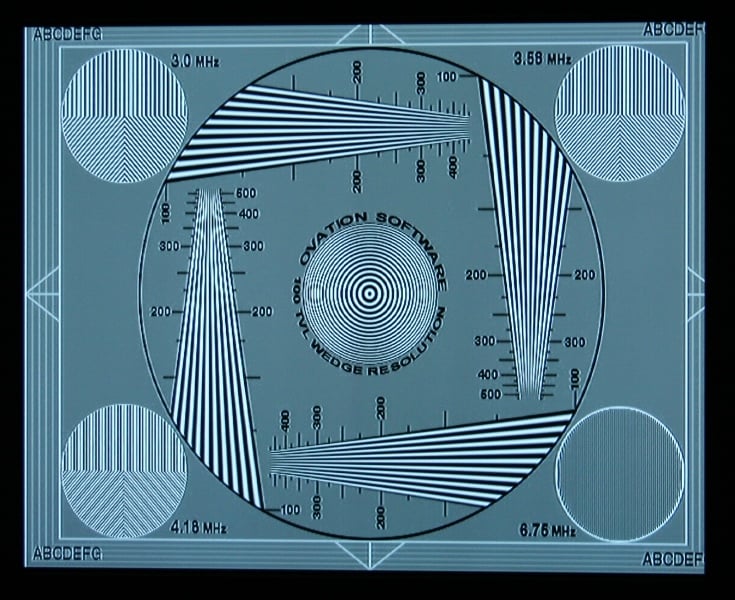
Composite S-video
As you can see, there are a lot of visual artifacts on the composite side that just aren't there on the s-Video side (there are still a few on the s-video side though). This would necessarily lead you to believe that the s-video picture was better. And you'd be right. I found the composite picture to be much more muted and soft with many more visual artifacts than the S-video one. Consider this carefully when you are deciding which input to use for each source.
Audioholics/HQV Bench Testing Summary of Test Results
Perfect Score is 130
Impact
Acoustics Video to PC Converter
Benchmark total
score: 40/130.
|
Test |
Max |
Results Composite |
Pass/Fail |
Results S-Video |
Pass/Fail |
|
Color Bar |
10 |
10 |
Pass |
10 |
Pass |
|
Jaggies #1 |
5 |
0 |
Fail |
0 |
Fail |
|
Jaggies #2 |
5 |
0 |
Fail |
0 |
Fail |
|
Flag |
10 |
0 |
Fail |
0 |
Fail |
|
Detail |
10 |
5 |
Pass |
10 |
Pass |
|
Noise |
10 |
0 |
Fail |
0 |
Fail |
|
Motion adaptive Noise Reduction |
10 |
0 |
Fail |
0 |
Fail |
|
Film Detail |
10 |
5 |
Pass |
0 |
Fail |
|
Cadence 2:2 Video |
5 |
0 |
Fail |
0 |
Fail |
|
Cadence 2:2:2:4 DV Cam |
5 |
0 |
Fail |
0 |
Fail |
|
Cadence 2:3:3:2 DV Cam |
5 |
0 |
Fail |
0 |
Fail |
|
Cadence 3:2:3:2:2 Vari-speed |
5 |
0 |
Fail |
0 |
Fail |
|
Cadence 5:5 Animation |
5 |
0 |
Fail |
0 |
Fail |
|
Cadence 6:4 Animation |
5 |
0 |
Fail |
0 |
Fail |
|
Cadence 8:7 animation |
5 |
0 |
Fail |
0 |
Fail |
|
Cadence 24fps film |
5 |
0 |
Fail |
0 |
Fail |
|
Scrolling Horizontal |
10 |
10 |
Pass |
10 |
Pass |
|
Scrolling Rolling |
10 |
10 |
Pass |
10 |
Pass |
|
Total Points |
130 |
40 |
|
40 |
|
Comments on Audioholics DVD Torture Tests
While 40 out of 130 doesn't
sound very good, it really isn't that bad. The biggest disappointment here is
the lack of 3:2 pulldown (Cadence 24fps film) and jaggy reduction. The S-video
did better on the Detail test than the composite but the composite did better
on the Film Detail (the reason it got half points was because it locked on in
time, lost it, then reacquired). Keep in mind that these tests are all
unflagged, so the more common flagged video might yield better real-world
results. I wasn't really expecting any noise reduction so that wasn't as
surprising to me. While it won't win any awards for its deinterlacing, it does
do a fine job especially at this price point. Don't forget that your average computer
monitor does zero deinterlacing (garbage in, garbage out) so these 40 points is
way better than what you had before.
Viewing Evaluation
Even though I was technically working (preparing for my next episode of AVRant), I went ahead and popped in a movie in the name of doing a thorough review. Ah, the sacrifices we make.
DVD: 300 I
didn't know what I wanted to watch. After skipping over endless movies beloved
by my wife (seriously, how many times can you watch Pretty Woman before it is considered a mental disorder?) I picked something that would not only hold my attention but give the dark and light
scenes that would establish how well the Video to PC Converter was working. I
picked a period piece with an epic storyline based on true events. I picked the
feel-good movie of the summer (at least I felt good). I picked 300.
I
didn't know what I wanted to watch. After skipping over endless movies beloved
by my wife (seriously, how many times can you watch Pretty Woman before it is considered a mental disorder?) I picked something that would not only hold my attention but give the dark and light
scenes that would establish how well the Video to PC Converter was working. I
picked a period piece with an epic storyline based on true events. I picked the
feel-good movie of the summer (at least I felt good). I picked 300.
I've done a comparison of the video quality of the Blu-ray version of this movie to the DVD version before - and there is no contest. I don't care how good your deinterlacing is, you're never going to get an HD quality picture. But you can get a very good one - especially important when you are blowing it up on a big screen. The VtPC did a reasonably good job of deinterlacing, especially on the S-video input. There were some artifacts, especially with movement, but overall it was a fairly good picture. The composite was definitely inferior to the S-video with the S-video looking sharper, more in focus, and having less artifacts. Since the Westinghouse is a 42" display, everything was a bit exaggerated compared to what you're going to experience on your (most likely extremely) smaller computer display. On a small display, the picture will look much improved over a straight interlaced signal.
Recommendations
It wasn't hard to like the idea of the Video to PC Converter, but that doesn't mean I don't have some recommendations. First, the Menu/Power button is not a great choice to use as a Select button while scrolling through the different menu screens. It's a little confusing. Adding a few buttons might not be a bad choice. While I really like the aesthetics of the VtPC, it is a bit hard to place once you get all those cables hooked into it. The fact that the buttons are on the unit and there isn't a remote means that you'll want it close at hand. It ended up on the floor which meant I had to bend down whenever I wanted to adjust the volume (which needs to be made independent of the PC volume). Some sort of case or magnet to hold it down would make it easier to locate conveniently and counteract the pull of all those heavy cables. Lastly, I'd love to see the menus settings made to be independent for each of the video inputs. Having global settings pretty much guarantees that one of the two sources isn't going to look right. Even during my tests where I had a single source plugged into both video inputs, I found that I would have calibrated each differently if I had the option.
Conclusion
 The
Video to PC Converter is another great device by Impact
Acoustics to make your in-office experience more pleasurable
(perhaps at the expense of a little productivity). Take any composite or S-video
video source with its accompanied analogue audio and the VtPC will convert your
monitor to a display. All this without software or any other "not allowed
by IT" programs. The box is small and unobtrusive which you can easily
hide away. The deinterlacing on the VtPC may be a bit basic, but it is a world
better than the deinterlacing of your monitor. If you're an employee, this
should be on your birthday list, if you're an employer, you should be looking
for one to confiscate from your employees… so you can use it in your office.
The
Video to PC Converter is another great device by Impact
Acoustics to make your in-office experience more pleasurable
(perhaps at the expense of a little productivity). Take any composite or S-video
video source with its accompanied analogue audio and the VtPC will convert your
monitor to a display. All this without software or any other "not allowed
by IT" programs. The box is small and unobtrusive which you can easily
hide away. The deinterlacing on the VtPC may be a bit basic, but it is a world
better than the deinterlacing of your monitor. If you're an employee, this
should be on your birthday list, if you're an employer, you should be looking
for one to confiscate from your employees… so you can use it in your office.
Impact Acoustics Video to PC Converter
$99.99
Impact Acoustics
1501 Webster St.
Dayton, OH 45404
Phone: 877-AV-EXPERT (877-283-9737)
Fax: 800-331-2841
About Impact
Acoustics
Since 1984, Lastar has been a leader in the computer connectivity industry.
Under the brand name Cables To Go, Lastar created a line of computer
connectivity products known for quality and value. CTG uses the finest
components and the latest construction technologies to maximize cable
performance and ensure compliance to industry specifications for each cable and
its designated application. From PC Cables and Adapters to Networking and Data
Sharing products, Cables To Go has delivered the best products at an
always-competitive price.
The Score Card
The scoring below is based on each piece of equipment doing the duty it is designed for. The numbers are weighed heavily with respect to the individual cost of each unit, thus giving a rating roughly equal to:
Performance × Price Factor/Value = Rating
Audioholics.com note: The ratings indicated below are based on subjective listening and objective testing of the product in question. The rating scale is based on performance/value ratio. If you notice better performing products in future reviews that have lower numbers in certain areas, be aware that the value factor is most likely the culprit. Other Audioholics reviewers may rate products solely based on performance, and each reviewer has his/her own system for ratings.
Audioholics Rating Scale
 — Excellent
- — Very Good
- — Good
- — Fair
- — Poor
| Metric | Rating |
|---|---|
| Deinterlacing & Scaling | |
| Build Quality | |
| Ergonomics & Usability | |
| Ease of Setup | |
| Fit and Finish | |
| Calibration Options | |
| Performance | |
| Value |
As Associate Editor at Audioholics, Tom promises to the best of his ability to give each review the same amount of attention, consideration, and thoughtfulness as possible and keep his writings free from undue bias and preconceptions. Any indication, either internally or from another, that bias has entered into his review will be immediately investigated. Substantiation of mistakes or bias will be immediately corrected regardless of personal stake, feelings, or ego.
View full profile