
JVC DLA-X570R 4K e-Shift4 Projector Review
JVC's DLA-X570R 4K e-Shift4 Projector
- Product Name: DLA-X570R 4K e-Shift4
- Manufacturer: JVC
- Performance Rating:


- Value Rating:
- Review Date: August 24, 2017 00:00
- MSRP: $ 3999
- 0.7-inch Full HD D-ILA (1920x1080) X3
- 3840 x 2160 resolution
- Lens Shift: +/- 80% Vertical and +/- 34% Horizontal (Motorized)
- Projection Display Sizes: 60-inch to 200-inch diagonal
- 40,000:1 native contrast ratio and 400,000:1 dynamic contrast ratio with intelligent lens aperture
- 1800 Lumens with high power lamp
- 4K e-Shift4 technology
- 2 HDMI 2.0b inputs full speed 18Gbps, HDCP 2.2, and HDR 10 and HLG HDR
- Compatible with full spec native 4K signals such as 4K60p 4:4:4, 4K60p 4:2:2/36bit and 4K24p 4:4:4/36bit
- Compatible with 4K streaming devices and UHD BD content
- Compatible with DCI Color Space
- Low Latency Mode for Improved Gaming
- Auto HDR (High Dynamic Range) Picture Preset
- Motion Enhance (2D, 3D, 4K) with Clear Motion Drive
- Multi Pixel Control (MPC) with Auto Mode for ease of use3D Enabled (Active Shutter Method). 3D Requires optional adapter and glasses which are not included.
- Optional RF Active Shutter 3D Glasses (PK-AG3G) and RF 3D Emitter (PK-EM2G); Accepts Frame Sequential, Side-by-Side, and Top-Bottom; 3D Anamorphic capable; 3D Parallax adjustment
- Lens Memory with 5 user adjustable presets
- Motorized 2X Zoom Lens (1.4:1 – 2.8:1)
- Simplified 6-Axis Color Management System
- Manual Gamma Control included with JVC Calibration Software
- Control4 SDDP (Simple Device Discovery Protocol)
- 6th Generation 1920x1080 DILA devices
- Ultra Quiet Operation (21db/Low Lamp)
- Clear Black Processing improves local area contrast
- Screen Adjustment Modes
- Convergence Correction — 1/16th pixel increments with 2 memory position
- Ultra Quiet Operation (21db/Low Lamp)
- Clear Black Processing improves local area contrast
- Screen Adjustment Modes
Pros
- Superb overall performance.
- Excellent black levels.
- HDMI 2.0b with HDR10 and HLG HDR support provides some future-proofing.
- Very good performance on HDR content at this price point.
- 4K e-Shift4 technology will rival native 4K projectors.
- Robust options for fine-tuning installations.
- New low latency mode is great for gaming.
- Windows-based JVC Projector Calibration Software is performs excellent automated calibrations.
- Low noise.
Cons
- Does not cover BT.2020 or DCI-P3 color gamuts.
- Relatively slow lag time when switching resolutions.
- No automatic lens cover.
- JVC Projector Calibration Software is Windows-only.
JVC DLA-X570R Introduction
 Let’s face it, there’s just nothing like watching a movie on a big screen. Sure, today’s OLED and LED 4K/UHD displays are getting bigger and look beautiful. But, if you really want the big picture, there’s no substitute for a projector and screen.
While 4K/UHD displays have fallen to prices within reach of mortal men, native 4K/UHD projectors remain well out of reach for the vast majority, costing tens of thousands of dollars.
To that end, a select few companies, like JVC, have developed less expensive projectors that use native 1080p chips but use pixel shifting technology (I’ll get to that later) to produce a “4K-enhanced” image. Even though they have on-board 1080p chips, these projectors support the hallmarks of next-generation imaging such as DCI-P3 and BT.2020 expanded color gamut and High Dynamic Range (HDR).
All the specs you'd want in a 4K-capable projector
One such projector in JVC’s arsenal is the 4K e-Shift4 DLA-X570R projector, which retails for $3,999. While it’s by no means cheap, it represents the entry point to JVC’s e-Shift4 projector lineup. By all accounts, JVC’s DLA-X570R can serve as the heart of any high-end home theater. You won’t mistake this 34-pound projector for some puny presentation projector. It’s nearly 18-inches long, 18.5-inches wide, and 7-inches tall.
It accepts native 4K 60P 36-bit (4:4:4) content at a full 18Gbps. It features a 40:000:1 native contrast ratio and a 400,000:1 dynamic contrast ratio. You’ll be hard-pressed to find a better contrast ratio and real-world performance at this price point.
Traditional 1080p projectors support what’s called the Rec. 709 color gamut. This is the color gamut you find on Blu-rays and HD broadcasts. Unfortunately, that color gamut is limited. It doesn’t show anywhere near the colors the human eye can perceive nor can it even come close to the DCI-P3 color gamut used in commercial theaters.
As the entry level model, the X570R, is capable of covering the full Rec. 709 color gamut. That means you’ll be fine with traditional HD sources, but you’ll fall short of the expanded colors of the DCI-P3 and the even greater BT.2020 color gamut that has been adopted as the standard for next generation 4K/UHD images. You’ll have the move up JVC’s projector line to the X770R and X970R for that.
Brightness
The JVC’s NSH 265W lamp is capable of pumping out 1,800 lumens to a screen size between 60 - 200 inches diagonally. JVC claims that you’ll be able to get about 4,500 hours from the lamp in low power mode and 3,500 hours in high. When you need to replace the lamp, it will set you back $599 (MSRP), though I found some street prices under $500.
As a side note, using low brightness mode in a projector will increase its lamp life and is generally quieter (less fan speed needed to cool the bulb) but it produces a dimmer image. Whether you chose low (called “eco mode” on some projectors) or high brightness mode with traditional HD sources typically depends on your projector screen’s gain (or capability to reflect projected light) and your ability to control light in your room. Remember that ambient room light will wash out a projected image.
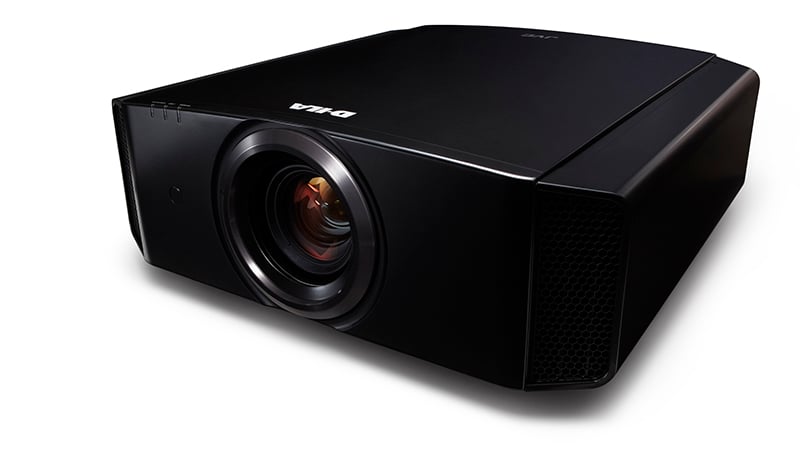
Front and side view of the JVC DLA-X570R
You should typically use the high brightness setting in scenarios where you need higher brightness like 4K/UHD and HDR sources; using a lower-gain screen, or you don’t have great light control in your room. There’s typically some color shifting that happens between low and high brightness mode, so if you’re calibrating your projector, you’ll want to do a calibration for each mode. Thankfully, JVC allows you to save individual calibration settings. You could, therefore, do a calibration with the projector in low and again in high and call them up separately if needed.
In low brightness mode, JVC says that the projector’s fan noise is about 21dB. To put that in practical terms, in my testing fan noise in low brightness was close to inaudible. Only when I switched to high brightness did the projector get noticeably louder than my room’s typical noise floor. Using an SPL, I measured a 6db difference between the two modes at about six-inches from the projector. Of course, the further away you go the less dramatic the difference. I noted about a 2-3dB SPL difference between low and high brightness mode at my seating position approximately 9.5 feet away.
Features
The motorized lens has a 2X zoom and a motorized focus of f=21.4 to 42.8mm/F3.2-F4. To aid with different installation scenarios, the X570R has a motorized lens shift of +/- 80% vertical and +/- 34% horizontal. In other words, there’s no need to tilt the projector (which you should never do with the JVC) like you might do with presentation projectors. You can put the projector on a level surface and still project the image above or below the projector’s horizon. The JVC’s lens features worked perfectly in my ceiling-oriented setup. I didn’t find any limitations. Should you need it, you also have the ability to apply some keystone correction. Keystone correction gives you the ability to adjust the geometry of an image in case you have to put the projector at an angle from center, which tends to skew the image.
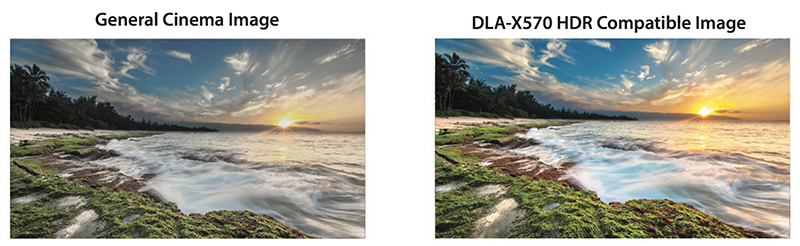
JVC's marketing images give you an idea of the differences you'll see between an SDR (standard dynamic range) and HDR (high dynamic range) image with expanded color gamut.
While these images are simulated, there's no question that HDR and expanded color are the real deal.
The JVC X570R has a few upgraded options over its 2016 predecessor, the X550R. One such feature is a low latency mode for gaming. It works great! I enjoyed connecting my Xbox One to the X570R. You haven’t played Star Wars Battlefront or Lego Dimensions until you’ve experienced them on a 119-inch screen in full 7.1 surround sound. In a word: awesome. I noted simply excellent response time with the Xbox One’s controllers. That makes the JVC a real winner for those of you who would love to fire up a gaming console in addition to movies on the big screen.

Star Wars Battlefront on Xbox One and any game for that matter was simply spectacular through the JVC.
The new low latency mode for gaming made a noticeable difference.
Unlike some of the competition at this price point, the JVC doesn’t have a motorized lens cover. There’s a removable plastic cover to protect the lens that you need to take off or place back. It’s a bit of a downer, but clearly not a deal breaker.
Unlike its far more expensive siblings, the X770R and X970R, the X570R lacks THX certification and a THX mode. It also and falls short of those models’ superior color filters, expanded color gamut support, dynamic range, and optics.
In case you’re wondering, projectors or displays that are THX certified conform to certain standards set by THX. They go through a battery of hundreds of tests for color and image quality. In my experience, projectors with a THX mode will come as close to a professional calibration as possible out of the box. It’s a feature I’d love to see in the X570R’s successor.
The JVC X570R supports 3D with active shutter glasses. It's loaded with all the 3D features you can hope for in a projector. 3D is limited to 1080p. UltraHD Blu-ray and 4K/UHD programming do not have a 3D spec, in case you're wondering. 3D is on its last leg and most likely won't have a life beyond existing 1080p content. If 3D is important to you and you have 3D titles, in your collection then you'll need to purchase an RF 3D emitter (part number PK-EM2G) to the X570R, which costs about $100. It's not included in the box. You'll also need to purchase compatible active shutter RF 3D glasses. JVC didn't provide any of the 3D options with the review unit, so I didn't have the opportunity to test any 3D Blu-ray content.
The JVC’s rear panel has two HDMI 2.0b and HDCP 2.2-compliant inputs, which means you’re getting the most up-to-date HDMI standard available on the market today. Previous generation HDMI 2.0a inputs supported HDR10 (ST .2084), which is the high dynamic range grading found on UltraHD Blu-rays. However, the presence of HDMI 2.0b is critical and I’ll explain why.
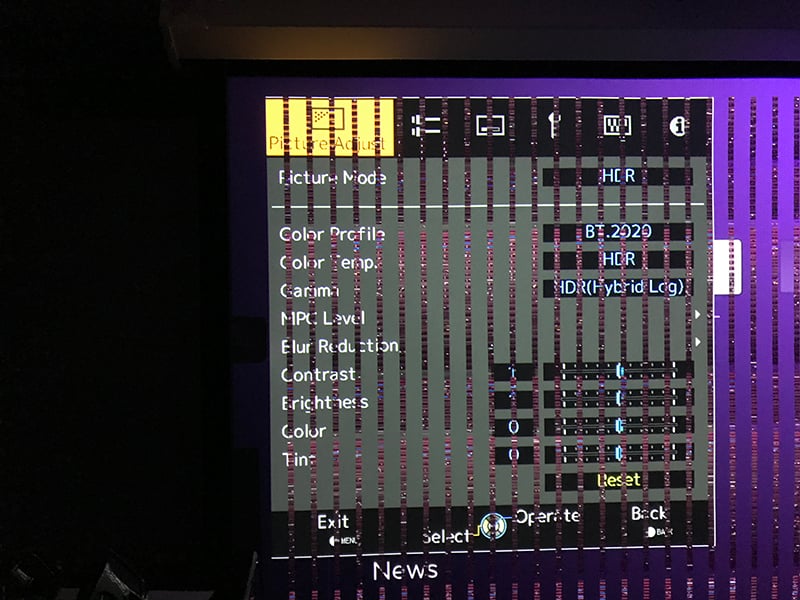
![]()
You can fine-tune the JVC's picture controls—including specifying which area of the screen to adjust.
Hybrid Log Gamma (HLG) HDR is a high dynamic range technology developed by the BBC and Japanese public broadcaster NHK. HLG HDR is projected to be supported by future 4K/UltraHD television programming because it is backwards compatible with standard definition sources. The caveat is that HLG HDR requires HDMI 2.0b. The DLA-X570R is one of the few projectors at this price point that supports both HDR10 and HLG HDR, and it’s a really big deal that gives you some future-proofing.
I did ask JVC if they would be supporting the newly announced HDR10+ standard with dynamic metadata via a firmware upgrade. There was nothing definitive that they could tell me at this time. There’s no standard for Dolby Vision HDR on projectors (in case you’re wondering).
JVC's PC-based Projector Calibration Software will take ambient light readings in your room and adjust the projector's settings accordingly.
Whether you’re watching 1080p programming, popping in a 4K/UltraHD Blu-ray, or streaming 4K HDR content, the X570R will automatically select the proper setting and gamma. In fact, auto HDR picture preset is one of the new features in this model. In my testing, the JVC automatically selected the proper setting for a given source. Regular high-def programming got an SDR setting, 4K/UHD Blu-rays got HDR10. Slick and seamless.
JVC’s E-Shift4 and other technologies
Remember, the JVC DLA-X570R is technically a 1080p projector. However, thanks to JVC’s pixel-shifting technology, the DLA-X570R is capable of pumping out a 4K image. JVC first introduced their e-shift pixel shifting technology in 2013. The DLA-X570R contains JVC’s fourth generation e-shift technology.
Let’s explain how the X570R accomplishes this 4K/UHD feat from a 1080p projector. The JVC breaks down a native 4K/UHD 3840 x 2160 signal into two 1920 x 1080 images. The JVC then projects the first 1920 x 1080 image and a fraction of a second later projects the second 1920 x 1080 image but shifts the second image diagonally by a half pixel. It then repeats this process, constantly alternating the two portions of the 4K/UHD signal. Because this happens so fast, our visual perception creates a composite 3840 x 2160 image whose resolution is virtually indistinguishable from a true 4K projector. In fact, if you had a native 4K projector side-by-side with the X570R you’d be hard-pressed to tell the difference. It’s that good. The effect, if you think about it, is a bit similar to how traditional film tricked our visual perception to assemble individual frames together to create the illusion of motion.
How JVC's e-Shift4 technology works to create a 4K/UHD image from 1080p chips.
In my tests across a variety of UltraHD Blu-rays on both a 90-inch and 119-inch screen, I found JVC’s E-Shift4 to be absolutely stunning. It’s not a gimmick; it works wonders.
There are a few other technologies that JVC includes to enhance your viewing experience. Most notably, JVC includes MPC (Multi Pixel Control) and CMD (Clear Motion Drive) which is the company’s 120Hz frame interpolation. MPC is a new image processing algorithm that JVC developed that the company says creates a natural impression that areas in focus are sharper and areas not in focus are softer. The company says it creates a greater sense of depth with 4K/UHD sources. It’s an interesting feature and you can adjust its intensity or leave it off. I used the default settings, which I found to be just right.
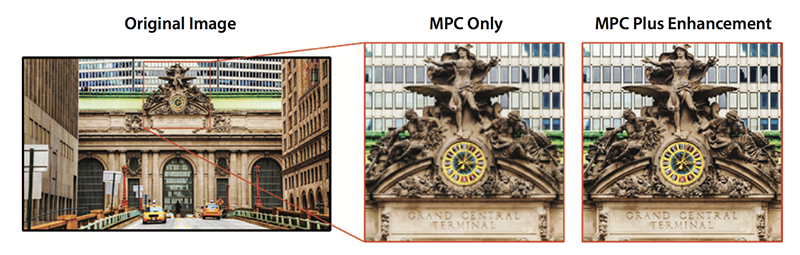
JVC's MPC enhancement technology
JVC says that CMD reduces image lag and improves dynamic resolution. JVC told me that CMD optimizes the drive of the D-ILA device so it turns on and off at 120 Hz to give you a sharp image without any bleeding or trailing images. The foreground and background will be nice and sharp as the object moves across the screen. Typically, the drawback with such frame interpolation technologies is that they produce the dreaded “soap opera effect” which makes a movie start to look visually like a TV soap opera (hence the name) or like it was shot on a home video camera. I can’t stand the soap opera effect created by many frame interpolation engines.
However, on the JVC, keeping that setting on low benefited every single source I viewed. In fact, with very few exceptions, this blur-reduction setting didn’t call attention to itself. I asked JVC how they were able to do this so effectively and they told me that they do a frame interpolation by scanning each frame three times and make up a frame that is a combination of the frame before and the frame after. When CMD is turned on low, the projector provides the following sequence of frames A-AB-B-BC-C. I liked it so much that I kept it on for most of my viewing.
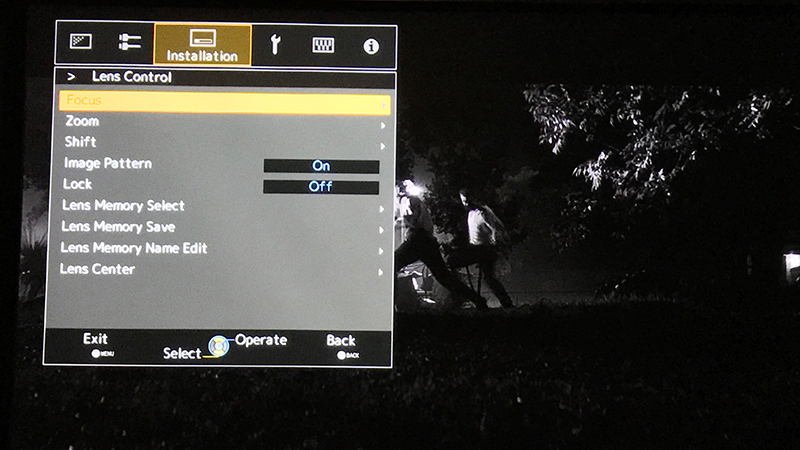
There are ample lens control and lens memory options available on the JVC X570R.
Now some users have reported online that enabling CMD can produce vertical banding on some material. Vertical banding is an issue you’ll sometimes see with LCD projectors (DLP-based projectors have their own issue called rainbows). When vertical banding occurs, you start to get subtle, but noticeable, vertical bars in your image. The vertical bars can sometimes be as wide as 1-inch. Vertical banding can subtle all the way up to nasty and really distracting. As a general rule with LCD projectors, vertical banding and its severity can sometimes differ with different units of the same model (and can be maddening).
I reached out to JVC to ask about these reports. JVC told me that if vertical banding does occur it can be minimized by adjusting levels in noise reduction. I saw that some users claimed anecdotal evidence that the severity of the banding varied depending on the 4K/UHD player. In my testing with my source UltraHD Blu-rays and Oppo UDP-203, I did not readily notice any vertical banding during actual programming.
Enabling CMD did have another impact that I experienced. It tended to increase the X570R’s lag time to switch resolutions when handshaking HDMI sources. The JVC isn’t a speed demon to begin with, so this made the lag time even worse. This was most painful with switching screen resolutions on the Roku. It took so long for the JVC to switch resolutions that upon initial setup I couldn’t see the Roku’s picture settings dialog box to confirm them. I was stuck at 720p in an unending Ground Hog Day loop. Turning off CMD will improve the JVC’s X570R speed, so keep that in mind.
All in all, I was extremely pleased by the number of options in JVC’s control panel. Enthusiasts and custom installers will have just about everything they need to dial the X570R into pretty much any installation.
JVC DLA-X570R Installation & Setup
I set up the JVC approximately 24 feet from my two screens. I placed the projector just below the ceiling. Using JVC’s granular menus and feature set, I was able to get the projector spot on.
I appreciated the JVC X570R’s lens memory feature. I have both a 90-inch 1.1 white gain and 119-inch 0.8 gain grey screen (one screen is immediately behind the other). I created two lens profiles with custom settings for size and focus. I could switch to either lens memory setting at the press of a button on the excellent remote. Once set, the X570R kept fairly consistent memory settings between the two screens that didn’t require constant readjustment.
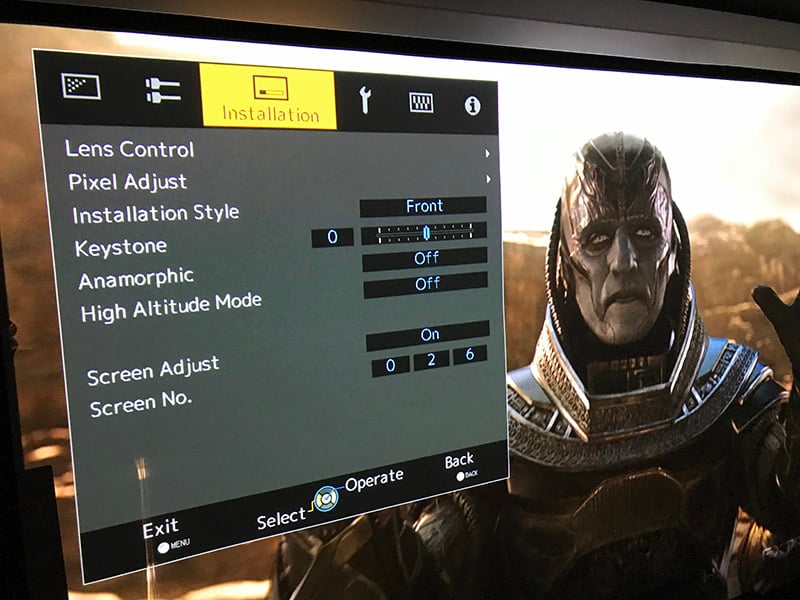
The JVC X570R provides lots of options to dial the projector into your room.
One feature is a screen adjustment option where you reference your screen's manufacturer and model and enter in a screen number so that the projector can make adjustments.
Here, I am entered in screen number corresponding to my Draper 0.8 gain grey screen.
Because the projector’s approximately 24-foot throw from the back of my room created an image slightly larger than 90-inches, I used the projector’s built-in masking tools to trim the edges for a perfect fit when I was evaluating content on the 90-inch screen.
A great remote
It’s very rare that I’ll comment on a review unit’s remote control, but JVC’s deserves special mention. The backlit remote is smartly laid out and never buried me in useless buttons. As with any good remote, I was able to navigate it without looking. The feature that I loved more than anything, however, was the backlight option.
It didn’t turn on with the slightest accidental movement. If you need to refer to the remote in the dark, the backlight button has an ever-so-subtle glow to let you know where it is. When you depress it, the remote lights up and all the buttons are clearly and intelligibly lit. I wish more remotes had this very simple yet incredibly helpful cue.
Beware HDMI 2.0b and HDR headaches
Users be warned, if you thought that we had reached a relatively stable HDMI plateau, you’re going to get your world rocked. When I set up the projector, I did my normal routine, where I have some HDMI sources plugged directly into my Denon X7200WA receiver and the remaining media sources fed via an HDBase-T matrix switcher. Boy, was I in for some unexpected pain.
The JVC X570R rendered incredible detail on both Blu-ray and 4K/UltraHD Blu-ray sources.
First off, I couldn’t get HDR to work at all from sources fed via my HDBase-T HDMI switcher. I emailed the vendor who told me that current HDBase-T extenders don’t support any flavor of HDR and they won’t be able to be firmware upgraded either. That meant I needed to move the Oppo UDP-203 and connect it directly to the Denon X7200WA. So far, so good…or so I thought.
Next, I had some quirky issues where the Oppo UDP-203 sometimes made UltraHD Blu-ray titles with HDR look very dark and reddish. For those of you with a background in design, it’s like someone had jacked up Photoshop’s “burn” filter to high and applied it to the screen. I also noted very sporadic issues where it apparently wasn’t always sending the right color space. To be fair, I cannot confirm if this was disc-related or the Oppo UDP-203. Nevertheless, once Oppo updated their firmware, things fell right in line and I never had those problems again.
On two occasions I experienced what JVC described as a synchronization error when I opened up the projector menu. Each time it went away when I closed the menu and never experienced it during movie content.
But wait, there were a few more surprises.
I tried to enable 4K/UHD with HDR on the Roku. The Roku confirmed all these capabilities in my signal chain but then I’d get a purple screen and nothing more. Long story short, I couldn’t get the Denon X7200WA and Roku to play nicely together. In order to get the Roku to work, I had to plug it directly into the JVC.
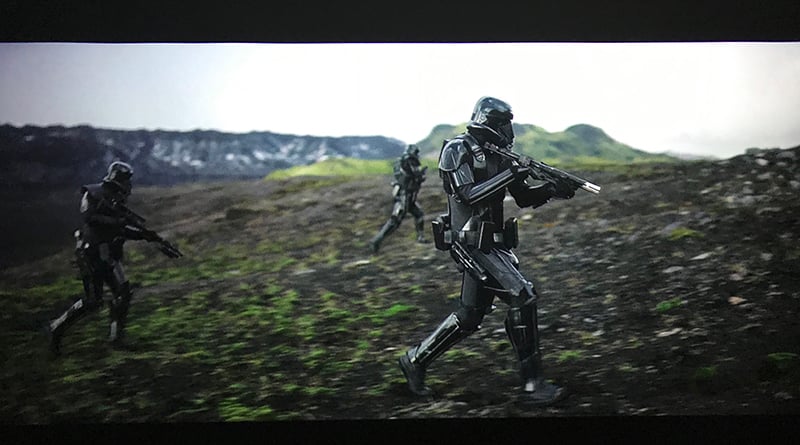
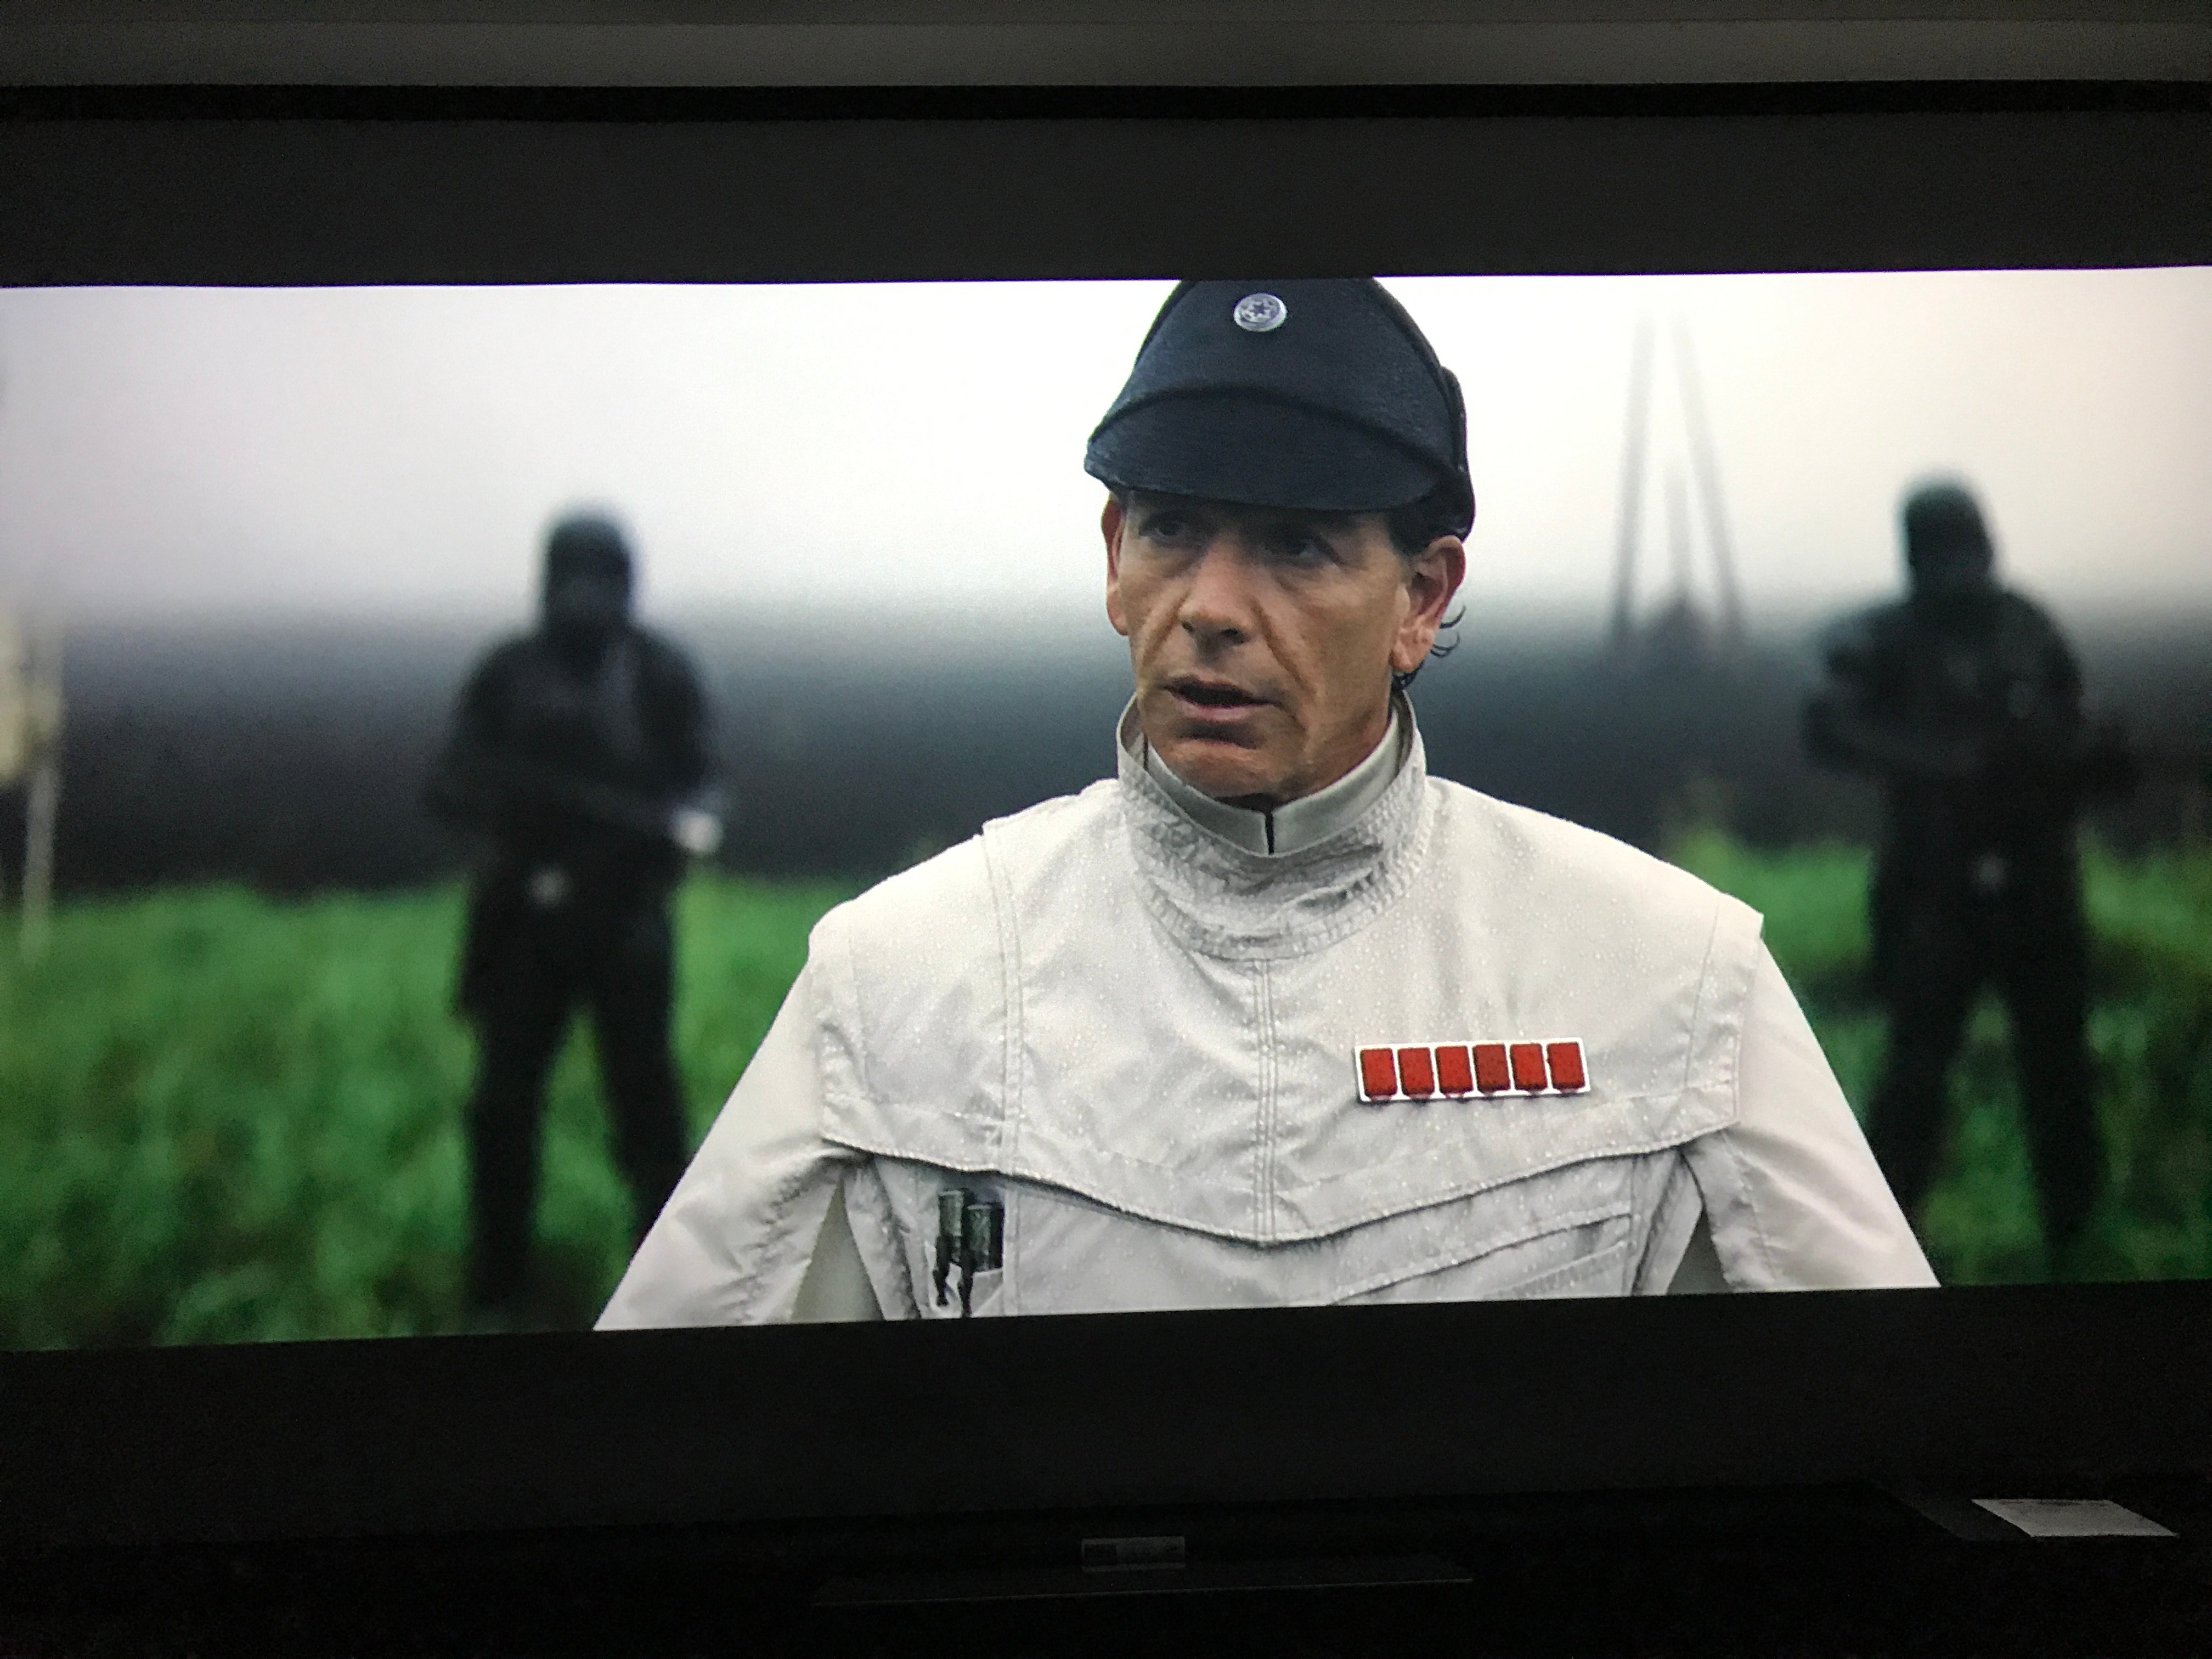
The JVC X570R's black levels were superb. With Rogue One on Blu-ray, the X570R displayed deep blacks and fine shades of grays.
As part of all this debugging, I also found out that Denon won’t have an HDMI 2.0b upgrade for the X7200WA. Yes, I’ve spent an inordinate amount of time relating some of these issues because most (if not all) will be way beyond the technical ability of a typical user to debug. I note them because we are going through another turbulent HDMI and display technology period. If you are going to be using sources with HDR in general or HLG HDR, in particular, make sure you are able to pass things through an end-to-end HDMI 2.0b signal chain. Put another way: Sooner or later, all of us are going to have to look at our home theater equipment and make sure we have HDMI 2.0b-compliant devices to avoid problems.
Just so there’s no mistake, Let me be crystal clear that none of these issues are a knock on the X570R.
JVC DLA-X570R Projector Calibration
With the setup issues out of the way, it was time to turn towards calibration. If you buy the JVC and want the best “out of the box” settings, you should select “natural.” In my tests, “natural” was very, very good but green and red were oversaturated. To really get the best out of the X570R, you want to get it professionally calibrated or take the time to do a calibration yourself with the right equipment. JVC offers its own calibration software, which runs only on Windows. The JVC Projector Calibration Software was at version 9 during my review period and I found it to be excellent.
I typically use CalMan for all my calibrations. In this case, I wanted to use JVC’s software because it is the only way to edit certain gamma settings and the PQ curve on the projector. Another upside to JVC’s software is that it auto-calibrates, which can be a real time-saver. The downside with JVC’s software is that it only works with two meters, DataColor’s entry-level Spyder and the far more expensive (but excellent) X-Rite’s i1 Pro2 meter. The meter I typically use, X-Rite’s i1, wasn’t compatible, so I purchased the entry-level Spyder5 for this review to give it a try.
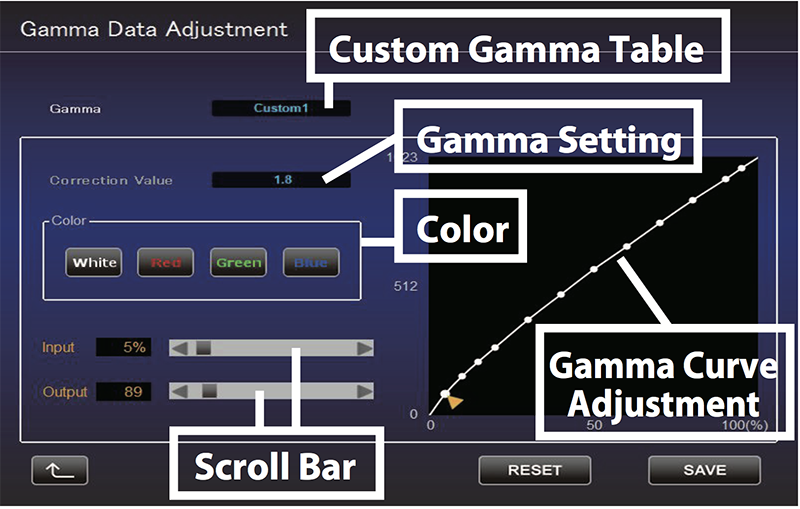
JVC's free Windows-based software gives you the ability to fine-tune the projector's gamma curve.
To use JVC’s calibration software, you must connect the X570R via Ethernet to your network. There’s no other option. You then type in the IP address of the X570R in the JVC software to connect to the projector. The software won’t auto-discover the projector on the network.
Once you connect the software with the projector, you choose which of the two meters you have. You’re then presented with all the projector’s profiles. You chose which profile, gamma setting, and projector lamp setting you wish to calibrate.
In my setup, since I have both a 90-inch 1.1 gain white screen and 119-inch 0.8 gain grey screen, I performed two calibrations. For purposes of this review, I’ll be referring mostly to the calibrated 1.1 gain screen as reference.
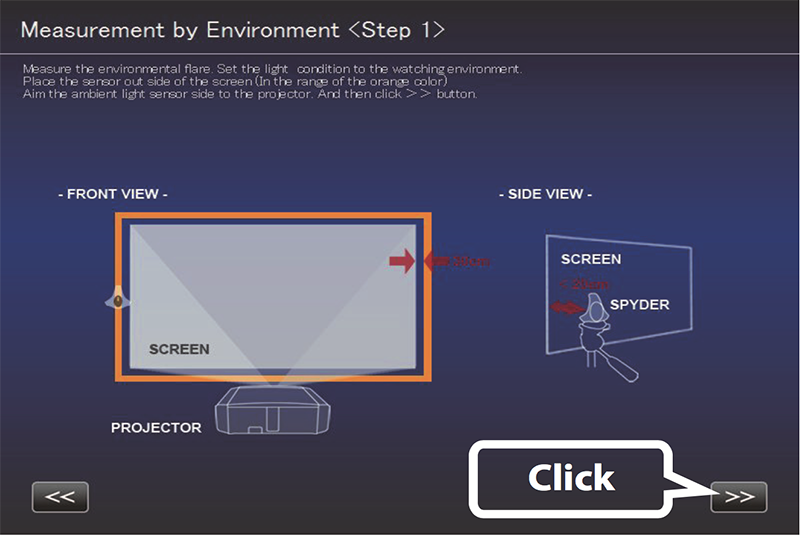
Using JVC’s Projector Calibration Software
If you are using the Spyder meter, you point the meter directly at the projector, not the screen. If you’re using the X-Rite i1 Pro2, then you take your measurements off the screen.
When you fire everything up, the JVC Calibration Software will take a light measurement and present you with an orange rectangle. You need to place the meter at a distance from the projector where it lands within the orange rectangle. If the meter is too close to the projector, it will get oversaturated and yield incorrect readings. Everything updates in nearly real-time so you’ll know if you need to move the meter closer to the projector or closer to the screen. The best practice is to put the Spyder about one foot in front of the screen.
Performing the auto calibration with JVC’s software was very easy and relatively painless. It will do both SDR Rec. 709 and HDR.BT2020 calibrations. You do need to run a separate calibration for each.
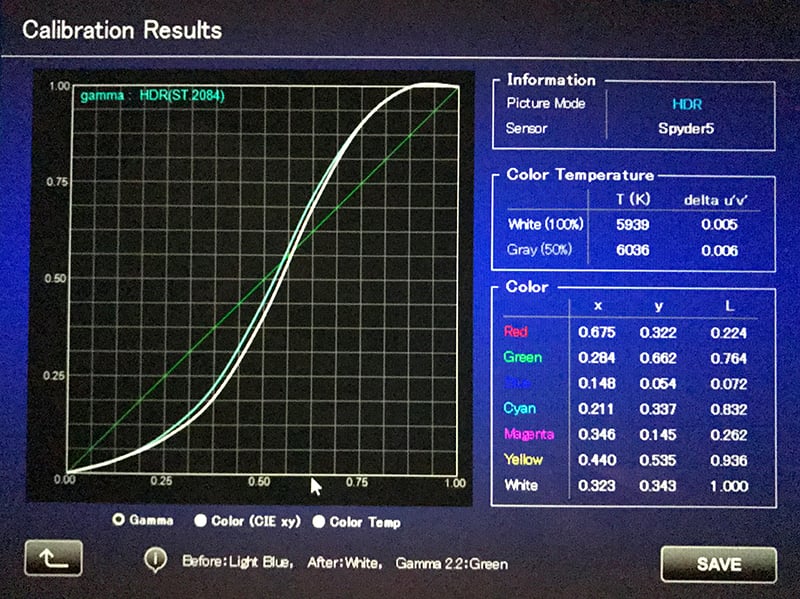
The JVC's Projector Calibration Software did a decent job of getting me a decent PQ (Perceptual Quantizer) Curve post-calibration for HDR.
I checked my results with R. Masciola's HDR 10 patterns and noted that post calibration, the X570R was graded to show content up to 1,000 nits peak brightness.
Taking measurements is lightning fast. On average, it takes only about seven and a half minutes to perform a full SDR or HDR calibration. There’s no need for you to supply external patterns. All the patterns you need are generated by the projector itself.
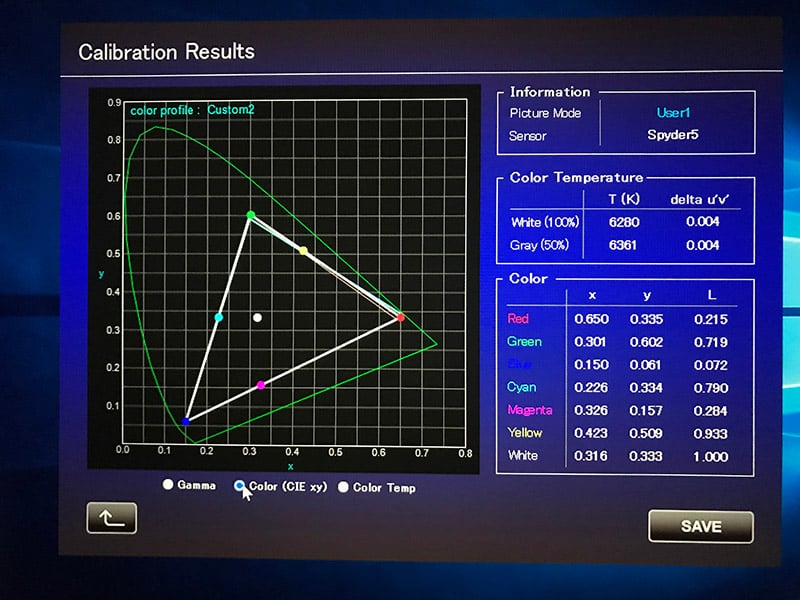
The JVC did a decent job of giving me a good Rec. 709 calibration for HD content.
What I liked most about the JVC software is that it measures and sets your gamma and PQ curve. Measurements were generally excellent but weren’t always spot-on. I sometimes had to perform a calibration twice to eliminate obvious anomalies post-calibration. The good news is performing a second calibration typically fixed any issues.
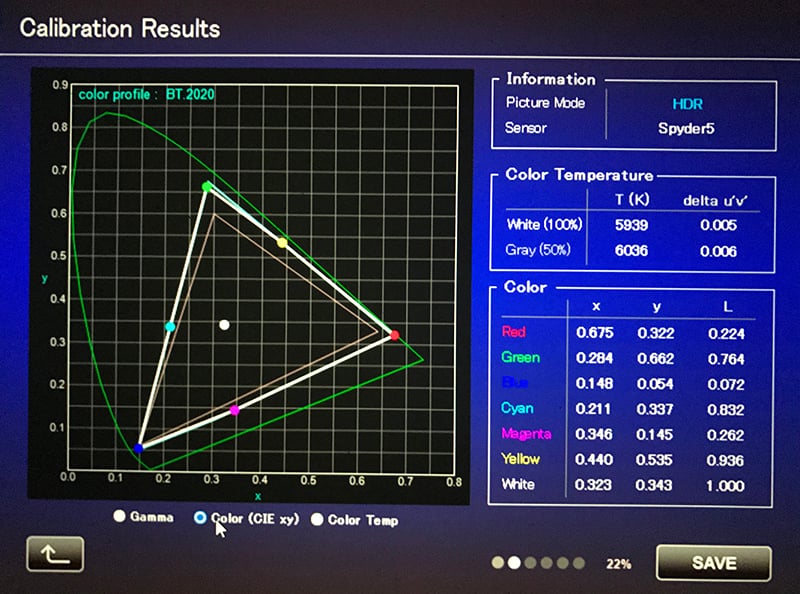
The results of one of the calibrations of the BT2020 profile using a Spyder5 with JVC's Projector Calibration Software.
In the BT.2020 profile, JVC told me that the X570R will cover slightly beyond the Rec. 709 color gamut but doesn't cover either the full DCI-P3 or BT.2020 color gamuts.
Out of curiosity, I fired up CalMan 5 with the X-Rite i1 meter to double-check my settings. With some JVC models, you can set CalMan to auto calibrate the projector in the same way that the JVC software does. A full auto-calibration doesn’t work with the X570R unfortunately. You can, however, communicate with the projector to generate its internal patterns. To do so, you’ll need to communicate with the projector via a null modem RS-232 cable. Using a Kensington USB to RS-232 adapter and parallel cable, I connected to the projector and I was on my way.
For HDR calibration, I used Ryan Masciola’s HDR10 patterns. Ryan’s patterns have a CalMan 5 HDR workflow included. I loaded the HDR patterns on a USB stick and displayed them via the Oppo UDP-203’s USB media port.

I used R. Masciola's HDR 10 patterns with Calman to check my HDR calibration settings.
The X570R’s brightness was very good. I measured just over 29fL in low mode and over 35fL in high. With HDR calibrations, I measured over 37fL. JVC told me that these readings were right in line with what I should expect with my setup.
So that I don’t prolong this aspect of the review, I’ll note that Calman 5 does not support HDR projectors. In fact, when you take readings, all readings will be below target—even though the picture looked very good post calibration. This initially drove me crazy until SpectraCal referred me to this thread. This correlates exactly with my measurements. In summary, you need to adjust CalMan by a factor of four to get the right HDR readings. Just to be sure, I sent my calibration results to JVC, who confirmed this to be the case and they recommend a factor of four when they do their training with partners who use CalMan. Needless to say, this made me feel far more at ease. From that point on, it was time to see what this projector could do.
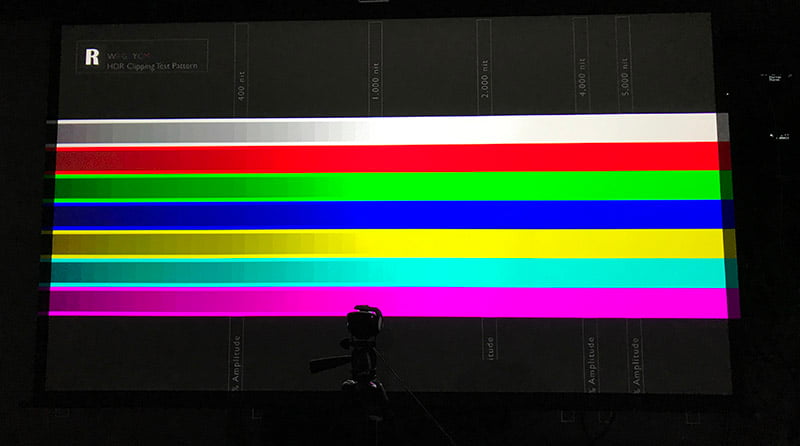
R. Masciola's HDR 10 UHD test patterns had just about everything I needed to see the results of a calibration.
JVC DLA-X570R Projector Video Performance
After installation and calibration, I was ready to go. Electronics and speakers associated with the JVC review setup included a Denon X7200WA receiver with a Monprice Monolith 7 amplifier driving my floorstanding speakers. Speakers were SVS Ultra towers, Ultra Center, Ultra bookshelf, and dual SB13-Ultra subwoofers. Beale Street Audio in-ceiling speakers took care of Dolby Atmos and immersive audio tracks. An Oppo UDP-203, 4th Gen Apple TV and Roku Premiere+ rounded out much of the sources.
In a nutshell, the performance of JVC’s X570R at this price point is out of this world. I tested the JVC on a variety of sources including Blu-ray discs, OTA (over-the-air) HDTV, a 4th generation Apple TV, a Roku Premiere+, and a host of UltraHD Blu-ray discs. I’ll break out my impressions into 1080p and Rec. 709 sources and 4K/UHD sources with HDR.
Rec.709 and HD sources
 Blu-ray, HDTV, and 1080p streaming sources were nothing short of spectacular on the X570R. I fired up Star Wars: Rogue One on Blu-ray. In the opening scene, Commander Orson Krennic, lands on the desolate planet, Lah’mu, looking for Galen Erso, a brilliant scientist who had been responsible for the development of the Death Star. When Krennic’s Delta-class T-3c shuttle passes over the planet, the earthy-color pallet of the barren ground and hills basks in blacks, dark greys, and subtle dark shadows.
The JVC’s ability to render these darks was superb. When Krennic lands his shuttle and walks across the landscape with an accompaniment of Death Troopers, Krennic’s light grey attire beautifully pops on-screen. The Death Troopers’ all-black armor maintained its menacing feel without becoming washed out or lost against the black earth of Lah’mu. Close-up scenes of Krennic showed nearly infinite detail. I could easily see detailed water droplets shimmering on his commander’s uniform.
I was fortunate enough to have the JVC X570R during the NHL’s playoffs through the Stanley Cup finals (alas, my Boston Bruins didn't get past the first round this year). I watched the playoffs on the NBC Sports app on the AppleTV and via an over-the-air HDTV antenna.
The X570R had no problem rendering the details of ice surfaces while also pumping out the deep black accents of the Pittsburgh Penguins’ uniforms. The JVC’s excellent motion processing also eliminated the overwhelming amount of motion blur during fast moving plays, making any hockey action easy to enjoy.
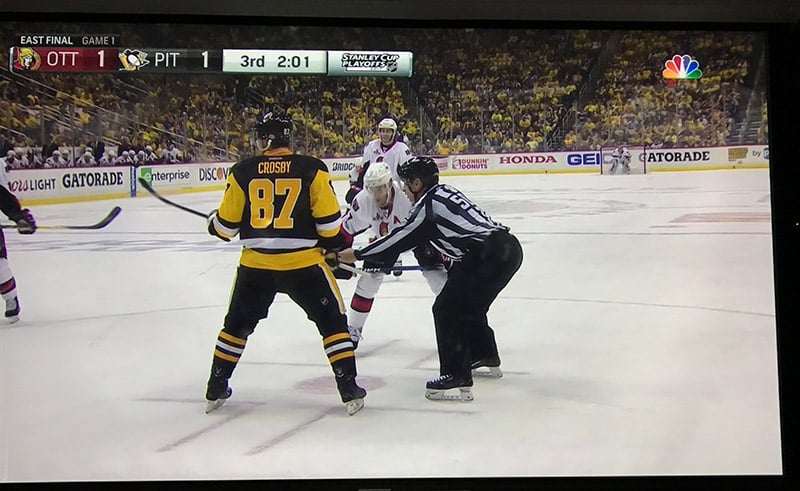
Watching the NHL playoffs, NBA playoffs, or any sport for that matter was thoroughly enjoyable on the X570R.
Blacks were deep, colors were vibrant and tough shots, like hockey rink ice, were always spot-on.
UltraHD and HDR sources
 As good as high-definition sources were, switching to UltraHD was a knockout. That's not to say that we still don't have HDR problems. And there are still situations where HDR-graded content without dynamic metadata can still seem too dark; but all in all, videophiles rejoice! We have lots of great stuff to look forward to.
Even without displaying the full DCI-P3 color gamut within a BT.2020 container, UltraHD Blu-rays reveled in rich, lush colors complemented by subtle hues. While the JVC certainly won’t pump out anything close to the brightness of today’s 4K/UHD LED displays, it didn’t take away my enjoyment or the heightened experience of HDR 10 graded content. In fact, I had more than one person remark how bright HDR-graded content was when I'd bring people in to give me their reactions on the JVC.
Let me offer some concrete examples. First, I fired up the UltraHD Blu-ray of X-Men Apocalypse. In the opening chapter, Apocalypse’s outdoor procession in Egypt basks in sunlight. Dark scenes were wrapped in deeper shadows and bright scenes or highlights captured your attention. Elements like Psylocke’s telekinetic katana (her glowing purple blade of psychic energy) also took on a vibrant glow on-screen. Did the JVC enhance my movie experience? You bet.
Next, I fired up Pacific Rim on UltraHD Blu-ray. All I can say is wow! The entire tone of the film is dark and the JVC captured deep, dark blacks and fine shadow details with ease. The stark contrast between bright and dark elements made the film a visual spectacle. Bright lights, explosions, and highlights just popped. The JVC mastered battle scenes between Jaegers and Kaijus. They were intense.
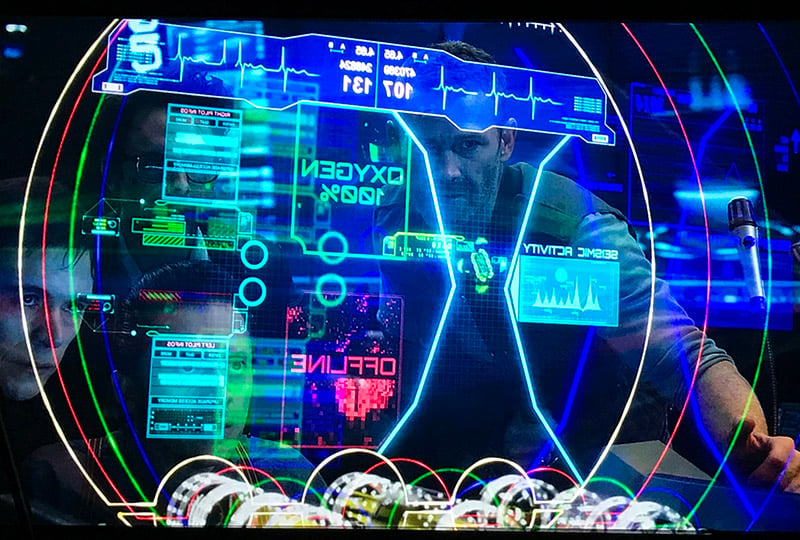
Scenes in Pacific Rim with lights and control panels just popped wonderfully in HDR.
The way the X570R conveyed the masterful play of darkness and light really drew me into the movie. What really made for visual eye candy were the three-dimensional computerized displays inside the Jaegers or in the main control room. I compared these scenes on the Blu-ray edition via a Panasonic ZT60 plasma and it’s just no contest, the UltraHD version came alive through the X570R.

As you can see in this scene from Pacific Rim, the X570R had no problem rendering deep blacks and different shades of black and deep grey—even when set against a bright background.
The UltraHD version of Logan came with the black and white Logan Noir edition. Don’t try playing Logan Noir with a projector that’s a black-level wimp. Thankfully, the JVC isn’t such a projector. The nuanced gradations of the all-black and white rendition were superb. Whether it was the opening scene with Logan fighting off would-be car robbers in the middle of the night or bright desert scenes outside the fallen water tower, the JVC didn’t blink. Now, was the X570R the absolute last word in dynamic range or black levels? Of course not, but it certainly didn’t leave me wanting.
Finally, I’ll simply note that if you have an HDR-capable streaming device, then upgrade to Netflix with HDR support. Shows such as Iron Fist or DareDevil will take on a whole new level of realism. I switched back and forth between HDR and non-HDR versions and once again, the HDR-graded content always won the day.
JVC DLA-X570R Projector Conclusion

JVC's X570R may be their "entry level" model, but the picture it produces is simply stunning.
It’s always tough making a major investment during a technology transition. How long will my investment last? Is now the right time to jump in? These are all valid questions. Sometimes those questions become even more tough with a significant investment in projector technology.
Simply put, JVC’s X570R e-shift4 projector hits all the sweet spots you can ask for in a projector under $5,000. Its e-shift4 technology will rival native 4K projectors to the point where you’ll be hard-pressed to tell the difference. JVC’s Projector Calibration Software makes calibrating the X570R a breeze. Black levels are excellent. And the raw performance in this “entry level” high-end projector? It is simply awesome. My only regret is that the X570R's color support is pretty much limited to the Rec. 709 color gamut even with 4K/UltraHD sources.
With HDMI 2.0b, HDR10 and HLG HDR, you’ll be covered for quite a while. If I had to choose only one projector under $5K, the X570R would likely be that choice. Highly and enthusiastically recommended!
The Score Card
The scoring below is based on each piece of equipment doing the duty it is designed for. The numbers are weighed heavily with respect to the individual cost of each unit, thus giving a rating roughly equal to:
Performance × Price Factor/Value = Rating
Audioholics.com note: The ratings indicated below are based on subjective listening and objective testing of the product in question. The rating scale is based on performance/value ratio. If you notice better performing products in future reviews that have lower numbers in certain areas, be aware that the value factor is most likely the culprit. Other Audioholics reviewers may rate products solely based on performance, and each reviewer has his/her own system for ratings.
Audioholics Rating Scale
 — Excellent
- — Very Good
- — Good
- — Fair
- — Poor
| Metric | Rating |
|---|---|
| Detail and Resolution | |
| Deinterlacing & Scaling | |
| Contrast and Black Levels | |
| Color Reproduction | |
| Noise Reduction | |
| Calibration Options | |
| Build Quality | |
| Ergonomics & Usability | |
| Ease of Setup | |
| Features | |
| Remote Control | |
| Fit and Finish | |
| Performance | |
| Value |
Theo Nicolakis has been reviewing high end audio, video, home theater, headphone, and portable music products for the past 14 years. His reviews have appeared here on Audioholics as well as Techhive.com, PCWorld.com, MacWorld.com, and more. His reviews span high end two-channel and home theater systems, AVRs and immersive audio processors, headphones, DACs, DAPs, music servers, sound bars, and display technologies.
View full profile