
Subwoofer Connection Guide For A Multi Subwoofer System
PSB subs
Originally Published: January 24, 2008
We are always preaching the more subs the better in a home theater system (particularly two to four) for a variety of reasons such as; smoother bass response across a wider listening area and increased dynamic range. So now that you've decided to purchase two or four subs, its time to show you how to connect them up properly to ensure you achieve the maximum benefits of a multi sub system. This article has been recently updated to incorporate two YouTube video discussions - 1. Why Multi-Sub, 2. How to Connect Multi-Sub.
Why Have Multiple Subwoofers?
Before reading this article, the reader is advised to check out our recently added YouTube video discussion on this subject matter to understand the benefits of using multiple subwoofers in a home theater environment.
The Benefits of Multiple Subwoofers for Home Theater
Step 1: Choosing your subwoofers
We get a lot of questions about what types of subs to purchase for a multiple sub setup. When choosing the right subwoofers for your system, it’s a good idea to choose identical subs for optimal cancellation of room resonances, or ones of similar output level and design. Don’t for example mix and match a high quality 15” servo subwoofer with a cheap dual 6” bandpass sub that came with your “cubed” speaker system. Implementing an inferior subwoofer with a good one will limit your systems dynamic range and bandwidth to the weaker sub making your ears focus on the one that is breaking up and running out of steam. Mixing different subs will also reduce the success of canceling out room resonances since they will exhibit different amplitude and phase responses. Always select two well designed subwoofers (preferably the same) that are each in their own capable of filling your theater room with ample bass without bottoming out or running out of gas. If you can’t afford two subwoofers at the moment, buy one quality sub for now and add a similar capable one down the road when you’ve got the cash. IF you absolutely must use mismatched subs, it's important to try to chose models with a similar low frequency roll off slope. IE. Sealed subs are usually 12dB/oct while ported subs are usually 24 dB/oct below tuning.
For more information, read: Sealed vs Ported Subwoofers: Which One is Right for You?
Step 2: Identify the best locations for your subwoofers
As a quick rule of thumb, if you have wall space at the front of your room, a good starting point is to place each sub ¼ the length of the front wall from each respective side wall as illustrated in Figure 1. In other words if your front wall is 20 ft wide, place each sub about 5 ft from each side wall close to the front wall. Figure 1 works extremely well especially if you only have one row of seating located a few feet off the back wall.
Another option that works fairly well is to place each sub at opposite diagonal corners of the room as illustrated in Figure 2. I personally like placing both subs up against the front wall in a stereo configuration. I have had excellent success with this scenario, especially if the room has symmetrical side walls.
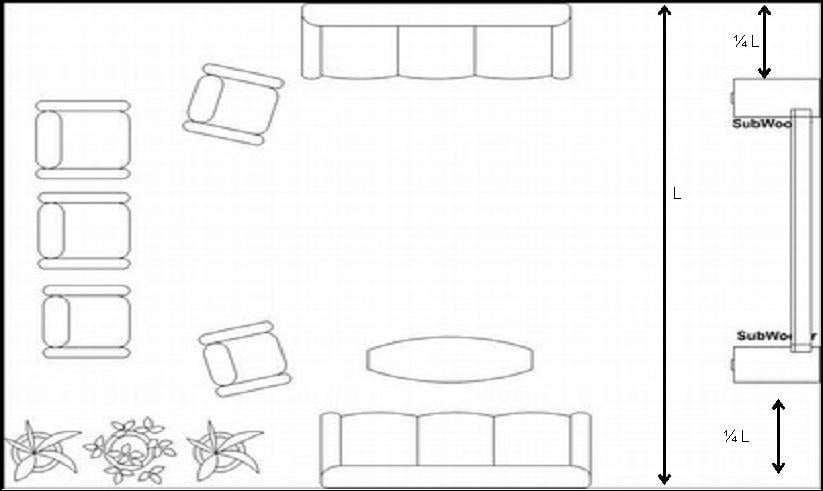
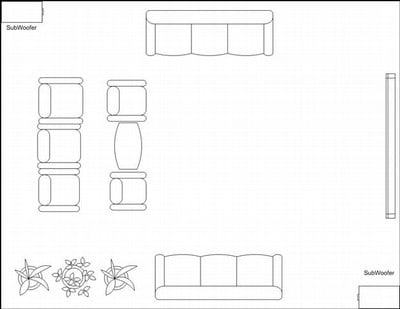
Figure 1. Two Front Subs (very good) Figure 2. Two Diagonal
Subs (good)
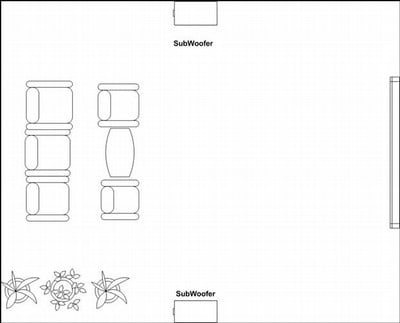
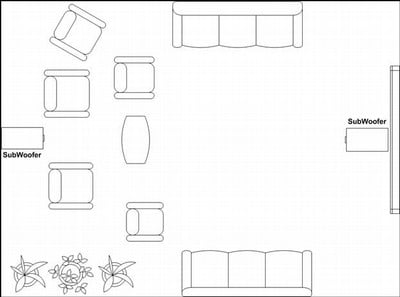
Figure 3. Two Mid Side Wall Subs (very good) Figure 4. Two Mid Front/Back Wall Subs (best)
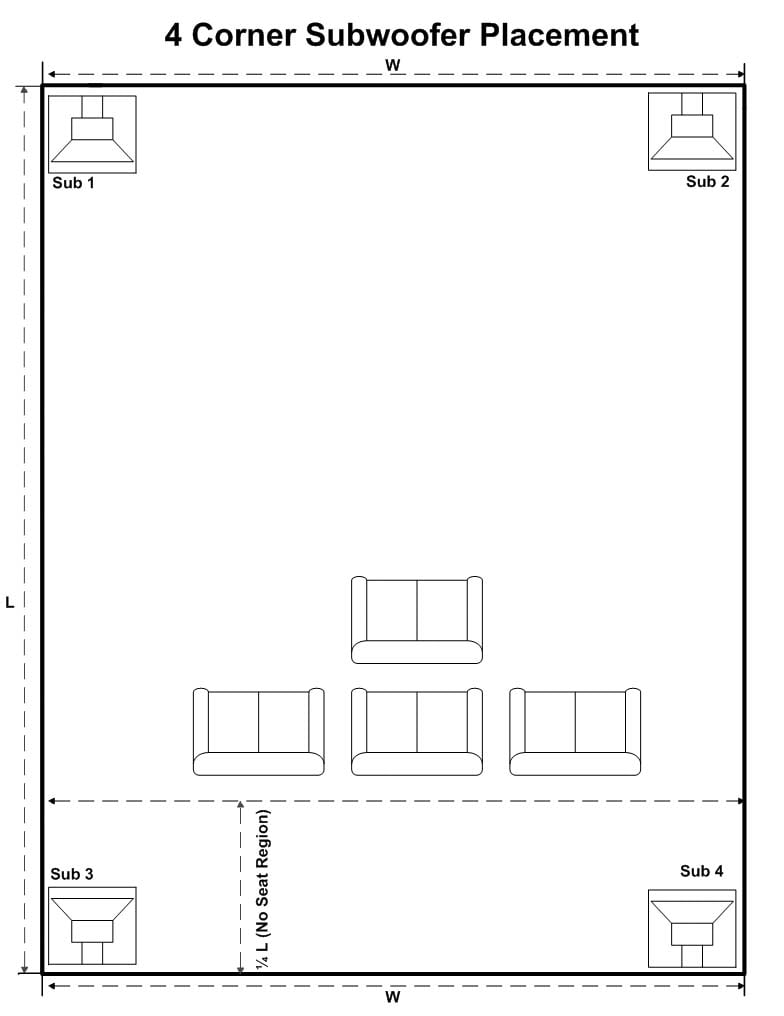
Figure 5. four Corner Loaded Subs (best)
The best configuration options include two subs in the mid-wall of opposing walls such as in Figures 3 & 4, or if you have four subs, have each corner loaded (Figure 5). While these configurations work extremely well and usually better than what I proposed in figures 1 and 2, they are often impractical in most rooms. The configuration in Figure 4 is preferred over Figure 3 because it typically offers more SPL output.
I’d love to sell you on the idea of four subwoofers but two is nearly as good and certainly more practical especially if you place them as suggested in Figures 3 and 4. Recent research per "Sound Reproduction" by Dr. Floyd Toole indicates that 4 subs each corner loaded provides less frequency response variation and more overall output than placing each sub at opposing midwall locations. This is really a great option to ensure maximum gain with reasonably practical positioning. EQ can be used to flatten out any peaks in the response. Since speakers are minimum phase devices, flattening out a peak will take the energy out of the room and benefit ALL seats.
If you cannot place your subs in either of the above recommended configurations, do your best to use symmetry when pairing subwoofers like we show in the above illustration. Using our technique of crawling for bass is a good way to find the proper locations to place your subs.
More advanced installers would benefit from using our subwoofer placement guidelines, to get more specific on choosing the appropriate locations for the subwoofers.
How to Connect Multiple Subwoofers
Before reading on, we recommend checking out our recently added YouTube Video discussion on how to connect multiple subwoofers to your AV receiver.
How to Connect Multiple Subwoofers
Step 3: Identify the “sub out” connection(s) of your receiver/processor
Do you only have one subwoofer output or multiple ones?
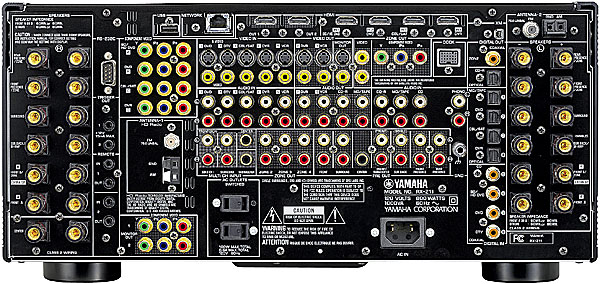 For multiple subwoofer outputs on your processor
If you have
multiple sub outs (which is a rarity right now but becoming more and more
common on newer receivers), then your job is a little easier. Simply connect an RCA cable from each sub out
of your processor to each of your subwoofers.
Next configure the layout in your processor if given the option. Some processors will allow you to set the sub
out to: mono, stereo L/R and front/back.
Use the appropriate setting depending on your layout but also note that
some processors that offer the “front/back” option only send the LFE info to
one of the subs (usually the back). Thus
I usually recommend either the mono or stereo L/R option.
For one subwoofer output on your processor
If your
processor only has one sub out connection, you will need a male to female
y-splitter (see Processor Y-Splitter picture below) such as the Impact
Acoustics Sonicwave 1-male to 2-female splitter. Next connect each subwoofer to the splitter
via your RCA type subwoofer cables. Choose quality interconnects that are well
shielded and constructed. Again a great
subwoofer cable choice would be the Sonicwave Series
from Impact Acoustics.
What about subwoofers with stereo L/R RCA inputs?
Most subwoofers that have two individual Left and Right inputs
have one labeled mono or LFE and it is usually the left one. Unless the manufacturer specifies otherwise,
simply use the Left input. Alternatively
you can use a 1-female to 2-male y-splitter (see Subwoofer Y-Splitter image below) and connect the female side to the subwoofer
RCA cable and the male sides to the respective left and right inputs.
Y-Splitter Types
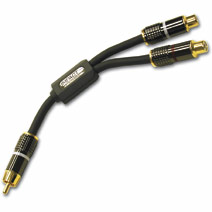
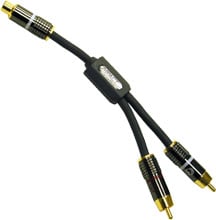
Processor Y-Splitter Subwoofer Y-Splitter
Step 4: Calibrating the subwoofers
 The first
thing you need to do is go into the bass management menu of your processor to
properly configure your speakers and subwoofers.
The first
thing you need to do is go into the bass management menu of your processor to
properly configure your speakers and subwoofers.
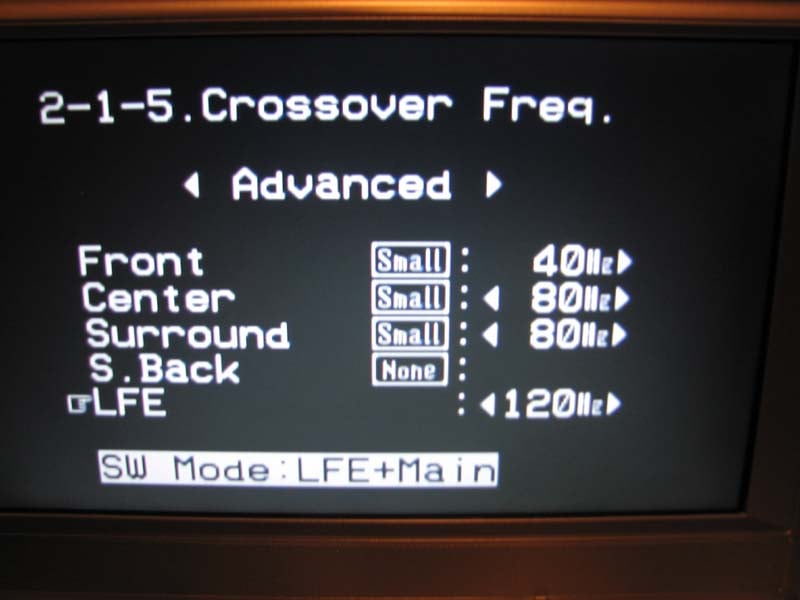
Speaker Size & Crossover Settings
In most
cases you will want to set all of your speakers to small and select an 80Hz
crossover point. This is a good starting point.
More advanced users can experiment with crossover points to improve the
subwoofer to satellite speaker integration. If your receiver has a separate LFE setting, it's usually best to set it for 120Hz which will allow you to reproduce the actual full bandwidth of the LFE channel.
Speaker Distance
Using a
tape measure, note the distances from each speaker with respect to the main
listening seat and write it down. Enter
this information for each appropriate speaker in your processor menu that
relates to speaker distances.
If your processor has multiple subwoofer outputs and independent level and distance controls, input the respective distances of each subwoofer. If your processor only has one subwoofer output or non independent trim settings for each, you will need to do a little math. Take the average distance between each subwoofer and the main listening position and enter that distance into your processor using the following formula:
Davg = (Dsub1 + Dsub2) / 2.
For example, if the left sub is 10 ft away and the right sub is 8ft away, the average distance is 9 ft ((10+8)/2). This is a staring point to try out. It would be best if you could pull some measurements with an RTA of at least 1/12th octave resolution at your primary listening position to determine the best delay setting for achieving optimal integration of your subwoofers with your front main channels. This should be repeated for the two or three most important seats in your theater room until you find the best setting that works reasonably well for all seats. Please note it is usually better to have independent delay control for each subwoofer. Some AV receivers/processors offer this as previously mentioned. Some powered subwoofers also offer a delay setting to compensate for receivers/processors that don't.
 Speaker Level
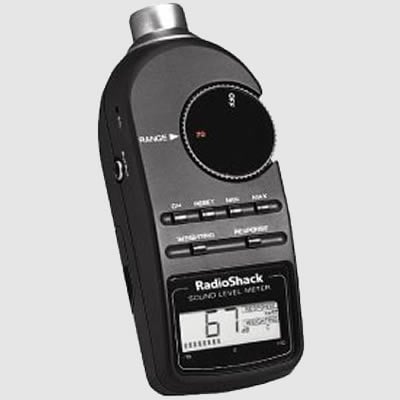
Using an SPL meter set to c-weighted slow response,
place the unit point up at the ceiling at the appropriate ear height and
location for the main listening seat. Using
the main front speakers as your reference channels, adjust the master volume
until the SPL meter reads 75dB when the left front speaker is playing the test
tone. Next calibrate each speaker to
that 75dB reference.
If your processor has independent multiple subwoofer outputs and trim controls, set the sub level to within a few dB of the other channels. If you don’t have independent level controls on your processor, disconnect one of the subs, and set the level using the sub's volume control. Next reconnect the sub and disconnect the calibrated sub and repeat this process. Once you have completed the level matching, connect up both subwoofers and lower the sub level control on the processor if the level has jumped up when both subwoofers are playing the test tone.
Step 5: Listen and Evaluate
The most important aspect is how it sounds after its all setup. Use bass intensive program material you are very familiar with and take a listen. Make sure the bass sounds uniform and well integrated with the rest of your speakers over the entire listening area. It’s a good idea to test two channel and multi channel music to ensure your system as a whole is integrated properly with your subwoofers. Movies may have a lot of bass, but it generally isn't sustained long enough to be considered good test material. Feel free to adjust sub level up or down to your taste and enjoy.
What About Auto Set-Up?
Most modern day receivers and processors have an auto setup option where you place a microphone at the main listening position(s) and have it do all of the set-up for you. The results tend to be a mixed bag where most of these systems will get channel levels and speaker distances correct, they will almost always identify speaker sizes and crossover points incorrectly. It is highly recommended that should you decide to use such a system to not follow the end results as a definitive guide but more as a starting point for you to go in and customize to better suit the needs of your particular installation. Specifically, we suggest verifying the speaker sizes and crossover points.
Recommendations
Following the guidelines set forth in this article will help you properly set up a multi-subwoofer home theater system. If done correctly, using two or more subs will yield significantly better and smoother bass response for all of the seats in your theater room. Getting the bass right can make a good home theater system sound stellar, which will greatly enhance the enjoyment and wow factor for yourself and your guests. The best way of achieving this is with multiple subs properly positioned and set up.
Gene manages this organization, establishes relations with manufacturers and keeps Audioholics a well oiled machine. His goal is to educate about home theater and develop more standards in the industry to eliminate consumer confusion clouded by industry snake oil.
View full profile