
Subwoofer Set Up and Configuration for Bass Performance
Subwoofer Placement for Dummies
Originally published: 12/9/2010
Anytime I see a book on a complex topic that attempts to disseminate the subject material in layman terms for the average reader using the word “Dummies” in the title, I cringe. I’d love to learn a foreign language or how to setup a complex home network but I absolutely refuse to pick up a book whose author assumes I am a “dummy”. Realizing a large portion of our readership are essential enthusiasts when it comes to home theater, but also intelligent readers, I conjured up this article and YouTube video for those wanting to get a good grip on how to properly setup and integrate a subwoofer into their new home theater system. This article assumes you already purchased a modern 5.1/7.1 A/V receiver and speaker system with a powered subwoofer.
Step 1: Subwoofer Placement
This is the single most important factor when getting ready to setup your subwoofer. Although bass waves below 80Hz are non directional to the ear, placement of the subwoofer is vital to how it plays in the room and how it will sound at your listening position. We have written many articles broaching the topic, offering common placement suggestions. In rectangular rooms, it's very predictable as to where the best locations are to place your subwoofer(s). We give very specific instructions for such rooms. Crawling for bass is a viable option for those in more oddly shaped rooms.
We recommend the following reading:
- Crawling for Bass
- Tips for Connecting multiple subwoofers
- Home Theater Multiple Subwoofer Set-up Guide (advanced guide)
Subwoofer Set Up and Optimization
Step 2: Connecting the Subwoofer
Once you have your subwoofer positioned properly in your room, it's time to connect it to your A/V receiver.
There are two possible ways of doing this:
-
Line level connection – using unbalanced RCA level connections or balanced cables as if you were connecting a CD player or amplifier
-
Speaker level connection – using speaker wire as if you were connecting your other speakers
Most folks purchase powered subwoofers where the amplifier is built into the subwoofer box. This article makes this assumption and thus focuses solely on this application. Since we typically run our subs in mono, only a single RCA or balanced level connection is needed between the A/V receiver's LFE output and subwoofer line-level input. Very few A/V receivers offer balanced subwoofer outputs, so this article assumes the reader is using unbalanced RCA line level connections.
Simply run a good unbalanced COAX or shielded twisted pair cable between your A/V receiver and subwoofer. Make sure there is plenty of slack as the cable should never be under tension when it's connected to equipment on both ends else you risk damaging the cable and connected products.
We typically recommend Bluejeans 1694 COAX for all line level connections. Bluejeans cable are among the most robust designs money can buy, have excellent Canare terminations, and are a great value. Esoteric folks wanting a more prestigious brand and look should consider Kimber Kable. We found their designs to be well engineered and snake oil free.
For cable recommendations, see:
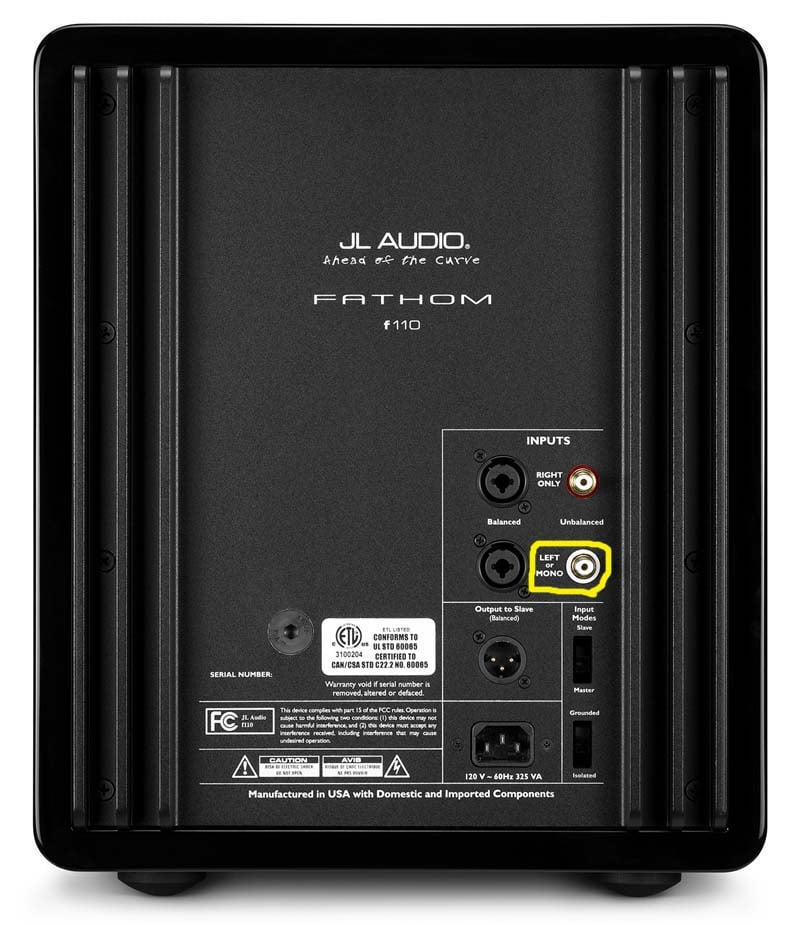
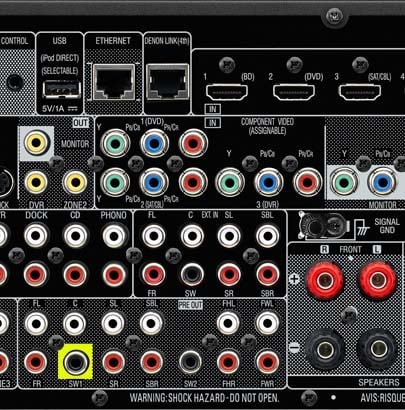
Left Pic: JL f110 subwoofer backpanel ; Right Pic: Denon AVR-4311CI backpanel
See the circled "left/mono" input on the JLf110 subwoofer and the highlighted subwoofer out "sw1" on the Denon AVR-4311CI receiver backpanels. These are the correct inputs and outputs, respectively, to use when connecting a subwoofer to an A/V receiver line-level.
Now that you’ve got your cable, simply plug one end into the A/V receiver “Sub out” or “LFE out”. This is the dedicated subwoofer output of the receiver that sends LFE info from discrete 5.1/7.1 recordings and summed bass for all channels set to “small” to the subwoofer. Next, connect the other end of the cable to the RCA level connector marked “LFE input” or “mono input” of your subwoofer. If your sub doesn’t have a dedicated input like this and instead has stereo RCA inputs, you can either connect the cable to one of the two inputs or use a Y-splitter to connect it to both. The advantage of the Y-splitter is the signal will be summed into both inputs of the sub increasing sensitivity 6dB meaning you can now lower the gain in the A/V receiver 6dB to achieve the same output level as you would have with only one connection utilized on the sub. Having enough drive level is rarely an issue with today’s modern A/V receiver so in most cases, we recommend using the single connection.
Step 3: Configure your Sub
 In almost all circumstances we recommend bypassing the subwoofer's internal bass management facilities in favor of the one found in your A/V receiver. You can do this either by engaging the LPF bypass switch (if available) or setting the crossover to its maximum setting (in the case of the Axiom EP800 pictured, that’s 150Hz).
There are several reasons for this:
- Your A/V receiver does bass management in the digital domain making the filtering much neater.
- Your A/V receiver typically has a better Low Pass Filter (LPF), typically 24dB/Octave ensuring your sub won’t be localized since the frequencies above what it was designed to produce will be attenuated better.
Failing to disable your sub's internal crossover can cause excessive losses in the subwoofers passband thus degrading the sound quality when used in conjunction with your A/V receiver's bass management facilities. This is especially true if the crossover frequency of both the sub's LPF and your receiver's bass management are set to the same frequency. This is called cascading crossovers and should usually be avoided.
Now that you’ve disabled your subwoofer's crossover, set the level to about 50% of max volume. We recommend setting the phase switch to 0 degrees or positive. You can revisit this later to see if the 180 degrees or negative setting sounds better in your system by having a friend flip the switch while you listen at the seated position to compare the two settings.
A/V Receiver Bass Management Settings
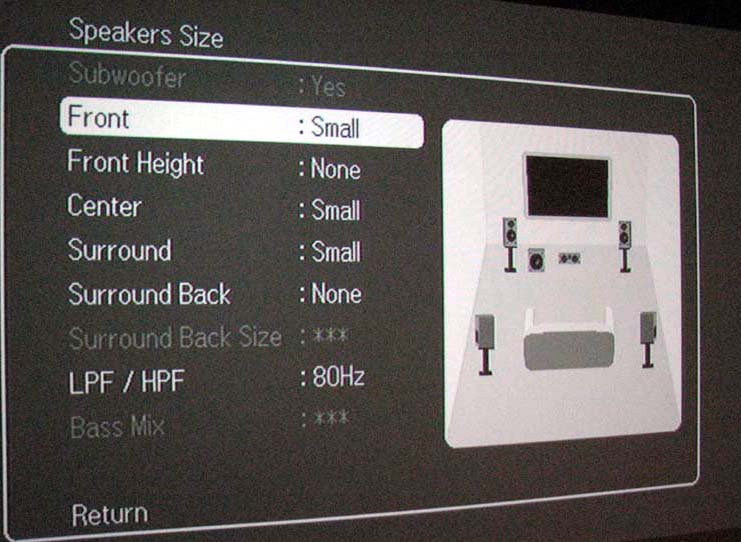 Don't forget to setup the bass management in your A/V receiver. Go into its bass management menu and set all speakers to "Small" and the crossover frequency to 80Hz. This is a great starting point and a common configuration that works best for most systems. It's also the THX recommendation for good reason, it works well. Make sure you also properly set channel distances when configuring your bass management.
Editorial Note on two channel bass:
Some A/V receivers require you to configure them to engage the subwoofer when listening to two channel sources even if you have the main channels set to "small". Make sure you are aware of this else you won't have adequate bass in such circumstances.
Recommended Reading
Bass Management Basics - Settings Made Simple
Step 4: Calibrating your Sub
Your subwoofer is properly placed and setup. Now it's time to level match it to the rest of your speakers so it blends in seamlessly without drawing attention to itself. You can do this in two different ways: auto setup (if your receiver has this feature) or manual calibration.
Auto Setup
If you prefer to not manually calibrate and instead wish to rely on your receiver's auto calibration process, follow the manufacturer's instructions on how to perform this task. Unless otherwise stated by the manufacturer, always place the microphone supplied with your A/V receiver on a tripod or stand away from your body or surface of your couch at your primary listening position. Position the microphone at seated ear level position and let the A/V receiver take its measurements.
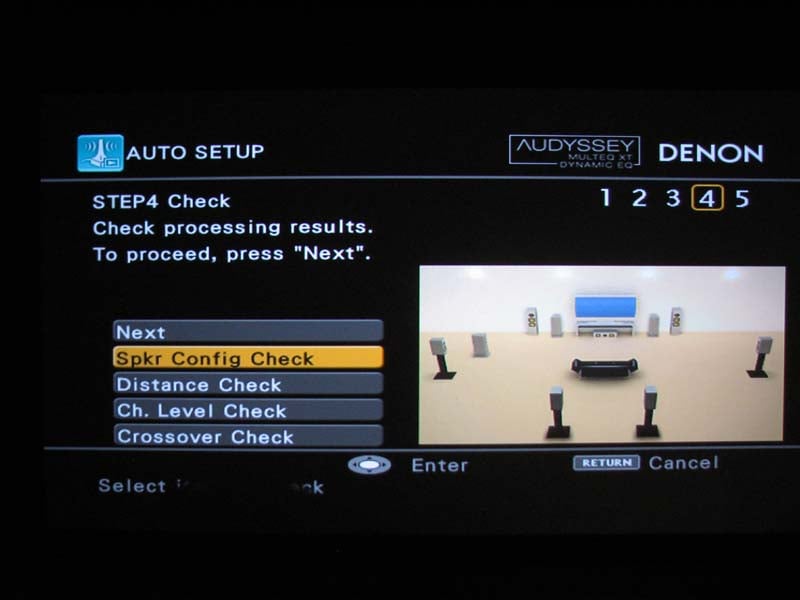
Denon AVP-A1HDCI Auto Setup for Audyssey MultEQXT
Most auto setup programs are pretty accurate at setting distance and levels for each channel. But, we usually recommend going into the setup menus afterwards and adjusting crossover points to 80Hz and all speakers that were set to "Large" back to "Small" to ensure the best possible integration in your system.
Manual Calibration
 It's important to set the proper distances for each of your channels, including your sub(s) via the A/V receivers bass management setup menus. Make sure you have a tape measure handy to measure the distance of each speaker relative to the primary listening position. Do this before level matching as the output levels when playing the main channels in conjunction with the sub(s) can vary if you don't have the proper distances set since the sub(s) and main speakers may not properly sum at the crossover point if they aren't properly time aligned.
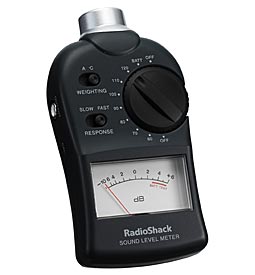
It's important to level match your sub relative to rest of the speakers in your system. The proper way to level match your sub is to use the internal pink noise generator of your processor (aka. test tones) and an SPL meter set for slow response "C-weighted". Position the SPL meter with a tripod or other device to ensure the microphone is in the upright position firing at the ceiling about seated ear level at the primary listening position. Using the internal test tones, calibrate each speaker to roughly the same level (use 75dB as a reference). It's ok to boost the sub level a couple of dB if you want a bit more bass impact. So if you set all of your speakers to 75dB, don't sweat setting your sub to say 77-78dB. It's a good idea to measure the SPL at least two locations and calibrate your main channels with respect to your sub to within few dB of each other to ensure they are more closely level matched for your listening area. In fact THX suggests that you shouldn't rush your measurements. Take your time when performing SPL and RTA measurements. THX recommends each measurement take at least 20 seconds for example.
Have a friend flip the 0/180 deg phase switch on the back of the sub while you play pink noise for the front left / right main channels plus the sub(s) to see if the level goes up or down on your meter. If the level goes down in the 180 deg position, flip it back to 0 degrees. You can also confirm via listening tests which setting sounds better by having your friend flip the switch back and forth while you listen to bass heavy content.
Recommended Reading:
Step 5: Listen to your System
After you have everything setup and configured, it's time to listen. Play some bass heavy music content you are familiar with. Does the system sound well balanced? If you can't hear a good seamless blend between the subwoofer and speakers, you need to experiment some more.
We recommend the following steps for fine tuning your system:
- Adjust level up or down as needed via your A/V receiver subwoofer level control
- Adjust the subwoofer position using our crawling technique to ensure you've found the best possible location
- Adjust the listening seats as needed (placing chairs near a back wall may result in excessive bass boost). We recommend placing chairs at least 1/4L of the room away from the back wall.
- Consider using equalization to tame room modes
- Consider adding a second subwoofer to smooth response across your listening area
No Questions are Dumb Questions
Achieving good bass can make or break the overall fidelity of your home theater. It's important to invest the time both in setup and critical listening evaluation to ensure you get the most out of your system by getting the bass right. We hope this basic guide helps you in achieving sonic nirvana both heard and felt. If you run into a snag during setup, peruse the Audioholics forums and post questions for our staff and or other forum readers to help you. Remember you’re not a dummy for wanting to set things up right and asking questions. It certainly beats the alternative of owning nice equipment that doesn’t sound good because of bad or improper setup. Don't be afraid to ask for help.
Gene manages this organization, establishes relations with manufacturers and keeps Audioholics a well oiled machine. His goal is to educate about home theater and develop more standards in the industry to eliminate consumer confusion clouded by industry snake oil.
View full profile