
Creative Sound Solutions SDX12 12" Sealed Subwoofer DIY Kit Review
- Product Name: SDX12 Subwoofer Kit
- Manufacturer: Creative Sound Solutions
- Performance Rating:


- Value Rating:
- Review Date: February 22, 2020 00:35
- MSRP: $ 505
Driver
- Dotted non-pressed paper cone with NBR surround
- High power, low inductance design, 2 layer 3" (76mm) copper voice coil with 2 aluminium and 1 copper shorting rings inside the magnet
- Forged and machined T-yoke and top plate with larger radiused pole vent for low aerodynamic noise
- High excursion spider with integrated lead wire
- Attractive cast aluminum basket design with cast aluminum trim ring
- 1000W RMS, 2000W peak Power-handling
- Dimensions: 14”x14”x14”
- 0.75” Thick panels and bracing
- 1.5” Front baffle thickness
Pros
- Very high excursion subwoofer driver
- Handles a lot of power
- Better than typical deep bass extension for a sealed subwoofer
- Linear and low distortion performance
- Deep, articulate, and tight bass
- Unusually compact enclosure, among the smallest twelve-inch sealed subwoofers on the market
Cons
- Finish quality up to the builder
- Setup can be complex
- Driver can go from 0 to ugly without warning
- Requires an external amplifier with DSP for optimal performance
Does DIY Compete with Commercial Subwoofer Offerings?
Many of our readers are often faced with a hard choice, buy a commercially available subwoofer, or try their hand at a little do it yourself. Companies like SVS, HSU, Paradigm, Klipsch, JTR, and Power Sound all produce impressive subwoofers that provide significant output and capability, without the need to learn a new science. Commercial subwoofers offer a warranty, a well-finished product, proven performance, and in many cases, value that is hard to beat. At the same time, there is something special about being able to design and build your own subwoofer. A show of pride to be able to show to your friends and family the hard work you put into carefully designing your own enclosure, choosing just the right driver, and assembling everything into your one of a kind package. A further question, one that few can typically answer, would be if the DIY effort netted any significant value over a commercial product? Does building your own subwoofer provide a significant increase in performance relative to what you would have obtained had you just bought a commercially available subwoofer. This is a question I have long wondered about, and with no clear answers when CSS offered to provide me with one of the SDX12 drivers assembled in their standard sealed enclosure, I couldn’t wait. With other commercially available twelve-inch subwoofers that I could compare against, in good Audioholics fashion, we thoroughly put them to the test to see if buying a DIY sub is worth the time an money.
Features and Appearance
I picked up the CSS SDX12 at AXPONA 2019 after a freak blizzard brought inches of snow at the start of Spring. This unexpected weather event made transferring the subwoofer to my car a bit of an adventure, and honestly, this small sealed subwoofer was far heavier than I had expected. I couldn’t help but think, What is in this thing?
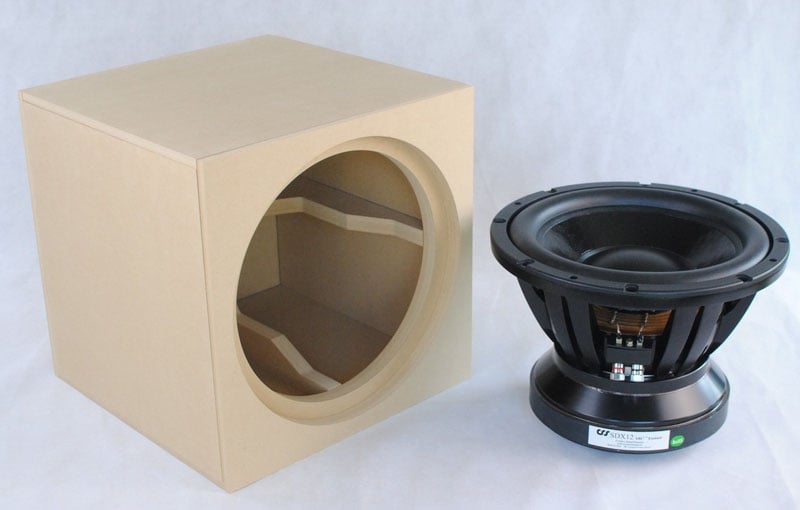
The twelve-inch driv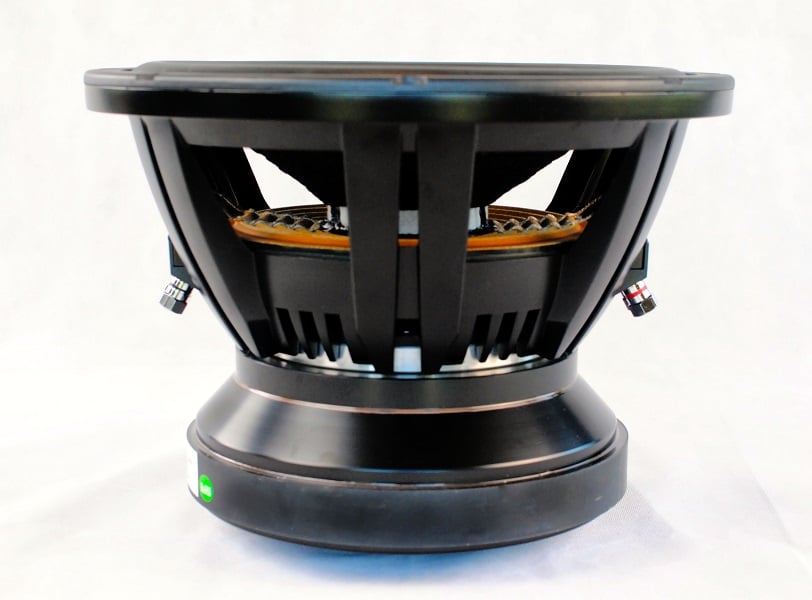 er is solid, with a huge motor. The driver is really the review here, so it deserves a little discussion. The CSS subwoofer lineup was originally designed by famed driver designer, Dan Wiggins. As such, it contains his, now famous, XBL2 motor. This motor design utilizes two gaps (a split gap design) to help flatten the BL curve. This helps linearize the woofer over a longer excursion range and provides lower distortion. What does longer linear excursion mean in a subwoofer driver? In practice, it means more output below about 40hz at a given level with acceptably low distortion. But that’s not all. The Motor also includes copper shorting rings, which, due to the price of copper, is unusual in a subwoofer driver. Shorting rings help to further linearize the driver, with lower inductance and less distortion. When you see our measurements, you will better understand why, but this driver is impressive for a subwoofer. It could just as easily be used as a large midbass- that’s what happens when you throw so much technology into the motor. The subwoofer also has a two-layer 3” voice coil capable of handling more than 1000 watts RMS. Add a strong non-pressed paper cone, large roll rubber surround, and heavy-duty cast frame and you have an incredibly robust driver. One unusual property of this driver is that it works best in unusually small enclosures. The driver cost is $375 with free shipping. The Kit I tested sells for $505 with shipping.
For $505 you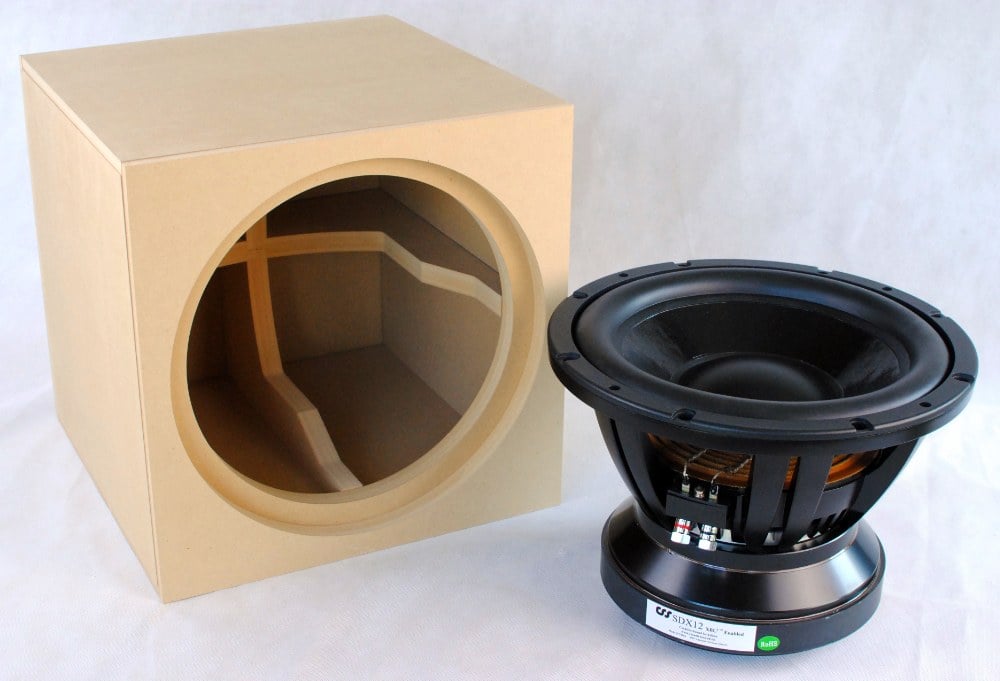 get a 14” flat-pack kit and the driver. That means you get all the panels precision cut and ready to assemble. You could easily assemble this with nothing more than wood glue and tape if you wanted. The enclosure includes good bracing, so you get a strongbox, with all walls made of 3/4” MDF, and the front baffle is 1.5”. How does this compares to commercial subwoofers? Most are not built this way. Most commercial subwoofers would use .5” or .75” MDF all around and often bracing is minimal. Because of this, many commercial 12" sealed subwoofers are somewhat larger than this particular kit. Score one for DIY. However, it should be clear that a pile of precision-cut wood and a driver does not make a subwoofer. To complete this you will need an amplifier, glue, polyfill stuffing, wire, binding posts or speakon connectors, and some way to finish the enclosure. Over the years I have built at least a dozen subwoofers and I can say that you should plan on adding at least $100 to the kit just to finish the box, and plan to spend at least $300 for an acceptable amplifier. While you could use a plate amplifier, I suggest using a separate rack mount style pro audio amplifier such as the Behringer NX3000D. I used a NU6000DSP (predecessor to the new NX series) for all of my testing. These affordable amplifiers are very capable, very powerful for the money, and provide among the best DSP facilities available to the DIYer.
Set up
Setting up the CSS SDX12 was a trickier affair than usual. Unlike a commercial subwoofer, the SDX12 is a raw subwoofer with no DSP settings or crossover built-in. Without measurements, setting it up can be a bit of a guessing game. However, CSS has taken that guesswork out of the equation by providing some basic suggestions to get you started. By applying a PEQ filter centered at 25hz, Q of 1, and 6dB of boost provides a nice response with good bass down to 20hz and below in room. This simple approach is a good idea for most. However, being Audioholics, and having access to significant measurement capabilities, I had to take it to the next level. By carefully measuring the subwoofers compression behavior, modeling its free-space response, I was able to develop an alternative EQ approach that provides a flatter and more extended bass response, while still providing good protection against over-excursion. Instead of using a PEQ filter, I used a 12dB per octave Shelf filter with a similar 6dB of boost. The driver will start to exceed Xmax between 20hz and 25hz, so I applied a negative value dynamic PEQ filter designed to counteract the over-excursion. I applied a dynamic limiter to the amplifier so that it could not exceed 1200 watts. This helped ensure that the subwoofer always operated safely.
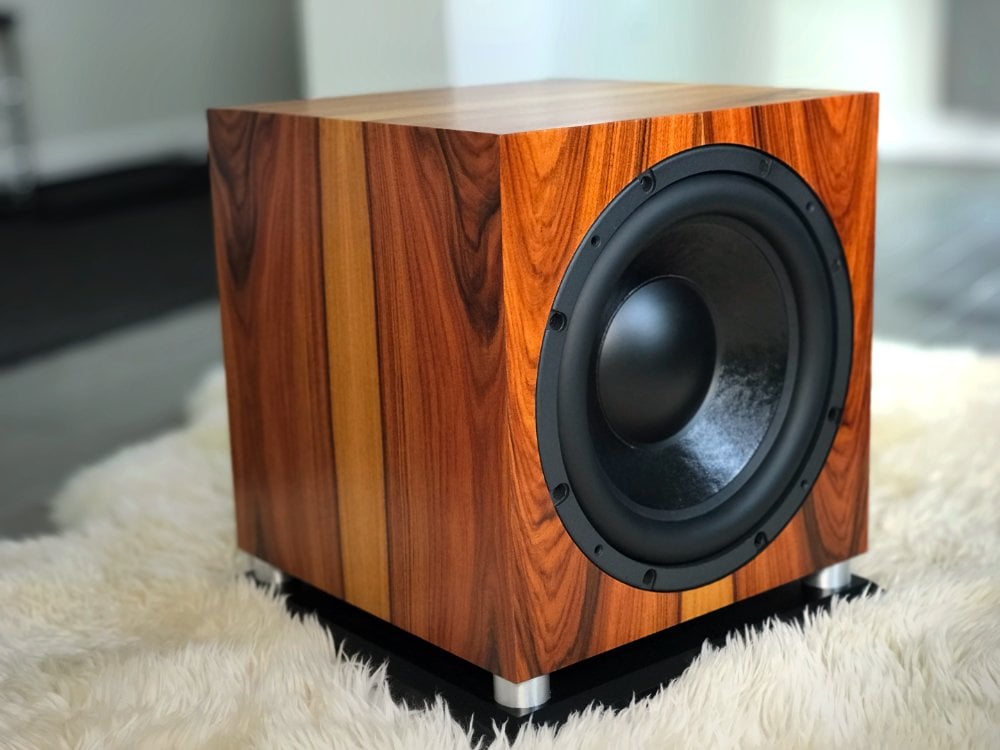
CSX SDX12 Subwoofer Assembled & Finished
After the subwoofer’s DSP settings were sorted, I set the subwoofer up in my primary home theater. The main subwoofer it was replacing was an 18” ported subwoofer in a 6 cubic foot enclosure. I was nervous placing such a small subwoofer into my system, given the company. I also compared it directly against the MartinLogan 1100x, which I found to be a very similar commercial offering and a better point of comparison than the 18” sub I normally use. I paired it with speakers such as the Philharmonic BMR Philharmonitor, a pair of reference Gedlee Abbeys, and the JTR Noesis 212RT’s. The subwoofer ended up having unusually clean and extended midbass performance, and ultimately, I decided to cross it over with a 4th order L-R filter set at 100hz. As is my usual practice, with larger speakers, I ran the mains full range and allowed for substantial overlap between the subwoofer and mains. Finally, I took in-room measurements of the response and applied a small number of PEQ filters to remove the effect of strong modal room resonances.
Listening Tests & Product Comparison
I have mentioned in other reviews that I have a love/hate relationship with subwoofer reviews. That is, I have a strong philosophical view that makes reviewing subwoofers hard for me. I believe (dare I say) It is a fact that the room ultimately dominates the sound of the low frequencies in a system. The subwoofer is simply a means of exciting the room, and its sound is irrelevant and largely non-existent. What matters for me, when it comes to sound, is how loud the subwoofer can play over a specified bandwidth and with low distortion. Now that doesn’t mean that there are no defining characteristics in the sound of a subwoofer besides loudness, but all of them tend to still be related to linearity and bandwidth. Unlike full-range speakers, the flatness of a subwoofer’s natural response is unimportant. First- all subwoofers have a relatively flat natural response. Second- the room ultimately dominates the response of a subwoofer. A subwoofer’s design or quality has nothing to do with the room response shape. What can matter, however, is how clean the subwoofer is when producing sound. Subwoofers are specialized speakers that need to reproduce low frequencies, and when the cone is relatively small (even a 12” driver is fairly small for producing 20hz), the driver has to move a lot. When a driver moves a lot, a lot of bad things can happen. One form of this problem is distortion, a kind of non-linearity that we directly test for and can readily measure. However, another form of the problem is inharmonic distortions which do not show up in our test. Examples of these distortions are port chuffing, motor noises, suspension noises, or cabinet resonances. While these might present in our measurements, they often are masked by other problems. We have to use our ears to judge and I find these problems to be one of the most important distinguishing factors between subwoofers. Two subwoofers might have the same basic output capability, but if one is quieter in the sense that I hear less ugly noises added to the music, that is obviously the better sub.
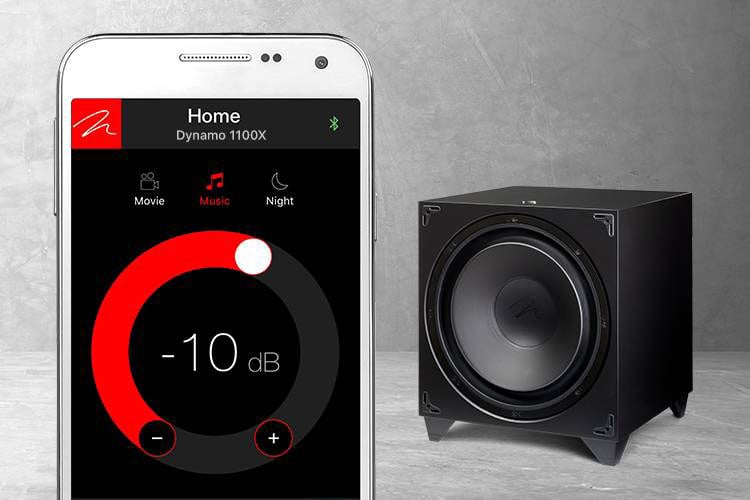
MartinLogan Dynamo 1100X Subwoofer
 As noted before, similar-sized subwoofers often sound similar when operating within their linear range. That is, if we compare the CSS SDX12 to a similar priced Martin Logan 1100x (the most comparable subwoofer I am aware of commercially), we would expect the sound to be very similar. The 1100x has far less excursion. When comparing these two subwoofers back to back they sounded very similar when operating within the linear range. However, the SDX12 has far more linear range than the 1100x does. On top of that, the SDX12 doesn’t make ugly noises nearly as often or as easily as the 1100x (which itself is a pretty serious subwoofer). What that means is that, compared to subwoofers in the $1200 price range, the CSS SDX12 is going to provide more deep bass output and in scenarios where the driver excursion and amplifier power will begin to matter most, you will again find the SDX12 outperforming similar commercial offerings. However, due to the heavy cone and low efficiency of this driver, the SDX12 does not have as much output above 40hz as subs like the 1100x or the SVS SB3000. You are trading a bit more-deep bass for a bit less midbass. Given how much money you save, I would argue that you could afford to buy two SDX12 kits. Remember, you can always use one amplifier to power two subs in a scenario like this.
Now all this is unimportant if I don’t discuss how the subwoofer sounded. I paired this subwoofer with several speakers such as the JTR Noesis 212RT and the Philharmonic BMR Philharmonitor. I had this subwoofer at the same time as the Martin Logan 1100x that I reviewed for another website. One song I have been listening to a lot lately is a new recording of the theme from Jurassic Park. This is a very dynamic performance with big crescendos. At the same time, it has its delicate moments with various stringed or wind instruments playing quietly. The BMR’s have exceptional bass on their own, but I preferred them paired with a subwoofer. Adding the CSS SDX12 to the mix was a great option. The tight and well-articulated bass sounded accurate and blended well with the sound of the BMR’s.
Another piece I use in a lot of reviews is the classical guitar piece, Suite Espanola, Op. 47: No. 4, Asturias (Leyenda) performed by John Williams. This subwoofer helped with the bottom end of the guitar during the more dynamic strumming of this piece. The SDX12 did a great job of adding back the full visceral impact of the dynamic strumming of the guitar. I’ve heard this piece performed live and you can not only hear but feel the crescendo’s in the music. It’s amazing how loud a guitar can be. Without the SDX12, I didn’t find it sounded real. It lacked that visceral aspect. With the SDX12, everything came alive. The SDX12 was a perfect companion to the BMR and JTR’s, filling in that last octave or two.
I mentioned earlier that for me, it is the competition to commercial subs that makes DIY interesting. I recently reviewed the Martin Logan 1100x which sells for around $1200. James Larson recently reviewed the SVS SB3000, which also retails for around $1000. We found those two subwoofers to be close in performance. Surprisingly similar output and sound quality. They were both deemed excellent values for what they are. Before going into the numbers, let’s consider the price. As mentioned, an SDX12 kit sells for $505. The kit, however, is not everything you need. We will add $100 for paint, glue, speaker wire, insulation, and speaker connectors. That brings us to $605. We still need amplification, and the suggested amplifier is a Behringer NX3000D, which sells for around $400. A cheaper option would be the NX1000D, at $300, however that amplifier does not produce enough output to drive the SDX12 to its maximum output. This brings the total price of the DIY subwoofer to $1005. At $150 we haven’t saved a lot of money here, but this doesn’t tell us the total story. Are we comparing apples to apples?
The subwoofers I am comparing the SDX12 with are good subwoofers, but their drivers are simply not comparable to the SDX12. They do not have as much linear excursion, as low distortion, nor can they handle as much amplifier power. Further, the amplifiers they come with are also not likely as powerful (A Behringer NX3000D into 4 ohms will produce around 2000 watts RMS, which is more than twice the power of the commercial offerings). It is likely that more expensive twelve-inch subwoofers with bigger amplifiers, such as the SVS SB4000, would be a better comparison. That subwoofer retails for $1499 and has a 13.5” driver with quite a bit of excursion and a more powerful amplifier. The output and overall performance between the CSS SDX12 kit and an SB4000 are very comparable (Note that the output data for an SB4000 was not available, so I used the PB4000 in sealed mode, however, these two subwoofers do not use the same driver and may not perform the same). The SDX12 appears to have a bit more output below 25hz which we will look at next.
CSS SDX12 Subwoofer Measurements and Analysis
Few reviewers have the technical capability of performing CEA-2010 testing of a subwoofer. The reason for this is clear, you need a lot of expensive equipment and a large quiet outdoor space to take measurements. In addition, you need to know how to process the final resulting data to accurately create the performance metrics. Sadly, because taking the measurements is not all that difficult (including that REW can do this for free), I have found that many have tried their hand at this measurement style and reported misleading or erroneous numbers. To help readers understand the difference between my measurements and those of others, I will provide a quick explanation of my testing procedure, location, and equipment.
The equipment used for testing includes an earthworks M23 or MicW M215 measurement microphone, an SPL calibrator, a MOTO 828x, Room EQ Wizard on a laptop, numerous cables, the subwoofer under test, and a multi-acre field that is over 1000 feet from any road. In accordance with legacy reporting practices and that of most other official CEA-2010 measurements being published, I will report all values at 2 meters RMS. These values can simply be converted to the CEA standard of 1-meter peak by adding 9dB.
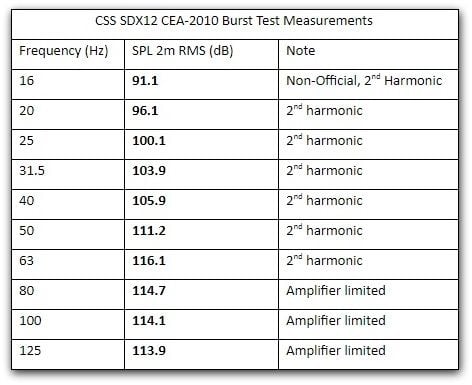
The performance on this subwoofer is impressive when you consider its size, that it is a sealed box and its price point. Its midbass performance is slightly compromised as compared to its deep bass, but this tradeoff is minor when you consider the large difference in deep bass output and the small difference in midbass output as compared to its commercial competition. One thing to note is that the subwoofer largely fails the CEA burst tone intervals as a result of the more benign 2nd harmonic distortion. It switches to 3rd harmonic in the upper bass, outside its normal operating bandwidth, where the amplifier became an issue. The SDX12 was capable of absorbing a surprising amount of power we suspect a more powerful amplifier may have achieved higher output.
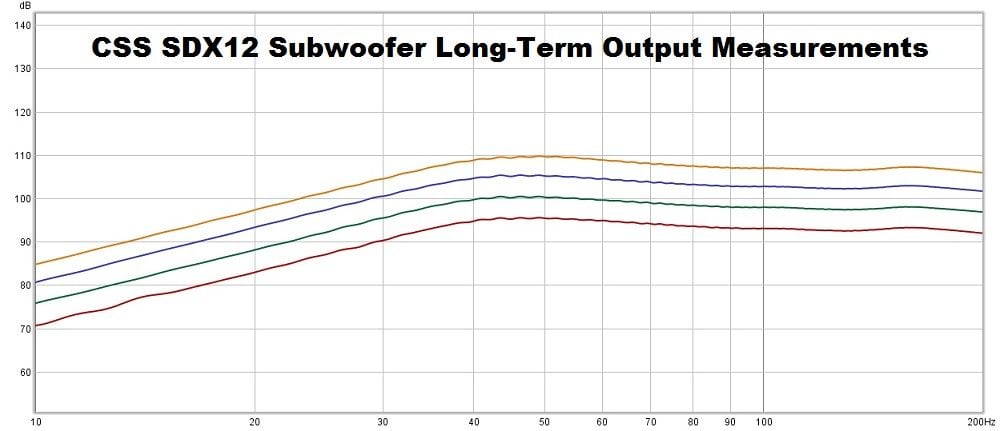
The compression test for this subwoofer was interesting. Basically, it didn’t compress. We ran out of amplifier power, and the subwoofer exceeded reasonable distortion thresholds before the subwoofer’s response shape ever changed. Part of this comes from the lack of limiters applied during testing. While I applied limiters to the subwoofer for my use, this is not a feature of the subwoofer, and so we turned them off for testing.
Looking at the distortion data, it can be seen that THD rises at lower frequencies, as would be expected. Distortion is low in the upper bass range of the maximum output plot. At a maximum continuous output of 109 dB, the point at which we ran out of amplifier power for testing, however distortion below 30hz became unusably high.
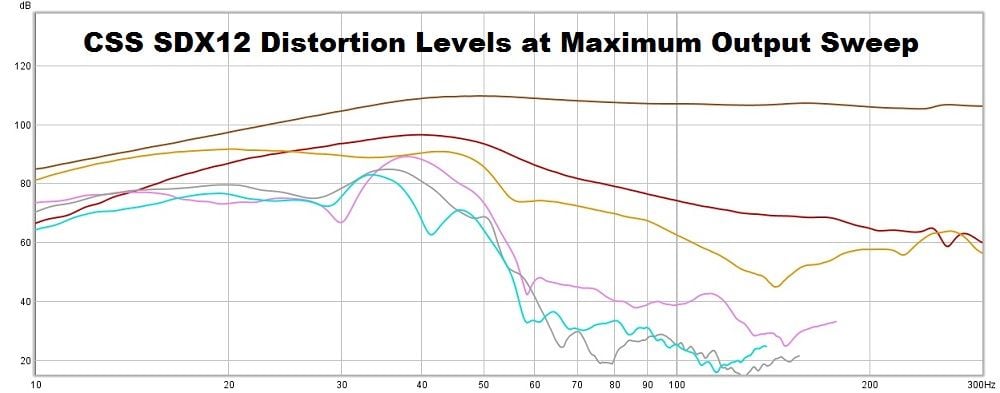
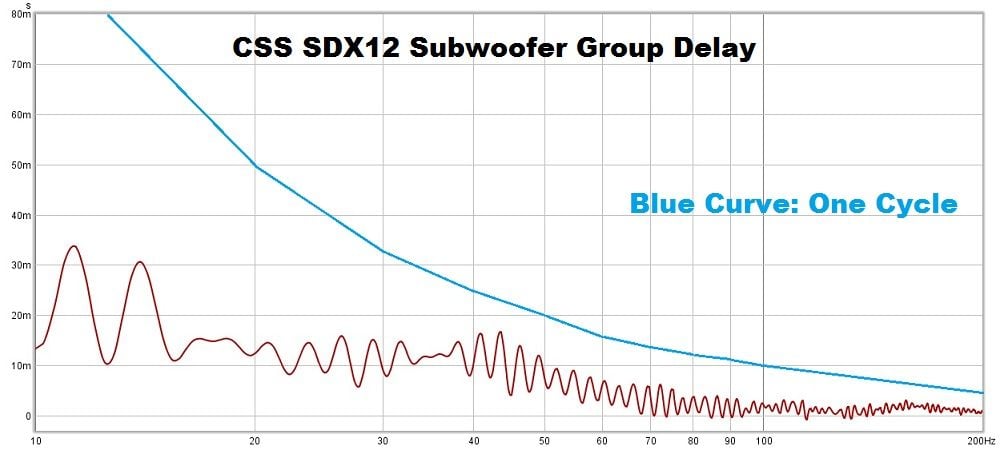
Group Delay was commendably low, falling below 1 cycle to well below 20hz. This subwoofer was tested without any EQ to flatten and extend the response, as would be seen in a commercial subwoofer. Adding a filter, as I used in my listening tests, would increase group delay slightly.
One point that I would want to make about this driver is that, for a subwoofer, it has an unusually wide bandwidth. This driver has a smooth and flat response out to 1khz, if not beyond. That is not common. While that is not important for a subwoofer, it means the SDX12 could be used as part of a 3-way or possibly even a 2-way speaker (if the tweeter could be crossed low enough). The very linear motor with very low distortion makes this a good choice for a speaker with subwoofer performance. The biggest problem would be its relatively low sensitivity.
The measured performance of the CSS SDX12 subwoofer is excellent when you consider its price and size. There are other 12” subwoofers that will outperform the SDX12 in pure output, they will typically be more expensive or ported. The deep bass output of this subwoofer is impressive when compared to the commercial competition. There are very few twelve-inch sealed subwoofers that can achieve this level. Further, moving up to the larger dual passive radiator kit is likely to gain 6-9 dB of additional output below 40hz. Hopefully we can test this in the future.
Conclusion
 It has long been my dream to be able to directly compare a DIY subwoofer to a commercial offering and see which subwoofer would come out on top. Most of us who like to DIY would like to believe that our home-made custom subwoofers are untouchable for the money, that we would have to spend 2, 3, 4, maybe 10 times more to beat their performance. Recently, I've been lucky enough to test various DIY products against similar commercial offerings and gain a better perspective. In this review of the CSS SDX12, I can say that a DIY subwoofer will provide greater value than a commercial offering, accounting for size and alignment. However, as I noted, the final finished subwoofer is around $1000, and a similar commercial offering, like the SVS SB4000, is around $1500, so our value multiplier is only around 1.5 times. To be honest, that finding is unsurprising and even sobering. That is not a negative for the CSS SDX12 however. The output of this subwoofer allows it to earn the Audioholics Medium room size rating. It comes very close to meeting the large room size rating, falling slightly short at 30 to 40hz. This DIY subwoofer kit still provides immense value, allowing its owners the joy of having produced something great with their own two hands. Further, it provides deep bass performance that is without reproach. In fact, for not much more money than the SB4000, you could build two SDX12 subwoofers powered with a single NX6000D, which would provide as much as 6dB of additional output, clearly outperforming any commercial offering in its price class. Finally, I should note that a dual passive radiator version of this kit is also available for $750. That provides a an even better value. Taken as a whole, while requiring a bit more involved work by the buyer, a CSS SDX12 is a great value and something I would encourage all our readers to consider.
The Score Card
The scoring below is based on each piece of equipment doing the duty it is designed for. The numbers are weighed heavily with respect to the individual cost of each unit, thus giving a rating roughly equal to:
Performance × Price Factor/Value = Rating
Audioholics.com note: The ratings indicated below are based on subjective listening and objective testing of the product in question. The rating scale is based on performance/value ratio. If you notice better performing products in future reviews that have lower numbers in certain areas, be aware that the value factor is most likely the culprit. Other Audioholics reviewers may rate products solely based on performance, and each reviewer has his/her own system for ratings.
Audioholics Rating Scale
 — Excellent
- — Very Good
- — Good
- — Fair
- — Poor
| Metric | Rating |
|---|---|
| Bass Extension | |
| Bass Accuracy | |
| Build Quality | |
| Fit and Finish | |
| Ergonomics & Usability | |
| Features | |
| Dynamic Range | |
| Performance | |
| Value |
Matthew has spent the better part of the last two decades studying acoustics and good sound reproduction. He provides down to earth explanations of complex scientific topics related to audio reproduction.
View full profile