
Room Acoustics: Acoustic Treatments
Taught by Anthony Grimani of PMI Ltd.
Anthony Grimani's "Room Acoustics: Acoustic Treatments" class followed his course on "High Performance Home Theater Calibration" on the afternoon of my first day at CEDIA. I'm reviewing it here, as the third installment of our CEDIA Seminars because it flows well and builds upon John Dahl's "Acoustics 101" course. A CEDIA System Designer-in-training would normally take these two classes in this sequence so that is the order in which we are presenting them.
Critical Distance
Have you ever tried to grasp concepts in learning something new? Like room acoustics for instance? If you've read Parts 1 and 2 of The CEDIA Seminars you've heard it said that the speaker system and the electronics contribute 50% of the sound of the system and that the room is responsible for the other 50%. That was all well and good for me, though still pretty nebulous, until, that is, Tony introduced the concept of Critical Distance. Critical Distance is the distance to the listening position at which the sound from the speakers and the sound from the room are equal. And, he contends, that in a typical home theater, before acoustic treatment, that distance is usually only 6 feet from the speakers!
Wow. I found that stat' amazing. This seemed to possibly explain why for so many years I'd read of reviewers listening to very large stereo speaker pairs from what seemed like ridiculously close distances. Were they trying to get within the Critical Distance criteria? Had they been aware of the room reflections and realized that they were not, in fact, truly listening to the speakers when they sat back at more typical listening distances?
The slide above is one of the best you're likely to see on the subject of room reflections for mid and high frequencies. In addition to noting all the reflections vs. direct sound depicted on Tony's slide note also that the absolute worst position to sit if you're in a typical rectangular home theater would appear to be right in the middle. The middle spot gives you perfectly symmetrical 1st, 2nd, and 3rd order reflection paths so they're theoretically at equally balanced strength as they reach your ears! Not at all desirable.
But don't move away from that center position just yet all you old-time stereo diehards. Remember a couple of important points here.
- If you move off center figuring you can get away without acoustically treating the first reflections, forget it. You'll still get them. More reflections at slightly differing intensities but reflections none the less. So you've got to do something about them.
- Some might ask "What about the auto EQ functions built into many of today's more feature laden receivers?" The answer is, that these room EQ receivers, which come with a microphone intended to be placed at the listening position, are not capable of discerning a difference between a 1000Hz direct wave or the whole slew of 1000Hz waves that might arrive at the listening position only a couple milliseconds later. In other words, the receiver is trying to equalize for all the 1000Hz notes "heard" at the listening position! It follows then, that to allow the receiver's room EQ feature to work accurately, we must absorb strong, first reflection waves over a very broad bandwidth. And, Tony Grimani recommends not EQing frequencies above 1KHz reasoning that a quality speaker system, appropriate to the level of refinement of your home theater, should have no problem producing a tight tolerance, linear response in the first place.
- Virtually no room is perfectly rectangular. Most non-theater-specific rooms have doors, windows or perhaps archways leading into another living space. So it's highly unlikely that the "perfectly centered" scenario will ever be the most detrimental contributor to reflections. The speaker/room interface is itself the cause of the reflections and it's pretty darn hard to get rid of either. But it can be done. Stay with us.
- This is, after all, home theater, "surround sound". So unlike the old stereo mantra wherein the best sound was had by placing oneself exactly in the center of the audience, we've now got a center channel which carries 70% of all movie dialog and sound effects while also anchoring the center image for listeners at every position. This is true only when all other room set-up, tuning, level setting and equalization is done correctly and in a methodical way.
Room Acoustics: Acoustic Treatments - page 2
A Common Living Area/Home Theater Layout
Before you all give up and figure the whole room acoustics deal is hopeless let me give you my current solution to reflections in my home theater:
The key here is to be able to picture how the reflections like you see in Tony's slide might change once you move the speaker system around in the room a bit. I want to also stress, as you study the pictures, that I've done as much as I can with proper speaker placement and positioning. We have added the dual-drape system, but so far I have not had to propose more drastic changes to my significant other's carefully appointed living room in which my A/V set-up is the barely-tolerated intruder.
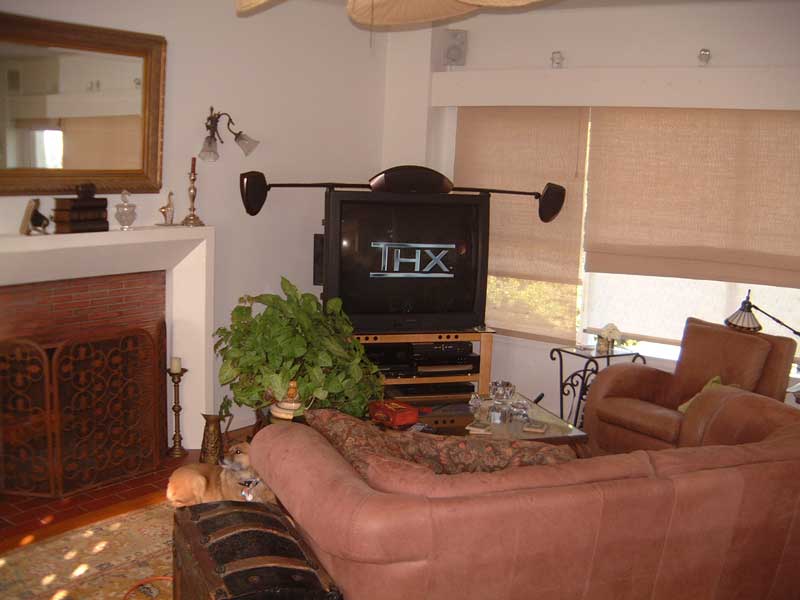
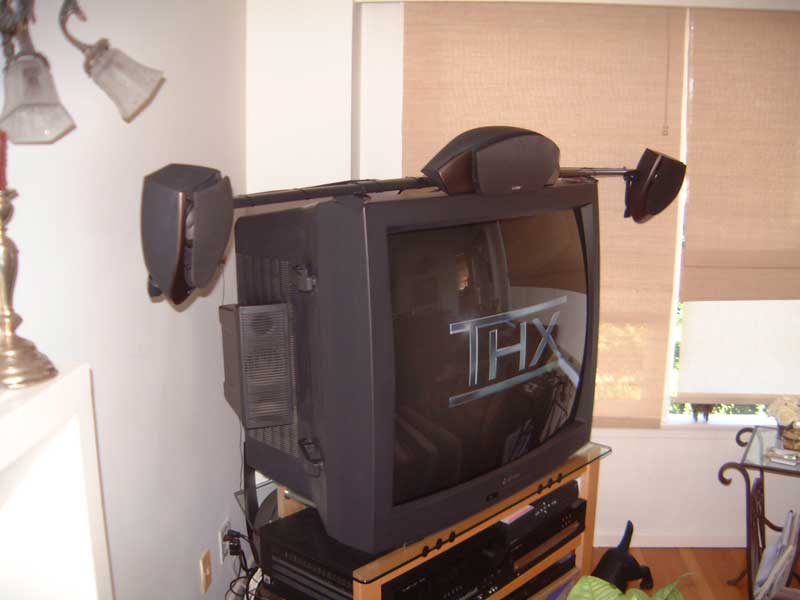
About my set-up > The last two homes I've had leant themselves to corner placement of the home theater. I figure for the vast majority of us we're making due with a home theater in the living room and that usually means there's a fireplace right smack dab in the middle of the main wall. No problem. Placing my beloved (and huge) 40" Mitsubishi tube TV in the corner does two very important things for us at the same time. See the first pictures below.
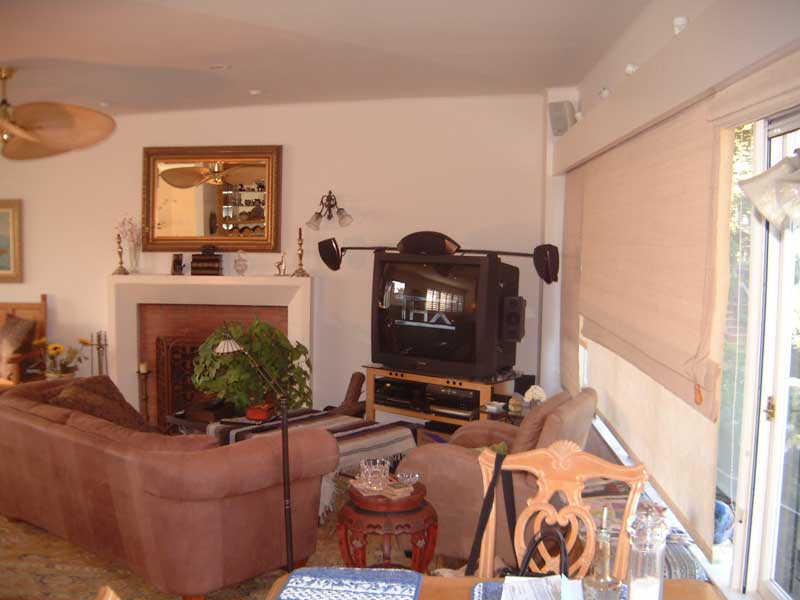
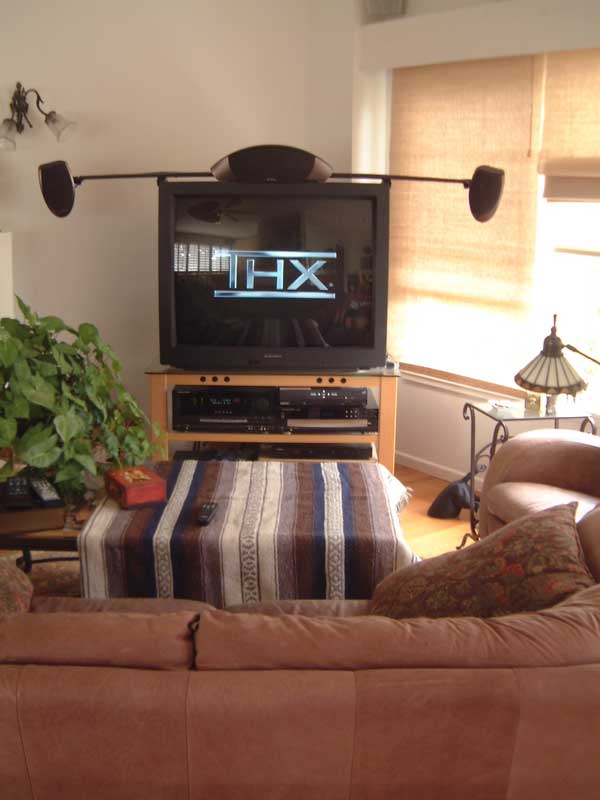
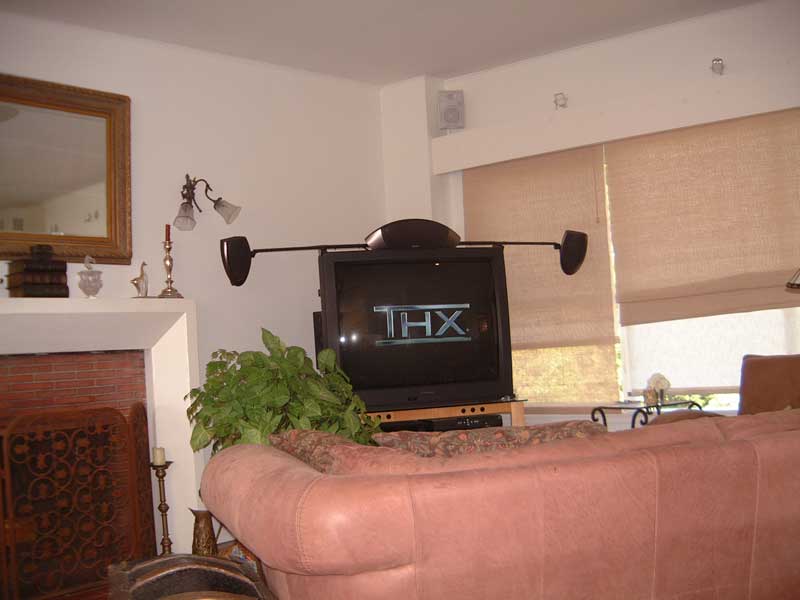
Most obvious in the long shot from the right side of the system is that the Infinity Modulus satellite speakers hanging outboard of the TV on the optional Infinity bar have their front baffles almost parallel with the right window (with the tan shades drawn). Guess what? No sidewall(axial) reflections. The same is true for the left satellite. Note also that not only are both left and right satellites pointed inward toward the listening position on the couch but they are tilted down toward the listening position as well. (See Tony's doorstop trick from Part 1 of this series.)
This positioning would shift a good portion of the first reflection frequencies, from the ceiling bounce of the left-center-right speakers, to behind the listening position so you can't hear them. The tilt also makes the upper ceiling and lower floor bounce angle different (diffusion) for the same frequency.
A 1000Hz reflection heading toward the ceiling will hit the ceiling and end up hitting the listener's head without any control at all. Tilting the speakers down reduces the level of this reflection. The same 1000Hz frequency going to the floor or toward the glass coffee table will hit the floor and the coffee table having traveled a shorter distance (than the ceiling 1000Hz frequency). It will be absorbed in the Persian area rug in front of the TV. And for the coffee table I will tell you of a trick later in this article.
Meanwhile, at the listening position, the 1000 Hz tone is heard directly. There is about 3 milliseconds of delayed 1000 Hz bouncing off other surfaces and arriving at the listening location. So it's important to either absorb these sound-smearing tones or divert a large percentage of them out of the listening area.
I mentioned the coffee table. This hard surface right between you at the listening position and the left-center-right speakers is a real reflective liability. (See the second set of pictures.) Since the speakers are now pointed inward and downward toward the listening position the highly reflective glass coffee table will have a lot of mid and high frequencies bouncing off the glass before they arrive at the listening position. This is very similar to the "console bounce" recording engineers have become aware of when they put small studio monitor speakers on the mixing console's meter bridge. Blurred sound and a masking of intelligible vocals can result.
Fortunately the answer, for my humble abode anyway, is pretty easy. I want to put my feet on the coffee table when I kick back to watch a movie so I just throw my heavy Mexican blanket (absorption) on the table and the significant other is truly pleased with my thoughtfulness. Works Great!
Room Acoustics: Acoustic Treatments - page 3
Acoustical Treatments - Absorption
Okay, what if your situation is such that you can't rearrange your room or system or you've already tried the speaker aiming and positioning as best your situation will allow? And, you can still tell from moving in and out of the critical distance that more acoustical treatment needs to be done? One suggestion would be to enlist the help of your significant other to "confirm" the need for absorptive or diffusive materials.
Over the years I've found that women are much more critical of perceived "distortion" or "unclear sound" in the midrange frequencies. The effect can be more pronounced on female vocals of her favorite artist backed up by well-recorded and somewhat complex musical arrangements. If you can demonstrate to her that moving forward into the critical distance area (adjusting the volume down to compensate for the nearer distance) will yield clearer, more distinct overall musical presentation, you've made a pretty convincing case for acoustical treatment. Now you need to get clever and figure out how to incorporate acoustical treatment into your room/system interface in the most amenable way possible.
First some facts:
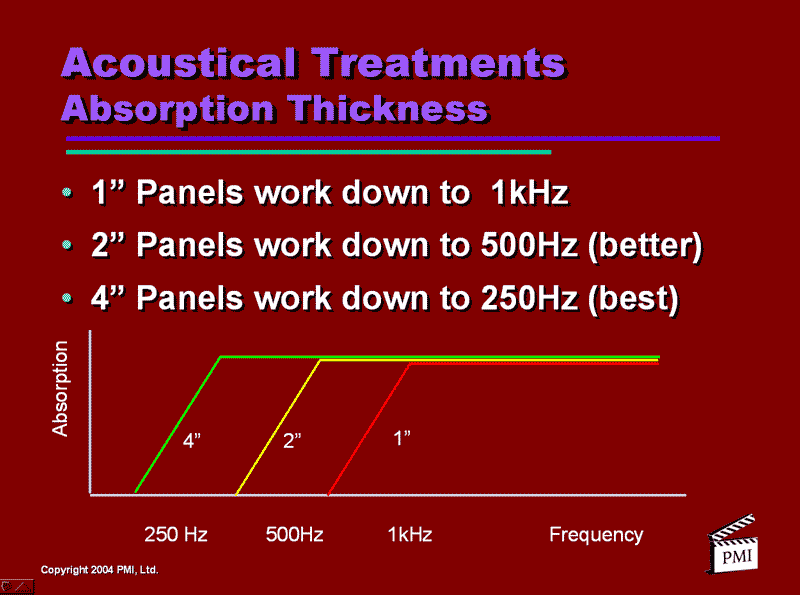
Note that 1" acoustical panels only work down to 1000Hz which is above most of the primary vocal frequencies and thus just about useless in affecting vocal intelligibility. Two inch material gets down to 500Hz or so and 4" down to 250Hz.
So what should we use? According to F. Alton Everest from "The Master Handbook of Acoustics" a bass or baritone voice can get down to 80Hz or 100Hz respectively. So, technically speaking, even the 4" thick acoustical absorption won't get you down in frequency as far as you want to go. In practice though, absorbing down to 250Hz will take care of most of the sound reflections that affect intelligibility and sound imaging for human beings. So 4" material is the sweet spot for thickness. Two inch material works OK too, but for good quality work you really need to absorb down to 250Hz.
This is why Tony's second slide is so useful; by standing 2" thick foam off of a surface with, for instance, a couple of 2 x 2s, you can actually get much the same effect as using 4" thick material in the first place. Not identical, but similar.
So how to get the most bang for the buck and still pass the WAF test? A recommendation would be to use some of the more common pre-made 2" x 2' x 4' acoustical panels offered by a variety of manufacturers. These panels come with the correct acoustical fabric which allows sound waves to pass through and have their energy dissipated in the fibrous absorption material behind.
The best-bang for-the-buck part comes if you can place that 2" thick panel over a 16" section of wall where the significant other has allowed you to remove the sheet rock between studs while filling the gap in the wall cavity with high density mineral wool or fiberglass insulation (3 pounds per cubic foot). Now you effectively have 6" of acoustical absorption which will truly absorb reflections across a wide bandwidth of frequencies and down to ~125Hz.
That last phrase in italics is important. If you use only 2" thick acoustical absorbers, for instance, mounted directly to sheetrock you are only attacking those frequencies down to 500Hz. So you have, in effect, used a high frequency tone control on the reflections to 500Hz while ignoring those reflections from 125Hz to 500Hz. This type of set-up will change the spectral balance of the reflections heard and thus the overall sound of the system as heard at the listening position. And it is virtually impossible to know if the end result will be satisfactory to you the home theater owner without trying it.
Acoustical Treatments - Diffusion
Absorption is not the only way to effectively deal with reflections. Breaking up the direction of a reflection so that the frequency doesn't carom off a wall at a predictable angle is the job of a diffuser.
As noted in the first slide, diffusors can be either purpose built panels or perhaps something more common to a home like a bookcase. How then does one know when to use an absorber vs. when to use a diffuser?
In many, if not most instances in either home theaters or dual-use rooms it usually works out that the front left, center and right channel reflections which bounce off the walls, ceiling and floors are attended to by the use of absorptive materials. In the rear area of the theater it is a combined use of both absorptive and diffusive materials which can provide the dual-purpose role of attenuating the effect of slap echoes from directly behind the listening position (absorptive), while at the same time, adding to the immersive effect from the surround speakers which comes most easily by the judicious placement of diffusors.
A common solution for the rear of a theater is place absorptive material in the center area and diffusors on either side. This will knock down the slap echoes directly behind the listening position while allowing the surround speakers, which are mounted on the left and right walls to fire back into the diffusors, giving the desired immersion effect. For a 7.1 system place monopole left and right rear surrounds on either side of the absorptive material, at least 3 feet apart.
Room Acoustics: Acoustic Treatments - page 4
How Much Acoustical Treatment?
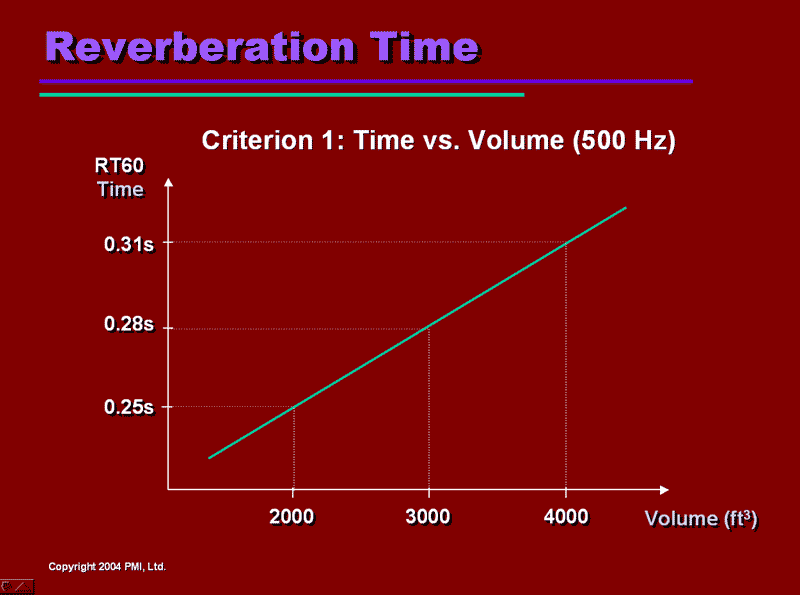
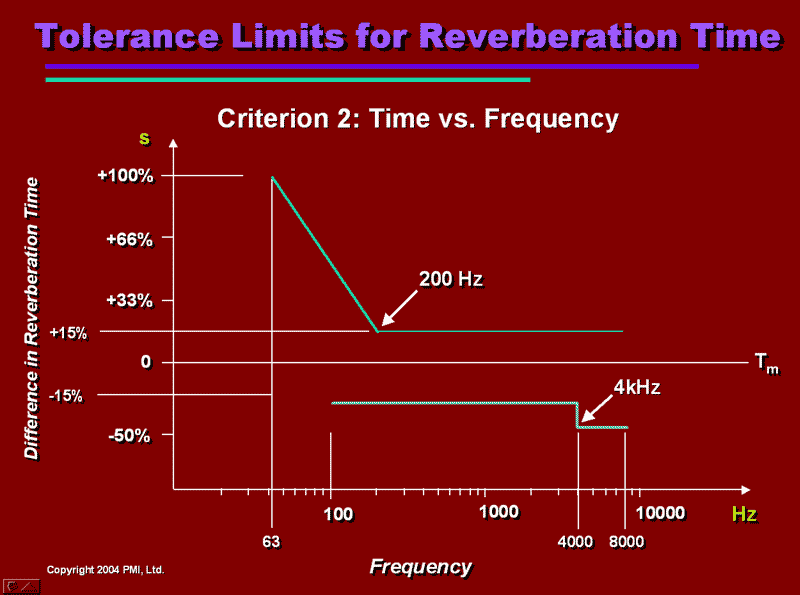
Tony had a "Reverberation Guidelines" slide which gives a recommended delay time between 0.2 and 0.4 seconds within a typical room. There is even a graph showing the tolerance limits for reverberation time vs. frequency.
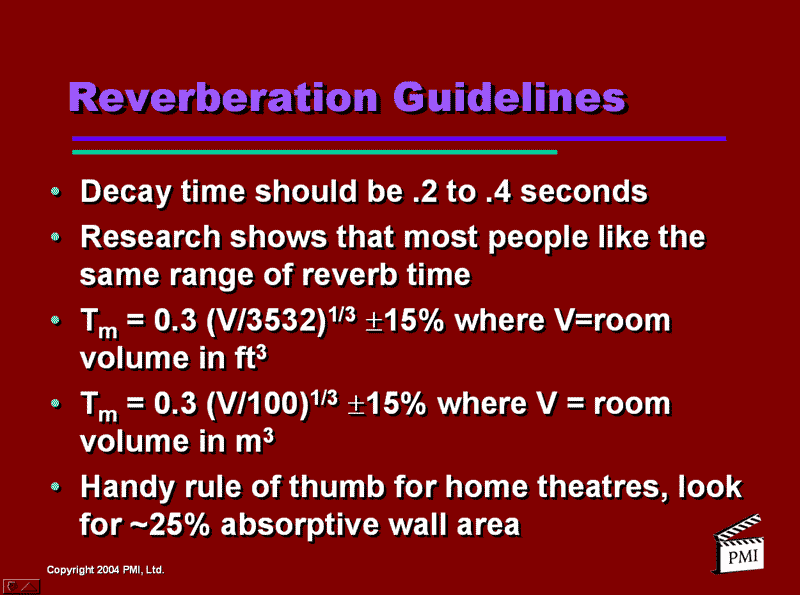
If this sounds like it's getting really complicated, it is. To do the math requires that you know the absorption coefficients of the materials in your room (carpet, sofa, drapes, etc.), figure out the square footage area of each and apply the right amount of mid-high absorption plus the right amount of bass absorption (Helmholtz or diaphragm type). Or, just use Tony's handy rule of thumb for achieving that goal: strive for ~25% of absorptive wall area.
That's a lot of absorptive surface for most non-room-specific home theaters (living rooms or great rooms). So, if using less than the recommended 25% of absorption per sidewall, the critical placement and overall effectiveness of qualified materials can make a major difference. Done correctly, it is heard in the system's expansive front soundstage and imaging depth along with how that front soundstage effectively blends with the rear surround channels which provide a feeling of "immersion" or "envelopment".
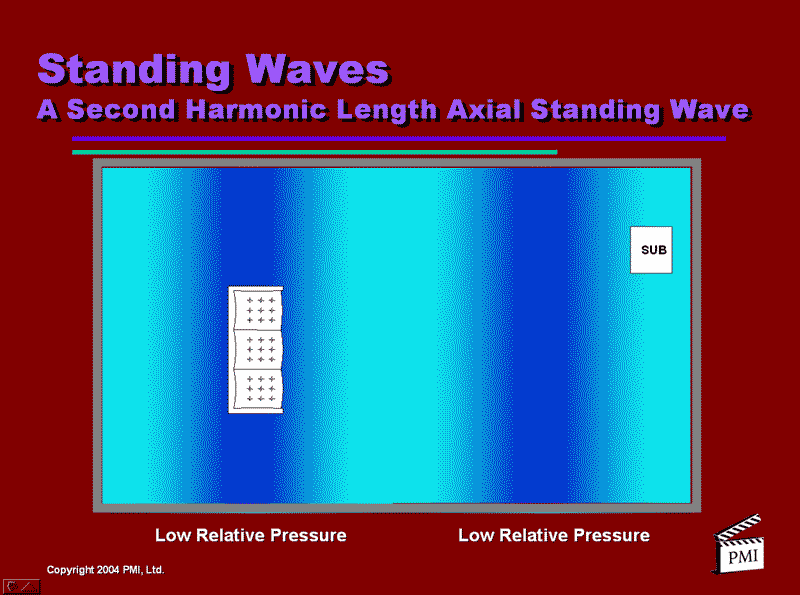
Standing Waves
John Dahl had touched upon standing waves in Part 2 of the CEDIA Seminar series so let's look a bit more at some possible solutions. Realize though that if your room is capable of sustaining standing waves (aka room modes) around your listening position odds are you'll hear (and feel) waves of similar or greater intensity in many places within the room.
Room modes can never be entirely eliminated. That is not the goal. From the listening position, the goal is to smooth-to-an-average-overall-level, the strength and specific frequency or frequencies which tend to peak in the low frequency region below approximately 150Hz.
Note here that we've now gone in frequency below the area in which reflections were dealt with earlier. Standing waves consist of substantially longer wave lengths which produce much larger errors in frequency response by virtue of the fact that the bass wave lengths and the room dimensions can act aggressively by either reinforcing or canceling each other at many places within the room.
Not surprisingly, given the strength of these room modes, the methods used to deal with them can sound quite drastic:
- Change one or more room dimensions. Professionals like Tony Grimani often use a false, specially configured wall at the front of their project theaters to accomplish this as well as other design goals.
- Move seating location. Here we're usually talking about inches, not feet. One caveat for your prime listening position(s) is to try to always stay away from the rear and side walls.
- Move subwoofer location or add more subwoofers which, when calibrated properly, can ameliorate to a great extent the standing wave problem at the listening position(s).
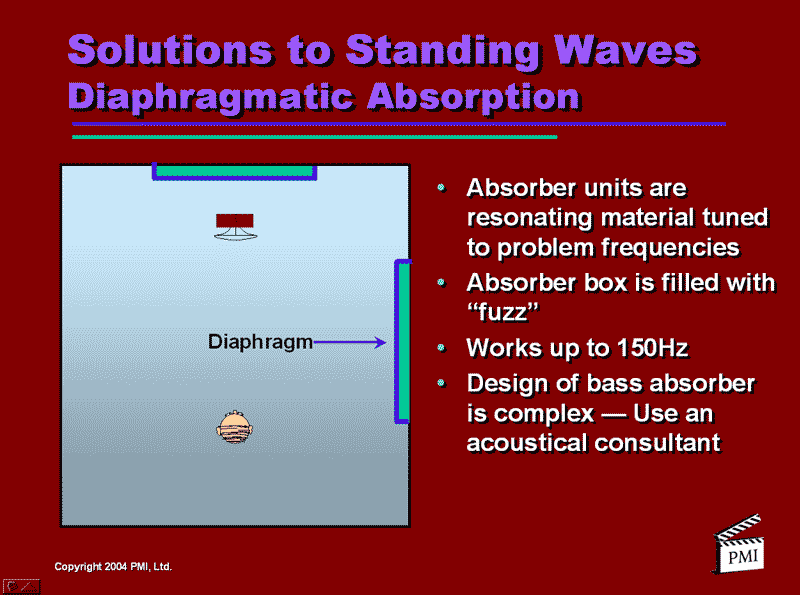
- Use bass absorption. Constructing a diaphragmatic absorber is discussed in "The Master Handbook of Acoustics" by F. Alton Everest. Tony warned, however, that this is a very tough project to build accurately if you are trying to absorb a single, problem, low frequency peak. There are professionally built diaphragmatic bass absorbers which are effective across a wide bandwidth of bass frequencies.
- Equalize. Use a 1/12 octave minimum and preferably a parametric equalizer for the low bass region. You need to be able to have an EQ which is capable of centering within 2 or 3 Hz of a bass peak to effectively attenuate it. Dips in frequency response at these frequencies are always left alone. Attempting to boost a dip in bass response is an exercise in futility and serves only to suck the power reserves out of the bass amplifier.
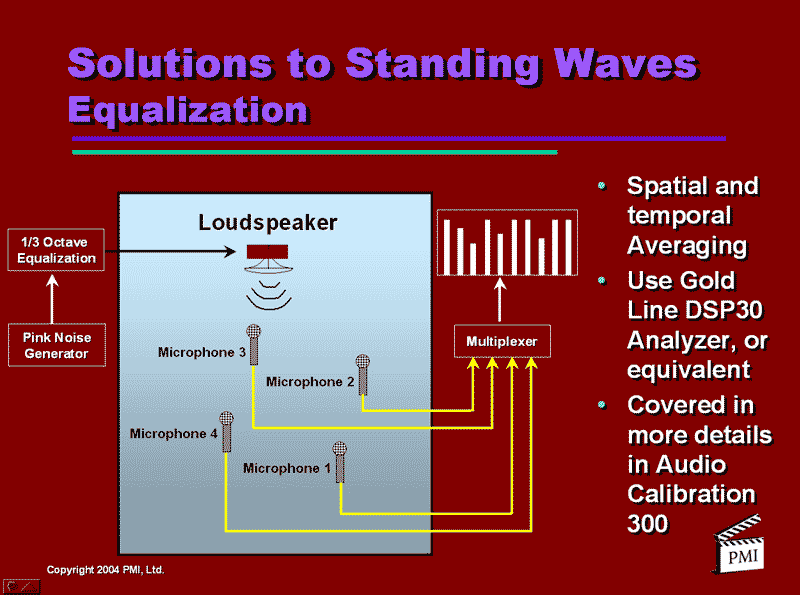
This last slide shows how the "Every seat a good seat" is accomplished. Microphones representing each of the seating positions are portrayed above. The information is fed to a central computer equipped with software which can average the frequency response reading for all positions and apply a global equalization scheme. If the theater owner wants his two or three most common seating positions to have a better, more tightly defined frequency response it is a simple matter to tell the software program to "weight" certain microphone positions more heavily than others.
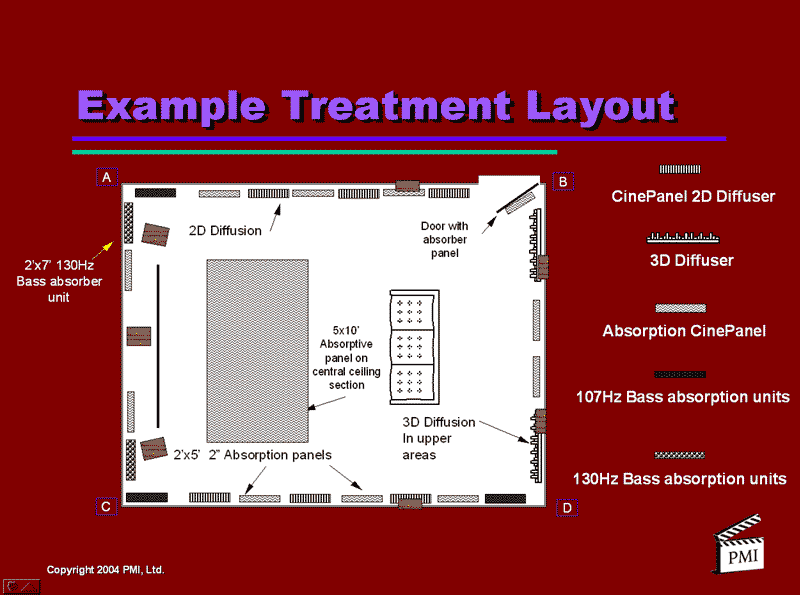
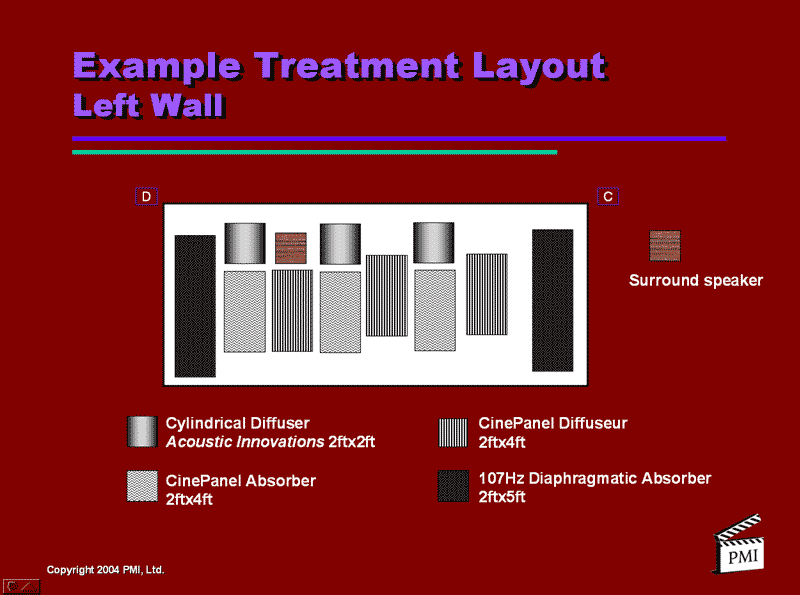
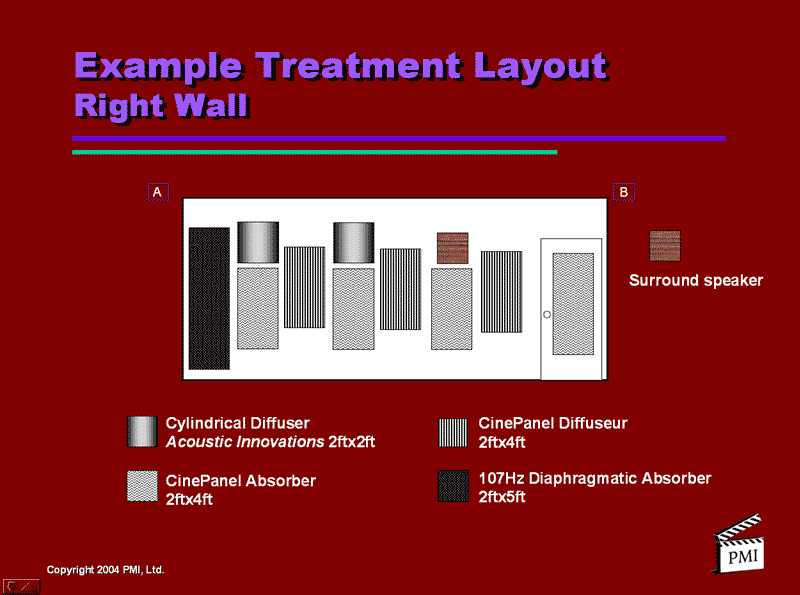
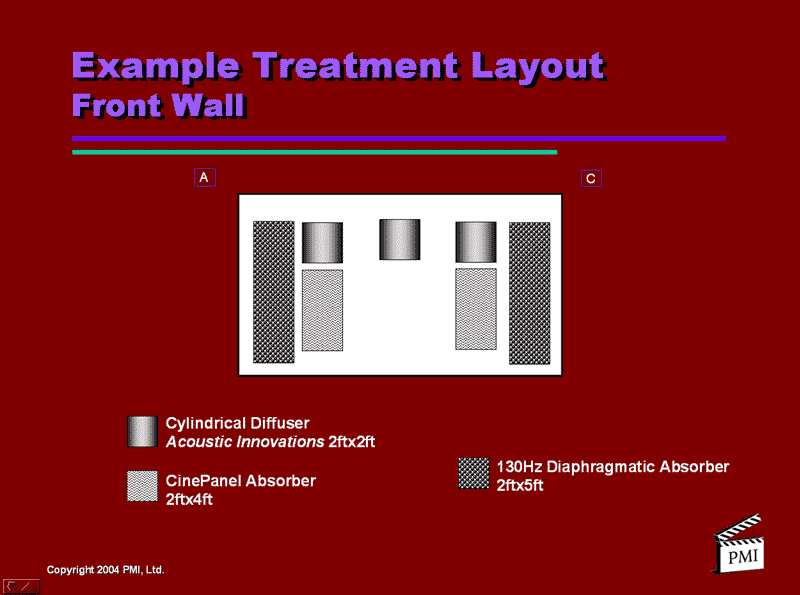
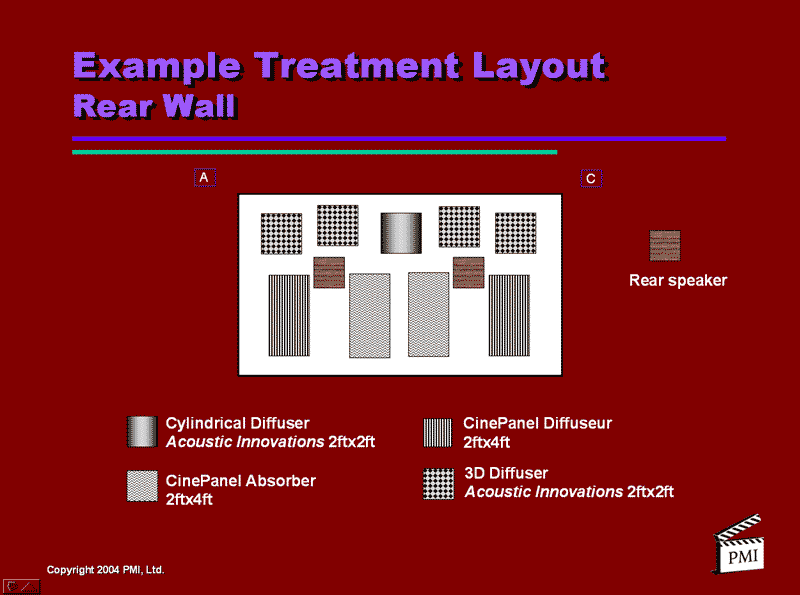
Example Treatment Layouts
Tony saved the best for last and so have we. Five of the last six slides show an ideally treated, dedicated home theater room. This level of treatment would normally only exist in professionally designed and executed home theaters costing in excess of $50,000. This theater is the reason, gentle reader, I decided to place photos of my much less ambitious living room/home theater at the beginning of this article!

Again, many thanks to Tony Grimani of Performance Media Industries Ltd., www.pmiltd.com , and CEDIA, www.cedia.org , for their generous assistance with this article.
- Patrick Hart