
SI TPM80 Performance Series Motorized Projector Screen Review
SI Screens TPM80 Electric Screen
- Product Name: TPM80 80" Performance Series Motorized Projector Screen
- Manufacturer: SI Screens
- Performance Rating:

- Value Rating:
- Review Date: August 31, 2009 07:00
- MSRP: $ 1699
"Super
Flat" Rigid Screen Tensioning System
Screen Sizes - 16:9 -
80", 92", 100", 106", 110", 119",
133"
Screen Sizes - 4:3 - 77", 84", 90", 96",
100", 110" 120"
Gamma HD screen material
24"
of black screen drop
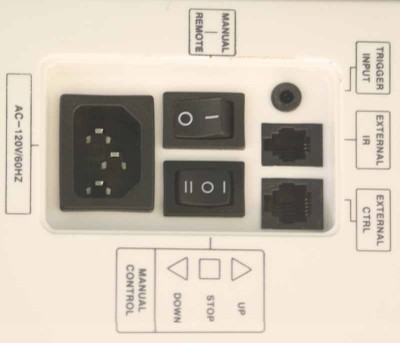
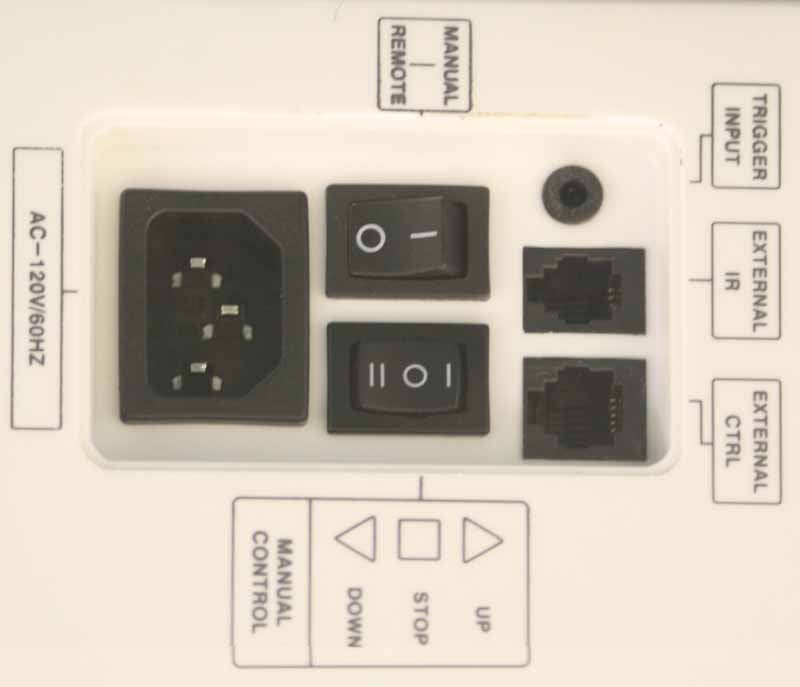
Power and 12 volt trigger are located on the
left side of the unit
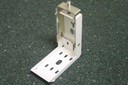
Simple installation with universal aluminum
brackets
Mounts to the wall or ceiling
IR and 12 Volt trigger
control built in
Remote Control
"Easy set" upper and
lower limit adjustments
Durable extruded aluminum powder coated
chassis
Luxurious curved case
Lifetime replacement policy
Pros
- Very easy to install
- Aesthetically pleasing
- IR, wired, 12V trigger, and rocker-switch controls
- Very Quiet
- Easy to adjust
- Quality construction
Cons
- Pricey
SI TPM80 Performance Series Full Review
After the marathon installation of our projector lift (another story, for another day), we waited with anticipation as to what SI Screens had to offer. Prepped for a full night of demolition and construction, we were pleasantly surprised soon after the TPM80 electric dropdown screen arrived. The mounting system that was included made the job extremely easy, and efficient; therefore it was no time at all before we were watching a very exciting PowerPoint presentation on our new electric screen.
Features and Favorites
SI seemed to put tremendous effort into the engineering and construction of this screen. We don’t recall there was anything that they left out, and no, it doesn’t need the kitchen sink.
-
Finish
Gorgeous, high-gloss white powder coat. The finish was impeccably smooth and void of any imperfections. All edges were rounded, and even the fastened plastic parts were machined with exact tolerances.
-
Controls
Controlling the ascending and descending of the screen is an array of low voltage choices thanks to the external control box. A simple IR remote is included with up, down, and stop controls. SI Also includes a wired rocker switch with several feet of wire (enough to drop it down a wall, plus it's easily extended for longer runs). A built-in 12V trigger input is also provided to sync the dropping of the screen with any compatible video source. Lastly, a rocker switch (up/down/stop) is hard-mounted to the screen case.
-
 Easy,
E-Z Installation
Easy,
E-Z InstallationThe included mounting system made installation a breeze. The two included mounts are attached to the wall and/or ceiling with screws and anchors (also included) and the screen fits within.

-
High Contrast Screen available in several flavors
Screen choices are available from Gamma Maestro White Weave to Black Diamond. Use the screen wizard on the SI website to determine the perfect video color-light-projection termination point (screen). We tested the Gamma Maestro HD 1.1 White Weave.


Construction Quality
To our amazement, the SI screen made it to our office without any lethal scars from the caring hands of the selected parcel company. Opening the box revealed a well-packaged beautifully designed and finished projector screen. Holding the screen in our hands and feeling the weight gave us the instant impression of high-quality construction.
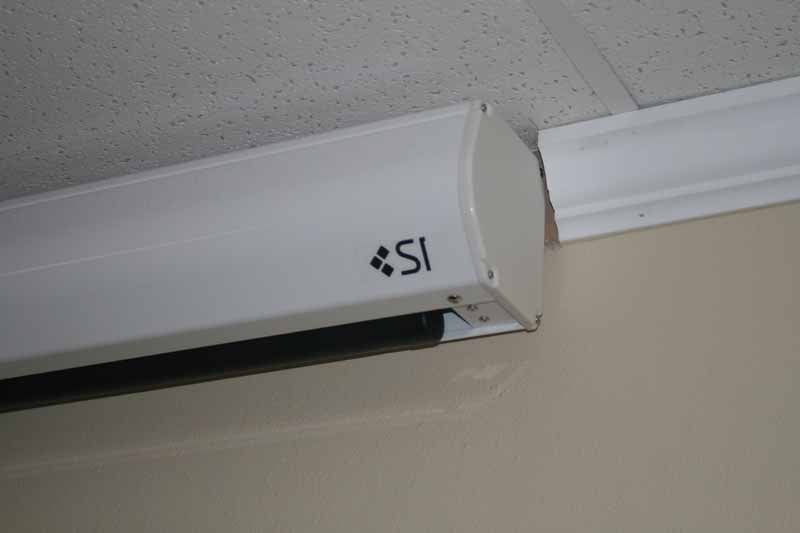
The chassis is constructed of extruded aluminum, coated with a very glossy white powder coat. Plastic end caps match the color very well, and the rounded edges are snag-proof. Facing the screen, the right end-cap has a smooth finish, and the left end-cap revealed the attached rocker control, 120V input, 12V trigger connection, and the wired rocker switch input. Even the two mounts were well-constructed and had a very nice, matching finish.
The screen itself was made of heavy material, and remained very flat when in its lowered position. There was plenty of black material left at the top of the screen to allow for virtually for any ceiling height (about 24 inches, in fact). Noted in the specs was a “Super Flat” Rigid Screen Tensioning System. We couldn’t explain better than that, and it’s the truth. The screen remains very flat even though it doesn't feature the concave tensioning system found on more traditional (and expensive) "tensioned" electric screens.
Installation
This was actually unreal, as to how easy this installation was. We just took the screen, held it close to the wall, and it just jumped right into place. Okay, not really, but it wasn’t much more than that. We measured the overall screen width, found the center point of the wall, and then made our marks for the two mounts. After this, we screwed the mounts to the wall and hung the screen.
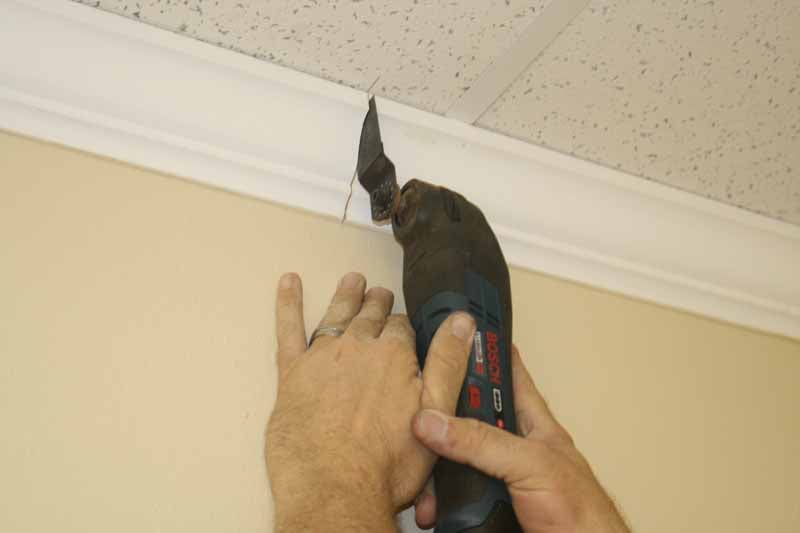 Of
course, our conference room had a 24" grid drop-ceiling and
crown-molding as well. After finding the center of the wall, we then
made our marks for the mounts. We positioned the mounts equidistant
from each other in order to disburse the weight of the screen. In
order to attach the mounts to the wall, we had to cut out the
crown-molding where the screen would hang. The use of a Bosch
cordless multi-tool made the cutting and removal a cinch. Once the
wall was void of excess crown molding wood, we held the mount in place and marked
where we needed to put the anchors. We drilled holes for each of the
anchors, hammered them in place, and then screwed the mounts into the
wall. In typical construction you may run into studs along the way. In this case simply forgo the anchors and drill and drive a screw directly into the stud (wood or metal) as needed.
Of
course, our conference room had a 24" grid drop-ceiling and
crown-molding as well. After finding the center of the wall, we then
made our marks for the mounts. We positioned the mounts equidistant
from each other in order to disburse the weight of the screen. In
order to attach the mounts to the wall, we had to cut out the
crown-molding where the screen would hang. The use of a Bosch
cordless multi-tool made the cutting and removal a cinch. Once the
wall was void of excess crown molding wood, we held the mount in place and marked
where we needed to put the anchors. We drilled holes for each of the
anchors, hammered them in place, and then screwed the mounts into the
wall. In typical construction you may run into studs along the way. In this case simply forgo the anchors and drill and drive a screw directly into the stud (wood or metal) as needed.
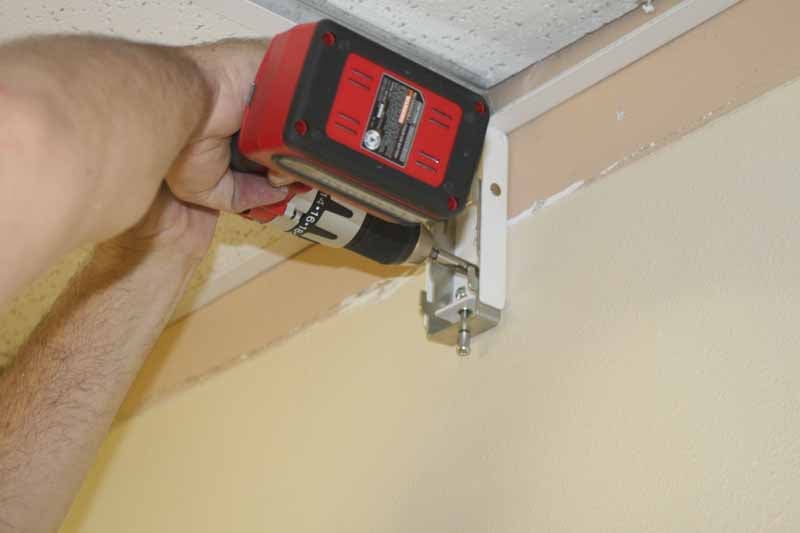 Now
that the mounts were in place, two of us lifted the screen and sat it
on the mounts. With one hand on the screen, the other hand was free
to turn the Phillips-head screw, which tightened the mount to the
screen. The mounts have four rigid hooks pointing up, and the hooks
rise as the adjustment screw is tightened. Once the mount screw is
fully tightened, the brackets are clamping the screen from the
bottom, against the top of the mount. The chassis has a continuous
double-rail that runs the full length, so the mounts can be attached
anywhere on the chassis. This is perfect for those situation where
you can't position the mounts in a perfectly proportional manner.
Just find the studs or a secure mounting position and you'll be good
to go.
Now
that the mounts were in place, two of us lifted the screen and sat it
on the mounts. With one hand on the screen, the other hand was free
to turn the Phillips-head screw, which tightened the mount to the
screen. The mounts have four rigid hooks pointing up, and the hooks
rise as the adjustment screw is tightened. Once the mount screw is
fully tightened, the brackets are clamping the screen from the
bottom, against the top of the mount. The chassis has a continuous
double-rail that runs the full length, so the mounts can be attached
anywhere on the chassis. This is perfect for those situation where
you can't position the mounts in a perfectly proportional manner.
Just find the studs or a secure mounting position and you'll be good
to go.
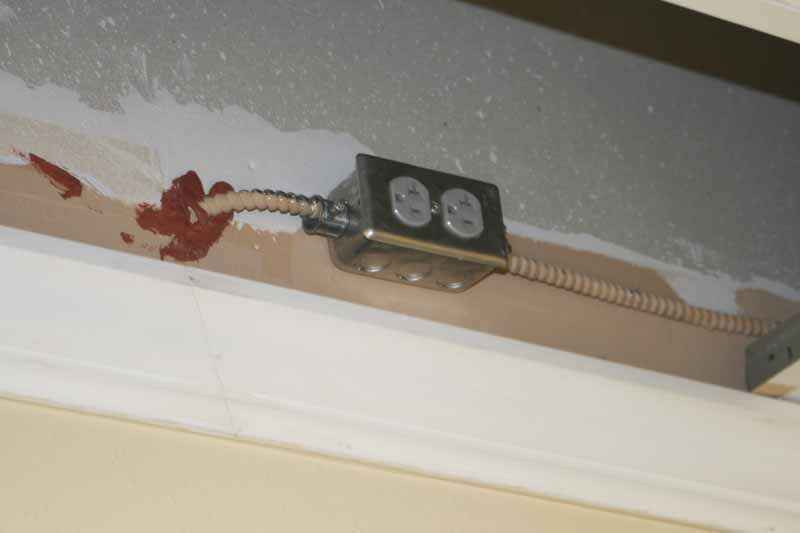 Knowing
that we were hanging an electric screen made having available power a
pre-requisite. In our case, we routed the 110V electric (grounded)
wire through a “slit” in the acoustic tile ceiling. Next, we
plugged into the available outlet, put the batteries in the remote,
pointed the remote at the infrared eye, on the front of the screen
chassis, and pushed the “Down” arrow. The screen, very quietly,
exited the chassis and continued until we thought it would hit the
floor. A quick adjustment with the projector on, and the included
tool for screen adjusting, revealed the perfect placement for the
screen to terminate when descending.
Knowing
that we were hanging an electric screen made having available power a
pre-requisite. In our case, we routed the 110V electric (grounded)
wire through a “slit” in the acoustic tile ceiling. Next, we
plugged into the available outlet, put the batteries in the remote,
pointed the remote at the infrared eye, on the front of the screen
chassis, and pushed the “Down” arrow. The screen, very quietly,
exited the chassis and continued until we thought it would hit the
floor. A quick adjustment with the projector on, and the included
tool for screen adjusting, revealed the perfect placement for the
screen to terminate when descending.
One click of the “Down” button places the screen at the exact same location each time; just as a click of the “Up” button returns the screen to the chassis for concealment while not in use. Stopping points can be adjusted for the “Up” and “Down” controls of the screen. Reading this installation process makes it seem so much tougher than it was. We could easily do this installation again in less than 30 minutes. In fact, we had to move the screen off-center on the wall, so we did have to remove it and move and reinstall the mounts. Removing, mounting the hardware, and reinstalling took about 23 minutes.
Viewing Tests
The screen material used was white and did an excellent job displaying in the both lighted and dim room settings. Using a laptop's VGA output to power the projector, we performed several tests. First we used static images, such as .PDF files and power point presentations. We also played some short videos from YouTube, as well as displaying a DVD. The projector used was a Hitachi . What impressed us most was that the screen itself virtually disappeared into the image when we projected material onto the screen. You were never conscious of a texture or anything that inhibited or interfered with the projected image. Additionally, we felt that th screen did a gd job of reflecting all available light and not much was transmitted through the screen the the wall behind it. This means that the screen isn't losing light unnecessarily and it results in a more crisp and vibrant image.
Performance of the screen material far surpassed the needs of our conference room. Continued, daily use of the screen only adds to the “Pros” column of this article.
Conclusion
 SI
Screens has delivered an aesthetically stunning product whose
performance is on par with its good looks. From the solid packaging
to the incredible ease of installation, the Performance Series screen
is an excellent choice for any consumer that is looking for quality.
And if you are an installer, don't gloss over that last point –
this really was the easiest electric screen system we've ever
installed. If time is money, you need to pick up an SI Screen and see
for yourself how it might enhance your business model. The retail,
nor “street”, price is very easy on the pocket; however, you are
looking at a motorized projector screen with excellent tension and an
assortment of standard features. Convenience comes with a price.
Without question, I would highly recommend the SI Screens Performance
Series motorized projector screen.
SI
Screens
11110
Metric Blvd. Ste D
Austin, TX 78758
512.832.6939
About
SI
SI
is a technology based U.S. projector screen manufacturer focused on
delivering “state-of-the-art” performance. Each motorized, fixed,
and curved projector screen they produce meets exceedingly tight
tolerances and must deliver all the stunning HD visuals they require.
The Score Card
The scoring below is based on each piece of equipment doing the duty it is designed for. The numbers are weighed heavily with respect to the individual cost of each unit, thus giving a rating roughly equal to:
Performance × Price Factor/Value = Rating
Audioholics.com note: The ratings indicated below are based on subjective listening and objective testing of the product in question. The rating scale is based on performance/value ratio. If you notice better performing products in future reviews that have lower numbers in certain areas, be aware that the value factor is most likely the culprit. Other Audioholics reviewers may rate products solely based on performance, and each reviewer has his/her own system for ratings.
Audioholics Rating Scale
 — Excellent
- — Very Good
- — Good
- — Fair
- — Poor
| Metric | Rating |
|---|---|
| Performance | |
| Value |