
StudioTech E-1 Cantilevered TV Stand Review
StudioTech E-1 TV Stand
StudioTech has been building TV and hi-fi furniture since 1989, and they pride themselves on high quality and excellent customer service. I recently reviewed some speaker stands from the company and was very impressed at not only how solid and well made they were, but at how well organized the instructions and assembly process were too.
The E-1 Cantilevered TV stand is a new product that is decidedly high-end and robust. One look at the contemporary design and you know that this is a serious piece of furniture. You can't help but think industrial when you see it, but it exudes a simplified grace alongside this modern styling that creates a great looking platform for your gear.
The design boasts floating glass shelves on an exposed cantilever steel framework that is offered in white or silver, with a rich wood veneer back panel and bottom shelf, offered in black ash or rosewood. I requested the black and silver combo, which has a decidedly high-tech feel that I felt would best fit my listening room.
Build-Quality & Set-Up
StudioTech provides free shipping on the E-1, and that is a good thing, because it was delivered to my house via 18-wheeler. Actually, I was eating lunch at a restaurant near my house and got a call on my cell phone from the truck driver. He was about 20 minutes away and wanted to discuss dropping the pallet, yes, I said PALLET, at my house. After some directions and discussion, we both decided it would be easier for me to meet him out on the highway at a gas station about 5 minutes from my house. I drove over in my pickup and backed it up to his rig for the transfer, after deciding this would be easier than him navigating through my neighborhood in his truck. The pallet had several boxes shrink wrapped together, so we cut the wrap and loaded them into the truck one at a time. This was the first sign I had that the E-1 was a substantial piece of furniture. The boxes were heavy enough that I was already thinking through who I could call to help me get them out of the truck and into my house.
Just before dinner I talked my smokin' hot wife into helping me unload the truck. This woman is a saint. She (un)happily agreed and we offloaded it into the garage for the time being, and I would later come out and sort the boxes before beginning to put it together.
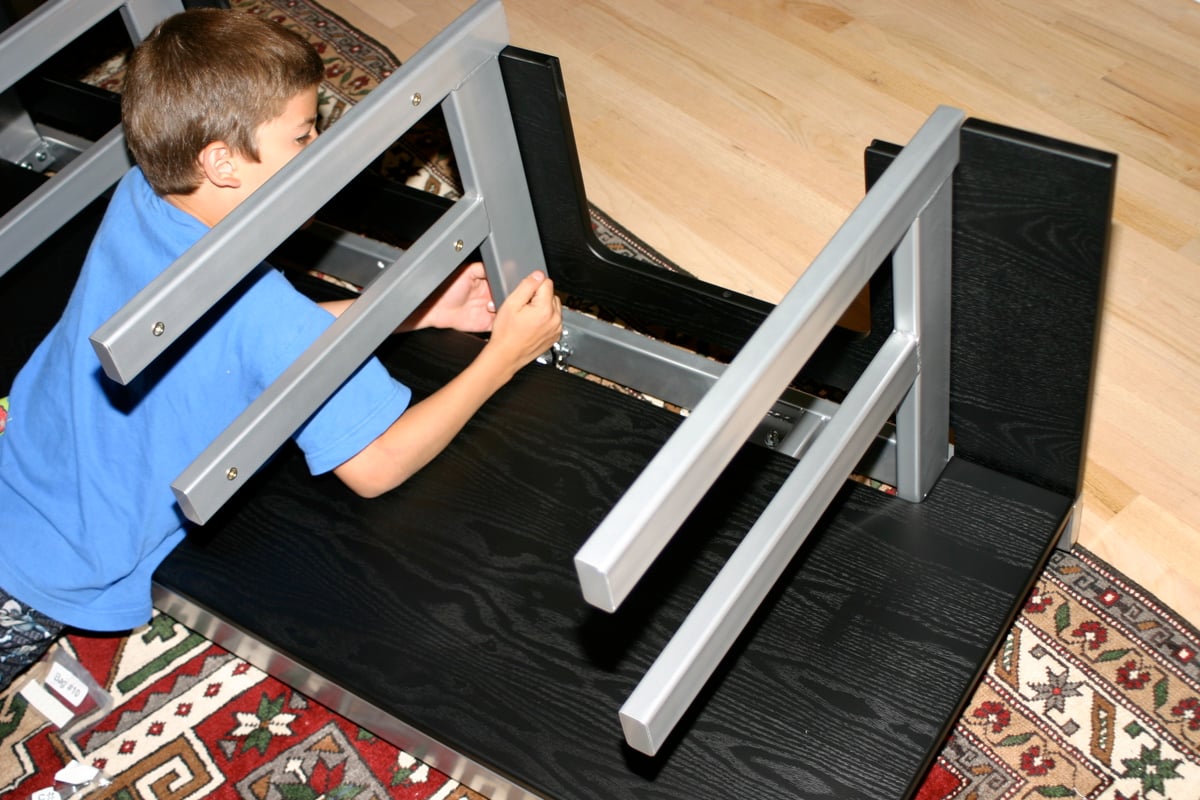
 When it came time to assemble the unit, I called on the engineer in our family, my 10 year old son, Walker. This kid can put together anything. He loves a puzzle, and he loves anything mechanical. He can put one of those monster Lego Millennium Falcons together in about 20 minutes. I knew he was the guy. I showed him the instructions and he was in.
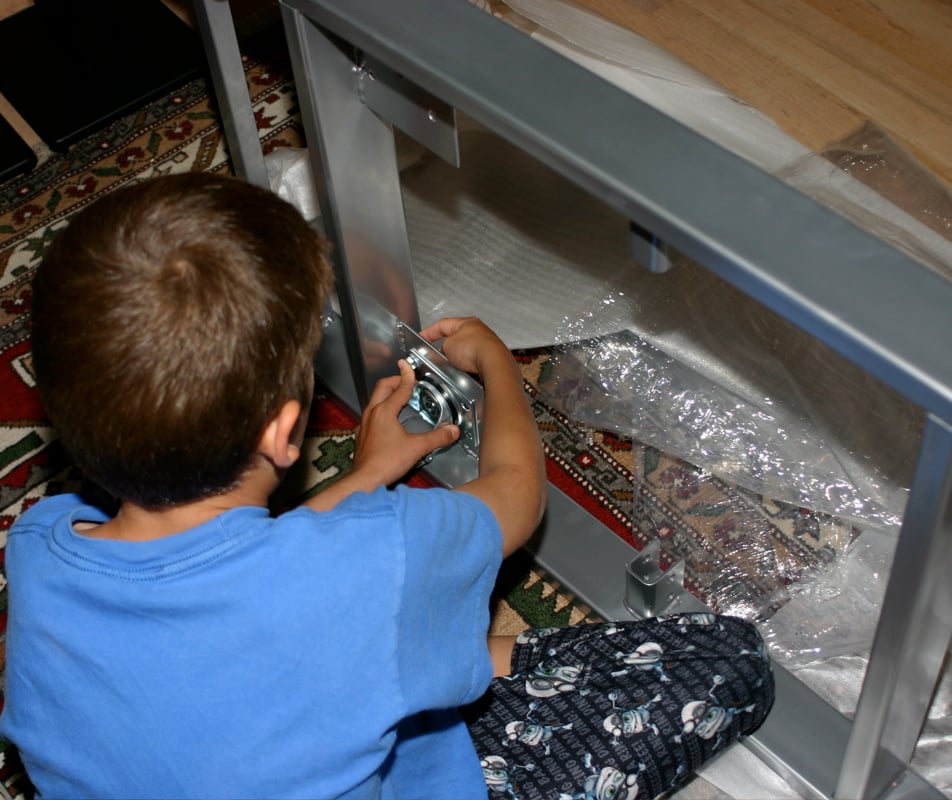
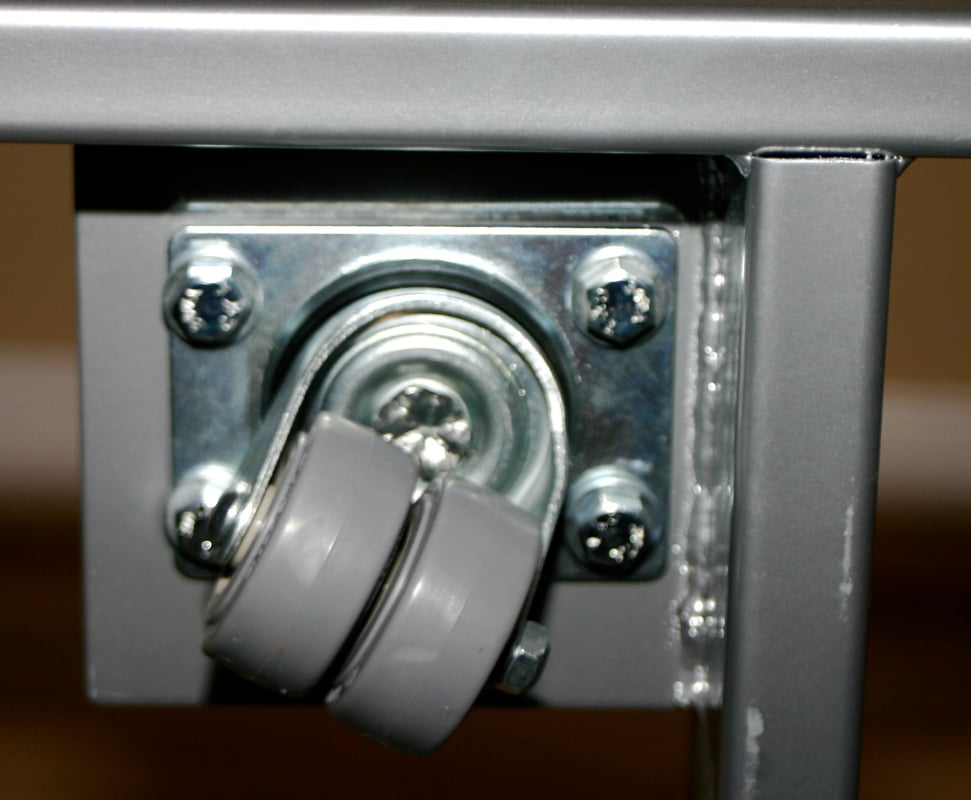
Out in the garage, we looked through the boxes and found things divided into four cartons: the steel frame, the steel E frames, the glass, and the wood. We first broke into the steel frame box, which also contained the four rolling casters. Within the carton, the frame was wrapped in plastic and surrounded by styrofoam in such a way that it would have been almost impossible for any damage to occur in shipping. We lifted the heavy frame out together and walked it into the house and put it on the floor of our listening room. The first step was bolting the heavy duty casters into place.
Over the years I have assembled many pieces of A/V furniture. Usually it is constructed of cheap pressboard and veneer, with chintzy hardware and "iffy" instructions that don't always make sense. With StudioTech, you get clear instructions, heavy duty hardware, and everything fits together exactly as described.
The instructions are very easy to understand with clear drawings that show you exactly what you are doing. And how is this for refreshing - the instructions appear to be written by someone who actually speaks English as a first language! For each step that requires hardware, there is a bag labeled for that step. There is a diagram of each bolt, washer and screw, showing overhead and side views so you will be sure not to mix anything up.
I left the instructions to Walk, and he had everything laid out for me as I handed him the big pieces. In no time, we had the casters, each with hard rubber double wheels, bolted into place on the bottom steel frame.
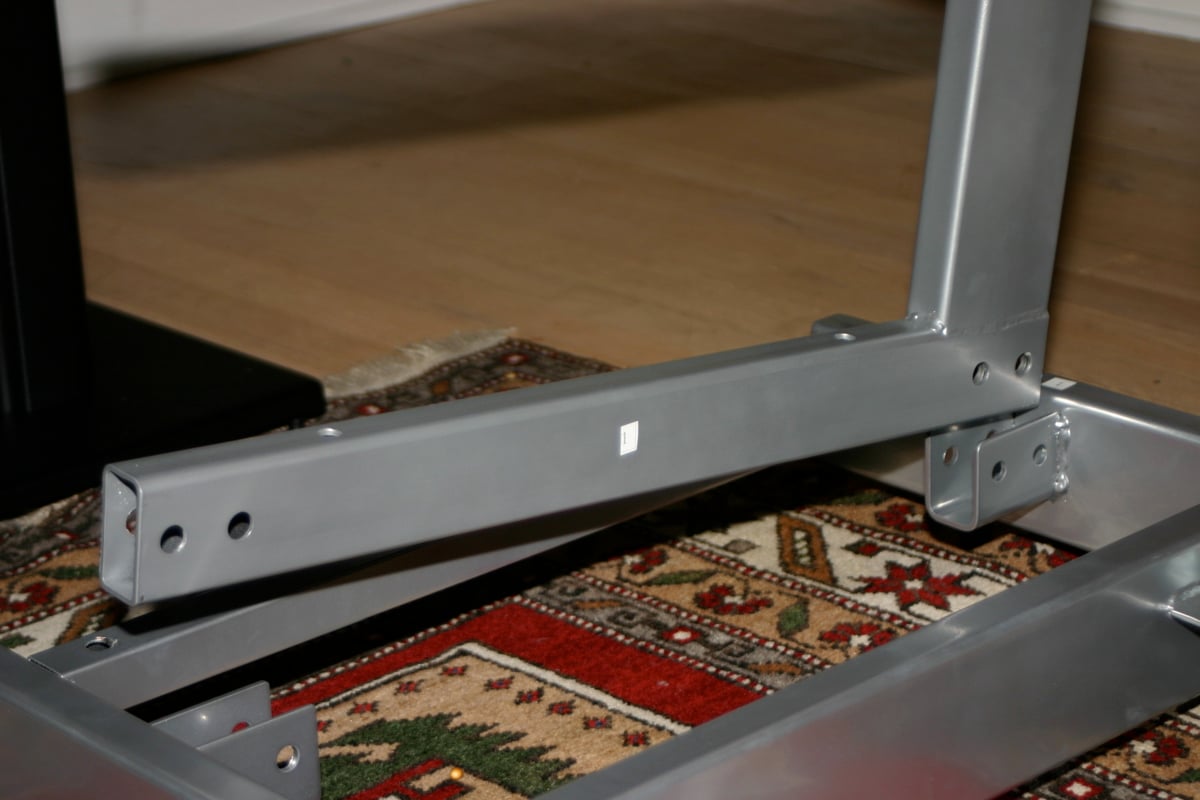
 Next, Walk sent me to the garage for the square carton containing the E frames that would support the shelves. Again, these pieces were meticulously packaged, each one in its own plastic sleeve, separated by a layer of cardboard and styrofoam. I brought these in and held each in place as Walk bolted them down, careful not to tighten them up yet per the instructions. They fit smoothly into slots on each side of the frame. The assembly is ridiculously strong; literally industrial strength.
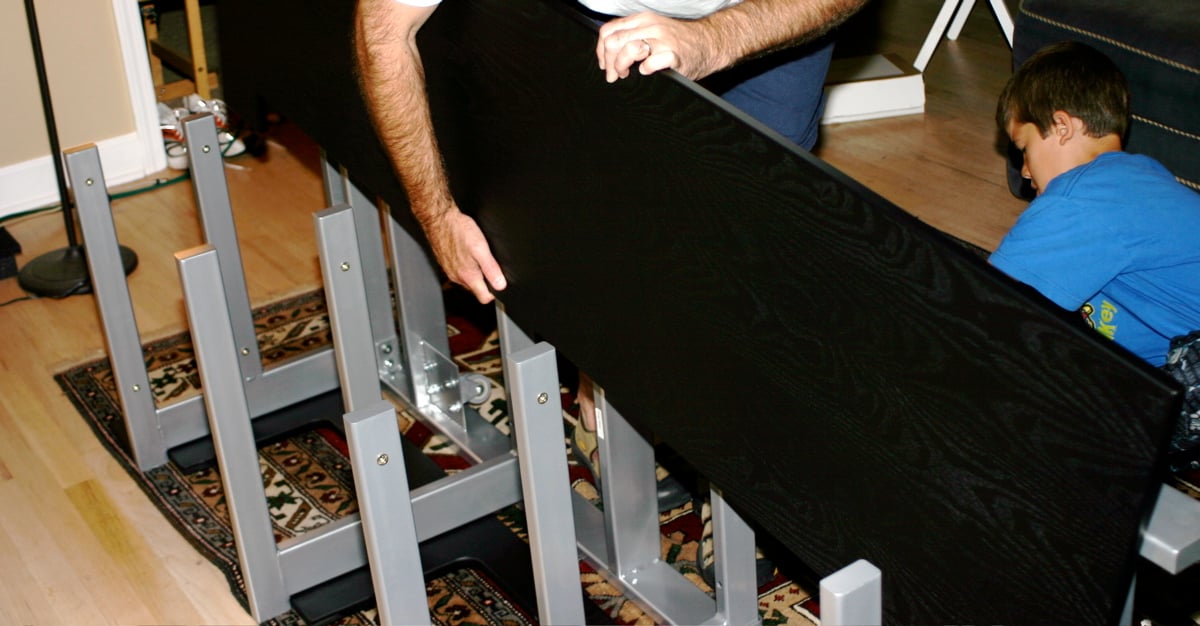
At this point the stand had taken shape, and it was time to fetch the wooden back panel. Just as with the steel, I unpacked it from the plastic and styrofoam and brought it in and held it in place at the rear of the unit. I removed the swinging doors that allow access to equipment for installation of the rear panel. It made the large panel easier to work with. The rear panel is connected with hex bolts, and a hex tool is included for this step. As Walker began to attach it to the E frames, it became clear why we were instructed to leave the bolts loose from the earlier step. Attaching the back panel was much easier with some play in the E frames, allowing for alignment of the screws and holes. Again, we kept bolts loose as we finished this step.
 In order to install the bottom shelf, the unit must be flipped on it's back. The bottom shelf (and back panel) is a solid black board with a beautiful woodgrain. No chintzy looking vinyl veneer happening here! I positioned the bottom shelf and Walk bolted it into place. This time we were instructed to tighten it down, but not too much (to keep from damaging the wood). We flipped the unit back upright, and I noticed that sure enough, we had put the back panel on backwards. Thankfully we had not locked down the nuts, so we quickly unscrewed them all, flipped it around, and tightened everything back down. Next we tightened up the E frames, and suddenly we had a nice stand taking shape!
In order to prepare for the final steps, the installation of the shelves, we needed to install the brackets to the E frames that will support the glass. The brackets are color matched to the E frames, which in our case is silver. Once again, Walk explained that we were not to tighten down the brackets. And with that, I lost my helper, as it was WAY past his bedtime...
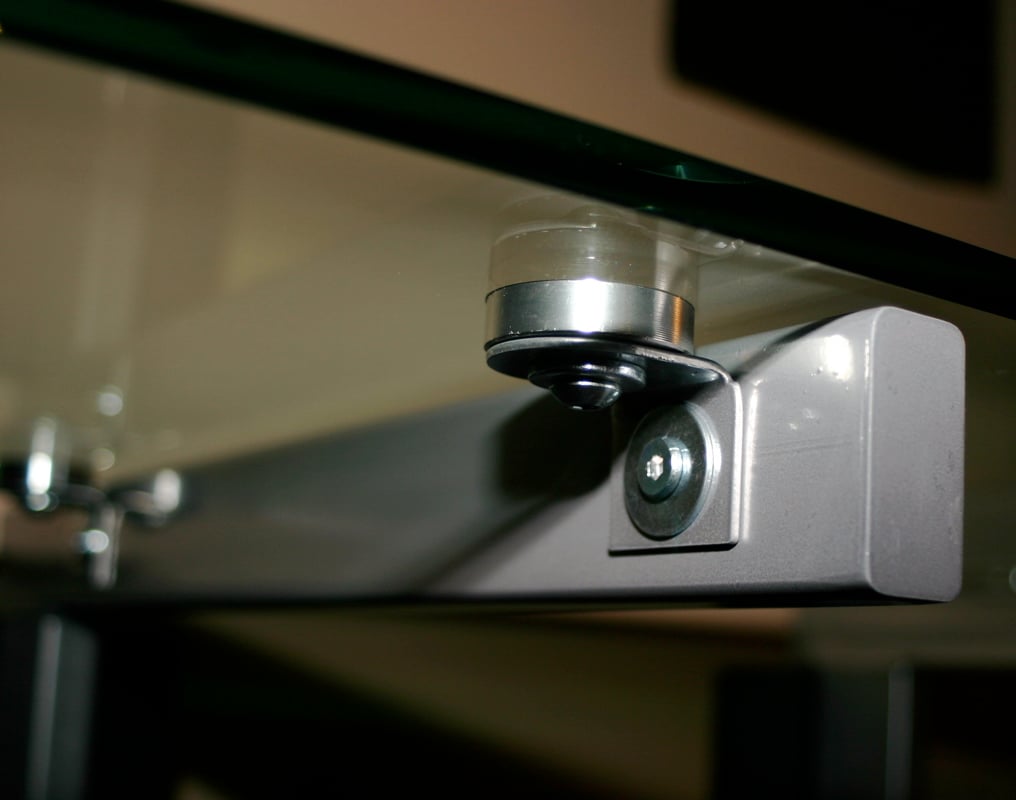
 Before placing the glass, I applied the included self-sticking clear rubber bumpers on each of the E frames. I enlisted the help of my wife again to bring the massive glass top shelf into the house. This glass is serious - it is true-tempered and 1/2 - inch thick. The glass is clear, with just a hint of green that you would normally associate with such a thick piece of glass. And yes, it is very heavy. The shelf has eight round aluminum disks on the underside that line up perfectly with the brackets we had installed on the E frames. After placing the glass, I secured it to the brackets using bolts and washers that screwed into the mounts. After tightening these, I was able to tighten and lock down the brackets. I followed the same steps and installed the 2 smaller glass shelves for the middle of the rack.
The instructions give detailed information on the TV placement and how to properly distribute the load. The max weight for the top shelf is 300 pounds, which StudioTech rates for plasma, DLP and LCD screens up to 70". Each of the two middle glass shelves are rated for a 50 pound load, as is the center metal shelf.
 The center shelf of the rack is metal and can be bolted in place flush with the glass shelves on either side or flipped and mounted down in order to give more vertical space for a center channel speaker if required. I chose to mount it in the flush position.
The final step is to install the 3 rear access panels, which is as easy as dropping them into place, slipping their pins into slots at the top corners of the back panel. There is a center pin in the bottom of each panel that keeps it locked into place when not in use.
 If you have purchased a wall mount for a large plasma or LCD display, StudioTech offers a plasma pillar set for the E-1 that will accommodate up to 200 pounds. The twin pillars bolt onto the rear panel (into the two center E frames). Once in place, you can mount the rear plate (that came with the tv mount you purchased separately) to the pillars.
Conclusion
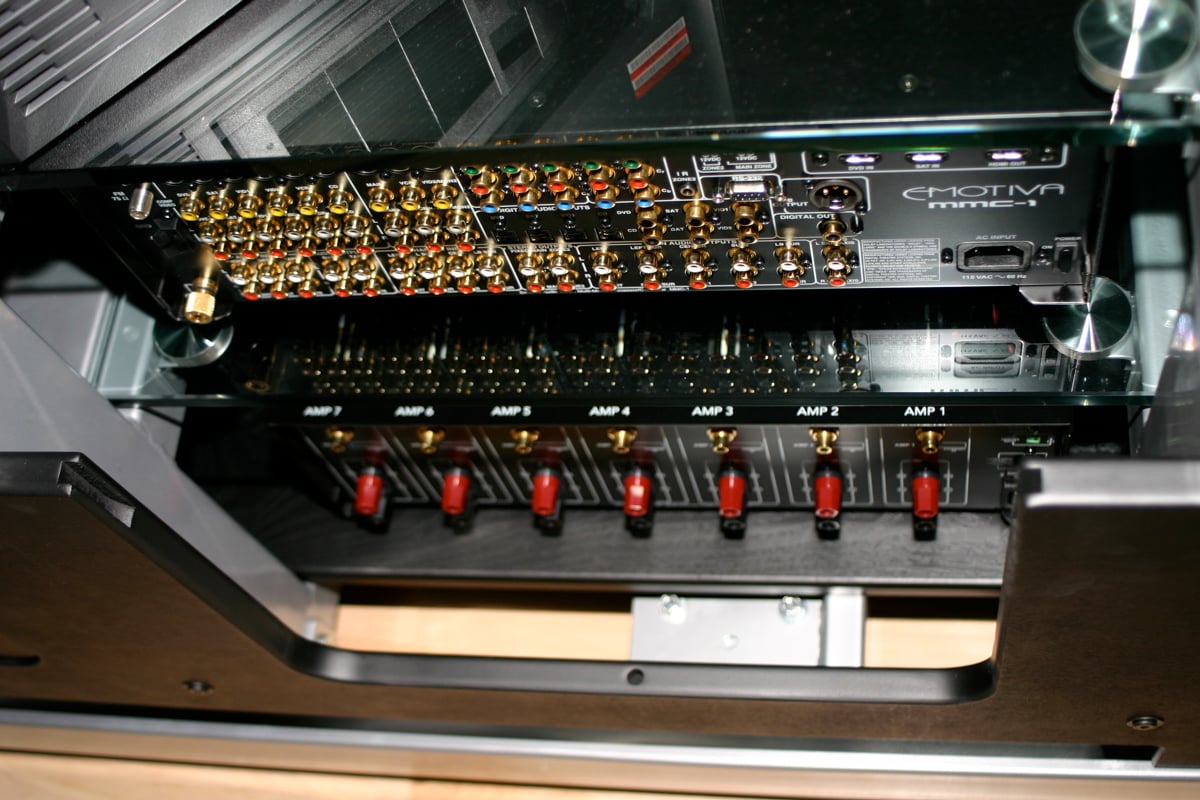
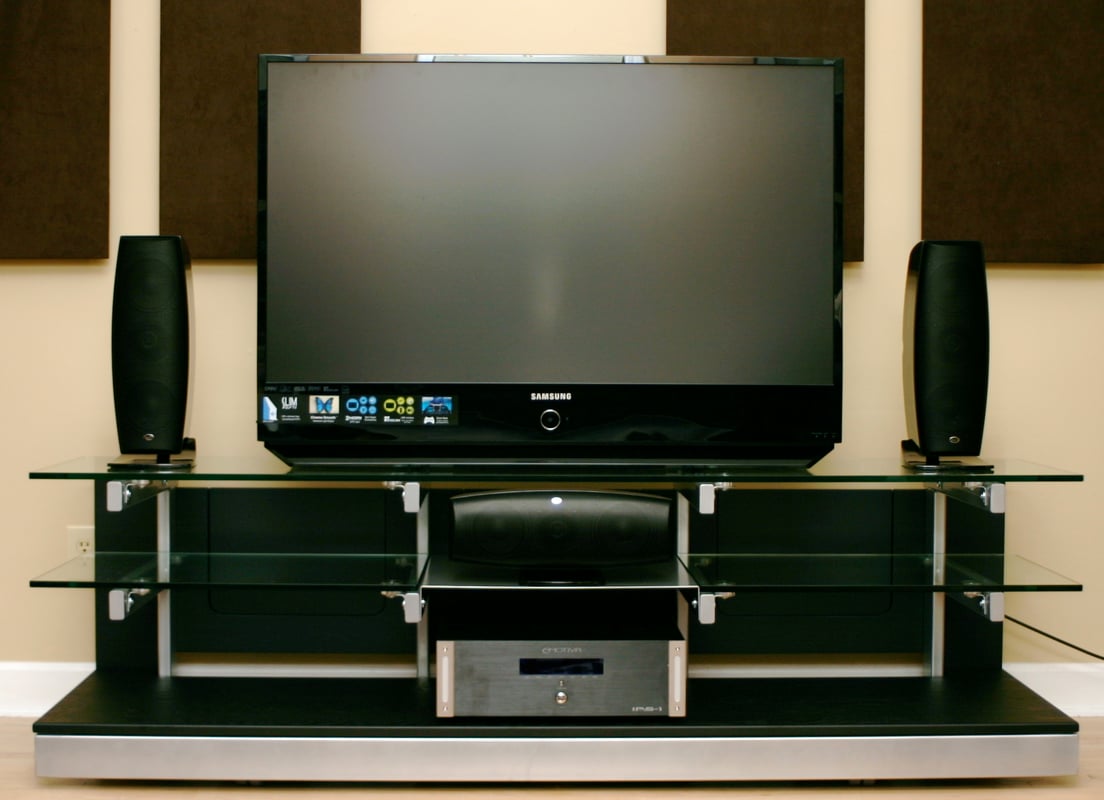
I checked the clock, and found that the entire assembly process took about 2 and a half hours. Not bad considering how impressive this stand is, and how heavy duty all the pieces are. I couldn't wait to load it up, so I immediately moved the Samsung 46" HL-S4676S Slim DLP HDTV I have been using recently onto the stand, and flanked it with some NHT Verve Large speakers. The horizontal center channel fit easily in the center middle shelf and looked great. I then put my Rotel receiver and DVD player in place, and just for kicks put an Emotiva IPS-1 amp and MMC-1 processor in place opposite the Rotel gear.
 The casters allow simple movement of the stand (in my case, on a hardwood floor) which made for easy access to the removable back panels. For a quickie setup, I wired up the Rotel gear with whatever wires and cables I could find to get an idea of how easy it is to access the rear of the components using the removable panels, which can also act as swinging doors. They are simple to swing open for a quick adjustment or lift out entirely for a big hookup.
Worried that my Rotel receiver might push the 50 pound weight limit of the middle glass shelf (it didn't - I later checked and it was only about 40 lbs.), I put it on the bottom (wooden) shelf. The rear cutout does not extend quite low enough to get to all of the connectors easily. This is a minor complaint, as there is enough depth to the shelf that I still had a decent amount of room to work with. On the other side of the rack, I had the beastly IPS-1 amp on the bottom shelf, and there was no problem accessing the speaker terminals and inputs. On the middle shelf the MMC-1 pre/pro was in perfect position for easy access to the multitudes of inputs and outputs, and I imagine most people will either follow this scenario or position their receiver on the middle shelf too.
 The StudioTech E-1 is a very well-made piece of hi-tech furniture designed for your plasma, DLP or LCD display. The modern, industrial, rock solid design is very easy to assemble, with plenty of room for a center channel speaker and your other components, and has no problem accommodating heavy amps or receivers.
I love this rack. It is striking and sophisticated, and incredibly functional. It comes with a limited lifetime warranty, and sells for $1499. No, it's not cheap. But that's just it. It is not cheap. This is big-boy stuff. It is time you took all that big-boy gear of yours and gave it the home it deserves!
rack or stand
Assembly
involved
Build Quality
rock-solid
furniture grade
excellent
Price
pricey!
Specs:
- Price: $1499 (includes free shipping)
- Height - 21.25"
- Width - 72"
- Depth - 20.75"
- Max. weight (total) - 400 lbs
- Max. weight (top shelf) - 250 lbs
- Shelf spacing (bottom to top) - 9.375" / 7.5"
For More Information:
E-1 Cantilevered TV Stand Product Info
StudioTech, Inc.
P.O. Box 5995
Irvine, CA 92616
800-887-8834
Over the years J. has constantly found himself to be an "early-adopter," spending way too much money on "new" technologies such as Compact Disc, LaserDisc, and DVD. He is one of the few people who actually purchased (and still owns) a CORE programmable remote control (bonus points if you remember this product).
View full profile