
HD-Products PowerBridge Total Solution Slim-Line In-wall Power Kit Review
PowerBridge Power Extension Cable Kit
- Product Name: PowerBridge Slim-Line Power Kit
- Manufacturer: HD-Products, Inc.
- Performance Rating:

- Value Rating:
- Review Date: April 20, 2009 07:35
- MSRP: $ 99.95
- Model Number: TSPBIW-WH
- Power Outlet: Output Voltage: 125V 15 amp, 1 Receptacle, Style: NEMA 5-15R, UL approved
- Power Inlet: Input Voltage: 125V 15 amp, Input Connection Plug: 1, Style: NEMA 5-15P, UL approved
- Power Connection Cord: Maximum Input/Output Current is 15 Amps, 1875 watts, Style: NEMA 5-15 R/P
- Warranty: Limited 3 year warranty from Manufactures Defects
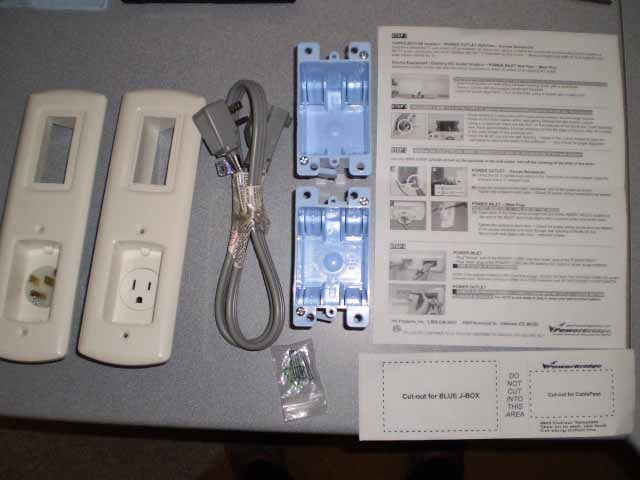
- What’s in the Box: One Power Recessed Inlet, includes Decora Style Cable Pass Thru, One Power Recessed Outlet, includes a Reversible Decora Style Cable Pass Thru, Two In-Wall Junction Box Single Gang (PVC) with two sets of screws for fastening plates, One 36” Power Connection Cord for power energizing form an existing A/C source, One Wall cut-out template, and Installation Instructions.
Pros
- Includes IEC jumper and receptacle boxes
- Easy instructions
- Supports Decora-style keystone inserts
- Removable power sockets
- Available in black or white
Cons
- Female IEC plug extends 2 inches past the plate
HD-Products PowerBridge Introduction
I'm amazed at the number of flat panel TVs that are purchased by friends and family, only to be placed on top of traditional furniture. I mean, isn't a flat panel designed to be hung on the wall? I think so, but then there's the issue of unsightly cables dangling down from the set to the equipment below. Well HD-Products, Inc solves this with their line of PowerBridge products. The Total Solution Slim-Line system’s primary function is used to hide all of your power, audio, video, and coaxial cables behind the wall - where they belong. I elected to use this system to get rid of the clutter of cables and even the power cord that hung down from my wall-mounted Samsung 40-inch flat screen TV. It's the perfect solution to eliminate cables lying around on the floor, or dangling from your components for a cleaner look - the way a flat panel was meant to be.
The PowerBridge Total Solution Slim Line kit (long name, we know) comes with two wall plates, and power extension cord (male to female), two plastic "old work" electrical boxes, hardware, template and instructions. The design of the system is simple in principle, you install your cabling behind the wall and the plates finish everything off nicely. What makes this system especially attractive is that it allows you to safely (and legally, per NEC code) run 12/2 or Romex-style wiring behind the wall as well. It does this by providing actual "in" and "out" power terminals that are safely encased within an electrical box where the 12/2 is protected from exposure as you'd expect. It's not only a slick system, it's incredibly easy to install and you can use any length of 12/2 you need, whether you're making a 3 foot run as we were, or running it over or under your house from one side of the room to another.
HD-Products PowerBridge Kit Build Quality and Conclusion
 The first thing I saw when I opened the box
were the two wall-plate systems. My
first impression was how smooth and clean it looked, and I how didn’t have to
assemble anything on the electrical side of things. I started to visualize how it would look
installed on my wall and quickly realized that I could install it horizontally,
if needed, to better hide behind the television and work well with my flat
panel mount. Turning over the integrated wall plates, I quickly noted that screws
held the sockets and pass-thru plates in place.
This was wonderful because, if a socket went bad it could easily be
replaced with what looked like standard parts (not that we'd expect you'll need
to). Next, I noted the heavy-duty power cord, which seemed to be more robust
and not just some regular extension cord we all buy to hook up our Christmas lights
with. Lastly, I noted the inclusion of the two "old work" electrical
boxes which are easily used in existing drywall or even plaster wall
construction. These boxes have tabs that
open up in place behind the drywall and are fastened in place by tightening the
two screws to hold the box in place. Since the outer plate only has two
securing points to anchor it to the electrical box, you'll want to make sure to
install that box perfectly, since it ultimately holds everything together.
The first thing I saw when I opened the box
were the two wall-plate systems. My
first impression was how smooth and clean it looked, and I how didn’t have to
assemble anything on the electrical side of things. I started to visualize how it would look
installed on my wall and quickly realized that I could install it horizontally,
if needed, to better hide behind the television and work well with my flat
panel mount. Turning over the integrated wall plates, I quickly noted that screws
held the sockets and pass-thru plates in place.
This was wonderful because, if a socket went bad it could easily be
replaced with what looked like standard parts (not that we'd expect you'll need
to). Next, I noted the heavy-duty power cord, which seemed to be more robust
and not just some regular extension cord we all buy to hook up our Christmas lights
with. Lastly, I noted the inclusion of the two "old work" electrical
boxes which are easily used in existing drywall or even plaster wall
construction. These boxes have tabs that
open up in place behind the drywall and are fastened in place by tightening the
two screws to hold the box in place. Since the outer plate only has two
securing points to anchor it to the electrical box, you'll want to make sure to
install that box perfectly, since it ultimately holds everything together.
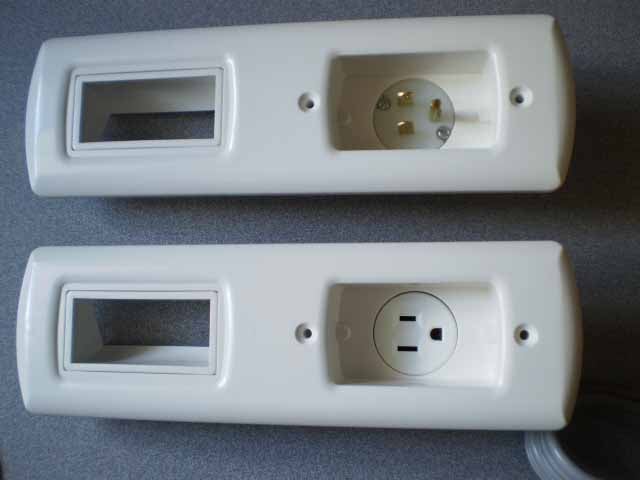
Each plate is tall, and above the power receptacle I noted a square, angled opening for low voltage wiring. When I flipped over the plate I also took note that this angled plastic piece could be removed and replaced with a Decora-style insert that could support keystone jacks. This meant that I could easy affix a plate that would have the component video and RF (cableTV) connections I needed for my room. Since the plate insert gets screwed to the exterior plate from within, there are no exposed screws and the cables will connect securely to the plate itself.
Installation
 I set about to install the PowerBridge as
per the instructions. The only tools I needed to do the complete installation
were:
I set about to install the PowerBridge as
per the instructions. The only tools I needed to do the complete installation
were:
- Level
- Pencil
- cordless drill
- Razor knife (or drywall saw)
- Slotted screwdriver
- Small Philips screwdriver
- Stud finder (or a good knuckle rap and some ears)
All of the materials were supplied, except for the 12/2 electrical cable. The manufacturer leaves purchase of the electrical cable to the installer, since they have no idea of the length of cable you will need to make the connections behind the boxes in the wall. We'll assume you know how to install electrical boxes, but check with your local building codes if you're unsure of anything - including the cable type & size of wire required for installation.
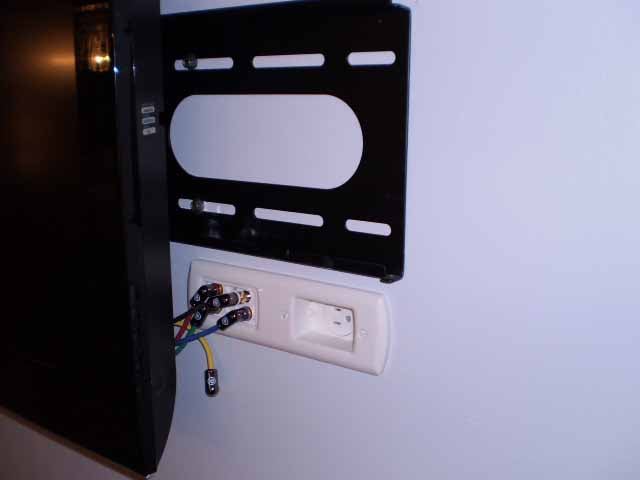
To begin, I located my existing studs with a stud finder and then marked the desired locations for the PowerBridge plates by laying out the template provided. The template should be set vertically for the bottom plate, but can be horizontal behind the television depending on your requirements, location of the studs, etc. I chose a horizontal layout for the top part of my installation as it allowed the finished plate to be completely concealed behind my flat panel TV mount and also provide easy access to the cable jacks. After cutting all the holes (4 in all; two at the top and two at the bottom), I fed my 12/2 Romex cable through the top single gang box (not fastened to the wall yet), thru the large hole at the top, down the inside of the wall, and out through the large hole at the bottom. I then sent it through the single gang box dedicated for the power feed behind the wall. Once the power was run I stripped the ends of the 12/2 cable and fastened the ends to the inlet and outlet Edison connectors.
Next, I fed some custom-assembled Planet Waves cables for my component video and also my coaxial RG6 cable line for video through the small hole at the top. With everything loosely connected and run I was then able to work on the low voltage wiring..
For these, I chose to use Leviton Quickport multimedia plates. These are simple 4-port, duplex inserts and are available at your local home improvement store. Using these plates allows for a more professional finished look when making the final connections. These plates screw down to the inside of the PowerBridge via two small Phillips screws, securing them to the plate and allowing you to use them without having to use a low voltage plate in the drywall if you choose not to. The included pass-thru ports will also work just fine for those who don't want to go the extra mile for finished connector plates. Once fastened I just snapped in the coax jack and component jacks from CablesToGo and secured the wires to the rear side of the ports.
The PowerBridge Total Solutions Slim Line kits actually come in several flavors. While we grabbed the white system (TSPBIW-WH) there are actually several other choices, including some preconfigured units:
- Plain in Black (TSPBIW-BK)
- HDMI, Component & stereo audio, White (TSPBIW-WH/HCAI)
- HDMI, Component & stereo audio, Black (TSPBIW-BK/HCAI)
- HDMI x 2 and Component, White (TSPBIW-WH/H2CI)
- HDMI x 2 and Component, Black (TSPBIW-BK/H2CI)
 Lastly I made all my low voltage connections
for the Planet Waves component and cableTV cables. These I connected to the
rear of the Leviton Quickport jacks. I then made the final connections for the
12/2 (Romex) electrical cable by tightening the three screws on the inlet &
outlet. Using the four screws supplied, I fastened each of the completely wired
systems to the Single gang box previously installed in the wall. If you have a
voltmeter you can use the continuity circuit to test the wiring from point to
point before applying power to the system. All that was left was to connect the
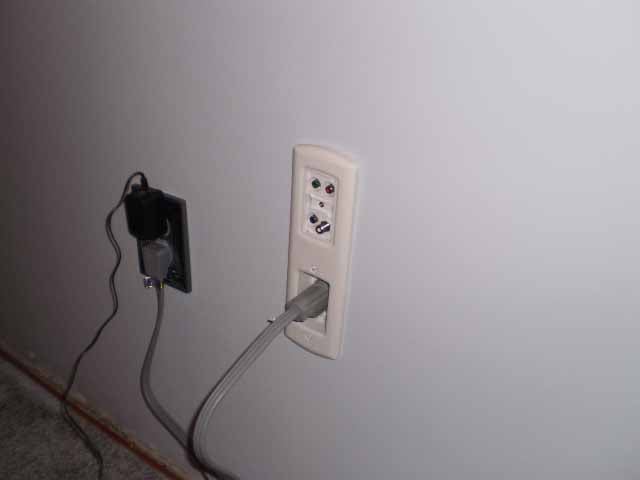
36" jumper (extension) power cable to the nearest power outlet on my wall. The system
was up and running in no time and I was thrilled with the results. Installation
from unpacking to watching my television took just 90 minutes.
Lastly I made all my low voltage connections
for the Planet Waves component and cableTV cables. These I connected to the
rear of the Leviton Quickport jacks. I then made the final connections for the
12/2 (Romex) electrical cable by tightening the three screws on the inlet &
outlet. Using the four screws supplied, I fastened each of the completely wired
systems to the Single gang box previously installed in the wall. If you have a
voltmeter you can use the continuity circuit to test the wiring from point to
point before applying power to the system. All that was left was to connect the
36" jumper (extension) power cable to the nearest power outlet on my wall. The system
was up and running in no time and I was thrilled with the results. Installation
from unpacking to watching my television took just 90 minutes.
Conclusion
The HD-Products PowerBridge Total Solution Slim-Line In-Wall Power Extension and Cable Kit is a complete and very satisfying product. After working as an electrician for 30 years at Pennsylvania's Bethlehem Steel, and owning my own Home Improvement business, I was pleasantly surprised at the ease of installation and the quality of this product. The process left me wondering why more people don't hide away their cables and mount their flat panels on the wall. I would highly recommend this product to both individuals and custom installers because of its versatility, ease of installation, and the quality of construction. It's simply a solid solution for a common installation situation.


Working with the system was safe, since there was no live electricity to work around. All of the power is supplied when you connect the heavy-duty power cord to the power inlet of the system and then into your existing wall outlet. With this configuration there is no need to run any additional power from another source, saving time and money. Best of all, it means you don't need to hire an electrician to hook up your television properly.
PowerBridge
Solution by HD-Products, Inc.
3869
Norwood Dr. #5
Littleton, CO 80125
888-636-6407
About
HD-Products, Inc.
PowerBridge Solution for HDTV was innovated by a life long AV
Home Theater Systems Integrator, specifically for solving a major issue of
running power safely within a wall when mounting HDTV
Flat Screen Plasma, Flat Panel LCD, HDTV
Home Theater / Data Projectors. PowerBridge® Solution for HDTV was innovated with safety as a top
priority, designed with a unique RECESSED POWER-INLET Wall
Plate. If the Power-cord is ever unplugged from the INLET, by anyone,
especially a child, there are NO contact points to
touch, eliminating risk of electrical shock.
The Score Card
The scoring below is based on each piece of equipment doing the duty it is designed for. The numbers are weighed heavily with respect to the individual cost of each unit, thus giving a rating roughly equal to:
Performance × Price Factor/Value = Rating
Audioholics.com note: The ratings indicated below are based on subjective listening and objective testing of the product in question. The rating scale is based on performance/value ratio. If you notice better performing products in future reviews that have lower numbers in certain areas, be aware that the value factor is most likely the culprit. Other Audioholics reviewers may rate products solely based on performance, and each reviewer has his/her own system for ratings.
Audioholics Rating Scale
 — Excellent
- — Very Good
- — Good
- — Fair
- — Poor
| Metric | Rating |
|---|---|
| Performance | |
| Function | |
| Versatility | |
| Build Quality | |
| Ease of Setup/Programming/Integration | |
| Features | |
| Performance | |
| Value |