
Drive-Up Movie Theater
I have always wanted to combine my love of movies with a neighborhood "get together", so when I first heard about the idea for a home-made outdoor movie theater (using the space within your garage), the proverbial light bulb went off in my head. All you really need is a portable projector, DVD player (HTPC or otherwise), some combination of an audio amplifier and speaker(s), and something to project onto (or in this case through!). Having staged my first successful "Drive-Up Movie Theater", I thought I would share my experience.
Screen Setup
![[PIC3]](../../../images/pic3.jpg)
![[PIC4]](../../../images/pic4.jpg) Before you do anything, I recommend either unplugging or shutting off the circuit breaker to your garage door opener; you don't want it closing either during or after you setup the screen. For example, I was able to kill the circuit that goes to the garage door (and garage lights) without losing the electrical outlets inside the garage. The actual screen material was cut from a roll of 6 millimeter thick plastic sheeting that is readily available at your local home improvement store (about $25 per roll). I used a 10 foot wide by 25 foot long roll, from which I cut about a 12 foot long piece to fit across my double-wide garage door opening; obviously you want to leave room on the sides to enter/exit the garage. Using a small tack gun (easy) or hammer and nails (harder), simply attach the long edge of the sheeting along the wooden frame of your garage (avoiding the sheetrock). Hint: this is a good time to draft some help from any onlookers (e.g. your kids). You may also want to trim a foot or so off the bottom depending on how much "overhang" you need; this is important for anchoring the screen in the presence of windy conditions (which happened to me). I recommend at least a central anchor, and this is where I "killed two birds with one stone": by utilizing the auxiliary input on my large boom box, I had centralized stereo sound as well as a stabilizing weight for the screen. I didn't pursue surround sound options for several reasons:
Before you do anything, I recommend either unplugging or shutting off the circuit breaker to your garage door opener; you don't want it closing either during or after you setup the screen. For example, I was able to kill the circuit that goes to the garage door (and garage lights) without losing the electrical outlets inside the garage. The actual screen material was cut from a roll of 6 millimeter thick plastic sheeting that is readily available at your local home improvement store (about $25 per roll). I used a 10 foot wide by 25 foot long roll, from which I cut about a 12 foot long piece to fit across my double-wide garage door opening; obviously you want to leave room on the sides to enter/exit the garage. Using a small tack gun (easy) or hammer and nails (harder), simply attach the long edge of the sheeting along the wooden frame of your garage (avoiding the sheetrock). Hint: this is a good time to draft some help from any onlookers (e.g. your kids). You may also want to trim a foot or so off the bottom depending on how much "overhang" you need; this is important for anchoring the screen in the presence of windy conditions (which happened to me). I recommend at least a central anchor, and this is where I "killed two birds with one stone": by utilizing the auxiliary input on my large boom box, I had centralized stereo sound as well as a stabilizing weight for the screen. I didn't pursue surround sound options for several reasons:
- I didn't want to expose any expensive electronics to the elements (and small children)
- My "DVD player" was simply a laptop computer with only an analog stereo output
- The main objective was to experience an OUTDOOR movie environment, not high-quality surround-sound production (which isn't necessarily the case for my INDOOR movie theater)
The most interesting aspect of the screen material is illustrated in the accompanying pictures: no matter how "nicked" or "creased" the plastic appears in the light, it looks fine when viewed in the dark!
Equipment Setup
![[PIC5]](../../../images/pic5.jpg)
![[PIC1]](../../../images/pic1.jpg) Once you've got the screen in place, the rest is easy. While it may not initially seem important, choosing the height of your projector "platform" is critical for optimum viewing conditions (I don't think anyone is going to bother with a ceiling mount for their garage). The trick here is to locate the projector close to the ground with a slight upward angle so the audience doesn't get the "hot spot" in the viewed image. Checkout the (night-time) picture above to see how I was able to accomplish this (you can see the "hot spot" below the viewed image). I used a TV-tray table to hold the laptop/PC, but just about anything will do. All that's left is cable management, and I was lucky enough to have a couple of AC outlets nearby to power the projector, laptop, and boom-box. The only extension cables required were for the boom-box: one for power and an eighth-inch stereo cable extension for the audio out from the laptop.
Once you've got the screen in place, the rest is easy. While it may not initially seem important, choosing the height of your projector "platform" is critical for optimum viewing conditions (I don't think anyone is going to bother with a ceiling mount for their garage). The trick here is to locate the projector close to the ground with a slight upward angle so the audience doesn't get the "hot spot" in the viewed image. Checkout the (night-time) picture above to see how I was able to accomplish this (you can see the "hot spot" below the viewed image). I used a TV-tray table to hold the laptop/PC, but just about anything will do. All that's left is cable management, and I was lucky enough to have a couple of AC outlets nearby to power the projector, laptop, and boom-box. The only extension cables required were for the boom-box: one for power and an eighth-inch stereo cable extension for the audio out from the laptop.
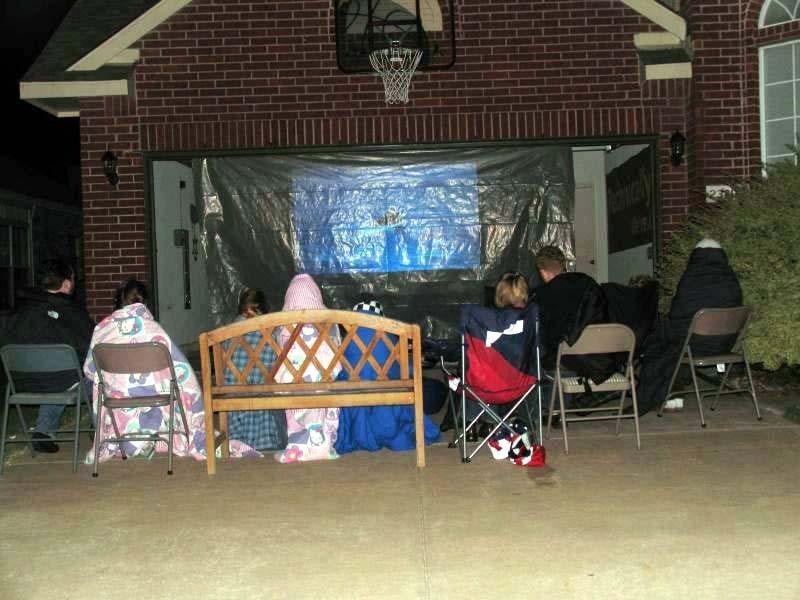
Summary![[PIC2]](../../../images/pic2_th.jpg)
![[PIC2]](../../../images/pic2.jpg/image)
Throw in an assortment of chairs, blankets, and snacks and the end result is a nice evening with the neighbors at your "Drive-Up Movie Theater". One nice thing about doing this on your driveway is the fact that all the important (expensive) equipment is shielded from the elements (and children) inside your garage. Everyone had such a good time that I plan on making this an annual event!