
Installing Surround Sound - A Primer
Installing surround sound - a primer
I love surround sound. I love it so much I want everyone else to share my love for it. But how do you do that? Well, for starters you can help others get surround sound in their home. You know the people I'm talking about. They've got a little of everything - from TV speakers, to a stereo mini system, to a home theater-in-a-box (HTiB) whose surround speakers have never seen the light of day. It's your friend… your pastor… your buddy who works in construction… that dude who just moved here from California and talks just like Pauly Shore (OK, maybe you aren't blessed with that last example, but let me tell you - it keeps things interesting!)…
What kind of experience would it be to give all these people surround sound in their homes? Would they care? Would it affect them the same way it affects me? Will they use it for music? Will they use it for movies?
There was only one way to find out. I decided to go for it. I would install 5 separate surround sound systems in five completely different houses in just 10 days. But before all that, I wanted to lay out an article that covered some of the basics - so I could reference it throughout this surround sound installation series. I'll break it down into the following categories: Tools & Parts, Rooms, System Types & Aesthetics, and Tips & Methods.
Tools & Parts
The primary lesson here is: don't use a screwdriver when you really need a chisel. While you can technically get the job done, it will more likely ruin the job, cause loads of frustration and generally take much more time to accomplish your goal. There are remarkably few tools you'll need to do a surround sound installation, regardless of the type of room or job. There are some specialty tools we'll leave out - but we'll cover those when we get to the Methods section. Let's start with the basic tools:
- Cordless power drill (plus charger, bits, etc - extra battery HIGHLY recommended)
- Various "spade" drill-bits for wood (1/4-inch, 1/2-inch, 3/4-inch and 1-inch)
- 24-inch long length drill bit extender (optional)
- Screwdrivers (flat & Phillips)
- Razor knife (with lots of blades)
- Pliers (I also carry a lineman's pliers - my favorite workhorse tool)
- Framing hammer (a real one, not those wussy household types your mama uses)
- Wire cutters/strippers (a decent pair like this)
- A drywall keyhole saw
- Short pieces of 10/2 romex or a couple wire coat hangers
- Voltmeter (if you can't afford one then bring a 9V battery)
- Wood chisel (just in case)
- LED head lamp and LED low-profile flashlight
As far as parts go, you'll likely need the following:
- Single/double gang low voltage "old-work" electrical boxes
- Decora-style wall plates, binding posts insert panels, and banana jack keystone modules (Impact Acoustics makes plenty of styles)
- Plenty of Impact Acoustics CL2-rated in-wall 12 gauge speaker cable (we used over 750 feet for our 5 installations)
- Banana speaker connectors (optional)
- Pack of nail-in cable clips (you can get these almost anywhere)
Now, if you're a pro, you might also have something like a complete Custom Install Tech System (C.I.T.S) system. This is basically a parts warehouse on wheels and involves a scanning system for replenishing inventory. Let's assume for now that you don't have this (but I happened to have one on hand as part of a product review).
Rooms
There are a number of room types, sizes and styles that can exist in a home. When you are placing a surround system into a listening area it's important to take in account the room so that you correctly match the system to the room. Things to look for are shape, size, ceiling height, and the makeup of the general acoustics of the room. Taking all of these things into account means that you can better decide what size and type of system can be utilized to deliver the best sound.
Room Shape & Size
If a room is L-shaped, does it open up into an adjoining room? Does it have archways that cannot be closed off? Does it share air space with an adjoining room? If so, then you might be dealing with a larger volume of room than just what you see in the immediate listening area. This means that a speaker (and in particular, the subwoofer system) will need to be big enough to fill this area and "pressurize" it with sound. The use of a small 8-inch subwoofer commonly found in most home theater-in-a-box systems won't do more than provide a little bit of boominess in a room that is at max 10x10 with 8-foot ceilings. Anything larger than that and you will still get sound, but you'll bottom out (exceed the specs of the sub) quite rapidly and spend a lot of your time listening to it flap. That or you'll simply not have enough gain to really add the level of bass material that should accompany the main speakers. For satellite systems you can certainly fill a larger room but the returns diminish quickly. Here's a quick guideline:
- Home Theater-in-a-Box - Can be safely used for systems under 1000 cubic feet (8-inch subwoofer)
- Satellite speaker system - Use for rooms under 1500 cubic feet in volume (8- to 10-inch subwoofer[s])
- Bookshelf systems - Best for rooms up to any size but typically under 2000 cubic feet (10- to 12-inch subwoofer[s])
- Floorstanding systems - Use for lager rooms over 2000 cubic feet and pair with at least 2 subwoofers for best results. (12- to 15-inch subwoofers)
As you can see above, we really like the use of two subwoofers - not because we're bass-heads, but because it helps smooth out low frequency response. Dual subwoofers have been shown to clearly help the overall listening experience in almost every scenario. This means that it will make your overall surround sound system excel - regardless of whether you're utilizing a satellite system or a full-blown floorstanding system.
Ceiling Height
Ceiling height is something to consider as it affects the overall volume of the room. It also makes ceiling-mounting speakers difficult if, for example, you have 10-foot or higher ceilings. We also don't recommend ceiling-mounted speakers on vaulted or sloped ceilings. OK, honestly we never recommend ceiling-mounted speakers, but sometimes that's really all you can do in a room - and we understand those situations. A nice flat ceiling is best for predictability in acoustics and higher ceilings can yield incredibly live and spacious sounds if the rest of the acoustics are taken into account. When doing room volume calculations to determine system size, don't forget to factor in the correct height. The difference between an 8-foot ceiling and 10-foot ceiling on a 10x15 room is 300 cubic feet!
Acoustics
If you're placing a system into the room, keep in mind that lots of glass and hard surfaces will result in a highly reflective room. What this means is that if you have wood floors and a wall that is one big series of windows you may be in for a very bright sound. This is great if you're over 65 and have lost the top end of your hearing, but for those of us with some ears left it's good to balance out the room if possible. While I don't feel it's possible to introduce all sorts of acoustic treatments into every room, care should be taken to ensure that you don't unnecessarily color your sound. For example, here are some ways that sound will be significantly colored in a room:
- Placing a center channel on a glass shelf with several inches of glass exposed in front of the speaker
- Having one floorstanding speaker up against a wall or corner with the other in an open area
- Using a bookshelf speaker directly against the wall
- Sticking a rear- or down-ported subwoofer into a built-in entertainment center
- Placing your bookshelf speakers into a bookshelf or built-in entertainment center (oh the irony)
- Having a glass coffee table directly in front of your center channel speaker
- Having all reflective surfaces in your room (mirrors, windows, tile floors, etc) with no curtains, throw rugs or soft furniture to break it up
- Putting a single subwoofer directly in the corner (of most rooms)
If one or more of the above apply to you, think about how you can change it so that your sound quality is not negatively affected. Not every room can be made perfect, but there are subtle things that can be done which will still enable you to maintain aesthetics in a room. Throw rugs and fabric curtains are a favorite of ours, as is ensuring that floorstanding and bookshelf speakers are placed "into" the room when possible, rather than directly against walls or in corners. Similarly, subwoofers should go along walls rather than directly into a corner, especially when rooms are square in shape.
System Types & Aesthetics
Aside from the four system types listed above, you can choose between small or large speakers, and also whether your speakers are hung from the ceiling, the wall, placed on stands or even mounted in-ceiling and in-wall. A lot of this decision-making process will center on how much of a role aesthetics has in your decision-making process. For some, their significant others have them safely wrapped around their finger and will not allow anything that would interfere with the décor of the room. We like to call these people "girly-men" and it's an unfortunate place to be as it significantly limits the overall sound potential of the listening room.
For girly-men the only option might, at first glance, be a small home theater-in-a-box, regardless of room size. Our suggestion is to push for something a bit more upper-scale: on-wall or even in-wall speakers. This allows a far larger speaker to be placed alongside a flat panel display - and since the speakers are located either against the wall or within it, the aesthetics are just as nice. You cannot nab an in-wall system for HTiB prices, but it will ultimately deliver a much more pleasing experience. We've also found that those people that are most concerned about aesthetics tend to overestimate how much a speaker will "ruin" their room. Often we've heard success stories of people that have purchased speakers and installed them when their spouse wasn't home. After the initial shock, the spouse often finds the thought of speakers was worse than the actuality of them. Of course, you know your spouse better than us so don't do anything you'll regret later.
Subwoofers are also a major bone of contention with respect to room aesthetics. While we'd never recommend an Internet-direct behemoth that looks like a coffee table just swallowed your Labrador retriever, there are some aesthetically pleasing subwoofers on the market that can serve as non-threatening accent pieces while delivering full, rich low-end.
One thing we try to stay away from are in-ceiling front speakers. To be honest, we're not big fans of in-ceiling surrounds either, but there are a few products on the market that at least render acceptable stereo imaging. If you want to know the best possible system - it's one that has all three front speakers (left, right, center) lined up pretty evenly across the front of the room. This can be accomplished by anything from on-wall, to bookshelf, to floorstanding speakers but it delivers the best front sound stage and avoids the whole "swooping center" problem when your center channel - which anchors sound to your television - is located way below the front channels (as with a ceiling-mount situation).
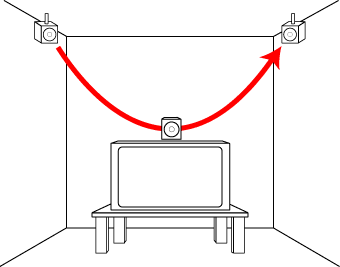
Behold a Left-to-Right pan with typical ceiling-mounted HTiB speakers
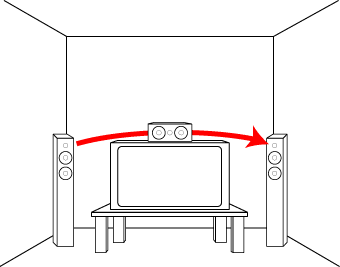
This is a Left-to-Right pan with bookshelf or floorstanding speakers
As you can see here, the better sound is going to come from a system that has a closer grouping of its front three channels. No matter how you dial in the system, there's always a sort of awkwardness when something pans across the screen with ceiling-mounted front speakers.
Tips & Methods
During my installation I learned many tips and tricks. Some were new, and some were learned long ago from past experiences. It's nice to pass some of these on so that others don't make the same mistakes and can come prepared for whatever installation they are tackling.
Cable lengths
Don't skimp on cables - and I'm talking about how much you buy, not necessarily whether they are silver plated and dipped in kosher chicken fat. When crawling around in an attic or crawlspace it's always easiest to bring cables with you that are cut to the approximate lengths you need. When measuring, overestimate. You can do this easily by accounting for an entire floor-to-ceiling length when you are coming down a wall, and allocating 4 feet out of each hole once you poke through. You never want to do all that work only to find that you've hamstrung yourself with short cables, or worse, you didn't cut enough to do the job. This is especially important in the event that you need to work an alternate cable route and it ends up running longer than you anticipated. Cable is relatively cheap - and extra $2.50 in cable isn't worth the hassles you might face if you come up short.
Always buy your speaker cable in bulk when possible and realize that larger rolls come in more reliable pull spools (500' for example comes on a nice thick wooden spool, while 100 feet will arrive on a plastic spool that is easily broken). When pulling lots of cable from a spool, you may want to invest in a cable reel/feeder or make one yourself out of some 2x4s and a broom handle.
Identifying Speakers
I found long ago that labeling speaker cables as you go, while smart - also takes time. I now prefer to simply run all my speaker wire and "pin everything out" at the end. To do this you can use the "audible short" function on any voltmeter, or you simply take a 9V battery and momentarily touch the ends of the speaker cable to it to see which speaker is which (to use this method you need to connect the speakers first of course). Always wire your speakers in phase (red to positive/red and white/black to negative/black) and you'll only have to deal with identification. Also, don't worry about a 9V battery hurting your speakers - it doesn't have enough current to fry any of the internal wiring even though the speaker will pop up like you just slapped it silly. Once identified, I prefer to use an actual label printer to mark the cables in the wall. This way if I ever need to change anything out I know I'm ahead of the game. Labeling is one thing that will save you time down the road - and even if you need to use a Sharpie (blah!) it's better than nothing.
Finding Your Place - Drilling Holes in Wall Cavities
When you are looking to get into a wall cavity it's often disconcerting to think about how you will find your place in the attic. One easy way is to look for easy identifiers while you're still in the room. Here are some basic identifiers that make it much easier to find your spot:
- Air conditioning vents
- Power outlets
- Cable and telephone outlets
- Studs, doorways, chimneys
While you may think a tape measure is the best way - it’s often difficult to line everything up once you get into an attic or under a crawlspace. The very best way to get to the correct location is to use a point of reference like the items listed here. Studs may be easy to spot once you cut a hole in the wall of the room for your speaker wires to connect to your audio system. Once you cut this hole, look inside. When you find a stud, then a rough measurement should get you where you need to be and you can typically see two or more nails that identify the stud in a header or footer for the wall.
We recommend selecting the wall hole where the speaker cables will run to before you do much else. The reason is that it's much easier to know, when you are in an attic or crawlspace, that you are in the correct location if you can see light coming from the room below or above. Using the above identifiers, you should be able to hit the correct stud or wall cavity 100% of the time and avoid drilling unnecessary holes.
Finding Your Place - Ceiling Mounted Speaker Holes
Another time you'll need to find yourself is when you are looking to locate holes you may have drilled in the ceiling for a ceiling-mounted speaker installation. Attics are often big and the last thing you want to be doing is measuring or pulling away a ton of insulation to find a small 1/4-inch hole. To solve this dilemma I have found that using either a coat hanger or a wire from a short (2 foot) piece of Romex works wonders. Simply create a thin loop at one end by bending over the last inch of the wire. Insert the thin side into the hole you drilled into the ceiling and wedge the wire in place by shoving it up until the bent side wedges in the hole. Now when you go into the attic you can easily find the wire sticking straight up and know where your holes are.
Crown Molding Is Your Friend
Crown molding isn't very hard to install once you learn how to cut it and have the right tools - namely a powered chop (miter) saw. What's also great about crown molding is that it solves a myriad of problems for those looking to run surround sound speakers around their rooms - especially on the first floor of a two-story building. By using crown molding to hide your cables, you can use the wall cavity to run vertically up and down the wall to the precise locations you need. Your horizontal and front-to-back mobility is provided by the crown molding, which neatly hides all your cables. I have actually done this and it works incredibly well, even with block construction and on exterior walls.
To simplify the explanation of this process, there are several steps you'll follow:
- Run 1x2 strips of wood around the top of your room. This is where the crown molding will attach and it provides a nice anchor point above which the cables will run. Leave a break for anywhere cables need to drop into the wall for vertical travel.
- Locate your speaker positions, especially side-mounted surrounds
- Drill oversized holes into the wall just below the header at all speaker locations to insert cables and run them down the wall towards the floor. Cut holes in the wall at the actual speaker location (for side surrounds or wall-mounted speakers) or at typical wall-plate height (for floorstanding speakers)
- Run your cable down the wall to each speaker location and then take the remaining length and go around the room to the central repository point for all speakers (typically behind the AV equipment)
- Use simple nail-in cable clips to anchor the wires just above the 1x2 wood furring strips
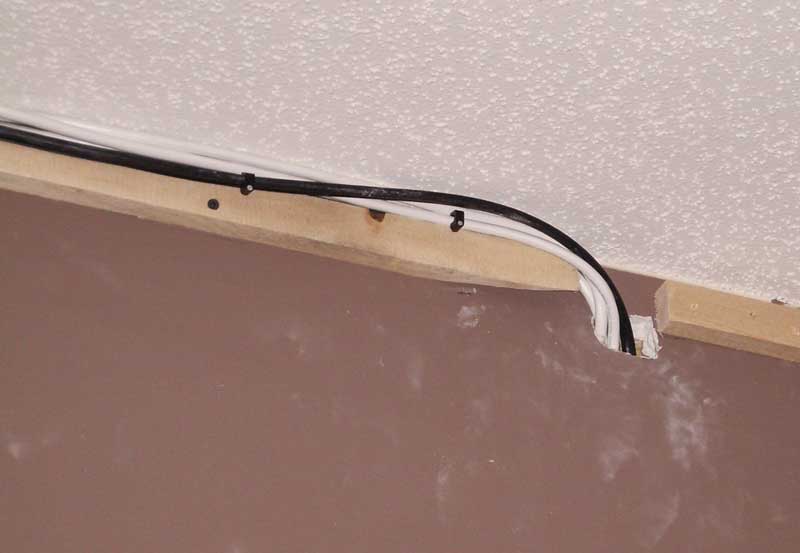

As you can see, the wiring can be run just above the
1x2 furring strips and tuck into the wall cavities where it runs down the
inside of the wall and exits where needed. In this way you can run cable all
around the room.
Ceiling speakers
When mounting speakers from the ceiling, don't use fancy wall-plates or jumper wires. Simply drill up into the ceiling where the wire will poke through and allow the bare cable to connect directly to the speaker. With this method you'll want to use white speaker cables where possible to help hide the cable. This will be much less cluttered than having two binding posts or speaker clips mounted on the ceiling.
The Next Phase - Outlining Various Installation Adventures
That should do it for now. Our next step is to outline five separate installation adventures. Each had different structural challenges, and its own share of hassles, difficulties and requirements. Each had a different personality guiding the process (or avoiding it altogether as the case may be). Each had different aesthetic requirements. And each was a completely different installation and taught me different tips and tricks along the way. As you read through each install its likely that you'll find at least some similarities to your own situation or home. If so, then just maybe we can save you some major headaches.
Clint Deboer was terminated from Audioholics for misconduct on April 4th, 2014. He no longer represents Audioholics in any fashion.
View full profile