
How to Set Up a Home Studio for Beginners
A home studio is a great investment to make especially if you are an independent, up and coming musician or artist. The benefits of having a professional home studio can range from not having to pay an astronomical rate every hour to being able to start or stop work on your music any time you like. The best part about creating a studio in your own home is how simple it can be not to mention the number of opportunities the internet provides for young artists. Going to a studio is becoming less and less popular than it was 15 years ago, so let's get into some steps and essentials you will need to make a professional home studio.
Having the Right Budget

When putting together a home studio, there is such a thing as "too expensive" as well as "too cheap." A home studio will not cost you a year's worth of salary but that doesn't mean you should be spending only pennies and dimes on it either. It's important to go over your finances carefully and choose your best options when it comes to equipment and other essentials you will need. Choosing items simply because they cost less may hinder the quality of your content which will be noticed by your listeners. If you wish to have the best quality for your music, you will need to have high-quality tools to work with. Before you start spending money on equipment you will need to first find your ideal recording room.
Choosing a Proper Room
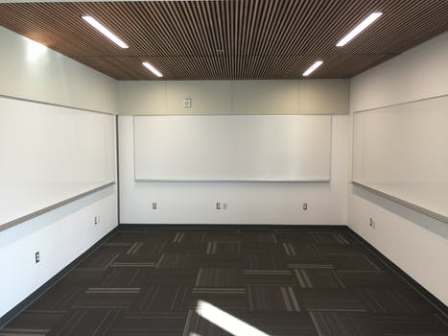
Choosing a room to set up your home studio is the first and most important decision you will need to make. There are numerous considerations that will go into this decision therefore choosing wisely is the best way to go.
Avoid extra small spaces
Even though smaller rooms may seem more tempting because of how cozy they are, they won't suffice when it comes to your long-term goals. Bigger sized rooms have the potential to produce better sound and allow for more room if you require more equipment or if you plan on bringing more people to your studio. You should consider choosing a room you can still use socially, especially if you plan on having guests to do podcasting.
Noise Considerations
Another thing to consider when you're choosing a room is the amount of noise that surrounds it as well as the amount of noise that can get into it. You can test this by placing a microphone in different rooms for a short period and compare the recordings to see which room picks up the most amount of noise. Be considerate of your neighbors and pick a room where a lot of noise won't be getting out. Since not many rooms in modern houses provide for this, soundproofing and other renovations will need to take place.
Flooring
Type of flooring is another issue that should be addressed when you are making your room choice because that will also have an effect on the quality of your recordings. Hard flooring such as hardwood, cork, or thin membrane will be your best choice when it comes to flooring of your recording room. A heavy carpeted room tend to absorb high frequency sounds but not low frequency sounds which can result in poor acoustics of the room. If certain areas of the room must be carpeted for instruments, a rug can be placed wherever necessary so it won't compromise the acoustics of the entire room.
Acoustics
Acoustics can be one of the most important considerations of the room since a room with very good acoustics will produce great quality music. Having a room that is large with irregular surfaces can provide a good acoustical environment. Symmetric side walls are ideal to preserve early reflections of the loudspeakers. Unfortunately, not many houses are designed to have these types of rooms so you will have to choose the room that best fits this description and add some acoustical treatments to it as needed.
Acoustic Treatment
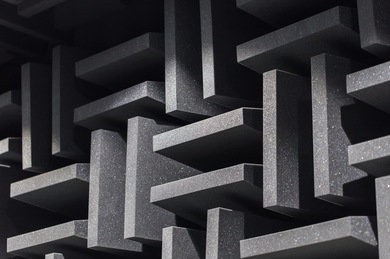
It's important to learn the difference between acoustic treatment and soundproofing because they are two completely different processes contrary to popular belief. Soundproofing aims to remove any internal sound from getting out, and any external sounds from getting in. Acoustic treatment, on the other hand, aims to increase the audio quality of the room that you're recording in by adding absorption panels to the walls. In a home studio, it's very important to have a good balance between both soundproofing and acoustic treatment. If you're strapped for cash and can only really afford to put your room through one of these processes, acoustic treatment will give your audio quality the upper hand. Sound proofing is a much harder task, especially when trying to block bass waves with long wavelengths (20Hz = 57ft!).
There are two main elements to consider when trying to acoustically treat your room: Acoustic panels and bass traps. Acoustic panels are what you commonly see placed all over the walls in home studios or professional studios. Every square inch of space on your wall doesn't need to be covered with acoustic panels. Simply having the side walls treated with acoustical panels can help in absorbing any mid to high frequencies if your speakers don't exhibit linear off-axis response and you prefer to absorb their early reflections. Bass traps do the job acoustic panels cannot do: Absorbing the low frequencies of sound that comes from your instruments or vocals. Bass traps are commonly placed in the corners of rooms and not on the middle of walls like acoustic panels. If you would prefer to go for an "all in one" type of element then porous bass traps are going to be your best option because they are able to absorb all types of frequencies ranging from low to high.
Editorial Note About Bass Traps vs Multi-Sub by Gene DellaSala
If you utilize multi-subs properly positioned and EQ'ed, this will significantly cut down on your need for passive bass trapping if playing music through a sub/sat system. Multi-sub only works like a bass trap when the subs are active and producing the music. Thus the room bass isn't fixed once the subs are inactive. Sound production where the instruments are producing sound require passive bass trapping to fix bass issues in the room. Bass traps are only absolutely necessary in sound production, not sound reproduction. There is a difference.
5 Essential Items
Once your room is set up and soundproofed or acoustically treated, you will need to buy at least 5 basic items that will aid in enhancing your vocals and producing your music. Every beginner or professional studio should have all 5 of these items as a part of their set-up. For starters we will need:
A Computer

Recommendation: Mac or PC
MSRP varies depending on the model
It goes without saying that a computer is necessary for this equipment list. Your choice boils down to 2 types of computers; a Mac or a PC. The individual setting up the home studio can go with the choice they find most comfortable but most professionals will have a Mac inside of their studio. The gripe against Mac's is always the price at which they cost but their reliability is unmatched. Macs are known for having amazing security software and protection against hackers and viruses. A PC, on the other hand, can provide you with one of the most famous and reliable music producing/editing software' FL Studio (Fruity Loops).
DAW/Audio Interface
Recommendation: PreSonus USB 96 2x2 Audio Interface
MSRP: $99.00 | Buy Now
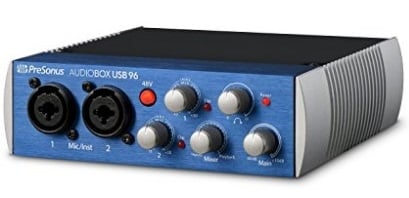
The DAW (digital audio workstation) is the software you will need to properly record, edit and mix your audio to avoid sounds from overlapping one another. Using any free DAW is not a great recommendation for the fact that they don't offer the best experience or the most amount of audio tools to work with. The best option would be to go with a limited version or a full paid version of a DAW. One of the most popular DAWs is the Presonus Studio One 3. Double checking to see if your computer is compatible with your DAW of choice is another precaution that must be taken before making any sort of purchase. The audio interface is the hardware that will connect all your other equipment to your computer. Audio interfaces and DAW's usually go hand in hand so buying an audio interface will usually come with the DAW which will be a convenient investment.
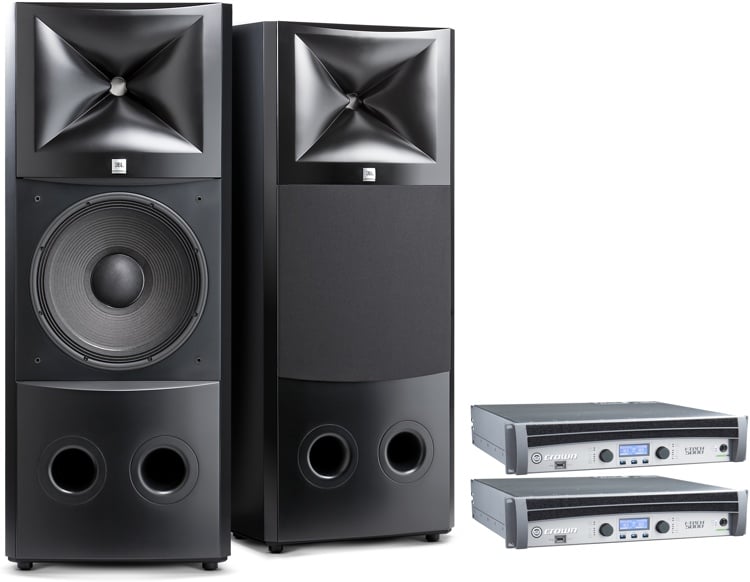
Studio Monitors
Recommendation: KRK Rokit 5 Generation 3 Studio Monitor
MRSP: $299/pair | Buy Now
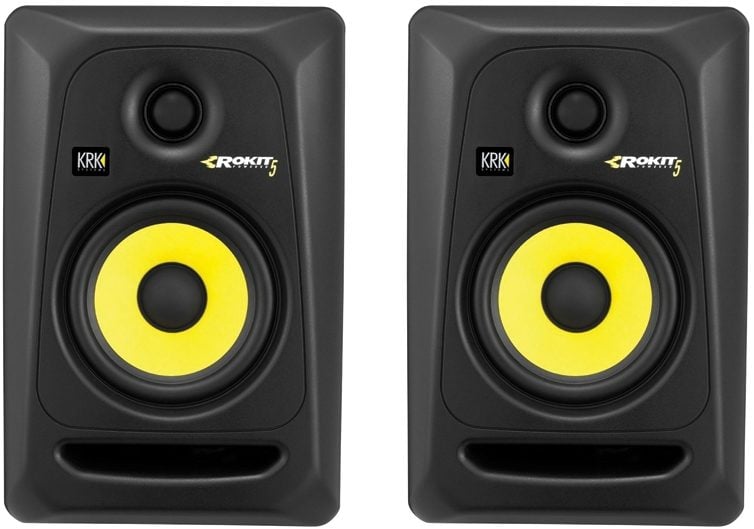
The quality of your mixing will best be judged when you listen to them through speakers or "studio monitors." Traditional studio monitors are going to be worth your investment for the sheer fact that they tend to have a flatter frequency response which produces a more "neutral" sound. This will help you judge how well your mix is and what may or may not need to be adjusted. Studio monitors are usually superior to consumer speakers because they aren't designed with any sort of enhancements that gloss the audio into sounding amazing. Almost all recording studios contain studio monitors, therefore, getting a pair for a home studio will be crucial during the mixing and mastering process.
Recommendation: JBL LSR-306 MKii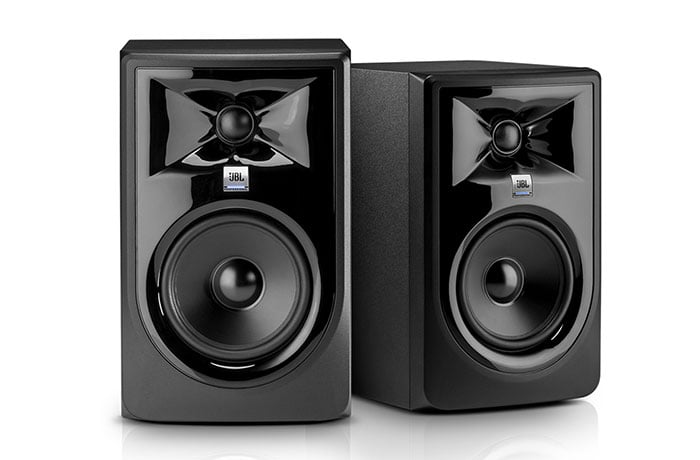 MRSP: $399/pair | Buy Now
If you want to step up your game, a better alternative studio monitor speaker to consider is from the new JBL 3-Series MKii. The LSR-306P MKii sport a high output 6.5" midbass driver and a waveguide tweeter borrowed from their venerable M2 Master Reference speakers. These speakers have a -3dB pt of 47Hz with the ability to output 110dB SPL. The originial 3-series received rave reviews when first introduced. Their MKii is an improved version with refinements in performance, and noise floor. Few speakers can compete with the 3-Series at their price points so check them out.
Microphone(s)
In the beginning stages of a home studio one to two microphones will suffice. As your studio progresses you can look to incorporate more microphones if you would like. Check out our article on $100 microphone comparisons to gauge which type of microphone is right for your needs a budget.
Recommendation: Rode NT1A Cardioid Condenser Microphone
MSRP: $289 | Buy Now
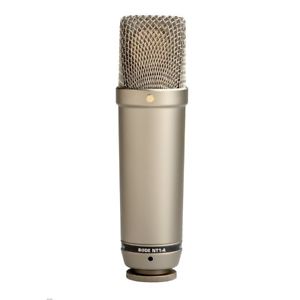
The Rode NT1A is the most famous condenser microphone for vocal recordings. Every professional recording studio will have at least one Rode NT1A set up. Critically acclaimed rappers such as "The Notorious BIG" and "Big L" have been known to use this microphone while recording songs for their albums and for good reason, the Rode NT1A offers amazing raw recording quality without the need of compressing or equalizing the vocals.
Recommendation: AKG 170 Instrumental Microphone
MSRP: $99 | Buy Now
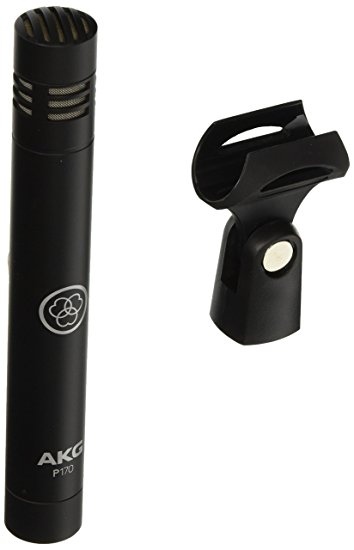
Recording your instruments is easy when using the AKG 170 instrumental microphone thanks to its cardioid polar pattern and the minimal amount of space it occupies. It picks up guitar sounds, drums, and brass instruments wonderfully with clarity and crisp sound. The AKG 170 will be the best bang for your buck if live instruments are going to be incorporated into the recording session.
Microphone Accessories
MSRP: $37.61 | Buy Now
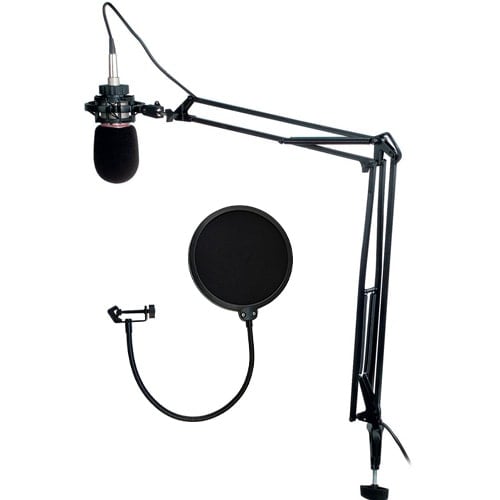
Along with the microphone(s), you will require some essentials to help with improving the sound quality and the placement of the microphone. The two most important accessories for a microphone are a pop filter and a microphone stand. The pop filter will do exactly what the name suggests, which is filter out the strong "pop" sound that might arise from saying words that start with P too harshly. The microphone stand will hold the microphone in place and allow movement to your liking which is very important because microphone placement is often overlooked when it comes to improving vocal recordings. If the microphone is too close, your vocals will be too loud and cause distortion, but if the microphone is too far away, your vocals become too quiet and can't be mixed properly. This creates a problem during the mixing process so be aware and place the microphone no more than a couple of meters away from your mouth.
Conclusion
We have gone over the basics of what will be needed for a do it yourself home studio. As your home studio gets better over time, you can look to incorporate more advanced equipment. Remember that looking for cheap alternatives when it comes to equipment and necessities won't result in a quality environment for your studio. For recording equipment, you get what you pay for. Be aware of your expenses; the type of equipment you buy will play a huge role in how your music will sound. Best of luck in your journey of creating a home studio and chasing your dreams of making it big.