
Building Do It Yourself Loudspeakers
DIY Speakers
Background and History
Back in college I had the opportunity to A-B test a pair $600 Klipsch speakers, which was a lot of money when I was in college, against a pair of home brew speakers that were built from Peerless drivers at a cost of less than $200. There was really no comparison, the home made speakers were leaps and bounds better. I then realized that good speakers could be built at low cost. After graduating with an electrical engineering degree and starting my career in audio I had a solid grasp on audio basics. I built that same pair of home brews with the help of Warren Merkel, who designed them. He also wrote and published a speaker design program called Perfect Box. Later in my career a colleague built speakers using Dynaudio tweeters and after listening to his speakers I knew then that I also wanted to design speakers using Dynaudio drivers. At that time I was still early into my career and Dynaudio's were some of the most expensive drivers available plus I didn't have a good grasp of speaker design yet. Through the years I listened to as many speakers as I could in the area and what I found in general was that I didn't like hard dome tweeters. Although there were a few speakers with hard domes that I did like I decided to stick to building speakers with a soft dome tweeter. So after studying speaker design books through the years I was ready to build speakers with Dynaudio drivers. I don't claim to be an expert at speaker design but I learned that it is a combination of science and art.
Design Goals
Clarity was not a design goal because it is inherent in Dynaudio drivers. My first and primary design goal was imaging and sound stage. My second goal was speaker size. I didn't want speakers half the size of a refrigerator. My third goal was some good low end bass which resulted in making a 3-way speaker. Lastly, I wanted these speakers to look good.
The Balancing Act - Woofers and Tweeters Working Together
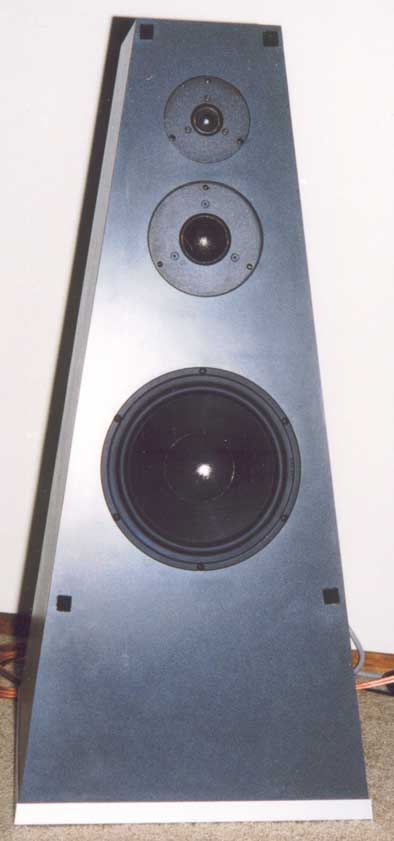
Designing speakers requires a balancing act and this is where the design gets tough. I had to find drivers that sounded good together, a woofer that played down into the upper 20 Hz range, drivers with closely matched sensitivities, and result in a box of medium size. I started with the famous and world renowned Dynaudio D260 Esotec tweeter. Keeping my primary goal in mind I then chose a Dynaudio dome midrange. The dome tweeter coupled with the dome midrange should provide excellent imaging and their sensitivities were within 1 dB of each other. It is important to consider driver sensitivity in order to keep the crossover as simple as possible. When their sensitivities don't match, typically, additional components are needed to the compensate for the mismatch.
If you are not familiar with speaker design, the box size is based on the woofer parameters. Using Perfect Box software I modeled different woofers and observed the frequency response compared with the box size. I started with Dynaudio woofers but after modeling them, their box size turned out to be larger than I wanted. This was some what disappointing because I wanted all drivers to be Dynaudio. I also modeled Scan Speak woofers but their box size wasn't conducive either. I finally settled on a Peerless 10" Woofer. It was a company I was familiar with and like Dynaudio was a Danish company which made quality drivers. The box size met my goals and the sensitivity was within 2 dB of the other two drivers. Something I haven't mentioned that was a very important part of my design was the manufacturers response curves. I was looking for smoothness in the curves. Since this woofer was to be used as a mid-bass driver it also had to be smooth.
Attacking the Nearly Impossible - The Crossover
Now that all drivers were chosen the next step was to design a crossover. With all the variables associated with speaker drivers it is nearly impossible to design a crossover with a pencil, paper and a calculator. If you do, you will be tweaking them for a long time and eventually you'll spend more time tweaking the crossovers instead of enjoying music. A crossover modeling program is essential but it was not included in the Perfect Box program. Fortunately, Madisound offers a service for designing crossovers using the LEAP program from LinearX. I believe LEAP is the industry standard for crossover modeling so I used the Madisound service. After I researched many DIY speaker projects on the Net and studied the manufacturers frequency response curves, I chose the crossover frequencies without the aid of LEAP. This very important decision and different from most other designs was not to push the drivers to their on axis limits. In other words I chose crossover points where the driver was still flat even at 60 degrees off axis. This key decision is why I believe my speakers have excellent imaging and sound stage.
Building DIY Loudspeakers - Trapezoidal Design
Build Phase - A Trapezoidal Speaker Design?
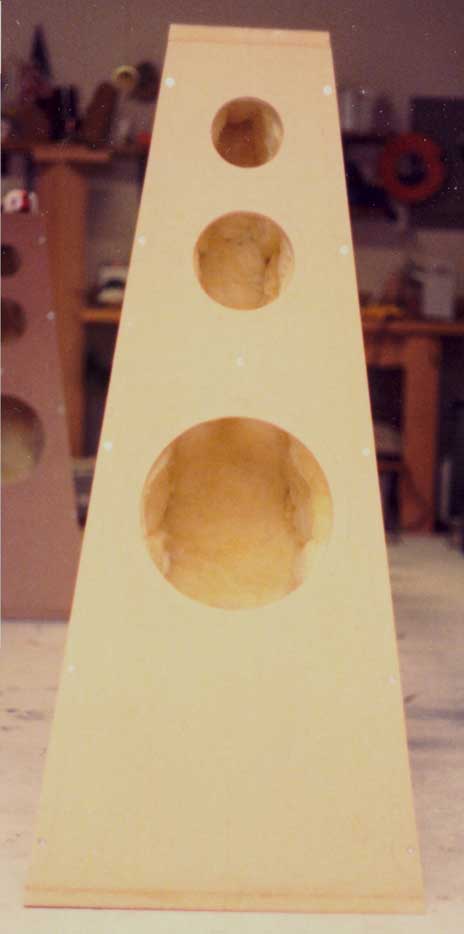
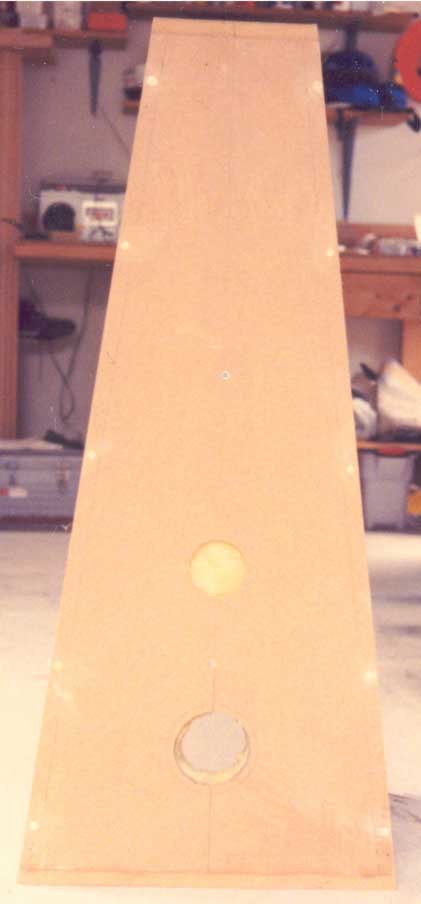
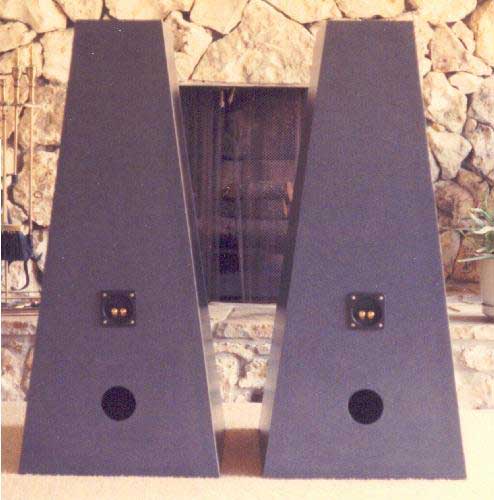
If you haven't noticed, speaker shape has changed in the last 10 or 15 years. They used to be wide with a shallow depth but now they're tall with a narrow width and much deeper. That is because of diffraction of sound on the front surface of speakers; even the thickness of the driver flange can cause diffraction of sound. In order to minimize diffraction I needed to make the surface area around the tweeter and midrange as small as possible, the woofer is not as important because bass is non-directional. B&W Nautilus has optimized this concept by placing the tweeter above the box with no surrounding surface area. I made the speaker front triangular shaped as shown.
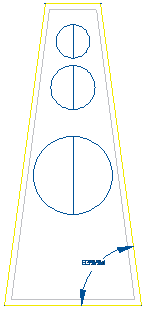
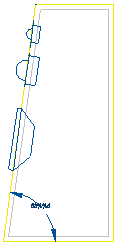
I also wanted to phase align the drivers so that the sound leaving each driver leaves together and at the same time. Physical phase alignment is achieved by lining up the voice coils of each driver in a line perpendicular to the floor. Therefore I also angled the "speaker front" backward.
A third benefit achieved from these angles is non-parallel panels. Non-parallel panels help reduce standing waves inside the box. A final benefit, in my opinion, is that I have a pyramid shaped speaker that is aesthetically pleasing. I had to search a few math books to find the volume formula for a frustum of a pyramid which works even though the back panel is straight. The final part of the physical shape will lead you to see why I wanted the box volume to be of medium size. The tweeter and midrange should be at ear level when sitting down. If the box volume was too large and keeping the previous mentioned constraints in mind the tweeter and midrange would be above ear level.
Most speaker manufacturers do not make non-rectangular boxes. I believe this is because of the difficulty in manufacturing odd shapes in large quantities and as I pointed out before most low frequency woofers require a much larger box. It is much more important to keep the tweeter-midrange at ear level than to worry about diffraction, especially if the drivers are pushed to their on axis response. So keeping the shape rectangular allows a larger volume. One design quality I did not implement was rounded edges which reduces diffraction at the edge of the speaker. I read that at least a 4 inch radius is needed to make a sonic difference. Given the complexity of the angles, this parameter was left out of my design. Thiel speakers, for example, use this concept. Although I haven't had the opportunity to listen to Thiel's, their physical design is a very good concept.
Bracing and Dampening the Enclosure Box
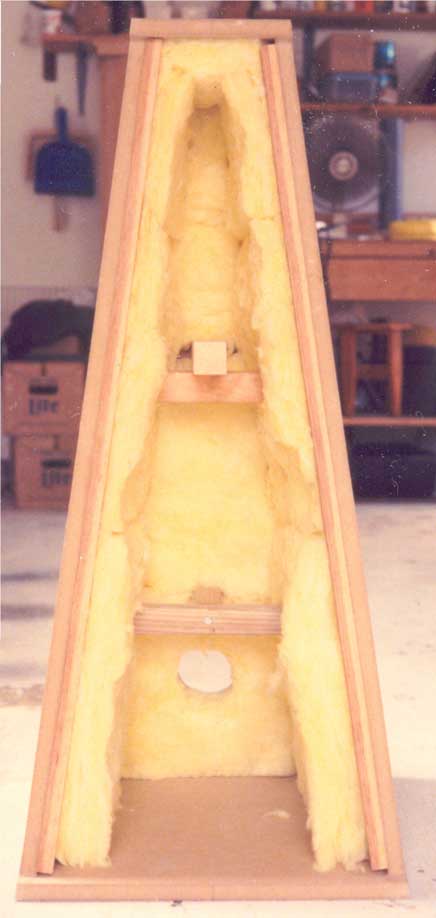 Bracing
and rigidity was the next build decision to make. I
wanted to do shelf bracing (like a shelf inside the
box but with open areas). Since the angles made shelf
bracing difficult I opted for cross bracing and corner
bracing. I have recently read that cross bracing is
a better choice to stiffen up the cabinet. The cross
bracing was placed above and below the woofer and then
braces were placed in the corners to stiffen up the
joints. I'm not sure if there is such a thing as over
bracing a speaker cabinet except that it s uses up box
volume. The cabinet was built from MDF as most speaker
manufacturers use. I have seen speaker book designs
use plywood but I am unsure why; plywood has voids which
gives an inconsistent density. A better choice if MDF
couldn't be obtained would be particle board. Finally,
the crossover was mounted on the bottom of the cabinet
to keep it as far as possible from the driver magnets.
Bracing
and rigidity was the next build decision to make. I
wanted to do shelf bracing (like a shelf inside the
box but with open areas). Since the angles made shelf
bracing difficult I opted for cross bracing and corner
bracing. I have recently read that cross bracing is
a better choice to stiffen up the cabinet. The cross
bracing was placed above and below the woofer and then
braces were placed in the corners to stiffen up the
joints. I'm not sure if there is such a thing as over
bracing a speaker cabinet except that it s uses up box
volume. The cabinet was built from MDF as most speaker
manufacturers use. I have seen speaker book designs
use plywood but I am unsure why; plywood has voids which
gives an inconsistent density. A better choice if MDF
couldn't be obtained would be particle board. Finally,
the crossover was mounted on the bottom of the cabinet
to keep it as far as possible from the driver magnets.
Building DIY Loudspeakers - Tuning and Sound Quality
Tuning the Boxes for Optimum Frequency Response
 Warren,
the author of the Perfect Box program, brought his test
equipment over and helped me tune the boxes to 26 Hz.
I used a rear port only for aesthetic reasons. After
recently learning how much sound is actually generated
through the port, I would have used a front port instead.
Warren,
the author of the Perfect Box program, brought his test
equipment over and helped me tune the boxes to 26 Hz.
I used a rear port only for aesthetic reasons. After
recently learning how much sound is actually generated
through the port, I would have used a front port instead.
The drivers were flush mounted to further reduce diffraction from the flange which was a little tricky with the Formica. I used gold plated binding posts and 10 gauge oxygen free copper wire to connect the crossovers and drivers. I've been amazed to see people use big expensive speaker cables when their mass produced speakers use thin, higher resistance 16 or 18 gauge wire internally.
Design Risks
 There
were several risks involved with designing and building
my own speakers. The high level risk included a large
monetary investment in drivers and materials plus all
of the hours of labor for speakers that I have never
heard. Additionally, a low level risk, is the uncertainty
of whether these drivers would compliment each other
or not. Also, with DIY speakers, most people including
myself do not have all of the proper test equipment
for taking measurements to verify all of the modeling.
Some speaker companies are known to use test
equipment along with an anechoic chamber which is pretty
unlikely in ones home. While computer modeling is a
must for the design it does not guarantee good sound
nor does it account for personal tastes. One more risk
to mention was that I put my trust in Madisound to properly
model my drivers in LEAP for the crossover design but
I am not sure if they used all of the parameters I supplied.
One such parameter is the center to center distance
between the drivers.
There
were several risks involved with designing and building
my own speakers. The high level risk included a large
monetary investment in drivers and materials plus all
of the hours of labor for speakers that I have never
heard. Additionally, a low level risk, is the uncertainty
of whether these drivers would compliment each other
or not. Also, with DIY speakers, most people including
myself do not have all of the proper test equipment
for taking measurements to verify all of the modeling.
Some speaker companies are known to use test
equipment along with an anechoic chamber which is pretty
unlikely in ones home. While computer modeling is a
must for the design it does not guarantee good sound
nor does it account for personal tastes. One more risk
to mention was that I put my trust in Madisound to properly
model my drivers in LEAP for the crossover design but
I am not sure if they used all of the parameters I supplied.
One such parameter is the center to center distance
between the drivers.
The Benefits of the DIY Speaker Approach
The biggest benefit is that I did it myself. It has been very rewarding to play these speakers for friends and all of them have been very impressed. Another great benefit is the price. I spent just under $1000 at the time for speakers that sounded like others in the range of $3000 to $4000. This project was don e before Dynaudio started making their own complete speakers and now that I see what that cost is, I am very happy with my decision. A less noticed benefit is that if I have problems with the speaker, which I haven't, I am the authorized repair center. The only part I may have to ship would be the driver itself, not the whole speaker.
Sound Quality and Performance
 When
the time came to first listen to them I was very anxious.
The entire project from design to finish took a year
and a half and now it was time to turn them on. I put
on some familiar jazz and I was so pleasantly surprised.
I have already mentioned that the imaging and sound
staging is excellent. The clarity and detail are also
exceptional. The quality I was not expecting was their
openness. These speakers are so open for standard driver
speakers they are on the verge of sounding like electrostatic
speakers. They do have a couple of down sides to them
though. I compared my speakers to a friend's Scan Speak
two-way kit that he bought and built. The two were very
close in sound. Mine had better imaging but his had
smoother midrange which is much more important for male
vocals. Although the bass plays down to 26 Hz and it
is fairly tight, it doesn't have a lot of punch to it.
I am in the process of investigating this weakness but
it hasn't stopped me from enjoying them.
When
the time came to first listen to them I was very anxious.
The entire project from design to finish took a year
and a half and now it was time to turn them on. I put
on some familiar jazz and I was so pleasantly surprised.
I have already mentioned that the imaging and sound
staging is excellent. The clarity and detail are also
exceptional. The quality I was not expecting was their
openness. These speakers are so open for standard driver
speakers they are on the verge of sounding like electrostatic
speakers. They do have a couple of down sides to them
though. I compared my speakers to a friend's Scan Speak
two-way kit that he bought and built. The two were very
close in sound. Mine had better imaging but his had
smoother midrange which is much more important for male
vocals. Although the bass plays down to 26 Hz and it
is fairly tight, it doesn't have a lot of punch to it.
I am in the process of investigating this weakness but
it hasn't stopped me from enjoying them.
As I mentioned before I don 't consider myself an expert at speaker design but I do have a good ear for sound. I have been listening to these speakers for over five years and so far I have not heard any other speakers to encourage me to replace mine. I'm sure that I will continue to enjoy these for several years to come. If you are interested in building your own but are not ready for all of the research, there are many good kits you can start with at many different price ranges.
Enjoy!
Ken Stein is a contributing writer and reviewer for Audioholics and he really REALLY likes his speakers (which he should, since he spent countless hours hand-crafting them himself.) Ken is an engineer with FedEx and applies his diligent attention to detail to his speaker and electronics reviews here at Audioholics.
View full profile