
Denon DVD-A1UDCI Universal Blu-ray Player Review
Denon DVD-A1UDCI Blu-ray Player
- Product Name: Denon DVD-A1UDCI Universal Blu-ray Player
- Manufacturer: Denon
- Performance Rating:

- Value Rating:

- Review Date: October 21, 2009 00:00
- MSRP: $ 4,500
- Plays Blu-ray DVD-Audio/Video, SACD, HDCD, DVD-R & DVD-RW, and DivX (v6.0) discs, CD-R & CD-RW, and MP3 & WMA CDs, digital photo CDs (JPEG/Kodak/Fuji)
- Selectable output resolution and upconversion: 720p/1080i/1080p signals available through HDMI outputs; 720p/1080i signals available through HDMI or component video
- Silicon Optix HQV Realta video processor
- Supports BonusView bonus features and BD-Live found on some Blu-ray discs
- Built-in audio decoding for Dolby TrueHD and DTS-HD Master Audio, DD/DTS, PLIIx & DTS Neo:6
- Up to 7.1-channel uncompressed PCM output via HDMI
- Bitstream audio output via HDMI for Dolby Digital Plus, Dolby TrueHD, DTS-HD, and DTS-HD Master Audio
- Dual HDMI digital outputs permit sending video with up to 1080p resolution to two displays simultaneously
- AV Pure Direct mode lets you assign one HDMI output to video and one to audio
- HDMI version 1.3a with Deep Color and x.v.Color™ support
- Advanced AL32 processing for greater audio dynamic range
- 192kHz/32-bit audio digital-to-analog converters for all channels
- 1 set of A/V outputs (composite video, S-video, and component video)
- 7.1-channel RCA audio outputs
- balanced 3-pin XLR stereo audio outputs
- coaxial and optical digital audio outputs
- Denon Link jack (4th Edition) passes DVD-Audio, SACD, and CD signals to compatible Denon components
- SD memory card slot for digital video/photo/music playback
- RS-232C port for third part controllers
- IR input and output for remote repeater systems
- Ethernet port for downloading BD-Live bonus material and possible future upgrades
- detachable power cord
- 7-block construction protects against cross-interference between circuits
- newly designed disc mechanism protects against magnetic influences, dust, and external vibration
- S.V.H. (Suppress Vibration Hybrid) loader ensures stable disc rotation
- remote control
- 17-1/8"W x 5-15/16"H x 17-13/16"D
- weight: 41 lbs. 11 oz.
Pros
- Phenomenal picture and sound quality
- Superb build quality
- Makes for a perfect combo with Denon Separates
- High end appeal
Cons
- No audio/video streaming support for Netflix, Pandora, Youtube, etc
- Very complex to setup
- Excessive load times on some Blu-ray discs
- Uber expensive
Introduction
 I love reviewing flagship products. It gives me a chance to play with some of the very best equipment this industry has to offer. For years now, we’ve been reviewing Denon flagship DVD players, with the most recent being DVD-5910CI. It was truly a reference player in every respect and had it not been for Blu-ray winning the format war, there’d be little reason to ever upgrade to a new source player. Enter the DVD-A1UDCI (yes their model #s are getting longer and vaguer with time). This new Blu-ray dream machine plays every existing disc format known to man sans HD DVD. For those of you that bought into HD DVD (myself included), I suggest tossing the dozen or so discs you still have, get over it and move on. If you want a reference player that will handle all of your DVD’s, Blu-rays, DVD-A and SACD’s, you’ve come to the right place. To own this player isn’t cheap however. So what does $4,500 buy you over say a $500 Oppo player? Read more to find out.
Design Overview
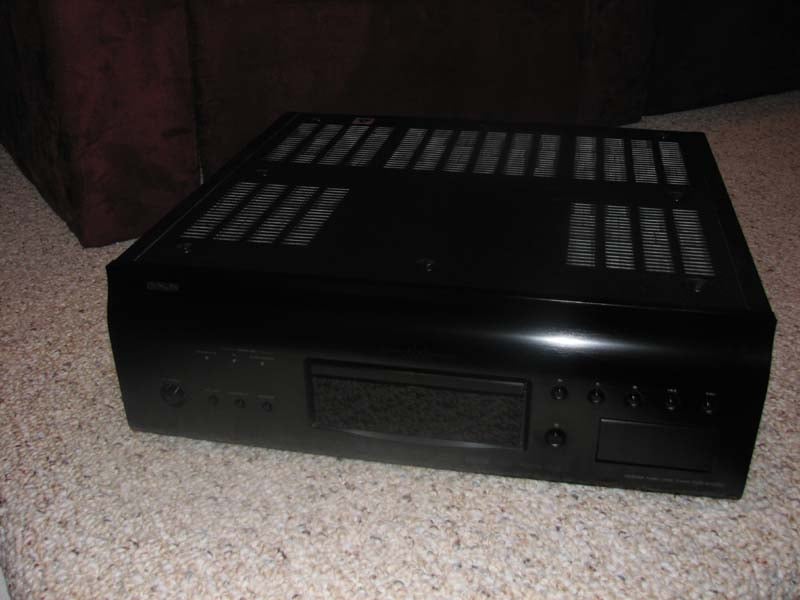
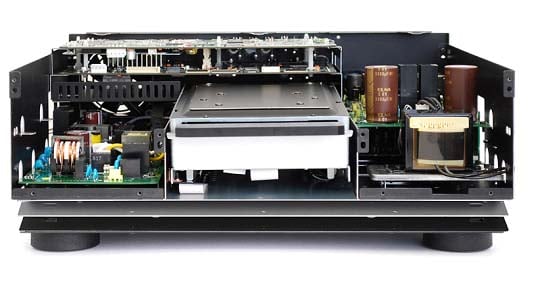 Leave it to Denon to product a Blu-ray player that outweighs many flagship A/V receivers. There are many reasons for this, including over-engineering, no holds barred construction and that fact that it has to be heavy to be considered high end.
Some of the design attributes of the DVD-A1UDCI that separate it from its competition include:
- Direct Mechanical Ground Construction
- Heavy duty drive Mechanism (weighs over 5lbs)
- Multi-layer Chassis Construction
- Separated Unit Structure
 Denon placed the drive mechanism low in the chassis to lower the center of gravity and reduce external vibration influences. The top cover and side panels utilize “Bulk Mold Compound” (Denon nomenclature) which is said to be heavy in mass and reduces external mechanical vibrations. The bottom panel is triple layered steel. This gives the player a bulletproof feel to it and Denon claims these design measures help to suppress internal & external vibrations and electromagnetic noises from affecting playback.
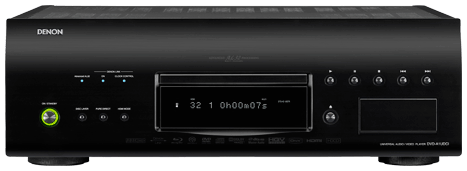
Interestingly enough the DVD-A1UDCI is physically smaller (about 4 inches less deep and 1” less high) than Denon’s previous flagship DVD-5910CI but they both weigh roughly the same amount. Both players were built like a tank but the DVD-A1UDCI (right player pictured) has a more high end appeal to me with its rounded front faceplate, thicker disc drawer and more modern looks.
Chock Full of Chips
 The DVD-A1UDCI sports a 10 bit REALTA I/P and Scalar just like their venerable flagship predecessor (DVD-5910CI) for HDMI and the ABT1030 for component video. An advanced 14 bit ADV7344 video encoder is on board to handle analog video (component, composite and S-video) for the utmost precision. Typically you find 10 bit video encoders on lesser designed players.
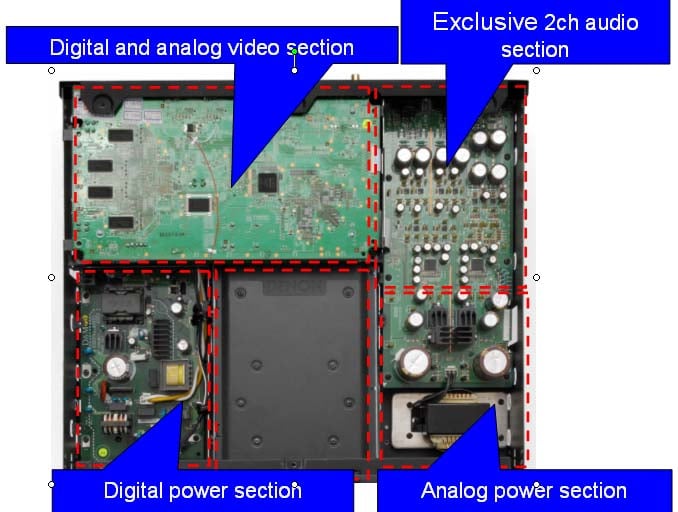
All audio and video circuits are on the same board with completely separate power supplies and grounding schemes. The DVD-A1UDCI utilizes the SiI9134 HDMI transmitter from Silicon Image which is said to completely eliminate jitter issues that plagued HDMI in the past, so one has to wonder what the point of D.Link would be going forward? More on that later.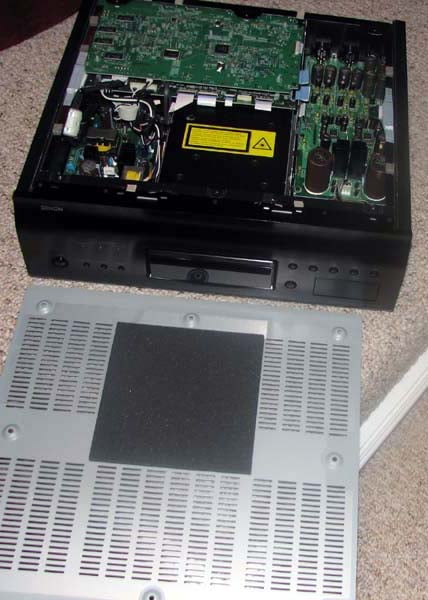 It's been a tradition for Denon to utilize top of the line Burr Brown DAC’s on past flagship DVD players and A/V receivers, but they balked that tradition with the introduction of the new 32 bit AK4399 DAC’s from AKM. These DAC’s are a dual differential configuration for maximum noise suppression and dynamic range. Utilizing Denon’s own proprietary AL32 bit upconversion algorithm, they now have the ability to transform a 16 bit CD to a pseudo 32 bit resolution. They also manage to keep DSD in its native format all the way to your A/V receiver/processor until of course you apply bass management and convert it to PCM. For those two channel purists, you can bypass this altogether, and run the separate audio circuits of the DVD-A1UDCI via balanced outputs of the player into your processor for the purist sound possible.
Popping the top off the DVD-A1UDCI player revealed a very rigid structure just like Denon claimed. Flimsy sheet metal does not the top cover make on this player like you typically find on budget players.
There is a lot going on in a Blu-ray player, much more so than past DVD players. Here is a block diagram of how the DVD-A1UDCI operates.

D.Link (aka DL) at a Glance
Denon claims a +4dB improvement of dynamic range using their proprietary low jitter D.Link connection over conventional HDMI or other digital transmission media (ie. Toslink, coax, etc). They also claim improved spatiality and localization utilizing this connection which sounds like pure marketing BS to me but since it can’t easily be verified through measurements and I admittedly at times thought I heard a difference, I will let it slide and consider it a unique bonus feature.
For those unclear about what audio formats the different versions of D.Link support, I have broken it down it the table below:
DENON LINK Edition
| 1st/2nd |
3rd | 4th | |
| BD | No | No | Yes(w/HDMI) |
| SACD | No | Yes | Yes |
| DVD AUDIO | Yes | Yes | Yes |
| DVD VIDEO |
Yes | Yes | Yes |
| CD | Yes | Yes | Yes |
Denon DVD-A1UDCI Features
The DVD-A1UDCI is one of those kitchen sink products from Denon. It basically has every latest feature on-board you’d expect from a flagship Blu-ray player but no support for streaming services such as Netflix or Pandora. This was a huge oversight in my opinion and Denon has no foreseeable upgrade path for users in the future. If sub-$300 LG and Samsung players can do this, why can’t a $4,500 from Denon?
Well, although BD-Live is supported on this player, it doesn’t have the built in storage memory required to use it. You must purchase an SD card and insert it at the front of the player. This is pretty lame since the $500 Oppo BDP-83 has built in memory onboard as do many of the latest and more affordable BD players.
So far we have a few strikes against this player in the features department, but just wait, redemption is close at hand. The DVD-A1UDCI is designed with a heavy emphasis in high fidelity playback but it also treats video with equal favor as you will see in our Measurements section.
Here are some of the major key features of the DVD-A1UDCI:
- BD, AVCHD. DVD-Audio/Video, SACD, CD, HDCD, DVD-R/RW, CD-R/RW, Divx, WMA, MP3, jpeg, gif , Kodak and Fuji Compatible
- True SACD Native Output via HDMI or DL 4th
- Fully Balanced Digital Output via DL
- Fully Balanced Analog output via XLRs
- 7.1 Analog outputs
- All New AL32 Processing with 32-bit DACs for best possible audio reproduction
- New DDSC-HD, decodes all Dolby and dts formats – even adds PLIIx and Neo:6
- Dual, simultaneously active HDMI outputs capable of up to 1080p resolution and multi channel audio support
- Vertical Stretch Mode for 2:35 to 1 Movies
- 1080p/24 Scaling for SD material
- Digital Noise Reduction & Enhancement
Basically if you’re running this player into an Analog only preamp via the 7.1 analog audio outputs, it can do all of the high resolution audio decoding and post processing you would ever need. We measured the analog section of this player and it’s absolutely pristine. The bass management of this  player and it was the most precise and feature laden we’ve seen in any DVD or BD player, rivaling some flagship A/V receivers.
Remote Control
The RC-1111 remote control is similar to that found on this flagships predecessor but with some distinct improvements. For one, the backlight button is now at the bottom of the remote instead of haphazardly placed near other buttons like it was for the DVD-5910CI remote. the backlight is blue instead of green and much better lit than their older remote. The faceplate of the RC-1111 has a shiny metal skin for a more “high end” look. If you’re like me, you will likely learn the functions of this remote into your universal remote control and shelve it especially since it’s quite a bulky remote control and a bit intimidating to casual users trying to plop in a Blu-ray disc when you’re not at home.
Denon DVD-A1UDCI Configuration and Setup
The Denon DVD-A1UDCI is NOT an easy player to setup properly. Let me repeat this. It’s not easy to set this player up. The user manual is terrible just like most Denon manuals tend to be. I have collected my setup notes and hope you find them useful when dialing in the basic operation of this player. After you make all of your connections (ie. HDMI, D.link, etc), follow this configuration procedure and you will be on your way towards Blu-ray nirvana.
Step 1: Go to the “Other Setup” menu option
Make sure you have an Ethernet cable connected and no disc inserted in the player. Select “Firmware Update” to download the latest firmware for this player. There have been 3 firmware updates since this player was released to market and I highly recommend getting the latest before operating this player. I didn’t and found operational issues when doing my testing which all disappeared after the firmware update.
Step 2: Go to the “Video Setup” menu option
This is where you set the aspect ratio for your display as well as resolution and scaling options for component video. I use “Wide(16:9) instead of “16:9 Squeeze” so the image completely fills the screen on 4:3 material.
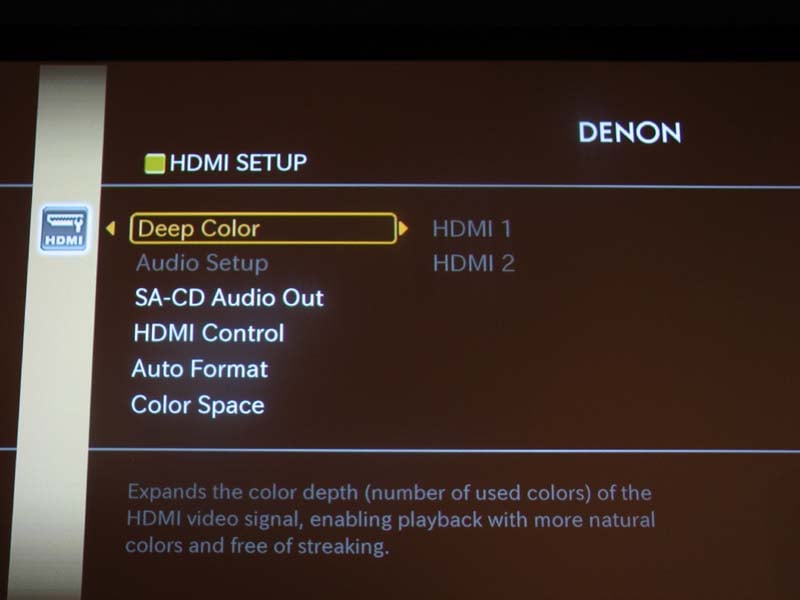
Step 3: Go to the HDMI Setup menu option
This menu option affects the function of this player on many levels both audio and video. Personally, I feel Denon should have kept the Audio stuff in the main “Audio setup” menu, as I found myself having to go back and forth between the “HDMI” and “Audio” menus to get this player’s audio settings properly configured. If you are a D.Link user (fellow AVR-5308CI and AVP-A1HDCI users), skip down to Step 5).
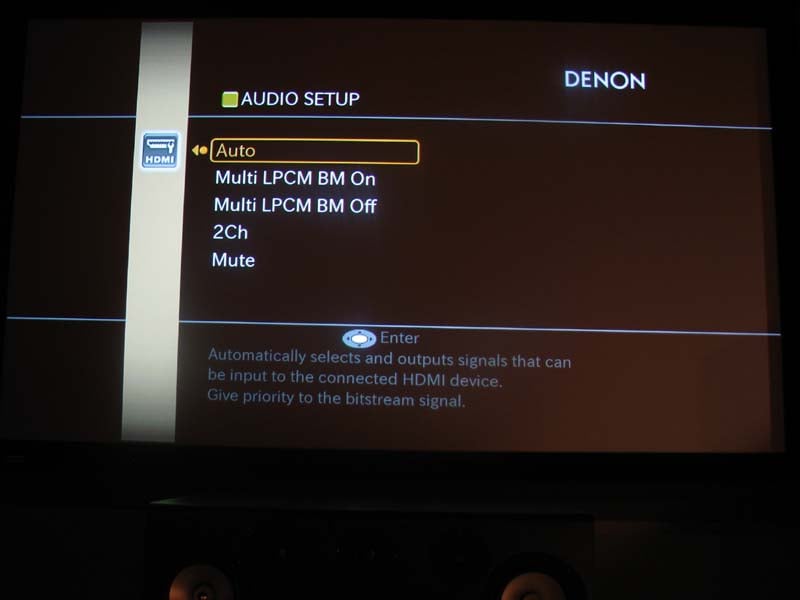
Although the manual does a terrible job of explaining this, you CANNOT get the player to do any decoding via the analog outputs unless you set it properly. To configure the audio output for HDMI, select the “Audio Setup” submenu in the HDMI menu. This menu can only be accessed if you disable D.Link first.
Setting HDMI Audio Output
- Auto – outputs bitstream signal decoded by the A/V receiver/processor. This is the setting you’ll likely want to use if you have an HDMI 1.3 receiver/processor.
- Multi LPCM BM On – decodes the audio signal, applies bass management and sends to the A/V receiver / processor as multi channel PCM.
- Multi LPCM BM Off – decodes the audio signal, sends it as multi channel PCM where the A/V receiver/processor applies bass management.
- 2 CH – downmixes signal to two-channel audio
- Mute – disables audio via the HDMI output and allows the player to do all of the audio decoding and bass management sending it out to the 7.1 analog outputs. Choose this option if only using the analog outputs of this player to have it doing all of your multi channel decoding.
In this menu, you also assign Deep Color, Color Space, HDMI control (power options to sync with your display), and HDMI resolution for your display of the two HDMI outputs. You can independently set all of these options for each HDMI output except resolution.
Editorial Note About HDMI YCbCr vs RGB
When setting up HDMI, you must consider the following selection of HDMI YCbCr or HDMI RGB. In most cases, the former is the appropriate one to use with the latter being utilized mostly for computer type displays. It really depends on how the color space conversion of your display is done so I suggest trying both settings and if you don’t see a notable difference, use the YCbCr setting.
Don’t forget to enable SACD if you plan on passing it out via the HDMI cable to your A/V receiver/processor.
When you’re done here, exit out of the Setup menu and hit the “HDMI Res” button towards the top of the remote. I set mine to “Auto”. Be warned if you set the resolution to “1080p24” then you may experience a very unnatural movement in the picture when playing back source material other than 24fps. 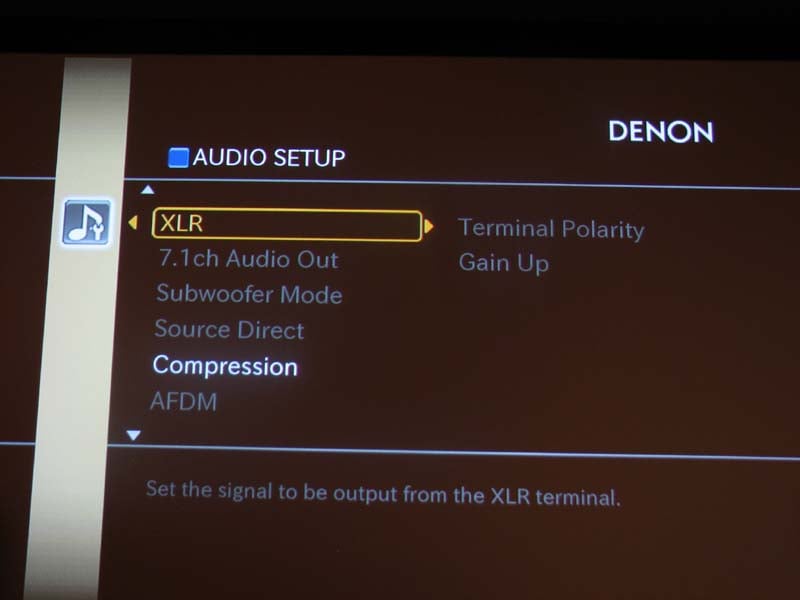 Step 4: Go to the “Audio Setup” menu option
There isn’t as much to do here as you would think since most of the critical audio settings of this player are located in the HDMI setup menu as I previously stated. If you are using the analog outputs of the player exclusively, here is where you setup your bass management, speaker levels and delay settings. You also configure audio mixing options for Blu-ray and compression. Set compression to “off”. This is a high resolution player, don’t limit your dynamic range!
If you’re using the balanced analog outputs of this player for high end two-channel playback, the DVD-A1UDCI allows you to invert output polarity of the channels and adjust gain as well.
Step 5: Set Mode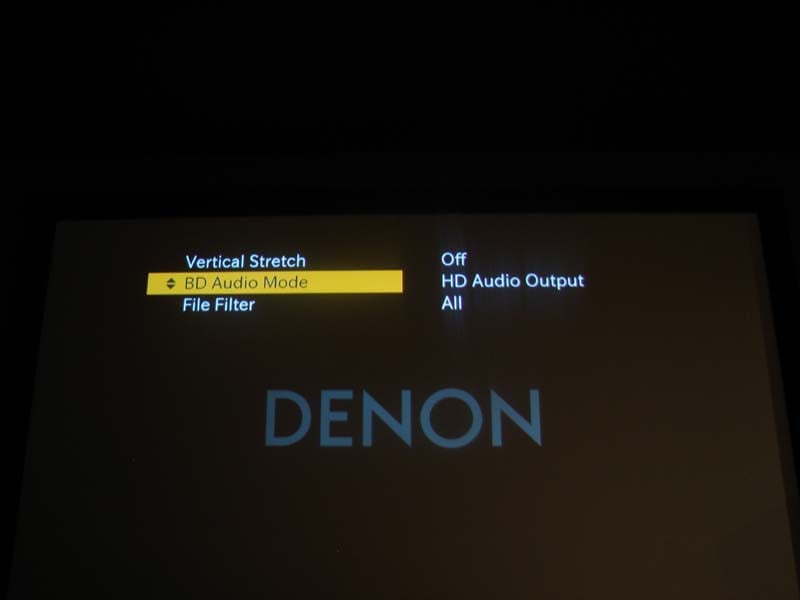 If you think you’re done with setting the audio options of this player so you can sit down and wonder in the sonic marvels of Dolby TrueHD and DTSHD, you are mistaken. There is one more critical step here which I think is ridiculous but Denon cannot be faulted as it’s apparently a Blu-ray standard. Unless you hit the “Mode” button and select “HD Audio Output”, your A/V receiver/processor will NOT be able to decode TrueHD and DTS HD audio tracks on Blu-ray discs. The default setting is “Mix Audio Output” which includes secondary audio options for Blu-ray. To heck with that, this is a high end Blu-ray player. Make sure you’re decoding audio at the best possible resolution.
If you don’t like to see horizontal black bars on your 2.35:1 Blu-ray discs, you can select “Vertical Stretch” in this menu as well. From an installers perspective it’s a very good feature that gives their customer a warm fuzzy feeling that their screen has a full image all of the time and they aren’t wasting wall space. Just don’t forget to disable it on 16:9 movies, else people will look a bit taller and thinner than they should.
Step 6: Setting D.Link (for AVR-5308CI, AVP-A1HDCI and DL4 enabled Denon products)
Getting D.Link 4th to function properly was no small task and the user manuals were of little help. It took me calling Denon tech support and a couple of emails to get that 3rd blue light to come on the front panel of the DVD-A1UDCI letting me know Denon’s doing the clocking for Blu-ray. 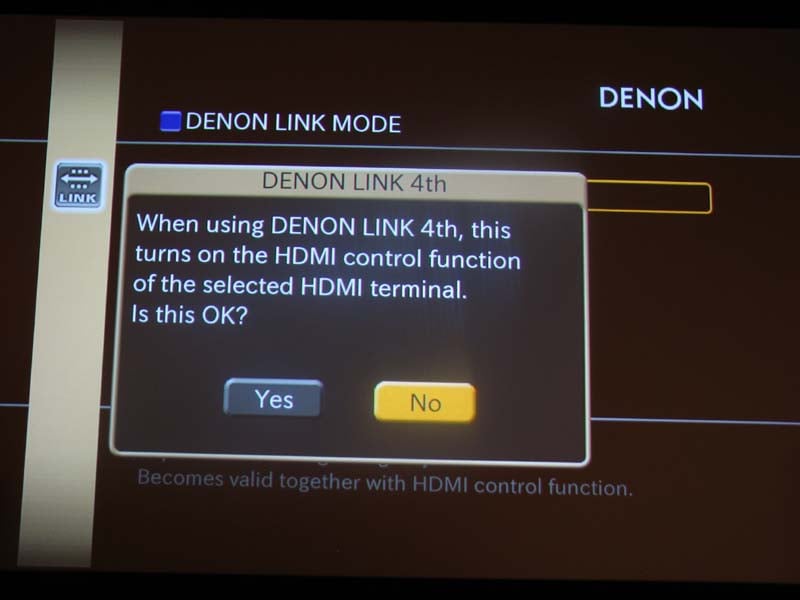 Following this D.Link setup procedure exactly, had my system working properly in no time:
- Enable HDMI control on both the AVP-A1HDCI and DVD-A1UDCI.
- Turn Denon Link off on the DVD-A1UDCI. (This has to be off to change settings for HDMI.)
- Set HDMI Audio to auto on the DVD-A1UDCI
- Turn Denon Link 4th on in the DVD-A1UDCI
- Set HDMI Mode to HDMI Dual (Auto) on the DVD-A1UDCI
- Assign Denon Link to the appropriate source on the AVP-A1HDCI
- Set the Input Mode to Auto on the AVP-A1HDCI
Step 7: Advanced Video Set-Up Denon’s infamous “Picture Adjust” hot button on the remote appears so inconspicuous but has the ability to change the picture so drastically on your player. You’d almost think Denon would have hidden this function in a video menu of the player Setup, but they didn’t. Hitting this button brings you to a menu enabling you to adjust contrast, brightness, sharpness, hue, and gamma correction and engage picture enhancement and noise reduction features. This is particularly useful when connecting multiple sources to a display on a common video input.
Picture Adjustment Menu 0 or +7.5 IRE
After playing with few Blu-ray machines (this one and most recently the Oppo BDP-83), I’ve learned that 0/+7.5IRE has no affect on HDMI output anymore. I did some digging and found that 7.5 IRE is defined only for 480i video signal in US TV broadcasting standard (SMPTE 170M) and not available for HD. The DVD-A1UDCI complies to this recent standard, so unless you are outputting 480i analog video, the player will be locked into a 0IRE setting. If you’ve got a player that allows you to change this setting on anything other than 480i analog outputs, then it doesn’t follow this standard. This is not a big deal, but it was interesting to note how much I had to change the settings on my projector to get proper black levels compared to my Denon DVD-5910CI Universal DVD player.
| DVD-5910CI | DVD-A1UDCI | Difference | |
| Contrast | +12 | -7 | -19 |
| Brightness | -21 | -8 | +13 |
Editorial Note on IRE
The digital video implementation for HDMI output is defined in CEA-861D. It further refers digital value encoding to ITU-R BT.601-5 and ITU-R BT.709-5 for SD and HD video respectively. “For the coding shall be 8-bit coding (scale of 0 to 255). R, G, B and Y signals shall have 200 quantization levels with the black level corresponding to level 16 and the peak white level corresponding to level 235. The signal level may occasionally move beyond level 235.” We also see signal level below 16 often encoded in DVD and BD contents.
The IRE level is an analog idea. CEA-861D also provides recommendations for converting digital to analog and aligning the IRE level: “It is recommended that for RGB or Y, the black level (i.e, sync level and blanking level) should be aligned with the video portion of the signal at digital levels 16 and the white level at digital level 235, such that the full range of the digital to analog converted signal is the same as the actual video. This means that zero analog level (0.0 IRE) should be associated with digital level 16. Digital levels 1 – 15 (undershoot region) and level 235 – 254 (overshoot region) are recommended to be passed through the digital to analog converter; however, full range of the analog signal should be aligned with 16-235 since it is expected that essential video is in the 16-235 range.”
Base on the above, its safe to assume 0 IRE for black reference (digital 16) is recommended by the CEA-861D standard.
DNR (Dynamic Noise Reduction) – recommended setting +2. When using video clips from HQV and Spears/Munsil, I found a +2 setting was sufficient enough to reduce noise without dulling the image.
Enhancer – emphasizes the contour or sharpness of the image. I found I had to boost this to around +6 on my display to get clear resolution enhancement.
Sharpness (medium/high range) – use the “medium” range setting to adjust sharpness of analog video and the “high” range setting for HDMI video. I varied the control up and down and didn’t find it to make much of a difference which was a bit puzzling to me.
The DVD-A1UDCI also allows you to adjust contrast, brightness, black level and white level which seems a bit redundant since contrast is synonymous with white level and brightness is synonymous with black level. I guess Denon just wanted to be geeky and give you multiple ways to skin a potato. The DVD-A1UDCI offers gamma correction and the ability to adjust picture vertical and horizontal positioning to fine tune your image position and minimize pixel cropping.
Step 8: Miscellaneous Setup
After you have all the important stuff setup on the DVD-A1UDCI, its time to customize its operation for your personal use.
Go to “Other” menu option
Denon gets a thumbs up for being green friendly. They included an “Auto Power Mode” that can be set so the player goes into standby mode if it’s inactive for more than 30 minutes. There are several “Power Savings” options that can be set to reduce idle power consumption at a penalty of longer power up times and sacrificing RS-232C and/or HDMI control. I mostly used “Quick Start Mode” during the review process which consumes the most idle power but offers the quickest load times which are important when flipping through discs for review. You should experiment with what works best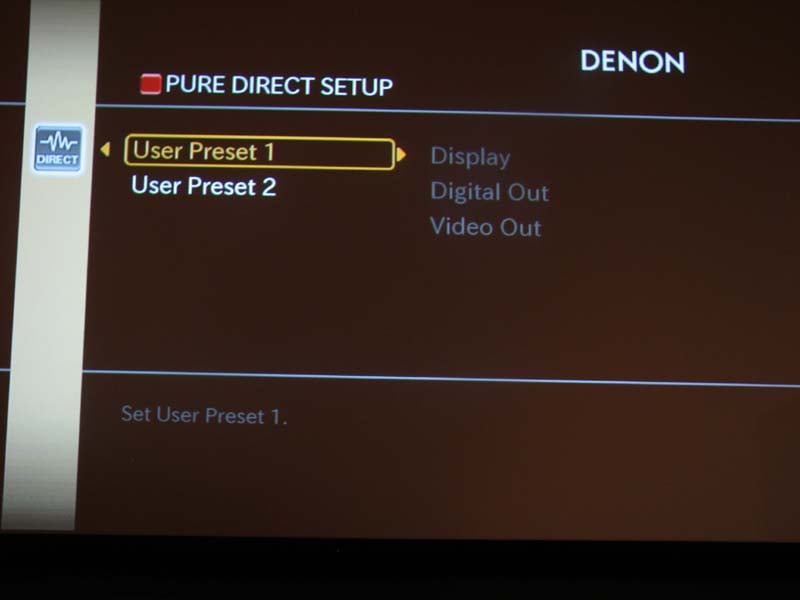 in your setup and consider using one of the lower power settings if you don’t mind waiting a bit longer to load up a disc and hit play.
Pure Direct
Denon takes functionality of “Pure Direct” to a whole new level with this product. There are two independent user presets that can be configured to enable/disable digital audio outputs, video, and front panel display. With “Pure Direct” engaged and using the analog outputs, I actually did see a measurable improvement so purists will definitely want to keep this in their pocket.
Operation
In operation, the DVD-A1UDCI is one smooth operator though it’s not as speedy at loading or removing discs as the rabbit Oppo BDP-83. Where the Oppo powers up and has you playing a disc in just under 30 seconds, the Denon does the same at around 45 seconds (in quick start mode). This is much better than some of the older Blu-ray and HD DVD players we’ve tested that could take several minutes or longer.
With HDMI control engaged, as soon as I hit the eject button on the DVD-A1UDCI to insert a disc, it had my AVP-A1UDCI processor switching to the right input. Very cool. The DVD-A1UDCI ejects a disc in just a few seconds which again is very good and better than some of the other players we’ve tested.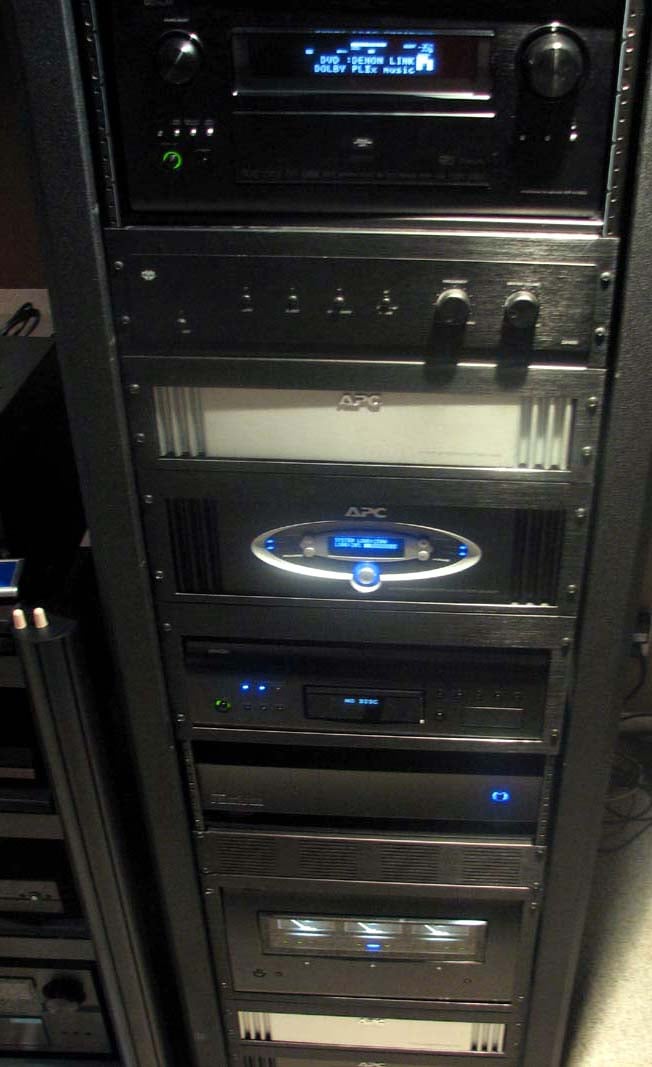 Every now and then the DVD-A1UDCI player would go Windows Vista on me in that it would lock up after I’d insert a blu-ray disc and wouldn’t power down no matter how many times I’d hit the power button. Instead, it would show a disc loading on my display and I’d get a green flashing power light that only after waiting a couple of minutes or unplugging the player and plugging it back in would resolve. Aside from these occasional psychotic episodes, the player operated just fine.
I integrated the DVD-A1UDCI into my Middle Atlantic Rack in the Audioholics Showcase Home theater reference system where the matching Denon AVP-A1HDCI preamp/processor and POA-A1HDCI 10 channel amplifier reside. It was quite an impressive site to see all these of these components in the same rack and I’d imagine this would be a Denon lover’s wet dream. The speaker system consisted of a 7.1 RBH Sound Signature T-30LSE speaker system with dual Velodyne DD-15 subwoofers. The entire system is power protected by dual APC S20 power conditioners and SBATTS. I connected the components up with Impact Acoustics Sonicwave HDMI cables, Bluejeans 1694 Coax cables and 10AWG speaker cables and the Denon supplied Ethernet cable for the D.link connection. Denon happens to sell an “audiophile” Ethernet cable with an asking price of several hundred dollars. Don’t waste your money on that hyperbola unless of course they coat it with kosher chicken fat blessed by a Rabbi.
Denon DVD-A1UDCI Listening Tests and Viewing Evaluation
 After I got the DVD-A1UDCI fully calibrated for my system, I was eager to be rewarded with state of the art picture and sound. Knowing this player was coming to me for review, prompted me to stock up on some of the latest Blu-ray offerings. I was eager to see and hear the full potential my system had to offer and based on my initial impressions of this player, I was confident it would show me.
Blu-ray: Star Trek Original Motion Picture Collection
Since I never owned the original Star Trek movies, I warped to Amazon and picked up the Blu-ray set for the first six movies. I must admit, I wasn’t expecting much from these movies since they are both old and low budget. I figured the transfers would be pretty lame but since I adore the stories so much it was a good excuse to go Blu-ray.
Boy was I mistaken. The video and sound quality of these movies ranges from very good to top notch. With the DVD-A1UDCI at the helm I was rediscovering these movies as if they were new.
I managed to capture a few screenshots of the brilliant transfers played back on a state of the art blu-ray machine.


Scenes from Star Trek III - the Enterprise faces off with a Klingon BOP
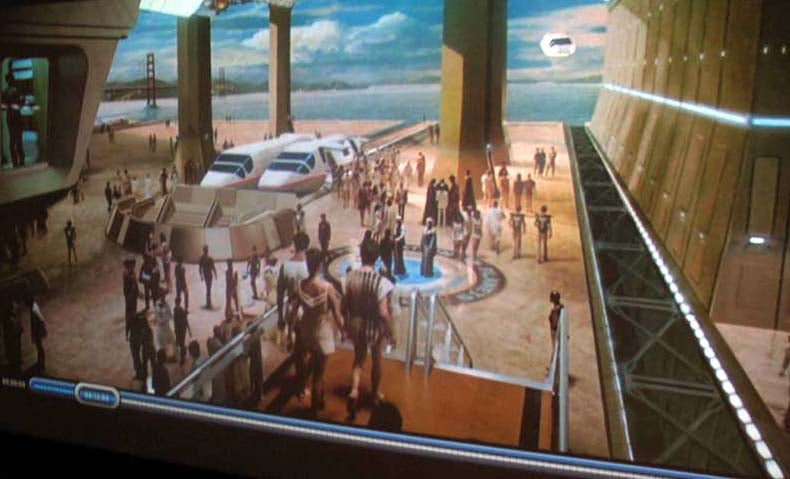

Scenes from Star Trek I – Starfleet academy (left) and Star Trek V - Enterprise meets God? (right)
Seeing the original NCC-1701 Enterprise in 1080p never looked so good. How they butchered this beautiful design in the new high budgeted reality TV meets 90210 movie seemed almost criminal to me in comparison. The depth of the color and sharpness of the imagery in these remastered classic Trek movies captivated my attention. Remastered in 7.1 Dolby TrueHD is no gimmick. The dynamics of the movie were excellent, especially when bearing through the willful destruction of the USS Enterprise in Star Trek III – the Search for Spock. The DVD-A1UDCI was conveying all of the subtle nuances these remastered films had to offer. During the space station scene in Star Trek I – the Motion Picture when they were witnessing the destruction of three Klingon D7 battlecruisers by the hands of V'GER, it was amazing to hear the communication channels of the floating astronauts all around me. Star Trek fans and audiophiles/videophiles unite, these are a great series of movies to add to your Blu-ray collection.
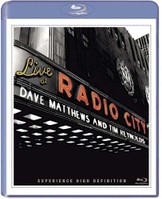 Blu-ray: Dave Matthews & Tim Reynolds - Live at Radio City Music Hall
This disc is a treasure for Dave Matthews fans. Imagine him and Tim Reynolds as an acoustic duo in one of the greatest concert venues in the USA. The video and audio quality on this disc is masterful. The DVD-A1UDCI brought out all of the detail in picture and sound you would expect from a flagship player. The color and detail was simply wonderful. You got a great sense of size of the stage and acoustical presence of the venue. “Bartender” showed off the power of Dave Matthews voice as he filled the venue and you could hear him all around you. I did my best to switch on/off D.Link to determine if there was an audible difference. During my sighted tests, I swore that D.link sounded better in that it had more focus and clarity. However, when I got my wife to do the switching, I was unable to statistically prove with a confidence level any higher than 60% that I actually preferred D.link. Realizing the switch time was roughly (3-4 seconds), it’s very hard to determine sonic differences of such minute detail. I could clearly hear the “cha cha” sounds Dave Matthews was whispering in the microphone on “Stay or Leave” in the Audioholics Theater reference system which actually caught me off guard as I never really noticed this on the Audioholics Family room system despite I’ve listened to this disc a good half dozen times. “Crash into Me” had me so mesmerized that I felt like I was at Radio City Music Hall basking in the musical bliss.

I captured a screen shot of Dave Matthews belting out the tunes so you could see the wonderous video quality, but if you want to hear it, you’re gonna have to get this disc and a Blu-ray player.
Miscellaneous Blu-ray
I ran a gamut of Blu-ray discs I rented from Netflix as well as the sampler discs Dolby is kind enough to send us from time to time. The most notable is on the Dolby demo disc “Sound of High Definition II”. Track #10 “100 sq.ft” from Benny Rietveld really demonstrated just how good this format is, especially when played back on quality reference gear. I don’t know who the singer is on this song, but her voice is simply breath taken and she’s also not unpleasant on the eyes. This is the type of pop/jazz music I wish would make it to mainstream. From the snap of the snare drums to the explosive guitar solo, there seemed to be no limitation to the dynamic range of this recording. The DVD-A1UDCI happily pushed my system to its limits and helped me appreciate just how far those limits were. I tried to close my eyes to better enjoy the music, but the vivid color and detail I was seeing in the instruments had me hooked. I sensed the dormant videophile in me blossom. With endorphins flowing through my body, and bass thumping, I was truly engaged in that “better than being there” experience I love discovering when reviewing the very best equipment in the industry.
SACD: Patricia Barber - Café Blue

I often use this disc as a two-channel reference for both its audiophile quality and excellent musical content. I wanted to determine if there was a benefit in using the analog outputs of the DVD-A1UDCI. I placed the player in “high gain” mode since the preamp gain of the AVP-A1UDCI is a bit low and I wanted to better match it to the digital outputs. I disabled Audyssey and bass management to ensure an unadulterated DSD transfer and engaged the DVD-A1UDCI Blu-ray player and AVP-A1UDCI processor in “pure direct mode”.
The percussions in track #1 “What a Shame” sounded incredibly lifelike while the brushes had an airy aura to them. This is what high end is all about. I subjectively felt the analog outputs of the DVD-A1UDCI offered a slightly warmer and less analytical presentation but switch times were painfully long since the AVP-A1UDCI takes around 5 seconds to engage audio once you toggle digital inputs. It was quicker to switch from digital to analog but that also biased me into knowing which input I was listening to. Let me state it another way. Both analog and digital outputs of this player sounded absolutely phenomenal. For me to gauge which input sounded better with such a long lapse in time between switching inputs would be like trying to detect the sound of a gnat farting in Carnegie Hall. I was going on pure emotion here as I felt moved regardless of what output I was using on the DVD-A1UDCI since they all sounded fantastic.
SACD: Andre Geraissati - Canto das Aquas

I picked up this SACD at the high end area of CEDIA a few years back after hearing it demoed at one of the exhibits. It’s tranquil Brazilian instrumental music that is recorded incredibly well and demonstrates how well your system can reveal the subtle details in recordings. The acoustic guitar in track #1 “Agreste” sounded so realistic that all you had to do was close your eyes to convince yourself it was a live unamplified performance. The shakers coming from the right speaker just popped at you. I again felt as if the analog outputs of the DVD-A1UDCI sounded a bit warmer than digital yet both sounded phenomenal. Track #6 “Kenya” demonstrated the incredibly low noise floor the DVD-A1UDCI had in order to reproduce such detail of the most delicate instruments and subtle ambient sounds in the recording. This recording is truly a sonic delight.
Comparing the sonic differences between the digital and analog outputs on the DVD-A1UDCI proved to be quite challenging more so than when I did the same comparison on my Oppo BDP-83. I clearly preferred the digital outputs of the Oppo player despite it also sounded very good in analog as well. The differences with the Denon however were much more subtle. At times I preferred the more analytical sound I was hearing for dynamic music with a lot of high energy content via the digital outputs while with acoustical music, I preferred the subjectively warmer and more intimate feel sound of the analog outputs. For two-channel SACD aficionados, I can’t give you any solid recommendation other than hook up both connections and try them for yourself.
CD: Special EFX – Collection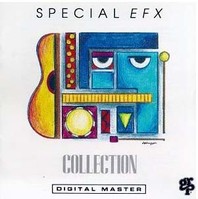

I made duplicate copies of this CD so I could directly compare the sonic differences between the Denon DVD-A1UDCI and Oppo BDP-83. This comparison seems kind of silly considering the Oppo player sells for 1/9th the cost of the Denon but it speaks volumes for just how good the Oppo player really is. Most of the time the sonic differences between CD players reveals itself in the high frequencies which is why this CD is an excellent choice to help flesh them out. Carefully listening to the shakers in Track #1 “Uptown East” revealed some significant sonic difference between the Denon and Oppo analog outputs. While the Oppo sounded excellent, the Denon simply sounded cleaner, more detailed and more lively. The bass was also a bit tighter on the Denon as well. Track #4 “Summers End” demonstrated the better stereo separation of the Denon player and the plucking of Chieli Minuccii’s guitar. Switching both players to HDMI made these sonic differences evaporate since the AVP-A1UDCI was doing the D/A conversion. I could listen to this entire CD on other player (digital or analog) and be completely satisfied with the performance. This is a testament to how far digital technology has evolved since the introduction of CD nearly 27 years ago.
Recommendations
As good as the Denon DVD-A1UDCI Universal Blu-ray player is, I can only conditionally recommend for two scenarios:
1. you simply want the very best reference Blu-ray player on the market regardless of price
2. you want to compliment your Denon separates package (AVP-A1UDCI and POA-A1UDCI)
For most consumers the Oppo BDP-83 will serve their functions just as well as the much more expensive Denon player just like a Corvette Z06 would serve a sports car enthusiast as well as a Ferrari 458 Italia. But for the most discerning audiophile/videophile that simply wants the best, you would be hard pressed to do better than this player unless of course you’re ready to pony up an extra $1500 for the Marantz UD9004 which is a clone of the Denon player but with a beefier power supply and copper coated chassis. Though, the Marantz player lacks the allegedly “low jitter” D.link connection so if you’ve already got the Denon separates rig, it makes little sense to go this route at all.
Video Tests
Using an assortment of tests from Silicon Optix HQV and HD HQV, as well as Spears / Munsil Blu-ray, we complied a test procedure to test the video prowess of the DVD-A1UDCI. Unless otherwise noticed, all tests were conducted with the DVD-A1UDCI set to 1080p via the HDMI output.
HQV Bench Tests (DVD)
HQV testing is useful in determining the quality of a systems deinterlacer for standard definition program material. I also use it to help determine the proper level of picture enhancements I need to use on the player under test to get the best possible combination of noise reduction and picture details using the Picture Detail test, I found the best combination of DNR (+2) and Enhancer (+4) in my system.
| Test | Max Points |
Results |
Pass / Fail |
| Color Bar | 10 | 10 | Pass |
| Jaggies #1 | 5 | 5 | Pass |
| Jaggies #2 | 5 | 5 | Pass |
| Flag | 10 | 10 | Pass |
| Detail | 10 | 10 | Pass |
| Noise | 10 | 10 | Pass |
| Motion adaptive Noise Reduction | 10 | 10 | Pass |
| Film Detail | 10 | 10 | Pass |
| Cadence 2:2 Video | 5 | 5 | Pass |
| Cadence 2:2:2:4 DV Cam | 5 | 5 | Pass |
| Cadence 2:3:3:2 DV Cam | 5 | 5 | Pass |
| Cadence 3:2:3:2:2 Vari-speed | 5 | 5 | Pass |
| Cadence 5:5 Animation | 5 | 5 | Pass |
| Cadence 6:4 Animation | 5 | 5 | Pass |
| Cadence 8:7 animation | 5 | 5 | Pass |
| Cadence 24fps film | 5 | 5 | Pass |
| Scrolling Horizontal | 10 | 10 | Pass |
| Scrolling Rolling | 10 | 10 | Pass |
| Total Points | 130 | 130 |
Comments on HQV Testing
The Denon DVD-A1UDCI received a perfect score (130/130) on HQV testing via the HDMI outputs but testing component video resulted in a slightly different story. Jaggies #2 marginally passed with 3 points, and the first 3 cadences (2:2, 2:2:2:4, 2:3:3:2, respectively) failed yielded a total score of 113. Apparently the ABT1030 processor used for component video outputs is no match for the Realta processor Denon uses for its HDMI outputs in this regard.
HQV HD (Blu-ray)
| Test | Max Points | Results | Pass / Fail |
| BluRay Noise Reduction | 25 | 25 | Pass |
| Video Resolution | 20 | 20 | Pass |
| Jaggies | 20 | 20 | Pass |
| Film Resolution Loss Test | 25 | 25 | Pass |
| Film Resolution Loss Test - Stadium | 10 | 10 | Pass |
| Total Points | 100 | 100 |
Comments on HQV HD Testing
The DVD-A1UDCI passed with flying colors (no pun intended) via the HDMI outputs. I found a setting of +2 for DNR was sufficient for greatly reducing noise. I tested the component video outputs at 720p resolution and the player still received a perfect score which was a bit surprising to me since it failed Jaggies #2 for standard definition.
Spears & Munsil (Blu-ray)
This disc is invaluable for properly optimizing picture black level, color, and detail. It’s also quite useful in gauging deinterlacing performance and overall quality of a display or source device. All of the images are in 1080p which makes for quite a spectacular display once you’ve calibrated your system properly.
I checked the DVD-A1UDCI for pixel cropping but found none at all to be reported. Using the pluge patterns I was able to pass blacker than black on my display and with some fine tune adjusting using the Dynamic high and low patterns, I was able to set white and black level to near perfection on my display.
The DVD-A1UDCI did fine on all the cadences for the Racecar clip but it had some problems on some of the cadences for the wedge tests as indicated below.
| Test | Pass / Fail |
| Cadence 2:2 | Fail |
| Cadence 2:2:2:4 | Fail |
| Cadence 2:3:2:3 (PF-T) | Pass |
| Cadence 2:3:2:3 | Pass |
| Cadence 2:3:3:2 | Fail |
| Cadence 3:2:3:2:2 | Fail * |
| Cadence 5:5 | Pass |
| Cadence 6:4 | Pass |
| Cadence 8:7:8:7 | Pass |
| Cadence 24P | Pass |
| Cadence difficult edits | Pass |
| Cadence time-adjusted | Fail |
Comments on Spears/Munsil Testing
I was surprised to see the DVD-A1UDCI fail some of these cadence tests but it did pass the most critical ones that deal with real video transfers used for DVD/Blu-ray and TV shows (ie. 24p, 5:5; respectively). In comparison, the Oppo BDP-83 passed all of these cadence tests but it failed the 2:2:2:4 cadence test on HQV.
During the Cadence 3:2:3:2:2 test, it caused the DVD-A1UDCI to lock up. Power cycling the player resulted in the captured screenshot. It wasn’t until I unplugged the player and plugged it back in that it would be restored to normal working condition. It was then I proceeded to check for new firmware which I happily found and it eliminated this operational anomaly.
Denon DVD-A1UDCI Audio Measurements and Analysis
HDMI Digital Audio Tests
Using the Audio Precision APx585 8 channel HDMI analyzer, I performed a series Bit Error Rate (BER) tests on the Denon DVD-A1UDCI. Unfortunately APx585 doesn’t yet support Bit Error Rate (BER) testing for Dolby TrueHD and DTS HD , so my testing was limited to real world usage tests in this regard. I tested whatever was relevant via the HDMI output of the DVD-A1UDCI to determine its performance.
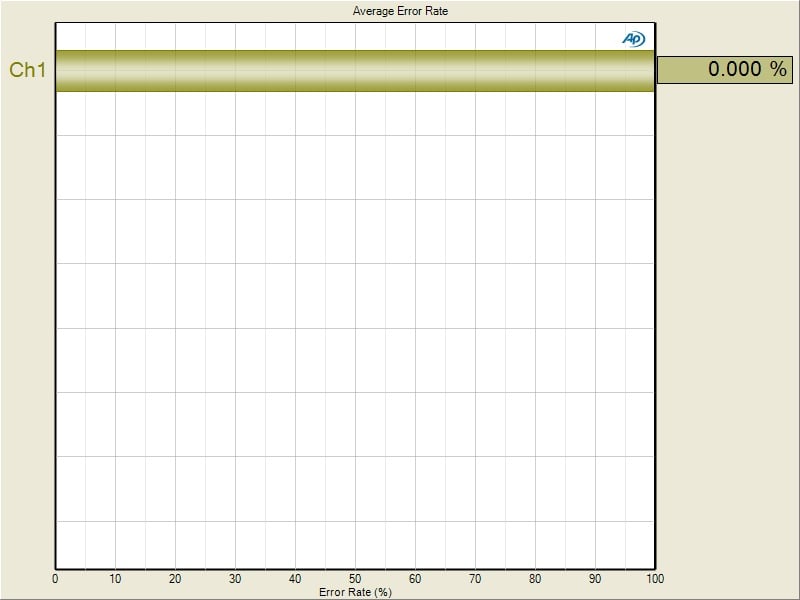
Denon DVD-A1UDCI Bit Error Rate (BER) Test for Dolby Digital
This test result is rather boring upon first glance but what it tells you is that utilizing the HDMI output of this player, it passes DD/DTS bitsteams bit for bit accurate to your AVR. The same applies for PCM 16 bit 44kHz all the way up to 192kHz / 24 bit. In fact, if any errors were present, the AVR wouldn’t be able to decode the multi channel formats. Since I physically tested every format that the Denon supports with actual software, it’s safe to assume the DVD-A1UDCI will pass BER with 0% errors for TrueHD and DTS-HD bitstreams as well. This begs the question, why have D.Link when HDMI seems to work just fine?
Editorial Note on BER Testing
A BER of 0% is essential for all bitstreams (ie. DD, DTS, TrueHD, etc) to pass through the player to the AVR for proper decoding. The same doesn’t apply for PCM data however as many players often upsample 44kHz, 16bit audio you get from a CD and thus alters the original data played from the disc. This usually results in failed BER tests but not necessarily bad audio performance. It’s important to check other aspects of the signal such as frequency response and THD after the digital to analog conversion stage to get a clearer picture of what is going on.
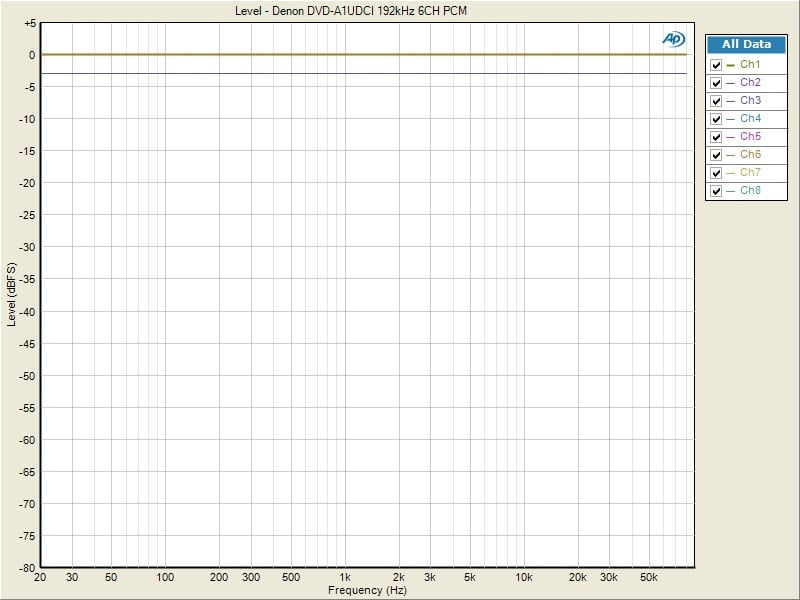
Denon DVD-A1UDCI 192kHz 6-channel Test
The Denon DVD-A1UDCI passed an 6-channel 192kHz / 24 bit test signal via the HDMI output perfectly as can be seen by the above ruler flat frequency response all the way out to the limit of the test gear (80kHz).
Analog Output Tests
For those rare users buying this player that don’t yet have an HDMI 1.3 AVR capable of decoding the latest surround formats, I tested the analog outputs of the Denon DVD-A1UDCI to see how it performed that function.
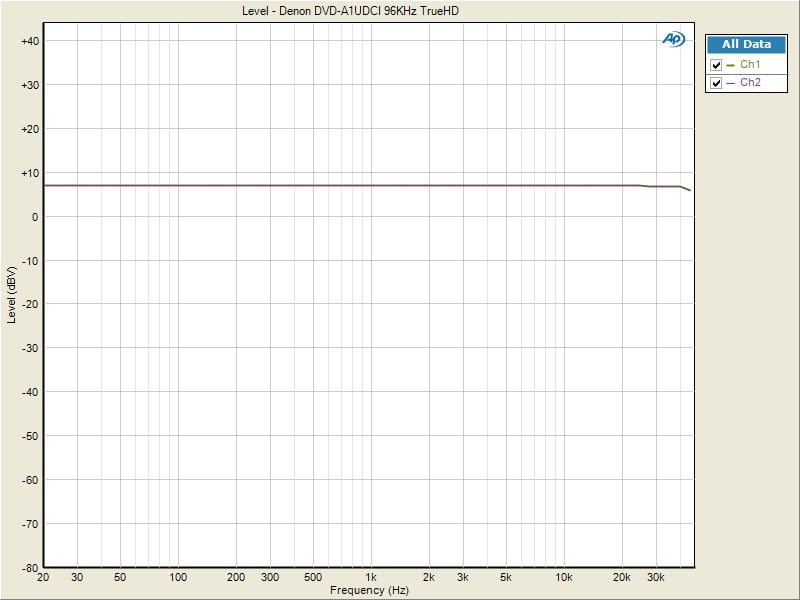
Denon DVD-A1UDCI Frequency Response with Dolby TrueHD 96Khz
The frequency response was ruler flat all the way out to 25kHz where for some reason the player seemed to bandwidth limit until I engaged pure direct. In Pure Direct mode, the DVD-A1UDCI exhibited ruler flat frequency response out to Nyquist (1/2 sampling rate or 48kHz).

Left image (normal mode); Right image (pure direct)
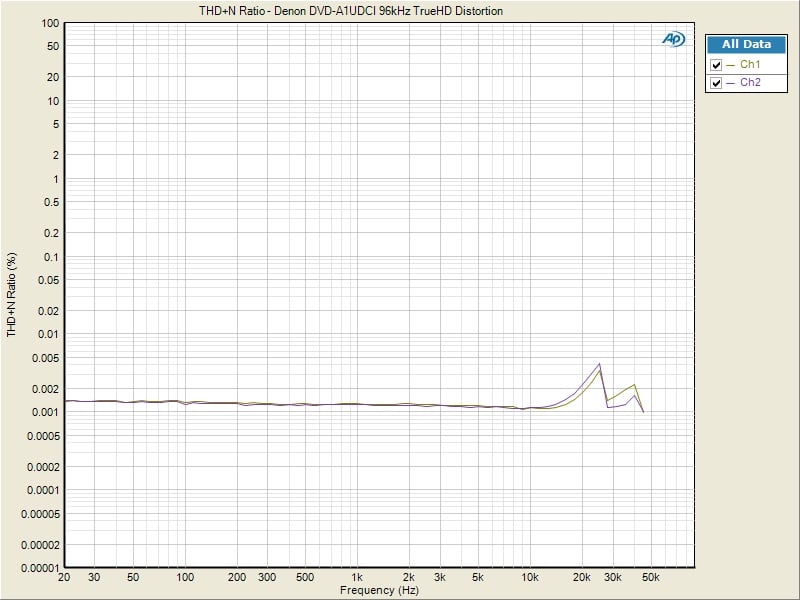
Distortion and noise via the analog outputs of the DVD-A1UDCI when engaged in “pure direct” were benchmark measuring below .002% for the entire audio band. When the player was switched out of “pure direct” distortion and noise got worse but was still commendably low.
Editorial Note about Non-Pure-Direct Mode Bandwidth Limiting
Denon engineering in Japan informed me that the DVD-A1UDCI should NOT bandwidth limit in none pure direct modes if D.Link is disables and HDMI audio is set to mute. I will confirm this at a later date when I run additional Blu-ray related bench tests with the Audio Precision.

Bass Management of the Denon DVD-A1UDCI
The Denon DVD-A1UDCI has state of the art bass management facilities befitting the very best A/V processors on the market. The HPF’s exhibited 12dB/octave slopes and the LPF for the sub exhibited 24dB/octave slopes as they should. The -3dB/-6dB points of the HPF/LPF, respectively, were within 2Hz of the dialed in frequency. Denon gives you a selection of crossover points from 40Hz to 250Hz and even allows for subwoofer output independent of the main speakers being set large or small.
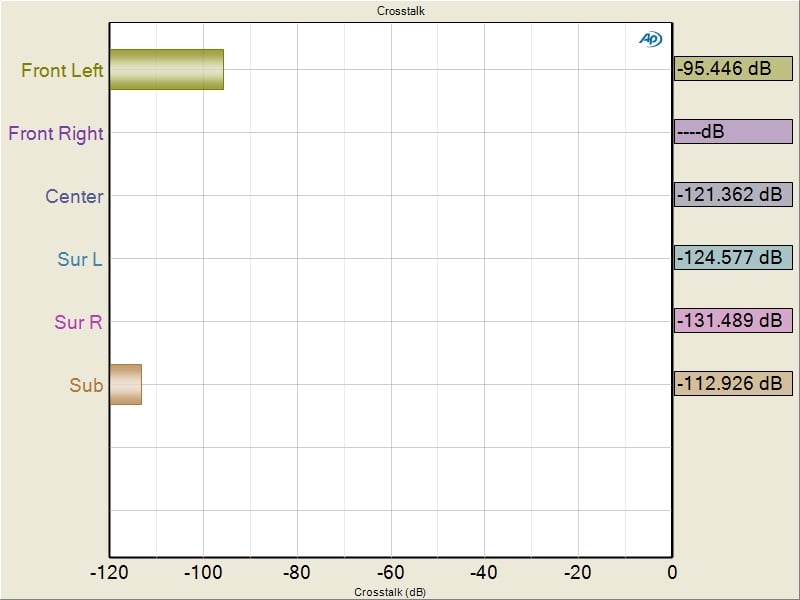
Denon DVD-A1UDCI Crosstalk Tests
With single channel driven, adjacent channel crosstalk was 95dB at 10kHz while other channels were around 120dB. This is an excellent result. With all channels driven but 1, the channel under test was about 93dB for balanced, while adjacent channel crosstalk measured an excellent 100dB. It’s obvious Denon paid extra care to board layout and signal routing when designing this player.
Denon DVD-A1UDCI Conclusion
 The Denon DVD-A1UDCI Universal Blu-ray player exemplifies flagship performance and status from a company that continually strives to be the leader in high performance audio gear and transports. It flawlessly plays every disc format currently relevant in the marketplace. The fact that every output is always active on this player gives an end user and/or installer almost endless configuration options on how one could utilize this player. With one DVD-A1UDCI, you can simultaneously feed two HDMI displays or A/V receivers with up to 1080p video and trueHD / DTS HD audio, up to 720p resolution via component video to a third display, 480i video for auxiliary displays via S-video and composite video, and balanced two-channel analog audio for a high end two channel rig. If you’re on a quest to have the very best Universal Blu-ray player regardless of price, or you want to assemble the perfect trio of Denon gear to match their separates A/V processor and power amp, then the DVD-A1UDCI is your player. This is the only way you’re gonna get the 3 blue lights on the front panel of the DVD-A1UDCI to illuminate which the bragging rights alone over your friend who just purchased another high end brand may be worth the extra $$$’s just to have him drooling over.
The reason is took me so long to write this review is that I was too busy enjoying it and rediscovering just how good my own reference system is when being feed with such a high quality source device. Whether I played back a Blu-ray, SACD, DVD-A or standard DVD, I was always in shock and awe at the end result. I had guests over one night watching Superbad on DVD, commenting how good the high definition image was from Blu-ray. Not wanting to spoil their enjoyment, I didn’t have the heart to tell them they were watching a normal DVD on a not so normal Blu-ray machine. During this review process, I got a glimpse of a feeling professional car reviewers get when they have the opportunity to test drive that $300k Ferrari, only I didn’t have change my pants at the end of the test drive. Awesome product!
Denon DVD-A1UDCI
MSRP: $4,500
http://usa.denon.com
The Score Card
The scoring below is based on each piece of equipment doing the duty it is designed for. The numbers are weighed heavily with respect to the individual cost of each unit, thus giving a rating roughly equal to:
Performance × Price Factor/Value = Rating
Audioholics.com note: The ratings indicated below are based on subjective listening and objective testing of the product in question. The rating scale is based on performance/value ratio. If you notice better performing products in future reviews that have lower numbers in certain areas, be aware that the value factor is most likely the culprit. Other Audioholics reviewers may rate products solely based on performance, and each reviewer has his/her own system for ratings.
Audioholics Rating Scale
 — Excellent
- — Very Good
- — Good
- — Fair
- — Poor
| Metric | Rating |
|---|---|
| High Definition Video Performance | |
| Standard Definition Video Performance | |
| High Definition Audio Performance | |
| Analogue Audio Performance | |
| Bass Management | |
| Deinterlacing & Scaling | |
| Build Quality | |
| Ergonomics & Usability | |
| Ease of Setup | |
| Features | |
| Remote Control | |
| Fit and Finish | |
| Performance | |
| Value |
Gene manages this organization, establishes relations with manufacturers and keeps Audioholics a well oiled machine. His goal is to educate about home theater and develop more standards in the industry to eliminate consumer confusion clouded by industry snake oil.
View full profile